1. cache的数据结构
类的结构:在objc_class结构体中,由isa、superclass、cache和bits组成。isa和superclass都是结构体指针,各占8字节。故此,使用内存平移:首地址 + 16字节,即可探索cache的数据结构体
1.1 lldb分析
打印LGPerson的首地址
p/x LGPerson.class-------------------------(Class) $0 = 0x0000000100008288 LGPerson
内存平移:首地址 + 16字节,强转为cache_t结构体指针类型
p/x (cache_t *)(0x0000000100008288 + 0x10)-------------------------(cache_t *) $1 = 0x0000000100008298
使用*取值,打印cache_t的数据结构
p *$1-------------------------(cache_t) $2 = {_bucketsAndMaybeMask = {std::__1::atomic<unsigned long> = {Value = 4298515344}}= {= {_maybeMask = {std::__1::atomic<unsigned int> = {Value = 0}}_flags = 32820_occupied = 0}_originalPreoptCache = {std::__1::atomic<preopt_cache_t *> = {Value = 0x0000803400000000}}}}
1.2 探索objc源码
找到cache_t的定义
struct cache_t {private:explicit_atomic<uintptr_t> _bucketsAndMaybeMask;union {struct {explicit_atomic<mask_t> _maybeMask;#if __LP64__uint16_t _flags;#endifuint16_t _occupied;};explicit_atomic<preopt_cache_t *> _originalPreoptCache;};...};
_bucketsAndMaybeMask:泛型,传入uintptr_t类型,占8字节union:联合体,包含一个结构体和一个结构体指针_originalPreoptCachestruct:包含_maybeMask、_flags、_occupied三个成员变量,和_originalPreoptCache互斥
我们找到了cache_t的数据结构,但它的作用还不得而知
通过cache_t的各自方法,可以看出它在围绕bucket_t进行增删改查
找到bucket_t的定义
struct bucket_t {private:// IMP-first is better for arm64e ptrauth and no worse for arm64.// SEL-first is better for armv7* and i386 and x86_64.#if __arm64__explicit_atomic<uintptr_t> _imp;explicit_atomic<SEL> _sel;#elseexplicit_atomic<SEL> _sel;explicit_atomic<uintptr_t> _imp;#endif...};
bucket_t中包含sel和imp- 不同架构,
sel和imp的顺序不一样
通过sel和imp不难看出,在cache_t中缓存的应该是方法
1.3 cache_t结构图

1.4 系统架构的区分
| Data Type | ILP32 | LP32 | ILP64 | LP64 | LLP64 |
|---|---|---|---|---|---|
| 宏定义 | - | - | - | LP64 | LLP64 |
| 平台 | Win32 API/Unix和Unix系统(Linux、Mac OS X) | Win16 API | - | Unix和Unix系统(Linux、Mac OS X) | Win64 API |
| char | 8 | 8 | 8 | 8 | 8 |
| short | 16 | 16 | 16 | 16 | 16 |
| int | 32 | 16 | 64 | 32 | 32 |
| long | 32 | 32 | 64 | 64 | 32 |
| long long | 64 | 64 | 64 | 64 | 64 |
| pointer | 32 | 32 | 64 | 64 | 64 |
2. lldb验证方法的存储
2.1 准备工作
执行LGPerson的sayNB实例方法,让缓存中有方法的数据
LGPerson *per= [LGPerson alloc];[per sayNB];
当LGPerson的实例方法执行后,cache_t的数据还是有一些变化的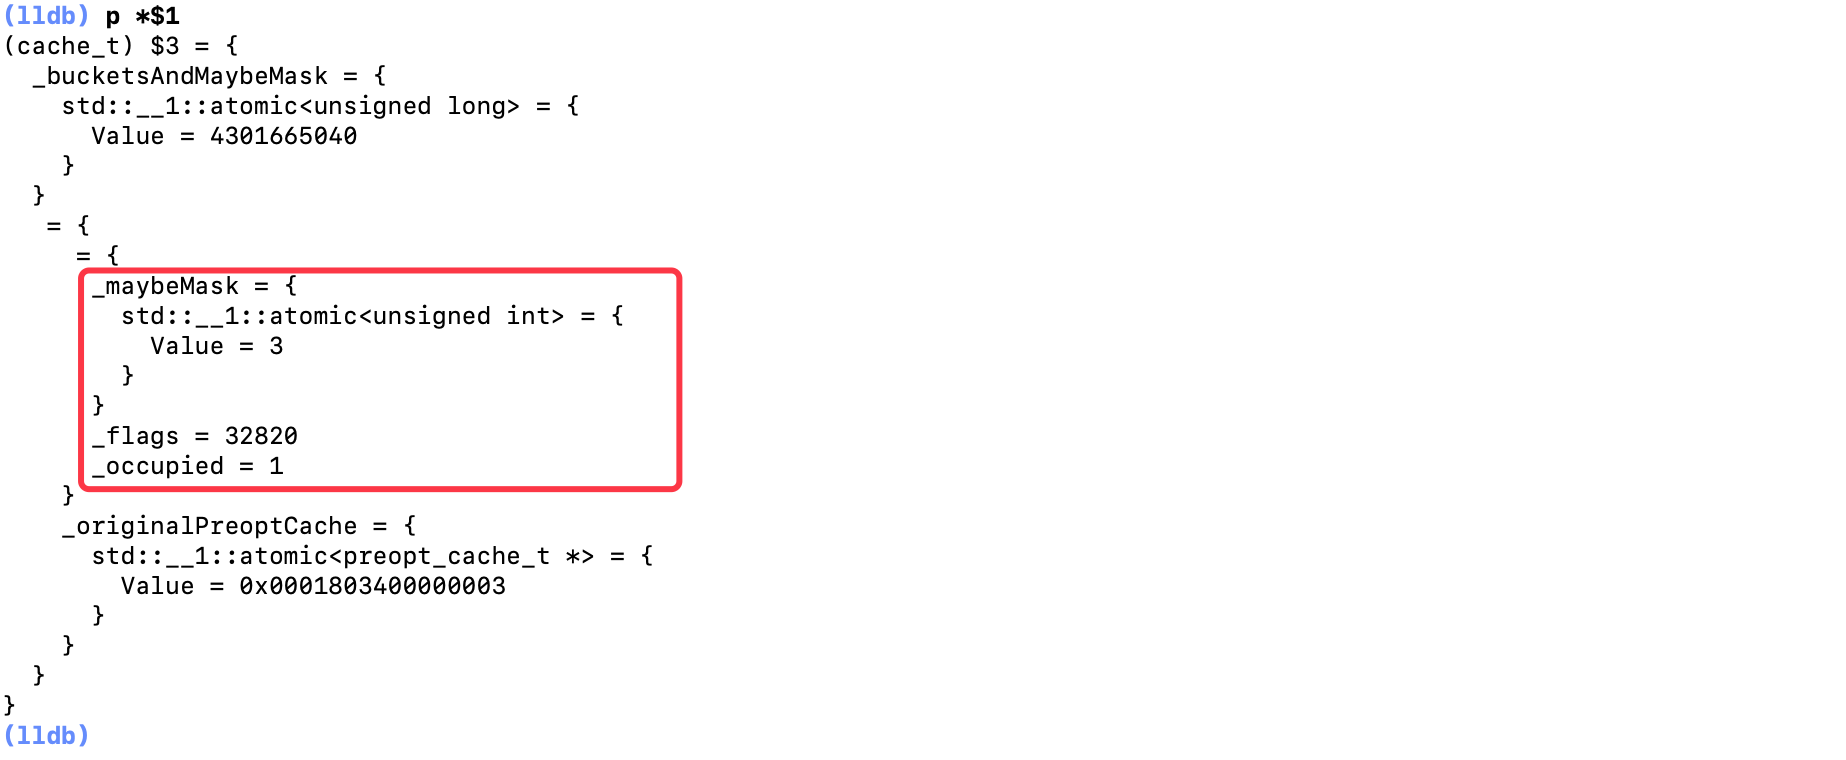
_maybeMask下的Value值变为3_occupied值变为1
2.2 打印buckets
使用lldb,无法直接输出结构体中Value的值。我们只能先回到源码中,找到结构体中的核心方法
在cache_t结构体中,找到buckets核心方法
struct cache_t {...struct bucket_t *buckets() const;...};
- 可获得
bucket_t结构体指针
调用buckets函数
p $2.buckets()-------------------------(bucket_t *) $3 = 0x0000000100362390
使用*取值,打印bucket_t的数据结构
p *$3-------------------------(bucket_t) $4 = {_sel = {std::__1::atomic<objc_selector *> = (null) {Value = (null)}}_imp = {std::__1::atomic<unsigned long> = {Value = 0}}}
- 输出
sel和imp,但里面没有存储任何数据
2.3 buckets数据结构
为什么buckets里面没有存储任何数据?我们先来了解buckets的数据结构
日常开发中,常见的数据结构有数组和链表。数组在查找时效率很高,但是插入和删除却很低。而链表刚好相反
而buckets数据结构,采用哈希表(散列表)进行存储。哈希表的存储结构,使用数组加链表的方式,集合了二者的优点
哈希表通过哈希函数(散列函数),将存储的内容映射到一个数字,用作存储位置的下标。映射的下标是随机的,且不同内容可能会映射相同下标,即:哈希冲突(散列冲突)
2.4 访问下标
由于映射的下标是随机的,我们通过0、1、2、3...依次打印
p $2.buckets()[1]-------------------------(bucket_t) $4 = {_sel = {std::__1::atomic<objc_selector *> = "" {Value = ""}}_imp = {std::__1::atomic<unsigned long> = {Value = 49024}}}
- 在
下标1的位置找到内容
在bucket_t结构体中,找到打印sel和imp的核心方法
struct bucket_t {...inline SEL sel() const { return _sel.load(memory_order_relaxed); }...inline IMP imp(UNUSED_WITHOUT_PTRAUTH bucket_t *base, Class cls) const {uintptr_t imp = _imp.load(memory_order_relaxed);if (!imp) return nil;#if CACHE_IMP_ENCODING == CACHE_IMP_ENCODING_PTRAUTHSEL sel = _sel.load(memory_order_relaxed);return (IMP)ptrauth_auth_and_resign((const void *)imp,ptrauth_key_process_dependent_code,modifierForSEL(base, sel, cls),ptrauth_key_function_pointer, 0);#elif CACHE_IMP_ENCODING == CACHE_IMP_ENCODING_ISA_XORreturn (IMP)(imp ^ (uintptr_t)cls);#elif CACHE_IMP_ENCODING == CACHE_IMP_ENCODING_NONEreturn (IMP)imp;#else#error Unknown method cache IMP encoding.#endif}...};
打印sel
p $4.sel()-------------------------(SEL) $5 = "sayNB"
打印imp
p $4.imp(nil,LGPerson.class)-------------------------(IMP) $6 = 0x0000000100003d10 (KCObjcBuild`-[LGPerson sayNB])
扩展内容
buckets函数,返回哈希表的首地址。所以下标访问,等同于内存平移
p $1->buckets()-------------------------(bucket_t *) $2 = 0x000000010062a020
使用内存平移的方式获取元素
p *($2+1)-------------------------(bucket_t) $3 = {_sel = {std::__1::atomic<objc_selector *> = "" {Value = ""}}_imp = {std::__1::atomic<unsigned long> = {Value = 48984}}}
3. 脱离源码分析
如果我们的源码无法编译运行,那意味着我们不能使用lldb调试。这里介绍另一种方式,让我们脱离源码也可以分析
3.1 还原数据结构
对象的本质是结构体,所以我们可以自定义数据结构,只要保证它们和原始数据结构在内存中是一一对应的,即可进行桥接
我们的目标是打印cache中的方法,即:sel和imp。所以我们要从最终的bucket_t结构体,自下而上,至最上层的objc_class结构体,按照它们原始的数据结构,一一进行还原
还原bucket_t结构体
struct lg_bucket_t {SEL _sel;IMP _imp;};
- 原始
_imp为泛型,传入的是uintptr_t类型 uintptr_t用来存放指针地址,所以将其替换为函数地址IMP类型
还原lg_cache_t结构体
struct lg_cache_t {struct lg_bucket_t *_buckets;uint32_t _maybeMask;uint16_t _flags;uint16_t _occupied;};
_buckets直接定义为lg_bucket_t结构体指针- 所以,我们尝试直接将其替换为
lg_bucket_t类型的结构体指针
还原lg_class_data_bits_t结构体
struct lg_class_data_bits_t {uintptr_t bits;};
还原lg_objc_class结构体
struct lg_objc_class {Class isa;Class superclass;struct lg_cache_t cache;struct lg_class_data_bits_t bits;};
扩展内容
为什么_buckets可以直接定义为lg_bucket_t结构体指针?
在objc源码中,不同架构下cache_t::setBucketsAndMask函数的实现代码不同
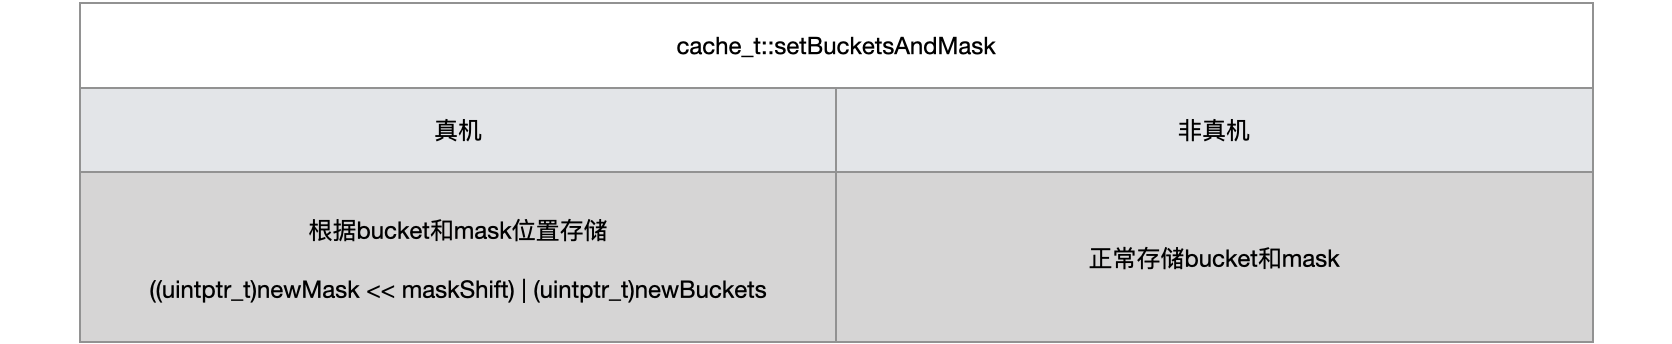
真机环境下,会根据bucket和mask位置去存储
_bucketsAndMaybeMask.store(((uintptr_t)newMask << maskShift) | (uintptr_t)newBuckets, memory_order_relaxed);
bucket和mask,按位存储到_bucketsAndMaybeMask中
在当前运行的非真机环境下,开辟空间正常存储buckets和mask
//__x86_64__ || i386_bucketsAndMaybeMask.store((uintptr_t)newBuckets, memory_order_release);_maybeMask.store(newMask, memory_order_release);
_bucketsAndMaybeMask中存储bucket_maybeMask中存储mask
同样,在cache_t::buckets函数中,&运算使用的掩码,不同架构下也各不相同
真机环境
static constexpr uintptr_t maskShift = 48;static constexpr uintptr_t maskZeroBits = 4;static constexpr uintptr_t maxMask = ((uintptr_t)1 << (64 - maskShift)) - 1;static constexpr uintptr_t bucketsMask = ((uintptr_t)1 << (maskShift - maskZeroBits)) - 1;
当前运行的非真机环境
static constexpr uintptr_t bucketsMask = ~0ul;
~0ul:0b1111111111111111111111111111111111111111111111111111111111111111addr & ~0ul,结果还是addr
使用lldb调试进行验证:
打印buckets函数返回的地址
p $1->buckets()-------------------------(bucket_t *) $2 = 0x000000010062a020
打印cache_t的数据结构
p *$1-------------------------(cache_t) $5 = {_bucketsAndMaybeMask = {std::__1::atomic<unsigned long> = {Value = 4301430816}}= {= {_maybeMask = {std::__1::atomic<unsigned int> = {Value = 3}}_flags = 32820_occupied = 1}_originalPreoptCache = {std::__1::atomic<preopt_cache_t *> = {Value = 0x0001803400000003}}}}
以16进制打印_bucketsAndMaybeMask的值
p/x 4301430816-------------------------(long) $6 = 0x000000010062a020
- 和
buckets函数返回的地址相同
结论:
- 当前运行的非真机环境下,
_bucketsAndMaybeMask存储就是哈希表的首地址,可直接定义为bucket_t结构体指针
3.2 打印关键信息
在main函数中,将类对象LGPerson桥接为lg_objc_class结构体,打印关键信息
int main(int argc, const char * argv[]) {@autoreleasepool {LGPerson *per= [LGPerson alloc];[per sayNB];struct lg_objc_class *lg = (__bridge struct lg_objc_class *)(LGPerson.class);NSLog(@"maybeMask:%u,occupied:%hu", lg->cache._maybeMask, lg->cache._occupied);for (uint16_t i=0; i<lg->cache._maybeMask; i++) {struct lg_bucket_t bucket=lg->cache._buckets[i];NSLog(@"bucket_%i:sel:%@,imp:%p",i, NSStringFromSelector(bucket._sel), bucket._imp);}}return 0;}-------------------------//输出结果:maybeMask:3,occupied:1bucket_0:sel:(null),imp:0x0bucket_1:sel:(null),imp:0x0bucket_2:sel:sayNB,imp:0xb880
maybeMask的值为3occupied的值为1- 遍历出三个
bucket,在下标2的位置,存储了sayNB的方法缓存 - 哈希表存储,映射的下标是随机的,存储在
下标2的位置上可以理解
调用LGPerson的更多实例方法
LGPerson *per= [LGPerson alloc];[per sayNB];[per sayNB1];[per sayNB2];-------------------------maybeMask:7,occupied:1method_0:sel:(null),imp:0x0method_1:sel:(null),imp:0x0method_2:sel:(null),imp:0x0method_3:sel:sayNB2,imp:0xb890method_4:sel:(null),imp:0x0method_5:sel:(null),imp:0x0method_6:sel:(null),imp:0x0
maybeMask的值为7occupied的值为1- 遍历出七个
bucket,在下标3的位置,存储了sayNB2的方法缓存
疑问:
maybeMask的作用是什么?它的值由3变为7,为什么跳跃性这么大?occupied的作用是什么?为什么两次打印结果都是1?- 调用三个实例方法,为什么只存储了
sayNB2?sayNB和sayNB1哪去了?
4. cache底层原理
从objc源码中,寻找上述问题的答案。我们先找到切入点,看一下方法的缓存是如何插入的
4.1 insert函数
在cache_t结构体中,找到insert函数
struct cache_t {...void insert(SEL sel, IMP imp, id receiver);...};
4.2 创建bucket
insert函数,当缓存列表为空时
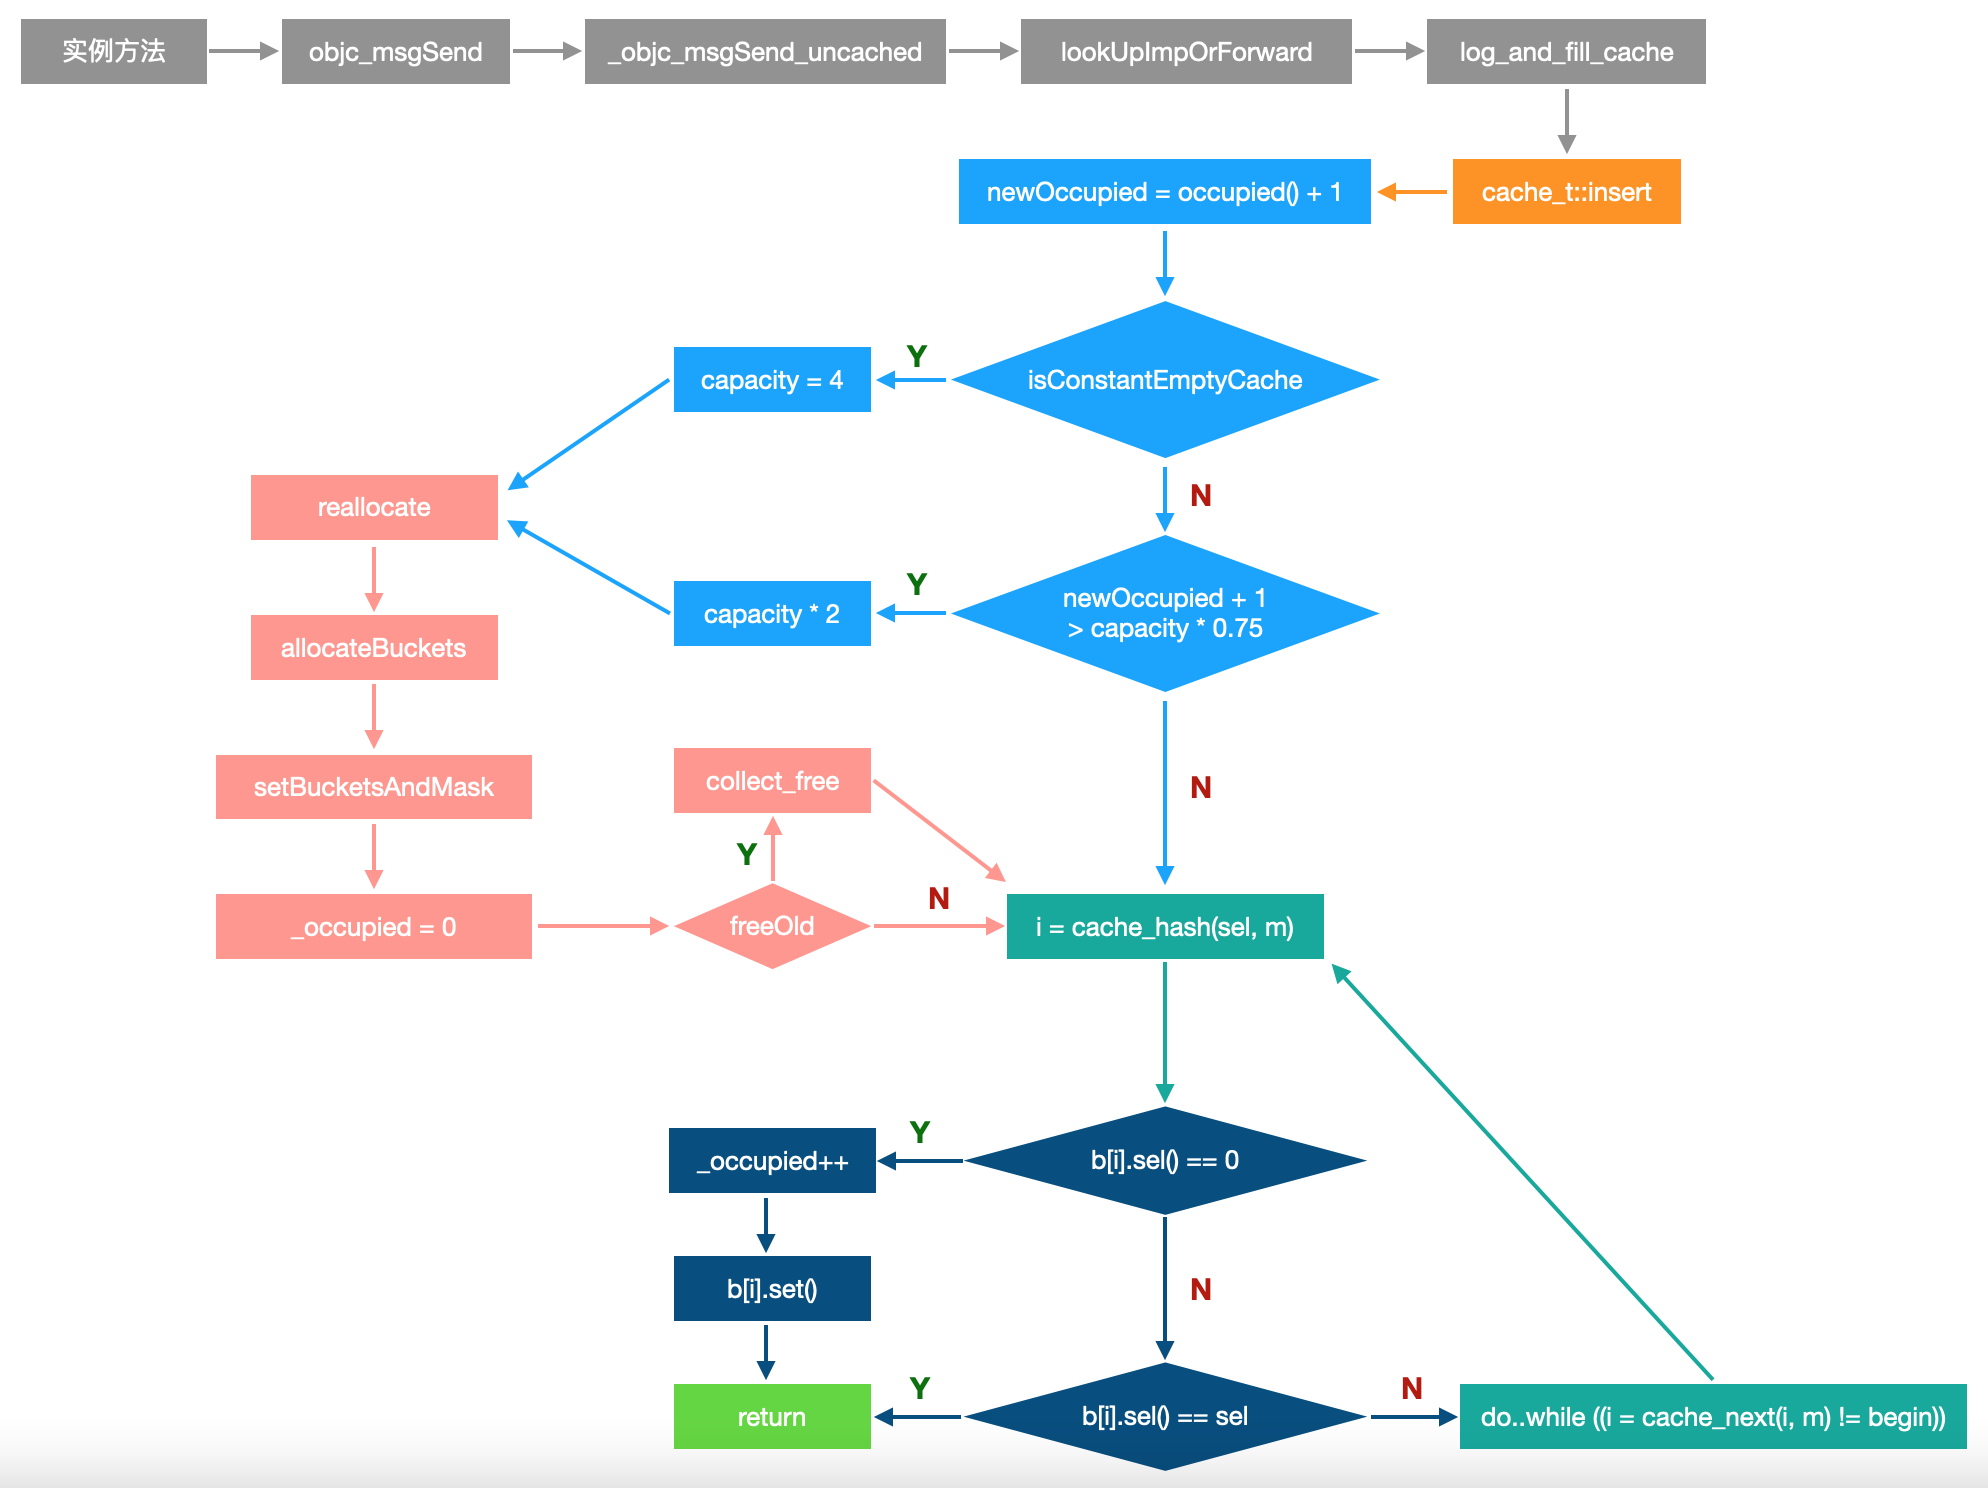
INIT_CACHE_SIZE_LOG2 = 2,INIT_CACHE_SIZE = (1 << INIT_CACHE_SIZE_LOG2),mask_t newOccupied = occupied() + 1;unsigned oldCapacity = capacity(), capacity = oldCapacity;if (slowpath(isConstantEmptyCache())) {// Cache is read-only. Replace it.if (!capacity) capacity = INIT_CACHE_SIZE;reallocate(oldCapacity, capacity, /* freeOld */false);}
newOccupied:已有缓存的大小+1capacity:值为4(1 << 2),缓存列表的初始容量reallocate函数,首次创建,freeOld传入false
reallocate函数,创建buckets存储桶,调用setBucketsAndMask函数
bucket_t *newBuckets = allocateBuckets(newCapacity);setBucketsAndMask(newBuckets, newCapacity - 1);
setBucketsAndMask函数,不同架构下代码不一样,以当前运行的非真机代码为例:
void cache_t::setBucketsAndMask(struct bucket_t *newBuckets, mask_t newMask){#ifdef __arm__// ensure other threads see buckets contents before buckets pointermega_barrier();_bucketsAndMaybeMask.store((uintptr_t)newBuckets, memory_order_relaxed);// ensure other threads see new buckets before new maskmega_barrier();_maybeMask.store(newMask, memory_order_relaxed);_occupied = 0;#elif __x86_64__ || i386// ensure other threads see buckets contents before buckets pointer_bucketsAndMaybeMask.store((uintptr_t)newBuckets, memory_order_release);// ensure other threads see new buckets before new mask_maybeMask.store(newMask, memory_order_release);_occupied = 0;#else#error Don't know how to do setBucketsAndMask on this architecture.#endif}
- 传入的
newMask为缓存列表的容量-1,用作掩码 - 将
buckets存储桶,存储到_bucketsAndMaybeMask中。强转uintptr_t类型,只存储结构体指针,即:buckets首地址 - 将
newMask掩码,存储到_maybeMask中 - 将
_occupied设置为0,因为buckets存储桶目前还是空的
4.3 扩容
如果newOccupied + 1小于等于75%,不需要扩容
#define CACHE_END_MARKER 1if (fastpath(newOccupied + CACHE_END_MARKER <= cache_fill_ratio(capacity))) {// Cache is less than 3/4 or 7/8 full. Use it as-is.}// Historical fill ratio of 75% (since the new objc runtime was introduced).static inline mask_t cache_fill_ratio(mask_t capacity) {return capacity * 3 / 4;}
CACHE_END_MARKER:系统插入的结束标记,边界作用
超过75%,进行2倍扩容
MAX_CACHE_SIZE_LOG2 = 16,MAX_CACHE_SIZE = (1 << MAX_CACHE_SIZE_LOG2),capacity = capacity ? capacity * 2 : INIT_CACHE_SIZE;if (capacity > MAX_CACHE_SIZE) {capacity = MAX_CACHE_SIZE;}reallocate(oldCapacity, capacity, true);
capacity进行2倍扩容,但不能超过65536- 调用
reallocate函数,扩容时freeOld传入true
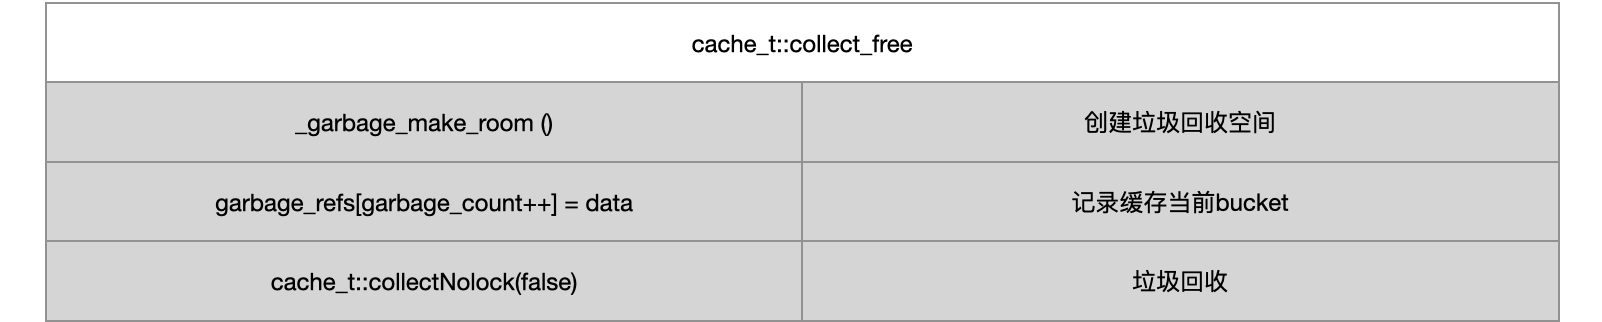
reallocate函数,当freeOld传入true
bucket_t *oldBuckets = buckets();bucket_t *newBuckets = allocateBuckets(newCapacity);setBucketsAndMask(newBuckets, newCapacity - 1);if (freeOld) {collect_free(oldBuckets, oldCapacity);}
- 创建
buckets存储桶,代替原有buckets,新的buckets容量为扩容后的大小 - 释放原有
buckets - 原有
buckets中的方法缓存,全部清除
4.4 计算下标
insert函数,调用哈希函数,计算sel的下标
mask_t m = capacity - 1;mask_t begin = cache_hash(sel, m);mask_t i = begin;
- 将
capacity - 1作为哈希函数的掩码,用于计算下标
4.5 写入缓存
insert函数,得到buckets存储桶
bucket_t *b = buckets();
buckets函数,进行&运算,返回bucket_t类型的结构体指针,即:buckets首地址
static constexpr uintptr_t bucketsMask = ~0ul;struct bucket_t *cache_t::buckets() const{uintptr_t addr = _bucketsAndMaybeMask.load(memory_order_relaxed);return (bucket_t *)(addr & bucketsMask);}
- 不同架构下,
bucketsMask的值不一样 ~0ul:0b1111111111111111111111111111111111111111111111111111111111111111&运算:如果两个相应的二进制位都为1,则该位的结果值为1- 所以
addr & ~0ul,结果还是addr
使用下标获取bucket,相当于内存平移。如果bucket中不存在sel,写入缓存
if (fastpath(b[i].sel() == 0)) {incrementOccupied();b[i].set<Atomic, Encoded>(b, sel, imp, cls());return;}
incrementOccupied函数,对_occupied进行++set函数,将sel和imp写入bucket
如果存在sel,并且和当前sel相同,直接return
if (b[i].sel() == sel) {// The entry was added to the cache by some other thread// before we grabbed the cacheUpdateLock.return;}
否则,表示哈希冲突
4.6 防止哈希冲突
cache_next函数,不同架构下算法不一样,以当前运行的非真机代码为例:
static inline mask_t cache_next(mask_t i, mask_t mask) {return (i+1) & mask;}
- 在产生冲突的下标基础上,先进行
+1,再和mask进行&运算
在do..while中,调用cache_next函数,直到解决哈希冲突为止
do {...} while (fastpath((i = cache_next(i, m)) != begin));
结论:
capacity:缓存列表的容量occupied:已有缓存的大小maybeMask:使用capacity-1的值作为掩码,在哈希算法、哈希冲突中,用于计算下标- 写入缓存时,如果
写入缓存后的大小 + 边界超过容量的75%,进行扩容
◦ 扩容:创建新的存储桶,释放原有空间
◦ 原有存储桶中的方法缓存全部清除
◦ 先进行2倍扩容,再写入缓存
- 使用哈希函数计算下标,使用下标找到
bucket - 判断
bucket中的sel,不存在则写入 - 如果存在
sel,并且和当前sel相同,直接return - 哈希冲突
◦ 不同架构,算法不一样
◦ 在产生冲突的下标基础上,先进行+1,再和mask进行&运算
◦ 在do..while中,直到解决哈希冲突为止
4.7. 为什么使用3/4扩容?
哈希表具有两个影响其性能的参数:初始容量和负载因子
- 初始容量是哈希表中存储桶的数量,初始容量只是创建哈希表时的容量
- 负载因子是在自动增加其哈希表容量之前,允许哈希表获得的满度的度量
当哈希表中的条目数超过负载因子和当前容量的乘积时,哈希表将被重新哈希。即:内部数据结构将被重建。因此哈希表的存储桶数大约为两倍
负载因子定义为3/4,在时间和空间成本之间提供了一个很好的折中方案
- 假如负载因子定为
1,那么只有当元素填满时才会扩容。虽然可以最大程度的提高空间利用率,但是会增加哈希冲突,因此查询效率会变得低下。所以当加载因子比较大的时候:节省空间资源,增加查找成本 - 假如负载因子定为
0.5,到达空间一半的时候就会去扩容。虽然说负载因子比较小可以最大可能的降低哈希冲突,但空间浪费会比较大。所以当加载因子比较小的时候:节省时间资源,耗费空间资源
4.8 打印IMP的关联信息
使用bucket_t结构体中的imp函数,可以打印出imp的关联信息。但日常开发中,我们打印一个IMP类型,只能输出它的函数地址。二者之间的区别是什么?
在bucket_t结构体的imp函数中,找到这样一句代码:
inline IMP imp(UNUSED_WITHOUT_PTRAUTH bucket_t *base, Class cls) const {...return (IMP)(imp ^ (uintptr_t)cls);}
- 将
imp和所属类对象的指针地址,进行按位异或
按位异或的原则,如果两个相应的二进制位值不同则为1,否则为0
如果对相同二进制位,进行两次按位异或,即可将其还原
- a ^ b = c
- c ^ b = a
所有我们有这样一个猜测:在方法插入sel和imp时,可能预先对imp进行了一次按位异或,相当于对其进行了一次编码。然后使用imp函数读取时,又进行了一次相同的操作,相当于对其进行了一次解码
在set函数中,找到encodeImp函数
void bucket_t::set(bucket_t *base, SEL newSel, IMP newImp, Class cls){uintptr_t newIMP = (impEncoding == Encoded? encodeImp(base, newImp, newSel, cls): (uintptr_t)newImp);...}
在encodeImp函数中,找到同样的代码
uintptr_t encodeImp(UNUSED_WITHOUT_PTRAUTH bucket_t *base, IMP newImp, UNUSED_WITHOUT_PTRAUTH SEL newSel, Class cls) const {...return (uintptr_t)newImp ^ (uintptr_t)cls;}
所以,在日常开发中,我们直接打印的IMP,打印的是编码后的IMP,只能输出地址
p bucket._imp-------------------------0x000000000000bf48
将IMP解码再打印,即可输出关联信息
p (IMP)((uintptr_t)bucket._imp ^ (uintptr_t)LGPerson.class)-------------------------0x0000000100003c00 (KCObjcBuild`-[LGPerson sayNB])
4.9 lldb调试_maybeMask为7问题
在Xcode中,使用代码执行per的sayNB方法,_maybeMask为3。这个结果是正确的,也符合我们的预期。但使用lldb调式,同样执行per的sayNB方法,_maybeMask竟然为7,这是什么情况?
(lldb) p [per sayNB]-------------------------_maybeMask = {std::__1::atomic<unsigned int> = {Value = 7}}_flags = 32820_occupied = 1
这种现象,感觉预先被扩容了一次。我们需要验证sayNB之前,系统还调用了哪些方法,导致缓存哈希表进行了扩容操作
来到objc源码,在cache_t::insert中进行打印
void cache_t::insert(SEL sel, IMP imp, id receiver){printf("%p,%p,%p\n", sel, imp, receiver);...}-------------------------(lldb) p [per sayNB]respondsToSelector:,0x100350210,0x100a1fe60class,0x10034fe70,0x100a1fe60sayNB,0x100003c00,0x100a1fe60
在sayNB方法之前,确实还有两个方法被执行。但还不构成扩容的条件,因为缓存大小未超过3/4。此时,我们需要在更关键的位置进行打印
既然猜测是扩容引发的问题,我们可以在cache_t::reallocate函数中,遍历oldBuckets进行打印,看一下原始空间在销毁前,里面到底存储了什么
在cache_t::reallocate中进行打印
ALWAYS_INLINEvoid cache_t::reallocate(mask_t oldCapacity, mask_t newCapacity, bool freeOld){bucket_t *oldBuckets = buckets();for (uint32_t i=0; i<oldCapacity; i++) {printf("sel:%p,imp:%p,bucket_%i:%p\n",oldBuckets[i].sel(), oldBuckets[i].imp(oldBuckets, nil), i, &oldBuckets[i]);}...}-------------------------(lldb) p [per sayNB]sel:0x7fff7b98f9d4,imp:0x3582b0,bucket_0:0x10083eb40sel:0x7fff7b98f939,imp:0x347d10,bucket_1:0x10083eb50sel:0x0,imp:0x0,bucket_2:0x10083eb60sel:0x1,imp:0x10083eb40,bucket_3:0x10083eb70
bucket_0和bucket_1,分别对应respondsToSelector:和class方法
(lldb) p (char *)0x7fff7b98f9d4(char *) $0 = 0x00007fff7b98f9d4 "respondsToSelector:"(lldb) p (char *)0x7fff7b98f939(char *) $1 = 0x00007fff7b98f939 "class"
bucket_2未被使用,但bucket_3存储的是什么?为什么sel为0x1,而imp为bucket_0的地址,即:buckets空间的首地址
其实,在cache_t::allocateBuckets函数中,系统对此有官方的解释
#if __arm__// End marker's sel is 1 and imp points BEFORE the first bucket.// This saves an instruction in objc_msgSend.end->set<NotAtomic, Raw>(newBuckets, (SEL)(uintptr_t)1, (IMP)(newBuckets - 1), nil);#else// End marker's sel is 1 and imp points to the first bucket.end->set<NotAtomic, Raw>(newBuckets, (SEL)(uintptr_t)1, (IMP)newBuckets, nil);#endif
- 无论使用
lldb调试,还是Xcode代码运行,系统都会插入结束标记作为边界 - 以
x86_64架构为例,系统插入结束标记,sel为1,imp指向第一个bucket
5. 流程图
5.1 cache_t::insert
5.2 cache_t::allocateBuckets

5.3 cache_t::setBucketsAndMask
5.4 cache_t::collect_free
6. cache的闭环
找到cache_t::insert的调用时机和函数的调用者
在insert函数中设置断点,查看函数调用栈
- 调用流程:
_objc_msgSend_uncached→lookUpImpOrForward→log_and_fill_cache→cache_t::insert
在源码中,搜索_objc_msgSend_uncached,可以在objc-msg的汇编代码中找到,而它是被objc_msgSend调用
cache的读取流程,在objc源码中,找到这样一段的注释:
* Cache readers (PC-checked by collecting_in_critical())* objc_msgSend** cache_getImp
- 同样是被
objc_msgSend调用
至此,想真正了解cache的调用闭环,就必须先了解消息转发流程
总结
cache的数据结构
cache_t:包含_bucketsAndMaybeMask、_maybeMask、_flags、_occupiedbucket_t:包含sel和imp,不同架构顺序不一样_bucketsAndMaybeMask:真机存储buckets和mask,非真机存储buckets
buckets数据结构
- 采用哈希表(散列表)进行存储
- 哈希表的存储结构,使用数组加链表的方式,集合了二者的优点
- 访问下标,可获取
bucket_t - 访问下标,等同于内存平移
脱离源码分析
- 数据结构在内存中一一对应,即可进行桥接
- 当源码无法编译运行时,用此方式代替
lldb调试
cache底层原理
capacity:缓存列表的容量occupied:已有缓存的大小maybeMask:使用capacity-1的值作为掩码,在哈希算法、哈希冲突中,用于计算下标- 写入缓存时,如果
写入缓存后的大小 + 边界超过容量的75%,进行扩容
◦ 扩容:创建新的存储桶,释放原有空间
◦ 原有存储桶中的方法缓存全部清除
◦ 先进行2倍扩容,再写入缓存
- 使用哈希函数计算下标,使用下标找到
bucket - 判断
bucket中的sel,不存在则写入 - 如果存在
sel,并且和当前sel相同,直接return - 哈希冲突
◦ 不同架构,算法不一样
◦ 在产生冲突的下标基础上,先进行+1,再和mask进行&运算
◦ 在do..while中,直到解决哈希冲突为止
为什么使用3/4扩容
- 负载因子定义为
3/4,在时间和空间成本之间提供了一个很好的折中方案
打印IMP的关联信息
(uintptr_t)newImp ^ (uintptr_t)cls将
IMP解码再打印,即可输出关联信息lldb调试_maybeMask为7问题使用
lldb调试,系统会预先执行respondsToSelector:和class方法- 无论使用
lldb调试,还是Xcode代码运行,系统都会插入结束标记作为边界 - 以
x86_64架构为例,系统插入结束标记,sel为1,imp指向第一个bucket
cache的闭环
- 想真正了解
cache的调用闭环,就必须先了解消息转发流程

若有收获,就点个赞吧
0 人点赞
