redisson watchdog 使用和原理
最近研究redisson分布式锁,有了一些收获特此记录一下
首先redisson加锁的基本流程图如下: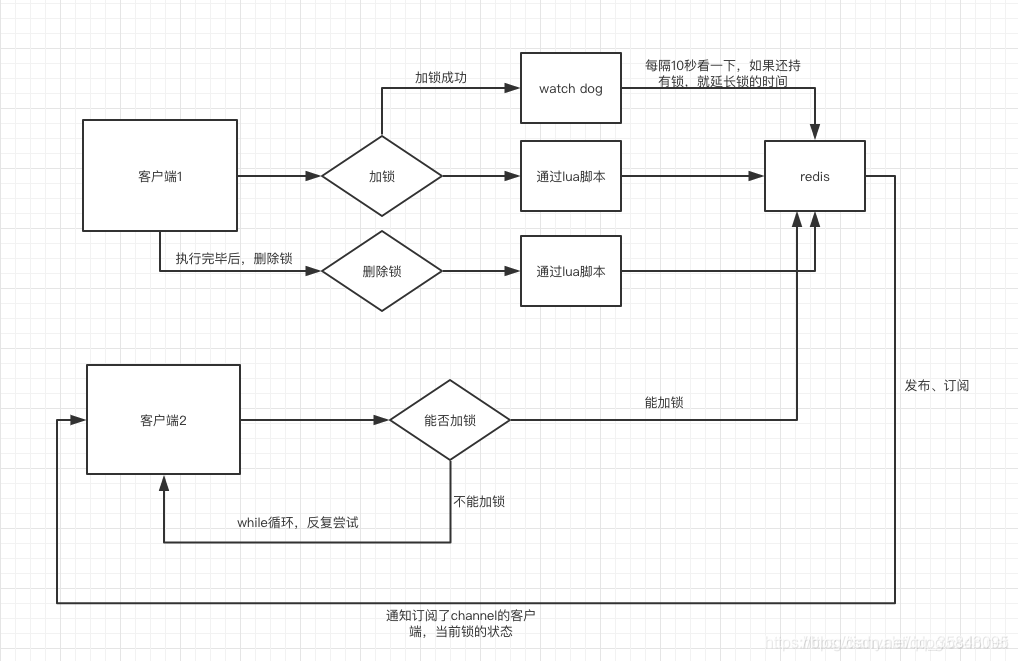
这里面我最难以理解的一点是 watchdog机制。找了很多资料,最后基本弄明白了 watchdog的使用和 原理。
首先watchdog的具体思路是 加锁时,默认加锁 30秒,每10秒钟检查一次,如果存在就重新设置 过期时间为30秒。
然后设置默认加锁时间的参数是 lockWatchdogTimeout(监控锁的看门狗超时,单位:毫秒)
官方文档描述如下
lockWatchdogTimeout(监控锁的看门狗超时,单位:毫秒)
默认值:30000
监控锁的看门狗超时时间单位为毫秒。该参数只适用于分布式锁的加锁请求中未明确使用leaseTimeout参数的情况。如果该看门狗未使用lockWatchdogTimeout去重新调整一个分布式锁的lockWatchdogTimeout超时,那么这个锁将变为失效状态。这个参数可以用来避免由Redisson客户端节点宕机或其他原因造成死锁的情况。
使用
首先代码如下:
public void test() throws IOException, InterruptedException {Config config = Config.fromYAML(new File("redison配置文件路径\\redisson.yaml"));RedissonClient redisson = Redisson.create(config);RLock redissonLock = redisson.getLock("hello");redissonLock.lock();//这里不要手动设定过期时间Thread.sleep(50000);redissonLock.unlock();}
# 单机模式singleServerConfig:password: "密码"address: "redis://ip:端口"database: 3dnsMonitoringInterval: 5000# 指定watchdog间隔lockWatchdogTimeout: 500
需要注意的是:
1.watchDog 只有在未显示指定加锁时间时才会生效。(这点很重要)
2.lockWatchdogTimeout设定的时间不要太小 ,比如我之前设置的是 100毫秒,由于网络直接导致加锁完后,watchdog去延期时,这个key在redis中已经被删除了。
原理,在调用lock方法时,会最终调用到tryAcquireAsync。详细解释如下:
private <T> RFuture<Long> tryAcquireAsync(long waitTime, long leaseTime, TimeUnit unit, long threadId) {//如果指定了加锁时间,会直接去加锁if (leaseTime != -1) {return tryLockInnerAsync(waitTime, leaseTime, unit, threadId, RedisCommands.EVAL_LONG);}//没有指定加锁时间 会先进行加锁,并且默认时间就是 LockWatchdogTimeout的时间//这个是异步操作 返回RFuture 类似netty中的futureRFuture<Long> ttlRemainingFuture = tryLockInnerAsync(waitTime,commandExecutor.getConnectionManager().getCfg().getLockWatchdogTimeout(),TimeUnit.MILLISECONDS, threadId, RedisCommands.EVAL_LONG);//这里也是类似netty Future 的addListener,在future内容执行完成后执行ttlRemainingFuture.onComplete((ttlRemaining, e) -> {if (e != null) {return;}// lock acquiredif (ttlRemaining == null) {//这里是定时执行 当前锁自动延期的动作scheduleExpirationRenewal(threadId);}});return ttlRemainingFuture;}
scheduleExpirationRenewal 中会调用renewExpiration。 这里我们可以看到是 启用了一个timeout定时,去执行延期动作
private void renewExpiration() {Timeout task = commandExecutor.getConnectionManager().newTimeout(new TimerTask() {@Overridepublic void run(Timeout timeout) throws Exception {ExpirationEntry ent = EXPIRATION_RENEWAL_MAP.get(getEntryName());if (ent == null) {return;}Long threadId = ent.getFirstThreadId();if (threadId == null) {return;}RFuture<Boolean> future = renewExpirationAsync(threadId);future.onComplete((res, e) -> {if (e != null) {log.error("Can't update lock " + getName() + " expiration", e);return;}if (res) {//如果 没有报错,就再次定时延期// reschedule itselfrenewExpiration();}});}// 这里我们可以看到定时任务 是 lockWatchdogTimeout 的1/3时间去执行 renewExpirationAsync}, internalLockLeaseTime / 3, TimeUnit.MILLISECONDS);ee.setTimeout(task);}
最终 scheduleExpirationRenewal会调用到 renewExpirationAsync,执行下面这段 lua脚本。他主要判断就是 这个锁是否在redis中存在,如果存在就进行 pexpire 延期。
protected RFuture<Boolean> renewExpirationAsync(long threadId) {return evalWriteAsync(getName(), LongCodec.INSTANCE, RedisCommands.EVAL_BOOLEAN,"if (redis.call('hexists', KEYS[1], ARGV[2]) == 1) then " +"redis.call('pexpire', KEYS[1], ARGV[1]); " +"return 1; " +"end; " +"return 0;",Collections.singletonList(getName()),internalLockLeaseTime, getLockName(threadId));}
注意:
我现在的版本是 redisson版本为 3.13.6。后续有新版源码可能代码会有变动,就像之前我参考的文章https://blog.csdn.net/ice24for/article/details/86177152 已和当前版本有了明显变化
总结:
1.要使 watchLog机制生效 ,lock时 不要设置 过期时间
2.watchlog的延时时间 可以由 lockWatchdogTimeout指定默认延时时间,但是不要设置太小。如100
3.watchdog 会每 lockWatchdogTimeout/3时间,去延时。
4.watchdog 通过 类似netty的 Future功能来实现异步延时
5.watchdog 最终还是通过 lua脚本来进行延时

若有收获,就点个赞吧
0 人点赞
