- Debugging Node applications
- MongoDB
- Schema
- creating and saving objects
- Fetching objects from the database
- Exercise 3.12
- Backend connected to a database
- Database configuration into its own module
- Using database in route handlers
- Verifying frontend and backend integration
- Error handling
- Moving error handling into middleware
- The order of middleware loading
- Other operations
Debugging Node applications
调试Node应用
将数据打印到控制台是一种可靠的方法,而且总是值得一试。
使用如下命令启动应用
node --inspect index.js
在Chrome浏览器点击绿色按钮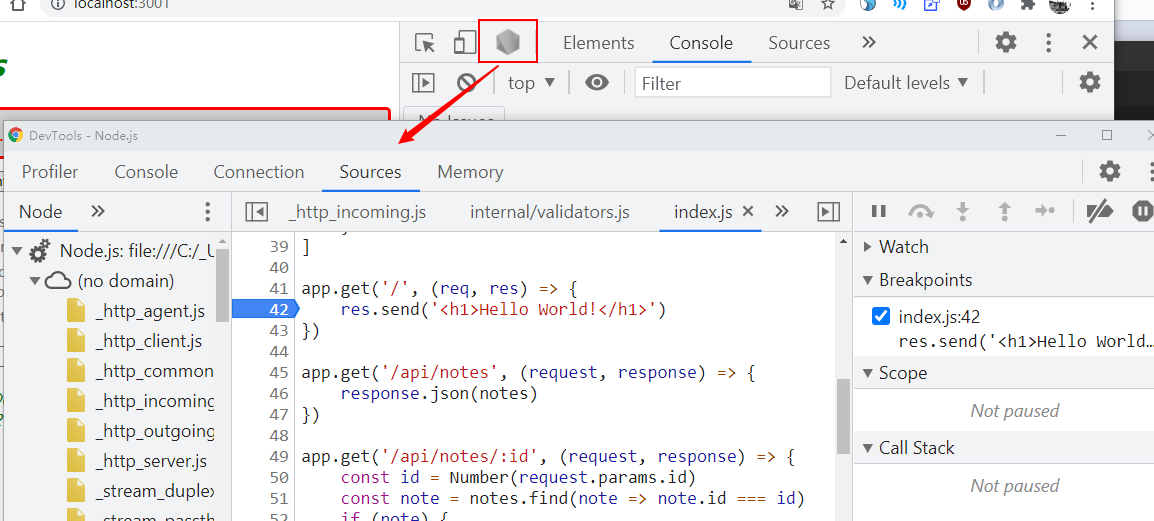
当有问题发生时,质疑一切,stop and fix
MongoDB
MongoDB是文档数据库
阅读材料:集合和文档
互联网上充满了Mongo数据库服务,推荐使用MongoDB Atlas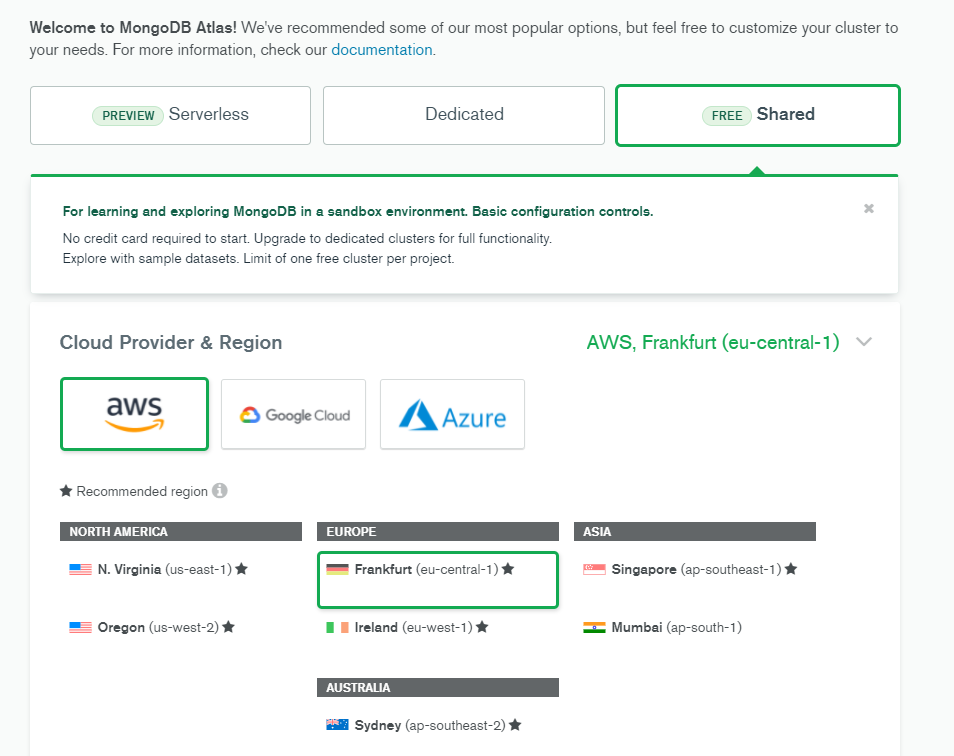
登录之后,要求创建一个集群, 选择AWS, Frankfurt, 耐心等待集群创建完成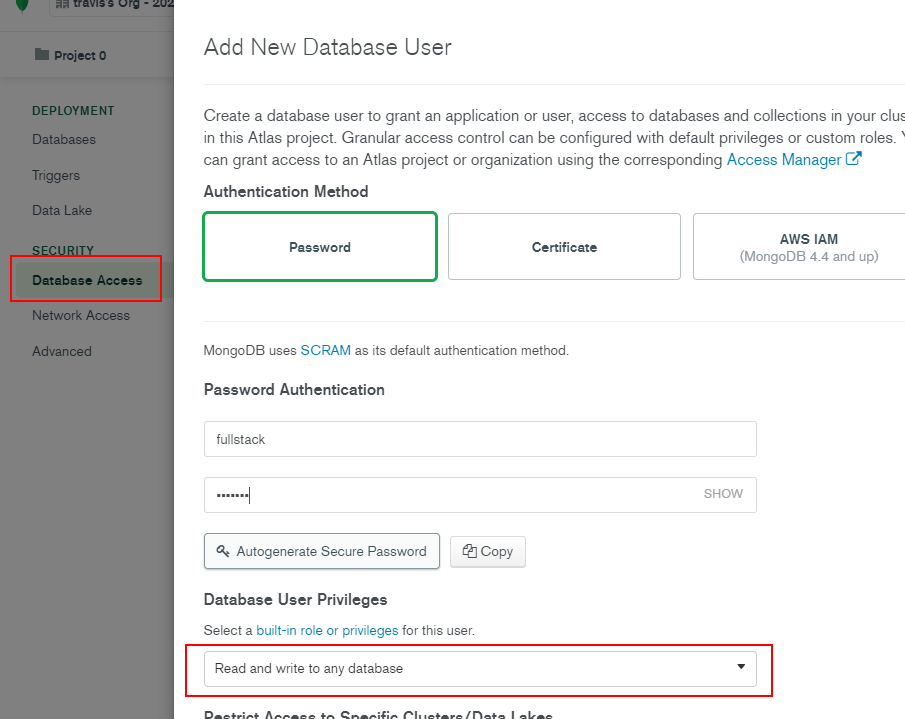
点击Database Access, 创建一个用户,允许读写数据库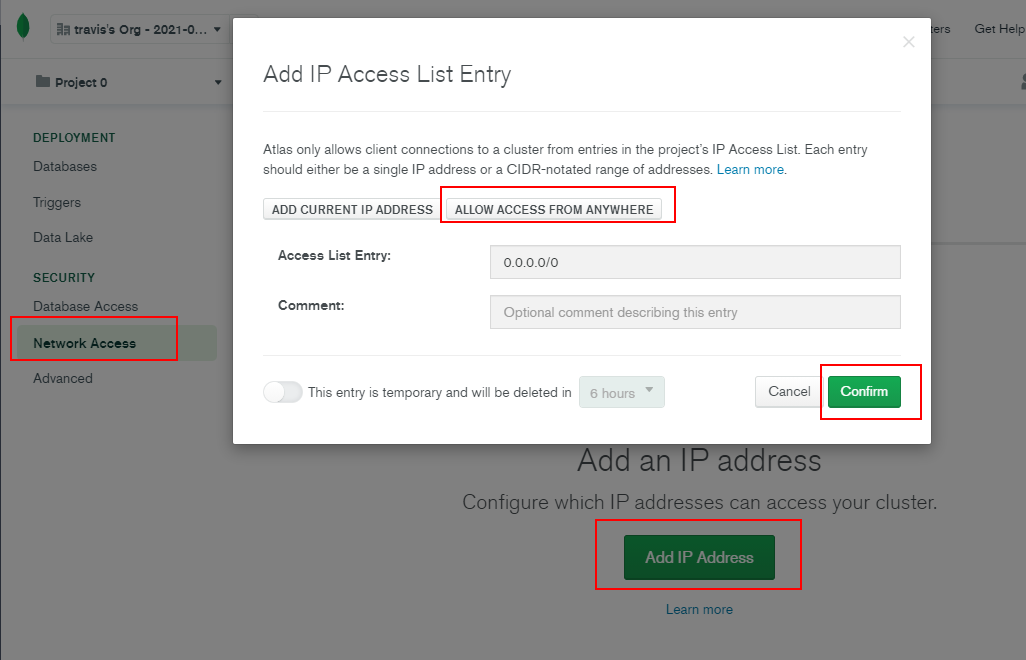
点击Network Access, 允许所有IP访问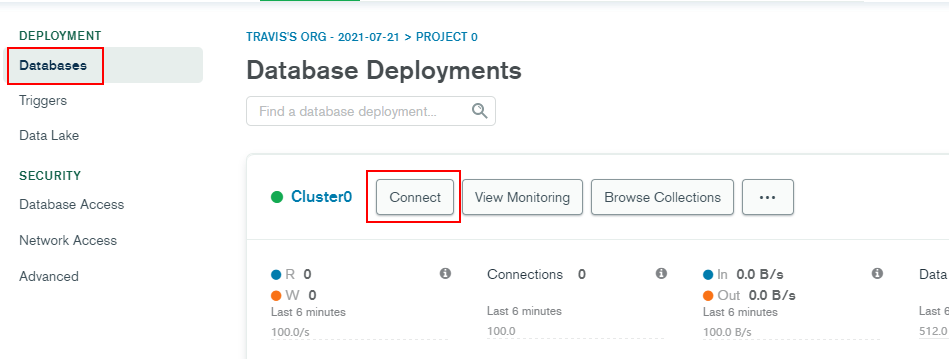
回到Databases, 点击connect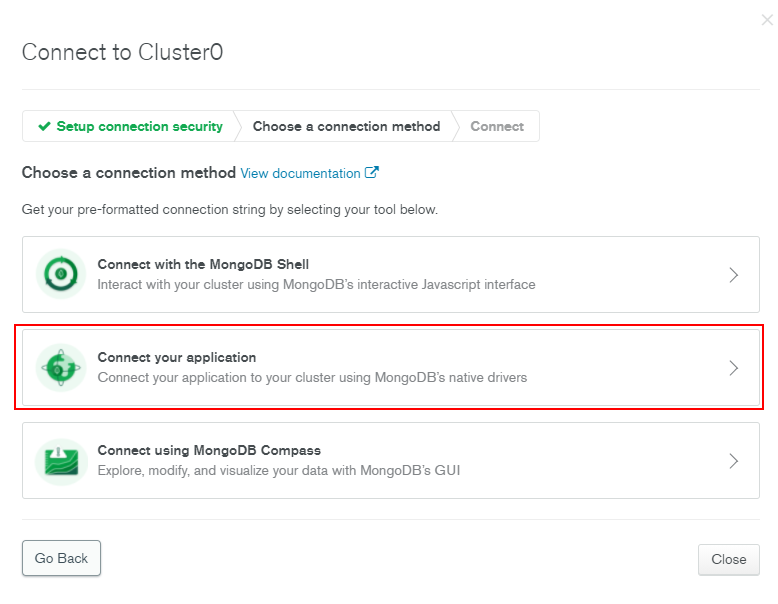
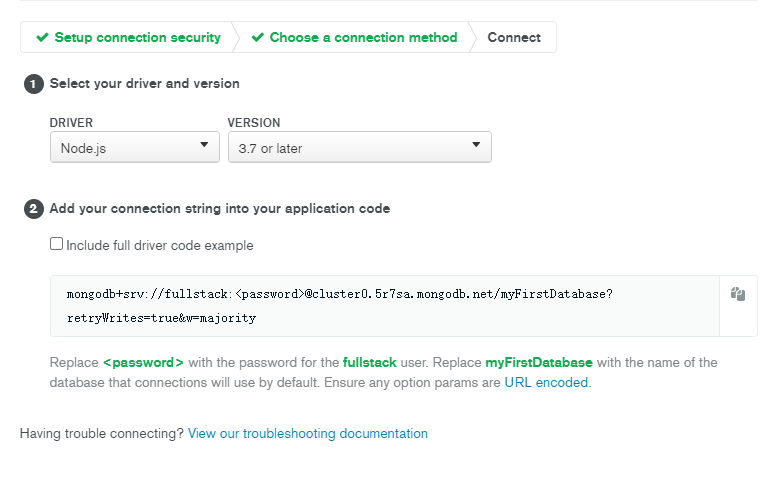
该视图显示MongoDB URI,这是我们将添加到应用的 MongoDB 客户端库的数据库地址。
官方的MongoDB NodeJs驱动用起来很麻烦,我们使用更高级的Mongoose库
安装Mongoose
npm install mongoose
让我们创建mongo.js 文件,来创建一个实践应用:
const mongoose = require('mongoose')if (process.argv.length < 3) {console.log('Please provide the password as an argument: node mongo.js <password>');process.exit(1)}const password = process.argv[2]// 注意,这里的fullstack是上文中创建的用户名const url =`mongodb+srv://fullstack:${password}@cluster0.5r7sa.mongodb.net/myFirstDatabase?retryWrites=true&w=majority`mongoose.connect(url, { useNewUrlParser: true, useUnifiedTopology: true, useFindAndModify: false, useCreateIndex: true })const noteSchema = new mongoose.Schema({content: String,date: Date,important: Boolean})const Note = mongoose.model('Note', noteSchema)const note = new Note({content: 'HTML is Easy',date: new Date(),important: true,})note.save().then(result => {console.log('note saved!')mongoose.connection.close()})
当使用命令_**node mongo.js password**_运行代码时,Mongo 将向数据库添加一个新文档。
注意,这里的password是前文中为数据库用户(fullstack)创建的密码,不是MongoDB Atlas的密码。如果密码里有特殊字符,需要URL encode that password, 编码工具:https://www.urlencoder.org/
运行时报错: MongooseError: Operation notes.insertOne() buffering timed out after 10000ms
解决办法:把DNS改成 8.8.8.8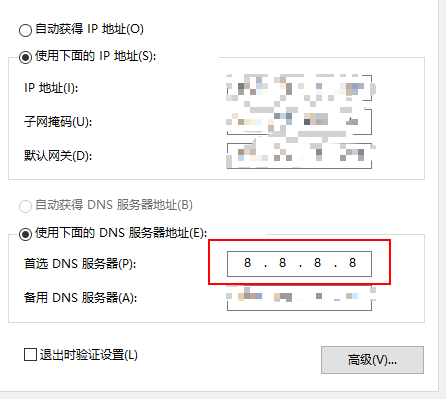
执行成功后,可以看到数据写入了myFirstDatabase数据库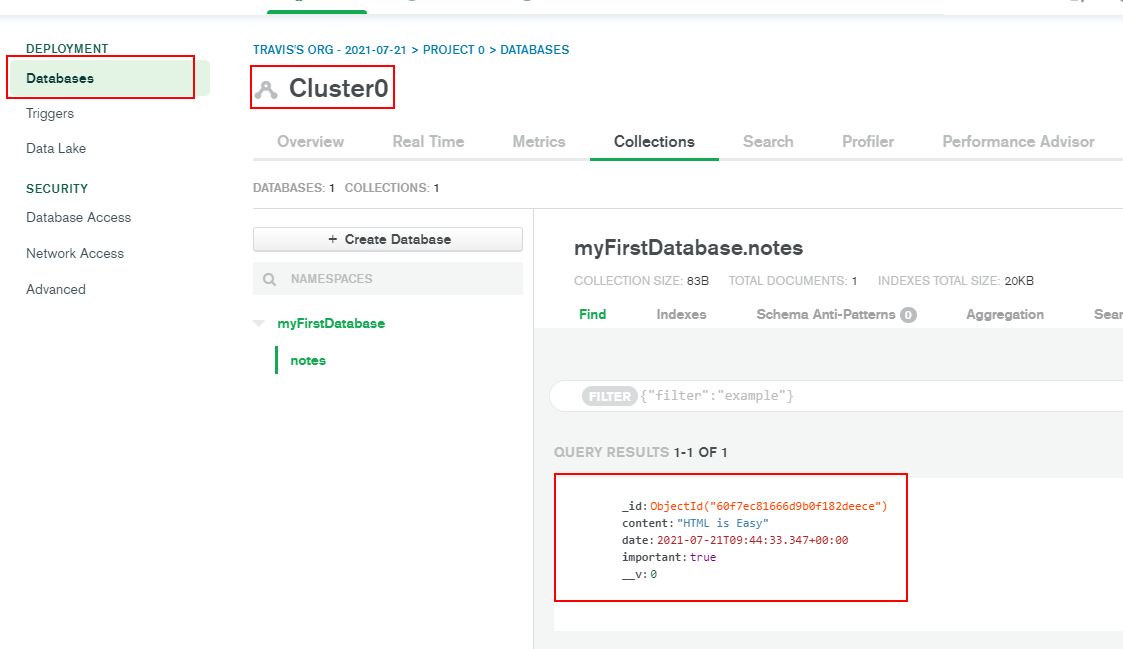
我们可以更改URI中的数据库名,比如改成note-app, 重新执行代码,则会生成一个新库,myFirstDatabase库可以手动删掉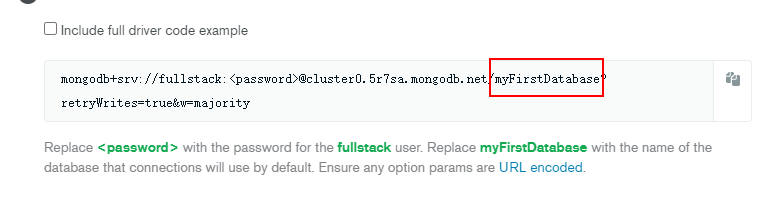
Schema
const noteSchema = new mongoose.Schema({content: String,date: Date,important: Boolean,})const Note = mongoose.model('Note', noteSchema)
上述代码定义了在mongoDB中存储数据的模式(schema)
在 Note 模型定义中,第一个 “Note”参数是模型的单数名。 集合的名称将是小写的复数 notes,因为Mongoose 约定是当模式以单数(例如Note)引用集合时自动将其命名为复数(例如notes)。
creating and saving objects
const note = new Note({content: 'HTML is Easy',date: new Date(),important: true,})note.save().then(result => {console.log('note saved!')mongoose.connection.close()})
上述代码创建并保存了一条数据
必须要有mongoose.connection.close(),否则操作不会完成
Fetching objects from the database
Note.find({}).then(result => {result.forEach(note => {console.log(note);})mongoose.connection.close()})
使用**find**方法搜索数据,条件为{},搜索出所有数据
指定条件搜索:
Note.find({important: true}).then(result => {...})
Exercise 3.12
当传递3个参数时插入,传递一个参数时查询
const mongoose = require('mongoose')if (process.argv.length < 3) {console.log('Please provide the password as an argument: node mongo.js <password>')process.exit(1)}const password = process.argv[2]const url =`mongodb+srv://fullstack:${password}@cluster0.5r7sa.mongodb.net/phonebook-app?retryWrites=true&w=majority`mongoose.connect(url, { useNewUrlParser: true, useUnifiedTopology: true, useFindAndModify: false })const personSchema = new mongoose.Schema({name: String,number: String,})const Person = mongoose.model('Person', personSchema)if (process.argv.length === 5) {const name = process.argv[3]const number = process.argv[4]const person = new Person({name,number,})person.save().then(result => {console.log(`add ${name} number ${number} to phonebook`)mongoose.connection.close()})} else if (process.argv.length === 3) {Person.find({}).then(result => {console.log("phonebook:")result.forEach(person => {console.log(`${person.name} ${person.number}`)})mongoose.connection.close()})}
Backend connected to a database
后端连接到数据库
将mongoose的定义放到index.js
注意:这里的密码是明文写的,不要把有密码的文件上传到github
const mongoose = require('mongoose')const url =`mongodb+srv://fullstack:你的密码@cluster0.5r7sa.mongodb.net/note-app?retryWrites=true&w=majority`mongoose.connect(url, { useNewUrlParser: true, useUnifiedTopology: true, useFindAndModify: false, useCreateIndex: true })const noteSchema = new mongoose.Schema({content: String,date: Date,important: Boolean,})const Note = mongoose.model('Note', noteSchema)
修改get方法
app.get('/api/notes', (request, response) => {Note.find({}).then(notes => {response.json(notes)})})
添加代码,修改schema的toJSON方法,使返回结果有id,不要_id和__v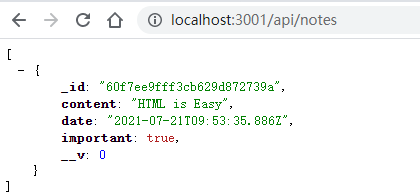
noteSchema.set('toJSON', {transform: (document, returnedObject) => {returnedObject.id = returnedObject._id.toString()delete returnedObject._iddelete returnedObject.__v}})
尽管 Mongoose 对象的 id 属性看起来像一个字符串,但实际上它是一个对象。 为了安全起见,我们定义的 toJSON 方法将其转换为字符串。 以免将来造成不必要的麻烦。
Database configuration into its own module
数据库配置分离到单独的模块
创建models目录, 新建note.js
const mongoose = require('mongoose')const url = process.env.MONGODB_URI// `mongodb+srv://fullstack:密码@cluster0.5r7sa.mongodb.net/note-app?retryWrites=true&w=majority`console.log('connecting to', url)mongoose.connect(url, { useNewUrlParser: true, useUnifiedTopology: true, useFindAndModify: false, useCreateIndex: true }).then(result => {console.log('connected to MongoDB');}).catch((error) => {console.log('error connecting to MongoDB: ', error.message);})const noteSchema = new mongoose.Schema({content: String,date: Date,important: Boolean,})noteSchema.set('toJSON', {transform: (document, returnedObject) => {returnedObject.id = returnedObject._id.toString()delete returnedObject._iddelete returnedObject.__v}})// const Note = mongoose.model('Note', noteSchema)module.exports = mongoose.model('Note', noteSchema)
注意看,nodeJS的module和ES6不同,使用module.exports变量,将Note赋值给它
导入模块的方法:
const Note = require('./models/note')
将数据库的地址硬编码到代码中并不是一个好主意,因此数据库的地址通过MONGODB_URI 环境变量传递给应用。
const url = process.env.MONGODB_URI
有很多方法可以定义环境变量的值。 一种方法是在应用启动时定义它:
MONGODB_URI=address_here npm run dev
一个更复杂的方法是使用dotenv ,使用如下命令安装库:
npm install dotenv
在项目根目录新建.env文件,写入下列信息
注意不可以使用反引号```, 只能用单引号
MONGODB_URI='mongodb+srv://fullstack:密码@cluster0.5r7sa.mongodb.net/note-app?retryWrites=true&w=majority'PORT=3001
将.env添加到.gitignore文件,以免私密信息上传到github
使用require('dotenv').config()命令来使用 .env 文件中定义的环境变量
require('dotenv').config()const express = require('express')const app = express()const Note = require('./models/note')// ..const PORT = process.env.PORTapp.listen(PORT, () => {console.log(`Server running on port ${PORT}`)})
Using database in route handlers
更改后端的其余部分,使其使用数据库
post创建新的便签:
app.post('/api/notes', (request, response) => {const body = request.bodyif (body.content === undefined) {return response.status(400).json({ error: 'content missing' })}const note = new Note({content: body.content,important: body.important || false,date: new Date(),})note.save().then(savedNote => {response.json(savedNote)})})
使用mongoose的**findById**方法查找指定id
app.get('/api/notes/:id', (request, response) => {Note.findById(request.params.id).then(note => {response.json(note)})})
Verifying frontend and backend integration
当后端扩展时,最好先用 浏览器,Postman 或者 VS Code REST 客户端 来测试后端。
当后端测试没问题时,再联合前端一起测试。
Error handling
当请求一个不存在的ID时,服务器响应404。
如果id的格式与mongoDB要求的格式不匹配的话,promise会rejected, 所以添加catch方法,在控制台log出error, 如果 id 的格式不正确,那么我们将在 catch 块中定义的错误处理程序中结束。 适合这种情况的状态代码是 400 Bad Request,表明服务器无法理解请求。 客户端不应该在没有修改的情况下重复请求
app.get('/api/notes/:id', (request, response) => {Note.findById(request.params.id).then(note => {if (note) {response.json(note)} else {response.status(404).end()}}).catch(error => {console.log(error)response.status(400).send({error: 'malformatted id'})})})
Moving error handling into middleware
将错误处理移入中间件
在某些情况下,最好在单个位置实现所有错误处理,可用使用next函数向下传递error
next函数必须以参数形式传入,这样才能将错误传给中间件
app.get('/api/notes/:id', (request, response, next) => {Note.findById(request.params.id).then(note => {if (note) {response.json(note)} else {response.status(404).end()}}).catch(error => next(error))})
error handler是一种错误处理中间件,将下列错误处理程序放在最后
const errorHandler = (error, request, response, next) => {console.log(error.message)if (error.name === 'CastError' && error.kind === 'ObjectId') {return response.status(400).send({ error: 'malformatted id' })}next(error)}app.use(errorHandler)
The order of middleware loading
中间件加载顺序
中间件的执行顺序与通过 app.use 函数加载到 express 中的顺序相同
app.use(express.static('build'))app.use(express.json())app.use(requestLogger)app.post('/api/notes', (request, response) => {const body = request.body// ...})const unknownEndpoint = (request, response) => {response.status(404).send({ error: 'unknown endpoint' })}// handler of requests with unknown endpointapp.use(unknownEndpoint)const errorHandler = (error, request, response, next) => {// ...}// handler of requests with result to errorsapp.use(errorHandler)
Other operations
删除便签
使用**findByIdAndRemove**删除便签
app.delete('/api/notes/:id', (request, response, next) => {Note.findByIdAndRemove(request.params.id).then(result => {response.status(204).end()}).catch(error => next(error))})
更新便签
使用**findByIdAndUpdate**更新便签
app.put('/api/notes/:id', (request, response, next) => {const body = request.bodyconst note = {content: body.content,important: body.important,}Note.findByIdAndUpdate(request.params.id, note, { new: true }).then(updatedNote => {response.json(updatedNote)}).catch(error => next(error))})
注意,findByIdAndUpdate 方法接收一个常规的 JavaScript 对象作为参数,而不是用 Note 构造函数创建的新便笺对象。
{new: true}参数是可选的, 表示返回的updatedNote是更新后的数据,如果没有这个参数,返回的是更新前的旧数据

若有收获,就点个赞吧
0 人点赞
