一、Rancher安装
1、Rancher HA架构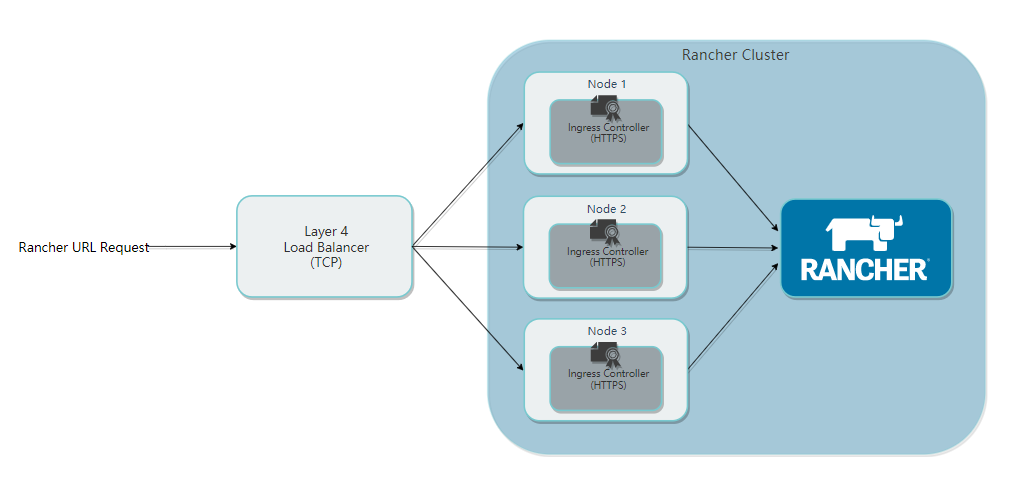
| ip | hostname | 功能 |
|---|---|---|
| 172.16.0.101 | rancher-master-1 | etcd、k8s master |
| 172.16.0.102 | rancher-master-2 | etcd、k8s master |
| 172.16.0.103 | rancher-master-3 | etcd、k8s master |
| 172.16.0.104 | rancehr-worker-1 | k8s worker |
| 172.16.0.105 | rancehr-worker-2 | k8s worker |
| 172.16.0.106 | rancehr-worker-3 | k8s worker |
| 172.16.0.107 | 负载均衡器 |
2、对应节点分别配置主机名
hostnamectl set-hostname rancher-master-1hostnamectl set-hostname rancher-master-2hostnamectl set-hostname rancher-master-3hostnamectl set-hostname rancher-worker-1hostnamectl set-hostname rancher-worker-2hostnamectl set-hostname rancher-worker-3
3、分别配置每台主机的hosts(/etc/hosts),添加host_ip $hostname到/etc/hosts文件中。
172.16.0.101 rancher-master-1172.16.0.102 rancher-master-2172.16.0.103 rancher-master-3172.16.0.104 rancher-worker-1172.16.0.104 rancher-worker-2172.16.0.104 rancher-worker-3
4、关闭防火墙
systemctl stop firewalld.service && systemctl disable firewalld.service
5、关闭SeLinux
sudo sed -i 's/SELINUX=enforcing/SELINUX=disabled/g' /etc/selinux/config
6、内核性能调优:
cat >> /etc/sysctl.conf<<EOFnet.ipv4.ip_forward=1net.bridge.bridge-nf-call-iptables=1net.bridge.bridge-nf-call-ip6tables=1vm.swappiness=0vm.max_map_count=655360EOFsysctl --system
7、禁用swap
swapoff -a && sed -i '/ swap / s/^\(.*\)$/#\1/g' /etc/fstab
8、安装docker、配置容器目录、镜像加速地址等。
https://www.rancher.cn/docs/rancher/v2.x/cn/install-prepare/basic-environment-configuration/
9、添加一个新的用户以创建rke集群:
groupadd dockeruseradd rancher -G dockerecho "gl2Hfc^JEF" | passwd --stdin rancher
10、从172.16.0.101配置免密登录到其他节点
su - rancherssh-keygenssh-copy-id rancher@172.16.0.101ssh-copy-id rancher@172.16.0.102ssh-copy-id rancher@172.16.0.103ssh-copy-id rancher@172.16.0.104ssh-copy-id rancher@172.16.0.105ssh-copy-id rancher@172.16.0.106
11、在172.16.0.101安装rke、kubectl、helm
su rootsudo wget https://www.cnrancher.com/download/rke/v0.2.2-rke_linux-amd64sudo wget https://www.cnrancher.com/download/kubernetes/linux-amd64-v1.13.6-kubectlsudo wget https://www.cnrancher.com/download/helm/helm-v2.14.0-linux-amd64.tar.gzsudo cp v0.2.2-rke_linux-amd64 /usr/bin/rkesudo chmod +x /usr/bin/rkesudo cp linux-amd64-v1.13.6-kubectl /usr/bin/kubectlsudo chmod +x /usr/bin/kubectlsudo tar -xvf helm-v2.14.0-linux-amd64.tar.gzsudo mv linux-amd64/helm /usr/bin/helmsudo mv linux-amd64/tiller /usr/bin/tillersudo rm -rf linux-amd64/
12、在172.16.0.101创建rancher集群配置文件:
su - ranchercat > rancher-cluster.yml << EOFnodes:- address: 172.16.0.101user: rancherrole: [controlplane,etcd]- address: 172.16.0.102user: rancherrole: [controlplane,etcd]- address: 172.16.0.103user: rancherrole: [controlplane,etcd]- address: 172.16.0.104user: rancherrole: [worker]- address: 172.16.0.105user: rancherrole: [worker]- address: 172.16.0.106user: rancherrole: [worker]services:etcd:snapshot: truecreation: 6hretention: 24hEOF
13、在172.16.0.101上启动rke集群
rke up --config ./rancher-cluster.yml
14、增删节点、修改12中的配置文件,执行13中的命令
15、在172.16.0.101配置环境变量:
su - rootecho export KUBECONFIG=/home/rancher/kube_config_rancher-cluster.yml >> /etc/profilesource /etc/profile
16、在172.16.0.101配置kubectl命令补全
echo "source <(kubectl completion bash)" >> ~/.bashrcsource ~/.bashrcsu - rancherecho "source <(kubectl completion bash)" >> ~/.bashrcsource ~/.bashrc
17、在172.16.0.101配置Helm客户端访问权限
(1)、kubectl -n kube-system create serviceaccount tiller(2)、kubectl create clusterrolebinding tiller --clusterrole cluster-admin --serviceaccount=kube-system:tiller
18、在172.16.0.101安装Helm客户端
helm init --service-account tiller --tiller-image registry.cn-hangzhou.aliyuncs.com/google_containers/tiller:v2.14.0 --stable-repo-url https://kubernetes.oss-cn-hangzhou.aliyuncs.com/charts
18、在172.16.0.101添加Chart仓库地址
helm repo add rancher-stable https://releases.rancher.com/server-charts/stable
19、使用权威CA机构颁发的证书安装rancher-server
(1)、创建secret
kubectl create namespace cattle-systemkubectl -n cattle-system \create secret tls tls-rancher-ingress \--cert=./cartechfin.com.pem \--key=./cartechfin.com.key
(2)、在172.16.0.101上使用helm安装rancher-server,域名为financial-k8s.coolops.cn
helm install rancher-stable/rancher \--name rancher \--namespace cattle-system \--set hostname=financial-k8s.coolops.cn \--set ingress.tls.source=secret
20、配置负载均衡,使用四层负载将ingress节点80、443端口配置到负载均衡,并将域名financial-k8s.coolops.cn解析到负载均衡外网IP。
二、其他设置
1、Ingress-NginX传递自定义header:
kind: ConfigMapapiVersion: v1metadata:name: nginx-configurationnamespace: ingress-nginxlabels:app: ingress-nginxdata:enable-underscores-in-headers: "true"
2、配置集群内部使用内网域名访问(非必须)
(1)kubectl -n cattle-system patch daemonsets cattle-node-agent --patch '{"spec": {"template": {"spec": {"hostAliases": [{"hostnames":["financial-k8s.coolops.cn"],"ip": "172.16.0.107"}]}}}}'(2) 、kubectl -n cattle-system patch deployments cattle-cluster-agent --patch '{"spec": {"template": {"spec": {"hostAliases": [{"hostnames":["financial-k8s.coolops.cn"],"ip": "172.16.0.107"}]}}}}'

若有收获,就点个赞吧
0 人点赞
