更改 Vuex 的 store 中的状态的唯一方法是提交 mutation。
为神马说是修改store中你的状态的唯一办法呢为何之前能修改呢
何为严格模式
在严格模式下,无论何时发生了状态变更且不是由 mutation 函数引起的,将会抛出错误。这能保证所有的状态变更都能被调试工具跟踪到。
说白就是在严格模式下,只能有mutation 函数修改state中的状态,要吗state里自己修改状态,不能从视口那里修改state中的状态
如下图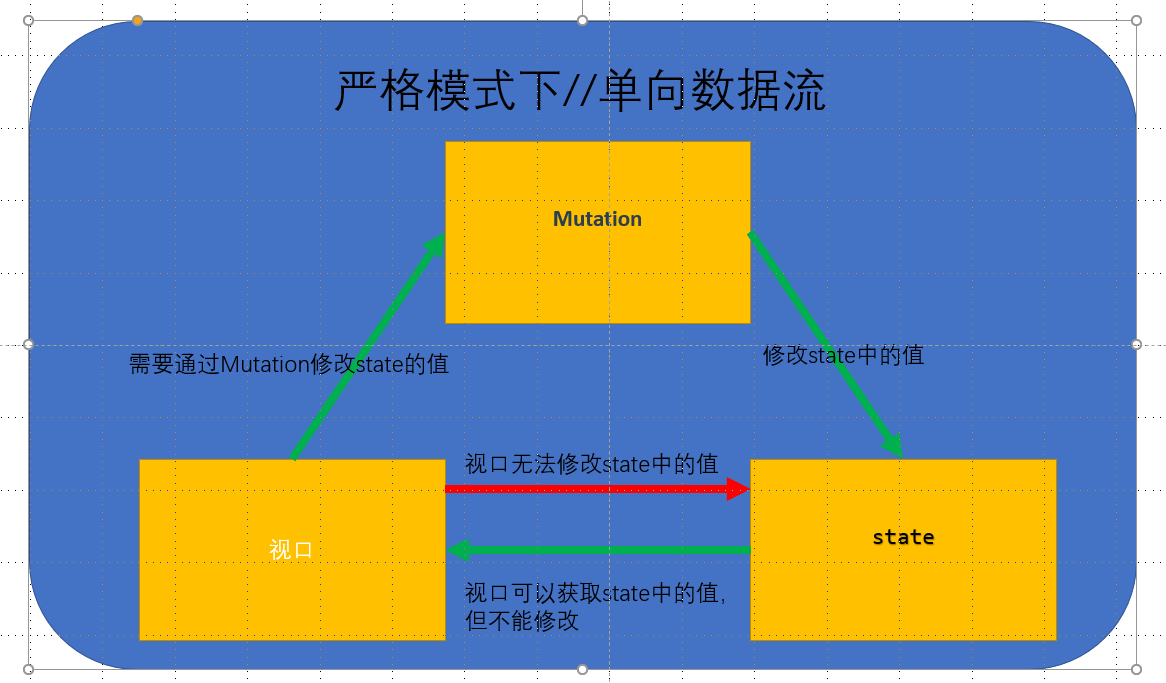
如何开启严格模式
const store = new Vuex.Store({// ...strict: true})
发布环境需要关闭严格模式
发布环境就是生产环境。严格模式就是规范我们在开发模式的行为规范的
不要在发布环境下启用严格模式!严格模式会深度监测状态树来检测不合规的状态变更——请确保在发布环境下关闭严格模式,以避免性能损失。
类似于插件,我们可以让构建工具来处理这种情况:
const store = new Vuex.Store({// ...strict: process.env.NODE_ENV !== 'production'})
示例//在视口中修改state的状态的报错信息

使用Mutation
官方的对Mutation的简介

如何声明
更改 Vuex 的 store 中的状态的唯一方法是提交 mutation。
const store = new Vuex.Store({state: {count: 1},mutations: {increment (state) {// 变更状态state.count++}}})
如何调用
this.$store.commit('increment');
如何使用辅助函数
除了在组件中使用 this.$store.commit(‘xxx’) 提交 mutation之外,还可以使用 mapMutations 辅助函数:
import { mapMutations } from 'vuex'export default {// ...methods: {...mapMutations(['increment', // 将 `this.increment()` 映射为 `this.$store.commit('increment')`]),...mapMutations({add: 'increment' // 将 `this.add()` 映射为 `this.$store.commit('increment')`})}}
提交载荷(Payload)// 传递参数
你可以向store.commit传入额外的参数,即mutation的载荷(payload):
mutations: {increment (state, n) {state.count += n}}
store.commit('increment', 10)
在大多数情况下,载荷应该是一个对象,这样可以包含多个字段并且记录的mutation会更易读:
mutations: {increment (state, payload) {state.count += payload.amount}}
store.commit('increment', {amount: 10})
对象风格的提交方式
提交 mutation 的另一种方式是直接使用包含 type 属性的对象:
store.commit({type: 'increment',amount: 10})
当使用对象风格的提交方式,整个对象都作为载荷传给 mutation 函数,因此 handler 保持不变:
mutations: {increment (state, payload) {state.count += payload.amount}}
使用常量代替Mutation事件类型(type)
把这些常量放在单独的文件中可以让你的代码合作者对整个 app 包含的 mutation 一目了然:
// mutation-types.jsexport const COUNT_INCREMENT = 'COUNT_INCREMENT'
// store.jsimport Vuex from 'vuex'import { COUNT_INCREMENT } from './mutation-types'const store = new Vuex.Store({state: { ... },mutations: {[COUNT_INCREMENT] (state) {// ...}}})
视口中如何调用
this.$store.commit('COUNT_INCREMENT',{num:10})
第二种方式
import {COUNT_INCREMENT} from '@/components/store/mutation-types'this.$store.commit(COUNT_INCREMENT,{num:10})
Mutation 需遵守 Vue 的响应规则
既然 Vuex 的 store 中的状态是响应式的,那么当我们变更状态时,监视状态的 Vue 组件也会自动更新。这也意味着 Vuex 中的 mutation 也需要与使用 Vue 一样遵守一些注意事项:
- 最好提前在你的 store 中初始化好所有所需属性。
- 当需要在对象上添加新属性时,你应该
Vue.use(Vuex)
export default new Vuex.Store({ // 启用严格模式,当在生产环境时取消严格模式 strict: process.env.NODE_ENV !== ‘production’, // 储存信息的仓库 state:{ obj:{a:1}, }, /**
* 严格模式下,仓库可以修改状态值,但是视口不可以直接修改仓库的状态值,可以通过mutations修改仓库的状态值*/mutations:{[COUNT_OBJ](state){// 不会触发响应式// state.obj.b = 3// 触发响应式Vue.set(state.obj, 'b' , '3')},}
})
```vue<template><div class="home">首页<button @click="handleClick">click</button><div>{{ obj }}</div></div></template><script>import {mapGetters, mapState, mapMutations } from 'vuex'import {COUNT_INCREMENT} from '@/components/store/mutation-types'export default {data(){return {}},computed:{// 当触发单击事件时只会改变组件内count值...mapState(['obj']),},methods:{handleClick(){this.$store.commit('COUNT_OBJ')console.log(this.obj)console.log(this.$store.state.obj)}},created(){}}</script>
表单处理
在Vuex的state上使用v-model时,由于会直接更改state的值,所以Vue会抛出错误。
如果想要使用双向数据的功能,就需要自己模拟一个v-model: :value=”msg” @input=”updateMsg”。
双向数据绑定
上面的做法,比v-model本身繁琐很多,所以我们还可以使用计算属性的setter来实现双向绑定:
<input v-model="msg">
computed: {msg: {get () {return this.$store.state.obj.msg;},set (value) {this.$store.commit(UPDATE_MSG, { value });}}}
Mutation 必须是同步函数
要记住 mutation 必须是同步函数。why?
mutations: {[COUNT_INCREMENT] (state) {setTimeout(() => {state.count ++;}, 1000)},}
执行上端代码,我们会发现更改state的操作是在回调函数中执行的,这样会让我们的代码在devtools中变的不好调试:当 mutation 触发的时候,回调函数还没有被调用,devtools 不知道什么时候回调函数实际上被调用,任何在回调函数中进行的状态的改变都是不可追踪的。

若有收获,就点个赞吧
0 人点赞
