Add Camera Support
添加相机支持
This lesson teaches you to
本节课您将学到
Connect a CSI-2 peripheral
连接一个 CSI-2 外设
- Add camera features to an app
- 在应用中添加相机功能
- Handle I/O threading
- 处理 I/O 线程
- Trigger still image capture
- 触发静态图像拍摄
- Receive image data from the camera
- 接收相机图片数据
Try it out
试试看
A smart doorbell should capture an image of who (or what) is at the door, allowing the owner to remotely make a decision about whether or not to answer.
一个智能的门铃应该在门外有人或物时自动拍摄图像,使主人能够远程查看,并决定是否应答。
Because Android Things builds on the Android framework, you can access the same robust camera APIs that an Android mobile developer would use. In this lesson, you’ll access the camera peripheral using Android camera APIs and capture an image for later processing.
由于 Android Things 基于 Android 框架进行构建,您可以使用 Android 移动开发者所使用的成熟的相机 APIs 。在本节课,您将使用 Android 相机 APIs 来控制相机外设然拍摄一张图片以便后续处理。
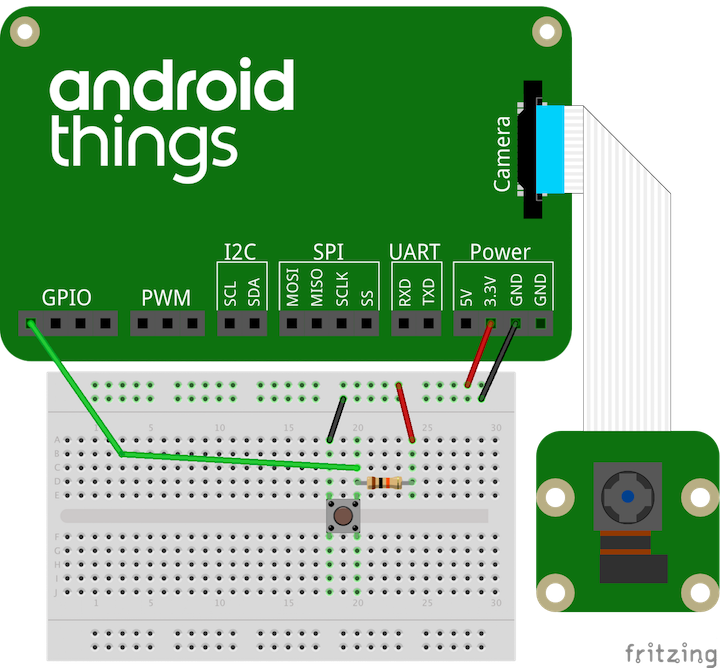
Connect the camera
连接摄像头
Connect a supported camera module to the CSI-2 camera port on your board. Ensure that the cable is fully inserted and sits evenly before closing the connector latch.
将一个开发板所支持的相机模块连接到您的开发板的 CSI-2 相机端口。在固定连接器之前确认线缆完全插入并且结合处平整。
Add permissions and required features
添加权限和必要的功能
Add the required permissions to your app’s manifest file:
在您应用的 manifest 文件中添加必要的权限:
<uses-permission android:name="android.permission.CAMERA" />
Set up an I/O thread
创建一个 I/O 线程
Communicating with peripheral hardware introduces blocking operations into the flow of your app. To avoid blocking the app’s main thread, and thus delaying framework events, create a background worker thread to process input and handle commands. The HandlerThread works very nicely for this purpose.
与外设硬件通信将阻塞您的应用。为了避免应用的主线程被阻塞,从而导致框架事件被延迟,需要新开启一个后台线程来处理输入和处理指令。在这种情况下, HandlerThread 将会是一个很好的选择。
public class DoorbellActivity extends Activity {/*** A Handler for running tasks in the background.*/private Handler mCameraHandler;/*** An additional thread for running tasks that shouldn't block the UI.**/private HandlerThread mCameraThread;@Overrideprotected void onCreate(Bundle savedInstanceState) {super.onCreate(savedInstanceState);// Creates new handlers and associated threads for camera and networking operations.mCameraThread = new HandlerThread("CameraBackground");mCameraThread.start();mCameraHandler = new Handler(mCameraThread.getLooper());}@Overrideprotected void onDestroy() {super.onDestroy();mCameraThread.quitSafely();}}
Initialize the camera session
初始化相机会话
The first step to capture a camera image is to discover the hardware and open a device connection. To connect to a camera device:
捕捉图像的第一步是找到硬件并且打开设备连接。为了连接相机设备,您需要:
- Use the
CameraManagersystem service to discover the list of available camera devices withgetCameraIdList().
使用
CameraManager系统服务中的getCameraIdList()方法找到的可用的相机设备列表。Create an
ImageReaderinstance to process the raw camera data and produce a JPEG-encoded image to your app. The reader processes data asynchronously, and invokes the providedOnImageAvailableListenerwhen the image is ready.
- 在您的应用中创建一个
ImageReader实例用于处理原始的相机数据并生成一个 JPEG 编码图像。读取数据是异步的操作,当图像准备好将会调用OnImageAvailableListener方法。 - Open a connection to the appropriate camera device using
openCamera().
- 使用
openCamera()方法来连接一个合适的相机。 - The
CameraDevice.StateCallbackreports that the camera was opened successfully through theonOpened()callback method.
- 利用
CameraDevice.StateCallback中的回调方法onOpened()来通知相机已经被成功打开。 - Close the
CameraDevicewhen it is not in use to free the system resources:
- 当不再使用相机时,调用
CameraDevice方法关闭相机,释放系统资源:
public class DoorbellCamera {// Camera image parameters (device-specific)private static final int IMAGE_WIDTH = ...;private static final int IMAGE_HEIGHT = ...;private static final int MAX_IMAGES = ...;// Image result processorprivate ImageReader mImageReader;// Active camera device connectionprivate CameraDevice mCameraDevice;// Active camera capture sessionprivate CameraCaptureSession mCaptureSession;// Initialize a new camera device connectionpublic void initializeCamera(Context context,Handler backgroundHandler,ImageReader.OnImageAvailableListener imageAvailableListener) {// Discover the camera instanceCameraManager manager = (CameraManager) context.getSystemService(CAMERA_SERVICE);String[] camIds = {};try {camIds = manager.getCameraIdList();} catch (CameraAccessException e) {Log.d(TAG, "Cam access exception getting IDs", e);}if (camIds.length < 1) {Log.d(TAG, "No cameras found");return;}String id = camIds[0];Log.d(TAG, "Using camera id " + id);// Initialize image processormImageReader = ImageReader.newInstance(IMAGE_WIDTH, IMAGE_HEIGHT,ImageFormat.JPEG, MAX_IMAGES);mImageReader.setOnImageAvailableListener(imageAvailableListener, backgroundHandler);// Open the camera resourcetry {manager.openCamera(id, mStateCallback, backgroundHandler);} catch (CameraAccessException cae) {Log.d(TAG, "Camera access exception", cae);}}// Callback handling devices state changesprivate final CameraDevice.StateCallback mStateCallback =new CameraDevice.StateCallback() {@Overridepublic void onOpened(CameraDevice cameraDevice) {mCameraDevice = cameraDevice;}...};// Close the camera resourcespublic void shutDown() {if (mCameraDevice != null) {mCameraDevice.close();}}}
Trigger an image capture
触发图像拍摄事件
Once the camera device connection is active, create a CameraCaptureSession to facilitate image requests from the hardware. To open a capture session:
一旦相机设备连接处于活动状态,创建一个 CameraCaptureSession 类来处理硬件拍摄图片的请求。开始一个拍摄会话:
Build a new
CameraCaptureSessioninstance with thecreateCaptureSession()method.创建一个新的
CameraCaptureSession实例并实现createCaptureSession()方法。Pass the method a list of potential target surfaces for individual image requests. For this example, pass the surface connected to the
ImageReaderconstructed previously.将一系列独立图像请求的预览所组成的列表传递给一个方法。在本例中,我们将这个预览列表传递给之前所构建的的
ImageReader。Attach a
CameraCaptureSession.StateCallbackto report when the session is configured and active. The callback invokes theonConfigured()method if everything is successful.当配置和激活成功后将会回调
CameraCaptureSession.StateCallback中的onConfigured()方法。
public class DoorbellCamera {...public void takePicture() {if (mCameraDevice == null) {Log.w(TAG, "Cannot capture image. Camera not initialized.");return;}// Here, we create a CameraCaptureSession for capturing still images.try {mCameraDevice.createCaptureSession(Collections.singletonList(mImageReader.getSurface()),mSessionCallback,null);} catch (CameraAccessException cae) {Log.d(TAG, "access exception while preparing pic", cae);}}// Callback handling session state changesprivate CameraCaptureSession.StateCallback mSessionCallback =new CameraCaptureSession.StateCallback() {@Overridepublic void onConfigured(CameraCaptureSession cameraCaptureSession) {// The camera is already closedif (mCameraDevice == null) {return;}// When the session is ready, we start capture.mCaptureSession = cameraCaptureSession;triggerImageCapture();}@Overridepublic void onConfigureFailed(CameraCaptureSession cameraCaptureSession) {Log.w(TAG, "Failed to configure camera");}};}
Your app can now use the active CameraCaptureSession to request image data from the camera hardware. To begin an image capture request inside the capture session:
现在,您的应用可以使用激活的 CameraCaptureSession 对象来请求相机硬件的图像数据。为了在图像会话中开始一个图像拍摄请求,您需要:
Initialize a new
CaptureRequestusing the builder interface. To capture a single still image, use theTEMPLATE_STILL_CAPTUREparameter.使用建造者接口初始化一个新的
CaptureRequest实例,并通过设置TEMPLATE_STILL_CAPTURE参数来拍摄一张静态图像。Indicate the target surface for the request. For this example, this is the same
ImageReadersurface provided to the capture session.指出请求的目标图像。在本例中,同获取图像预览和拍照会话是同一个
ImageReader。Set any additional capture parameters, such as auto-focus and auto-exposure, using the request builder.
设置额外的拍摄参数,例如自动对焦和自动曝光。
Initiate the capture request on the
CameraCaptureSessionusing thecapture()method.使用
CameraCaptureSession的capture()方法发起拍摄请求。When the capture is complete, close the active session.
当拍摄完成,关闭会话。
public class DoorbellCamera {// Active camera device connectionprivate CameraDevice mCameraDevice;// Active camera capture sessionprivate CameraCaptureSession mCaptureSession;// Image result processorprivate ImageReader mImageReader;...private void triggerImageCapture() {try {final CaptureRequest.Builder captureBuilder =mCameraDevice.createCaptureRequest(CameraDevice.TEMPLATE_STILL_CAPTURE);captureBuilder.addTarget(mImageReader.getSurface());captureBuilder.set(CaptureRequest.CONTROL_AE_MODE, CaptureRequest.CONTROL_AE_MODE_ON);Log.d(TAG, "Session initialized.");mCaptureSession.capture(captureBuilder.build(), mCaptureCallback, null);} catch (CameraAccessException cae) {Log.d(TAG, "camera capture exception");}}// Callback handling capture progress eventsprivate final CameraCaptureSession.CaptureCallback mCaptureCallback =new CameraCaptureSession.CaptureCallback() {...@Overridepublic void onCaptureCompleted(CameraCaptureSession session,CaptureRequest request,TotalCaptureResult result) {if (session != null) {session.close();mCaptureSession = null;Log.d(TAG, "CaptureSession closed");}}};}
Handle the image result
处理图像结果
From your activity, initialize the camera and invoke the takePicture() method when the doorbell button is pressed. During capture, the camera hardware streams the image data to the provided ImageReader surface and invokes the OnImageAvailableListener with the result.
在您的界面,初始化相机并且当门铃按钮被按下时调用 takePicture() 方法。在拍照时,使用 ImageReader 对象预览相机图像数据并在 OnImageAvailableListener 监听方法中获取图片。
To obtain the image after capture completes:
为了在拍摄结束后获取图片,您需要:
Obtain the latest
Imagefrom theImageReaderprovided to theonImageAvailable()method.使用
ImageReader对象提供的onImageAvailable()方法获取最新的Image。Retrieve the JPEG-encoded image as a
byte[]from the buffer returned by thegetBuffer()method:使用
getBuffer()方法将缓冲区中返回的 JPEG 编码的图像转为byte[]格式。
public class DoorbellActivity extends Activity {/*** Camera capture device wrapper*/private DoorbellCamera mCamera;@Overrideprotected void onCreate(Bundle savedInstanceState) {super.onCreate(savedInstanceState);...mCamera = DoorbellCamera.getInstance();mCamera.initializeCamera(this, mCameraHandler, mOnImageAvailableListener);}@Overrideprotected void onDestroy() {super.onDestroy();...mCamera.shutDown();}@Overridepublic boolean onKeyUp(int keyCode, KeyEvent event) {if (keyCode == KeyEvent.KEYCODE_ENTER) {// Doorbell rang!Log.d(TAG, "button pressed");mCamera.takePicture();return true;}return super.onKeyUp(keyCode, event);}// Callback to receive captured camera image dataprivate ImageReader.OnImageAvailableListener mOnImageAvailableListener =new ImageReader.OnImageAvailableListener() {@Overridepublic void onImageAvailable(ImageReader reader) {// Get the raw image bytesImage image = reader.acquireLatestImage();ByteBuffer imageBuf = image.getPlanes()[0].getBuffer();final byte[] imageBytes = new byte[imageBuf.remaining()];imageBuf.get(imageBytes);image.close();onPictureTaken(imageBytes);}};private void onPictureTaken(final byte[] imageBytes) {if (imageBytes != null) {// ...process the captured image...}}}

若有收获,就点个赞吧
0 人点赞
