Raspberry Pi 3 Starter Kit for Android Things
Raspberry Pi 3 Android Things 新手套件
Follow these instructions to set up your Raspberry Pi 3 Starter Kit
根据以下指南设置您的 Raspberry Pi 3 Starter Kit
What’s in the box
开箱指南
Open the box and make sure you have all of the components in the kit.
打开包装盒确认所有配件齐全
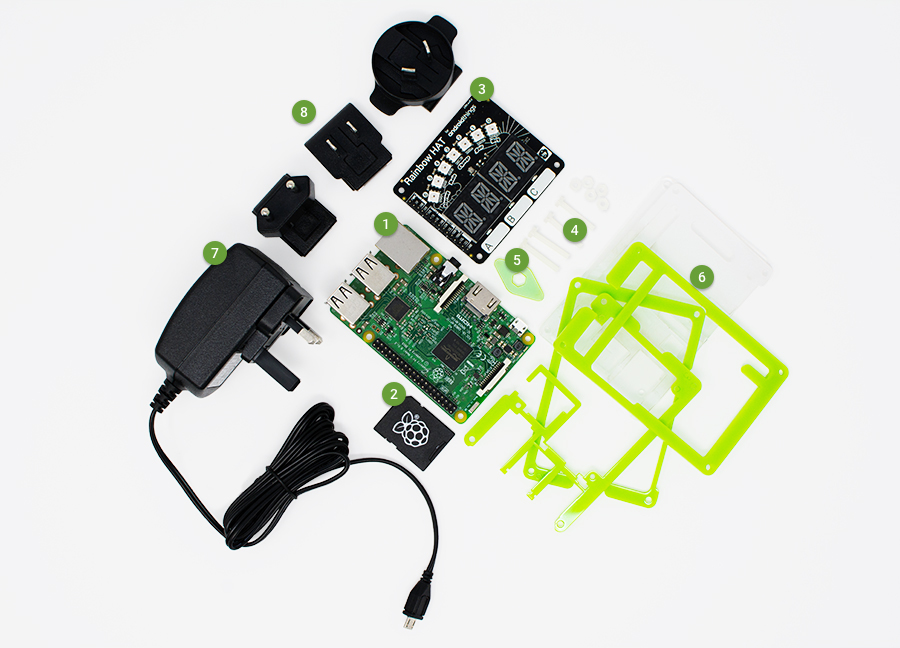
 Raspberry Pi 3 development board
Raspberry Pi 3 开发板
Raspberry Pi 3 development board
Raspberry Pi 3 开发板 |
 Micro SD card with adapter
Micro SD卡与转换卡槽
Micro SD card with adapter
Micro SD卡与转换卡槽 |
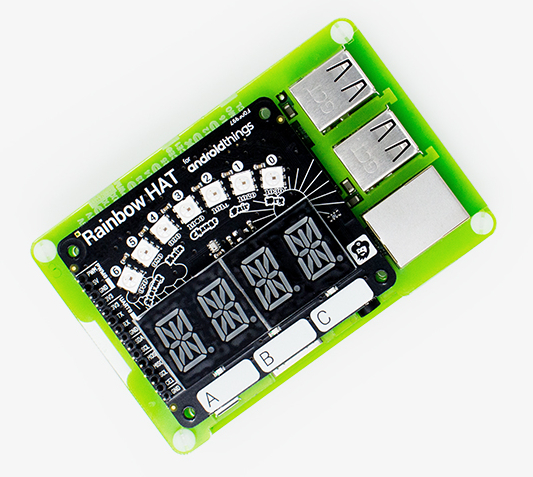
 Rainbow HAT
 |
 Plastic bolts (x4)
塑料螺丝(四个)
and nuts (at least x4)
塑料螺母(至少四个)
Plastic bolts (x4)
塑料螺丝(四个)
and nuts (at least x4)
塑料螺母(至少四个) |
 Plastic wrench
塑料扳手
Plastic wrench
塑料扳手 |
 Plastic case layers (x5)
塑料架(五个)
Plastic case layers (x5)
塑料架(五个) |
 Power adapter
电源接头
Power adapter
电源接头 |
 Power outlet adapters (x3)
插头转换器
Power outlet adapters (x3)
插头转换器
|
Connect the parts
拼装指南
Connect the parts in the following order.
按以下顺序拼装所有配件
Protective case
保护壳
The case encloses the Raspberry Pi and protects it.
此保护壳可以包装和保护整个 Raspberry Pi
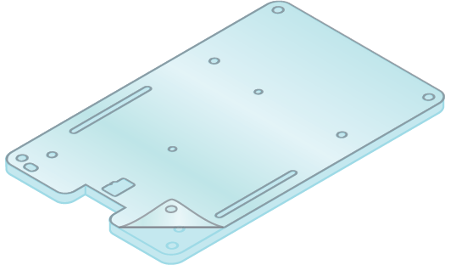 ① Locate the two clear plastic layers for the case. Each layer has a white protective film on one side. Use your fingernail to peel off this film.
找到保护壳的两个透明塑料板。每一个塑料板的一边有白色的保护膜。用指甲将保护膜撕开。
① Locate the two clear plastic layers for the case. Each layer has a white protective film on one side. Use your fingernail to peel off this film.
找到保护壳的两个透明塑料板。每一个塑料板的一边有白色的保护膜。用指甲将保护膜撕开。 |
 ② All of the plastic layers are numbered in the top left corner except for one (the top layer)
. Place the unnumbered layer aside for now. Find the layer with a “0” on it and place it so that the number is in the top left corner facing up.
除了最上层的塑料板,其余塑料板的左上角都有数字标记。
先将没有数字标记的塑料板放到一边。找到标有数字0的塑料板,将其面朝上放置并确保数字在左上角
② All of the plastic layers are numbered in the top left corner except for one (the top layer)
. Place the unnumbered layer aside for now. Find the layer with a “0” on it and place it so that the number is in the top left corner facing up.
除了最上层的塑料板,其余塑料板的左上角都有数字标记。
先将没有数字标记的塑料板放到一边。找到标有数字0的塑料板,将其面朝上放置并确保数字在左上角
|
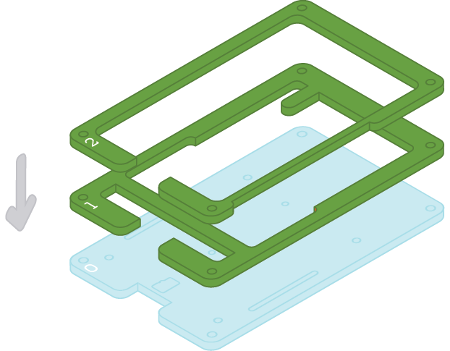 ③ Find the layer with a “1” on it and place it on top of layer 0. Find the layer with a “2” on it and place it on top of layer 1. Make sure that the numbers are lined up in the top left corner.
找到标有数字1的塑料板并把它放到0号板上。找到标有数字2的塑料板并把它放到1号板上.确保板左上角的数字对齐
③ Find the layer with a “1” on it and place it on top of layer 0. Find the layer with a “2” on it and place it on top of layer 1. Make sure that the numbers are lined up in the top left corner.
找到标有数字1的塑料板并把它放到0号板上。找到标有数字2的塑料板并把它放到1号板上.确保板左上角的数字对齐 |
 ④ Place the Raspberry Pi so that it rests inside layer 2.
将 Raspberry Pi 嵌入2号板内
④ Place the Raspberry Pi so that it rests inside layer 2.
将 Raspberry Pi 嵌入2号板内 |
 ⑤ Find the layer with a “3” on it and place it on top of the Raspberry Pi. Place the unnumbered layer on top of layer 3. Make sure that the numbers are lined up in the top left corner.
找到标有数字1的塑料板并把它放到 Raspberry Pi 上。把未标记的塑料板放到3号板上。确认所有板左上角的数字对齐。
⑤ Find the layer with a “3” on it and place it on top of the Raspberry Pi. Place the unnumbered layer on top of layer 3. Make sure that the numbers are lined up in the top left corner.
找到标有数字1的塑料板并把它放到 Raspberry Pi 上。把未标记的塑料板放到3号板上。确认所有板左上角的数字对齐。 |
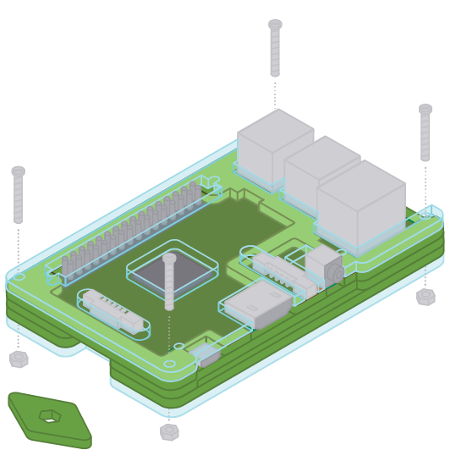 ⑥ Insert the four plastic bolts into the four corner holes in the case. Attach a nut to each of the bolts underneath the case. You can press down on the head of each bolt and use the included plastic wrench to tighten the nut.
将四个塑料螺丝分别插入保护盒四角的孔里。在四个塑料螺丝下加装塑料螺母。您可以适当按压塑料螺丝也可以用塑料扳手将螺母拧紧。
⑥ Insert the four plastic bolts into the four corner holes in the case. Attach a nut to each of the bolts underneath the case. You can press down on the head of each bolt and use the included plastic wrench to tighten the nut.
将四个塑料螺丝分别插入保护盒四角的孔里。在四个塑料螺丝下加装塑料螺母。您可以适当按压塑料螺丝也可以用塑料扳手将螺母拧紧。 |
Rainbow HAT
Rainbow HAT
Connect the Rainbow HAT to the Raspberry Pi.
将 Rainbow HAT 连接到 Raspberry Pi 上
 ① Locate the Rainbow HAT. The HAT has a 40-pin female connector. The Raspberry Pi has a 40-pin male connector. You will connect these together in the next step.
找到 Rainbow HAT 板。HAT 板有40针的母接头。Raspberry Pi 有40针的公接头。下一步中,您会把它们接在一起
① Locate the Rainbow HAT. The HAT has a 40-pin female connector. The Raspberry Pi has a 40-pin male connector. You will connect these together in the next step.
找到 Rainbow HAT 板。HAT 板有40针的母接头。Raspberry Pi 有40针的公接头。下一步中,您会把它们接在一起 |
 ② Gently press the connector on the back of the Rainbow HAT onto the connector on the Raspberry Pi. Be sure to press straight down.
轻按 Rainbow HAT 板将其后面的接头接到 Raspberry Pi 的接头上。确保竖直按压。
② Gently press the connector on the back of the Rainbow HAT onto the connector on the Raspberry Pi. Be sure to press straight down.
轻按 Rainbow HAT 板将其后面的接头接到 Raspberry Pi 的接头上。确保竖直按压。 |
Power adapter
电源接头
The power adapter may not have the right outlet adapter for your location. Do the following to change the outlet adapter (if needed)
电源接头可能与您所在的地区不匹配。按照以下指南来更换接头。(如果有需要)
 ① Press down on the plastic tab below the outlet posts.
按压插头下的塑料片
① Press down on the plastic tab below the outlet posts.
按压插头下的塑料片 |
 ② Gently slide the outlet adapter off of the power adapter.
轻轻将插头转换器从电源中拔出
② Gently slide the outlet adapter off of the power adapter.
轻轻将插头转换器从电源中拔出 |
 ③ Locate the correct outlet adapter for your location. Slide it onto the power adapter.
找到适配您的地区的插头。将它插入电源内。
③ Locate the correct outlet adapter for your location. Slide it onto the power adapter.
找到适配您的地区的插头。将它插入电源内。 |
 ④ Gently press the outlet adapter until it locks into place. You should hear a click.
轻轻按压插头直到其被锁住。锁住时有响声。
④ Gently press the outlet adapter until it locks into place. You should hear a click.
轻轻按压插头直到其被锁住。锁住时有响声。 |
Final result
最终成果
Your kit is now assembled. You will insert the micro SD card and connect the power cable in the installation instructions below.
您的套件现在就拼装完了。您可以按照下面的安装指南插入 micro SD 卡和连接电源
Install Android Things
安装 Android Things
Follow the hardware setup instructions
to flash the latest version of Android Things on your Raspberry Pi development board.
按照硬件设置 指南
在您的 Raspberry Pi 开发板上来烧录最新版的 Android Things
Blink an LED
闪烁 LED
Follow these instructions to download and run a sample
that blinks one of the HAT’s LEDs.
按照以下指南来下载和运行一个可以闪烁 HAT 的 LED 的 示范程序
Download and unzip the sample-button
project to the directory of your choice.
下载并解压 sample-button 程序到您指定的文件地址
Run the project using either of the following: 用以下两种方法任选其一来运行程序
In Android Studio, select File > Open and select the directory where you unzipped the sample. Select Run > Run ‘app’.
在 Android Studio 里,选择 文件 > 打开 然后选择解压缩文件的文件地址。选择 运行 > 运行 ‘app’
From the command line:
cd sample-button-master./gradlew assembleDebugadb install -g -r app/build/outputs/apk/app-debug.apkadb shell am start com.example.androidthings.button/.ButtonActivity
通过命令行:
cd sample-button-master./gradlew assembleDebugadb install -g -r app/build/outputs/apk/app-debug.apkadb shell am start com.example.androidthings.button/.ButtonActivity
Press the “A” button on the Rainbow HAT and the red LED will light up.
按下 Rainbow HAT 上的 A 键来点亮红色的 LED
Next steps
下一步
- Try one of the other code samples
尝试 其他的示范程序
Remember to uninstall any existing samples from the development board before installing a new one, so that one does not interfere with the other. For example, to uninstall the previous sample from the command line:
adb uninstall com.example.androidthings.button
注意为了程序之间不互相干扰,请先卸载开发板上已有的程序,再安装新程序。比如您可以通过这段命令行来卸载之前的程序:
adb uninstall com.example.androidthings.button
Take a look at the Peripherals codelab or learn how to build your first device
Connect with the community at g.co/iotdev
加入官方讨论社区 g.co/iotdev
Feedback
用户反馈
You can report bugs
您可以 汇报 bugs
也可以 推荐新功能
with the Android Things issue tracker.
使用 Android Things 问题跟踪系统

若有收获,就点个赞吧
0 人点赞
