第12-14章 组件化
12组件化
vue开发中的特色-组件化。当一个项目越来越庞大,页面结构越来越复杂,会有太多的虚拟DOM节点。这时候就需要用到组件化,将功能抽离成独立的组件,用这些组件完成项目开发,易于开发又易于维护。
12.1渲染组件
定义一个组件, 其实就是一个固定格式规范的对象。
const myComponent = {name: "MyComponent",data(){return { foo: 1}}}
从渲染器的内部实现看,一个组件就是一个特殊类型的虚拟DOM节点。
const vnode = { type: "div", // ... }
const vnode = {type: Fragment, // ...}
const vnode ={type :Text, //...}
渲染器的patch可以印证组件为特殊的虚拟节点
function patch(n1, n2, container, anchor){if(n1 && n1.type !== n2.type){unmount(n1)n1 = null;}const {type} = n2;if(typeof type ==="string"){/// 普通元素}else if(type === Text){ // 文本节点}else if(type === Fragment) { // Fragment 片段节点}}
为了使用虚拟节点描述组件,可以使vnode.type属性存储组件的选项对象。
const vnode = {type: MyComponent, // type存储组件的对象}
让patch函数能处理组件类型, 调用mountComponent和patchComponent函数完成组件的挂载和更新。
function patch(n1, n2, container, anchor){if(n1 && n1.type !== n2.type){unmount(n1)n1 = null;}const {type} = n2;if(typeof type ==="string"){/// 普通元素}else if(type === Text){ // 文本节点}else if(type === Fragment) { // Fragment 片段节点}else if(typeof type ==="object"){if(!n1){mountComponent(n2, container, anchor);}else {patchComponent(n1, n2, anchor)}}}
渲染器有了处理组件的能力,然后就要设计组件在用户层面的接口。组件本身是对内容的封装,一个组件包含一个渲染函数render,函数返回值是虚拟DOM,组件的渲染函数就是用来描述组件所渲染内容的接口。
const MyComponent = {name: "myComponent", // 定义组件名称// 组件的渲染函数,返回值是虚拟DOMrender(){return {type: "div",children : "text world"}}}
有了基本的组件结构,渲染器就可以完成组件渲染
const CompVnode = {type: MyComponent //用来描述组件的vnode对象, type属性为组件的选项对象}// 调用渲染器来渲染组件renderer.render(CompVnode, document.querySelector("#app"));
渲染器中完成渲染任务的是 mountComponent 函数
function mountComponent(vnode, container, anchor){// 通过vnode获取组件的选项对象--vnode.typeconst componentOptions = vnode.type;// 获取组件的渲染函数 renderconst { render } = componentOptions;// 执行渲染函数,获取组件要渲染的内容, render函数返回的虚拟DOMconst subTree = render();// 调用patch函数挂载组件所描述的内容,subTreepatch(null, subTree, container, anchor)}
12.2组件的状态与自更新
完成了初始组件渲染,接下来为组件设计自身状态 data
const MyComponent = {name: "MyComponent",// data定义组件自身状态数据data (){return {foo:"hello vue3"}},render(){return {type:"div",children : `foo 的值是 ${this.foo}` //在渲染函数内使用组件的状态数据 data}}}
- 使用data函数定义组件自身状态
- 在渲染函数中,通过this 访问由data函数返回的状态数据
组件自身状态初始化
function mountComponent(vnode, container, anchor){const componentOptions = vnode.type;const {render, data} = componentOptions;// 调用data函数获取原始数据,并调用reactive函数将数据包装为响应式数据const state = reactive(data());// 调用render函数,将this设置 为stateconst subTree = render.call(state, state);patch(null, subTree, container, anchor);}
- 使用reactive函数将data函数返回值包装成响应式数据
- 调用render渲染函数,第一个参数设置this的值为state,第二参数将state作为参数传入
当组件自身状态发生变化时,需要触发组件更新。需要将整个渲染任务包装到一个effect中。
function mountComponent(vnode, container, anchor){const componentOptions = vnode.type;const {render, data} = componentOptions;// 调用data函数获取原始数据,并调用reactive函数将数据包装为响应式数据const state = reactive(data());// 将组件的render函数调用包装到effect中effect(()=>{const subTree = render.call(state, state);patch(null, subTree, container, anchor);})}
组件自身的响应式数据发生变化时,组件就会自动重新执行渲染函数。
由于effect执行是同步,当响应式数据发生变化时,与之关联的副作用函数会同步执行。这样会导致有多少次修改数据就有多少次渲染函数的重复执行,严重降低性能。 可以设计一个调度器scheduler,当副作用函数需要重新执行时,不会立即执行它,而是将它缓存到微任务队列中,等到执行栈清空后,再将它从微任务队列中取出并执行。有了缓存机制,就可以对任务进行去重,避免多次执行重复副作用函数带来的性能浪费。
// 任务缓存队列,用Set数据结构表示,这样可以自动去重const queue = new Set();// 设置一个标记,代表是否正在进行刷新任务队列let isFlushing = false;// 创建一个立即 resolve 的Promise实例const p= Promise.resolve();// scheduler调度器的主要函数,用来将一个任务添加到缓存队列,并开始刷新队列function queueJob(job){// 将 job添加到任务队列中queue.add(job);//如果还没有刷新队列if(!isFlushing){//进入刷新队列,将标志位设置为true以避免重复刷新isFlushing = true;// 在微任务中刷新缓存队列p.then(()=>{try{// 执行任务队列中的任务queue.forEach(job => job())}finally{// 重置状态isFlushing = false;queue.length = 0;}})}}
利用微任务的异步执行机制,实现副作用函数的缓存。有了queueJob函数,就可以在创建渲染副作用时使用它。
function mountComponent(vnode, container, anchor){const componentOptions = vnode.type;const {render, data} = componentOptions;// 调用data函数获取原始数据,并调用reactive函数将数据包装为响应式数据const state = reactive(data());// 将组件的render函数调用包装到effect中effect(()=>{const subTree = render.call(state, state);patch(null, subTree, container, anchor);}, {//指定副作用函数的调度器为 queueJobscheduler: queueJob})}
这样就能达到当数据发生变化时,副作用函数不会立即同步执行,而是被queueJob函数调度缓存,最后在一个微任务中执行。
12.3组件实例与组件的生命周期
组件实例本质是一个状态集合,包含组件运行过程中的所有信息,如组件生命周期、组件渲染的子树subTree、组件是否已经被挂载,组件的自身状态等。为了解决组件更新问题,引入组件实例的概念,以及与之相关的状态信息。
function mountComponent(vnode, container, anchor){const componentOptions = vnode.type;const {render, data} = componentOptions;// 调用data函数获取原始数据,并调用reactive函数将数据包装为响应式数据const state = reactive(data());//定义组件实例const instance = {// 组件自身状态数据 datastate,// 一个布尔值, 用来表示组件是否已经被挂载isMounted: false,// 组件所渲染的内容, subTreesubTree: null}//将组件实例设置到vnode上, 用于后续更新vnode.component = instance;// 将组件的render函数调用包装到effect中effect(()=>{// 调用组件的渲染函数,获得子树const subTree = render.call(state, state);// 检查组件是否已经被挂载if(!instance.isMounted){// 初次挂载,patch第一个参数nullpatch(null, subTree, container, anchor);// 将组件的isMounted设置为true,阻止更新时执行挂载。instance.isMounted = true;}else{// isMounted为true,执行更新。patch函数的第一个参数,为组件上次渲染的子树// 意思是,使用新的子树与上次渲染的子树进行打补丁操作patch(instance.subTree, subTree, container, anchor);}// 更新组件实例子树instance.subTree = subTree;}, {//指定副作用函数的调度器为 queueJobscheduler: queueJob})}
用一个对象表示组件实例,该对象包含三个属性
- state:组件自身的状态数据,即data
- isMounted:表示组件是否被挂载
- subTree:存储组件的渲染函数返回的虚拟DOM,即组件的子树 subTree。
可以在任意的在组件实例instance上添加需要的属性。
用组件实例的isMounted属性来区分组件的挂载和更新,在合适的时机调用组件对应的生命周期钩子。
function mountComponent(vnode, container, anchor){const componentOptions = vnode.type;const {render, data, beforeCreate, created, beforeMount, mounted, beforeUpdate, updated} = componentOptions;// 设置调用 beforeCreate 钩子beforeCreate && beforeCreate();// 调用data函数获取原始数据,并调用reactive函数将数据包装为响应式数据const state = reactive(data());//定义组件实例const instance = {// 组件自身状态数据 datastate,// 一个布尔值, 用来表示组件是否已经被挂载isMounted: false,// 组件所渲染的内容, subTreesubTree: null}//将组件实例设置到vnode上, 用于后续更新vnode.component = instance;// 设置调用 created 钩子created && create.call(state)// 将组件的render函数调用包装到effect中effect(()=>{// 调用组件的渲染函数,获得子树const subTree = render.call(state, state);// 检查组件是否已经被挂载if(!instance.isMounted){// 设置调用 beforeMount 钩子beforeMount && beforeMount.call(state)// 初次挂载,patch第一个参数nullpatch(null, subTree, container, anchor);// 将组件的isMounted设置为true,阻止更新时执行挂载。instance.isMounted = true;// 设置调用 mounted 钩子mounted && mounted.call(state);}else{// 设置调用 beforeUpdate 钩子beforeUpdate && beforeUpdate.call(state)// isMounted为true,执行更新。patch函数的第一个参数,为组件上次渲染的子树// 意思是,使用新的子树与上次渲染的子树进行打补丁操作patch(instance.subTree, subTree, container, anchor);// 设置调用 updated 钩子updated && updated.call(state)}// 更新组件实例子树instance.subTree = subTree;}, {//指定副作用函数的调度器为 queueJobscheduler: queueJob})}
代码中首先从组件的选项对象中取得注册到组件上的生命周期函数,然后在合适的时机调用它们,这就是组件生命周期的原理。
实际中可能存在多个同样的组件生命周期钩子,例如mixins中的生命周期钩子函数,因此需要将组件生命周期钩子序列化一个数组。
12.4 props和组件的被动更新
虚拟DOM对的props和html的属性类似<MyComponent title="A big Title" :other="val" />
const vnode = {type: MyComponent,props: {title: "A big Title",other: this.val}}
const MyComponent = {name: "MyComponent",// 组件接收名为title的props,并且改props的类型为Stringprops: {title: String},render(){return {type : "div",children: `count is : ${this.title}` //访问props数据}}}
关于props有两部分需要注意:
- 组件选项定义的props的地方,MyComponent.props对象
设置并传递props数据的地方, 即vnode.props对象 ```javascript function mountComponent(vnode, container, anchor){ const componentOptions = vnode.type; const {render, data, props: propsOption,beforeCreate, created, beforeMount, mounted, beforeUpdate, updated} = componentOptions;
// 设置调用 beforeCreate 钩子 beforeCreate && beforeCreate(); // 调用data函数获取原始数据,并调用reactive函数将数据包装为响应式数据 const state = reactive(data()); // 解析出props和attrs数据 const [props, attrs] = resolveProps(propsOption, vnode.props)
//定义组件实例 const instance = { // 组件自身状态数据 data state, // 一个布尔值, 用来表示组件是否已经被挂载 isMounted: false, // 组件所渲染的内容, subTree subTree: null, //将解析出的props数据用 shallowReactive 包裹,并定义到组件实例 props: shallowReactive(props), } //将组件实例设置到vnode上, 用于后续更新 vnode.component = instance;
// 设置调用 created 钩子 created && create.call(state)
// 将组件的render函数调用包装到effect中 effect(()=>{ // 调用组件的渲染函数,获得子树 const subTree = render.call(state, state); // 检查组件是否已经被挂载 if(!instance.isMounted){
// 设置调用 beforeMount 钩子beforeMount && beforeMount.call(state)// 初次挂载,patch第一个参数nullpatch(null, subTree, container, anchor);// 将组件的isMounted设置为true,阻止更新时执行挂载。instance.isMounted = true;// 设置调用 mounted 钩子mounted && mounted.call(state);
}else{
// 设置调用 beforeUpdate 钩子beforeUpdate && beforeUpdate.call(state)// isMounted为true,执行更新。patch函数的第一个参数,为组件上次渲染的子树// 意思是,使用新的子树与上次渲染的子树进行打补丁操作patch(instance.subTree, subTree, container, anchor);// 设置调用 updated 钩子updated && updated.call(state)
} // 更新组件实例子树 instance.subTree = subTree; }, { //指定副作用函数的调度器为 queueJob scheduler: queueJob }) }
// resolveProps 函数用于解析组件的 props 和 attrs数据 function resolveProps(options, propsData){ const props = {}; const attrs = {}; // 遍历pros 数据 for(const key in propsData){ if(key in options){ // 如果为组件传递的 props[key] = propsData[key]; }else{ // 将没有定义在props选项中的props数据,添加到attrs对象中 attrs[key] = propsData[key]; } } // 返回 props 和attrs return [props, attrs]; }
props发生变化,会触发父组件重新渲染```javascript// 定义的父组件模板<MyComponent :title="title">// 定义父组件的虚拟DOMconst vnode = {type: MyComponent,props: {title: "first"}}// 当props中title发生变化,父组件会重新执行渲染,const vnode = {type: MyComponent,props: {title: "change ..."}}
父组件进行更新,在更新过程中,渲染器发现父组件的subTree包含组件类型的虚拟节点,会调用patchComponent函数完成子组件的更新。
funtion patch(n1, n2, container, anchor){if(n1 && n1.type !== n2.type){unmount(n1);n1= null;}const {type} = n2;if(typeof type === "string"){}else if(type === Text){}else if(type === Fragment){}else if(typeof type === "object"){// vnode.type的值 是选项对象if(!n1){mountComponent(n2, container, anchor);}else{// 更新组件patchComponent(n1, n2, anchor)}}}
patchComponent函数完成子组件的更新。父组件引起的子组件更新,子组件被动更新时,需要判断
- 检查子组件是否真的需要更新,因为子组件的props可能不变
如果需要更新,则更新子组件的props和slots等内容
function patchComponent(n1, n2, anchor){// 获取组件实例, 即n1.component,同时让新组件的虚拟节点n2.component也指向组件实例const instance = (n2.component = n1.component);// 获取当前的props数据const {props} = instance;// 调用hasPropsChanged检测为子组件传递的props是否发生if(hasPropsChange(n1.props, n2.props)){//调用resolveProps函数获取新 props 数据const [nextProps] = resolveProps(n2.type.props, n2.props);// 更新propsfor(const k in nextProps){props[k] = nextProps[k]}// 删除不存在的propsfor(const k in props){if(!(k in nextProps)) delete props[k]}}}function hasPropsChanged(oldProps, newProps){const newKeys = Object.keys(newProps);// 如果新旧 props的数量变化,则说明有改变if(newKeys.lenght !== Object.keys(oldProps).length){return true;}for(let i=0; i< newKeys.length; i++){const key = newKeys[i];if(oldProps[key] !== newProps[key]) return true;}return false;}
组件被动更新时,需要将组件实例添加到新的组件vnode对象上,即n2.component = n1.component,否则下次更新时无法取得组件实例。
由于props数据和组件自身的状态数据都需要暴露到渲染函数中,并使得渲染函数能够通过this访问他们,因此将props数据和组件自身的状态数据封装为一个上下文对象。function mountComponent(vnode, container, anchor){// ...//定义组件实例const instance = {// 组件自身状态数据 datastate,// 一个布尔值, 用来表示组件是否已经被挂载isMounted: false,// 组件所渲染的内容, subTreesubTree: null}//将组件实例设置到vnode上, 用于后续更新vnode.component = instance;// 创建渲染上下文对象const renderContext = new Proxy(instance, {get(t, k,r){const {state, props} = t;if(state && k in state){ // 获取组件自身状态和props数据return state[k]}else if(k in props){ // 如果组件自身没有该数据,则从props中获取return props[k]}else{console.error('不存在 props或state')}},set(t, k, v, r){const {state, props} = t;if(state && k in state){state[k] = v;}else if(k in props){props[k]}else{console.error('不存在 props或state')}}})// 生命周期函数调用时,绑定渲染上下文created && created.call(renderContext);}
给组件创建了一个代理对象,即渲染上下文对象。该对象的作用在于拦数据状态的读取和设置操作,每当渲染函数和生命周期钩子中通过this来读取数据时,
都会优先从组件的自身状态读取,如果组件本身没有对应的数据,则再从props数据中读取。最后将上下文对象作为渲染函数和生命周期钩子的this值。
除了组件自身数据及props外,完整的组件还包含methods、computed等选项中定义的数据和方法。12.5 setup函数的作用和实现
setup函数是vue3新增的组件选项,主要用于组合式API【composition】,用于组合逻辑、创建响应式数据、创建通用函数、注册生命周期钩子的能力。在组件整个生命周期中,setup函数只会被挂载时执行一次。它的返回值有2中情况:
返回一个函数,作为组件的render函数
-
【返回函数】
const Comp = {setup(){//返回函数时,作为组件的渲染函数return ()=>{return {type: "div", children : "hello"}}}}
这种方式用于组件不是以模板【使用template标签】定义渲染内容。
【返回对象】
const Comp = {setup(){const count = ref(0);return {count}},render(){return {type: 'div', children: `count is: ${this.count}`}}}
将setup返回的对象暴露给render函数使用,可以通过this访问到暴露出的响应式对象。
setup接收两个参数:第一个props数据对象;第二个参数也是对象,{attrs、emits、slots、expose}; props对象为外部给组件传递的属性数据
第二个参数setupContext对象,保存着与组件接口相关的数据和方法
- slots: 组件接收的插槽
- emit: 一个函数,用于向父组件发送自定义事件
- attrs:当为组件传递props时,那些没有显示声明为props属性的数据会存储到attrs对象中。
- expose:用来显示的向外暴露组件数据,和vue2中的ref类型。 ```javascript function mountComponent(vnode, container, anchor){ const componentOptions = vnode.type; const {render, data, props: propsOption,beforeCreate, created, beforeMount, mounted, beforeUpdate, updated} = componentOptions;
// 设置调用 beforeCreate 钩子 beforeCreate && beforeCreate(); // 调用data函数获取原始数据,并调用reactive函数将数据包装为响应式数据 const state = reactive(data()); // 解析出props和attrs数据 const [props, attrs] = resolveProps(propsOption, vnode.props)
//定义组件实例 const instance = { // 组件自身状态数据 data state, // 一个布尔值, 用来表示组件是否已经被挂载 isMounted: false, // 组件所渲染的内容, subTree subTree: null, //将解析出的props数据用 shallowReactive 包裹,并定义到组件实例 props: shallowReactive(props), }
/////———-setupContext 定义————-/// const setupContext = {attrs}; // attrs是第10行解构出来的 const setupResult = setup(shallowReadonly(instance.props), setupContext); // setupState存储由setup返回的数据 let setupState = null; //如果 setup 函数的返回值是函数,则将其作为渲染函数 if(typeof setupResult === ‘function’){ // 报告冲突 if(render) console.error(‘setup返回渲染函数,render选项被忽略’) render = setupResult }else{ // 如果 setup 的返回值不是函数, 作为数据状态赋值给setupState setupState = setupContext; }
//将组件实例设置到vnode上, 用于后续更新 vnode.component = instance;
// 创建渲染上下文对象 const renderContext = new Proxy(instance, { get(t, k,r){
const {state, props} = t;if(state && k in state){ // 获取组件自身状态和props数据return state[k]}else if(k in props){ // 如果组件自身没有该数据,则从props中获取return props[k]}else{console.error('不存在 props或state')}
}, set(t, k, v, r){
const {state, props} = t;if(state && k in state){state[k] = v;}else if(k in props){props[k]}else{console.error('不存在 props或state')}
} })
// 设置调用 created 钩子 created && create.call(state)
// 将组件的render函数调用包装到effect中 effect(()=>{ // 调用组件的渲染函数,获得子树 const subTree = render.call(state, state); // 检查组件是否已经被挂载 if(!instance.isMounted){
// 设置调用 beforeMount 钩子beforeMount && beforeMount.call(state)// 初次挂载,patch第一个参数nullpatch(null, subTree, container, anchor);// 将组件的isMounted设置为true,阻止更新时执行挂载。instance.isMounted = true;// 设置调用 mounted 钩子mounted && mounted.call(state);
}else{
// 设置调用 beforeUpdate 钩子beforeUpdate && beforeUpdate.call(state)// isMounted为true,执行更新。patch函数的第一个参数,为组件上次渲染的子树// 意思是,使用新的子树与上次渲染的子树进行打补丁操作patch(instance.subTree, subTree, container, anchor);// 设置调用 updated 钩子updated && updated.call(state)
} // 更新组件实例子树 instance.subTree = subTree; }, { //指定副作用函数的调度器为 queueJob scheduler: queueJob }) }
// resolveProps 函数用于解析组件的 props 和 attrs数据 function resolveProps(options, propsData){ const props = {}; const attrs = {}; // 遍历pros 数据 for(const key in propsData){ if(key in options){ // 如果为组件传递的 props[key] = propsData[key]; }else{ // 将没有定义在props选项中的props数据,添加到attrs对象中 attrs[key] = propsData[key]; } } // 返回 props 和attrs return [props, attrs]; }
setup函数的简版实现- setupContext是一个对象- 通过检测setup返回值类型决定应该如何处理返回值。- 渲染上下文renderContext应该正确的处理setupState。<a name="EDUxX"></a>### 12.6 组件事件与emit实现emit用来发送组件的自定义事件```javascriptconst MyComponent = {name:"MyComponent",setup(props, {emit}){//定义change事件emit("change", 1,23)return ()=>{return //...}}}
使用组件时,可以监听有emit函数定义的自定义事件。<MyComponent @change="handler" />
对应的虚拟DOM:
const CompVnode = {type: MyComponent,props: {onChange: handler}}
emit发射自定义事件的本质,根据事件名称去props数据对象去寻找对应的数据处理函数
function mountComponent(vnode, container, anchor){// ...const instance = {// 组件自身状态数据 datastate,// 一个布尔值, 用来表示组件是否已经被挂载isMounted: false,// 组件所渲染的内容, subTreesubTree: null,//将解析出的props数据用 shallowReactive 包裹,并定义到组件实例props: shallowReactive(props),}// 定义emit 函数,它接收2个参数:event事件名称,payload传递给事件处理函数的参数function emit(event, ...payload){// 根据约定对事件名称添加on前缀,并将第一个字母大写const eventName = `on${event[0].toUpperCase() + event.slice(1)}`// 根据处理后的事件名称 去props中寻找 对应的事件处理函数const handler = instance.props[eventName];if(handler){// 调用事件处理函数并传递参数handler(...payload);}else{console.error(`事件不存在`)}}// 将emit 函数添加到setupContext中const setupContext = {attrs, emit}}
- emit函数被调用是,根据约定对事件名称转换
前面resolveProps定义过没有显示声明为props的属性,都会存储到attrs中,事件类型的props都不会出现在props中,导致无法根据事件名称在instance.props中找到对应事件处理函数。所以要调整resolveProps函数
function resolveProps(options, propsData){const props = {}const attrs = {}for(const key in propsData){// 以字符串on开头的props,无论是否显示声明,都会添加到props数据中if(key in options || key.startsWith('on')){props[key] = propsData[key]} else{attrs[key] = propsData[key]}}return [props, attrs]}
检查propsData的key值,是否以字符串 on 开头,如果是,则认为该属性是组件的自定义事件。即使没有显示的声明为props,也可以将它添加到最终的props数据对象中。
12.7插槽的工作原理与实现
slot插槽,是组件会预留一个位置,让用户调用组件时,可以自由传入内容。
<template><header><slot name="header"></header><div><slot name='body'></slot></div><footer><slot name="footer" /></footer></template>
调用组件时,可以根据插槽的名称,传入自定义的内容
<MyComponent><template #header><h1>这里是 header 的插槽slot</h1></template><template #body><div>这里是 body 的插槽slot</div></template><template #footer><p>这里是 footer 的插槽slot</p></template></MyComponent>
将上面MyComponent组件的模版编译成渲染函数
function render(){return {type: MyComponent,children: {header(){return { type: "h1", children: "这里是 header 的插槽slot"}},body(){return { type: "div", children: "这里是 body 的插槽slot"}},footer(){return { type: "p", children: "这里是 footer 的插槽slot"}},}}}
组件模板中的插槽内容被编译为插槽函数,插槽函数的返回值就是具体的插槽内容。
而此时子组件 MyComponent 的模板会被编译为如下函数//MyComponent 组件模板的编译结果function render(){return [{type: "header", children: [this.$slots.header()] },{type: "body", children: [this.$slots.body()] },{type: "footer", children: [this.$slots.footer()] }]}
渲染插槽内容的过程,就是调用插槽函数并渲染由其返回的内容的过程。
运行时,插槽则依赖于setupContext中的slots对象。function mountComponent(vnode, container, anchor){const slots = vnode.children || {};const instance = {state,props: shallowReactive(props),isMounted: false,subTree: null,slots}// ...const renderContext = new Proxy(instance, {get(t, k, r){const {state, props, slots} = t;// 当k为$slots时,直接返回组件实例上的slotsif(k === "$slots") return slots;//...},set(t,k,v,r){}})}
对渲染上下文对象renderContext代理对象的get拦截函数做特殊处理,当读取的键是$slots时,直接返回组件实例上的slots对象,用户可以通过this.$slots来访问插槽内容。
12.8注册生命周期
在vue3中,组合式API是用来注册生命周期钩子函数的,生命周期钩子函数定义在setup中
import {onMounted} from 'vue'const MyComponent = {setup(){onMounted(()=>{console.log('mounted 1')})}}
多个组件都存在生命周期钩子函数的调用,怎么能确定当前组件实例只触发自己身上定义的钩子函数。这需要定义一个变量currnetInstance,用它来存储当前组件实例,当组件初始化并执行setup函数之前,先将currentInstance设置为当前组件实例。
let currentInstance = null;function setCurrentInstance(instance){currentInstance = instance;}
由于生命周期钩子函数在setup中可以重复定义多个,需要在mountComponent函数中给生命周期钩子函数定义成数组类型。
function mountComponent(vnode, container, anchor){const instance = {state,props: shallowReactive(props),isMounted: false,subTree: null,slots,mounted:[]}const setupContext = {attrs, emit, slots}setCurrentInstance(instance);const setupResult = setup(shallowReadonly(instance.props), setupContext)setCurrentInstance(null);}
为了存储onMounted函数注册生命周期,需要在组件实例对象上添加instance.mounted数组。
onMounted函数本身实现function onMounted(fn){if(currentInstance){currentInstance.mounted.push(fn)}else{console.error('onMounted只能在setup中定义')}}
没有在setup中调用onMounted函数是错误的用法。
最后在合适的时机调用instance.mounted数组中的生命周期function mountComponent(vnode, container, anchor){// ...effect(()=>{const subTree = render.call(renderContext,rendeContext);if(!instance.isMounted){instance.mounted && instance.mounted.forEach(hook => hook.call(renderContext))}else{//...}instance.subTree = subTree;}, {scheduler: queueJob})}
在合适的时机遍历 instance.mounted 数组,并逐个执行该数组内的生命周期函数。
13异步组件与函数式组件
异步组件
前端经常性的发送网络请求获取数据,改过程就是异步获取数据的过程。所以定义组件时,要能够支持异步,组件支持异步获取数据,并异步渲染组件。
使用import()语法异步加载组件:<template><CompA /><component :is="asyncComp"></template><script>import {shallowRef} from "vue";import CompA from "CompA.vue";export default{components: {CompA},setup(){const asyncComp = shallowRef(null);// 异步加载组件import("CompB.vue").then(CompB => asyncComp.value = CompB );return { asyncComp }}}</script>
这样简单实现了异步加载和渲染组件。
但是异步加载组件还需要处理比较多的特殊情况:如果组件加载失败或超时,是否需要渲染error组件
- 组件加载过程中,需要渲染loading组件
- 组件加载失败后,是否重新加载
异步组件原理
vue内部封装的defineAsyncComponent函数
在定义组件时,可以直接使用defineAsyncComponent加载函数;
<script>export default{components: {AsyncComp : defineAsyncComponent(()=>import("./compA"))}}</script>
使用defineAsyncComponent函数定义异步组件,简单方便,而且可以设置超时、error、loading、重试等机制。
function defineAsyncComponent(loader){let innerComp = null; // 定义变量,用来存储异步加载的组件return {name: "AsyncComponentWrapper",setup(){const loaded = ref(false); //异步组件是否加载成功loader().then(c=>{innerComp = c;loaded.value = true;})return ()=>{return loaded.value ? {type: innerComp} : {type: Text, children: "loading"}}}}}
- defineAsyncComponent函数本质时一个高阶组件,返回值时一个包装组件
- 包装组件会根据加载器的状态来决定渲染什么内容
通常占位内容是一个注释节点,组件没成功加载时,页面渲染一个注释节点。
超时与error组件
异步加载组件时,如果网络状态不好,可能造成长时间加载,如果时间过长,可以设置超时错误提醒。
<script>export default{components: {AsyncComp : defineAsyncComponent({loader: ()=>import("./compA"),timeout: 2000, //超时时长errorComponent: ErrorComp //显示的错误组件})}}</script>
定义好用户接口,可以具体实现。
function defineAsyncComponent(options){if(typeof options === "function"){ //options可以是配置项,也可以是加载器options = {loader: options}}const {loader} = options;let innerComp = null; // 定义变量,用来存储异步加载的组件return {name: "AsyncComponentWrapper",setup(){const loaded = ref(false); //异步组件是否加载成功// 定义变量,判断是否超时// const timeout = ref(false);// 定义error,当错误发生时,用来存储错误对象let error = shallowRef(null);loader().then(c=>{innerComp = c;loaded.value = true;}).catch(err = > error.value = err);let timer = null;if(options.timeout){timer = setTimeout(()=>{//timeout.value = true//超时后,创建一个错误对象,并赋值给error.valueconst err = new Error(`Async component timed out after ${options.timeout}ms`);error.value = err;}, options.timeout)}onUnmounted(()=> clearTimeout(timer));const placeholder = {type: Text, children: "..."}return ()=>{if(loaded.value){return {type: innerComp}} else if(error.value && options.errorComponent){return {type: options.errorComponent, props: {error: error.value}}}else{return placeholder;}}}}}
组件渲染是,只有error.value的值存在,且用户配置了 errorComponent 组件,就渲染errorComponent组件并将error.value的值作为该组件的proos传递。
延时与loading组件
异步组件加载受网络影响较大,加载过程可能很慢,在等待的过程中可以设置loading状态组件。这样有更好的用户体验,不会让用户觉得是卡死状态。
显示loading组件需要在合适的时机,如果时间很短就能显示出组件内容,这时还渲染loading就会出现闪烁,需要设置一个超过多长时间,才显示loading组件。避免闪烁问题
<script>export default{components: {AsyncComp : defineAsyncComponent({loader: ()=> import("./compA"),delay: 200, // 延迟200ms,如果还没加载出组件,则显示loading组件loadingComponent: { // 定义loading组件setup(){return ()=>{ return { type:"h2", children: "Loading..."}}}},timeout: 2000, //超时时长errorComponent: ErrorComp //显示的错误组件})}}</script>
delay: 设置延时展示loading组件的时长,超过该时间才显示loading
- loadingComponent: 用于配置显示的loading组件
在defineAsyncComponent函数中进行实现
function defineAsyncComponent(options){if(typeof options === "function"){ //options可以是配置项,也可以是加载器options = {loader: options}}const {loader} = options;let innerComp = null; // 定义变量,用来存储异步加载的组件return {name: "AsyncComponentWrapper",setup(){const loaded = ref(false); //异步组件是否加载成功// 定义变量,判断是否超时// const timeout = ref(false);// 定义error,当错误发生时,用来存储错误对象let error = shallowRef(null);// 一个标志,代表是否正在加载,默认为falselet loading = ref(false);let loadingTimer = null;// 如果delay存在,则开启定时器,当延迟时长超过loading.value设置为trueif(options.delay){loadingTimer = setTimeout(()=>{loading.value = true}, options.delay);}else{// 如果配置项没有delay,则直接标记为 loadingloading.value =true;}loader().then(c=>{innerComp = c;loaded.value = true;}).catch(err = > error.value = err).finally(()=>{loading.value = false;// 无论成功与否,最后都要清除延迟定时器clearTimeout(loadingTimer);});let timer = null;if(options.timeout){timer = setTimeout(()=>{//timeout.value = true//超时后,创建一个错误对象,并赋值给error.valueconst err = new Error(`Async component timed out after ${options.timeout}ms`);error.value = err;}, options.timeout)}onUnmounted(()=> clearTimeout(timer));const placeholder = {type: Text, children: "..."}return ()=>{if(loaded.value){return {type: innerComp}} else if(error.value && options.errorComponent){return {type: options.errorComponent, props: {error: error.value}}} else if(loading.value && options.loadingComponent){ // 渲染loading组件return {type: options.loadingComponent }} else{return placeholder;}}}}}
- 使用loading变量,判断是否正在加载
- 如果用户定义了延迟时间,则开启延迟定时器,再将loading.value设为true
- 无论异步组件加载成功与否,都清除loading的延迟定时器
- 在渲染函数中,如果组件正在加载,渲染用户定义的loading组件。
重试机制
重试是指当组件加载出错,重新发送加载组件的请求。异步组件加载失败后重试机制,与请求服务端接口失败后重试机制一样。
模拟接口重试请求: ```javascript function fetch(){ return new Promise((resolve, reject) =>{ setTimeout(()=>{ reject(“error …”) }, 1000) }) }
function load(onError){ // 请求接口,得到Promise实例 const p = fetch(); // 捕获错误 return p.catch(err => { return new Promise((resolve, reject)=>{ // retry函数,执行重试。重新调用load函数并发送请求 const retry = () => resolve(load(onError)) const fail = () => reject(err) onError(retry, fail) }) }) }
通过给onError传递retry和fail参数,这样用户就可以在错误发生时,主动选择重试或抛出错误。```javascriptload((retry) => { retry() }).then(res => { console.log(res) } );
基于接口请求失败的重试机制,来实现组件异步加载失败的重试
function defineAsyncComponent(options){if(typeof options === "function"){ //options可以是配置项,也可以是加载器options = {loader: options}}const {loader} = options;let innerComp = null; // 定义变量,用来存储异步加载的组件//记录重试次数let retries = 0;//封装load函数 用来加载异步组件function load(){return loader().catch(err=>{// 如果用户知道onError回调,则将控制权交给用户if(options.onError){return new Promise((resolve, reject) => {// 重试const retry = ()=>{resolve(load());retries++}const fail = ()=> reject(err);options.onError(retry, fail, retries)})}else{throw err}})}return {name: "AsyncComponentWrapper",setup(){const loaded = ref(false); //异步组件是否加载成功// 定义变量,判断是否超时// const timeout = ref(false);// 定义error,当错误发生时,用来存储错误对象let error = shallowRef(null);// 一个标志,代表是否正在加载,默认为falselet loading = ref(false);let loadingTimer = null;// 如果delay存在,则开启定时器,当延迟时长超过loading.value设置为trueif(options.delay){loadingTimer = setTimeout(()=>{loading.value = true}, options.delay);}else{// 如果配置项没有delay,则直接标记为 loadingloading.value =true;}loader().then(c=>{innerComp = c;loaded.value = true;}).catch(err = > error.value = err).finally(()=>{loading.value = false;// 无论成功与否,最后都要清除延迟定时器clearTimeout(loadingTimer);});let timer = null;if(options.timeout){timer = setTimeout(()=>{//timeout.value = true//超时后,创建一个错误对象,并赋值给error.valueconst err = new Error(`Async component timed out after ${options.timeout}ms`);error.value = err;}, options.timeout)}onUnmounted(()=> clearTimeout(timer));const placeholder = {type: Text, children: "..."}return ()=>{if(loaded.value){return {type: innerComp}} else if(error.value && options.errorComponent){return {type: options.errorComponent, props: {error: error.value}}} else if(loading.value && options.loadingComponent){ // 渲染loading组件return {type: options.loadingComponent }} else{return placeholder;}}}}}
函数式组件
函数式组建的本质是一个普通函数,该函数返回值是虚拟DOM。
函数组件使用:
function MyFunComp(props){return { type: "h1", children: props.title }}// 定义propsMyFunComp.props = { title: String}
调整patch函数支持vnode.type的类型为function函数类型。
function patch(n1, n2, container, anchor){if(n1.type !== n2.type){unmount(n1);n1 = null;}cosnt {type} = n2;if(typeof type==="string"){}else if(type === Text){}else if(type === Fragment){}else if(typeof type === "object" || typeof type === "function"){if(!n1){mountComponent(n2, container, anchor);}else {patchComponent(n1, n2, anchor);}}}
patch函数内部,检测vnode.type 的类型来判断组件的类型
- 如果vnode.type 是一个对象,则它是一个有状态的组件,vnode.type是组件选项对象
- 如果vnode.type是一个函数,则它是函数式组件
mountComponent 完成函数挂载,patchComponent完成函数更新;
修改 mountComponent 函数,让它支持挂载函数式组件
function mountComponent(vnode, container, anchor){const isFunctional = typeof vnode.type === 'function'let componentOptions = vnode.type;if(isFunctional){componentOptions = {render: vnode.type,props: vnode.type.props}}}
实现对函数式组件的兼容。修改 mountComponent 函数内检查组件的类型。如果是函数式组件,则直接将组件函数作为组件选项对象的 render 选项, 并将组件函数的静态props属性作为组件的props选项。
14内建组件和模块
vue框架中的3个重要的内建组件和模块,KeepAlive组件、Teleport组件、Transition组件。
1KeepAlive组件的实现原理
1组件的激活与失活
KeepAlive借鉴于HTTP协议,在HTTP协议中,KeepAlive为持久连接,允许多个请求或响应共用一个TCP连接,可以减少HTTP重复销毁和创建代理的性能消耗。
vue内建KeepAlive组件可以避免组件被频繁的销毁和创建。比如
<template><Tab v-if="currentTab === 1"> </Tab><Tab v-if="currentTab === 2"> </Tab><Tab v-if="currentTab === 3"> </Tab></template>
根据变量currentTab的不同,渲染不同的 Tab 组件。当用户频繁的切换Tab时,会导致不同的卸载并重新挂载对应的Tab组件。为了避免性能开销浪费,可以使用KeepAlive组件来解决这个问题。
<template><KeepAlive><Tab v-if="currentTab === 1"> </Tab><Tab v-if="currentTab === 2"> </Tab><Tab v-if="currentTab === 3"> </Tab></KeepAlive></template>
KeepAlive 的实现原理是 缓存策略,再加上特殊的挂载和卸载逻辑。
KeepAlive 组件在卸载时,不能将其真正卸载,否则再次就要重新挂载,而是把组件放到一个隐藏容器中,实现假卸载。当被挂载时,也不是执行真正的挂载逻辑,而是把隐藏容器中的组件显示出来。
const KeepAlive = {__isKeepAlive: true,setup(props, {slots}){// 创建缓存对象const cache = new Map();const instance = currentInstance// KeepAlive组件实例上存在特殊的 keepAliveCtx对象,该对象由渲染器注入// move函数,将一段DOM移动到另一个容器中const {move, createElement} = instance.keepAliveCtx;// 创建隐藏容器const storageContainer = createElement("div");//KeepAlive组件实例上被添加的两个内部函数 _deActivate 和 _activateinstance._deActivate = (vnode) => {move(vnode, storageContainer)}instance._activate = (vnode, container, anchor) => {move(vnode, container, anchor)}return ()=>{// KeepAlive 的默认插槽就是被 KeepAlive 的组件let rawNode = slots.default();if(typeof rawNode.type !== "object"){return rawNode;}//在挂载时,先获取缓存的组件 vnodeconst cachedVnode = cache.get(rawNode.type)if(cachedVnode){// 如果有缓存,直接使用缓存内容rawNode.component = cachedVnode.component;rawNode.keptAlive = true;}else{// 没有缓存,则将其添加到缓存中cache.set(rawNode.type, rawNode);}// 将shouldKeepAlive标记为true,避免渲染器真的将组件卸载。rawNode.shouldKeepAlive = true;// 将 keepAlive组件的实例添加到vnode上,可以在渲染器中访问rawNode.keepAliveInstance = instance;return rawNode;}}}
- shouldKeepAlive:该属性被添加到内部组件的vnode对象上,当渲染器卸载内部组件时,可以检查该属性得知内部组件需要被KeepAlive,于是组件不会真的被卸载,而是调用 _deActivate 函数完成隐藏操作
- keepAliveInstance: 在unmount函数中,通过 keepAliveInstance 来访问 _deActivate 函数。
keptAlive: 如果组件已经被缓存,会添加一个keptAlive标记。当再次渲染时,渲染器不会重新挂载,而是将其激活。
// 添加 vnode.shouldKeepAlive的判断,标识该组件是否应该被keepAlivefunction unmount(vnode){if(vnode.type === Fragment){vnode.children.forEach(c => unmount(c))}else if(typeof vnode.type === "object"){if(vnode.sholdKeepAlive){// 如果有sholdKeepAlive属性,不是直接卸载它,而是调用 _deActivate方法vnode.keepAliveInstance._deActivate(vnode);}else{unmount(vnode.component.subTree)}return}const parent = vnode.el.parentNode;if(parent){parent.removeChild(vnode.el)}}
// 如果组件的keptAlive为真,则渲染器不会重新挂载它,而是会通过 keepAliveInstance._activate函数激活它function patch(n1, n2, container, anchor){if(n1 && n1.type !== n2.type){unmount(n1);n1 = null;}const {type} = n2;if(typeof type==="string"){}else if(type === Text){}else if(type === Fragment){}else if(typeof type === "object" || typeof type === "function"){if(!n1){// 如果组件已经被keepAlive,则不会重新挂载它,而是调用_activate函数激活if(n2.keptAlive){n2.keepAliveInstance._activate(n2, container, anchor);} else{mountComponent(n2, container, anchor);}}else {patchComponent(n1, n2, anchor);}}}
用于激活 _activate 和失活 _deActivate 组件的两个函数:
const {move, createElement} = instance.keepAliveCtx;instance._deActivate = (vnode) => {move(vnode, storageContainer);}instance._activate = (vnode, container, anchor)=>{move(vnode, container, anchor);}
move函数是由渲染器注入,调整mountComponent函数实现move。
function mountComponent(vnode, container, anchor){const instance = {state,props: shallowReactive(props),isMounted: false,subTree: null,slots,mounted: [],// 只有keepAlive组件的实例下会有 keepAliveCtx属性keepAliveCtx: null}// 检查当前挂载的组件是否时 keepAlive组件const isKeepAlive = vnode.type.__isKeepAliveif(isKeepAlive){// 在 keepAlive 组件实例上添加 keepAliveCtx 对象instance.keepAliveCtx = {// move 函数来移动一段vnodemove(vnode, container, anchor){// 本质上是将组件渲染内容移动到指定容器内。insert(vnode.component.subTree.el, container, anchor)},createElement}}}
2 include 和exclude
默认情况下,keepAlive会对所有的包含在内的组件进行缓存,但是有时用户期望只缓存特定的几个组件,这时就需要能够自定义缓存规则,让KeepAlive组件支持两个props,分别为include和exclude。
include 显示配置应该被缓存的组件
- exclude 显示的配置不应该被缓存的组件
KeepAlive组件的props定义如下:
const KeepAlive = {__isKeepAlive: true,props: {include: RegExp,exclude: RegExp},setup(props, {slots}){}}
在keepAlive组件被挂载时,会根据内部组件的名称进行匹配。根据include和exclude的正则,对内部组件的名称进行匹配,来判断是否需要进行缓存。
const cache = new Map();const KeepAlive = {__isKeepAlive: true,props: {include: RegExp,exclude: RegExp},setup(props, {slots}){return ()=>{let rawVnode = slots.default();if(typeof rawVnode.type !== 'object'){return rawVnode}// 获取内部组件的 nameconst name = rawVnode.type.name;// 对name进行匹配if(name && (// 如果name 无法匹配 include(props.include && !props.include.test(name)) ||// name被exclude匹配(props.exclude && props.exclude.test(name)))){// 直接渲染内部组件,不进行缓存return rawVnode}}}}
3 缓存管理
使用Map对象进行缓存管理,该Map对象的键是组件选项对象,即vnode.type属性的值;Map对象的值时用于描述组件的vnode对象。
缓存的处理逻辑:
- 如果缓存存在,则继承组件实例,并将用于描述组件的vnode对象标记为keptAlive,这样渲染器就不会重新创建新的组件实例;
如果缓存不存在,则设置缓存
// 使用 组件选项对象 rawVnode.type 作为键去缓存中查找const cachedVnode = cache.get(rawVnode.type)if(cachedVnode){rawVnode.component = cachedVnode.componentrawVnode.keptAlive = true;}else{cache.set(rawVnode.type, rawVnode)}
这样会导致缓存不断增加,极端情况下会占有大量内存。为了解决这个问题,必须设置缓存阈值,超过了设置就对缓存进行删除,可以对缓存设置max属性。
<KeepAlive :max="2"><component :is="dynamicComp"></KeepAlive>
当缓存组件超过2个后,会对之前的组件进行删除处理,并缓存最新一次的组件。
vue提供用户实现自定义的缓存测量,在用户接口层面,体现在keepAlive组件新增了 cache 接口,允许用户指定缓存实例:<KeepAlive :cache="cache"><Comp /></KeepAlive>
缓存实例需要满足固定的格式,一个基本的缓存实例的实现:
const _cache = new Map();const cache: KeepAliveCache = {get(key){_cache.get(key)},set(key, value){_cache.set(key, value)},delete(key){_cache.delete(key)},forEach(fn){_cache.forEach(fn)}}
在KeepAlive组件的内部实现中,如果用户提供了自定义的缓存实例,则直接使用该缓存实例来管理缓存。
2Teleport组件的实现原理
Teleport组件是vue3新增的内建组件。主要解决将虚拟DOM渲染为真实DOM时,最终渲染出来的真实DOM的层级结构与虚拟DOM的层级结构一致。这样在某些情况下会导致错误,
<template><div id="box" style="z-index: -1;"><Overlay /></div></template>
Overlay组件作为蒙层组件,该组件需要设置z-index的层级最高,可以遮挡住其它元素,但是上层id为box的组件设置了z-index: -1,这就导致即使设置Overlay组件的层级无穷大,也无法实现遮挡。
为了解决这个问题,vue3内建 Teleport 组件,传送门组件,可以将指定内容渲染到特定容器中,而不受DOM层级的限制。<template><Teleport to="body"><div class="overlay"></div></Teleport></template><style scoped>.overlay{z-index: 9999;}</style>
Teleport 组件执行渲染目标为body,to属性的值,该组件会直接把它的插槽内容渲染到body下,而不会按照模版的DOM层级来渲染。
实现Teleport组件
Teleport 组件需要渲染器底层支持,将Teleport组件的渲染逻辑从渲染器中分离出来。
function patch(n1, n2, container, anchor){//...if(typeof type ==="object" && type.__isTeleport){// 组件选项中如果存在 __isTeleport 标识,则是 Teleport组件// 调用Teleport 组件选项中的 process函数,将控制权交接出去type.process(n1, n2, container, anchor){patch,patchChildren,unmount,move(vnode, container, anchor){insert(vnode.component ? vnode.component.subTree.el : vnode.el, container, anchor)}}}}
Teleport组件的定义:组件有两个特殊属性 __isTeleport 和 process;
const Teleport = {__isTeleport: true,process(n1, n2, container, anchor){// 通过 internals 参数,获取渲染器的内部方法const {patch} = internals;if(!n1){const target = typeof n2.props.to === "string" ?document.querySelector(n2.props.to): n2.props.to// 将n2.children 渲染到指定的挂载点n2.children.forEach(c => patch(null, c, target, anchor))}}}
通过判断n1是否存在,来决定是挂载还是执行更新,如果执行挂载,则需要根据 props.to 属性的值来取得真正的挂载点,最后遍历 Teleport 组件的children属性,并逐一调用 patch 函数完成子节点的挂载。
const Teleport = {__isTeleport: true,process(n1, n2, container, anchor){// 通过 internals 参数,获取渲染器的内部方法const {patch} = internals;if(!n1){const target = typeof n2.props.to === "string" ?document.querySelector(n2.props.to): n2.props.to// 将n2.children 渲染到指定的挂载点n2.children.forEach(c => patch(null, c, target, anchor))} else{ //处理更新patchChildren(n1, n2, container);if(n2.props.to !== n1.props.to){const newTarget = typeof n2.props.to === "string"? document.querySelector(n2.props.to) : n2.props.to;n2.children.forEach(c => move(c, newTarget))}}}}
调整 patch 中move函数的实现
function patch(n1, n2, container, anchor){//...if(typeof type ==="object" && type.__isTeleport){// 组件选项中如果存在 __isTeleport 标识,则是 Teleport组件// 调用Teleport 组件选项中的 process函数,将控制权交接出去type.process(n1, n2, container, anchor){patch,patchChildren,unmount,move(vnode, container, anchor){insert(vnode.component ? vnode.component.subTree.el : vnode.el, container, anchor)}}}}
3Transtion组件的实现原理
Transtion组件的核心原理:
当DOM被挂载时,将动效附加到该DOM元素上
当DOM元素被卸载,不要立即卸载DOM元素,等到附加到该DOM元素上的动效执行完后在卸载它
原生DOM的过渡效果
将 class 为box的元素,从x轴的200px移动到0;
<!-- <div class="box"> </div> --><style>.box{width:100px;height: 100px;background-color: red;}.enter-from {transform: translateX(200px);}.enter-to {transform: translateX(0px);}.enter-active {transition: transform 1s ease-in-out;}</style><script>// 创建 dom元素const el = document.createElement("div");el.classList.add("box");// 在dom元素被添加到页面之前,将初始状态和运动过程定义到元素上el.classList.add("enter-from");el.classList.add("enter-active");// 将元素添加到页面document.body.appendChild(el);</script>
创建dom元素
- 设置初始状态和运动过程定义到元素上
- 将元素添加到页面
经过三步,元素的初始状态就会生效。接下来添加切换元素时的处理。
入场动效过渡实现
// 创建 dom元素const el = document.createElement("div");el.classList.add("box");// 在dom元素被添加到页面之前,将初始状态和运动过程定义到元素上el.classList.add("enter-from");el.classList.add("enter-active");// 将元素添加到页面document.body.appendChild(el);// 切换元素的状态el.classList.remove("enter-from");el.classList.add("enter-to")
这样设置后,动画并不生效,原因是浏览器会在当前帧绘制DOM元素,最终结果是浏览器直接将enter-to这个类的样式绘制出来。为了解决这个问题,需要在下一帧执行状态切换
// 创建 dom元素const el = document.createElement("div");el.classList.add("box");// 在dom元素被添加到页面之前,将初始状态和运动过程定义到元素上el.classList.add("enter-from");el.classList.add("enter-active");// 将元素添加到页面document.body.appendChild(el);// 在下一帧, 切换元素的状态. requestAnimationFrame会在当前帧执行,所以要嵌套一层requestAnimationFrame(()=>{requestAnimationFrame(()=>{el.classList.remove("enter-from");el.classList.add("enter-to")})})
最后当过渡完成,将enter-to和enter-active这两个类从DOM元素上移除。
// 创建 dom元素const el = document.createElement("div");el.classList.add("box");// 在dom元素被添加到页面之前,将初始状态和运动过程定义到元素上el.classList.add("enter-from");el.classList.add("enter-active");// 将元素添加到页面document.body.appendChild(el);// 在下一帧, 切换元素的状态. requestAnimationFrame会在当前帧执行,所以要嵌套一层requestAnimationFrame(()=>{requestAnimationFrame(()=>{el.classList.remove("enter-from");el.classList.add("enter-to")// 监听 transitionend 事件 完成收尾工作el.addEventListener("transitionend", ()=>{el.classList.remove("enter-to");el.classList.remove("enter-active");})})})
进场过渡的过程,分为三步:
- beforeEnter节点:添加 enter-from和enter-active类
- enter阶段: 在下一帧 移除 enter-from 类,添加enter-to
-
离场过渡的实现
.leave-from {transform: translateX(200px);}.leave-to {transform: translateX(0px);}.leave-active {transition: transform 1s ease-in-out;}
离场动效发生在DOM元素被卸载的时候
el.addEventListener("click", ()=>{el.parentNode.removeChild(el);})
当点击元素时,元素会被立即移除,根本没有执行过渡的机会。需要在元素被卸载时,不要将其立即卸载,而是等到过渡效果结束后在卸载。将卸载DOm元素的代码封装到函数中,该函数等待过渡结束后才被调用。
el.addEventListener("click", ()=>{const performRemove = ()=> el.parentNode.removeChild(el);//设置初始状态el.classList.add("leave-from");el.classList.add("leave-active");// 强制reflow 使初始状态生效document.body.offsetHeight;// 在下一帧, 切换元素的状态. requestAnimationFrame会在当前帧执行,所以要嵌套一层requestAnimationFrame(()=>{requestAnimationFrame(()=>{//切换到结束状态el.classList.remove('leave-from');el.classList.add('leave-to');el.addEventListener("transitionend", ()=>{el.classList.remove("leave-to");el.classList.remove("leave-active");// 当过渡完成,调用 performRemove 函数,将DOM移除performRemove();})})})})
在vue中实现Transition组件
vue中是基于虚拟DOM节点实现过渡。可以将整个过渡过程抽象为几个阶段,如:beforeEnter、enter、leave;
为了实现Transition组件,先模拟在DOM中的表现形式<template><Transition> <div> 过渡元素 </div> </Transition></template>
将该模版编译为虚拟DOM后:
function render(){return {type: Transition,children: {default(){return {type: "div", children: "过渡元素"}}}}}
Transition组件的子节点,被编译为默认插槽,这与普通的组件行为一致。
接下来实现Transition组件:const Transition = {name : "Transition",setup(props, {slots}){return ()=>{const innerVnode = slots.default();innerVnode.transition = {beforeEnter(el){el.classList.add("enter-from");el.classList.add("enter-active");},enter(el){// 在下一帧 切换状态nextFrame(()=>{el.classList.remove("enter-from");el.classList.add("enter-to");el.addEventListener("transitionend", ()=>{el.classList.remove("enter-to");el.classList.remove("enter-active");})})},leave(el, performRemove){el.classList.add("leave-from");el.classList.add("leave-active");// 强制reflow 使初始状态生效document.body.offsetHeight;nextFrame(()=>{el.classList.remove("leave-from");el.classList.add("leave-to");el.addEventListener("transitionend", ()=>{el.classList.remove("leave-to");el.classList.remove("leave-acitve");performRemove()})})}}return innerVnode;}}}
需要调整mountElement函数和unmount函数,对Transition组件的支持。
function mountElement(vnode, container, anchor){const el = vnode.el = createElement(vnode.type);if(typeof vnode.children === "string"){setElementText(el, vnode.children)}else if(Array.isArray(vnode.children)){vnode.children.forEach(child=>{patch(null, child, el)})}if(vnode.props){for(cosnt key in vnode.props){patchProps(el, key, null, vnode.props[key])}}// vnode是否需要过渡const needTransition = vnode.transition;if(needTransition){vnode.transition.beforeEnter(el);}insert(el, container, anchor);if(needTransition){// 调用 transition.enter 钩子,将DOM元素作为参数传递vnode.transition.enter(el);}}
function unmount(vnode){const needTransition = vnode.transition;if(vnode.type === Fragment){vnode.children.forEach(c => unmount(c))return} else if(typeof vnode.type === "object"){if(vnode.shouldKeepAlive){vnode.keepAliveInstance._deActivate(vnode);}else{unmount(vnode.component.subTree);}return}cosnt parent = vnode.el.parentNode;if(parent){const performRemove = ()=> parent.removeChild(vnode.el);if(needTransition){vnode.transition.leave(vnode.el, performRemove)}else{performRemove();}}}
15-17编译器
15编译器核心
1模板DSL【特定领域代码】的编译器
编译器是一段程序,将
语言A翻译成语言B,其中语言A为源代码(source code),语言B为目标代码(target Code)。编译的过程通常包括:词法分析、语法分析、语义分析、中间代码生成、优化、目标代码生成。parser -> transformer -> code generator
整个编译过程分为编译前端和编译后端。 编译前端包含词法分析、语法分析、语义分析;它与目标平台无关,仅负责分析源代码
- 编译后端,通常与目标平台相关,编译后端涉及中间代码生成和优化,以及目标代码生成。
vue的模板作为DSL,被编译为可以在浏览器中运行的js代码。
vue模版编译器的目标代码其实就是渲染函数;vue模板编译器首先会对模板进行词法分析和语法分析,得到AST语法树,然后将AST 转换 [transform]为 JavaScript AST ,最后根据 JavaScript AST 生成JavaScript代码。
AST
AST是 abstract syntax tree[抽象语法树]的首字母缩写。
把如下模板编译成 AST<div><h1 v-if="ok"> vue template</h1></div>
const ast = {type: "Root",children : [{type: "Element", tag: "div", children: [{ type: "Element", tag: "h1",props: [{ type: "Directive", name: "if",exp: {type: "Expression", content: "ok"}}]}]}]}
AST其实就是一个具有层次结构的对象,模板AST具有与模板同构的嵌套结构。每个AST都有一个逻辑上的根节点,类型为Root。模版中真正的根节点(div标签节点)则作为Root节点的children存在。
parse函数解析得到模版AST

parse函数接收字符串模板作为参数,将解析后得到的AST作为返回值返回。生成模版AST。
然后继续将模板AST转换为 JavaScript AST,因为vue模板编译器的最终目标是生成渲染函数,而渲染函数的本质是JavaScript 代码。封装 transform 函数来完成模版AST到JavaScript AST的转换。
const templateAST = parse(template);const jsAST = transform(templateAST);
封装generate函数来完成渲染函数
这一步也可以通过代码表达
const code = generate(jsAST);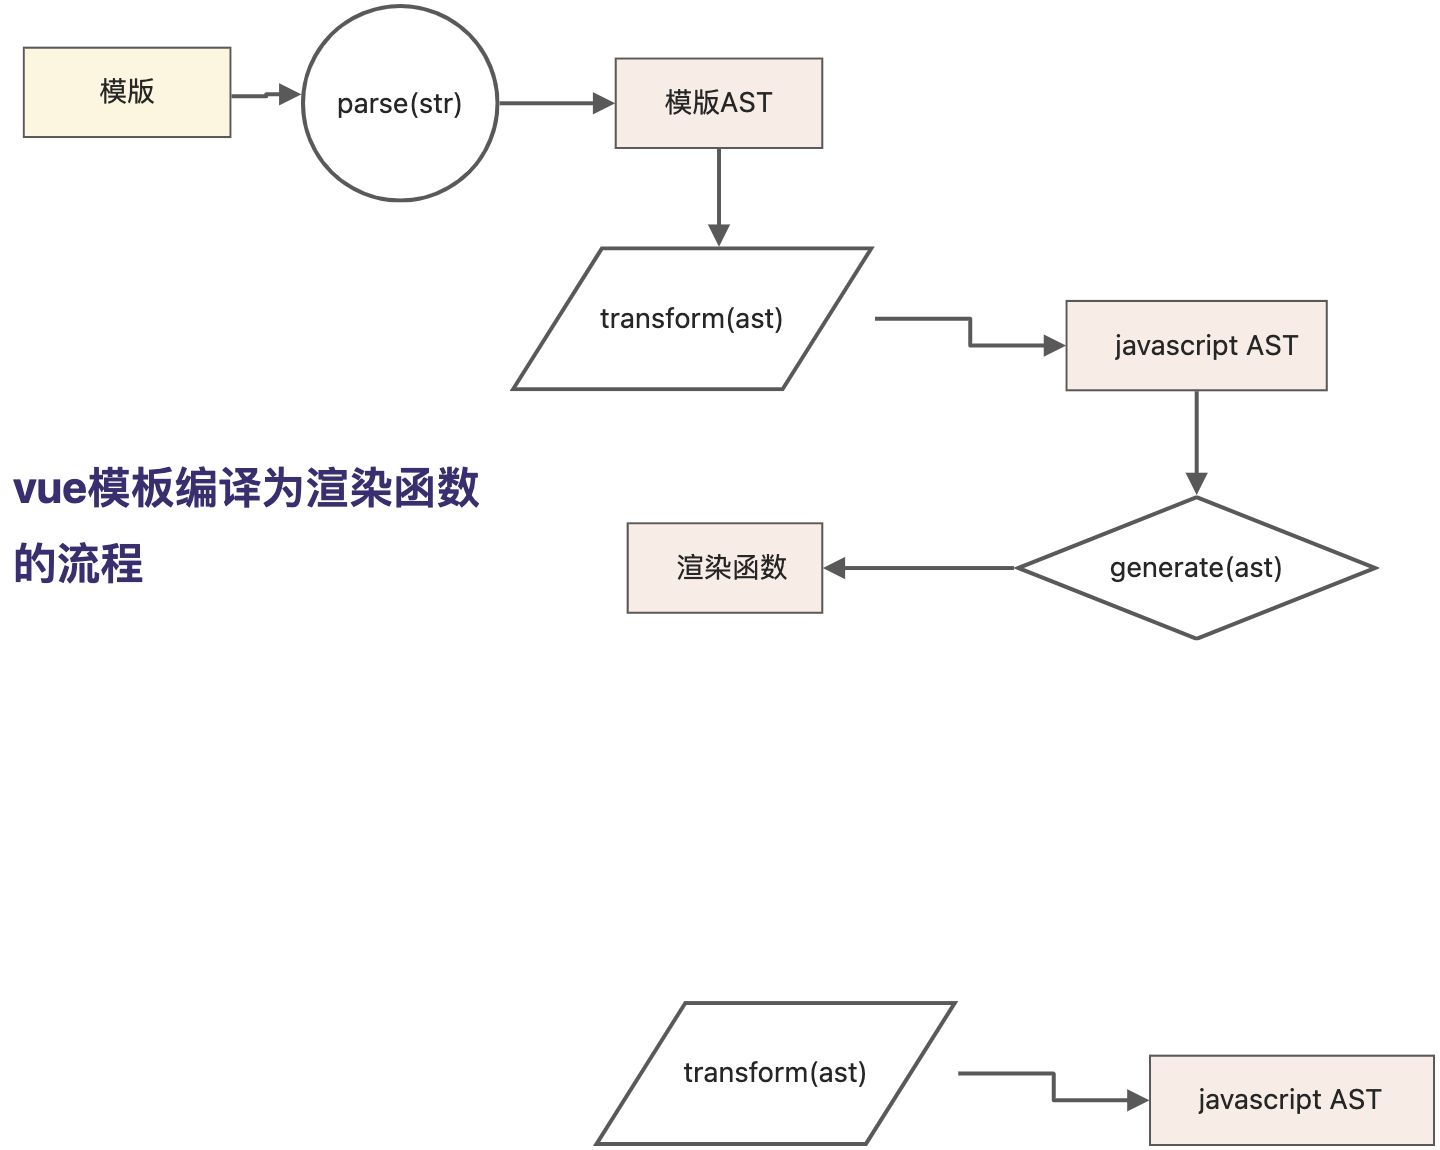
2parser的实现原理与状态机
vue模板编译器的基本结构和工作流程,主要分为三部分组件:
- parser: 将模板字符串解析为模板AST
- transformer: 将模板AST转为 JavaScript AST
- generator:根据 JavaScript AST 生成渲染函数的js代码
parser解析器的入参是字符串模板,解析器会逐个读取字符串模板中的字符,并根据一定的规则将整个字符串切割为Token。Token代表词法标记。
从图中可以看出:
- 在初始状态下,当遇到字符
<时,状态机 迁移到tag open state,即标签开始状态。 - 遇到除字符
<以外的字符,状态机迁移到 标签名称状态 - 遇到标签 / ,进入结束标签状态
- …
按照有限状态自动机的状态迁移过程,可以完成模板的标记化,最终生成一系列 Token。
const template = `<p>Vue</p>`// 定义状态机 状态const State = {initial: 1,tagOpen: 2,tagName: 3,text: 4,tagEnd: 5,tagEndName: 6}// 辅助函数 用来判断是否是字母function isAlpha(char) {return char >= 'a' && char <= 'z' || char >= 'A' && char <= 'Z'}// 接收模板字符串作为参数, 并将模板切割为 Token 返回function tokenize(str) {// 状态机的 当前状态let currentState = State.initial// 用于缓存字符const chars = []// 生成的Token会存储在Tokens数字中,并作为函数的返回值返回const tokens = []// 使用while循环开启自动机,只要str没有被解析完,自动机会一直运行while(str) {// 查看第一个字符const char = str[0]// 使用switch 匹配状态switch (currentState) {// 状态机当前处于初始状态case State.initial:// 遇到标签 <if (char === '<') {// 状态机切换到标签开始状态,从1-2的过程currentState = State.tagOpen// 消费掉字符 <str = str.slice(1)} else if (isAlpha(char)) {// 遇到字母,切换到文本状态currentState = State.text// 把字母缓存到chars 数组中chars.push(char)// 消费当前字符str = str.slice(1)}break// 状态机处于标签开始状态case State.tagOpen:if (isAlpha(char)) {// 遇到字母,切换到标签名称状态currentState = State.tagName// 把字母缓存到chars 数组中chars.push(char)str = str.slice(1)} else if (char === '/') {// 遇到字符 /,切换到结束状态currentState = State.tagEndstr = str.slice(1)}break// 状态机当前处于标签名称状态case State.tagName:if (isAlpha(char)) {chars.push(char)str = str.slice(1)} else if (char === '>') {currentState = State.initialtokens.push({type: 'tag',name: chars.join('')})chars.length = 0str = str.slice(1)}break// 状态机当前处于文本状态case State.text:if (isAlpha(char)) {chars.push(char)str = str.slice(1)} else if (char === '<') {currentState = State.tagOpentokens.push({type: 'text',content: chars.join('')})chars.length = 0str = str.slice(1)}break// 状态机当前处于标签结束状态case State.tagEnd:if (isAlpha(char)) {currentState = State.tagEndNamechars.push(char)str = str.slice(1)}break// 状态机当前处于结束标签名称状态case State.tagEndName:if (isAlpha(char)) {chars.push(char)str = str.slice(1)} else if (char === '>') {currentState = State.initialtokens.push({type: 'tagEnd',name: chars.join('')})chars.length = 0str = str.slice(1)}break}}// 最后返回tokensreturn tokens}console.log('tokens', tokenize(template))
代码还原了vue 解析器状态机变化的过程。通过有限状态机,能够将模板解析成token,进而可以用它们构建出AST 语法树,根据AST可以生成目标平台需要的对应代码(generator code);
3构造AST数据结构
定义 AST 数据结构,以便下一步编写一个方法,可以将tokens转换为AST。
假如有如下vue 模板: <div><p>Vue</p><p>Template</p></div>,一个根节点div标签,2个子节点p标签。每个p标签都有一个文本节点作为子节点。定义对应的AST结构:
const ast = {type: "Root",children : [{ type: "Element", tag: "div",children: [{type: "Element", tag: "p", children: [{type: "Text", content: "Vue"}]},{type: "Element", tag: "p", children: [{type: "Text", content: "Template"}]}]}]}

将模板 <div><p>Vue</p><p>Template</p></div>经过tokenize函数解析出tokens。
const tokens = tokenize("<div><p>Vue</p><p>Template</p></div>");// 生成tokenstokens = [{"type": "tag","name": "div"},{"type": "tag","name": "p"},{"type": "text","content": "Vue"},{"type": "tagEnd","name": "p"},{"type": "tag","name": "p"},{"type": "text","content": "Template"},{"type": "tagEnd","name": "p"},{"type": "tagEnd","name": "div"}]
Tokens列表转换为AST的过程,其实是对Token列表进行扫描的过程。按照顺序扫描整个Token列表,直到列表中所有Token处理完毕。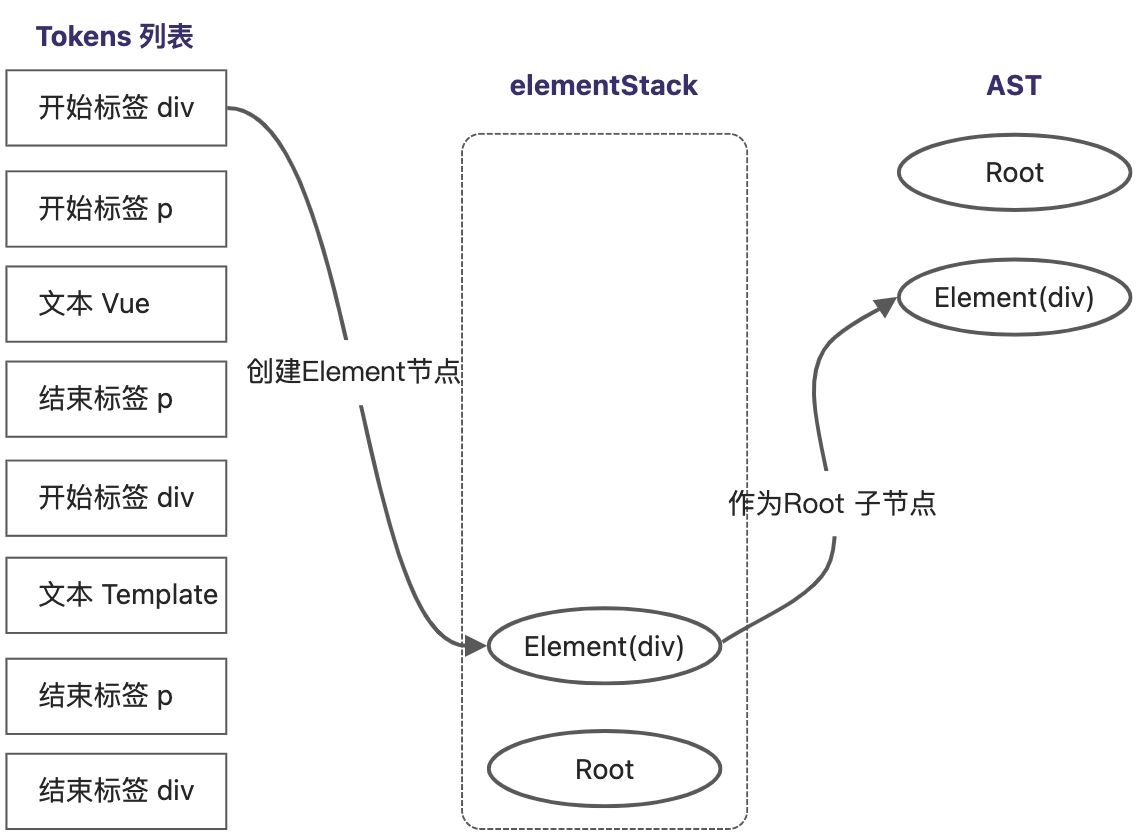
继续Tokens列表向下扫描
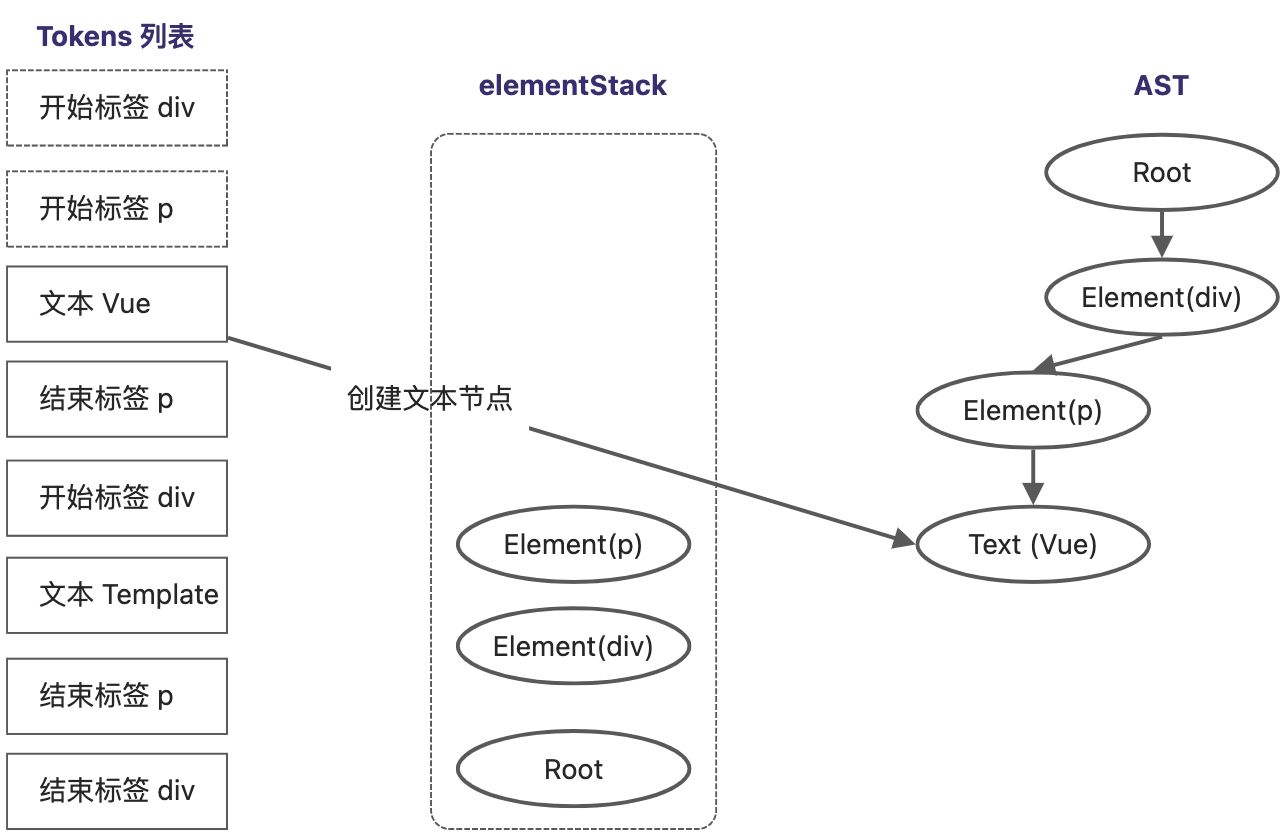
扫描到文本节点,创建一个类型为Text的AST节点 Text(Vue) ,然后将该节点作为当前栈顶节点的子节点。
继续扫描Token列表,遇到了结束标签。
继续向下扫描,再次遇到开始p标签,重复上述过程,将 Element(p) 压入栈中。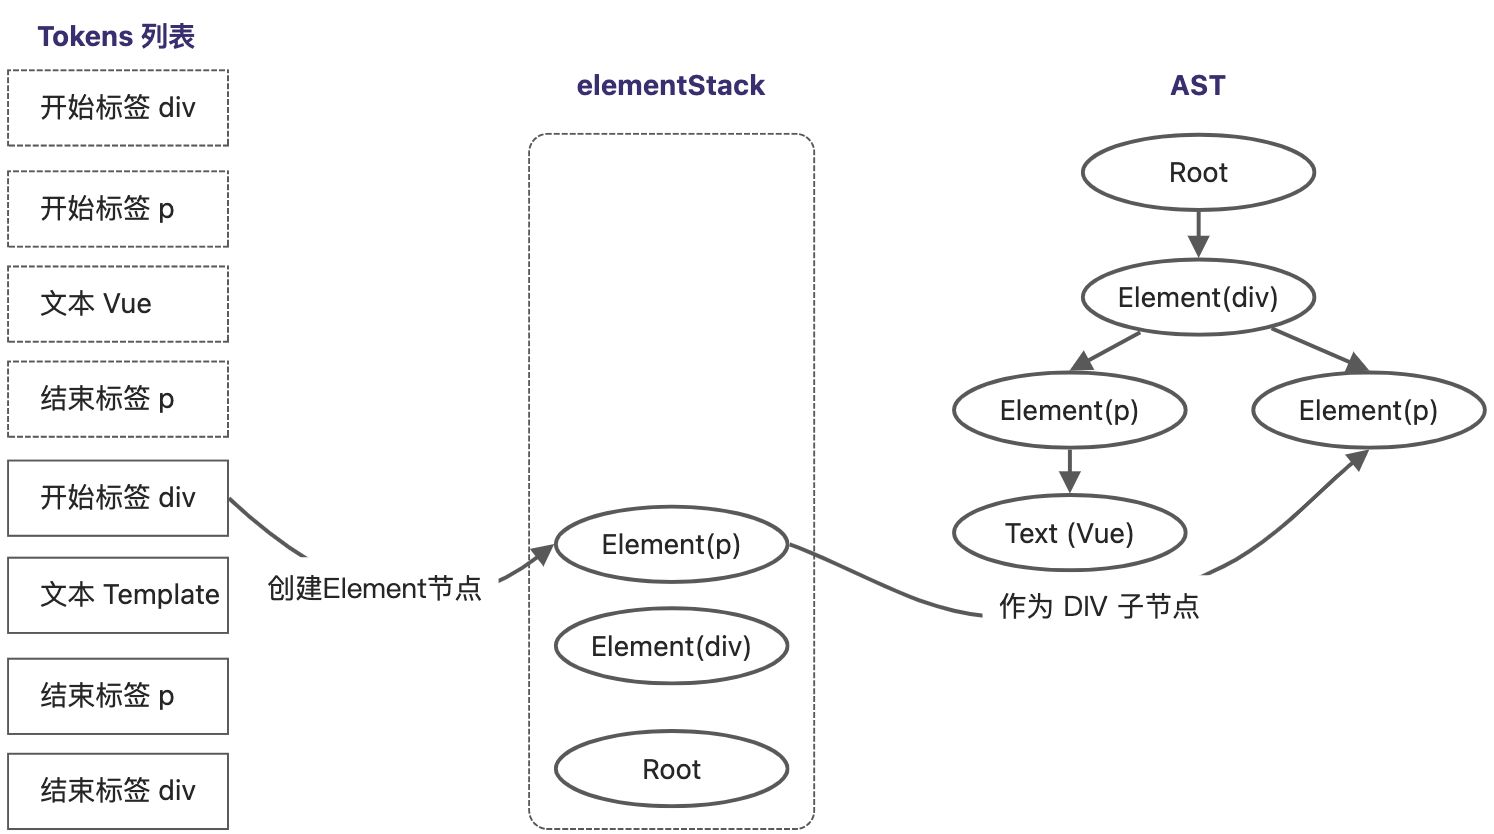
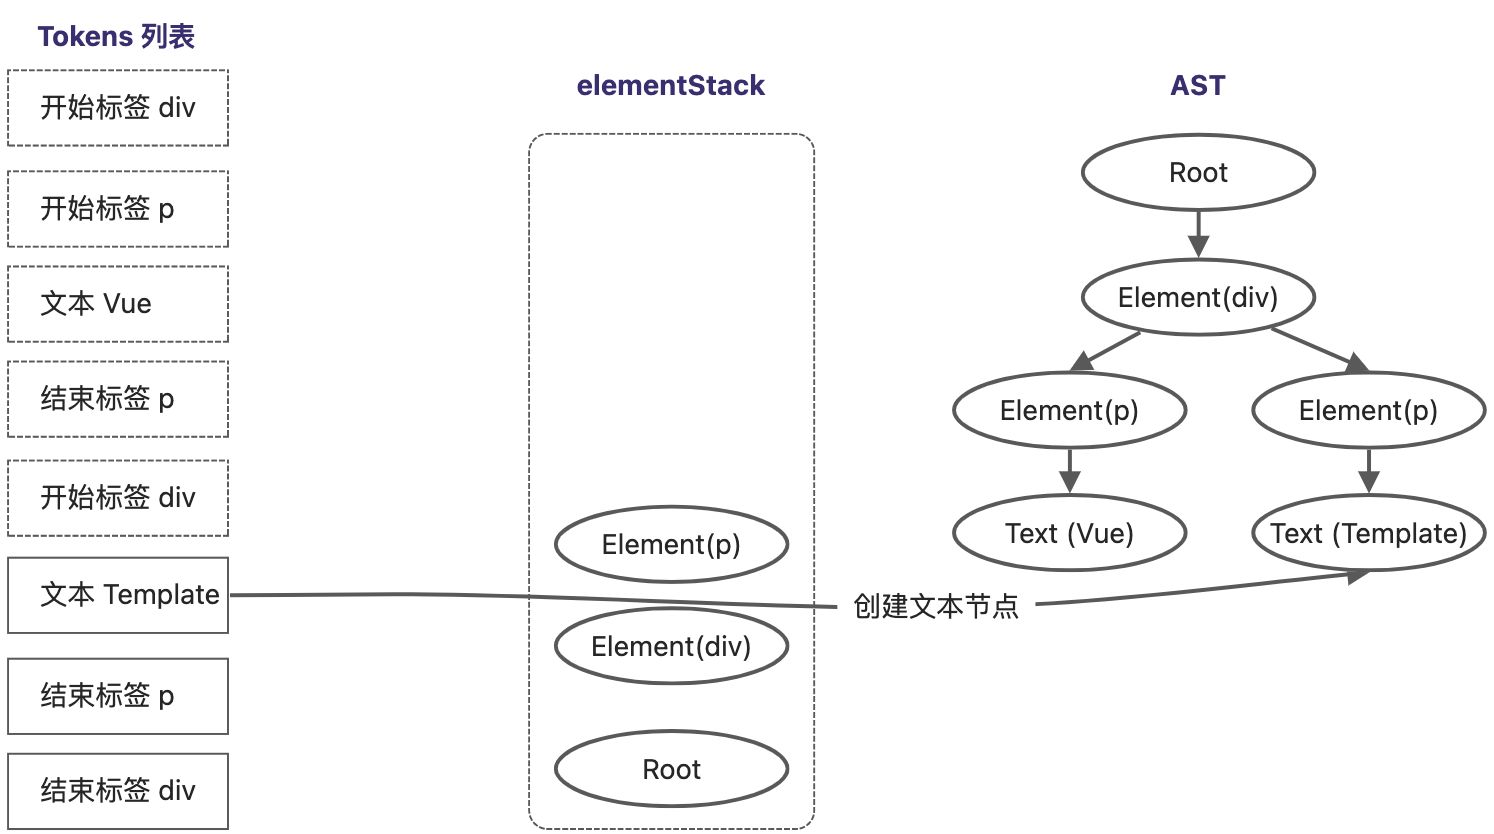


扫描到最后一个Token,它是一个div结束标签,将当前栈顶节点的 Element(div) 从elementStack中弹出,所有Token扫描完毕,AST树构建完成。
扫码Token列表,并构建AST的具体实现如下:
const template = `<div><p>Vue</p><p>Template</p></div>`const State = {initial: 1,tagOpen: 2,tagName: 3,text: 4,tagEnd: 5,tagEndName: 6}function isAlpha(char) {return char >= 'a' && char <= 'z' || char >= 'A' && char <= 'Z'}function tokenize(str) {let currentState = State.initialconst chars = []const tokens = []while(str) {const char = str[0]switch (currentState) {case State.initial:if (char === '<') {currentState = State.tagOpenstr = str.slice(1)} else if (isAlpha(char)) {currentState = State.textchars.push(char)str = str.slice(1)}breakcase State.tagOpen:if (isAlpha(char)) {currentState = State.tagNamechars.push(char)str = str.slice(1)} else if (char === '/') {currentState = State.tagEndstr = str.slice(1)}breakcase State.tagName:if (isAlpha(char)) {chars.push(char)str = str.slice(1)} else if (char === '>') {currentState = State.initialtokens.push({type: 'tag',name: chars.join('')})chars.length = 0str = str.slice(1)}breakcase State.text:if (isAlpha(char)) {chars.push(char)str = str.slice(1)} else if (char === '<') {currentState = State.tagOpentokens.push({type: 'text',content: chars.join('')})chars.length = 0str = str.slice(1)}breakcase State.tagEnd:if (isAlpha(char)) {currentState = State.tagEndNamechars.push(char)str = str.slice(1)}breakcase State.tagEndName:if (isAlpha(char)) {chars.push(char)str = str.slice(1)} else if (char === '>') {currentState = State.initialtokens.push({type: 'tagEnd',name: chars.join('')})chars.length = 0str = str.slice(1)}break}}return tokens}function parse(str) {// 先进行词法解析,生成Token 列表const tokens = tokenize(str)// 创建根 节点 Rootconst root = {type: 'Root',children: []}// 创建elementStack栈, 开始只有Root根节点const elementStack = [root]// 开启 while循环扫描 tokens,直到所有tokens都被扫描完毕while (tokens.length) {// 获取当前栈顶节点,作为父节点 parentconst parent = elementStack[elementStack.length - 1]// 当前扫描的 Tokenconst t = tokens[0]switch (t.type) {case 'tag':const elementNode = {type: 'Element',tag: t.name,children: []}parent.children.push(elementNode)elementStack.push(elementNode)breakcase 'text':const textNode = {type: 'Text',content: t.content}parent.children.push(textNode)breakcase 'tagEnd':elementStack.pop()break}tokens.shift()}// 最后返回 ASTreturn root}const ast = parse(template)console.log(ast)
4转换模板AST
上面完成了模板AST的创建,接下来进行AST转换,就是对AST进行一系列操作,将其转换为新的AST过程。
1节点转换
为了对AST进行转换,需要有个工具函数能够访问到AST的每个节点。
function dump(node, indent = 0) {// 节点类型const type = node.type// 节点描述,根节点、Element节点、Text节点const desc = node.type === 'Root'? '': node.type === 'Element'? node.tag: node.content// 打印节点的类型和描述信息console.log(`${'-'.repeat(indent)}${type}: ${desc}`)//如果是有children,则递归调用的打印子节点if (node.children) {node.children.forEach(n => dump(n, indent + 2))}}
使用上面定义的模板,调用dump函数看看输出结果
const template = `<div><p>Vue</p><p>Template</p></div>`const State = {initial: 1,tagOpen: 2,tagName: 3,text: 4,tagEnd: 5,tagEndName: 6}function isAlpha(char) {return char >= 'a' && char <= 'z' || char >= 'A' && char <= 'Z'}function tokenize(str) {let currentState = State.initialconst chars = []const tokens = []while(str) {const char = str[0]switch (currentState) {case State.initial:if (char === '<') {currentState = State.tagOpenstr = str.slice(1)} else if (isAlpha(char)) {currentState = State.textchars.push(char)str = str.slice(1)}breakcase State.tagOpen:if (isAlpha(char)) {currentState = State.tagNamechars.push(char)str = str.slice(1)} else if (char === '/') {currentState = State.tagEndstr = str.slice(1)}breakcase State.tagName:if (isAlpha(char)) {chars.push(char)str = str.slice(1)} else if (char === '>') {currentState = State.initialtokens.push({type: 'tag',name: chars.join('')})chars.length = 0str = str.slice(1)}breakcase State.text:if (isAlpha(char)) {chars.push(char)str = str.slice(1)} else if (char === '<') {currentState = State.tagOpentokens.push({type: 'text',content: chars.join('')})chars.length = 0str = str.slice(1)}breakcase State.tagEnd:if (isAlpha(char)) {currentState = State.tagEndNamechars.push(char)str = str.slice(1)}breakcase State.tagEndName:if (isAlpha(char)) {chars.push(char)str = str.slice(1)} else if (char === '>') {currentState = State.initialtokens.push({type: 'tagEnd',name: chars.join('')})chars.length = 0str = str.slice(1)}break}}return tokens}function parse(str) {// 先进行词法解析,生成Token 列表const tokens = tokenize(str)// 创建根 节点 Rootconst root = {type: 'Root',children: []}// 创建elementStack栈, 开始只有Root根节点const elementStack = [root]// 开启 while循环扫描 tokens,直到所有tokens都被扫描完毕while (tokens.length) {// 获取当前栈顶节点,作为父节点 parentconst parent = elementStack[elementStack.length - 1]// 当前扫描的 Tokenconst t = tokens[0]switch (t.type) {case 'tag':const elementNode = {type: 'Element',tag: t.name,children: []}parent.children.push(elementNode)elementStack.push(elementNode)breakcase 'text':const textNode = {type: 'Text',content: t.content}parent.children.push(textNode)breakcase 'tagEnd':elementStack.pop()break}tokens.shift()}// 最后返回 ASTreturn root}const ast = parse(template)dump(ast)// ----输出结果----/*Root:--Element: div----Element: p------Text: Vue----Element: p------Text: Template*/
接下来着手实现对 AST 节点的访问,从根AST节点开始,深度优先遍历节点
function traverseNode(ast) {// 当前节点, ast本身是 Root 节点const currentNode = ast// 可以对当前阶段进行特殊操作处理if(currentNode.type === "Element" && currentNode.tag === "p"){currentNode.tag = "h1"; //将p标签转换为 h1 标签}// 如果有子节点,则递归调用 traverseNode 函数进行遍历const children = currentNode.childrenif (children) {for (let i = 0; i < children.length; i++) {traverseNode(children[i])}}}
经过转换后,再次打印节点。由于此过程会重复执行多次,所以封装成一个transform函数,用来对AST 进行转换
// transform函数,封装了traverseNode和dump的调用,以及设置 context 对象function transform(ast) {// 调用 traverseNode 完成转换traverseNode(ast)// 打印 AST 信息console.log(dump(ast))}
可以看到所有的p标签被转换为h1标签。
Root:--Element: div----Element: h1------Text: Vue----Element: h1------Text: Template
另外还可以对文本节点的内容重复打印2次。
function traverseNode(ast) {const currentNode = ast// 可以对当前阶段进行特殊操作处理if(currentNode.type === "Element" && currentNode.tag === "p"){currentNode.tag = "h1"; //将p标签转换为 h1 标签}// 对 Text 节点类型,重复文本内容2边if(currentNode.type === "Text"){currentNode.content = currentNode.content.repeat(2)}const children = currentNode.childrenif (children) {for (let i = 0; i < children.length; i++) {traverseNode(children[i])}}}// 打印结果Root:--Element: div----Element: h1------Text: VueVue----Element: h1------Text: TemplateTemplate
完整代码示例
随着功能的增加,traverseNode中包含太多逻辑处理,会越来越臃肿,可以对该函数进行解耦。
// 接收第二个参数 contextfunction traverseNode(ast, context) {const currentNode = astconst transforms = context.nodeTransformsfor (let i = 0; i < transforms.length; i++) {transforms[i](currentNode, context)}const children = currentNode.childrenif (children) {for (let i = 0; i < children.length; i++) {traverseNode(children[i])}}}// 调整 transform函数对 traverseNode的调用function transform(ast) {const context = {nodeTransforms: [transformElement, transformText],}// 调用 traverseNode 完成转换traverseNode(ast, context)// 打印 AST 信息console.log(dump(ast))}function transformElement(node) {if (node.type === 'Element' && node.tag === 'p') {node.tag = 'h1'}}function transformText(node) {if (node.type === 'Text') {node.content = node.content.repeat(2)}}
首先为 traverseNode 函数增加第二个参数 context,暂时把特殊的逻辑处理函数放到context.nodeTransforms数组中,然后使用for循环遍历数组,逐个调用注册在其中的回调函数,最后将当前节点currentNode和context对象
分别作为参数传递给回调函数。
对处理逻辑进行单独的抽离,完整的示例代码
2转换上下文与节点操作
转换上下文context可以看作AST转换函数过程中的上下文数据。所有AST转换函数都可以通过context来共享数据。上下文对象中通常会维护程序的当前状态。
function transform(ast) {const context = {// 增加currentNode,用来存储当前正在转换的节点currentNode: null,// 增加 childIndex,用来存储当前节点在父节点的children中的位置索引childIndex: 0,// 增加 parent ,用来存储当前转换节点的父节点parent: null,replaceNode(node) {context.currentNode = nodecontext.parent.children[context.childIndex] = node},removeNode() {if (context.parent) {context.parent.children.splice(context.childIndex, 1)context.currentNode = null}},nodeTransforms: [transformElement,transformText]}// 调用 traverseNode 完成转换traverseNode(ast, context)// 打印 AST 信息console.log(dump(ast))}
然后在 traverseNode 函数中设置转换上下文对象中的数据。
function traverseNode(ast, context) {// 设置当前转换的节点信息 context.currentNodecontext.currentNode = astconst transforms = context.nodeTransformsfor (let i = 0; i < transforms.length; i++) {transforms[i](context.currentNode, context)if (!context.currentNode) return}const children = context.currentNode.childrenif (children) {for (let i = 0; i < children.length; i++) {// 递归调用 traverseNode 转换子节点之前,将当前节点设置为父节点context.parent = context.currentNode// 设置位置索引context.childIndex = i// 递归调用 traverseNode函数,将context参数继续传递traverseNode(children[i], context)}}}
有了上下文数据context,可以实现节点替换 replaceNode 及节点删除removeNode 的操作。
可以在转换函数中使用 replaceNode 函数对AST中的节点进行替换。
function transformText(node, context) {if (node.type === 'Text') {context.replaceNode({type: "Element",tag: "span"})}}
将文本节点类型 Text,替换为 span标签节点,而不是显示文本内容。
// 转换后Root:--Element: div----Element: h1------Element: span----Element: h1------Element: span
还可以设置移除当前节点,在 transform 函数中的context,添加removeNode方法。调整 transformText 把替换节点改成删除节点。
function transformText(node, context) {if (node.type === 'Text') {context.removeNode()}}
Root:--Element: div----Element: h1----Element: h1
3进入和退出
在转换AST节点过程中,往往需要根据其子节点的情况来决定如何对当前节点进行转换,要求父节点的转换操作在所有子节点都转换完成后再执行。需要设计一种转换工作流,对节点的访问分为两个阶段:进入阶段和退出阶段。当函数处于进入阶段,先进入父节点,再进入子节点。当转换函数处于退出阶段时,则会先退出子节点,再退出父节点。重新调整 traverseNode 函数。
function traverseNode(ast, context) {context.currentNode = ast// 增加退出阶段的回调函数 数组const exitFns = []const transforms = context.nodeTransformsfor (let i = 0; i < transforms.length; i++) {// 转换函数可以返回另外一个函数,该函数可作为退出阶段的回调函数const onExit = transforms[i](context.currentNode, context)if (onExit) {// 将推出阶段的回调函数添加到 exitFns数组中exitFns.push(onExit)}if (!context.currentNode) return}const children = context.currentNode.childrenif (children) {for (let i = 0; i < children.length; i++) {context.parent = context.currentNodecontext.childIndex = itraverseNode(children[i], context)}}// 在节点处理的最后阶段,执行缓存到exitFns中的回调函数// 这里要反序执行let i = exitFns.lengthwhile (i--) {exitFns[i]()}}
给 transformElement 函数增加 return返回函数的处理,用来设置退出节点的操作
function transformElement(node) {console.log(`进入:${JSON.stringify(node)}`)return () => {console.log(`退出:${JSON.stringify(node)}`)}}
5将模板AST转换jsAST
vue框架会将模板编译成渲染函数,而渲染函数是由JavaScript代码构成,因此需要将模板AST转换为用于描述渲染函数的JavaScript AST。
// 模版<div><p>Vue</p><p>Template</p></div>// 转换为渲染函数function render(){return h("div", [h("p", "vue"), h("p", "Template")])}
渲染函数的代码,是一个函数声明,首先描述JavaScript中的函数声明语句。一个函数声明语句包括以下部分:
- id:函数的名称,是一个标识符 Identifier
- params:函数参数,是一个数组
- body:函数体,函数体可以包含多个语句,它也是一个数组
定义一个基本数据结构,来描述函数声明语句:
const FunctionDeclNode = {type: "FunctionDecl",id: {type: "Identifier",name: "render"},params: [],body: [ {type: "ReturnStatement", return : null}]}
使用一个对象来描述JavaScript AST节点。每个节点都具有type字段,该字段表示节点的类型。
介绍完函数声明语句的节点结构,再来看一下渲染函数的返回值。渲染函数的返回的是虚拟DOM节点,是h函数的调用。可以使用CallExpression类型的节点来描述函数调用语句。
const CallExp = {type: "CallExpression",callee: {type: "Identifier",name: "h"},arguments:[]}
类型为CallExpression的节点,有两个属性
- callee:描述被调用函数的名称
- arguments:被调用函数的参数,多个参数用数组表示
最外层的h函数的第一个参数是一个字符串字面量,可以使用类型为StringLiteral的节点来描述它。
const Str = {type: "StringLiteral",value: "div"}
h函数的第二个参数是数组,可以使用ArrayExpression的节点来描述它
const Arr = {type: "ArrayExpression",elements: []}
渲染函数的返回值:
const FunctionDeclNode = {type: "FunctionDecl",id: {type: "Identifier",name: "render"},params: [],body: [ {type: "ReturnStatement", return : {type: "CallExpression",callee: {type: "Identifier", name: "h"},arguments: [{type: "StringLiteral", value: "div"},{type: "ArrayExpression", elements: [{type: "CallExpression", callee: {type: "Identifier", name: "h"},arguments:[{type: "StringLiteral", value: "p"},{type: "StringLiteral", value: "Vue"}]},{type: "CallExpression", callee: {type: "Identifier", name: "h"},arguments:[{type: "StringLiteral", value: "p"},{type: "StringLiteral", value: "Template"}]}]}]}}]}
以上这段JavaScriptAST的代码,它是对渲染函数代码的完整描述。接下来是编写转换函数,将模板AST转换为上面的JavaScript AST结构。
首先创建 JavaScript AST节点的辅助函数
function createStringLiteral(value) {return {type: "StringLiteral",value};}function createIdentifier(name) {return {type: "Identifier",name};}function createArrayExpression(elements) {return {type: "ArrayExpression",elements};}function createCallExpression(callee, arguments) {return {type: "CallExpression",callee: createIdentifier(callee),arguments};}
为了转换AST,需要两个转换函数 transformText 和 transformElement ,分别用了处理标签节点和文本节点。
// 转换文本节点function transformText(node) {if (node.type !== "Text") {return;}// 文本节点对应的JavaScript AST节点其实是一个字符串字面量// 将文本节点对应的JavaScript AST 节点添加到node.jsNode属性下node.jsNode = createStringLiteral(node.content);}// 转换标签节点function transformElement(node) {// 将转换代码编写在退出阶段的回调函数中,保证该节点的子节点全部被处理完毕return () => {// 如果被转换的节点不是元素节点,什么都不做if (node.type !== "Element") {return;}// 创建 h 函数调用语句const callExp = createCallExpression("h", [createStringLiteral(node.tag)]);// 处理 h 函数调用参数node.children.length === 1? callExp.arguments.push(node.children[0].jsNode): callExp.arguments.push(createArrayExpression(node.children.map((c) => c.jsNode)));// 将当前标签节点对于的 JavaScript AST添加到jsNode属性node.jsNode = callExp;};}
最后编写transformRoot函数实现对Root根节点的转换
// 转换Root根节点function transformRoot(node) {// 将逻辑编写在退出阶段的回调函数中,保证子节点全部被处理完毕return () => {if (node.type !== "Root") {return;}// node是根节点,根节点的第一个子节点就是模板的根节点const vnodeJSAST = node.children[0].jsNode;// 创建render函数的声明语句节点, 将 vnodeJSAST 作为render 函数体的返回语句。node.jsNode = {type: "FunctionDecl",id: { type: "Identifier", name: "render" },params: [],body: [{type: "ReturnStatement",return: vnodeJSAST}]};};}
经过这步处理,模板AST就转换为对应的JavaScript AST,并且可以通过根节点node.jsNode来访问转换后JavaScript AST。
完整代码示例
6根据 jsAST 生成代码
上面完成了JavaScript AST的构造,接下来根据JavaScript AST生成渲染函数的代码。代码生成的本质是字符串拼接的艺术。访问JavaScript AST的节点,为每一种类型的节点生成相符的JavaScript代码。
function compile(template){// 模板astconst ast = parse(template);// 将模板ast转 为 JavaScript ASTtransform(ast);// 代码生成const code= generate(ast.jsNode);return code}
代码生成需要上下文对象,该对象用来维护代码生成过程的程序的运行状态
function generate(node) {const context = {// 存储最终生成的渲染函数代码code: '',// 在生成代码时,通过调用 push 函数完成代码的拼接push(code) {context.code += code},// 当前缩进的位置currentIndent: 0,// 换行newline() {context.code += '\n' + ` `.repeat(context.currentIndent)},// 缩进indent() {context.currentIndent++context.newline()},// 删除缩进deIndent() {context.currentIndent--context.newline()}}// 调用 genNode函数 完成代码生成工作genNode(node, context)return context.code}
有了基础能力,开始编写genNode函数,来完成代码生成工作。
function genNode(node, context) {switch (node.type) {case "FunctionDecl":genFunctionDecl(node, context);break;case "ReturnStatement":genReturnStatement(node, context);break;case "CallExpression":genCallExpression(node, context);break;case "StringLiteral":genStringLiteral(node, context);break;case "ArrayExpression":genArrayExpression(node, context);break;}}
在 genNode 内部,使用switch分支匹配不同类型的节点
- 遇到 FunctionDecl 节点,使用genFunctionDecl函数为该类型节点生成对应的JavaScript代码
- 遇到 ReturnStatement 节点,使用 genReturnStatement 函数为该类型节点生成对于的JavaScript代码
- 遇到 CallExpression 节点,使用 genCallExpression 函数为该类型节点生成对于的JavaScript代码
- 遇到 StringLiteral 节点,使用 genStringLiteral 函数为该类型节点生成对于的JavaScript代码
- 遇到 ArrayExpression 节点,使用 genArrayExpression 函数为该类型节点生成对于的JavaScript代码
接下来完善代码生成工作,实现5个函数
function genFunctionDecl(node, context) {const { push, indent, deIndent } = context;push(`function ${node.id.name} `);push(`(`);genNodeList(node.params, context);push(`) `);push(`{`);indent();node.body.forEach((n) => genNode(n, context));deIndent();push(`}`);}// genNodeList在genFunctionDecl函数内部调用,函数接受一个节点数组作为参数,并为每个节点递归调用genNode函数完成代码生成function genNodeList(nodes, context) {const { push } = context;for (let i = 0; i < nodes.length; i++) {const node = nodes[i];genNode(node, context);if (i < nodes.length - 1) {push(", ");}}}function genReturnStatement(node, context) {const { push } = context;push(`return `);genNode(node.return, context);}function genCallExpression(node, context) {const { push } = context;const { callee, arguments: args } = node;push(`${callee.name}(`);genNodeList(args, context);push(`)`);}function genStringLiteral(node, context) {const { push } = context;push(`'${node.value}'`);}function genArrayExpression(node, context) {const { push } = context;push("[");genNodeList(node.elements, context);push("]");}
配合生成器函数的实现,将得到符合预期的渲染函数代码;
const ast = parse(`<div><p>Vue</p><p>Template</p></div>`);transform(ast);const code = generate(ast.jsNode);// 生成code代码// function render () {// return h('div', [h('p', 'Vue'), h('p', 'Template')])// }
16解析器
上一章中编译器是包含有解析器的,这一章利用正则来优化解析器。
递归下降算法构造模板AST
定义一个状态表TextModes,描述预定义的文本模式,然后定义parse函数,内部定义上下文对象context,用来维护解析程序执行过程中程序的各种状态。接着调用parseChildren函数进行解析,该函数会返回解析后得到的子节点,并使用这些子节点作为children来创建Root根节点。最后parse函数返回根节点,完成模板AST构建。
const TextModes = {DATA: 'DATA',RCDATA: 'RCDATA',RAWTEXT: 'RAWTEXT',CDATA: 'CDATA'}// 解析器函数,接收模板作为参数function parse(str) {// 定义上下文对象const context = {// source 是模板内容,用于解析过程中进行消费source: str,// 解析器当前处于文本模式,初始模式为 DATAmode: TextModes.DATA,advanceBy(num) {context.source = context.source.slice(num)},advanceSpaces() {const match = /^[\t\r\n\f ]+/.exec(context.source)if (match) {context.advanceBy(match[0].length)}}}// 调用 parseChildren函数进行解析,它返回解析后得到的子节点const nodes = parseChildren(context, [])// 解析器返回 Root 根节点return {type: 'Root',children: nodes}}
这段代码的实现思路和15章构建AST的思路不同。
上章是对模板内容进行标记化生成一系列Token,然后根据Token构建出模板AST。创建Token和构建模板AST可以同时进行。
上面代码中 parseChildren 函数是解析器的核心,递归的调用它不断的消费模板内容,parseChildren 函数会返回解析后得到的子节点。
// 模板<p>1</p><p>2</p>// 经过 parseChildren 函数解析后,得到2个 p 节点组成的数组[{type: "Element", tag: "p", children: [/*....*/]},{type: "Element", tag: "p", children: [/*....*/]},]
parseChildren 函数本质也是一个状态机,该状态机有多少状态取决于子节点的类型数量。
- 标签节点
- 文本插值节点 {{val}}
- 普通文本节点 text
- 注释节点
- CDATA 节点: <![CDATA[ xxx ]]>

- 遇到字符 < 时,进入临时状态
- 如果下一个字符匹配正则/a-z/i, 则认为是一个标签节点,调用parseElement函数
- 遇到 <!— 开头,则认为是注释节点,调用 parseComment 函数
- 遇到<![CDATA[ 开头, 则认为是一个 CDATA 节点,调用 parseCDATA 函数
- 如果字符串以 {{ 开头,则认为这是一个插值节点,调用 parseInterpolation 函数
其它情况作为普通文本,调用parseText 函数完成文本节点的解析
function parseChildren(context, ancestors) {// 定义 nodes 数组存储子节点,将作为最终的返回值let nodes = []// 从上下文对象中取的当前状态const { mode } = context// 开启while循环,满足条件就会一直对字符串进行解析while(!isEnd(context, ancestors)) {let nodeif (mode === TextModes.DATA || mode === TextModes.RCDATA) {if (mode === TextModes.DATA && context.source[0] === '<') {if (context.source[1] === '!') {if (context.source.startsWith('<!--')) {// 注释node = parseComment(context)} else if (context.source.startsWith('<![CDATA[')) {// CDATAnode = parseCDATA(context, ancestors)}} else if (context.source[1] === '/') {// 结束标签} else if (/[a-z]/i.test(context.source[1])) {// 标签node = parseElement(context, ancestors)}} else if (context.source.startsWith('{{')) {// 解析插值node = parseInterpolation(context)}}// node 不存在,说明处于其它模式if (!node) {// 解析文本节点node = parseText(context)}// 将节点添加到 nodes 数组中nodes.push(node)}return nodes}
parseChildren 函数用来解析子节点,while 循环一定要遇到父级节点的结束标签才会停止。
解析器进入标签节点状态,并调用 parseElement 函数进行解析。function parseElement(context, ancestors) {// 解析开始标签const element = parseTag(context)if (element.isSelfClosing) return elementancestors.push(element)if (element.tag === 'textarea' || element.tag === 'title') {context.mode = TextModes.RCDATA} else if (/style|xmp|iframe|noembed|noframes|noscript/.test(element.tag)) {context.mode = TextModes.RAWTEXT} else {context.mode = TextModes.DATA}// 递归调用 parseChildren 函数element.children = parseChildren(context, ancestors)ancestors.pop()if (context.source.startsWith(`</${element.tag}`)) {// 解析 结束标签parseTag(context, 'end')} else {console.error(`${element.tag} 标签缺少闭合标签`)}return element}
parseChildren 函数是整个状态机的核心,状态迁移操作都在该函数内完成。在 parseChildren 函数运行过程中,为了处理标签节点,会调用parseElement解析函数,并会间接调用 parseChildren 函数,产生新的状态机。随着标签嵌套层次的增加,新的状态机会随着 parseChildren 函数被递归地调用而不断创建,这就是递归下降中递归含义。
而上级 parseChildren 函数的调用用于构造上级模板AST节点,被递归调用的下级 parseChildren 函数则是用于构造下级模板AST节点,最终构造出一个模板AST树。状态机的开启与停止
状态机何时停止?while循环应该在何时停止运行,涉及到isEnd()函数的逻辑判断。
。这是因为一个结束标签,并且在父级节点栈中存在与该结束标签同名的标签节点。状态机2停止运行,并弹出父级节点栈中处于栈顶的节点。
在调用parseElement函数解析标签节点时,会递归调用parseChildren函数,开启新的状态机。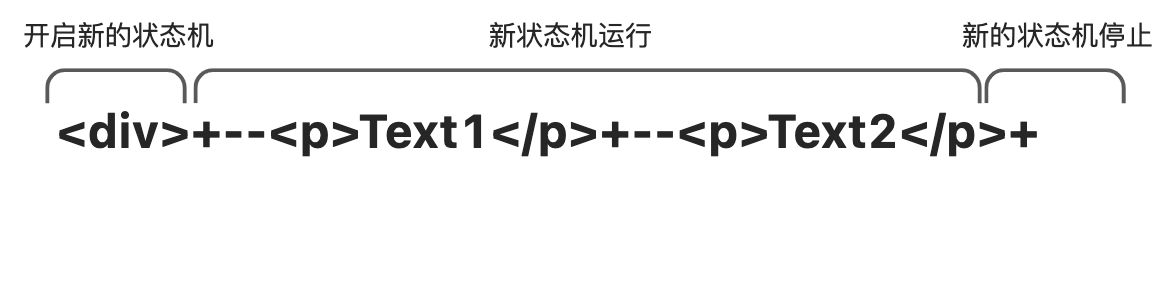
递归开启新的状态机
向下递归遍历时,遇到p标签时,会调用parseElement函数解析解析,于是重复开启新的状态机,会把当前解析的标签节点压入父级节点栈,然后递归的调用parseChildren函数,开始状态机2。此时有2个状态机同时运行。而且此时状态机2拥有程序的执行权,持续解析模板直到遇到结束标签
继续递归解析,再次遇到标签,,再次开启新的状态机3
。 遇到标签,停止运行状态机3
此时状态机3拥有程序的执行权,会继续解析模板,直到遇到结束标签
当解析器遇到开始标签时,会将标签压入父级节点栈,同时开启新的状态机。当解析器遇到结束标签时,并且父级节点栈中存在与该标签同名的开始标签时,会停止当前正在运行的状态机。
根据以上规则,可以得出isEnd函数的逻辑function isEnd(context, ancestors){if(!context.source) return true;const parent = ancestors[ancestors.length -1];if(parent && context.source.startWith(`</${parent.tag}`)){return true}}
处理错误节点
当模板是
<div><span></div></span>时,按照上面的parseChildren函数解析会出错,无法遇到正确的结束标签。
使用将模板内容完整解析完毕后,解析器再打印错误信息。function isEnd(context, ancestors) {if (!context.source) return true// 与节点栈内全部的节点比较for (let i = ancestors.length - 1; i >= 0; --i) {if (context.source.startsWith(`</${ancestors[i].tag}`)) {return true}}}
在调用parseElement解析函数是,parseElement函数能够发现缺少闭合标签,于是打印错误信息。
function parseElement(context, ancestors) {const element = parseTag(context)if (element.isSelfClosing) return elementancestors.push(element)if (element.tag === 'textarea' || element.tag === 'title') {context.mode = TextModes.RCDATA} else if (/style|xmp|iframe|noembed|noframes|noscript/.test(element.tag)) {context.mode = TextModes.RAWTEXT} else {context.mode = TextModes.DATA}element.children = parseChildren(context, ancestors)ancestors.pop()if (context.source.startsWith(`</${element.tag}`)) {parseTag(context, 'end')} else {console.error(`${element.tag} 标签缺少闭合标签`)}return element}
解析标签节点
解析标签节点使用parseTag函数,parseTag接收2个参数,第一个是Context上下文对象,第二个是判断是开始标签还是结束标签,默认值为start。无论处理开始标签还是结束标签,parseTag函数都会消费对应的内容,为了实现对应内容的消费,需要在上下文对象中新增两个工具函数,
function parse(str) {// 上下文对象const context = {// 模板内容source: str,mode: TextModes.DATA,// advanceBy函数用来消费指定数量的字符,advanceBy(num) {// 根据给定字符数 num,截取位置num后的模板内容,并替换当前模板内容context.source = context.source.slice(num);},// 无论是开始标签还是结束标签,都可能存在无用的空白字符,例如 <div >advanceSpaces() {// 匹配空白字符const match = /^[\t\r\n\f ]+/.exec(context.source);if (match) {// 调用 advanceBy 函数,消费空白字符context.advanceBy(match[0].length);}}};const nodes = parseChildren(context, []);return {type: "Root",children: nodes};}
有了
advanceBy和advanceSpaces函数后,就可以实现parseTag函数function parseTag(context, type = "start") {// 从上下文对象中 获取工具函数const { advanceBy, advanceSpaces } = context;// 处理开始标签 和 结束标签的正则表达式const match =type === "start"? /^<([a-z][^\t\r\n\f />]*)/i.exec(context.source): /^<\/([a-z][^\t\r\n\f />]*)/i.exec(context.source);const tag = match[1];// 消费正则表达式 匹配的全部内容advanceBy(match[0].length);// 消费标签中的 空白字符advanceSpaces();// 解析属性const props = parseAttributes(context);// 判断是否是自闭合标签const isSelfClosing = context.source.startsWith("/>");// 如果是自闭合标签,消费 /> 两个字符;非自闭合,消费一个字符 >advanceBy(isSelfClosing ? 2 : 1);// 返回标签节点return {type: "Element",tag,props,children: [],isSelfClosing};}
parseTag函数几个关键点
在完成正则匹配后,需要调用advanceBy函数消费正则匹配的全部内容
- 根据上面给出的第三个正则匹配例子,由于标签中可能存在无用的空白字符,例如,因此需要调用advanceSpaces函数消费空白字符
- 消费正则匹配的内容后,检查剩余模板内容是否以字符串 />开头
- 如果是,则说明当前解析的是一个自闭合标签,下次需要消费2个字符
- 判断非自闭合标签,只用消费 > 一个字符。
经过上面处理后,parseTag函数会返回一个标签节点。parseElement 函数在得到有parseTag函数产生标签节点后,需要根据节点的类型完成文本模式切换。
function parseElement(context, ancestors) {const element = parseTag(context);if (element.isSelfClosing) return element;ancestors.push(element);// 切换到正确的文本模式if (element.tag === "textarea" || element.tag === "title") {// parseTag解析得到标签 是<textarea>或<title>,则切换到RCDATA模式context.mode = TextModes.RCDATA;} else if (/style|xmp|iframe|noembed|noframes|noscript/.test(element.tag)) {// 解析得到的标签是<style>、<xmp>、<iframe>、<noembed>、<noframe>、<noscript>、切换到RAWTEXT模式context.mode = TextModes.RAWTEXT;} else {// 否则切换到 DATA 模式context.mode = TextModes.DATA;}element.children = parseChildren(context, ancestors);ancestors.pop();if (context.source.startsWith(`</${element.tag}`)) {parseTag(context, "end");} else {console.error(`${element.tag} 标签缺少闭合标签`);}return element;}
解析属性
parseTag解析整个标签,标签中还包含属性及指令,因此parseTag函数需要有能力处理开始标签中的属性和指令。<div id="foo" v-show="display"></div>标签中包含了id属性和v-show指令。因此parseTag函数中增加 parseAttributes 解析函数。
function parseAttributes(context) {const { advanceBy, advanceSpaces } = context;const props = [];while (!context.source.startsWith(">") && !context.source.startsWith("/>")) {const match = /^[^\t\r\n\f />][^\t\r\n\f />=]*/.exec(context.source);const name = match[0];advanceBy(name.length);advanceSpaces();advanceBy(1);advanceSpaces();let value = "";const quote = context.source[0];const isQuoted = quote === '"' || quote === "'";if (isQuoted) {advanceBy(1);const endQuoteIndex = context.source.indexOf(quote);if (endQuoteIndex > -1) {value = context.source.slice(0, endQuoteIndex);advanceBy(value.length);advanceBy(1);} else {console.error("缺少引号");}} else {const match = /^[^\t\r\n\f >]+/.exec(context.source);value = match[0];advanceBy(value.length);}advanceSpaces();props.push({type: "Attribute",name,value});}return props;}
模板经过消费标签及空白字符,最后剩下 id="foo" v-show="display",这段内容才是 parseAttributes 函数要处理的内容。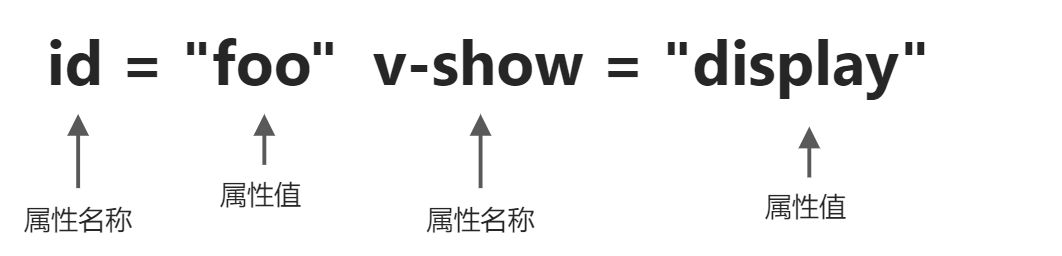
parseAttributes 函数消费模板的过程,就是不断的解析属性名、等号、属性值的过程。parseAttributes 函数会从左往右的顺序不断消费字符串。
- 首先解析出第一个属性的名称id,并消费字符串 id,模板剩余内容
="foo" v-show="display",在解析属性名称时,除了要消费属性名称之外,还要消费名称后面可能存在的空白字符。属性名称解析完毕后,模板剩余内容一定是以等号开头。 - 然后开始消费等号字符,由于等号和属性值之间也有可能存在空白字符,所以也需要消费对应的空白字符,进一步操作后,模板剩余内容为
"foo" v-show="display" - 接下来处理属性值环节,如果属性被引号包裹,则消耗引号,处理引号时,要记得处理空白字符。如果没有被引号包裹,那么下一个空白字符之前的所有字符都是属性值。模板中属性值存在三种情况:
- 属性值被双引号包裹: id=”foo”
- 属性值被单引号包裹: id=’foo’
- 属性值没有引号包裹: id=foo
- 此时模板中还剩下一个智力,只需要重新执行上述步骤,即可完成v-show指令的解析。当v-show指令解析完毕后,将会遇到标签的结束部分,即字符>。这是parseAttributes 函数中的while循环将停止,完成属性和指令的解析。
parseAttributes 函数中有两个重要的正则表达式:
/^[^\t\r\n\f />][^\t\r\n\f />=]*/,用来匹配属性名称/^[^\t\r\n\f >]+/用来匹配没有使用引号引用的属性值

- 部分A用于匹配一个位置,这个位置不能是空白字符,也不能是字符/ 或者
>,并且字符串要以该位置开头 - 部分B用于匹配0个或多个位置,这些位置不能是空白字符,也不能是字符
/ > =。注意这些位置不能出现=号字符,这就实现了只匹配等于号之前的内容,即属性名称。
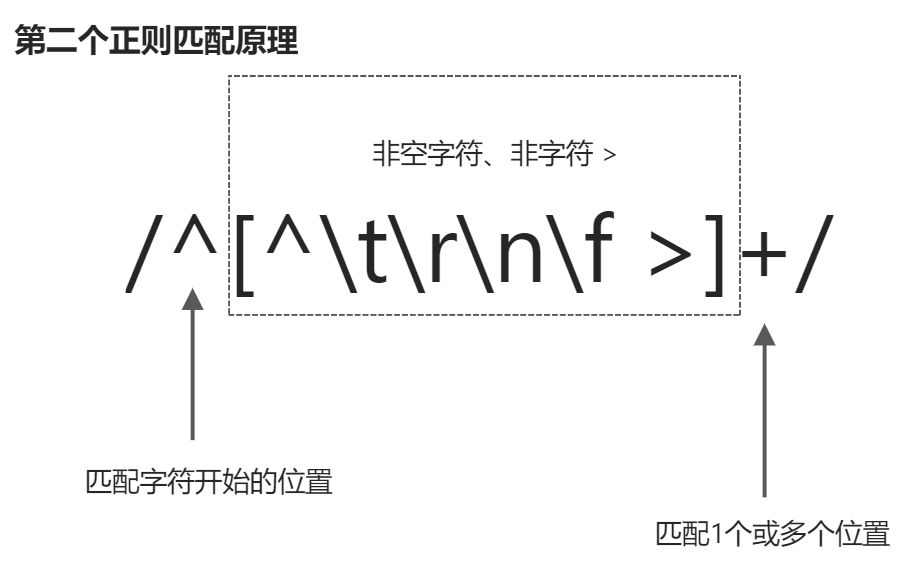
该正则表达式从字符串的开始位置进行匹配,并且会匹配一个或多个非空字符、非字符> 。该正则表达式会一直对字符串进行匹配,直到遇到空白字符或者字符>停止,这就实现了属性值得提取。
解析模板后,将会得到AST
const ast = {type:"Root",children: [{type: "Element", tag:"div",props: [{type: "Attribute", name: "id", value: "foo"},{type: "Attribute", name: "v-show", value: "display"}]}]}
解析文本和解码HTML实体
解析文本
接下来解析文本模板 <div>Text</div>,解析器解析这段模板内容,先经过parseTag 函数处理,会消费掉开始标签<div>,处理完成后,剩余内容 Text</div>。接着解析器调用parseChildren函数,开启新的状态机来处理模板。
状态机从初始状态1,进入状态7,即调用parseText函数处理文本内容。然后解析器会在模板中寻找下一个 <字符或插值定界符 {{的位置,记录索引I,解析器会从模板头部到索引I的位置截取内容。截取出来的字符串将作为文本节点的内容。Text</div>,parseText函数截取出文本内容 Text。
function parseText(context) {// endIndex 为文本内容的结尾索引,默认将整个模板剩余内容都作为文本内容let endIndex = context.source.length;// 寻找字符 < 的位置const ltIndex = context.source.indexOf("<");// 寻找字符 {{ 的位置const delimiterIndex = context.source.indexOf("{{");// 取ltIndex和当前 endIndex中较小的一个作为新的结尾的索引if (ltIndex > -1 && ltIndex < endIndex) {endIndex = ltIndex;}// 取delimiterIndex和当前endIndex中较小的一个作为新的结尾索引if (delimiterIndex > -1 && delimiterIndex < endIndex) {endIndex = delimiterIndex;}// 此时 endIndex是最终文本内容的结尾索引,调用slice函数截取文本内容const content = context.source.slice(0, endIndex);// 消耗文本内容context.advanceBy(content.length);return {type: "Text",content: decodeHtml(content)};}
- 由于字符 < 与定界符 {{ 出现的顺序未知,所以需要取两者中较小的一个作为文本截取的终点。
- 截取终点后,只需要调用字符串的slice函数对字符串进行截取即可,截取出来的内容就是文本节点的文本内容。
parseText函数解析模板: const ast = parse(‘
得到如下的AST:
const ast = {type: "Root", children: [{type: "Element",tag: "div",props: [],isSelfClosing: false,children:[{ type: "Text", content: "Text"}]}]}
解析HTML
解析html实体,解析器会对字符中的分号分情况处理:
- 当存在分号时:执行完整匹配
-
解析数字字符引用
使用正则表达式匹配文本中字符引用的开头部分
const head = /&(?:#x?)?/i.exec(rawText);
根据正则的匹配结果,判断字符引用的类型
如果head[0] ===’&’,说明匹配的是命名字符引用
- 如果head[0] ===’&#’ ,说明匹配的是以十进制表示的数字字符
- 如果head[0] ===’&#x’,说明匹配的是以十六进制表示的数字字符
根据head[0]匹配的值,判断是十进制还是十六进制
const head = /&(?:#x?)?/i.exec(rawText);const hex = head[0] === '&#x'const pattern = hex ? /^&#x([0-9z-f]+);?/i : /^&#([0-9]+);?/const body = pattern.exec(rawText); // body[1]的值就是 Unicode 值
解析插值和注释
文本插值是vue模板中用来渲染动态数据的 {{count}}。解析器在解析文本时,遇到起始定界符{{,会进入解析插值函数 parseInterpolation 来解析插值内容.
function parseInterpolation(context) {context.advanceBy("{{".length);let closeIndex = context.source.indexOf("}}");const content = context.source.slice(0, closeIndex);context.advanceBy(content.length);context.advanceBy("}}".length);return {type: "Interpolation",content: {type: "Expression",content: decodeHtml(content)}};}
最后是解析注释内容: parseComment函数
function parseComment(context) {context.advanceBy("<!--".length);let closeIndex = context.source.indexOf("-->");const content = context.source.slice(0, closeIndex);context.advanceBy(content.length);context.advanceBy("-->".length);return {type: "Comment",content};}
15解析器和16解析器的区别
- 在15章中编译器内的解析器原理是vue2中使用的,会按照把模板解析tokens,然后编译为模板ast。
- 16章中,是vue3采用的解析器原理。直接使用核心函数parseChildren进行解析,生成模板ast。
17编译优化
编译优化是vue3更新的一大特性,对vue3整体编译模板有很多提升。vue优化方式,区分动态内容和静态内容,并针对不同的内容采用不同的优化策略。动态节点收集和补丁标志
vue3在编译模板阶段,会提取编译时的关键信息,这些信息对渲染器在渲染时产生很大帮助,减少不必要的diff损耗操作。编译阶段区分出动态内容和静态内容,就可以实现极致的优化策略。
该模板内容只有bar时动态内容,当响应式数据bar发生变化时,只需要更新p标签的文本节点即可。生成的传统虚拟DOM结构。<div><div>foo</div><p>{{bar}}</p></div>
经过编译优化后,提取出动态静态节点信息的虚拟DOM节点。const vnode = {tag: 'div',children: [{tag: 'div', children: 'foo'},{tag: 'p', children: ctx.bar}]}
通过添加patchFlag属性,它的值是一个数字,patchFlag表示节点不同含义const vnode = {tag: 'div',children: [{tag: 'div', children: 'foo'},{tag: 'p', children: ctx.bar, patchFlag: 1}, // 这是动态节点]}
编写的模板代码,所有模板的根节点都会是block节点, 除了模板中的根节点需要作为block角色外, 任何带有v-if、v-for、v-else等指令的节点,都会作为block节点。const PatchFlags = {TEXT: 1, // 代表节点有动态的textContentCLASS: 2, // 元素有动态的class绑定STYLE: 3, // 元素有动态的style绑定//...}
Block节点,会将动态子代节点收集到 dynamicChildren 数组中。重新设计渲染函数的执行方式
createBlock函数,任何应该作为Block角色的虚拟节点,都有该函数完成虚拟节点的创建。 createBlock函数的执行数学是由内到外,当createBlock函数执行时,内层的所有 createBlock 函数已经执行完毕。currentDynamicChildren数组中所存储的就是属于当前Block的所有动态子代节点。const dynamicChildrenChildrenStack = [];let currentDynamicChildren = null;function openBlock(){dynamicChildrenChildrenStack.push((currentDynamicChildren = []))}function closeBlock(){currentDynamicChildren = dynamicChildrenChildrenStack.pop();}render(){return (openBlock(), createBlock('div', null, [createVNode('p', {class: 'foo'}, null, 1 ),createVNode('p', {class: 'bar'}, null)]))}function createBlock(tag, props, children){const block = createVNode(tag, props, children);block.dynamicChildren = currentDynamicChildrencloseBlock();return block;}
动态节点集合能够使得渲染器在执行更新是跳过静态节点,对于单动态节点并且存在patchFlag标志,可以针对性的完成靶向更新。这样避免全量的props更新,可以最大化提升性能。function patchElement(n1, n2) {const el = (n2.el = n1.el);const oldProps = n1.props;const newProps = n2.props;// 单节点,并且节点包含有patchFlags属性if (n2.patchFlags) {if (n2.patchFlags === 1) {// update class} else if (n2.patchFlags === 2) {// update style} else {// ...}} else {for (const key in newProps) {if (newProps[key] !== oldProps[key]) {patchProps(el, key, oldProps[key], newProps[key]);}}for (const key in oldProps) {if (!(key in newProps)) {patchProps(el, key, oldProps[key], null);}}}if (n2.dynamicChildren) {patchBlockChildren(n1, n2);} else {patchChildren(n1, n2, el);}}function patchBlockChildren(n1, n2) {for (let i = 0; i < n2.dynamicChildren.length; i++) {patchElement(n1.dynamicChildren[i], n2.dynamicChildren[i]);}}
Block树
Block树也是虚拟节点,比普通虚拟节点多出一个dynamicChildren数组,该数组用来收集所有动态子节点,利用createVnode和createBlock函数嵌套调用,完成收集,然后用一个节点栈完成动态节点的收集。由于Blcok会收集所有动态节点,所以对动态节点的比对操作是忽略DOM层级结构。
为了节点v-if以及v-for指令引起的不稳定性,需要把指令标签也作为Block节点,它们下面仍会有一个dynamicChildren数组存储动态节点。<div><section v-if="foo"><p>{{a}}</p></section><div v-else> <p>{{ a }}</p></div></div>// 解析后const block = {tag: "div",dynamicChildren:[/* Block(Section v-if) or Block(div v-else)*/{tag: 'section', {key:0 /* key值会根据不同的Block而变化*/}, dynamicChildren: [ //...]}]}
<div><p v-for="item in list">{{item}}</p><i>{{foo}}</i><i>{{ bar }}</i></div>// 解析后const block = {tag: "div",dynamicChildren:[{tag: Fragment, dynamicChildren: []},{tag: 'i', children: ctx.foo, 1 /* TEXT */},{tag: 'i', children: ctx.foo, 1 /* TEXT */},]}
静态节点提升
和Block树相对的是静态节点,如果节点是静态的,就可以把标签进行提取。
<div><p>static</p><p>{{count}}</p></div>//编译后const _hoisted_1 = /*#__PURE__*/_createElementVNode("p", null, "static", -1 /* HOISTED */)export function render(_ctx, _cache, $props, $setup, $data, $options) {return (_openBlock(), _createElementBlock("div", null, [_hoisted_1,_createElementVNode("p", null, _toDisplayString(_ctx.count), 1 /* TEXT */)]))}
把静态节点提升到渲染函数外,渲染函数只是对静态节点的引用。这样当后边响应式数据变化,不用重新创建静态的虚拟节点,减少了额外的开销。
如果属性是静态的,也会被提升
<div><p>static</p><p name='foo'>{{count}}</p></div>// 编译后const _hoisted_1 = /*#__PURE__*/_createElementVNode("p", null, "static", -1 /* HOISTED */)const _hoisted_2 = { name: "foo" }export function render(_ctx, _cache, $props, $setup, $data, $options) {return (_openBlock(), _createElementBlock("div", null, [_hoisted_1,_createElementVNode("p", _hoisted_2, _toDisplayString(_ctx.count), 1 /* TEXT */)]))}
预字符串化
基于静态提升,可以进一步采用预字符串化,将静态提升的虚拟节点或者节点树,提前转为字符串化
<div><p></p><p></p>// ... 20多个p标签<p></p></div>
经过 模板编译
const _hoisted_1 = /*#__PURE__*/_createElementVNode("p", null, "1", -1 /* HOISTED */)const _hoisted_2 = /*#__PURE__*/_createElementVNode("p", null, "1", -1 /* HOISTED */)const _hoisted_3 = /*#__PURE__*/_createElementVNode("p", null, "1", -1 /* HOISTED */)const _hoisted_4 = /*#__PURE__*/_createElementVNode("p", null, "1", -1 /* HOISTED */)const _hoisted_5 = /*#__PURE__*/_createElementVNode("p", null, "1", -1 /* HOISTED */)const _hoisted_6 = [_hoisted_1,_hoisted_2,_hoisted_3,_hoisted_4,_hoisted_5]export function render(_ctx, _cache, $props, $setup, $data, $options) {return (_openBlock(), _createElementBlock("div", null, _hoisted_6))}
这样优势:
- 大块的静态内容可以通过innerHTML进行设置,在性能上有一定优势
- 减少创建虚拟节点产生的性能开销
-
缓存事件
缓存内联事件处理函数,可以避免不必要的更新;假设
<Comp @change='a+b' />模板创建了绑定事件change,并且为事件绑定的事件处理程序是一个内联语句,编译器对内联函数进行缓存,减少不必要的更新function render(ctx, cache){return h(Comp, {onChange: cache[0] || (cache[0] = ($event) => (ctx.a + ctx.b))})}
v-once
当编译器遇到v-once指令时,会利用cache数组缓存渲染函数的全部或者部分执行结果。
// 模板内容<template><div v-once> {{ foo }}</div></template>// 编译后内容function render(ctx, cache){return (openBlock(), createBlock('div', null, [cache[1] || (cache[1] = createVnode('div', null, ctx.foo, 1 /* TEXT */))]))}
div标签内容被缓存到数组中,下次更新直接使用缓存的内容。
v-once指令能够从2方面提升性能 避免组件更新时重新创建虚拟DOM带来的性能损耗
- 避免不必要的DIff计算,被v-once标记的虚拟DOM树会被父节点Block节点收集。

若有收获,就点个赞吧
0 人点赞
