1、Pod使用ServiceAccount
参考资料:https://kubernetes.io/zh/docs/tasks/configure-pod-container/configure-service-account/
这道题暂时没有真题截图,大致意思这样:1、创建一个 SA(ServiceAccount)2、修改已有 yaml 文件指定创建的 SA3、删除当前命名空间中未绑定 Pod 的 SA
环境模拟:
vi pod-nginx.ymlapiVersion: v1kind: Podmetadata:name: webspec:containers:- image: nginxname: web
kubectl create sa test-sakubectl create -f pod-nginx.yml
2、kube-bench
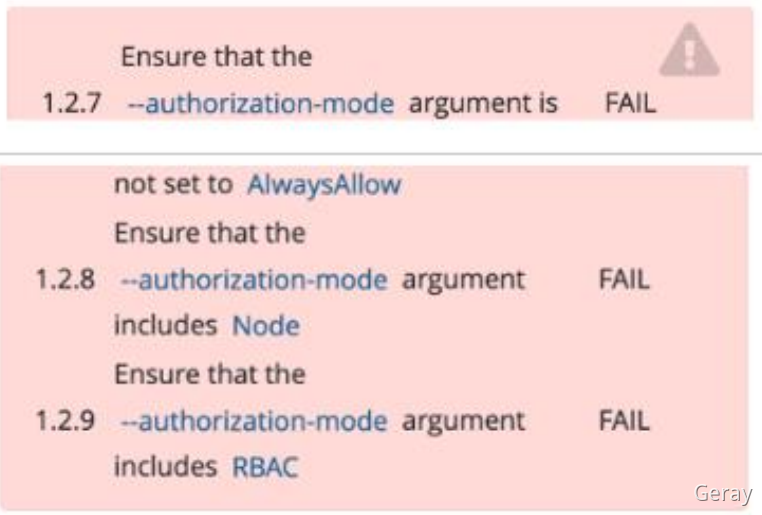
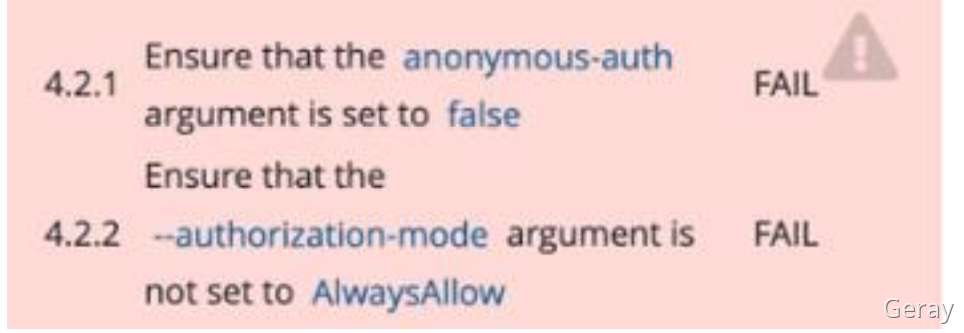

解读:使用 kube-bench 工具检查集群组件配置文件存在的问题与修复,并重启对应组件确保新配置生效。
环境模拟:
api-server:
vi /etc/kubernetes/manifests/kube-apiserver.yaml...- --authorization-mode=Node,RBAC,AlwaysAllow...
kubelet:
vi /var/lib/kubelet/config.yaml...authentication:anonymous:enabled: true...authorization:mode: Webhook,AlwaysAllow...
etcd:
vi /etc/kubernetes/manifests/etcd.yaml...- --client-cert-auth=false...
重启kubelet
systemctl restart kubelet
3、网络策略 (重要)
参考资料 : https://kubernetes.io/zh/docs/concepts/services-networking/network-policies/
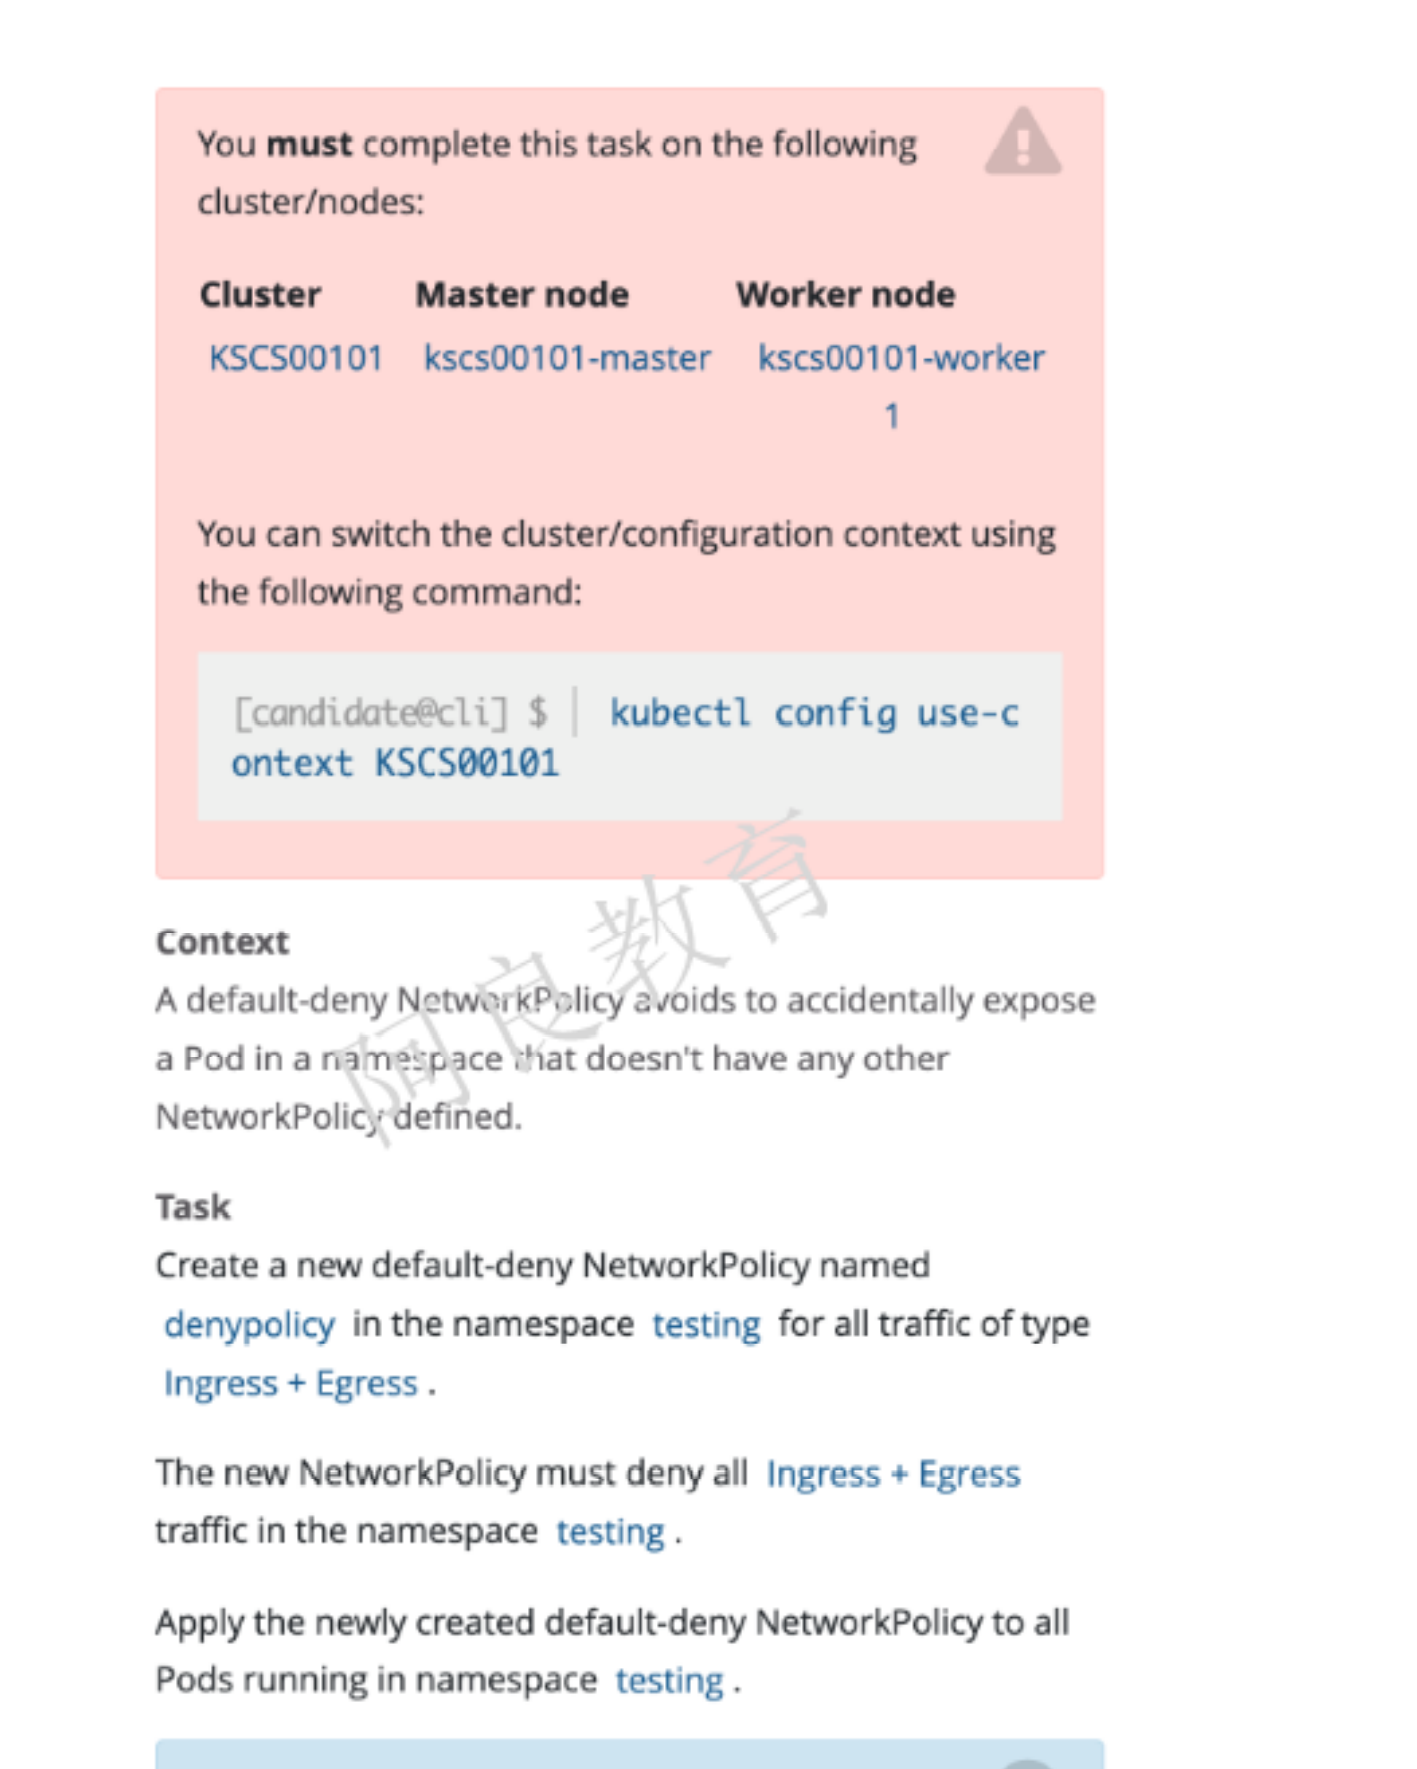
解读:在 testing 命名空间创建一个名为 denypolicy 的网络策略。拒绝所有 Ingress 和 Egress 流量。将网络策略应用到 testing 命名空间中的所有 pod。
环境模拟:
kubectl create namespace testingkubectl run testing-pod-1 --image=busybox -n testing --command -- sleep 24hkubectl run testing-pod-2 --image=busybox -n testing --command -- sleep 24hkubectl run testing-pod --image=busybox --command -- sleep 24h
4、Pod安全策略(PSP)(重要)
参考资料:https://kubernetes.io/zh/docs/concepts/policy/pod-security-policy/
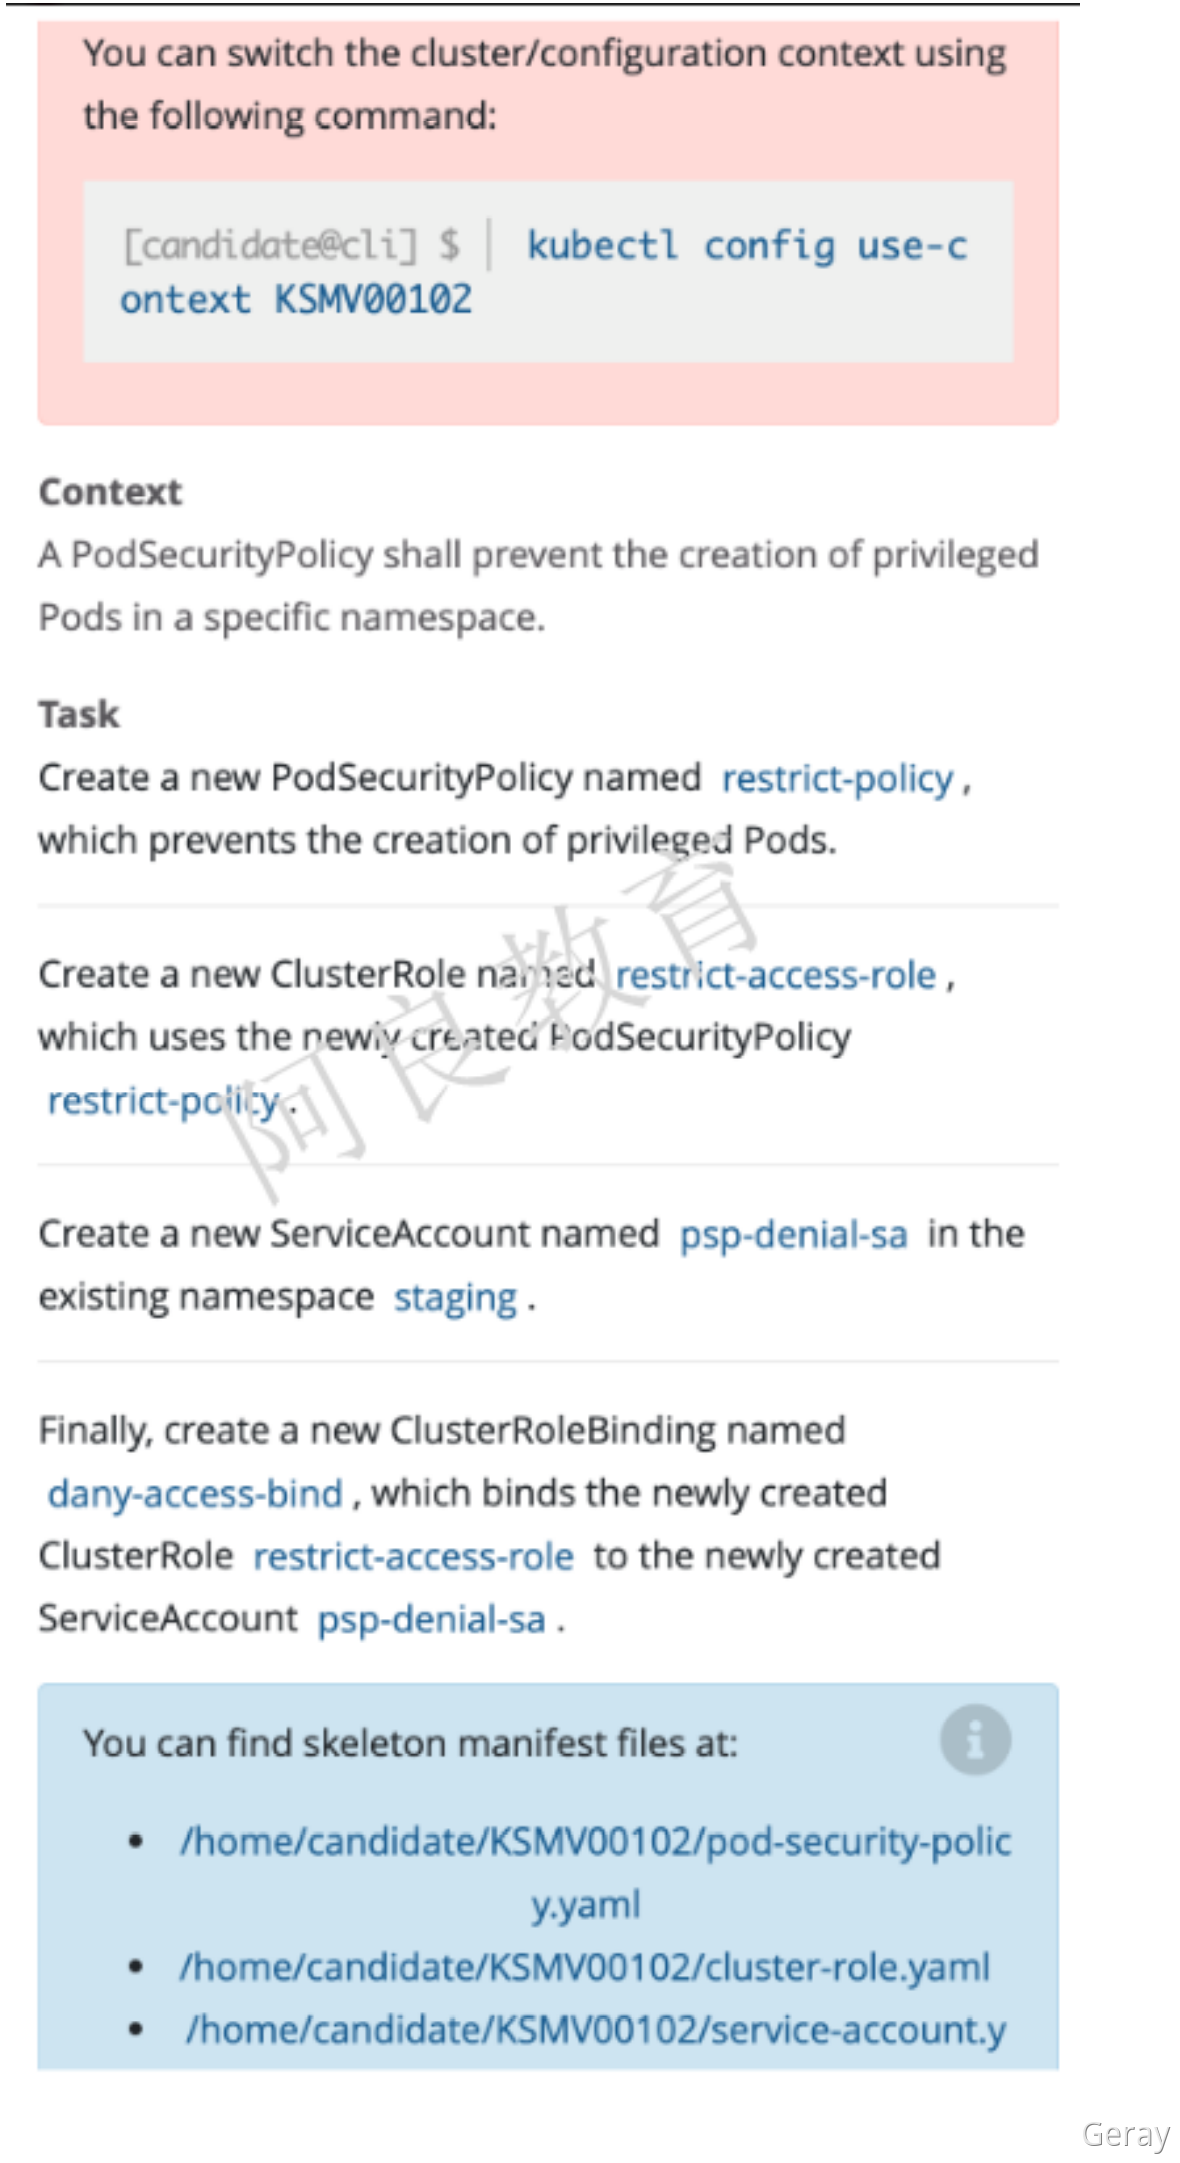
解读:1. 创建一个名为 restrict-policy 的 PodSecurityPolicy,防止创建特权 Pod2. 创建一个名为 restrict-access-role 的 ClusterRole 能够使用 PSP restrict-policy3. 在 staging 命名空间创建一个名为 psp-denial-sa 的 ServiceAccount4. 最后,创建一个名为 dany-access-bind 的 ClusterRoleBinding,绑定 ClusterRolerestrict-access-role 到 ServiceAccount psp-denial-sa
环境模拟:
/etc/kubernetes/manifests/kube-apiserver.yaml
- --enable-admission-plugins=NodeRestriction
pod-security-policy.yml
apiVersion: policy/v1beta1kind: PodSecurityPolicymetadata:name: restrict-policyspec:privileged: trueseLinux:rule: RunAsAnysupplementalGroups:rule: RunAsAnyrunAsUser:rule: RunAsAnyfsGroup:rule: RunAsAnyvolumes:- '*'
cluster-role.yml
apiVersion: rbac.authorization.k8s.io/v1kind: ClusterRolemetadata:creationTimestamp: nullname: restrict-access-rolerules:- apiGroups:- policyresourceNames:- restrict-policyresources:- podsecuritypoliciesverbs:- use
service-account.yml
apiVersion: v1kind: ServiceAccountmetadata:creationTimestamp: nullname: psp-denial-sanamespace: staging
cluster-role-binding.yml
apiVersion: rbac.authorization.k8s.io/v1kind: ClusterRoleBindingmetadata:creationTimestamp: nullname: dany-access-bindroleRef:apiGroup: rbac.authorization.k8s.iokind: ClusterRolename: restrict-access-rolesubjects:- kind: ServiceAccountname: psp-denial-sanamespace: staging
kubectl create namespace stagingkubectl create -f 4-PodSecurityPolicy/
5、RBAC

解读:1. 在 db 命名空间存在一个名为 web-pod 的 Pod2. 编辑该 Pod 绑定的 ServiceAccount service-account-web Role,只允许对 Endpoints 资源类型执行 get 操作3. 在 db 命名空间创建一个名为 role-2 的 Role,该角色只允许对 namespaces 资源类型执行delete 操作4. 创建一个名为 role-2-binding 的 RoleBinding,绑定到 ServiceAccount
环境模拟:
role-1
apiVersion: rbac.authorization.k8s.io/v1kind: Rolemetadata:namespace: dbname: role-1rules:- apiGroups: [""]resources: ["pods", "services","deployments","endpoints"]verbs: ["get", "list","delete","update"]
rolebinding
kubectl create rolebinding role-1-binding --role=role-1 --serviceaccount=db:service-account-web -n db
web-pod
apiVersion: v1kind: Podmetadata:name: web-podnamespace: dbspec:containers:- image: nginxname: web-podserviceAccount: service-account-webserviceAccountName: service-account-web
执行:
kubectl create namespace dbkubectl create serviceaccount service-account-web -n db
6、日志审计(重要)
参考资料:https://kubernetes.io/zh/docs/tasks/debug-application-cluster/audit/
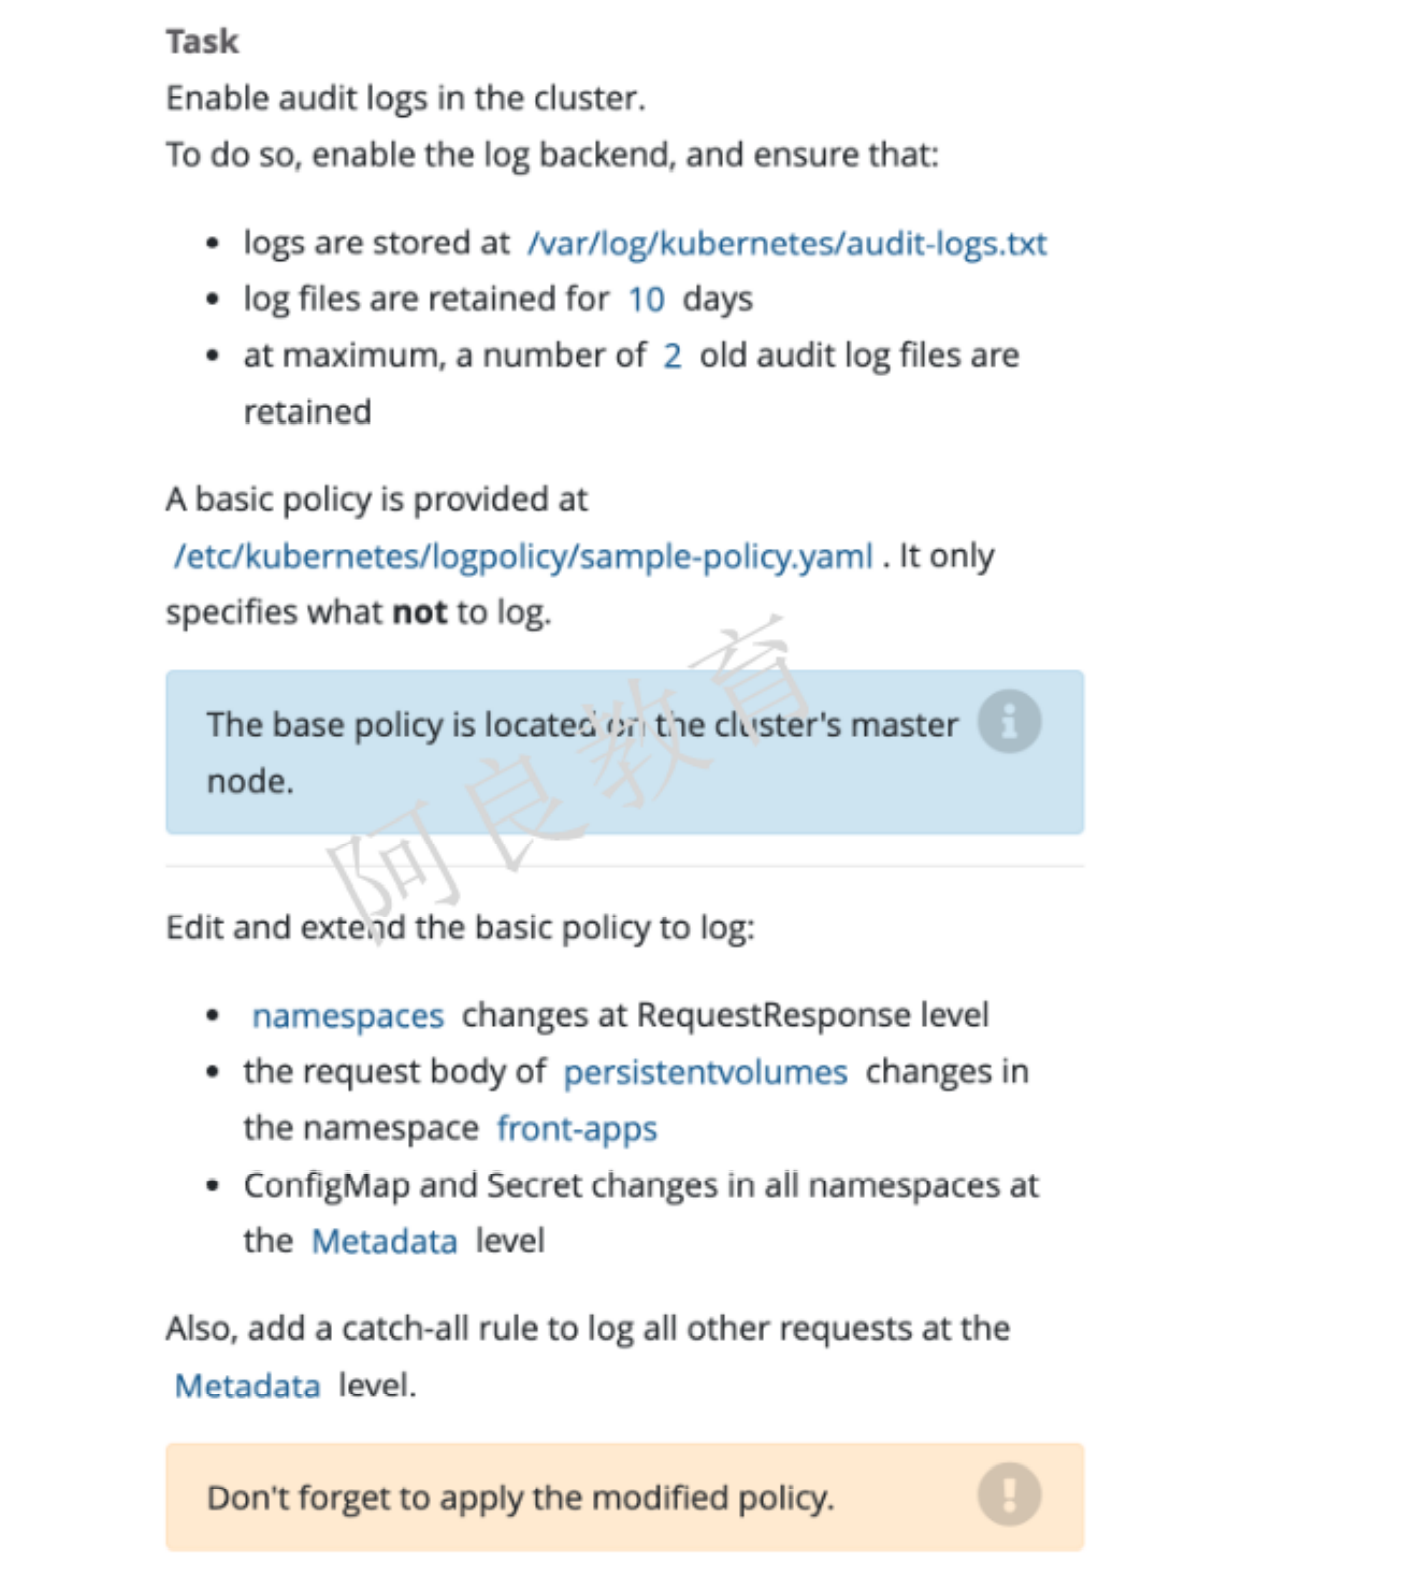
解读:在集群启用审计,并确保:日志路径为 /var/log/kubernetes/audit-logs.txt日志文件保留 10 天最多保留 2 个日志文件基本策略在/etc/kubernetes/logpolicy/sample-policy.yaml 文件(该文件在 master 节点上)中提供,它指定了不记录的内容编辑和扩展基本策略:命名空间在 RequestResponse 级别更改PV 的请求内容在 front-apps 命名空间发生了更改Configmap 和 secret 在所有命名空间 Metadata 级别更改
环境模拟:
7、Secret
参考资料:https://kubernetes.io/zh/docs/concepts/configuration/secret/
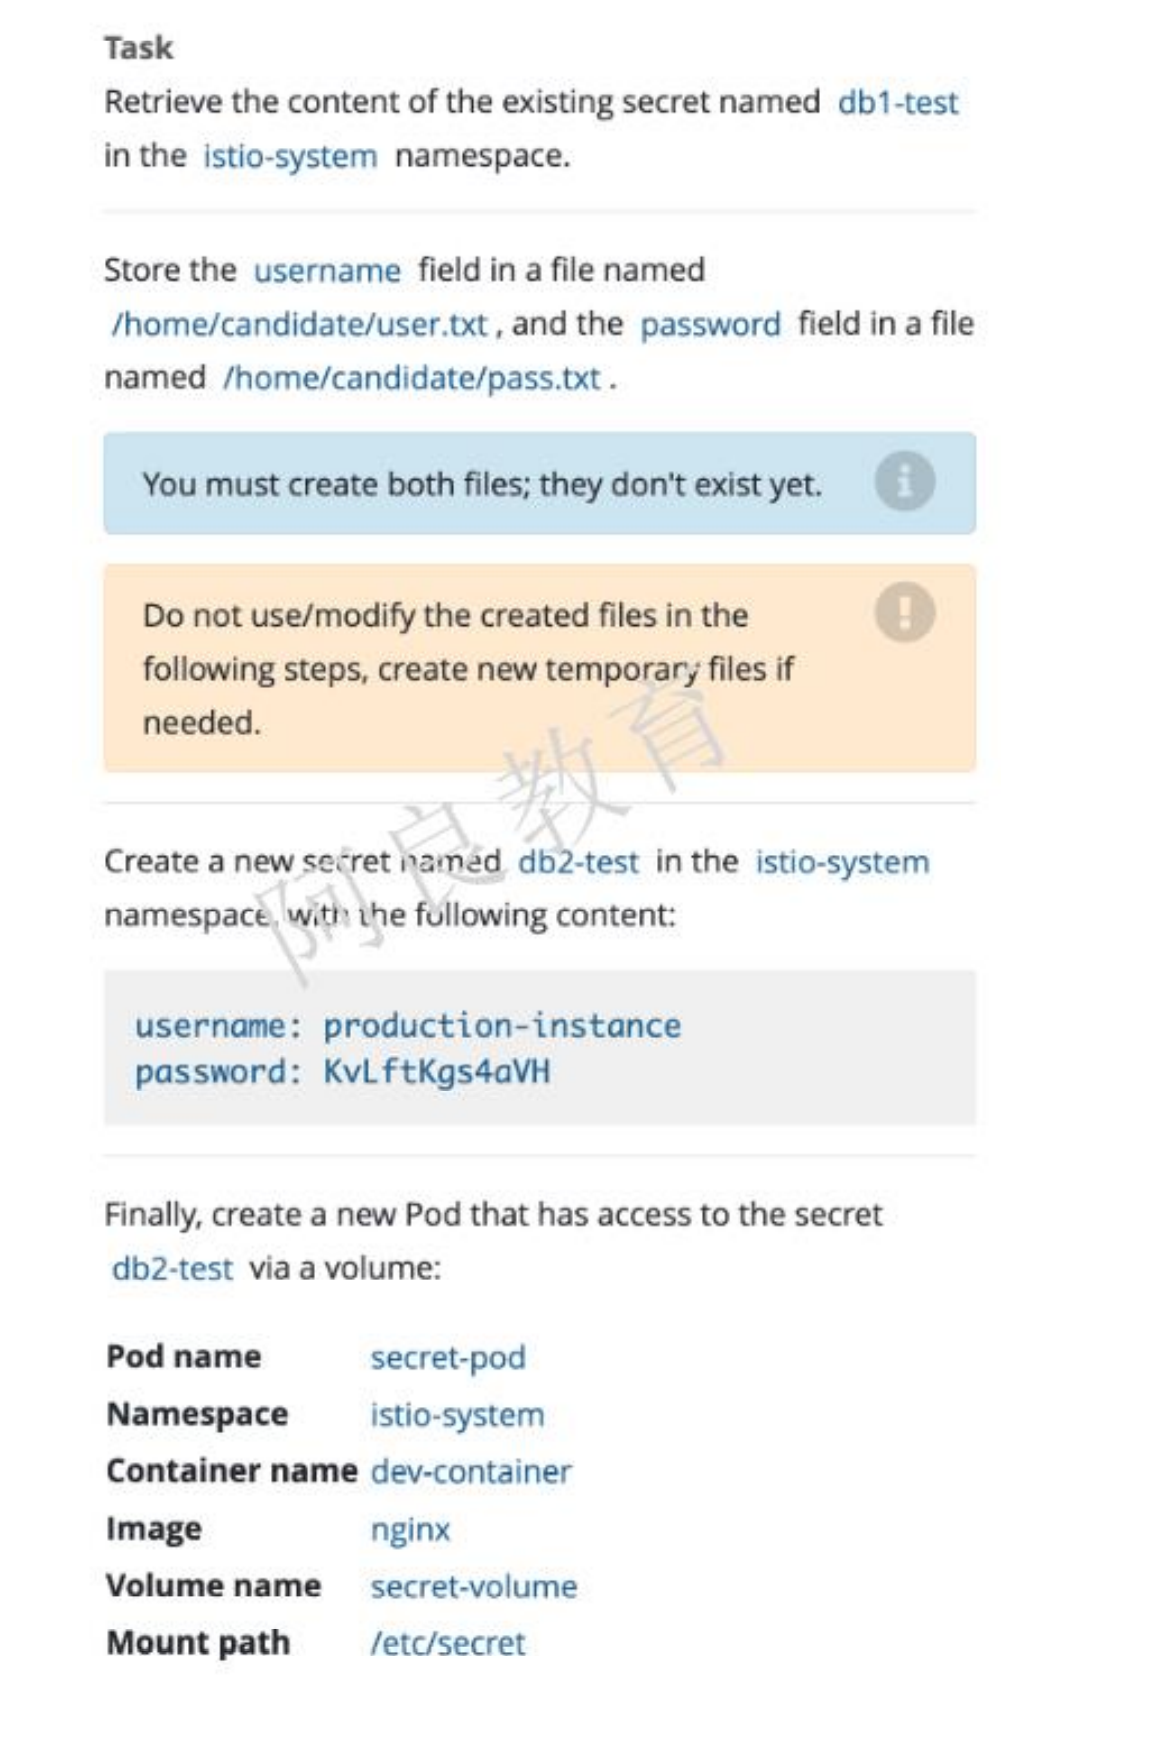
解读:1、在 istio-system 命名空间存在一个名为 db1-test 的 secret,将 username 字段保存到文件名为/home/candidate/user.txt 和 password 字段保存到文件名为/home/candidate/pass.txt注:文件需要自己创建2、在 istio-system 命名空间创建一个名为 db2-test 的 secret,内容如下:username: production-instancepassword: KvLftKgs4aVH最后,创建一个新的 Pod,可以通过 volume 方式访问 secret 内容。
环境模拟:
kubectl create namespace istio-systemkubectl create secret generic db1-test --from-literal=username=production-instance --from-literal=password=KvLftKgs4aVH -n istio-systemmkdir /home/candidate/
8、Dockerfile和Deployment优化
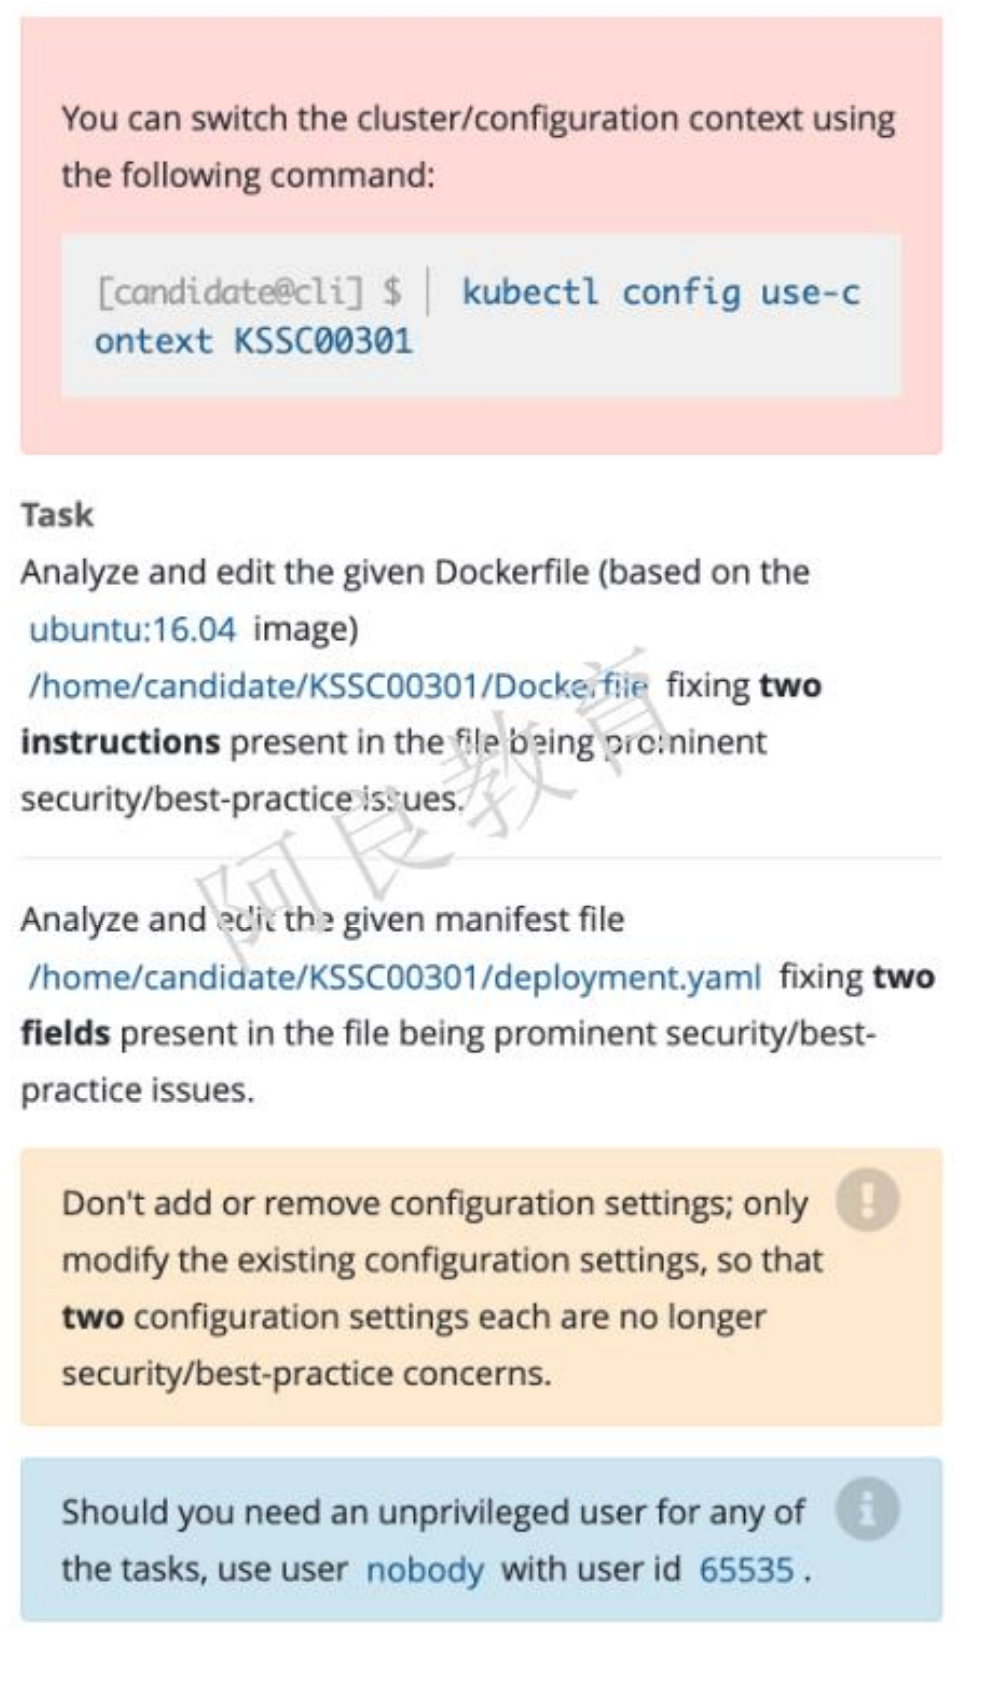
环境模拟:
Dockerfile
FROM ubuntu:16.04MAINTAINER "Geray <xxx@qq.com>"RUN /bin/echo 'root:123456' |chpasswdRUN useradd runoobRUN /bin/echo 'runoob:123456' |chpasswdRUN /bin/echo -e "LANG=\"en_US.UTF-8\"" >/etc/default/localEXPOSE 22EXPOSE 80USER rootCMD /usr/sbin/sshd -D
Deployment
apiVersion: apps/v1kind: Deploymentmetadata:name: web-testspec:replicas: 1selector:matchLabels:app: web-testtemplate:metadata:labels:app: web-testspec:containers:- image: nginxname: nginxsecurityContext:capabilities:add: ["NET_BIND_SERVICE"]privileged: true
9、沙箱运行容器gVisor
参考资料:https://kubernetes.io/zh/docs/concepts/containers/runtime-class/
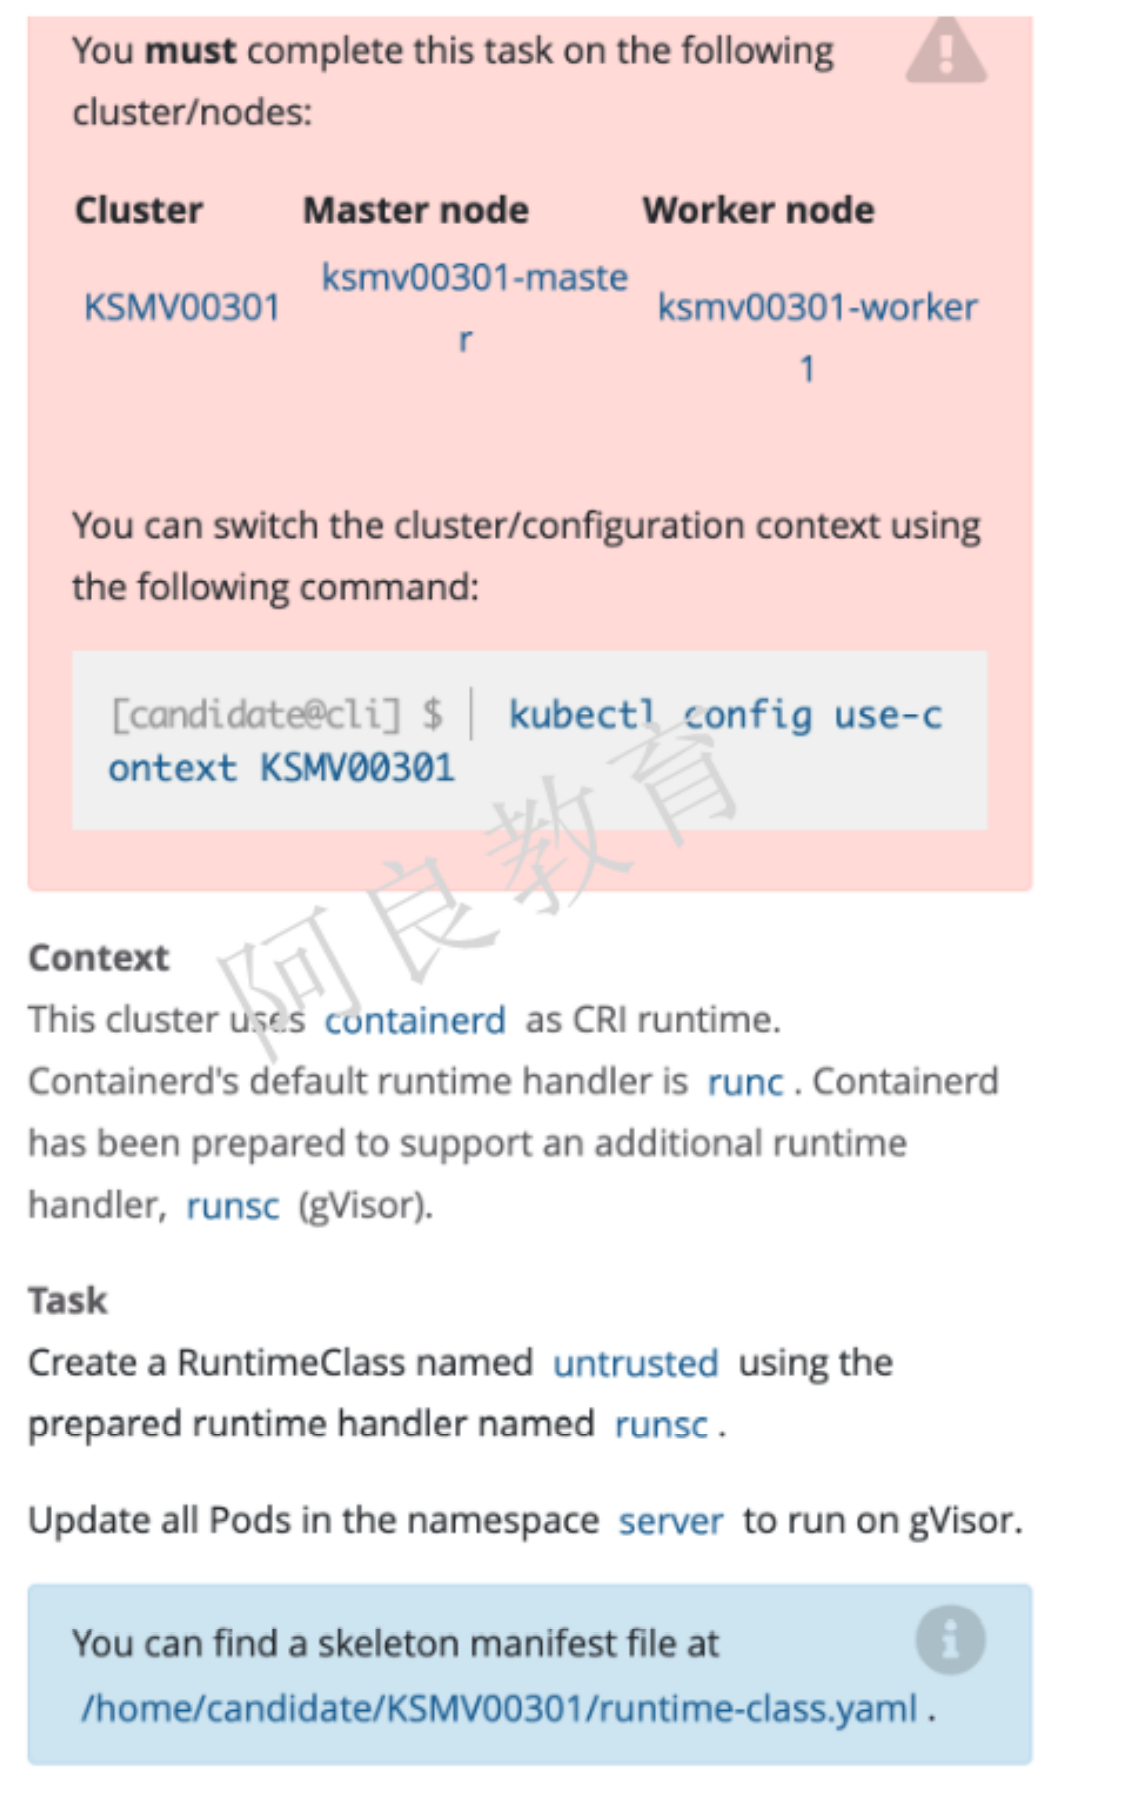
描述:这个集群使用 containerd 作为 CRI 运行时。Containerd 的默认运行时处理程序是runc,containerd 也支持额外的运行时处理程序 runsc(gVisor)解读:创建一个名为 untrusted 的 RuntimeClass,使用准备好的运行时处理程序 runsc。更新 server 命名空间中的所有 Pod 使其在 gVisor 上运行。
环境模拟:
1、使用containerd作为k8s容器运行时
1)准备配置
cat > /etc/sysctl.d/99-kubernetes-cri.conf << EOFnet.bridge.bridge-nf-call-iptables = 1net.ipv4.ip_forward = 1net.bridge.bridge-nf-call-ip6tables = 1EOFsysctl --system
2)安装containerd容器引擎
CentOS
cd /etc/yum.repos.dwget http://mirrors.aliyun.com/docker-ce/linux/centos/docker-ce.repoyum install -y containerd.io
Ubuntu
apt-get install -y containerd.io
3)修改配置文件
- pause镜像地址
- Cgroup驱动改为systemd
- 增加runsc容器运行时
- 配置docker镜像加速器
mkdir -p /etc/containerdcontainerd config default > /etc/containerd/config.tomlvi /etc/containerd/config.toml...[plugins."io.containerd.grpc.v1.cri"] # 下面修改sandbox_image = "registry.aliyuncs.com/google_containers/pause:3.2"...[plugins."io.containerd.grpc.v1.cri".containerd.runtimes.runc.options]# 下面增加SystemdCgroup = true...[plugins."io.containerd.grpc.v1.cri".containerd.runtimes.runsc]runtime_type = "io.containerd.runsc.v1"[plugins."io.containerd.grpc.v1.cri".registry.mirrors."docker.io"] # 上面增加两行endpoint = ["https://b9pmyelo.mirror.aliyuncs.com"] # 修改为阿里云的地址...systemctl restart containerd
4)配置kubelet使用containerd
** systemctl cat kubelet**查看EnvironmentFile
CentOS:/etc/sysconfig/kubelet
Ubuntu:/etc/default/kubelet
vi /etc/default/kubelet # 使用Ubuntu系统KUBELET_EXTRA_ARGS=--container-runtime=remote --container-runtime-endpoint=unix:///run/containerd/containerd.sock --cgroup-driver=systemdsystemctl restart kubelet
5)验证
kubectl get node -o wide
问题解决:crictl info异常
crictl infoNAME:crictl info - Display information of the container runtimeUSAGE:crictl info [command options] [arguments...]OPTIONS:--output value, -o value Output format, One of: json|yaml (default: "json")FATA[0010] failed to connect: failed to connect: context deadline exceeded
crictl config runtime-endpoint /run/containerd/containerd.sock
问题解决:calico节点pod无法启动(ip被占用)
kubectl logs calico-node-pj89k -n kube-system...2021-12-23 02:42:45.754 [WARNING][12] startup/startup.go 1074: Calico node 'k8s-master-1' is already using the IPv4 address 172.18.0.1.....
- IPv4地址已经被占用
ip a | grep 172.18.0.1inet 172.18.0.1/16 brd 172.18.255.255 scope global br-ae62d50bbde3docker network ls | grep ae62d50bbde3ae62d50bbde3 harbor_harbor bridge local
- 可以看到docker已经自动生成改网卡,使用docker删除这个网卡
docker network rm ae62d50bbde3Error response from daemon: error while removing network: network harbor_harbor id ae62d50bbde3d1547c9529127c2dd1a90abdd77357a8f826f3c417a3089c169b has active endpoints
- 无法删除,已经和harbor进行关联(之前装过harbor,停止harbor)
docker-compose down -v# 再次查看发现已经释放了,pod并成功运行ip a | grep 172.18.0.1docker network ls | grep ae62d50bbde3
问题处理:所有pod无法分配到k8s-node-1节点
Warning FailedScheduling 30s (x2 over 32s) default-scheduler 0/2 nodes are available: 1 node(s) had taint {node-role.kubernetes.io/master: }, that the pod didn't tolerate, 1 node(s) had taint {node.kubernetes.io/disk-pressure: }, that the pod didn't tolerate.
- 可以看到不可调度
kubectl describe node k8s-node-1 | grep -A4 TaintTaints: node.kubernetes.io/disk-pressure:NoScheduleUnschedulable: false...
- node.kubernetes.io/disk-pressure:NoSchedule
- https://kubernetes.io/zh/docs/reference/labels-annotations-taints/
kubelet 依据节点上观测到的 imagefs.available、imagefs.inodesFree、nodefs.available 和 nodefs.inodesFree(仅 Linux) 来判断磁盘压力。 用观测值对比 kubelet 设置的阈值,以确定节点状态和污点是否可以被添加/移除。这是由于我的节点磁盘空间使用率超过了kubelet的阈值导致服务被调度
2、准备runtime-class.yaml文件
runtime-class.yaml
apiVersion: node.k8s.io/v1kind: RuntimeClass # RuntimeClass 是一个集群层面的资源metadata:name: untrusted # 用来引用 RuntimeClass 的名字handler: runsc # 对应的 CRI 配置的名称(运行时接口)
3、执行
kubectl create namespace serverkubectl create -f runtime-class.yamlkubectl create deployment web --image=nginx -n server
10、删除启用的特权pod
参考资料:https://kubernetes.io/zh/docs/concepts/security/pod-security-standards/
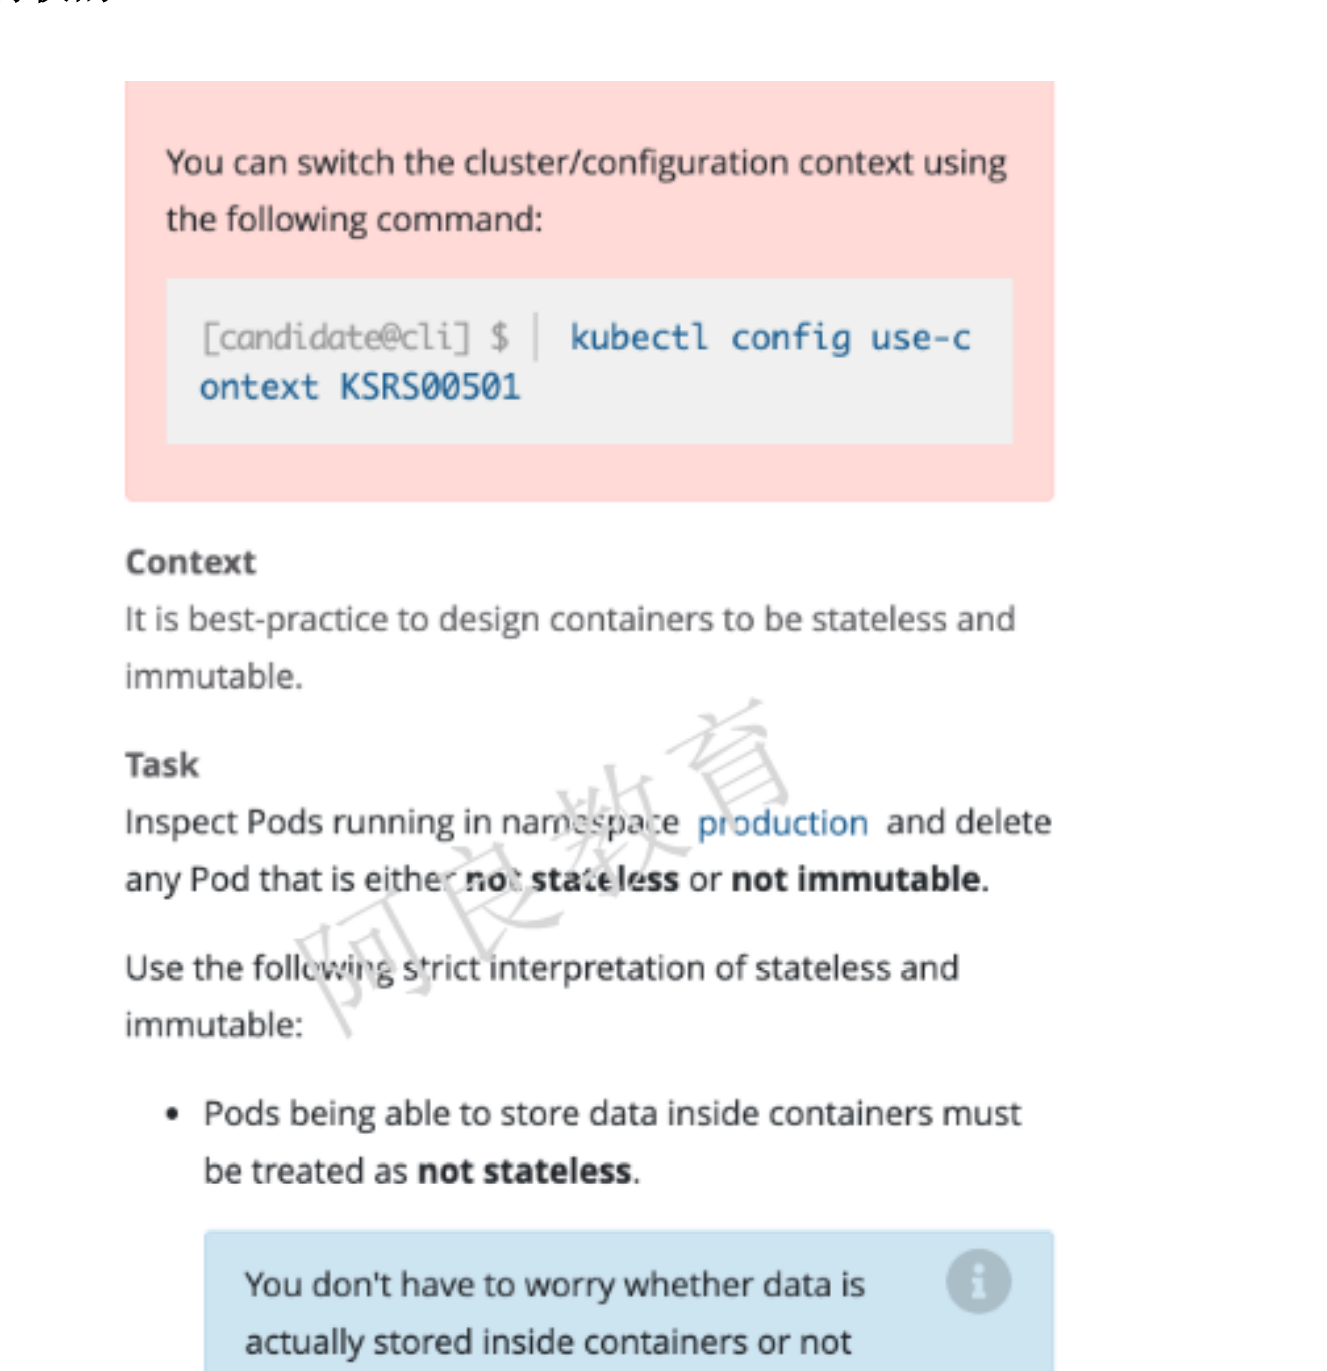
解读:检查在 production 命名空间运行的 Pod,并删除任何不是非无状态(有状态)或非不可变(可变)的 Pod以下是对无状态和不可变的解释: 在容器中存储数据的 Pod 视为非无状态(不用担心容器数据持久化) 启用特权的 Pod 都视为潜在的非无状态和非不可变
环境模拟:
这道题应该包含存在挂载(数据卷- 保留readOnly)和特权的pod
- 检查是否存在volumeMount 和 privileged: true
kubectl create namespace production---apiVersion: v1kind: Podmetadata:name: web1namespace: productionspec:containers:- image: nginxname: web1securityContext:privileged: true---apiVersion: v1kind: Podmetadata:name: web2namespace: productionspec:containers:- image: nginxname: web2securityContext:privileged: true---apiVersion: v1kind: Podmetadata:name: web3namespace: productionspec:containers:- image: nginxname: web3kubectl create -f web.yml
11、网络策略 (重要)
参考资料 : https://kubernetes.io/zh/docs/concepts/services-networking/network-policies

解读:创建一个名为 pod-restriction 的网络策略,以限制命名空间 dev-team 中 products-service Pod。只允许以下 Pod 连接 products-service Pod: qa 命名空间中的 Pod Pod 标签为 environment:testing,在所有命名空间
环境模拟:
kubectl create namespace dev-team --labels="environment=staging"kubectl create namespace qa --labels="name=qa"kubectl run products-service --image=nginx -ndev-teamkubectl -n qa run test --image=busybox --command -- sleep 24hkubectl run test1 --image=busybox --labels="environment=testing" --command -- sleep 24hkubectl run test2 --image=busybox --command -- sleep 24h
network-policy.yaml
apiVersion: networking.k8s.io/v1kind: NetworkPolicymetadata:name: pod-restrictionnamespace: dev-teamspec:podSelector:matchLabels:environment: stagingpolicyTypes:- Ingressingress:- from:- namespaceSelector:matchLabels:name: qa- from: # 这里的from可有可无- namespaceSelector: {} # 这个namespace是必须的podSelector:matchLabels:environment: testing
12、ImagePolicyWebhook (重要)
参考资料 : https://kubernetes.io/docs/reference/access-authn-authz/admission-controllers/#imagepolicywebhook
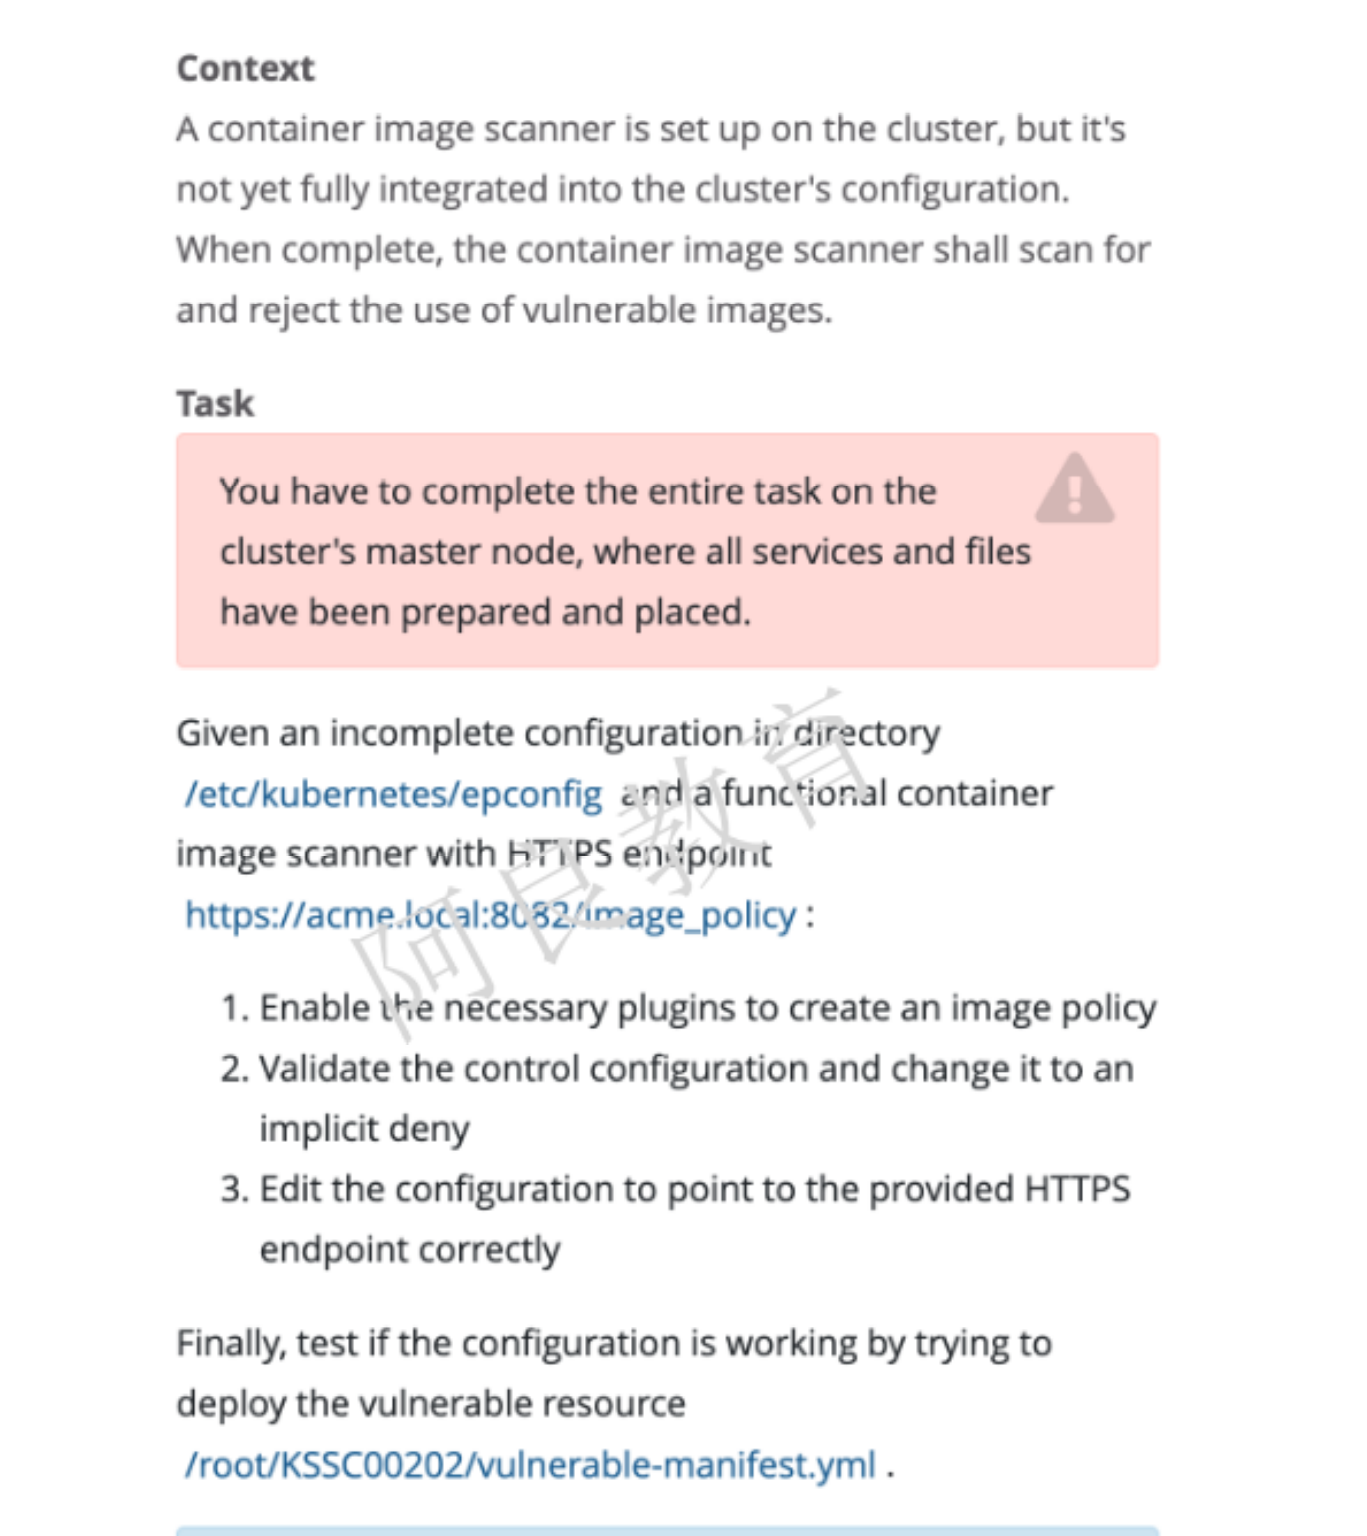
提示:必须在集群 master 节点完成任务,其中包含的所有服务和文件已准备好。解读:在/etc/kubernetes/epconfig 目录下有一个不完整的配置和一个功能容器镜像扫描器HTTPS 端点:https://acme.local:8082/image_policy1. 启用准入控制插件2. 验证控制配置并将其更改为默认拒绝。3. 修改配置文件,指向正确的 HTTPS 端点最后,尝试部署易受供攻击的资源来测试配置是否有效。/root/KSSC00202/ulnerable-manifest.yml查看容器扫描日志:/var/log/imagepolicy/roadrunner.log
环境模拟:暂时未模拟
1、插件
- 方便起见,使用YAML代替json
vi /etc/kubernetes/manifests/kube-apiserver.yaml…- --enable-admission-plugins=NodeRestriction#- --admission-control-config-file=/etc/kubernetes/epconfig/admission_configuration.yaml# 注释或删除HostPath数据卷在宿主机/etc/kubernetes/image-policy目录的挂载信息
2、验证配置文件
admission_configuration.yaml
cd /etc/kubernetes/epconfigvi adminssion_configuration.yamlapiVersion: apiserver.config.k8s.io/v1kind: AdmissionConfigurationplugins:- name: ImagePolicyWebhookconfiguration:imagePolicy:kubeConfigFile: /etc/kubernetes/epconfig/connect_webhook.yaml # 连接镜像策略服务器配置文件allowTTL: 50 # 控制批准请求的缓存时间(s)denyTTL: 50 # 控制拒绝请求的缓存时间(s)retryBackoff: 500 # 控制重试间隔(ms)defaultAllow: true # 确定Webhook后端实效的行为
3、kubeconfig配置文件
kubeconfig.yaml
类似于
kubectl config命令生成的~/.kube/conf,直接拷贝改文件至/etc/kubernetes/epconfig/connect_webhook.yaml并删除其中证书信息,并修改为如下
cd /etc/kubernetes/epconfig/vi connect_webhook.yamlapiVersion: v1clusters:- cluster:certificate-authority-data: /etc/kubernetes/epconfig/webhook.pem # 数字证书,用于验证远程服务server: https://192.168.6.31:8080/image_policy # 镜像策略服务器地址,必须是httpsname: kubernetescontexts:- context:cluster: webhookuser: apiservername: kubernetes-admin@kubernetescurrent-context: webhookkind: Configpreferences: {}users:- name: apiserveruser:client-certificate-data: /etc/kubernetes/epconfig/apiserver-client.pem # webhook准入控制器使用的证书client-key-data: /etc/kubernetes/epconfig/apiserver-client-key.pem # 对应私钥证书
- 注:涉及的证书文件,下一步生成,拷贝到该文件中对应路径
4、自签证书配置
image-policy-certs.sh
cat > ca-config.json <<EOF{"signing": {"default": {"expiry": "87600h"},"profiles": {"kubernetes": {"expiry": "87600h","usages": ["signing","key encipherment","server auth","client auth"]}}}}EOFcat > ca-csr.json <<EOF{"CN": "kubernetes","key": {"algo": "rsa","size": 2048},"names": [{"C": "CN","L": "Beijing","ST": "Beijing"}]}EOFcfssl gencert -initca ca-csr.json | cfssljson -bare ca -cat > webhook-csr.json <<EOF{"CN": "webhook","hosts": ["192.168.6.31"],"key": {"algo": "rsa","size": 2048},"names": [{"C": "CN","L": "BeiJing","ST": "BeiJing"}]}EOFcfssl gencert -ca=ca.pem -ca-key=ca-key.pem -config=ca-config.json -profile=kubernetes webhook-csr.json | cfssljson -bare webhookcat > apiserver-client-csr.json <<EOF{"CN": "apiserver","hosts": [],"key": {"algo": "rsa","size": 2048},"names": [{"C": "CN","L": "BeiJing","ST": "BeiJing"}]}EOFcfssl gencert -ca=ca.pem -ca-key=ca-key.pem -config=ca-config.json -profile=kubernetes apiserver-client-csr.json | cfssljson -bare apiserver-client
- -u root 挂载时需要使用root权限(生产环境将证书直接打到镜像,不会涉及改问题)
- PYTHONUNBUFFERED=1 关闭Python缓存区
5、webhook镜像策略容器(使用docker创建容器测试,k8s部署目前无法访问)
docker pull lizhenliang/image-policy-webhookdocker pull geray/image-policy-webhook:latest# 一下是docker测试用例,模拟考试环境使用deploymentdocker run -d -u root --name=image-policy-webhook \-v $PWD/webhook.pem:/data/www/webhook.pem \-v $PWD/webhook-key.pem:/data/www/webhook-key.pem \-e PYTHONUNBUFFERED=1 -p 8080:8080 \geray/image-policy-webhook:latest
ulnerable-manifest.yml
apiVersion: apps/v1kind: Deploymentmetadata:labels:app: image-policyname: image-policyspec:replicas: 1selector:matchLabels:app: image-policytemplate:metadata:labels:app: image-policyspec:containers:- image: geray/image-policy-webhook:latestname: image-policy-webhookenv:- name: PYTHONUNBUFFEREDvalue: "1"volumeMounts:- mountPath: /data/www/webhook.pemname: webhooksubPath: webhook.pem # 只挂载改文件- mountPath: /data/www/webhook-key.pemname: webhook-keysubPath: webhook-key.pemvolumes:- name: webhook # 挂载时引用的名称configMap:name: webhook#defaultMode: 0777 # 挂载文件权限items:- key: webhook # configmap名称path: webhook.pem- name: webhook-keyconfigMap:name: webhookitems:- key: keypath: webhook-key.pem
执行
chmod +x image-policy-certs.sh && ./image-policy-certs.shcp /etc/kubernetes/epconfig/apiserver-client.pemcp /etc/kubernetes/epconfig/apiserver-client-key.pemcp /etc/kubernetes/epconfig/webhook.pemkubectl create configmap webhook --from-file=webhook="/root/cks/12-networkpolicywebhook/tls/webhook.pem" --from-file=key="/root/cks/12-networkpolicywebhook/tls/webhook-key.pem"kubectl create -f ulnerable-manifest.ymlkubectl expose deployment image-policy --port=8080 --target-port=8080 --type=NodePort
13、Trivy扫描镜像安全漏洞

解读:对 kamino 命名空间中 pod 使用 Trivy 工具扫描镜像安全漏洞。查找具有高危或严重漏洞的镜像,并删除使用这些镜像的 Pod。注:Trivy 已经预装集群的 master 节点,工作节点不可用。
环境模拟:
kubectl create namespace kaminokubectl run web-test --image=nginxkubectl run test --image=busybox --command -- sleep 24h
14、AppArmor
参考资料:https://kubernetes.io/zh/docs/tutorials/clusters/apparmor

解读:在集群的工作节点上,执行下面准备好的配置文件/etc/apparmor.d/nginx_apparmor编辑准备好的清单文件/home/candidate/KSSH00401/nginx-deploy.yaml 应用于 AppArmor 文件。最后,在 Pod 中应用 apparmor 策略文件。
环境模拟:
15、启用kubernetes API认证
描述:kubeadm 创建的集群的 Kubernetes API 服务器,出于测试目的,临时配置为允许未经身份验证和未经授权的访问,授予匿名用户集群管理员访问权限。要求:重新配置集群的 Kubernetes API 服务器以确保只允许经过身份验证和授权的 API 请求。 使用授权模式 Node、RBAC 和准入控制器 NodeRestriction 删除名为 system:anonymous 的 ClusterRoleBinding
环境模拟:
vi /etc/kubernetes/manifests/kube-apiserver.yaml- kube-apiserver- --authorization-mode=Node,RBAC # 只保留这两个- --enable-admission-plugins=NodeRestriction # 只保留这一个systemctl restart kubelet# 删除角色绑定kubectl delete clusterrolebinding system:anonymous

若有收获,就点个赞吧
0 人点赞
