原文: https://javatutorial.net/implementing-controllers-in-spring
控制器在 Spring 中的主要目的是拦截传入的 http 请求,将数据发送到模型进行处理,最后从模型中获取处理后的数据,然后将完全相同的数据传递给要呈现它的视图。

上面所写内容的顶级概述:
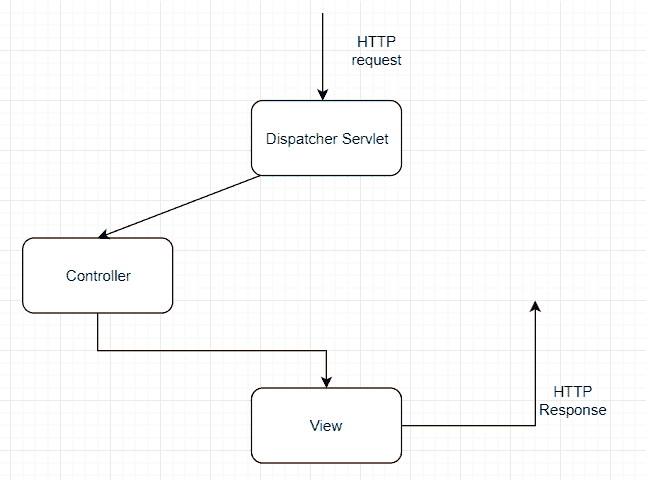
Spring 工作流程
现在,让我们构建一个简单的应用程序,作为在 Spring 中实现控制器的示例。
当您要“声明”一个类作为控制器时,就像使用@Controller对其进行注释一样简单。 在类级别使用时,控制器现在可以处理 REST API 请求。
GetMapping注解
当使用@Controller注解时,可以通过使用该方法的RequestMapping注解来提供请求映射。 还有@RequestMapping,@PostMapping,@PutMapping可以简化常见 HTTP 方法类型的映射。
package com.example.demo;import org.springframework.boot.SpringApplication;import org.springframework.boot.autoconfigure.SpringBootApplication;import org.springframework.stereotype.Controller;import org.springframework.web.bind.annotation.RequestMapping;import org.springframework.web.bind.annotation.ResponseBody;@RestController@SpringBootApplicationpublic class DemoApplication {@GetMapping("/")String home() {return "Greetings from Java Tutorial Network";}public static void main(String[] args) {SpringApplication.run(DemoApplication.class, args);}}
上面的代码段,我们创建了一个DemoApplication,其注释为@Controller和@SpringBootApplication。 请注意@GetRequest("/")的使用。 这就是说home()方法将显示注释中放置的内容,在本例中为"/",即http://localhost:8080/。
在示例中,我使用的是@RestConroller,它基本上是控制器的专用版本,其中包括@Controller和@ResponseBody注解。 它只是简化了控制器的实现。
当我们运行上面的代码时,我们得到以下结果:

输出量
如果我们想实现一个简单的登录功能,我们将执行以下操作:
package com.example.demo;import org.springframework.stereotype.Controller;import org.springframework.web.bind.annotation.RequestMapping;@Controller@RequestMapping("/account/*")public class AccountController {@RequestMappingpublic String login() {return "login";}}
我们在这里所做的是,我们对类AccountController和方法login()都进行了注释。 当访问http://localhost:8080/account/时,我们将被带到登录页面。 请注意网址末尾的"/"。 如果不存在,例如http://localhost:8080/account,将导致错误。
我在account/之后加上*的原因是,如果我们想向其添加更多内容(例如注册),则该 URL 将能够处理具有不同路径的所有请求。
但就目前而言,我们将仅坚持登录。 接下来,我们需要为登录创建一个类,并将其注释为@Controller:
package com.example.demo;import org.springframework.stereotype.Controller;import org.springframework.web.bind.annotation.RequestMapping;import org.springframework.web.bind.annotation.RequestMethod;@Controller@RequestMapping("/account/login")public class Login {@GetMappingpublic String login() {return "login";}}
现在,当我们访问http://localhost:8080/account/login时,它将返回login.jsp文件中的内容。

若有收获,就点个赞吧
0 人点赞
