在本教程中,我将解释如何构建 Java REST Web 服务以通过 HTTP 从任何客户端上载文件。
将文件上传到 Web 应用程序是当今的一项常见任务。 许多服务都支持在其网站上上传图片或文档。 使用 Java Web 服务,这很容易实现。 除了 Java Web 容器(由 Tomcat,GlassFish 或 JBoss 等应用服务器提供)之外,我们还需要 Jersey 使它运行。 首先,我将向您展示如何实现 Web 服务,然后为您提供两个使用该服务的客户端示例。
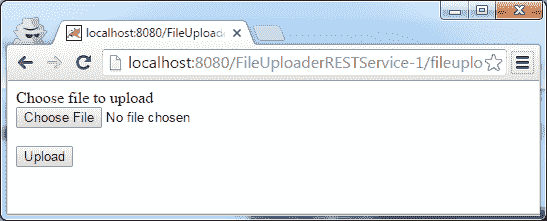
Java 文件上传表格
构建文件上传 REST 服务
该文件通过 HTTP POST 以编码类型multipart/form-data从客户端推送到我们的 Web 服务。 这样,除了文件之外,您还可以向 POST 请求添加多个参数。 让我们从需求开始。 您将需要 Web 应用程序服务器(例如 Tomcat,GlassFish 或 JBoss)来部署服务。 另外,我们将使用 jersey 框架来构建我们的服务端点。 请注意,GlassFish 4.x 版本需要 jersey 版本 2 库,因此如果使用 GlassFish 4,则请在您的 POM 文件中使用 jersey 2.x 依赖项。
为了快速参考,您可以在我们的 GitHub 存储库中的 https://github.com/JavaTutorialNetwork/Tutorials/tree/master/FileUploaderRESTService 下找到整个项目
我将在此处发布整个 POM 文件,但您需要考虑的是 Jersey 依赖项
<project xmlns="http://maven.apache.org/POM/4.0.0" xmlns:xsi="http://www.w3.org/2001/XMLSchema-instance"xsi:schemaLocation="http://maven.apache.org/POM/4.0.0 http://maven.apache.org/xsd/maven-4.0.0.xsd"><modelVersion>4.0.0</modelVersion><groupId>net.javatutorial.tutorials</groupId><artifactId>FileUploaderRESTService</artifactId><version>1</version><packaging>war</packaging><name>File Uploader Rest Service</name><url>https://javatutorial.net</url><properties><project.build.sourceEncoding>UTF-8</project.build.sourceEncoding></properties><dependencies><dependency><groupId>com.sun.jersey</groupId><artifactId>jersey-server</artifactId><version>1.8</version></dependency><dependency><groupId>com.sun.jersey</groupId><artifactId>jersey-servlet</artifactId><version>1.17.1</version></dependency><dependency><groupId>com.sun.jersey</groupId><artifactId>jersey-json</artifactId><version>1.8</version></dependency><dependency><groupId>com.sun.jersey.contribs</groupId><artifactId>jersey-multipart</artifactId><version>1.8</version></dependency></dependencies><build><plugins><plugin><groupId>org.apache.maven.plugins</groupId><artifactId>maven-compiler-plugin</artifactId><version>3.1</version><inherited>true</inherited><configuration><source>1.7</source><target>1.7</target></configuration></plugin><plugin><artifactId>maven-war-plugin</artifactId><version>2.3</version><configuration><webXml>src/main/webapp/WEB-INF/web.xml</webXml><webResources><resource><!-- this is relative to the pom.xml directory --><directory>${project.basedir}/src/main/resources</directory></resource></webResources></configuration></plugin></plugins></build></project>
现在拥有所有必需的库,让我们继续实现 REST 服务。 下面的代码中有几个地方我想提醒您注意。 首先请注意@Consumes(MediaType.MULTIPART_FORM_DATA)作为请求的编码类型的用法。 其次,如果愿意,您可能希望向该方法添加其他参数。 例如,您可能要在上传时传递一些描述或其他文本数据。 最后,如果您尝试将文件上传到不存在的目录中,Java 将抛出异常。 为了避免这个问题,我创建了方法createFolderIfNotExists(StringdirName)。
package net.javatutorial.tutorials.services;import java.io.File;import java.io.FileOutputStream;import java.io.IOException;import java.io.InputStream;import java.io.OutputStream;import javax.ws.rs.Consumes;import javax.ws.rs.POST;import javax.ws.rs.Path;import javax.ws.rs.core.Context;import javax.ws.rs.core.MediaType;import javax.ws.rs.core.Response;import javax.ws.rs.core.UriInfo;import com.sun.jersey.core.header.FormDataContentDisposition;import com.sun.jersey.multipart.FormDataParam;/*** This example shows how to build Java REST web-service to upload files* accepting POST requests with encoding type "multipart/form-data". For more* details please read the full tutorial on* https://javatutorial.net/java-file-upload-rest-service** @author javatutorial.net*/@Path("/upload")public class FileUploadService {/** The path to the folder where we want to store the uploaded files */private static final String UPLOAD_FOLDER = "c:/uploadedFiles/";public FileUploadService() {}@Contextprivate UriInfo context;/*** Returns text response to caller containing uploaded file location** @return error response in case of missing parameters an internal* exception or success response if file has been stored* successfully*/@POST@Consumes(MediaType.MULTIPART_FORM_DATA)public Response uploadFile(@FormDataParam("file") InputStream uploadedInputStream,@FormDataParam("file") FormDataContentDisposition fileDetail) {// check if all form parameters are providedif (uploadedInputStream == null || fileDetail == null)return Response.status(400).entity("Invalid form data").build();// create our destination folder, if it not existstry {createFolderIfNotExists(UPLOAD_FOLDER);} catch (SecurityException se) {return Response.status(500).entity("Can not create destination folder on server").build();}String uploadedFileLocation = UPLOAD_FOLDER + fileDetail.getFileName();try {saveToFile(uploadedInputStream, uploadedFileLocation);} catch (IOException e) {return Response.status(500).entity("Can not save file").build();}return Response.status(200).entity("File saved to " + uploadedFileLocation).build();}/*** Utility method to save InputStream data to target location/file** @param inStream* - InputStream to be saved* @param target* - full path to destination file*/private void saveToFile(InputStream inStream, String target)throws IOException {OutputStream out = null;int read = 0;byte[] bytes = new byte[1024];out = new FileOutputStream(new File(target));while ((read = inStream.read(bytes)) != -1) {out.write(bytes, 0, read);}out.flush();out.close();}/*** Creates a folder to desired location if it not already exists** @param dirName* - full path to the folder* @throws SecurityException* - in case you don't have permission to create the folder*/private void createFolderIfNotExists(String dirName)throws SecurityException {File theDir = new File(dirName);if (!theDir.exists()) {theDir.mkdir();}}}
最后,我们需要配置web.xml以将我们的类注册为 Web 服务并使其在启动时运行。
<?xml version="1.0" encoding="UTF-8"?><web-app xmlns:xsi="http://www.w3.org/2001/XMLSchema-instance"xmlns="http://java.sun.com/xml/ns/javaee" xmlns:web="http://java.sun.com/xml/ns/javaee/web-app_2_5.xsd"xsi:schemaLocation="http://java.sun.com/xml/ns/javaee http://java.sun.com/xml/ns/javaee/web-app_2_5.xsd"id="WebApp_ID" version="2.5"><display-name>net.javatutorial.tutorials.services</display-name><servlet><servlet-name>Jersey REST Service</servlet-name><servlet-class>com.sun.jersey.spi.container.servlet.ServletContainer</servlet-class><init-param><param-name>com.sun.jersey.config.property.packages</param-name><param-value>net.javatutorial.tutorials.services</param-value></init-param><load-on-startup>1</load-on-startup></servlet><servlet-mapping><servlet-name>Jersey REST Service</servlet-name><url-pattern>/rest/*</url-pattern></servlet-mapping></web-app>
好的! 现在,您可以构建和部署 WAR 文件。 如果您使用上面代码中提供的完全相同的名称,则您的服务 URL(假设您在localhost上运行)将是:http://localhost:8080/FileUploaderRESTService-1/rest/upload
文件上传 HTML 表格
您可以使用非常简单的 HTML post 表单作为客户端将文件发送到服务器。
请注意multipart/form-data作为编码类型的用法。 您还需要添加文件类型为[file]的输入
Choose file to upload<br><form action="http://localhost:8080/FileUploaderRESTService-1/rest/upload" method="post" enctype="multipart/form-data"><input name="file" id="filename" type="file" /><br><br><button name="submit" type="submit">Upload</button></form>
如前所述,您可以向请求中添加其他数据。 在这种情况下,别忘了在网络服务中处理它🙂
Java 文件上传客户端
您可以为 Android 或 Java 中的独立程序创建文件上传客户端。 在下面的示例中,我将使用 Apache http 库,您将需要以下五个:
- commonlog
- httpclient
- httpclient cache
- httpcore
- httpmime
package net.javatutorial.tutorials.clienst;import java.io.File;import java.io.FileInputStream;import java.io.IOException;import org.apache.http.HttpEntity;import org.apache.http.HttpResponse;import org.apache.http.client.ClientProtocolException;import org.apache.http.client.methods.HttpPost;import org.apache.http.entity.mime.MultipartEntity;import org.apache.http.entity.mime.content.InputStreamBody;import org.apache.http.impl.client.DefaultHttpClient;import org.apache.http.params.BasicHttpParams;import org.apache.http.util.EntityUtils;/*** This example shows how to upload files using POST requests* with encoding type "multipart/form-data".* For more details please read the full tutorial* on https://javatutorial.net/java-file-upload-rest-service* @author javatutorial.net*/public class FileUploaderClient {public static void main(String[] args) {// the file we want to uploadFile inFile = new File("C:\\Users\\admin\\Desktop\\Yana-make-up.jpg");FileInputStream fis = null;try {fis = new FileInputStream(inFile);DefaultHttpClient httpclient = new DefaultHttpClient(new BasicHttpParams());// server back-end URLHttpPost httppost = new HttpPost("http://localhost:8080/FileUploaderRESTService-1/rest/upload");MultipartEntity entity = new MultipartEntity();// set the file input stream and file name as argumentsentity.addPart("file", new InputStreamBody(fis, inFile.getName()));httppost.setEntity(entity);// execute the requestHttpResponse response = httpclient.execute(httppost);int statusCode = response.getStatusLine().getStatusCode();HttpEntity responseEntity = response.getEntity();String responseString = EntityUtils.toString(responseEntity, "UTF-8");System.out.println("[" + statusCode + "] " + responseString);} catch (ClientProtocolException e) {System.err.println("Unable to make connection");e.printStackTrace();} catch (IOException e) {System.err.println("Unable to read file");e.printStackTrace();} finally {try {if (fis != null) fis.close();} catch (IOException e) {}}}}
您将在我们的 GitHub 存储库中找到项目文件 https://github.com/JavaTutorialNetwork/Tutorials/tree/master/FileUploaderJavaClient
谢谢阅读。 一如既往欢迎评论🙂

若有收获,就点个赞吧
0 人点赞
