本文讲解如何构建一个工程化的前端库,并结合 Github Actions,自动发布到 Github 和 NPM 的整个详细流程。
示例
我们经常看到像 Vue、React 这些流行的开源项目有很多配置文件,他们是干什么用的?他们的 Commit、Release 记录都那么规范,是否基于某种约定? 废话少说,先上图!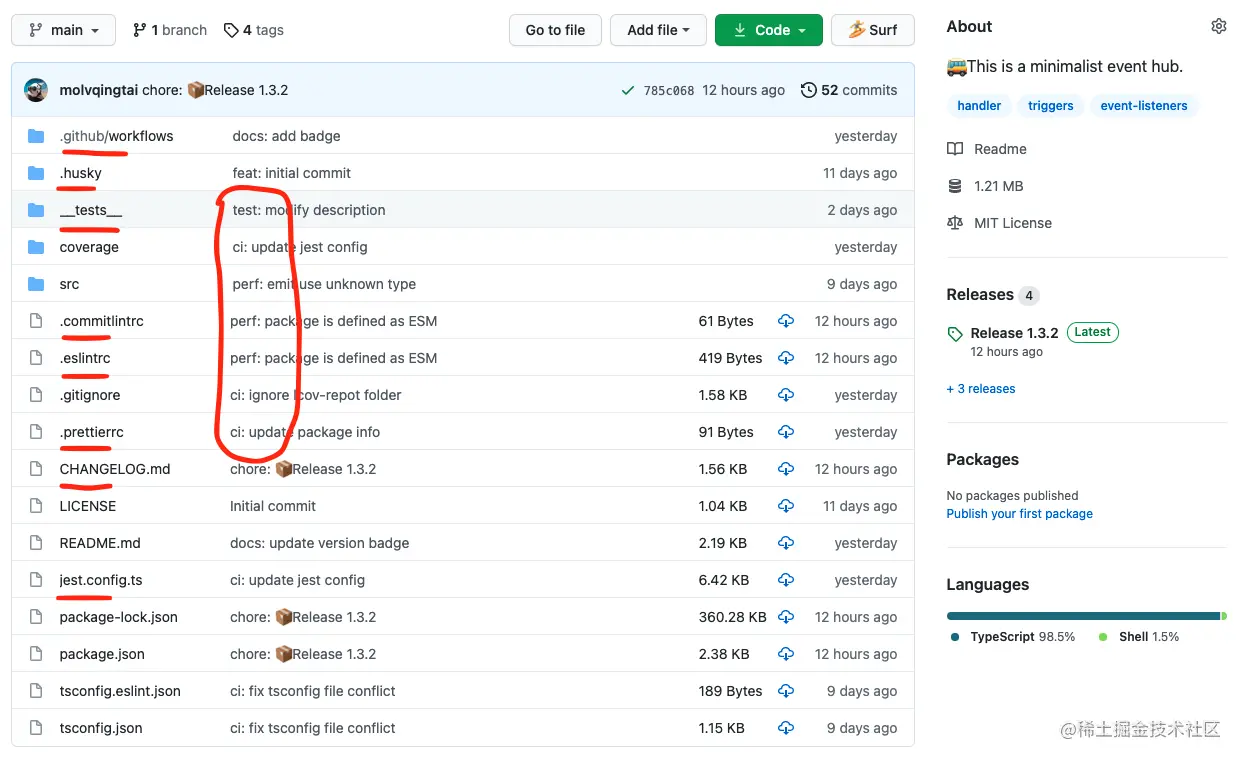
上图标红就是相关的工程化配置,有 Linter、Tests,Github Actions 等,覆盖开发、测试、发布的整个流程。
相关配置清单
下面我们从创建一个 TypeScript 项目开始,一步一步完成所有的工程化配置,并说明每个配置含义以及容易踩的坑。
初始化
为了避免兼容性问题,建议先将 node 升级到最新的长期支持版本。
首先在 Github 上创建一个 repo,拉下来之后通过npm init -y初始化。 然后创建src文件夹,写入index.ts。package.json 生成之后,我需要添加如下配置项:
"main": "index.js",+ "type": "module","scripts": {"test": "echo \"Error: no test specified\" && exit 1"},+ "publishConfig": {+ "access": "public"+ }
我们将项目定义为ESM规范,前端社区正逐渐向ESM标准迁移,从Node v12.0.0开始,只要设置了"type": "module", Node 会将整个项目视为ESM规范,我们就可以直接写裸写import/export。publishConfig.access表示当前项目发布到NPM的访问级别,它有 restricted和public两个选项,restricted表示我们发布到NPM上的是私有包(收费),访问级别默认为restricted,因为我们是开源项目所以标记为public。
配置
创建项目之后,我们开始安装工程化相关的依赖,因为我们是 TypeScript 项目,所以也需要安装 TypeScript 的依赖。
Typescript
先安装 TypeScript,然后使用 tsc命名生成 tsconfig.json。
npm i typescript -Dnpx tsc --init
然后我们需要添加修改 tsconfig.json 的配置项,如下:
{"compilerOptions": {/* Basic Options */"baseUrl": ".", // 模块解析根路径,默认为 tsconfig.json 位于的目录"rootDir": "src", // 编译解析根路径,默认为 tsconfig.json 位于的目录"target": "ESNEXT", // 指定输出 ECMAScript 版本,默认为 es5"module": "ESNext", // 指定输出模块规范,默认为 Commonjs"lib": ["ESNext", "DOM"], // 编译需要包含的 API,默认为 target 的默认值"outDir": "dist", // 编译输出文件夹路径,默认为源文件同级目录"sourceMap": true, // 启用 sourceMap,默认为 false"declaration": true, // 生成 .d.ts 类型文件,默认为 false"declarationDir": "dist/types", // .d.ts 类型文件的输出目录,默认为 outDir 目录/* Strict Type-Checking Options */"strict": true, // 启用所有严格的类型检查选项,默认为 true"esModuleInterop": true, // 通过为导入内容创建命名空间,实现 CommonJS 和 ES 模块之间的互操作性,默认为 true"skipLibCheck": true, // 跳过导入第三方 lib 声明文件的类型检查,默认为 true"forceConsistentCasingInFileNames": true, // 强制在文件名中使用一致的大小写,默认为 true"moduleResolution": "Node", // 指定使用哪种模块解析策略,默认为 Classic},"include": ["src"] // 指定需要编译文件,默认当前目录下除了 exclude 之外的所有.ts, .d.ts,.tsx 文件}
更多详细配置参考:www.typescriptlang.org/tsconfig
注意的点,如果你的项目涉及到WebWorker API,需要添加到 lib 字段中
"lib": ["ESNext", "DOM", "WebWorker"],
然后我们将编译后的文件路径添加到 package.json,并在 scripts 中添加编译命令。
- "main": "index.js",+ "main": "dist/index.js",+ "types": "dist/types/index.d.ts""type": "module",- "scripts": {- "test": "echo \"Error: no test specified\" && exit 1"- },+ "scripts": {+ "dev": "tsc --watch",+ "build": "npm run clean && tsc",+ "clean": "rm -rf dist"+ },"publishConfig": {"access": "public"}
types 配置项是指定编译生成的类型文件,如果 compilerOptions.declarationDir 指定的是dist,也就是源码和 .d.ts 同级,那么types可以省略。
验证配置是否生效,在 index.ts 写入
const calc = (a: number, b: number) => {return a - b}console.log(calc(1024, 28))
在控制台中执行
npm run build && node dist/index.js
会在 dist 目录中生成 types/index.d.ts、index.js、index.js.map,并打印 996。
Eslint & Prettier
代码规范离不开各种 Linter, 之所以把这两个放在一起讲,借用 Prettier 官网的一句话:“使用 Prettier 解决代码格式问题,使用 linters 解决代码质量问题”。虽然eslint也有格式化功能,但是prettier的格式化功能更强大。
大部分同学编辑器都装了prettier-vscode和eslint-vscode这两个插件,如果你项目只有其中一个的配置,因为这两者部分格式化的功能有差异,那么就会造成一个的问题,代码分别被两个插件分别格式化一次,网上解决prettier+eslint冲突的方案五花八门,甚至还有把整个rules列表贴出来的。
那这里我们按照官方推荐,用最少的配置去解决prettier和eslint的集成问题。
Eslint
首先安装 eslint,然后利用 eslint 的命令行工具生成基本配置。
npm i eslint -Dnpx eslint --init
执行上面命令后会提示一些选项,我们依次选择符合我们项目的配置。
注意,这里 eslint 推荐了三种社区主流的规范,Airbnb、Standard、Google,因个人爱好我选择了不写分号的 Standard规范。
生成的.eslintrc.cjs文件应该长这样
module.exports = {env: {browser: true,es2021: true,node: true},extends: ['standard'],parser: '@typescript-eslint/parser',parserOptions: {ecmaVersion: 12,sourceType: 'module'},plugins: ['@typescript-eslint'],rules: {}}
有些同学可能就要问了,这里为什么生成的配置文件名称是.eslintrc.cjs而不是.eslintrc.js?
因为我们将项目定义为ESM,eslit --init会自动识别type,并生成兼容的配置文件名称,如果我们改回.js结尾,再运行eslint将会报错。 出现这个问题是eslint内部使用了require()语法读取配置。
同样,这个问题也适用于其他功能的配置,比如后面会讲到的Prettier、Commitlint等,配置文件都不能以xx.js结尾,而要改为当前库支持的其他配置文件格式,如:.xxrc、.xxrc.json、.xxrc.yml。
验证配置是否生效,修改index.ts
const calc = (a: number, b: number) => {return a - b}- console.log(calc(1024, 28))+ // console.log(calc(1024, 28))
在package.json中添加lint命令
"scripts": {"dev": "tsc --watch","build": "npm run clean && tsc",+ "lint": "eslint src --ext .js,.ts --cache --fix","clean": "rm -rf dist"},
然后在控制台执行 lint,eslint将会提示 1 条错误信息,说明校验生效。
npm run lint# 1:7 error 'calc' is assigned a value but never used no-unused-vars
因为是 Typescript 项目所以我们还要添加Standard规范提供的 TypeScrip 扩展配置(其他规范同理)
安装eslint-config-standard-with-typescript
npm i eslint-config-standard-with-typescript -D
添加修改 .eslintrc.cjs
module.exports = {env: {browser: true,es2021: true,node: true},- extends: ['standard']+ extends: ['standard', 'eslint-config-standard-with-typescript'],parser: '@typescript-eslint/parser',parserOptions: {ecmaVersion: 12,sourceType: 'module',+ project: './tsconfig.json'},plugins: ['@typescript-eslint'],rules: {}}
验证配置是否生效
在控制台执行lint,eslint将会提示 2 条错误信息,说明校验生效。
npm run lint# 1:7 error 'calc' is assigned a value but never used no-unused-vars# 1:14 error Missing return type on function
Prettier
现在我们按照官网的推荐方式,把 prettier 集成到 eslint 的校验中。
安装 prettier 并初始化配置文件
npm i prettier -Decho {}> .prettierrc.json
然后在.prettierrc.json添加配置,这里只需要添加和你所选规范冲突的部分。
{"semi": false, // 是否使用分号"singleQuote": true, // 使用单引号代替双引号"trailingComma": "none" // 多行时尽可能使用逗号结尾}
更多配置详见:prettier.io/docs/en/opt…
安装解决冲突需要用到的两个依赖
- eslint-config-prettier 关闭可能与 prettier 冲突的规则
- eslint-plugin-prettier 使用 prettier 代替 eslint 格式化
再添加修改npm i eslint-config-prettier eslint-plugin-prettier -D
.eslintrc.cjs,如下: ```javascript module.exports = { env: { browser: true, es2021: true, node: true, }, - extends: [‘standard’, ‘eslint-config-standard-with-typescript’],
- extends: [‘standard’, ‘eslint-config-standard-with-typescript’, ‘prettier’], parser: ‘@typescript-eslint/parser’, parserOptions: { ecmaVersion: 12, sourceType: ‘module’, project: ‘./tsconfig.json’, },
- plugins: [‘@typescript-eslint’],
- plugins: [‘@typescript-eslint’, ‘prettier’],
- rules: {},
- rules: {
- ‘prettier/prettier’: ‘error’
- },
}
然后验证配置是否生效,修改`index.ts`typescript
- const calc = (a: number, b: number) => {
- const calc = (a: number, b: number): number => { return a - b }
- // console.log(calc(1024, 28))
- console.log(calc(1024, 28))
我们现在已经完成了然后在控制台执行`lint`,这里`prettier`和`eslint`的行为已保持一致,如果没有报错,那就成功了。```shellnpm run lint
eslint和prettier的集成配置。和编辑器无关,也就是说无论你使用什么编辑器,有没有安装相关插件,都不会影响代码校验的效果。Husky
因为一个项目通常是团队合作,我们不能保证每个人在提交代码之前执行一遍lint校验,所以需要git hooks来自动化校验的过程,否则禁止提交。
安装Husky并生成.husky文件夹
然后我们需要在每次执行npm i husky -Dnpx husky install
npm install时自动启用husky
如果你的npm版本大于等于7.1.0
否则手动在npm set-script prepare "husky install"
package.json中添加 ```json “scripts”: { “dev”: “tsc —watch”, “build”: “npm run clean && tsc”, “lint”: “eslint src —ext .js,.ts —cache —fix”, “clean”: “rm -rf dist”, - “prepare”: “husky install”
},
相当于手动在然后添加一个`lint`钩子```shellnpx husky add .husky/pre-commit "npm run lint"
.husky/pre-commit文件写入以下内容:
测试钩子是否生效,修改#!/bin/sh. "$(dirname "$0")/_/husky.sh"npm run lint
index.ts```typescript const calc = (a: number, b: number): number => { return a - b }
- console.log(calc(1024, 28))
- // console.log(calc(1024, 28))
然后提交一条`commit`,如果配置正确将会自动执行`lint`并提示 1 条错误信息,`commit`提交将会失败。```gitgit add .git commit -m 'test husky'# 1:7 error 'calc' is assigned a value but never used
Commitlint
为什么需要Commitlint,除了在后续的生成changelog文件和语义发版中需要提取commit中的信息,也利于其他同学分析你提交的代码,所以我们要约定commit的规范。
安装Commitlint
- @commitlint/cli Commitlint 命令行工具
- @commitlint/config-conventional 基于 Angular 的约定规范
最后将npm i @commitlint/config-conventional @commitlint/cli -D
Commitlint添加到钩子
创建npx husky add .husky/commit-msg 'npx --no-install commitlint --edit "$1"'
.commitlintrc,并写入配置
注意,这里配置文件名使用的是{"extends": ["@commitlint/config-conventional"]}
.commitlintrc而不是默认的.commitlintrc.js,详见 Eslint 章节
测试钩子是否生效,修改index.ts,让代码正确 ```typescript const calc = (a: number, b: number): void => { console.log(a - b) } - // calc(1024, 28)
- calc(1024, 28)
修改为正确的提交一条不符合规范的`commit`,提交将会失败```gitgit add .git commit -m 'add eslint and commitlint'
commit,提交成功!
Angular 规范说明:git commit -m 'ci: add eslint and commitlint'
- feat:新功能
- fix:修补 BUG
- docs:修改文档,比如 README, CHANGELOG, CONTRIBUTE 等等
- style:不改变代码逻辑 (仅仅修改了空格、格式缩进、逗号等等)
- refactor:重构(既不修复错误也不添加功能)
- perf:优化相关,比如提升性能、体验
- test:增加测试,包括单元测试、集成测试等
- build:构建系统或外部依赖项的更改
- ci:自动化流程配置或脚本修改
- chore:非 src 和 test 的修改,发布版本等
- revert:恢复先前的提交
Jest
美好生活从测试覆盖率 100% 开始。
安装jest,和类型声明@types/jest,它执行需要ts-node和ts-jest
这里暂时固定了ts-node的版本为v9.1.1,新版的ts-node@v10.0.0会导致jest报错,等待官方修复,详见:issues
初始化配置文件npm i jest @types/jest ts-node@9.1.1 ts-jest -D
然后修改npx jest --init
jest.config.ts文件 ```typescript // A preset that is used as a base for Jest’s configuration - // preset: undefined,
- preset: ‘ts-jest’
将测试命令添加到`package.json`中。json “scripts”: { “dev”: “tsc —watch”, “build”: “npm run clean && tsc”, “lint”: “eslint src —ext .js,.ts —cache —fix”, “clean”: “rm -rf dist”, “prepare”: “husky install”, - “test”: “jest”
},
创建测试文件夹`__tests__`和测试文件`__tests__/calc.spec.ts`<br />修改`index.ts`typescript const calc = (a: number, b: number): number => { return a - b }
- // console.log(calc(1024, 28))
- export default calc
然后在`calc.spec.ts`中写入测试代码typescript import calc from ‘../src’
test(‘The calculation result should be 996.’, () => { expect(calc(1024, 28)).toBe(996) })
验证配置是否生效<br />在控制台执行`test`,将会看到测试覆盖率 100% 的结果。```shellnpm run test
最后我们给__tests__目录也加上lint校验
修改package.json
"scripts": {"dev": "tsc --watch","build": "npm run clean && tsc",- "lint": "eslint src --ext .js,.ts --cache --fix",+ "lint": "eslint src __tests__ --ext .js,.ts --cache --fix","clean": "rm -rf dist","prepare": "husky install","test": "jest"},
这里如果我们直接执行npm run lint将会报错,提示__tests__文件夹没有包含在tsconfig.json的include中,当我们添加到include之后,输出的dist中就会包含测试相关的文件,这并不是我们想要的效果。
我们使用typescript-eslint官方给出的解决方案,如下操作:
新建一个tsconfig.eslint.json文件,写入以下内容:
{"extends": "./tsconfig.json","include": ["**/*.ts", "**/*.js"]}
在.eslintrc.cjs中修改
parserOptions: {ecmaVersion: 12,sourceType: 'module',- project: './tsconfig.json'+ project: './tsconfig.eslint.json'},
然后验证配置是否生效,直接提交我们添加的测试文件,能正确提交说明配置成功。
git add .git commit -m 'test: add unit test'
Github Actions
我们通过Github Actions实现代码合并或推送到主分支,dependabot机器人升级依赖等动作,会自动触发测试和发布版本等一系列流程。
在项目根目录创建.github/workflows文件夹,然后在里面新建ci.yml文件和cd.yml文件
在ci.yml文件中写入:
name: CIon:push:branches:- '**'pull_request:branches:- '**'jobs:linter:runs-on: ubuntu-lateststeps:- uses: actions/checkout@v2- uses: actions/setup-node@v2with:node-version: 16- run: npm ci- run: npm run linttests:needs: linterruns-on: ubuntu-lateststeps:- uses: actions/checkout@v2- uses: actions/setup-node@v2with:node-version: 16- run: npm ci- run: npm run test
上面配置大概意思就是,监听所有分支的push和pull_request动作,自动执行linter和tests任务。
GithubActions 更多用法参考:github.com/features/ac…
然后推送代码,验证配置是否生效
git add .git commit -m 'ci: use github actions'git push
此时打开当前项目的 _Github_ 页面,然后点击顶部 _Actions_ 菜单就会看到正在进行的两个任务,一个将会成功(测试),一个将会失败(发布)。
上面只是实现了代码自动测试流程,下面实现自动发布的流程。
在此之前需要到NPM网站上注册一个账号(已有可忽略),并创建一个package。
然后创建GH_TOKEN和NPM_TOKEN(注意,不要在代码中包含任何的 TOKEN 信息):
- 如何创建 GITHUB_TOKEN(创建时勾选
_repo_和_workflow_权限) - 如何创建 NPM_TOKEN(创建时选中
_Automation_权限)
将创建好的两个TOKEN添加到项目的 _Actions secrets_ 中:_**Github 项目首页**_** **-> _**顶部 Settings 菜单**_ -> _**侧边栏 Secrets**_
然后修改package.json中的“name”,“name”就是你在NPM上创建的package的名称。
在cd.yml文件中写入:
name: CDon:push:branches:- mainpull_request:branches:- mainjobs:release:runs-on: ubuntu-lateststeps:- uses: actions/checkout@v2- uses: actions/setup-node@v2with:node-version: 16# https://github.com/semantic-release/git/issues/209- run: npm ci --ignore-scripts- run: npm run build- run: npx semantic-releaseenv:GH_TOKEN: ${{ secrets.GH_TOKEN }}NPM_TOKEN: ${{ secrets.NPM_TOKEN }}
由于“黑命贵”,Github 已将新项目的默认分支名称更改为 “main”,详见:issues, 为了方便,后面统一称为 主分支
所以如果你的主分支名称是“main”,上面的branches需要修改为:
on:push:branches:- mainpull_request:branches:- main
然后安装语义发版依赖,需要用到semantic-release和它的插件:
- semantic-release:语义发版核心库
- @semantic-release/changelog:用于自动生成
changelog.md - @semantic-release/git:用于将发布时产生的更改提交回远程仓库
在项目根目录新建配置文件npm i semantic-release @semantic-release/changelog @semantic-release/git -D
.releaserc并写入:
这里同样,如果你的主分支名称是{"branches": ["master"],"plugins": ["@semantic-release/commit-analyzer","@semantic-release/release-notes-generator","@semantic-release/changelog","@semantic-release/github","@semantic-release/npm","@semantic-release/git"]}
“main”,上面的branches需要修改为:
最后新建分支"branches": ["+([0-9])?(.{+([0-9]),x}).x", "main"],
develop分支并提交工作内容。
然后将git checkout -b developgit add .git commit -m 'feat: complete the CI/CD workflow'git push --set-upstream origin developgit push
develop分支合并到主分支,并提交,注意:这个提交会触发测试并发布版本(自动创建tag和changelog)
完成上面操作之后,打开git checkout mastergit merge developgit push
Github 项目主页和NPM 项目主页可以看到一个Release的更新记录。
最后切回到develop分支,创建一个自动更新依赖的workflow。
在.github文件夹中创建dependabot.yml文件,并写入内容:
提交并查看version: 2updates:# Enable version updates for npm- package-ecosystem: 'npm'# Look for `package.json` and `lock` files in the `root` directorydirectory: '/'# Check the npm registry for updates every day (weekdays)schedule:interval: 'weekly'
workflows是否全部通过,再合并到 主分支 并提交,这个提交不会触发版本发布。 ```git git pull origin master git add . git commit -m ‘ci: add dependabot’ git push
git checkout master git merge develop git push ``` 触发版本发布需要两个条件:
- 只有当
push和pull_request到 主分支 上才会触发版本发布 - 只有
commit前缀为feat、fix、perf才会发布,否则跳过。
更多发布规则,详见:github.com/semantic-re…
SemanticRelease 使用方式,详见:semantic-release.gitbook.io
如果你能正确配置上面所有步骤,并成功发布,那么恭喜你!你拥有了一个完全自动化的项目,它拥有:自动依赖更新、测试、发布,和自动生成版本信息等功能。
完整的项目示例:@resreq/event-hub
结语
本文未涉及到:组件库、Monorepo、Jenkins CI 等配置,但能覆盖绝大部前端项目 CI/CD 流程。
有些地方讲得比较细,甚至有些啰嗦,但还是希望能帮助到大家!撒花! 🎉🎉🎉

若有收获,就点个赞吧
0 人点赞
