- 文章概要">文章概要
- 使用Spring Boot构建第一个Web应用程序">使用Spring Boot构建第一个Web应用程序
- 使用Spring Boot+MyBatis访问数据库(CURD)注解版">使用Spring Boot+MyBatis访问数据库(CURD)注解版
- 使用Spring Boot+MyBatis访问数据库(CURD)xml配置版">使用Spring Boot+MyBatis访问数据库(CURD)xml配置版
- 使用Spring Boot+MyBatis多数据源配置(注解版)">使用Spring Boot+MyBatis多数据源配置(注解版)
- 使用Spring Boot+MyBatis多数据源配置(xml配置版)">使用Spring Boot+MyBatis多数据源配置(xml配置版)
- 使用Spring Boot+Freemarker模板引擎开发Web应用">使用Spring Boot+Freemarker模板引擎开发Web应用
- 使用Spring Boot+Thymeleaf模板引擎开发Web应用">使用Spring Boot+Thymeleaf模板引擎开发Web应用
- Spring Boot应用 打包与部署教程">Spring Boot应用 打包与部署教程
文章概要
Spring Boot 入门教程,包含且不仅限于使用Spring Boot构建API、使用Thymeleaf模板引擎以及Freemarker模板引擎渲染视图、使用MyBatis操作数据库等等。
本教程示例代码:https://github.com/ken-io/springboot-course
本系列所有代码示例都是基于Spring Boot 1.5.x,如果想在Spring Boot 2.0 环境下运行示例代码,需要注意配置中所有项都要修改为以小写字母命名。
使用Spring Boot构建第一个Web应用程序
一、前言
什么是Spring Boot?
Spring Boot就是一个让你使用Spring构建应用时减少配置的一个框架。约定优于配置,一定程度上提高了开发效率。https://zhuanlan.zhihu.com/p/22920391
另外Spring是一个IOC框架,如果之前未使用过IOC框架建议先了解下IOC:https://zh.wikipedia.org/wiki/%E6%8E%A7%E5%88%B6%E5%8F%8D%E8%BD%AC
本篇开发环境
1、操作系统: Windows 10 X64
2、Java SDK: jdk-8u141
3、Maven:3.5
4、IDE:IntelliJ IDEA 2017
5、Spring Boot:1.5.6
二、构建项目
1、创建项目并引入Spring Boot
- 使用Maven项目模板创建项目
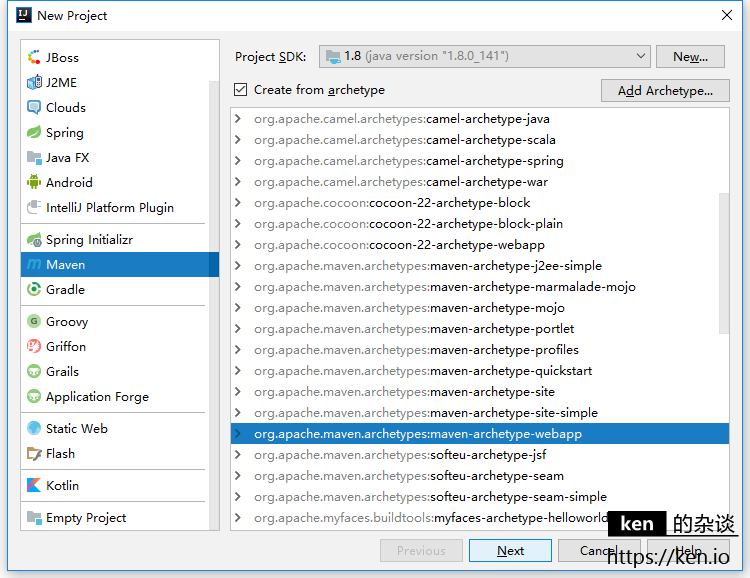
项目模板:maven-archetype-webapp
GroupId:io.ken.springboot-course
ArtifactId:springboot-course
- 创建Sources Root
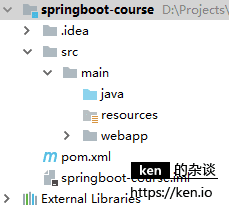
(1)在src/main创建文件夹:java,并使用右键菜单Mark Directory AS->Sources Root
(2)设置将src/resources Mark:使用右键菜单Mark Directory AS->Resources Root
- 在pom.xml中引入spring boot
<parent><groupId>org.springframework.boot</groupId><artifactId>spring-boot-starter-parent</artifactId><version>1.5.6.RELEASE</version></parent><dependencies><dependency><groupId>org.springframework.boot</groupId><artifactId>spring-boot-starter-web</artifactId></dependency></dependencies>
Ctrl + 鼠标左键点击 groupId/artifactId 可以查看引用的Packge的依赖等信息
2、创建应用程序类&应用程序入口
(1)创建package:io.ken.springboot.course
(2)创建应用程序类:CourseApplication
(3)增加注解:@SpringBootApplication 并配置启动
package io.ken.springbootcourse;import org.springframework.boot.SpringApplication;import org.springframework.boot.autoconfigure.SpringBootApplication;@SpringBootApplicationpublic class CourseApplication {public static void main(String[] args) throws Exception {SpringApplication.run(CourseApplication.class, args);}}
3、创建测试Controller
(1)创建package:io.ken.springboot.course.controller
(2)创建控制器:HelloController
package io.ken.springbootcourse.controller;import org.springframework.stereotype.Controller;import org.springframework.web.bind.annotation.RequestMapping;import org.springframework.web.bind.annotation.ResponseBody;@Controllerpublic class HelloController {@RequestMapping("/")@ResponseBodyString index() {return "Hello World!";}}
4、启动配置
菜单:Run->Edit Configurations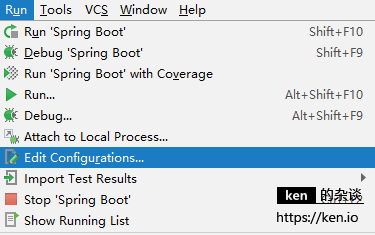
增加Spring Boot启动配置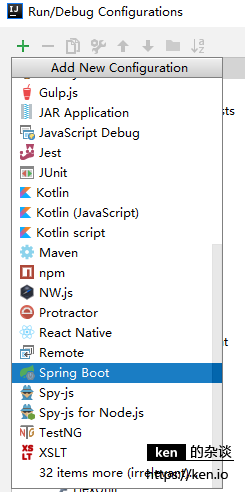
选择应用程序入口类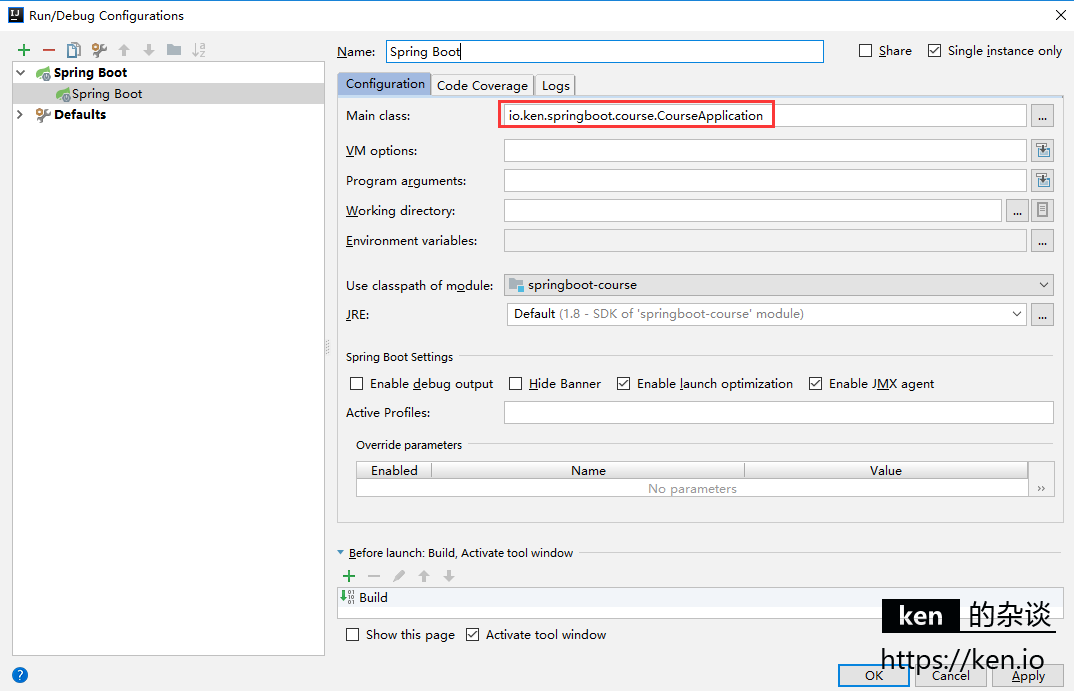
5、启动项目&访问测试
- 启动项目
使用快捷键Shift+F10启动即可
(或者在CourseApplication编辑区,使用右键菜单->Run “CourseApplication”启动)
控制台输出片段:
[main] o.s.j.e.a.AnnotationMBeanExporter : Registering beans for JMX exposure on startup[main] s.b.c.e.t.TomcatEmbeddedServletContainer : Tomcat started on port(s): 8080 (http)[main] i.k.springboot.course.CourseApplication : Started CourseApplication in 1.999 seconds (JVM running for 2.555)
从输出的信息可以看出,Spring Boot也是跑在Tomcat中的,关键是本机不用安装也不用做任何Tomcat的配置。就可以跑起来。这一点就很爽了。想知道Spring Boot还依赖了那些组件,在Pom.xml文件中Ctrl+鼠标单击org.springframework.boot即可
- 访问测试
项目启动后,访问http://localhost:8080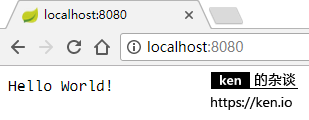
Hello World!
- 更换运行端口
在/src/main/resources下新建配置文件application.yml
文件内容:
server:port: 8080
有了Spring Boot,构建Web应用程序So Easy!
赶紧去试试,嘿嘿~
三、备注
Spring注解说明
| 注解 | ken.io的说明 |
|---|---|
@SpringBootApplication |
等价于使用@Configuration, @EnableAutoConfiguration 和 @ComponentScan默认属性的情况。 |
@Controller |
用于定义控制器类 |
@RestController |
等价于@ResponseBody和@Controller |
@RequestMapping |
用于定义路由,也就是Url与Controller方法的映射 |
@ResponseBody |
表示将结果直接填充到HTTP的响应体中,用于构建API |
@EnableAutoConfiguration |
将根据添加的jar依赖自动配置Spring,比如我们的应用依赖于spring-boot-starter-web,而它又依赖Tomcat和Spring MVC,有了这个注解,Spring boot将自动进行相关配置 |
@ComponentScan |
表示将该类自动扫描并注册为Bean |
@Configuration |
用于定义配置文件类,可以将配置类替换xml配置 |
附录
- 本文代码示例
https://github.com/ken-io/springboot-course/tree/master/chapter-01-01
使用Spring Boot+MyBatis访问数据库(CURD)注解版
一、前言
什么是MyBatis?
MyBatis是目前Java平台最为流行的ORM框架
https://baike.baidu.com/item/MyBatis/2824918
本篇开发环境
1、操作系统: Windows 10 X64
2、Java SDK: jdk-8u141
3、Maven:3.5
4、IDE:IntelliJ IDEA 2017
5、Spring Boot:1.5.6
本项目构建基于:https://ken.io/note/springboot-course-basic-helloworld
二、Spring Boot整合MyBatis
1、引入MyBatis
- 引入核心依赖 | package | 说明 | | —- | —- | | mybatis-spring-boot-starter | MyBatis核心for Spring Boot | | mysql-connector-java | 用于连接MySQL |
pom.xml文件:
<parent><groupId>org.springframework.boot</groupId><artifactId>spring-boot-starter-parent</artifactId><version>1.5.6.RELEASE</version></parent><dependencies><dependency><groupId>org.springframework.boot</groupId><artifactId>spring-boot-starter-web</artifactId></dependency><dependency><groupId>org.mybatis.spring.boot</groupId><artifactId>mybatis-spring-boot-starter</artifactId></dependency><dependency><groupId>mysql</groupId><artifactId>mysql-connector-java</artifactId><version>5.1.38</version></dependency><dependency><groupId>junit</groupId><artifactId>junit</artifactId><version>3.8.1</version><scope>test</scope></dependency></dependencies>
2、配置数据库连接
在配置文件:application.yml中增加以下配置:
spring:datasource:driver-class-name: com.mysql.jdbc.Driverurl: jdbc:mysql://localhost:3306/courseusername: mysqlpassword: password
数据库自行创建MySQL下载地址:https://dev.mysql.com/downloads/
Package创建 | Package | 说明 | | —- | —- | | io.ken.springboot.course.model | 用于存放实体 | | io.ken.springboot.course.dao | 用于存放数据访问映射*mapper |
3、创建User表并创建对应实体
user表创建脚本
DROP TABLE IF EXISTS `user`;CREATE TABLE `user` (`id` int(11) NOT NULL AUTO_INCREMENT,`name` varchar(255) DEFAULT NULL,`age` int(11) DEFAULT NULL,`hobby` varchar(500) DEFAULT NULL,PRIMARY KEY (`id`)) ENGINE=InnoDB DEFAULT CHARSET=utf8;
user实体创建
package io.ken.springboot.course.model;public class User {private int id;private String name;private int age;private String hobby;public int getId() {return id;}public void setId(int id) {this.id = id;}public String getName() {return name;}public void setName(String name) {this.name = name;}public int getAge() {return age;}public void setAge(int age) {this.age = age;}public String getHobby() {return hobby;}public void setHobby(String hobby) {this.hobby = hobby;}}
getger和setter可以选中类名之后使用快捷键Alt+Insert生成
4、数据库操作映射
创建UserMapper
package io.ken.springboot.course.dao;import io.ken.springboot.course.model.User;import org.apache.ibatis.annotations.*;import java.util.List;@Mapperpublic interface UserMapper {@Select("SELECT * FROM user WHERE id = #{id}")User queryById(@Param("id") int id);@Select("SELECT * FROM user")List<User> queryAll();@Insert({"INSERT INTO user(name,age,hobby) VALUES(#{name},#{age},#{hobby})"})int add(User user);@Delete("DELETE FROM user WHERE id = #{id}")int delById(int id);@Update("UPDATE user SET name=#{name},age=#{age},hobby=#{hobby} WHERE id = #{id}")int updateById(User user);}
5、创建测试API
创建UserController并提供API
package io.ken.springboot.course.controller;import io.ken.springboot.course.dao.UserMapper;import io.ken.springboot.course.model.User;import org.springframework.beans.factory.annotation.Autowired;import org.springframework.stereotype.Controller;import org.springframework.web.bind.annotation.RequestMapping;import org.springframework.web.bind.annotation.ResponseBody;import java.util.List;@Controller@RequestMapping("/user")public class UserController {@AutowiredUserMapper userMapper;@RequestMapping("/querybyid")@ResponseBodyUser queryById(int id) {return userMapper.queryById(id);}@RequestMapping("/queryall")@ResponseBodyList<User> queryAll() {return userMapper.queryAll();}@RequestMapping("/add")@ResponseBodyString add(User user) {return userMapper.add(user) == 1 ? "success" : "failed";}@RequestMapping("/updatebyid")@ResponseBodyString updateById(User user) {return userMapper.updateById(user) == 1 ? "success" : "failed";}@RequestMapping("/delbyid")@ResponseBodyString delById(int id) {return userMapper.delById(id) == 1 ? "success" : "failed";}}
6、API测试
| API | 示例 |
|---|---|
| 添加用户 | /user/add?name=tom&age=1&hobby=football |
| 更新用户 | /user/updatebyid?name=ken&age=18&hobby=coding&id=1 |
| 查询指定用户 | /user/querybyid?id=1 |
| 查询所有用户 | /user/queryall |
| 删除指定用户 | /user/delbyid?id=2 |
三、备注
- 本文代码示例
https://github.com/ken-io/springboot-course/tree/master/chapter-02-01
使用Spring Boot+MyBatis访问数据库(CURD)xml配置版
一、前言
什么是MyBatis?
MyBatis是目前Java平台最为流行的ORM框架
https://baike.baidu.com/item/MyBatis/2824918
本篇开发环境
1、操作系统: Windows 10 X64
2、Java SDK: jdk-8u141
3、Maven:3.5
4、IDE:IntelliJ IDEA 2017
5、Spring Boot:1.5.6
本项目构建基于:https://ken.io/note/springboot-course-basic-helloworld
二、Spring Boot整合MyBatis
1、引入MyBatis
- 引入核心依赖 | package | 说明 | | —- | —- | | mybatis-spring-boot-starter | MyBatis核心for Spring Boot | | mysql-connector-java | 用于连接MySQL |
pom.xml文件:
<parent><groupId>org.springframework.boot</groupId><artifactId>spring-boot-starter-parent</artifactId><version>1.5.6.RELEASE</version></parent><dependencies><dependency><groupId>org.springframework.boot</groupId><artifactId>spring-boot-starter-web</artifactId></dependency><dependency><groupId>org.mybatis.spring.boot</groupId><artifactId>mybatis-spring-boot-starter</artifactId></dependency><dependency><groupId>mysql</groupId><artifactId>mysql-connector-java</artifactId><version>5.1.38</version></dependency><dependency><groupId>junit</groupId><artifactId>junit</artifactId><version>3.8.1</version><scope>test</scope></dependency></dependencies>
2、配置数据库连接
在配置文件:application.yml中增加以下配置:
#数据库连接配置spring:datasource:driver-class-name: com.mysql.jdbc.Driverurl: jdbc:mysql://localhost:3306/course?zeroDateTimeBehavior=convertToNull&useUnicode=true&characterEncoding=utf-8username: mysqlpassword: password#mybatis配置mybatis:mapper-locations: classpath:conf/mybatis/mapper/*.xml
数据库自行创建MySQL下载地址:https://dev.mysql.com/downloads/
- Package创建 | Package | 说明 | | —- | —- | | io.ken.springboot.course.model | 用于存放实体 | | io.ken.springboot.course.dao | 用于存放数据访问映射*mapper |
3、测试表和对应实体创建
user表&实体创建
user表创建脚本
DROP TABLE IF EXISTS `user`;CREATE TABLE `user` (`id` int(11) NOT NULL AUTO_INCREMENT,`name` varchar(255) DEFAULT NULL,`age` int(11) DEFAULT NULL,`hobby` varchar(500) DEFAULT NULL,PRIMARY KEY (`id`)) ENGINE=InnoDB DEFAULT CHARSET=utf8;
user实体创建
package io.ken.springboot.course.model;public class User {private int id;private String name;private int age;private String hobby;public int getId() {return id;}public void setId(int id) {this.id = id;}public String getName() {return name;}public void setName(String name) {this.name = name;}public int getAge() {return age;}public void setAge(int age) {this.age = age;}public String getHobby() {return hobby;}public void setHobby(String hobby) {this.hobby = hobby;}}
getger和setter可以选中类名之后使用快捷键Alt+Insert生成
创建UserMapper,用于跟MyBatis数据操作配置(*mapper.xml)映射
package io.ken.springboot.course.dao;import io.ken.springboot.course.model.User;import org.apache.ibatis.annotations.Mapper;import java.util.List;@Mapperpublic interface UserMapper {User queryById(int id);List<User> queryAll();int add(User user);int delById(int id);int updateById(User user);}
4、MyBatis Mapper配置
1、创建MyBatis配置文件夹
resources/conf/mybatis/mapper
2、在mapper文件夹下创建UserMapper.xml<?xml version="1.0" encoding="UTF-8"?><!DOCTYPE mapper PUBLIC "-//mybatis.org//DTD Mapper 3.0//EN" "http://mybatis.org/dtd/mybatis-3-mapper.dtd"><mapper namespace="io.ken.springboot.course.dao.UserMapper"><select id="queryById" resultType="io.ken.springboot.course.model.User"parameterType="int">SELECT * FROM user WHERE id = #{id}</select><select id="queryAll" resultType="io.ken.springboot.course.model.User">SELECT * FROM user</select><insert id="add" parameterType="io.ken.springboot.course.model.User">INSERT INTO user(name,age,hobby) VALUES(#{name},#{age},#{hobby})</insert><delete id="delById" parameterType="int">DELETE FROM user WHERE id = #{id}</delete><update id="updateById" parameterType="io.ken.springboot.course.model.User">UPDATE user SET name=#{name},age=#{age},hobby=#{hobby} WHERE id = #{id}</update></mapper>
5、创建UserController并提供API
package io.ken.springboot.course.controller;import io.ken.springboot.course.dao.UserMapper;import io.ken.springboot.course.model.User;import org.springframework.beans.factory.annotation.Autowired;import org.springframework.stereotype.Controller;import org.springframework.web.bind.annotation.RequestMapping;import org.springframework.web.bind.annotation.ResponseBody;import java.util.List;@Controller@RequestMapping("/user")public class UserController {@AutowiredUserMapper userMapper;@RequestMapping("/querybyid")@ResponseBodyUser queryById(int id) {return userMapper.queryById(id);}@RequestMapping("/queryall")@ResponseBodyList<User> queryAll() {return userMapper.queryAll();}@RequestMapping("/add")@ResponseBodyString add(User user) {return userMapper.add(user) == 1 ? "success" : "failed";}@RequestMapping("/updatebyid")@ResponseBodyString updateById(User user) {return userMapper.updateById(user) == 1 ? "success" : "failed";}@RequestMapping("/delbyid")@ResponseBodyString delById(int id) {return userMapper.delById(id) == 1 ? "success" : "failed";}}
6、API测试
| API | 示例 | | —- | —- | | 添加用户 | /user/add?name=tom&age=1&hobby=football | | 更新用户 | /user/updatebyid?name=ken&age=18&hobby=coding&id=1 | | 查询指定用户 | /user/querybyid?id=1 | | 查询所有用户 | /user/queryall | | 删除指定用户 | /user/delbyid?id=2 |
三、备注
- 本文代码示例
https://github.com/ken-io/springboot-course/tree/master/chapter-02-02
使用Spring Boot+MyBatis多数据源配置(注解版)
一、前言
本教程主要内容
-
本教程开发环境
1、操作系统: Windows 10 X64
2、Java SDK: jdk-8u141
3、Maven:3.5
4、IDE:IntelliJ IDEA 2017
5、Spring Boot:1.5.6
本项目构建基于:https://ken.io/note/springboot-course-basic-curd-annotation二、多数据源配置
1、创建数据库&表
创建数据库test
CREATE DATABASE test;
创建表:note
DROP TABLE IF EXISTS `note`;CREATE TABLE `note` (`id` int(11) NOT NULL AUTO_INCREMENT,`title` varchar(255) DEFAULT NULL,`body` longtext,PRIMARY KEY (`id`)) ENGINE=InnoDB AUTO_INCREMENT=2 DEFAULT CHARSET=utf8;
2、修改配置文件增加数据源
修改数据库连接配置(application.yml),将之前的spring.datasource更换为自定义的courseDataSource、testDataSource
#数据库连接配置courseDataSource:driver-class-name: com.mysql.jdbc.Driverurl: jdbc:mysql://localhost:3306/course?zeroDateTimeBehavior=convertToNull&useUnicode=true&characterEncoding=utf-8username: rootpassword: roottestDataSource:driver-class-name: com.mysql.jdbc.Driverurl: jdbc:mysql://localhost:3306/test?zeroDateTimeBehavior=convertToNull&useUnicode=true&characterEncoding=utf-8username: rootpassword: root
3、调整数据源对应实体
1、在io.ken.springboot.course.model下新建两个package:course、test
2、将User.java移动到io.ken.springboot.course.model.course
3、在io.ken.springboot.course.model.test下新建Note.javapackage io.ken.springboot.course.model.test;public class Note {private int id;private String title;private String body;public int getId() {return id;}public void setId(int id) {this.id = id;}public String getTitle() {return title;}public void setTitle(String title) {this.title = title;}public String getBody() {return body;}public void setBody(String body) {this.body = body;}}
4、调整数据访问接口
1、在io.ken.springboot.course.dao下新建两个package:course、test
2、将UserMapper.java移动到io.ken.springboot.course.dao.course
3、在io.ken.springboot.course.dao.test下新建NoteMapper.javapackage io.ken.springboot.course.dao.test;import io.ken.springboot.course.model.test.Note;import org.apache.ibatis.annotations.Mapper;import org.apache.ibatis.annotations.Select;import java.util.List;@Mapperpublic interface NoteMapper {@Select("SELECT * FROM note")List<Note> queryAll();}
5、配置数据源对应Configuration
1、在io.ken.springboot.course下新建package:config
2、在io.ken.springboot.course.config下创建CourseDbConfig.javapackage io.ken.springboot.course.config;import org.apache.ibatis.session.SqlSessionFactory;import org.mybatis.spring.SqlSessionFactoryBean;import org.mybatis.spring.annotation.MapperScan;import org.springframework.beans.factory.annotation.Qualifier;import org.springframework.boot.autoconfigure.jdbc.DataSourceBuilder;import org.springframework.boot.context.properties.ConfigurationProperties;import org.springframework.context.annotation.Bean;import org.springframework.context.annotation.Configuration;import org.springframework.context.annotation.Primary;import javax.sql.DataSource;@Configuration@MapperScan(basePackages = "io.ken.springboot.course.dao.course", sqlSessionFactoryRef = "courseSqlSessionFactory")public class CourseDbConfig {@Bean(name = "courseDataSource")@ConfigurationProperties(prefix = "courseDataSource")@Primarypublic DataSource courseDataSource() {return DataSourceBuilder.create().build();}@Bean(name = "courseSqlSessionFactory")@Primarypublic SqlSessionFactory courseSqlSessionFactory(@Qualifier("courseDataSource") DataSource dataSource) throws Exception {SqlSessionFactoryBean bean = new SqlSessionFactoryBean();bean.setDataSource(dataSource);return bean.getObject();}}
3、在io.ken.springboot.course.config下创建TestDbConfig.java
package io.ken.springboot.course.config;import org.apache.ibatis.session.SqlSessionFactory;import org.mybatis.spring.SqlSessionFactoryBean;import org.mybatis.spring.annotation.MapperScan;import org.springframework.beans.factory.annotation.Qualifier;import org.springframework.boot.autoconfigure.jdbc.DataSourceBuilder;import org.springframework.boot.context.properties.ConfigurationProperties;import org.springframework.context.annotation.Bean;import org.springframework.context.annotation.Configuration;import javax.sql.DataSource;@Configuration@MapperScan(basePackages = "io.ken.springboot.course.dao.test", sqlSessionFactoryRef = "testSqlSessionFactory")public class TestDbConfig {@Bean(name = "testDataSource")@ConfigurationProperties(prefix = "testDataSource")public DataSource testDataSource() {return DataSourceBuilder.create().build();}@Bean(name = "testSqlSessionFactory")public SqlSessionFactory testSqlSessionFactory(@Qualifier("testDataSource") DataSource dataSource) throws Exception {SqlSessionFactoryBean bean = new SqlSessionFactoryBean();bean.setDataSource(dataSource);return bean.getObject();}}
6、创建NoteController并提供API
package io.ken.springboot.course.controller;import io.ken.springboot.course.dao.test.NoteMapper;import io.ken.springboot.course.model.test.Note;import org.springframework.beans.factory.annotation.Autowired;import org.springframework.stereotype.Controller;import org.springframework.web.bind.annotation.RequestMapping;import org.springframework.web.bind.annotation.ResponseBody;import java.util.List;@Controller@RequestMapping("/note")public class NoteController {@AutowiredNoteMapper noteMapper;@RequestMapping("/queryall")@ResponseBodyList<Note> queryAll() {return noteMapper.queryAll();}}
7、API测试
| API | 示例 | | —- | —- | | 添加用户 | /user/add?name=tom&age=1&hobby=football | | 更新用户 | /user/updatebyid?name=ken&age=18&hobby=coding&id=1 | | 查询指定用户 | /user/querybyid?id=1 | | 查询所有用户 | /user/queryall | | 删除指定用户 | /user/delbyid?id=2 | | 查询所有日志 | /note/queryall |
三、备注
- 本文代码示例
https://github.com/ken-io/springboot-course/tree/master/chapter-02-03
使用Spring Boot+MyBatis多数据源配置(xml配置版)
一、前言
本教程主要内容
-
本教程开发环境
1、操作系统: Windows 10 X64
2、Java SDK: jdk-8u141
3、Maven:3.5
4、IDE:IntelliJ IDEA 2017
5、Spring Boot:1.5.6
本项目构建基于:https://ken.io/note/springboot-course-basic-curd-xml二、多数据源配置
1、创建数据库&表
创建数据库test
CREATE DATABASE test;
创建表:note
DROP TABLE IF EXISTS `note`;CREATE TABLE `note` (`id` int(11) NOT NULL AUTO_INCREMENT,`title` varchar(255) DEFAULT NULL,`body` longtext,PRIMARY KEY (`id`)) ENGINE=InnoDB AUTO_INCREMENT=2 DEFAULT CHARSET=utf8;
2、修改配置文件增加数据源
修改数据库连接配置(application.yml),将之前的spring.datasource更换为自定义的courseDataSource、testDataSource
#数据库连接配置courseDataSource:driver-class-name: com.mysql.jdbc.Driverurl: jdbc:mysql://localhost:3306/course?zeroDateTimeBehavior=convertToNull&useUnicode=true&characterEncoding=utf-8username: rootpassword: roottestDataSource:driver-class-name: com.mysql.jdbc.Driverurl: jdbc:mysql://localhost:3306/test?zeroDateTimeBehavior=convertToNull&useUnicode=true&characterEncoding=utf-8username: rootpassword: root
3、调整数据源对应实体
1、在io.ken.springboot.course.model下新建两个package:course、test
2、将User.java移动到io.ken.springboot.course.model.course
3、在io.ken.springboot.course.model.test下新建Note.javapackage io.ken.springboot.course.model.test;public class Note {private int id;private String title;private String body;public int getId() {return id;}public void setId(int id) {this.id = id;}public String getTitle() {return title;}public void setTitle(String title) {this.title = title;}public String getBody() {return body;}public void setBody(String body) {this.body = body;}}
4、配置数据源对应Configuration
1、在io.ken.springboot.course.dao下新建两个package:course、test
2、将UserMapper.java移动到io.ken.springboot.course.dao.course并去掉@Mapper注解
3、在io.ken.springboot.course.dao.test下新建NoteMapper.javapackage io.ken.springboot.course.dao.test;import io.ken.springboot.course.model.test.Note;import java.util.List;public interface NoteMapper {List<Note> queryAll();}
5、调整MyBatis Mappere配置
1、在/resources/conf/mybatis/mapper下新建两个文件夹:course、test
2、将UserMapper.xml移动到/resources/conf/mybatis/mapper/course
3、在/resources/conf/mybatis/mapper/test下新建NoteMapper.xml<?xml version="1.0" encoding="UTF-8"?><!DOCTYPE mapper PUBLIC "-//mybatis.org//DTD Mapper 3.0//EN" "http://mybatis.org/dtd/mybatis-3-mapper.dtd"><mapper namespace="io.ken.springboot.course.dao.test.NoteMapper"><select id="queryAll" resultType="io.ken.springboot.course.model.test.Note">SELECT * FROM note</select></mapper>
6、配置数据源对应Configuration
1、在io.ken.springboot.course下新建package:config
2、在io.ken.springboot.course.config下创建CourseDbConfig.javapackage io.ken.springboot.course.config;import org.apache.ibatis.session.SqlSessionFactory;import org.mybatis.spring.SqlSessionFactoryBean;import org.mybatis.spring.annotation.MapperScan;import org.springframework.beans.factory.annotation.Qualifier;import org.springframework.boot.autoconfigure.jdbc.DataSourceBuilder;import org.springframework.boot.context.properties.ConfigurationProperties;import org.springframework.context.annotation.Bean;import org.springframework.context.annotation.Configuration;import org.springframework.context.annotation.Primary;import org.springframework.core.io.support.PathMatchingResourcePatternResolver;import javax.sql.DataSource;@Configuration@MapperScan(basePackages = "io.ken.springboot.course.dao.course", sqlSessionFactoryRef = "courseSqlSessionFactory")public class CourseDbConfig {@Bean(name = "courseDataSource")@ConfigurationProperties(prefix = "courseDataSource")@Primarypublic DataSource courseDataSource() {return DataSourceBuilder.create().build();}@Bean(name = "courseSqlSessionFactory")@Primarypublic SqlSessionFactory courseSqlSessionFactory(@Qualifier("courseDataSource") DataSource dataSource) throws Exception {SqlSessionFactoryBean bean = new SqlSessionFactoryBean();bean.setDataSource(dataSource);bean.setMapperLocations(new PathMatchingResourcePatternResolver().getResources("classpath:conf/mybatis/mapper/course/*.xml"));return bean.getObject();}}
3、在io.ken.springboot.course.config下创建TestDbConfig.java
package io.ken.springboot.course.config;import org.apache.ibatis.session.SqlSessionFactory;import org.mybatis.spring.SqlSessionFactoryBean;import org.mybatis.spring.annotation.MapperScan;import org.springframework.beans.factory.annotation.Qualifier;import org.springframework.boot.autoconfigure.jdbc.DataSourceBuilder;import org.springframework.boot.context.properties.ConfigurationProperties;import org.springframework.context.annotation.Bean;import org.springframework.context.annotation.Configuration;import org.springframework.core.io.support.PathMatchingResourcePatternResolver;import javax.sql.DataSource;@Configuration@MapperScan(basePackages = "io.ken.springboot.course.dao.test", sqlSessionFactoryRef = "testSqlSessionFactory")public class TestDbConfig {@Bean(name = "testDataSource")@ConfigurationProperties(prefix = "testDataSource")public DataSource testDataSource() {return DataSourceBuilder.create().build();}@Bean(name = "testSqlSessionFactory")public SqlSessionFactory testSqlSessionFactory(@Qualifier("testDataSource") DataSource dataSource) throws Exception {SqlSessionFactoryBean bean = new SqlSessionFactoryBean();bean.setDataSource(dataSource);bean.setMapperLocations(new PathMatchingResourcePatternResolver().getResources("classpath:conf/mybatis/mapper/test/*.xml"));return bean.getObject();}}
7、创建NoteController并提供API
package io.ken.springboot.course.controller;import io.ken.springboot.course.dao.test.NoteMapper;import io.ken.springboot.course.model.test.Note;import org.springframework.beans.factory.annotation.Autowired;import org.springframework.stereotype.Controller;import org.springframework.web.bind.annotation.RequestMapping;import org.springframework.web.bind.annotation.ResponseBody;import java.util.List;@Controller@RequestMapping("/note")public class NoteController {@AutowiredNoteMapper noteMapper;@RequestMapping("/queryall")@ResponseBodyList<Note> queryAll() {return noteMapper.queryAll();}}
8、API测试
| API | 示例 | | —- | —- | | 添加用户 | /user/add?name=tom&age=1&hobby=football | | 更新用户 | /user/updatebyid?name=ken&age=18&hobby=coding&id=1 | | 查询指定用户 | /user/querybyid?id=1 | | 查询所有用户 | /user/queryall | | 删除指定用户 | /user/delbyid?id=2 | | 查询所有日志 | /note/queryall |
三、备注
- 本文代码示例
https://github.com/ken-io/springboot-course/tree/master/chapter-02-04
使用Spring Boot+Freemarker模板引擎开发Web应用
一、前言
为什么要使用模板引擎?
在最早的Java Web应用中,最为广泛使用的就是JSP,但是JSP已经是陈旧的技术了,ken.io觉得JSP主要有三个问题:
1、视图代码不能与Java代码完全分离,如果再JSP页面写Java代码维护成本高
2、无法实现页面继承工程,实现模板页的方式蹩脚
3、由于一些已知问题,Spring Boot官方不建议,比如:Spring Boot+JSP打成jar包会有问题
所以,ken.io选择了较为流行的Freemarker,本文我们介绍Spring Boot+Freemarker的基本使用
本项目构建基于:https://ken.io/note/springboot-course-basic-helloworld
二、操作步骤
1、引入Freemarker
在pom.xml文件的dependencies引入
<dependencies><dependency><groupId>org.springframework.boot</groupId><artifactId>spring-boot-starter-web</artifactId></dependency><dependency><groupId>org.springframework.boot</groupId><artifactId>spring-boot-starter-freemarker</artifactId></dependency></dependencies>
2、创建Freemarker模板
- 创建模板文件夹
在resources文件夹下新建templates文件夹,作为模板根目录
完整路径:src/main/resources/templates
为什么文件夹名字一定要叫templates?
答:Spring Boot就是这么约定的,如果有需要,可以通过配置application.yml修改
spring:freemarker:template-loader-path: classpath:/templates/
- 在templates新建welcome.ftl文件
ftl就是Freemarker模板文件后缀,可以通过配置application.yml修改
<!DOCTYPE html><html><head><title>Welcome - ken.io</title></head><body>Message: ${message}</body></html>
3、创建Welcome访问入口
在HomeController中增加函数
@RequestMapping("/")@ResponseBodyString index() {return "Hello World!";}@RequestMapping("/welcome")ModelAndView welcome(){ModelAndView modelAndView = new ModelAndView();modelAndView.setViewName("welcome");modelAndView.addObject("message","Welcome to Spring Boot & Freemarker");return modelAndView;}
对比index函数,主要发生了以下几个变化:
1、去掉@ResponseBody注解,如果使用该注解,返回结果会直接输出,而不是使用模板引擎渲染
2、使用ModelAndView对象,指定视图名&添加视图对象
对于setViewName函数,如果视图的路径是templates/home/index.ftl
那么使用方式应该是:
modelAndView.setViewName("home/index");
4、启动&访问
启动项目&访问
访问:http://localhost:8080/welcome:
Message: Welcome to Spring Boot & Freemarker
三、备注
1、Freemarker 常用配置
| 配置项 | 说明 |
|---|---|
| spring.freemarker.template-loader-path | 模板根目录,例如:classpath:/templates/ |
| spring.freemarker.cache | 是否启用缓存(true/false) |
| spring.freemarker.charset | 字符编码 |
| spring.freemarker.content-type | 内容类型,例如:text/html |
| spring.freemarker.suffix | 模板文件后缀,默认为.ftl |
2、附录
- 本文参考:
https://docs.spring.io/spring-boot/docs/1.5.6.RELEASE/reference/htmlsingle/#boot-features-spring-mvc-template-engines
https://docs.spring.io/spring-boot/docs/1.5.6.RELEASE/reference/htmlsingle/#boot-features-jsp-limitations
- 示例代码地址
https://github.com/ken-io/springboot-course/tree/master/chapter-03-01
- 相关阅读
Freemarker母版页示例:https://ken.io/note/freemarker-skill-layout
使用Spring Boot+Thymeleaf模板引擎开发Web应用
一、前言
为什么要使用模板引擎?
在最早的Java Web应用中,最为广泛使用的就是JSP,但是JSP已经是陈旧的技术了,ken.io觉得JSP主要有三个问题:
1、视图代码不能与Java代码完全分离,如果再JSP页面写Java代码维护成本高
2、无法实现页面继承工程,实现模板页的方式蹩脚
3、由于一些已知问题,Spring Boot官方不建议,比如:Spring Boot+JSP打成jar包会有问题
所以,ken.io选择了较为流行的Thymeleaf,本文我们介绍Spring Boot+Thymeleaf的基本使用
本项目构建基于:https://ken.io/note/springboot-course-basic-helloworld
二、操作步骤
1、引入Thymeleaf
在pom.xml文件的dependencies引入
<dependencies><dependency><groupId>org.springframework.boot</groupId><artifactId>spring-boot-starter-web</artifactId></dependency><dependency><groupId>org.springframework.boot</groupId><artifactId>spring-boot-starter-thymeleaf</artifactId></dependency></dependencies>
2、创建Thymeleaf模板
- 创建模板文件夹
在resources文件夹下新建templates文件夹,作为模板根目录
完整路径:src/main/resources/templates
为什么文件夹名字一定要叫templates?
答:Spring Boot就是这么约定的,如果有需要,可以通过配置application.yml修改
spring:thymeleaf:prefix: classpath:/templates/
- 在templates新建welcome.html文件
html就是Thymeleaf模板文件后缀,可以通过配置application.yml修改
<!DOCTYPE html><html><head><title>Welcome - ken.io</title></head><body></body></html>
Thymeleaf的语法跟Freemarker差异比较大,因为Thymeleaf所有的语法都依赖于HTML标签。
<p th:text="${message}"></p>
表示将controller返回的message对象以文本形式输出到标签内
相对来说,ken.io更喜欢Fremarker的语法
3、创建Welcome访问入口
在HomeController中增加函数
@RequestMapping("/")@ResponseBodyString index() {return "Hello World!";}@RequestMapping("/welcome")ModelAndView welcome(){ModelAndView modelAndView = new ModelAndView();modelAndView.setViewName("welcome");modelAndView.addObject("message","Welcome to Spring Boot & Thymeleaf");return modelAndView;}
对比index函数,主要发生了以下几个变化:
1、去掉@ResponseBody注解,如果使用该注解,返回结果会直接输出,而不是使用模板引擎渲染
2、使用ModelAndView对象,指定视图名&添加视图对象
对于setViewName函数,如果视图的路径是templates/home/index.ftl
那么使用方式应该是:
modelAndView.setViewName("home/index");
4、启动&访问
启动项目&访问
访问:http://localhost:8080/welcome:
Welcome to Spring Boot & Thymeleaf
三、备注
1、Thymeleaf 常用配置
| 配置项 | 说明 | |
|---|---|---|
| spring.thymeleaf.prefix | 模板根目录,例如:classpath:/templates/ | |
| spring.thymeleaf.cache | 是否启用缓存(true | false) |
| spring.thymeleaf.encoding | 字符编码 | |
| spring.thymeleaf.content-type | 内容类型,例如:text/html | |
| spring.thymeleaf.suffix | 模板文件后缀,默认为.html |
2、附录
- 本文参考:
https://docs.spring.io/spring-boot/docs/1.5.6.RELEASE/reference/htmlsingle/#boot-features-spring-mvc-template-engines
https://docs.spring.io/spring-boot/docs/1.5.6.RELEASE/reference/htmlsingle/#boot-features-jsp-limitations
- 示例代码地址
https://github.com/ken-io/springboot-course/tree/master/chapter-03-02
- 相关阅读
Thymeleaf母版页示例:https://ken.io/note/thymeleaf-skill-layout
Spring Boot应用 打包与部署教程
一、前言
1、本教程主要内容
- 通过Maven将Spring Boot应用打包成jar包
- 将打包的jar包传输的服务器并配置启动、停止脚本
- 将Spring Boot应用配置为系统服务并配置开机启动
2、Spring Boot打包与部署特点说明
Java Web应用在Spring Boot之前,通常是打包成war(Web application ARchive)包,结合Tomcat来完成部署。
对于Spring Boot,Spring官方的建议是将Spring Boot应用打包成一个fat jar(Java ARchive),通过java命令来启动运行。这个fat jar会把Tomcat内置进来,所以部署时也不需要单独配置Tomcat。
Spring官方的打包说明:
https://docs.spring.io/spring-boot/docs/1.5.9.RELEASE/reference/htmlsingle/#getting-started-first-application-executable-jar3、本教程环境信息
开发环境: | 用途 | 工具&版本 | | —- | —- | | 操作系统 | Windows 10 | | 开发工具 | IntelliJ IDEA 2017 | | 打包工具 | Maven 3.X | | JDK | 1.8.x | | 传输工具 | FlashFxp |
生产环境: | 用途 | 工具&版本 | | —- | —- | | 操作系统 | CentOS 7 | | JDK | 1.8.x | | 传输工具 | Vsftp |
CentOS 7快速上手教程:https://ken.io/serie/centos7-quickstart
二、Spring Boot应用打包
1、打包基础依赖
打包工具的话如前面提到的,我们使用的是Maven
首先需要在pom.xml文件build节点增加如下配置:
<build><finalName>springboot-course</finalName><plugins><plugin><groupId>org.springframework.boot</groupId><artifactId>spring-boot-maven-plugin</artifactId></plugin></plugins></build>
另外,需要确认pom.xml文件的package节点配置:
<packaging>jar</packaging>
本篇ken.io会介绍两种打包方式,一个是Maven命令打包。一个是IDEA+Maven插件打包。
2、 Maven命令打包
- 准备工作
配置Java、Maven环境变量
参考:http://wiki.jikexueyuan.com/project/maven/environment-setup.html
- cmd:进入项目目录
本次项目目录是:D:\Projects\GitHub\springboot-course\package-maven
d: & cd D:\Projects\GitHub\springboot-course\package-maven
清理package
#清理已存在的编译结果mvn clean#清理成功后输出信息示例[INFO] -----------------------------------------------------------[INFO] BUILD SUCCESS[INFO] -----------------------------------------------------------
打包
#打包mvn package#清理成功后输出信息示例[INFO] -----------------------------------------------------------[INFO] BUILD SUCCESS[INFO] -----------------------------------------------------------#清理成功后会在项目根目录生成target文件夹#查看是否生成target文件夹ls#查看是否生了jar文件ls target#根据pom.xml文件的配置,生成的jar文件名是:springboot-course.jar
2、IDEA + Maven插件打包
通过View->Tool Windows->Maven projects 呼出Maven工具栏
或者通过IDEA右侧工具栏呼出Maven工具栏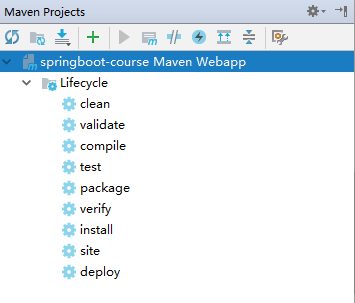
图形化操作就很简单了。两个步骤:
- clean
- package
成功之后也会在IDEA 控制台显示以下输出:
[INFO] --------------------------------------------------------------------[INFO] BUILD SUCCESS[INFO] --------------------------------------------------------------------[INFO] Total time: 7.839 s[INFO] Finished at: 2017-12-09T13:36:40+08:00[INFO] Final Memory: 21M/218M[INFO] --------------------------------------------------------------------
生成的jar包路径:项目根目录\target\springboot-course.jar
3、本地运行测试
通过java命令运行jar包
#进入jar包所在目录d: & cd D:\Projects\GitHub\springboot-course\package-maven\target#执行java -jar springboot-course.jar#运行成功后会输出如下信息(部分信息略去)[main] o.s.j.e.a.AnnotationMBeanExporter : Registering beans for JMX exposure on startup[main] s.b.c.e.t.TomcatEmbeddedServletContainer : Tomcat started on port(s): 8080 (http)[main] i.k.springboot.course.CourseApplication : Started CourseApplication in 5.569 seconds (JVM running for 6.363)
通过浏览器访问:localhost:8080,验证是否正常
端口号
在/src/main/resources下新建配置文件application.yml
文件内容:
server:port: 8081
配置完成之后,重新打包即可
三、Spring Boot应用部署
1、 准备工作
- JDK 1.8部署 https://ken.io/note/centos-java-setup
- FTP服务端部署 https://ken.io/note/centos-quickstart-ftpserver
通过FTP将jar包上传到CentOS的 /webroot/helloweb 目录
创建日志目录:
#创建应用目录&日志目录sudo mkdir /webroot/hellowebsudo mkdir /webroot/helloweb/logs#修改文件夹权限sudo chmod 777 /webroot/hellowebsudo chmod 777 /webroot/helloweb/logs
开放端口
#添加可访问端口sudo firewall-cmd --add-port=8081/tcp --permanent#重新加载防火墙策略sudo firewall-cmd --reload
2、启动&停止脚本
创建启动脚本
#创建启动脚本start.shsudo vi /webroot/helloweb/start.sh
脚本内容:
#!/bin/sh#指定JDK目录&AppNameexport JAVA_HOME=/usr/java/jdk1.8.0_151APP_NAME=springboot-course.jarecho $JAVA_HOMEecho $APP_NAME#nohup命令后台启动jar包并写入日志nohup java -jar $APP_NAME >>logs/start.log 2>>logs/startError.log &#sleep等待15秒后,判断包含AppName的线程是否存在sleep 15if test $(pgrep -f $APP_NAME|wc -l) -eq 0thenecho "Start Failed"elseecho "Start Successed"fi
创建停止脚本
#创建停止脚本文件sudo vi /webroot/helloweb/stop.sh
脚本内容:
#!/bin/sh#指定AppNameAPP_NAME=springboot-course.jar#找到包含AppName的进程PROCESS=`ps -ef|grep $APP_NAME|grep -v grep |awk '{ print $2}'`#循环停用进程直到成功while :dokill -9 $PROCESS > /dev/null 2>&1if [ $? -ne 0 ];thenbreakelsecontinuefidoneecho 'Stop Successed'
启动/停止站点
#启动sh /webroot/helloweb/start.sh#停止sh /webroot/helloweb/stop.sh
3、访问测试
启动应用后,访问
http://<ip address>:8081验证是否正常即可四、开启启动&Nginx反向代理配置
1、开机自动启动配置
我们可以把Spring Boot应用配置为系统服务,就可以设置开机启动
将站点停止脚本标记为可执行文件
chmod +x /webroot/helloweb/stop.sh
创建helloweb服务
#创建服务文件sudo vi /usr/lib/systemd/system/helloweb.service#文件内容[Unit]Description=hellowebAfter=network.target[Service]WorkingDirectory=/webroot/hellowebExecStart=/usr/java/jdk1.8.0_151/java -jar /webroot/helloweb/springboot-course.jarExecStop=/webroot/helloweb/stop.shRestart=alwaysRestartSec=10[Install]WantedBy=multi-user.target
设置服务开机启动&开启服务
#设置服务开机启动sudo systemctl enable helloweb#启动服务sudo systemctl start helloweb
2、Nginx反向代理配置
创建helloweb站点配置
#新建配置文件sudo vi /etc/nginx/conf.d/helloweb.conf#反向代理配置内容server {listen 80; #监听80端口server_name helloweb.mydomain.com; #绑定的域名location / { #转发或处理proxy_pass http://localhost:8081;}error_page 500 502 503 504 /50x.html;#错误页location = /50x.html {root /usr/share/nginx/html;}}
重载Nginx配置
sudo nginx -s reload
开放防火墙端口
#添加可访问端口sudo firewall-cmd --add-port=80/tcp --permanent#重新加载防火墙策略sudo firewall-cmd --reload
访问测试:
通过设置本地hosts将helloweb.mydomain.com指向服务器IP
然后通过浏览器访问:helloweb.mydomain.com即可五、备注
本篇源代码
https://github.com/ken-io/springboot-course/tree/master/package-maven

若有收获,就点个赞吧
0 人点赞
