资料
物联网IoT协议之OPC UA快速入门教程
UaExpert使用教程
本文内容将帮助你通过thingsboard网关快速接入opc ua协议的设备。并演示一个简单的数据读取与控制的例子。
准备环境
具体搭建步骤不在本文介绍
- thingsboard 3.2.1
- tb-gateway 2.5.5.2
- python3 3.7
OPC UA服务器
使用python的opcua搭建opcua服务端,各个步骤含义看代码注释
依赖安装
```python import syspip install opcua
sys.path.insert(0, “..”) import time from opcua import ua, Server, uamethod
@uamethod def set_value(parent, node_id, value): “”” 给node_id的节点赋值为value :param parent: 不需要传 :param node_id: 节点ID :param value: 节点要改的值 :return: res:boolean “”” node = server.get_node(node_id) res = False if ua.AccessLevel.CurrentWrite in list(node.get_access_level()): node.set_value(value) res = True return res
def argument(name, date_type, value_rank): “”” 构建参数 :param name: :param date_type: ua.ObjectIds.xxx :param value_rank: :return: “”” v = ua.Argument() v.Name = name v.DataType = ua.NodeId(date_type) v.ValueRank = value_rank v.ArrayDimensions = [] v.Description = ua.LocalizedText(name) return v
if name == “main“:
global serverserver = Server()# 服务地址server.set_endpoint("opc.tcp://0.0.0.0:4840/freeopcua/server/")# 允许的访问策略server.set_security_policy([ua.SecurityPolicyType.NoSecurity,ua.SecurityPolicyType.Basic128Rsa15_SignAndEncrypt,ua.SecurityPolicyType.Basic128Rsa15_Sign])uri = "http://examples.freeopcua.github.io"idx = server.register_namespace(uri)objects = server.get_objects_node()# 添加节点dev = objects.add_object(idx, "Device")dev_name = dev.add_variable(idx, "Name", "opcua_sensor")dev_battery = dev.add_variable(idx, "BatteryLevel", 9.0)dev_humidity = dev.add_variable(idx, "Humidity", 13)dev_switch = dev.add_variable(idx, "Switch", 1)dev_temperature = dev.add_variable(idx, "Temperature", 19)# 设置客户端可写dev_switch.set_writable()# 定义方法参数in_arg_node_id = argument("node_id", ua.ObjectIds.String, -1)in_arg_value = argument("value", ua.ObjectIds.Int64, -1)out_arg = argument("result", ua.ObjectIds.Boolean, -1)# 添加方法set_value_node = dev.add_method(idx, "set_value", set_value, [in_arg_node_id, in_arg_value], [out_arg])# 启动服务server.start()try:count = 0while True:# 设置和opcua-test.json配置文件中的数据采集频率("scanPeriodInMillis": 5000)一致,容易看效果.time.sleep(5)count += 0.1dev_battery.set_value(count)finally:server.stop()
<a name="VTnFY"></a>## OPC UA py可视化客户端安装python依赖```shellpip3 install opcua-clientpip3 install PyQt5
命令行执行下面指令
opcua-client
就可以看到opcua的界面,在前面的python opcua服务器启动的情况下,点击右上方的Connect按钮就能看到数据。
ThingsBoard官网介绍的节点获取方式如下图:
路径就是图中左边的树形路径,推荐使用图中右边的,命名空间标识符+节点标识符。像这样:Switch的值就是 ${ns=2;i=5} 原因文章末尾说。
tb网关配置
在网页版创建设备,勾选是网关选项.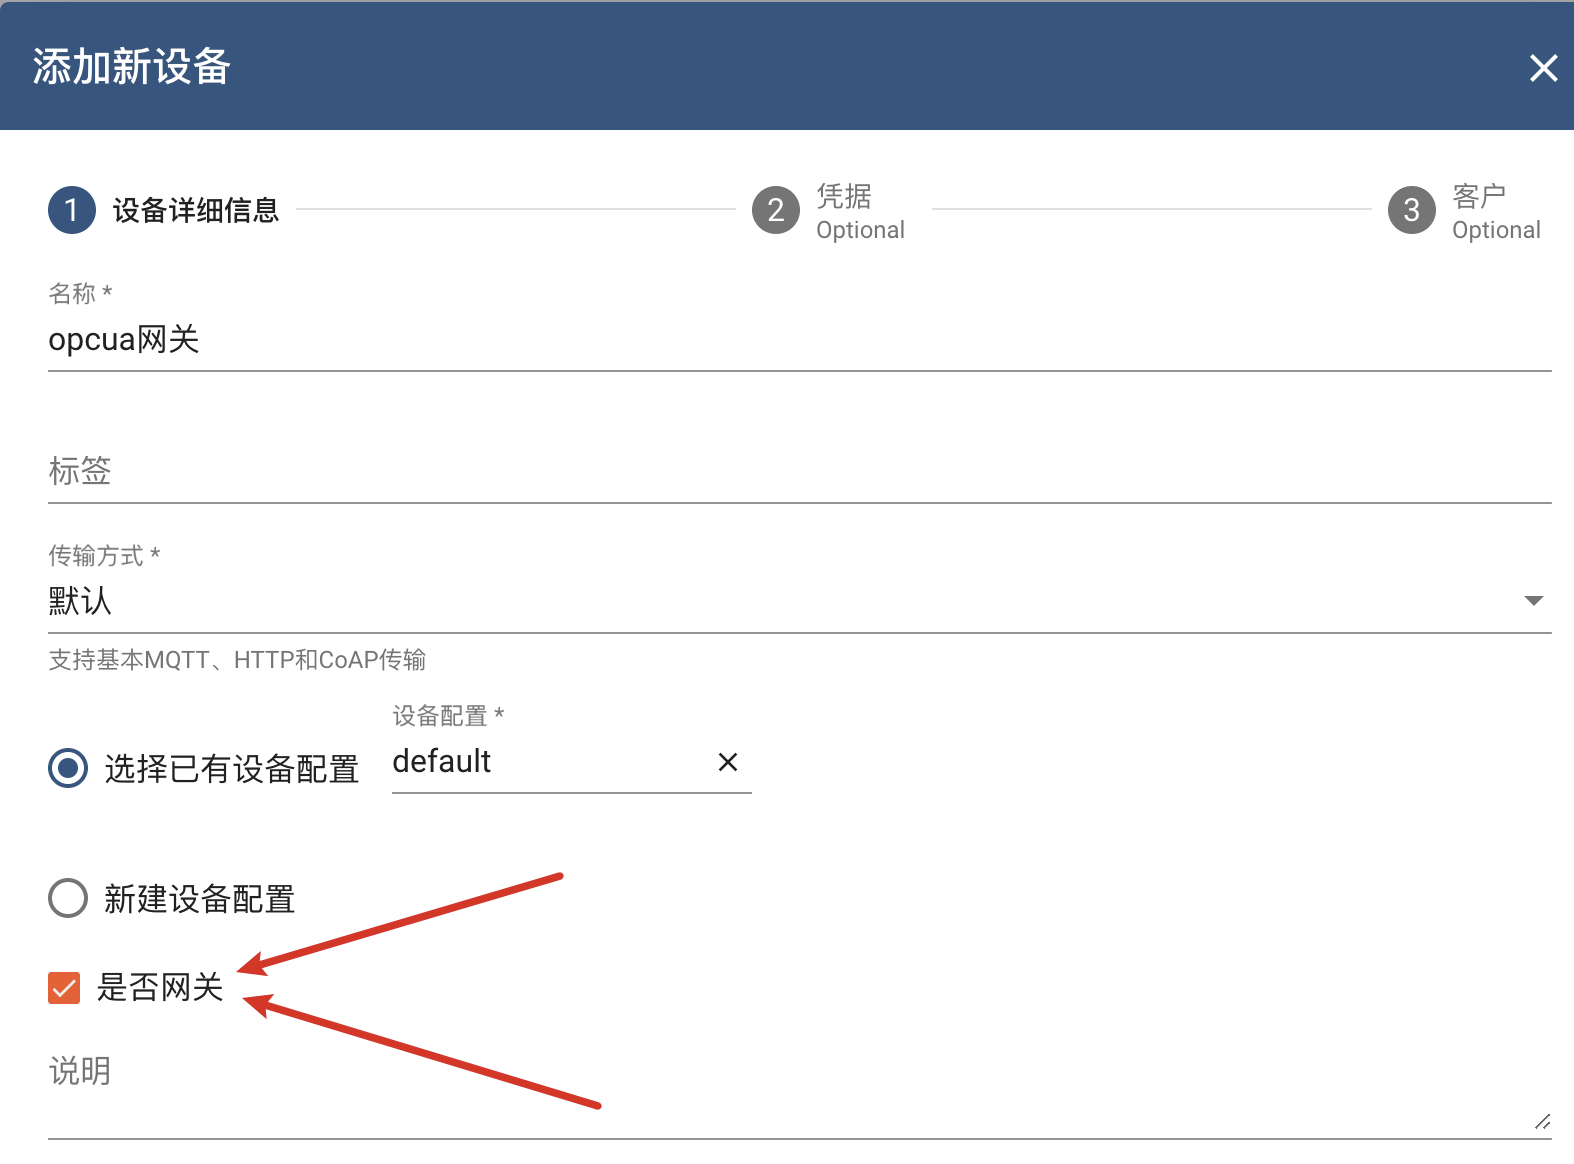
复制设备访问令牌,粘贴到配置文件中(这里截图中的opcua_sensor设备不是手动创建的,是根据后面步骤启动网关和opcua服务器后,自动生成的)
tb_gateway.yaml中打开opcua连接器
thingsboard:host: localhost # tb服务器地址port: 1883 # tb服务器mqtt端口,因为gateway与tb通过mqtt交互remoteShell: falseremoteConfiguration: falsesecurity:accessToken: z5zRQmSXe64U39my83jd # 网关的设备访问令牌qos: 0storage:type: memoryread_records_count: 100max_records_count: 100000connectors: #打开opcua连接器-name: OPC-UA Connectortype: opcuaconfiguration: opcua-test.json
opcua-test.json配置 「和python代码中的服务器设置对应」

若有收获,就点个赞吧
0 人点赞
