一、Electron 进程简介
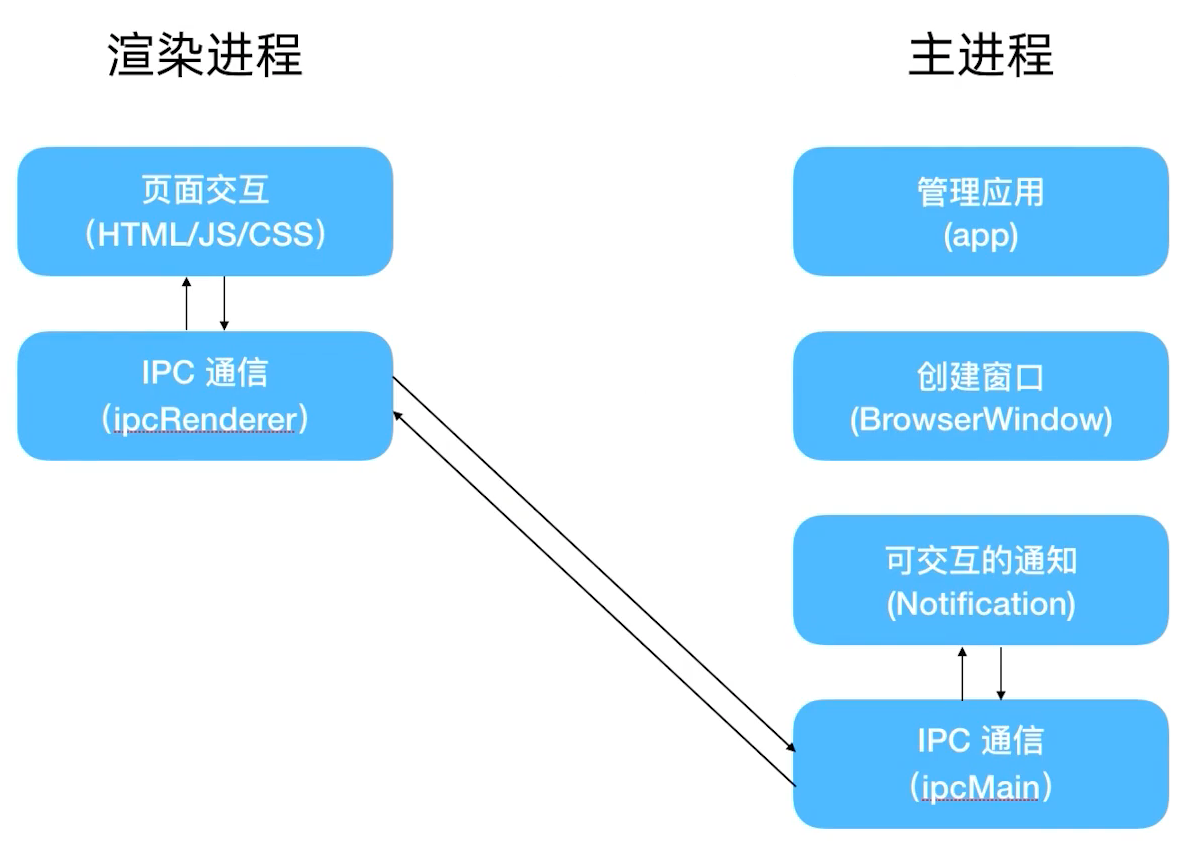
1.1 主进程
Electron 运行 package.json 的 main 脚本的进程被称为主进程:
- 每个应用只有一个主进程;
- 管理原生GUI,典型的窗口(BrowserWindow、Tray、Dock、Menu);
- 创建渲染进程;
- 控制应用生命周期(app);
示例:
const { app, BrowserWindow } = require('electron') // 主进程引入 app、BrowserWindow 模块let win = new BrowserWindow({ width, height, ...}) // 创建窗口,并设置宽高win.loadURL(url)、win.loadFile(path) // 加载页面let notification = new Notification({title, body, actions:[{text, type}]})notification.show()
- app,用于控制应用生命周期。举例:
app.on('ready', callback)用于在应用就绪后开始业务; - BrowserWindow,用于创建和控制窗口;
- Notification,创建 Notification;
ipcMain.handle(channel, handler)处理渲染进程的 channel 请求,在 handler 中 return 返回结果。
1.2 渲染进程
展示 Web 页面的进程被称为渲染进程:
- 通过 Node.js 、Electron 提供的 API 可以跟系统底层打交道;
- 一个 Electron 应用可以有多个渲染进程;
注:
在浏览器中 Web 页面是运行在沙盒环境中,无法访问操作系统的原生资源。而 Electron 可以让我们使用 Node.js来去访问系统底层。
示例:
引入模块,各进程直接在 electron 模块引入即可。例子:
const { ipcRender } = require('electron') // 渲染进程引入ipcRender// 通过 ipcRender.invoke 发送一个请求到主进程去响应ipcRender.invoke(channel, ...arges).then(result => { handleResult })
二、搭建简单样例
简单样例:番茄闹钟
主进程(main.js)
// 主进程const { app, BrowserWindow, Notification, ipcMain } = require('electron');let win;app.whenReady().then(() => {createMainWindow();setTimeout(handleIPC, 10000);});// 创建窗口function createMainWindow() {// 注:窗口需要挂在一个全局的变量,不然可能被垃圾回收掉,即窗口突然间没了win = new BrowserWindow({width: 1000,height: 600,webPreferences: {// 设置了Node环境的开启。// 注: 因为在Electron新版本,为了安全考虑,默认会将Node给禁掉。但由于用的是本地文件,也可以开启Node环境。nodeIntegration: true,contextIsolation: false,},});// 加载本地HTMLwin.loadFile('./index.html');// 打开调试终端win.webContents.openDevTools();}function handleIPC() {/*** handler最后要return一个结果,故将notification的整个过程用Promise给包起来,让其执行完成之后再返回过去*/ipcMain.handle('work-notification', async function () {let res = await new Promise((resolve, reject) => {// 创建一个通知let notification = new Notification({title: '任务结束',body: '是否开始休息',actions: [{ text: '开始休息', type: 'button' }],closeButtonText: '继续工作',});notification.show();// action: 代表点击按钮notification.on('action', () => {resolve('rest');});// close: 代表关闭事件notification.on('close', () => {resolve('work');});});// 将结果返回渲染进程return res;});}
渲染进程(renderer.js)
// 渲染进程const { ipcRenderer } = require('electron');const Timer = require('timer.js');function startWork() {let workTimer = new Timer({ontick: (ms) => {// 秒钟跳动的时候渲染页面updateTime(ms);},onend: () => {// 时间结束后发出一个通知notification();},});workTimer.start(10); // 启动定时器,时间为10秒}// 渲染时间function updateTime(ms) {// ms 表示剩余的毫秒数let timerContainer = document.getElementById('timer');let s = (ms / 1000).toFixed(0); // 转化成总秒数let second = s % 60;let minute = (s / 60).toFixed(0);// 利用 padStart 做一个补位timerContainer.innerHTML = `${minute.toString().padStart(2, 0)}:${second.toString().padStart(2, 0)}`;}async function notification() {let res = await ipcRenderer.invoke('work-notification');if (res === 'rest') {setTimeout(() => {alert('休息');}, 5 * 1000);} else if (res === 'work') {startWork();}}startWork();
package.json
{"name": "test","version": "1.0.0","main": "main.js","scripts": {"start": "electron ."},"dependencies": {"electron": "^13.0.0","timer.js": "^1.0.4"}}
三、进程间通信
进程间通信的目的有以下几类:
- 通知事件
- 数据传输
- 共享数据
3.1 进程通信:从渲染进程到主进程
- Callback 写法
- ipcRenderer.send(channel, …args)
- ipcMain.on(channel, handler)
- Promise 写法 (Electron 7.0 之后)
- ipcRenderer.invoke(channel, …args)
- ipcMain.handle(channel, handler)
注:
- ipcMain、ipcRenderer都是 EventEmitter 对象;
3.2 进程通信:从主进程到渲染进程
主进程通知渲染进程:
- ipcRenderer.on(channel, handler)
- webContents.send(channel) // 找到具体的窗体内容
为什么不采用 ipcMain.send ? 因为 Electron 只有一个主进程,多个渲染进程。如果调用 ipcMain.send 的话,主进程到底发给哪个渲染进程呢。因此,在Electron里面的一个做法是需要找到具体的窗体内容(即webContents),然后可以通过webContents.send 发送事件。
示例:主进程
const { app, BrowserWindow } = require('electron');let win;function createWindow() {win = new BrowserWindow({width: 800,height: 600,webPreferences: {nodeIntegration: true,contextIsolation: false,},});win.loadFile('index.html');}app.whenReady().then(() => {createWindow();setTimeout(() => {handleIPC();}, 2000);});function handleIPC() {win.webContents.send('do-test');}
渲染进程
const { ipcRenderer } = require('electron');ipcRenderer.on('do-test', () => {alert('do some work');});
3.3 进程通信:从渲染进程到渲染进程
渲染进程与渲染进程间通信:
- 通知事件:
- 通过主进程转发(Electron 5之前)
- ipcRenderer.sendTo(Electron 5之后)
- 数据共享
- Web 技术(localStorage、sessionStorage、indexedDB)
- 使用 remote(不推荐,用的不好话会导致程序卡顿、影响性能)
示例:主进程
const { app, BrowserWindow } = require('electron');let win1;let win2;app.whenReady().then(() => {win1 = new BrowserWindow({width: 600,height: 600,webPreferences: {nodeIntegration: true,contextIsolation: false,// 在electron 10.0.0之后,remote模块默认关闭// 必须手动设置webPreferences中的enableRemoteModule为true之后才能使用enableRemoteModule: true, // 这里是关键设置},});win1.loadFile('./index1.html');win1.webContents.openDevTools();win2 = new BrowserWindow({width: 600,height: 600,webPreferences: {nodeIntegration: true,contextIsolation: false,},});win2.loadFile('./index2.html');win2.webContents.openDevTools();/*** 在渲染页面里面要去发送消息给另外一个页面,需要知道这个页面对应* 的webContents.id。为了共享id,将id放置到全局对象global中*/global.sharedObject = {win2WebContentsId: win2.webContents.id,};});
渲染进程1
const { ipcRenderer, remote } = require('electron');let sharedObject = remote.getGlobal('sharedObject');let win2WebContentsId = sharedObject.win2WebContentsId;// 给渲染进程2发送消息ipcRenderer.sendTo(win2WebContentsId, 'do-test', 1);
渲染进程2
const { ipcRenderer } = require('electron');ipcRenderer.on('do-test', (e, a) => {alert('渲染进程2处理任务:', a);});
注:
开发IPC通信时遇到的一些坑:
- 少用 remote 模块,甚至不用;
- 不要用 sync 模式(写得不好,整个应用会卡死);
- 在 请求 + 响应的通信模式下,需要在响应的时候设置一个时长限制,当我们的应用响应超时的时候,需要直接 Response 一个异常的超时事件让业务处理,然后去做对应的交互;

若有收获,就点个赞吧
0 人点赞
