lerna 使用 yargs 作为整个脚手架框架,下面就简单介绍下 yargs 的使用方法。
一、工程环境搭建
- 搭建 npm 环境
创建空目录,使用 npm init -f 完成项目的初始化。
- 设置
**bin**字段
配置 package.json 文件,添加 bin 字段。
"bin": {"cli-test": "index.js"},
- 编写简易脚手架
编写简易脚手架,如下所示。先调用 yargs 的构造函数,并传入参数数组。解析完成之后,需调用 **argv** 才能完成整个 yargs 的初始化过程。
#! /usr/bin/env nodeconst yargs = require('yargs/yargs')// hideBin 可以进行参数解析const { hideBin } = require('yargs/helpers')// arg为参数解析数组const arg = hideBin(process.argv)console.log('arg:', arg)yargs(arg).argv
此时就会监听到传入的参数,并进行解析,默认情况下会展示 --help 和 --version。
- 创建软连接
进入 node 所在的 bin 目录,创建软链接ln -s ~/OpenSource/cli-test/index.js cli-test。
➜ which node/usr/local/bin/node➜ cd /usr/local/bin➜ ln -s ~/OpenSource/test/cli-test/index.js cli-test
- 运行脚手架
yargs 默认情况下会支持 --help 和 --version 这两条命令。在终端输入cli-test --help ,运行结果如下: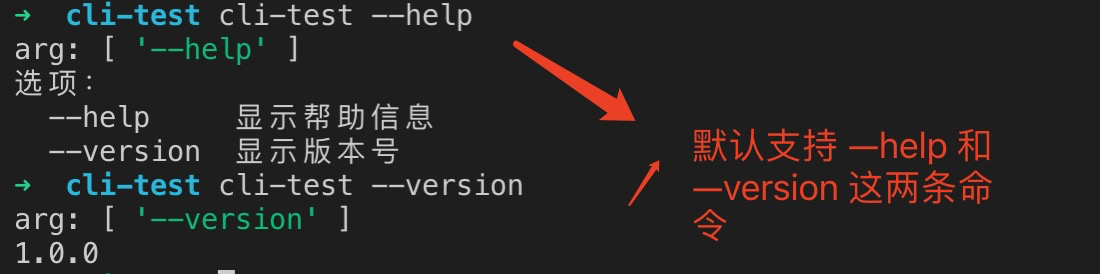
二、开发简易 yargs 脚手架
下面模仿 lerna 来开发简易的 yargs 脚手架。
#! /usr/bin/env nodeconst yargs = require('yargs/yargs')// hideBin可以进行参数解析const { hideBin } = require('yargs/helpers')const dedent = require('dedent')const arg = hideBin(process.argv)const cli = yargs(arg)cli.usage('Usage: cli-test [command] <options>') // 用法// 设置最少需要的 command 数量.demandCommand(1, "A command is required. Pass --help to see all avaliable commands and options").strict() // 严格模式:针对不能识别的指令,会给出错误提示.alias("h", "help") // 添加别名.alias("v", "version").wrap(cli.terminalWidth()) // 修改脚手架默认展示的宽度.epilogue(dedent`When a command fails, all logs are written to lerna-debug.log in the current working directory.For more information, find our manual at https://github.com/lerna/lerna`) // 结尾。可以在结尾处添加我们要展示的内容。.options({ // 主要用于增加一个全局的选项,一旦添加这个选项,针对所有的command都会生效。可支持多个debug: {type: 'boolean',alias: 'd',describe: '启动 debug 模式'}}).option('registry', { // 有别于options,只能一个个定义type: "string",alias: 'r',describe: '定义全局仓库地址'}).group(['debug'], '开发选项:') // group 用于对命令分组,此处将debug命令划分到开发选项组中.group(['registry'], '其他选项:').argv
在上述代码中,使用了 dedent 库,这个库的作用是去除多行字符串里的缩进(注:是缩进,不是空行!!!),这里借用了ES6的标签模板语法。
在终端输入 cli-test -h,运行结果如下: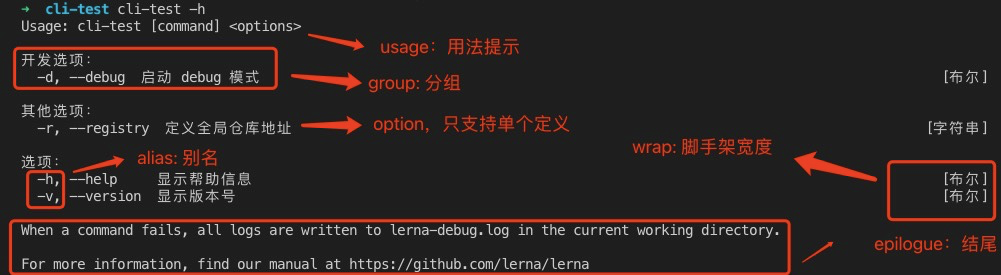
三、开发复杂 yargs 脚手架
3.1 创建 command
官方示例
在官方的 npm 介绍页中有创建 command 的示例,如下所示:
#!/usr/bin/env nodeconst yargs = require('yargs/yargs')const { hideBin } = require('yargs/helpers')yargs(hideBin(process.argv)).command('serve [port]', 'start the server', (yargs) => {return yargs.positional('port', {describe: 'port to bind on',default: 5000})}, (argv) => {if (argv.verbose) console.info(`start server on :${argv.port}`)serve(argv.port)}).option('verbose', {alias: 'v',type: 'boolean',description: 'Run with verbose logging'}).parse()
其中,
serve [port]:表示创建的自定义命令,其中port是自定义命令(command)相关的option;start the server:表示自定义命令的描述(describe);(yargs) => {}:builder 函数。builder 是指运行这个 commad 之前要做得准备工作,此处定义了一个只有serve命令才用到的 option 参数port;(argv) => {}:handler 函数,该函数是执行自定义命令(command)的具体行为,此处启动了一个HTTP服务。
此处采用官方示例方式定义一条 command ,如 init。
.command('init [name]', 'Init a project.', (yargs) => {// builder 函数,此处定义 optionreturn yargs.option('name', {type: 'string',describe: 'Name of a project',alias: 'n'})}, (argv) => {// handler 函数, argv 是解析的参数console.log('argv:', argv)})
在终端输入,cli-test init -h 则会显示 init 的用法。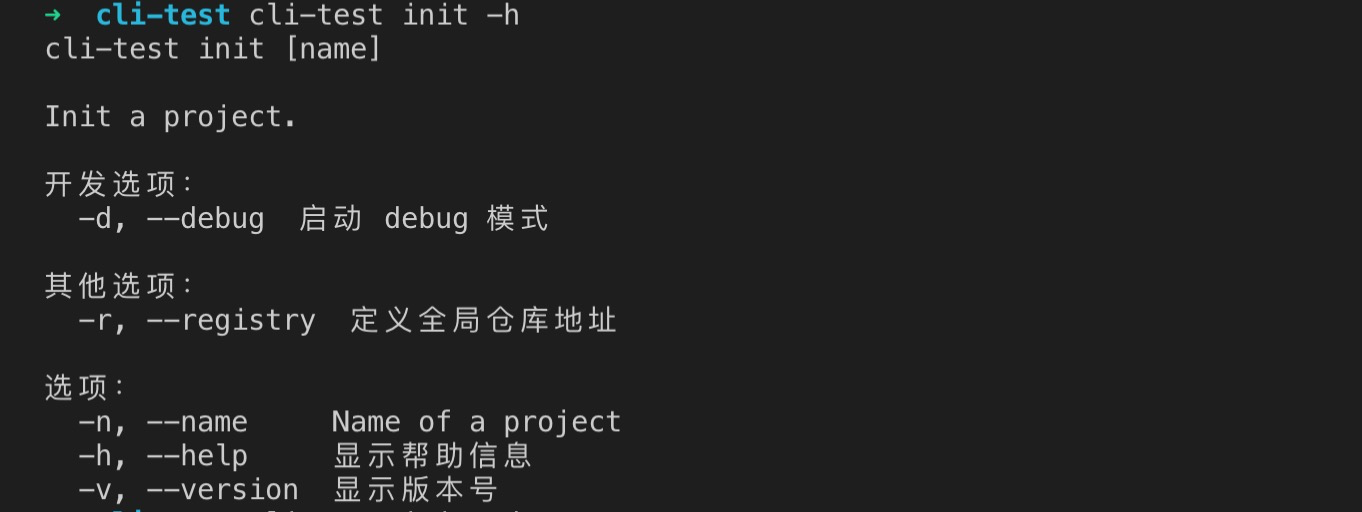
在终端输入 cli-test init -d -r npm -n project-xxxx, 展示结果如下: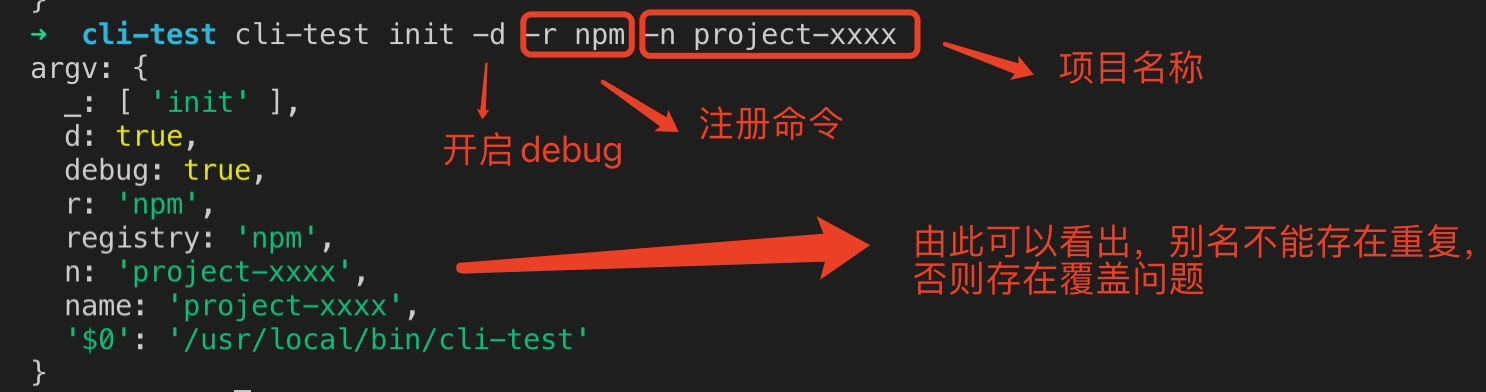
由此可以,定义脚手架的时候,别名不能重复,否则会存在覆盖问题。
lerna 用法
在 lerna 项目中,关于 command 则返回的是一个对象,如下所示: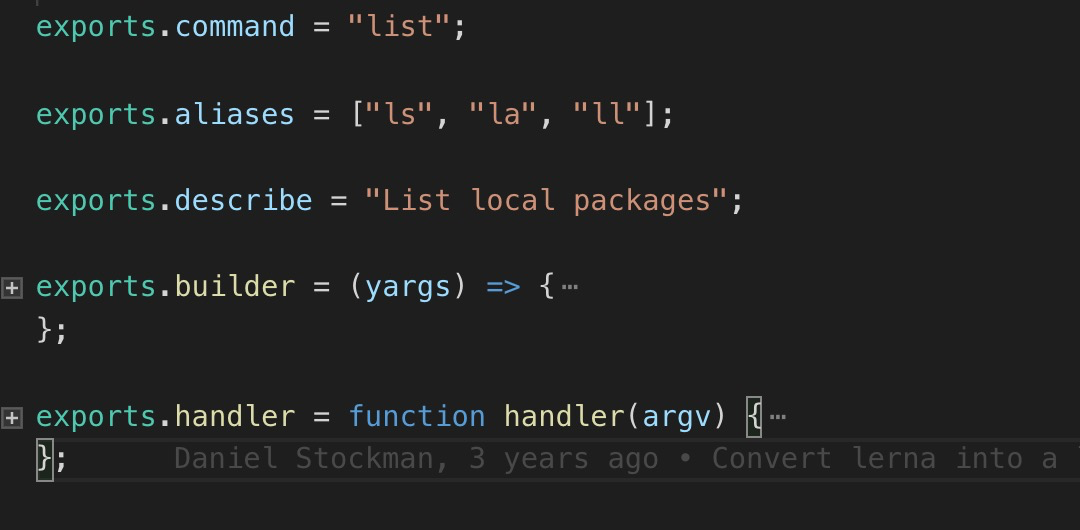
因此,定义 command 还有另外一种方法,即传入对象方式。
3.2 recommendCommands 用法
recommendCommands() 将我们输入的命令到所有的 command 中去查找,若找到最近似的命令就会给我们做提示,如下所示: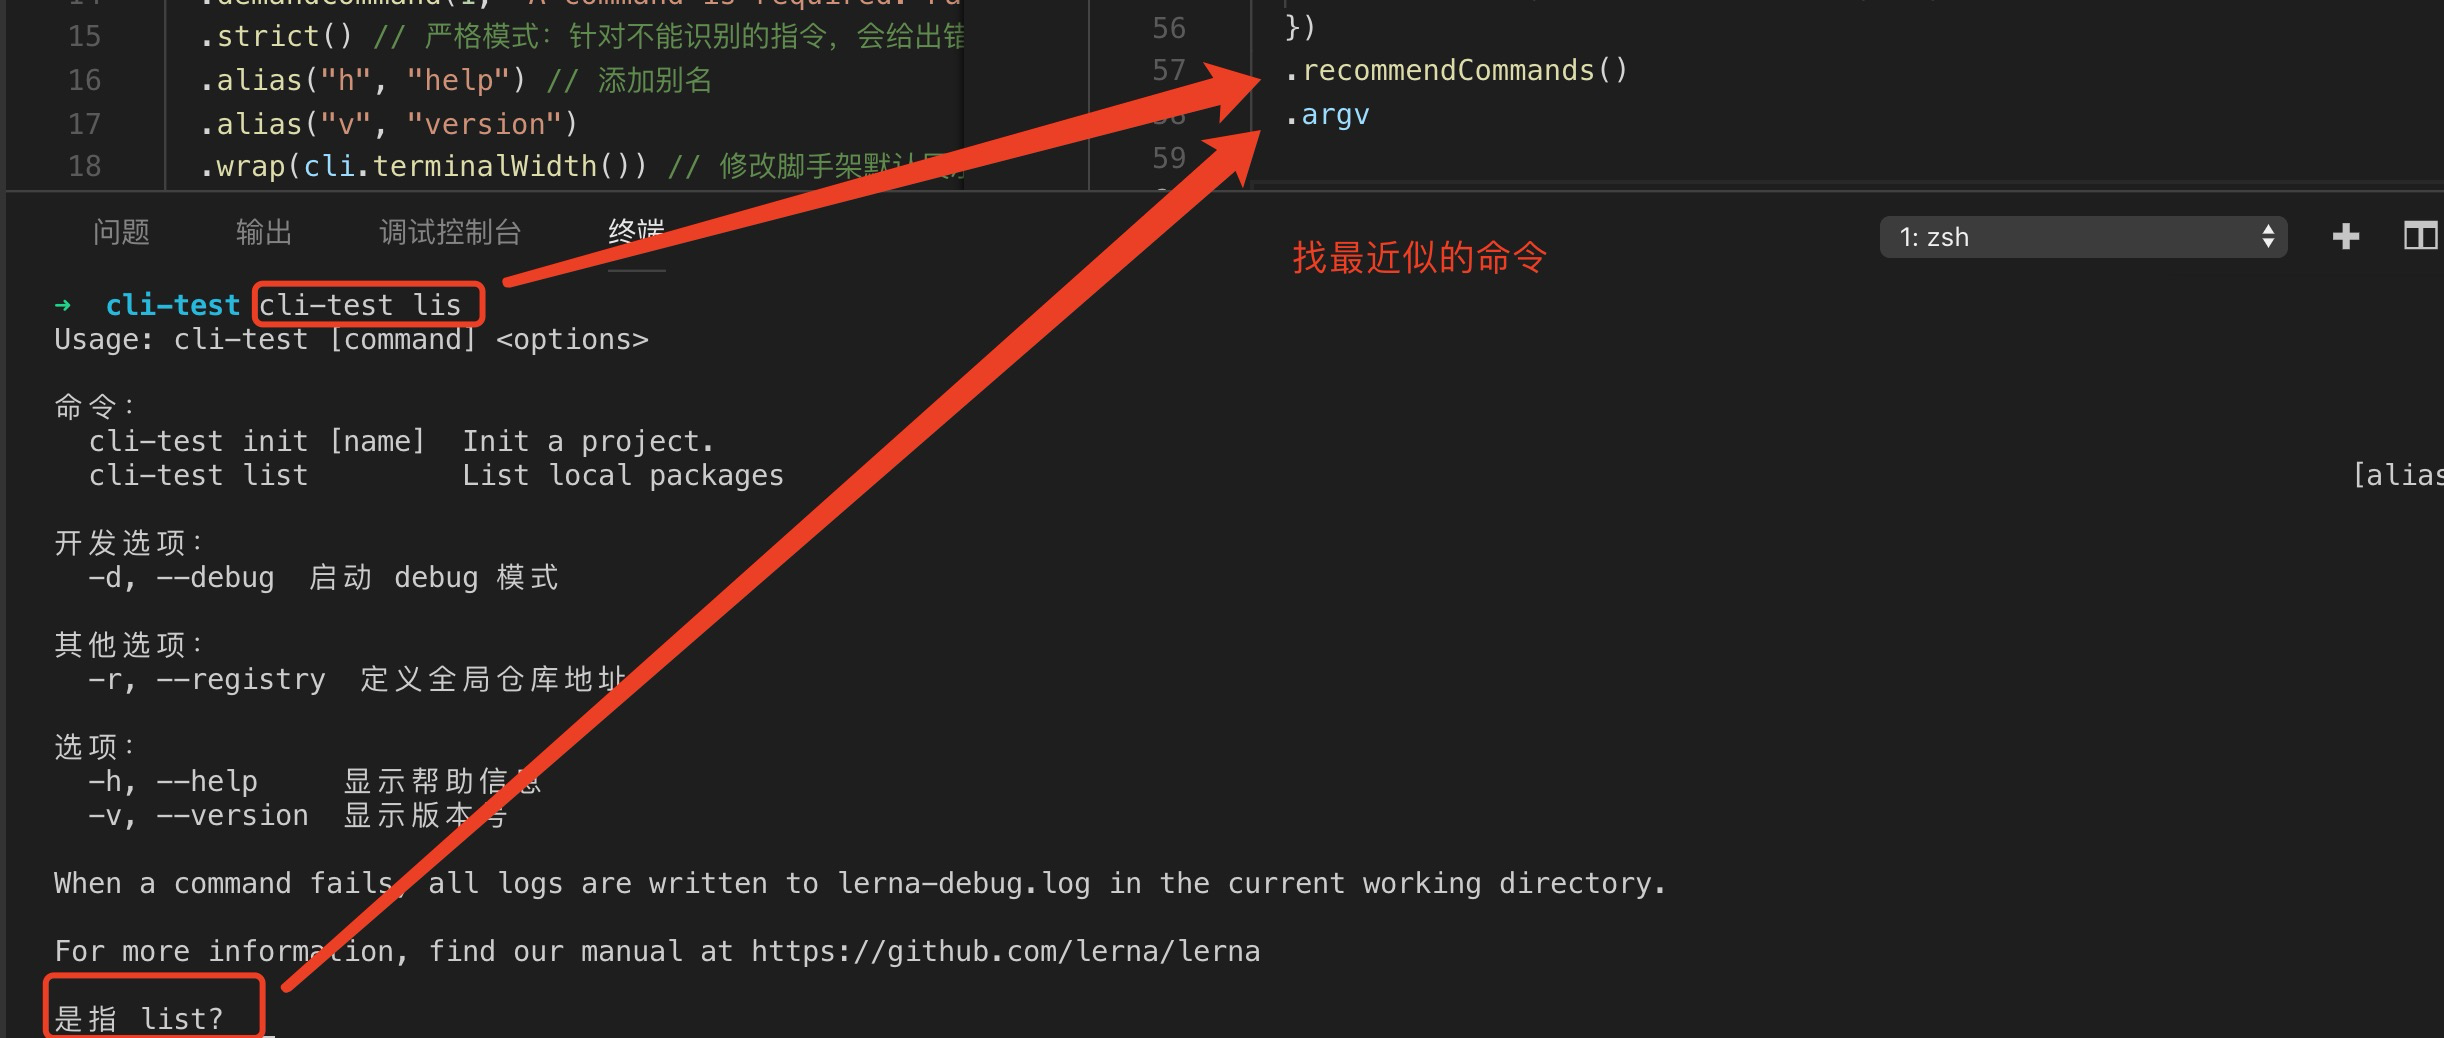
3.3 fail 用法
fail() 用于处理解析命令失败时要展示的结果,如果想做个性化错误提示就可以通过 fail 来进行处理。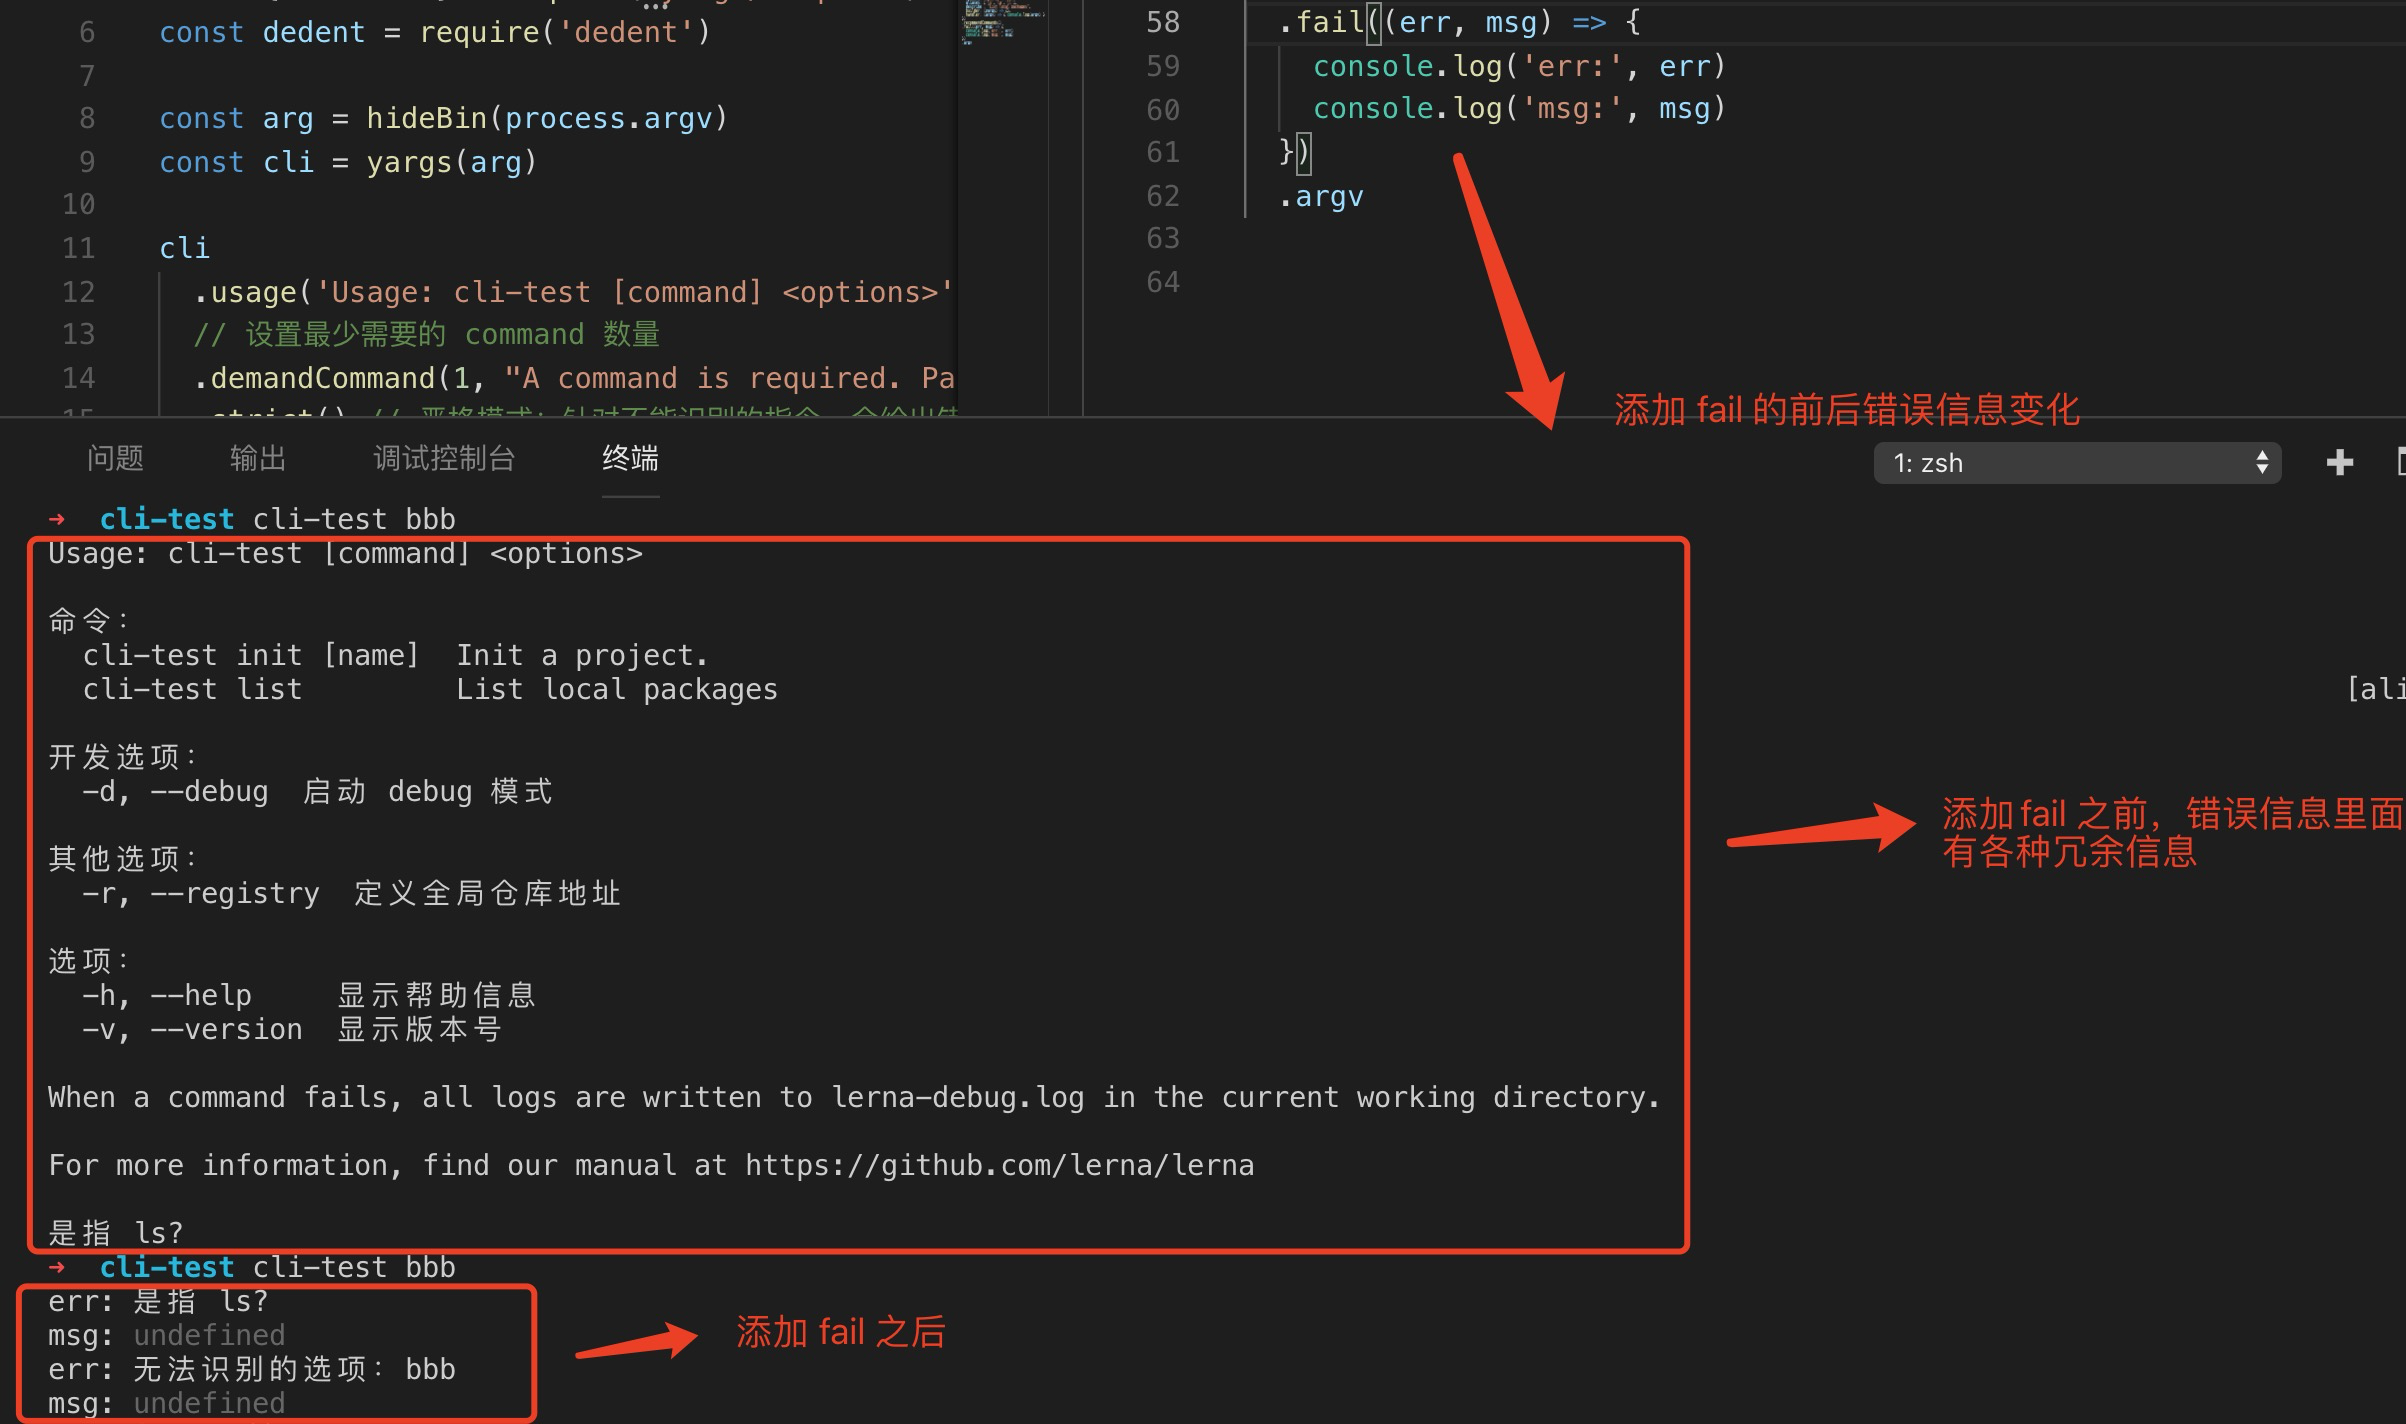
3.4 parse 用法
parse 会在最后帮我们进行参数解析,它会将传进去的 context 和 argv 进行合并,合并完后作为一个参数注入到当前的项目中。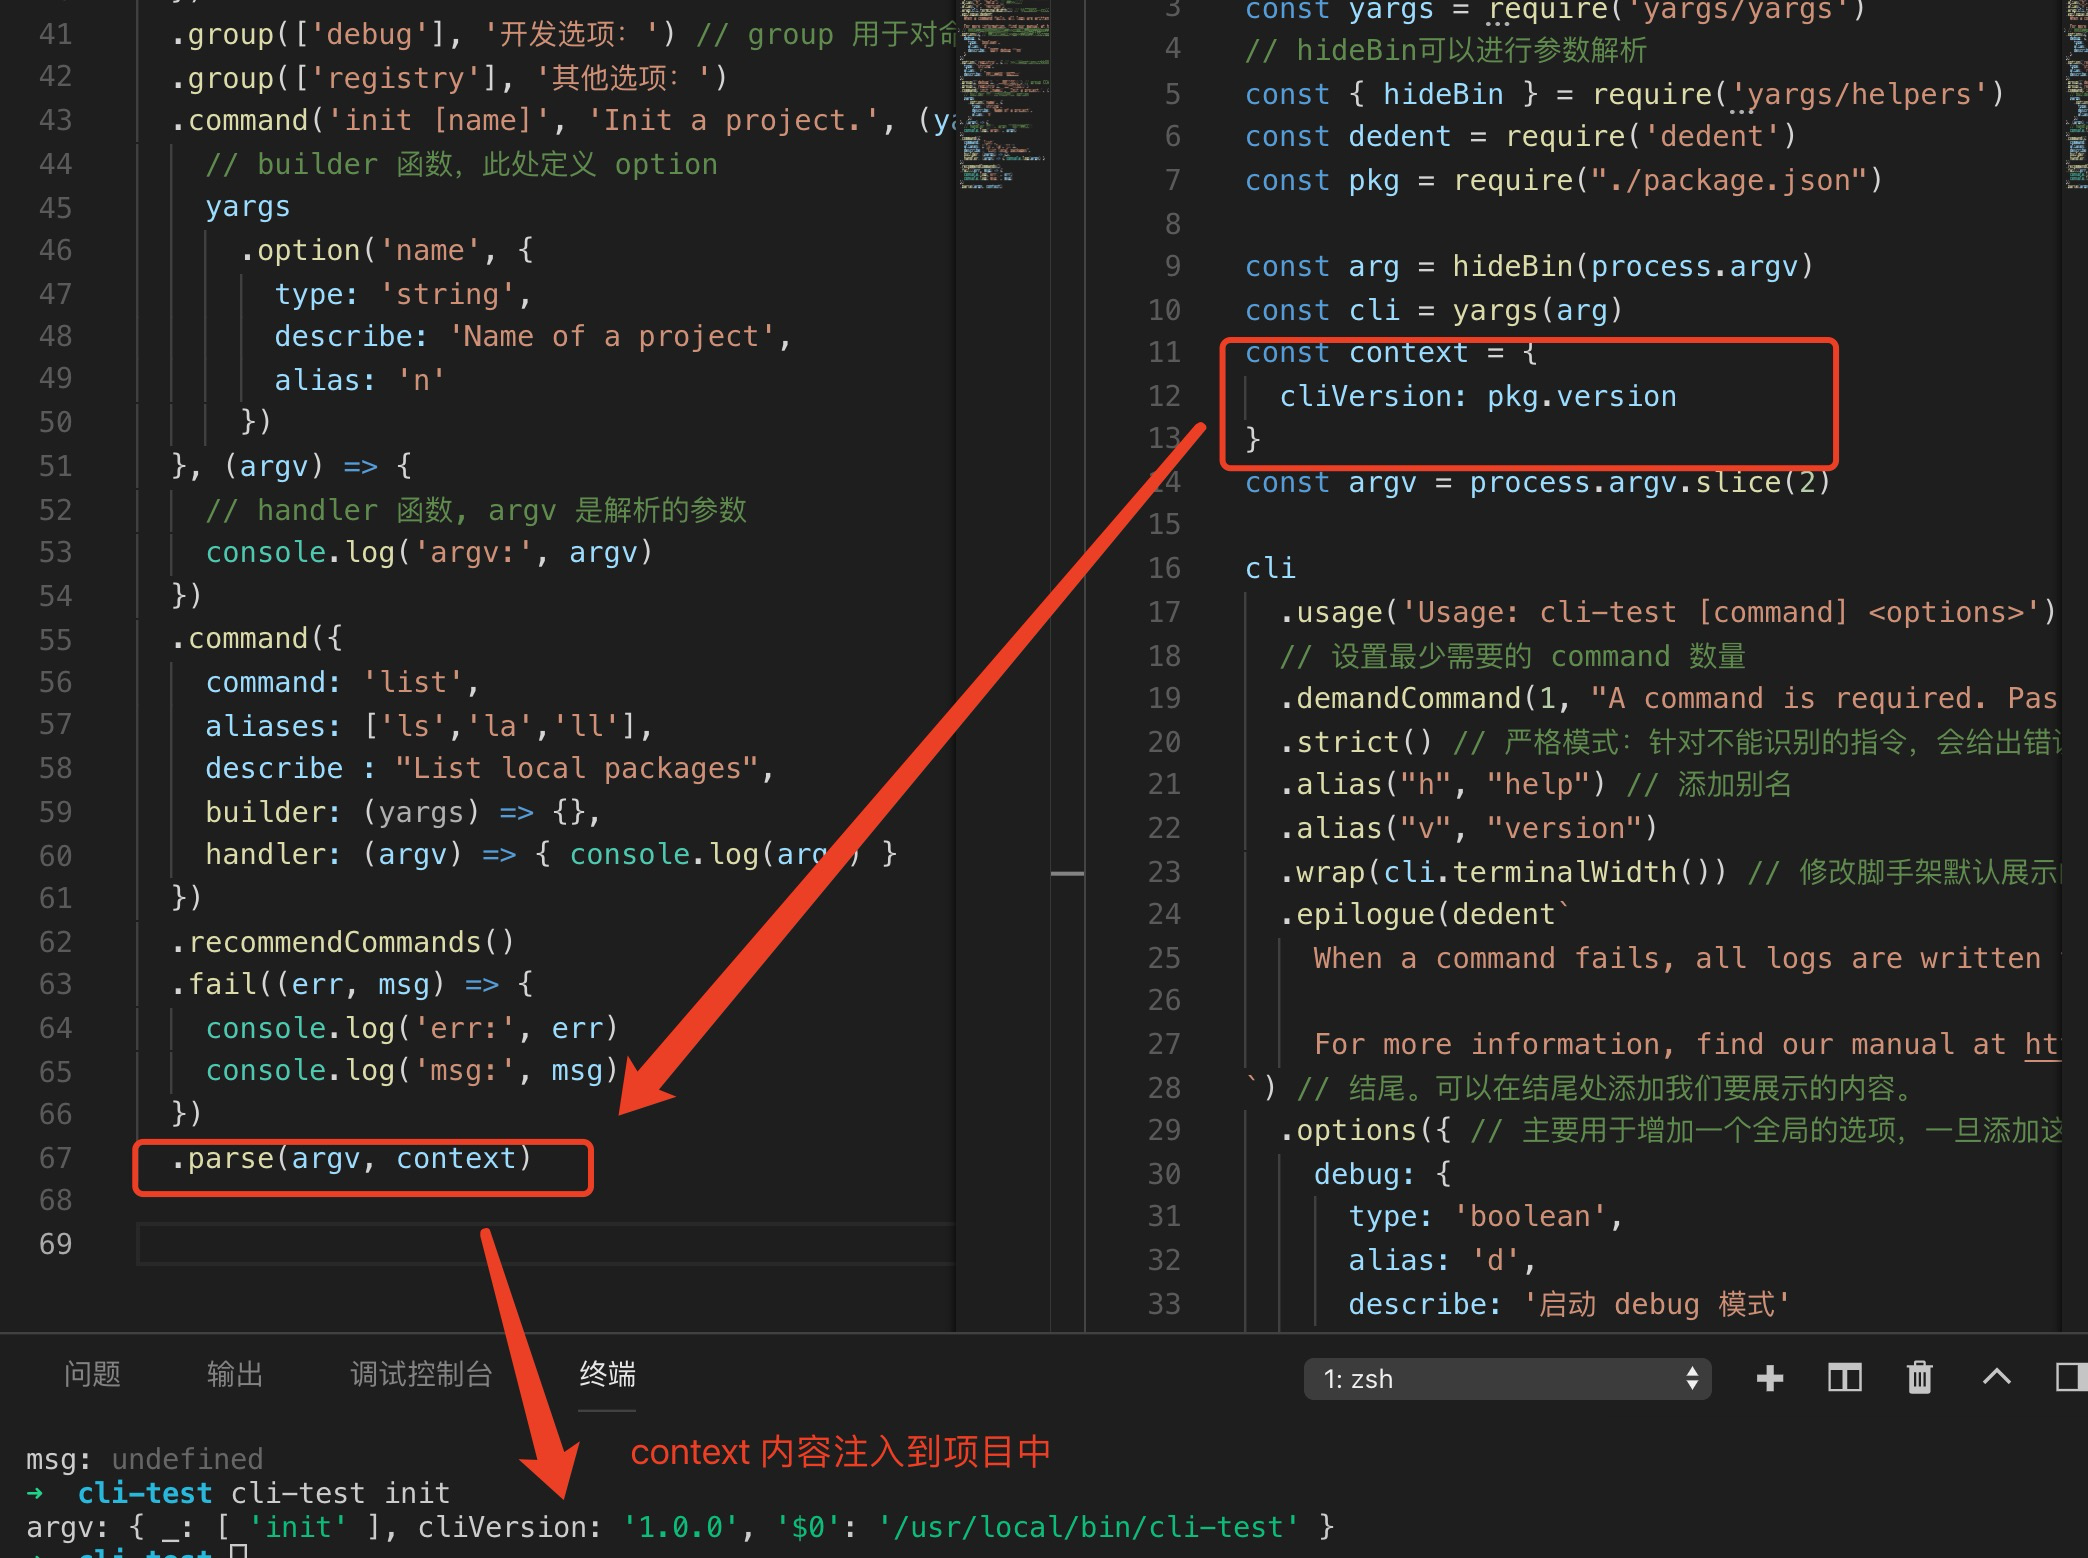
由此可见,使用 parse 方法有个最大好处就是可以帮助我们往 argv 里面注入参数,不需要我们自己手动做太多逻辑,如判断argv是否存在等等。
完整代码
#! /usr/bin/env nodeconst yargs = require('yargs/yargs')// hideBin可以进行参数解析const { hideBin } = require('yargs/helpers')const dedent = require('dedent')const pkg = require("./package.json")const arg = hideBin(process.argv)const cli = yargs(arg)const context = {cliVersion: pkg.version}const argv = process.argv.slice(2)cli.usage('Usage: cli-test [command] <options>') // 用法// 设置最少需要的 command 数量.demandCommand(1, "A command is required. Pass --help to see all avaliable commands and options").strict() // 严格模式:针对不能识别的指令,会给出错误提示.alias("h", "help") // 添加别名.alias("v", "version").wrap(cli.terminalWidth()) // 修改脚手架默认展示的宽度.epilogue(dedent`When a command fails, all logs are written to lerna-debug.log in the current working directory.For more information, find our manual at https://github.com/lerna/lerna`) // 结尾。可以在结尾处添加我们要展示的内容。.options({ // 主要用于增加一个全局的选项,一旦添加这个选项,针对所有的command都会生效。可支持多个debug: {type: 'boolean',alias: 'd',describe: '启动 debug 模式'}}).option('registry', { // 有别于options,只能一个个定义type: "string",alias: 'r',describe: '定义全局仓库地址'}).group(['debug'], '开发选项:') // group 用于对命令分组,此处将debug命令划分到开发选项组中.group(['registry'], '其他选项:').command('init [name]', 'Init a project.', (yargs) => {// builder 函数,此处定义 optionyargs.option('name', {type: 'string',describe: 'Name of a project',alias: 'n'})}, (argv) => {// handler 函数, argv 是解析的参数console.log('argv:', argv)}).command({command: 'list',aliases: ['ls','la','ll'],describe : "List local packages",builder: (yargs) => {},handler: (argv) => { console.log(argv) }}).recommendCommands().fail((err, msg) => {console.log('err:', err)console.log('msg:', msg)}).parse(argv, context)

若有收获,就点个赞吧
0 人点赞
