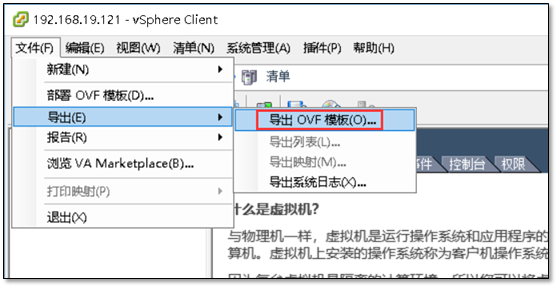
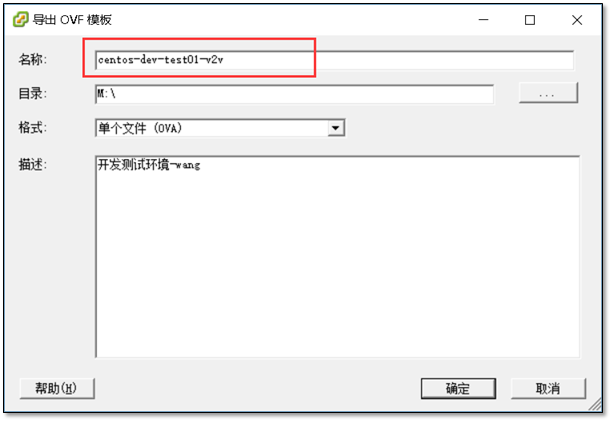
1、ESXI将虚拟机导出
2、配置KVM环境
详情参考:http://www.cnblogs.com/clsn/p/8366251.html
安装所需要的组件
[root@clsn7 ~]# yum install libvirt* virt-* qemu-kvm* -y
配置桥接网卡
[root@clsn7 ~]# virsh iface-bridge eth1 br1使用附加设备 br1 生成桥接 eth1 失败已启动桥接接口 br1
3、导入虚拟机
启动kvm管理程序,并设置开机自启动
[root@clsn7 ~]# systemctl start libvirtd.service[root@clsn7 ~]# systemctl enable libvirtd.service
创建虚拟机存放目录
[root@clsn7 ~]# virt-v2v -i ova centos-dev-test01-v2v.ova -o local -os /vmhost/dev/dev-test01 -of qcow2[ 0.0] Opening the source -i ova centos-dev-test01-v2v.ovavirt-v2v: warning: making OVA directory public readable to work aroundlibvirt bug https://bugzilla.redhat.com/1045069[ 23.1] Creating an overlay to protect the source from being modified[ 23.4] Initializing the target -o local -os /vmhost/dev/dev-test01[ 23.4] Opening the overlay[ 41.4] Inspecting the overlay[ 57.5] Checking for sufficient free disk space in the guest[ 57.5] Estimating space required on target for each disk[ 57.5] Converting CentOS release 6.9 (Final) to run on KVMvirt-v2v: This guest has virtio drivers installed.[ 178.6] Mapping filesystem data to avoid copying unused and blank areas[ 178.9] Closing the overlay[ 179.4] Checking if the guest needs BIOS or UEFI to boot[ 179.4] Assigning disks to buses[ 179.4] Copying disk 1/1 to /vmhost/dev/dev-test01/centos-dev-test01-v2v-sda (qcow2)(100.00/100%)[ 216.1] Creating output metadata[ 216.1] Finishing off
导入完成后在 /vmhost/dev/dev-test01 目录下会生成文件
[root@clsn7 dev-test01]# pwd/vmhost/dev/dev-test01[root@clsn7 dev-test01]# lscentos-dev-test01-v2v-sda centos-dev-test01-v2v.xml
修改网卡配置
修改网卡source network 为桥接
修改网卡使用virtio
[root@clsn7 dev-test01]# cat centos-dev-test01-v2v.xml<?xml version='1.0' encoding='utf-8'?><domain type='kvm'><!-- generated by virt-v2v 1.36.3rhel=7,release=6.el7_4.3,libvirt --><name>centos-dev-test01-v2v</name><memory unit='KiB'>524288</memory><currentMemory unit='KiB'>524288</currentMemory><vcpu>1</vcpu><features><acpi/><apic/></features><os><type arch='x86_64'>hvm</type></os><on_poweroff>destroy</on_poweroff><on_reboot>restart</on_reboot><on_crash>restart</on_crash><devices><disk type='file' device='disk'><driver name='qemu' type='qcow2' cache='none'/><source file='/vmhost/dev/dev-test01/centos-dev-test01-v2v-sda'/><target dev='vda' bus='virtio'/></disk><disk device='cdrom' type='file'><driver name='qemu' type='raw'/><target dev='hda' bus='ide'/></disk><disk device='floppy' type='file'><driver name='qemu' type='raw'/><target dev='fda'/></disk><interface type='bridge'><source bridge='br1'/><model type='virtio'/><address type='pci' domain='0x0000' bus='0x00' slot='0x03' function='0x0'/></interface><video><model type='qxl' ram='65536' heads='1'/></video><graphics type='vnc' autoport='yes' port='-1'/><input type='tablet' bus='usb'/><input type='mouse' bus='ps2'/><console type='pty'/></devices></domain>
4、启动虚拟机
导入主机
[root@clsn7 dev-test01]# virsh define centos-dev-test01-v2v.xml定义域 centos-dev-test01-v2v(从 centos-dev-test01-v2v.xml)
查看主机列表
[root@clsn7 dev-test01]# virsh list --allId 名称 状态----------------------------------------------------- centos-dev-test01-v2v 关闭
启动主机
[root@clsn7 dev-test01]# virsh start centos-dev-test01-v2v域 centos-dev-test01-v2v 已开始
5、测试可用性
登陆迁移后的虚拟机测试
[root@clsn7 ~]# ssh root@192.168.19.123The authenticity of host '192.168.19.123 (192.168.19.123)' can't be established.RSA key fingerprint is SHA256:iRmghFzgRIJy5+v8p4lqi8DyUG8F0hXR/qNdDZ2J6RY.RSA key fingerprint is MD5:37:b8:56:3b:b7:85:fa:cb:d9:55:a7:44:d5:de:f8:d9.Are you sure you want to continue connecting (yes/no)? yesWarning: Permanently added '192.168.19.123' (RSA) to the list of known hosts.root@192.168.19.123's password:Last login: Mon Mar 5 10:30:02 2018 from 192.168.19.9[root@dev-test01 ~]# hostname -I192.168.19.123
设置虚拟机开机自启动。
[root@clsn7 ~]# virsh autostart centos-dev-test01-v2v域 centos-dev-test01-v2v标记为自动开始
至此一台机器的迁移完成,后续按照相同的方式将其他的虚拟机进行迁移即可。

若有收获,就点个赞吧
0 人点赞
