- 1. 云计算简介
- 2. OpenStack简介
- 3. OpenStack基础配置服务
- 4. Keystone认证服务配置
- 5. 镜像服务glance部署
- 6. 计算服务(nova)部署
- 查看服务状态
- 7. Networking(neutron)服务
- 在这里,我只进行验证网络,网络正常说明服务正常
- 8. Dashboard(horizon-web界面)安装
- 9. 启动第一台实例
- 使用提供者物理网络的子网CIDR标记替换
PROVIDER_NETWORK_CIDR。 - 将
START_IP_ADDRESS和END_IP_ADDRESS使用你想分配给实例的子网网段的第一个和最后一个IP地址。这个范围不能包括任何已经使用的IP地址。 - 将 DNS_RESOLVER 替换为DNS解析服务的IP地址。在大多数情况下,你可以从主机
/etc/resolv.conf文件选择一个使用。 - 将
PUBLIC_NETWORK_GATEWAY替换为公共网络的网关,一般的网关IP地址以 ”.1” 结尾。 - 10 cinder块存储服务
- v2版本注册
- 11. 添加一台新的计算节点
- 启动nova服务,设置开机自启动
- 启动Linuxbridge代理并配置它开机自启动
- 查看状态
- 12. Glance镜像服务迁移
- 13. 添加一个新的网段并让它能够上网
- 14. Cinder服务对接NFS配置
- 15. OpenStack中的VXLAN网络
- 16. openstack API应用
- 17. 附录
1. 云计算简介
云计算(英语:cloud computing ),是一种基于互联网的计算方式,通过这种方式,共享的软硬件资源和信息可以按需求提供给计算机各种终端和其他设备。
云计算是继1980年代大型计算机到客户端-服务器的大转变之后的又一种巨变。用户不再需要了解“云”中基础设施的细节,不必具有相应的专业知识,也无需直接进行控制。云计算描述了一种基于互联网的新的IT服务增加、使用和交付模式,通常涉及通过互联网来提供动态易扩展而且经常是虚拟化的资源。
1.1 云计算的特点
互联网上的云计算服务特征和自然界的云、水循环具有一定的相似性,因此,云是一个相当贴切的比喻。根据技术研究院的定义如下。
云计算服务应该具备以下几条特征:
- 随需应变自助服务。
- 随时随地用任何网络设备访问。
- 多人共享资源池。
- 快速重新部署灵活度。
- 可被监控与量测的服务。
一般认为还有如下特征:
- 基于虚拟化技术快速部署资源或获得服务。
- 减少用户终端的处理负担。
- 降低了用户对于IT专业知识的依赖。
1.2 云计算服务模式
云计算定义中明确了三种服务模式: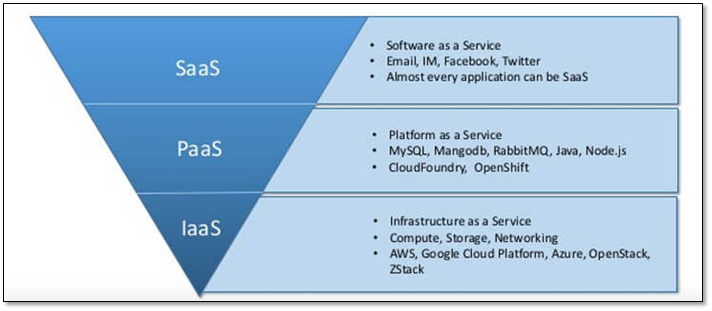
图 - 服务模式详情
软件即服务(SaaS**):
即Software-as-a-service;
消费者使用应用程序,但并不掌控操作系统、硬件或运作的网络基础架构。是一种服务观念的基础,软件服务供应商,以租赁的概念提供客户服务,而非购买,比较常见的模式是提供一组账号密码。
例如:Microsoft CRM与Salesforce.com。
平台即服务(PaaS**):
即Platform-as-a-service;
消费者使用主机操作应用程序。消费者掌控运作应用程序的环境(也拥有主机部分掌控权),但并不掌控操作系统、硬件或运作的网络基础架构。平台通常是应用程序基础架构。
例如:Google App Engine。
基础设施即服务(IaaS**):
**即Infrastructure-as-a-service;
消费者使用“基础计算资源”,如处理能力、存储空间、网络组件或中间件。消费者能掌控操作系统、存储空间、已部署的应用程序及网络组件(如防火墙、负载平衡器等),但并不掌控云基础架构。
例如:Amazon AWS、Rackspace。
关于这三种服务模式更多详情可以参考:https://www.zhihu.com/question/216417781.3 云计算的类型

图 - 云类型示例
公有云(Public Cloud)
简而言之,公用云服务可通过网络及第三方服务供应者,开放给客户使用,“公有”一词并不一定代表“免费”,但也可能代表免费或相当廉价,公用云并不表示用户数据可供任何人查看,公用云供应者通常会对用户实施使用访问控制机制,公用云作为解决方案,既有弹性,又具备成本效益。
私有云(Private Cloud)
私有云具备许多公用云环境的优点,例如弹性、适合提供服务,两者差别在于私有云服务中,数据与程序皆在组织内管理,且与公用云服务不同,不会受到网络带宽、安全疑虑、法规限制影响;此外,私有云服务让供应者及用户更能掌控云基础架构、改善安全与弹性,因为用户与网络都受到特殊限制。
混合云(Hybrid Cloud)
混合云结合公用云及私有云,这个模式中,用户通常将非企业关键信息外包,并在公用云上处理,但同时掌控企业关键服务及数据。1.4 为什么要选择云计算
1、有效解决硬件单点故障问题
2、按需增/减硬件资源
3、BGP线路解决南北互通问题
4、按需增/减带宽
5、更有吸引力的费用支付方式
详情查看《云计算之路:为什么要选择云计算》https://www.cnblogs.com/cmt/archive/2013/02/27/why-into-cloud.html
2. OpenStack简介
OpenStack是一个美国宇航局和Rackspace合作研发的云计算软件,以Apache授权条款2.0授权,并且是一个自由软件和开放源代码项目。
OpenStack是基础设施即服务(IaaS)软件,让任何人都可以自行创建和提供云计算服务。
此外,OpenStack也用作创建防火墙内的“私有云”(Private Cloud),提供机构或企业内各部门共享资源。
2.1 市场趋向
Rackspace以OpenStack为基础的私有云业务每年营收7亿美元,增长率超过了20%。
OpenStack虽然有些方面还不太成熟,然而它有全球大量的组织支持,大量的开发人员参与,发展迅速。国际上已经有很多使用OpenStack搭建的公有云、私有云、混合云,例如:RackspaceCloud、惠普云、MercadoLibre的IT基础设施云、AT&T的CloudArchitec、戴尔的OpenStack解决方案等等。而在国内OpenStack的热度也在逐渐升温,华胜天成、高德地图、京东、阿里巴巴、百度、中兴、华为等都对OpenStack产生了浓厚的兴趣并参与其中。
自2010年创立以来,已发布10个版本。其中Icehouse版本有120个组织、1202名代码贡献者参与,而最新的是Juno版本。OpenStack很可能在未来的基础设施即服务(IaaS)资源管理方面占据领导位置,成为公有云、私有云及混合云管理的“云操作系统”标准
2.2 大型用户
美国国家航空航天局
加拿大半官方机构CANARIE网络的DAIR(Digital Accelerator for Innovation and Research)项目,向大学与中小型企业提供研究和开发云端运算环境。
惠普云(使用Ubuntu Linux)
MercadoLibre的IT基础设施云,现时以OpenStack管理超过6000 台虚拟机器。
AT&T的“Cloud Architect”,将在美国的达拉斯、圣地亚哥和新泽西州提供对外云端服务。
2.3 OpenStack项目介绍

图 - 各项目关系图
各组件的详细说明:
| 服务类型 | 项目名称 | 描述 |
|---|---|---|
| Dashboard | Horizon 提供web界面 |
提供了一个基于web的自服务门户,与OpenStack底层服务交互,诸如启动一个实例,分配IP地址以及配置访问控制。 |
| Compute | Nova 计算节点 |
在OpenStack环境中计算实例的生命周期管理。按需响应包括生成、调度、回收虚拟机等操作。 |
| Networking | Neutron 网络服务 |
确保为其它OpenStack服务提供网络连接即服务,比如OpenStack计算。为用户提供API定义网络和使用。基于插件的架构其支持众多的网络提供商和技术。 |
| 存储 | ||
| Object Storage | Swift 对象存储 |
通过一个 RESTful,基于HTTP的应用程序接口存储和任意检索的非结构化数据对象。它拥有高容错机制,基于数据复制和可扩展架构。它的实现并像是一个文件服务器需要挂载目录。在此种方式下,它写入对象和文件到多个硬盘中,以确保数据是在集群内跨服务器的多份复制。 |
| Block Storage | Cinder 块存储 |
为运行实例而提供的持久性块存储。它的可插拔驱动架构的功能有助于创建和管理块存储设备。 |
| 共享服务 | ||
| Identity service | Keystone 认证节点 |
为其他OpenStack服务提供认证和授权服务,为所有的OpenStack服务提供一个端点目录。 |
| Image service | Glance 镜像服务 |
存储和检索虚拟机磁盘镜像,OpenStack计算会在实例部署时使用此服务。 |
| Telemetry | Ceilometer 计费 |
为OpenStack云的计费、基准、扩展性以及统计等目的提供监测和计量。 |
| 高层次服务 | ||
| Orchestration | Heat | Orchestration服务支持多样化的综合的云应用,通过调用OpenStack-native REST API和CloudFormation-compatible Query API,支持:term:HOT <Heat Orchestration Template (HOT)>格式模板或者AWS CloudFormation格式模板 |
2.4 系统环境说明
本文档使用主机环境均安装官方推荐进行设置:https://docs.openstack.org/mitaka/zh_CN/install-guide-rdo/environment.html
controller节点说明
[root@controller ~]# cat /etc/redhat-releaseCentOS Linux release 7.2.1511 (Core)[root@controller ~]# uname -r3.10.0-327.el7.x86_64[root@controller ~]# sestatusSELinux status: disabled[root@controller ~]# systemctl status firewalld.service● firewalld.service - firewalld - dynamic firewall daemonLoaded: loaded (/usr/lib/systemd/system/firewalld.service; disabled; vendor preset: enabled)Active: inactive (dead)[root@controller ~]# hostname -I10.0.0.11 172.16.1.11[root@controller ~]# tail -3 /etc/hosts10.0.0.11 controller10.0.0.31 compute110.0.0.32 compute2
compute1与compute2节点的配置与controller相同。
系统安装参考文档:http://www.cnblogs.com/clsn/p/8338099.html#_label1
系统优化说明:http://www.cnblogs.com/clsn/p/8338099.html#_label4
注意点:网卡的名称修改
3. OpenStack基础配置服务
注:本文中所使用的用户及密码都参考该文档,并且高度一致。
https://docs.openstack.org/mitaka/zh_CN/install-guide-rdo/environment-security.html
OpenStack 相关服务安装流程(keystone服务除外):
1)在数据库中,创库,授权;
2)在keystone中创建用户并授权;
3)在keystone中创建服务实体,和注册API接口;
4)安装软件包;
5)修改配置文件(数据库信息);
6)同步数据库;
7)启动服务。
3.1 OpenStack服务部署顺序
[1] 基础环境准备 https://docs.openstack.org/mitaka/zh_CN/install-guide-rdo/environment.html [2] 部署 Keystorne 认证服务,token https://docs.openstack.org/mitaka/zh_CN/install-guide-rdo/keystone.html [3] 部署 Glance 镜像服务 https://docs.openstack.org/mitaka/zh_CN/install-guide-rdo/glance.html [4] 部署 Nova 计算服务(kvm) https://docs.openstack.org/mitaka/zh_CN/install-guide-rdo/nova.html [5] 部署 Neutron 网络服务 https://docs.openstack.org/mitaka/zh_CN/install-guide-rdo/neutron.html [6] 部署 Horizon 提供web界面 https://docs.openstack.org/mitaka/zh_CN/install-guide-rdo/horizon.html [7] 部署 Cinder 块存储(硬盘) https://docs.openstack.org/mitaka/zh_CN/install-guide-rdo/horizon.html
3.2 配置本地yum源
首先将镜像挂载到 /mnt
mount /dev/cdrom /mntecho 'mount /dev/cdrom /mnt' > /etc/rc.d/rc.localchmod +x /etc/rc.d/rc.local
创建repo文件
cat >/etc/yum.repos.d/local.repo<<-'EOF'[local]name=localbaseurl=file:///mntgpgcheck=0[openstack]name=openstack-mitakabaseurl=file:///opt/repogpgcheck=0EOF
生成yum缓存
[root@controller repo]# yum makecache
3.3 安装NTP时间服务
官方文档:https://docs.openstack.org/mitaka/zh_CN/install-guide-rdo/environment-ntp.html
控制节点(提供时间服务,供其他机器同步)
安装软件
yum install chrony -y
配置控制节点,修改第22行
[root@controller ~]# vim /etc/chrony.conf···# Allow NTP client access from local network.allow 10/8
启动,设置自启动
systemctl enable chronyd.servicesystemctl start chronyd.service
计算节点(配置chrony客户端)
安装软件
yum install chrony -y
配置文件第三行,删除无用的上游服务器。
使用sed命令修改
sed -ri.bak '/server/s/^/#/g;2a server 10.0.0.11 iburst' /etc/chrony.conf
配置文件说明:
[root@compute1 ~]# vim /etc/chrony.conf# Use public servers from the pool.ntp.org project.# Please consider joining the pool (http://www.pool.ntp.org/join.html).server 10.0.0.11 iburst
启动,设置自启动
systemctl enable chronyd.servicesystemctl start chronyd.service
3.4 OpenStack的包操作(添加新的计算节点时需要安装)
官方文档:https://docs.openstack.org/mitaka/zh_CN/install-guide-rdo/environment-packages.html
安装 OpenStack 客户端:
yum -y install python-openstackclient
RHEL 和 CentOS 默认启用了 SELinux
# 安装 openstack-selinux 软件包以便自动管理 OpenStack 服务的安全策略yum -y install openstack-selinux
3.5 SQL数据库安装(在控制节点操作)
官方文档:https://docs.openstack.org/mitaka/zh_CN/install-guide-rdo/environment-sql-database.html
安装mariadb软件包:
[root@controller ~]# yum -y install mariadb mariadb-server python2-PyMySQL
创建配置文件
cat > /etc/my.cnf.d/openstack.cnf <<-'EOF'[mysqld]bind-address = 10.0.0.11default-storage-engine = innodbinnodb_file_per_tablemax_connections = 4096collation-server = utf8_general_cicharacter-set-server = utf8EOF
启动mariadb
systemctl enable mariadb.servicesystemctl start mariadb.service
执行mariadb安全初始化
为了保证数据库服务的安全性,运行mysql_secure_installation脚本。特别需要说明的是,为数据库的root用户设置一个适当的密码。
[root@controller ~]# mysql_secure_installation···Enter current password for root (enter for none):OK, successfully used password, moving on...Set root password? [Y/n] n... skipping.Remove anonymous users? [Y/n] Y... Success!Disallow root login remotely? [Y/n] Y... Success!Remove test database and access to it? [Y/n] Y- Dropping test database...... Success!- Removing privileges on test database...... Success!Reload privilege tables now? [Y/n] Y... Success!Thanks for using MariaDB!
3.6 NoSQL 数据库
官方文档:https://docs.openstack.org/mitaka/zh_CN/install-guide-rdo/environment-nosql-database.html
Telemetry 服务使用 NoSQL 数据库来存储信息,典型地,这个数据库运行在控制节点上。
向导中使用MongoDB。
在ceilometer中计费使用。由于本次搭建的为私有云平台,私有云不需要计费服务,这里就不进行安装了。
3.7 消息队列部署
官方文档:https://docs.openstack.org/mitaka/zh_CN/install-guide-rdo/environment-messaging.html
安装消息队列软件
[root@controller ~]# yum -y install rabbitmq-server
启动消息队列服务并将其配置为随系统启动:
systemctl enable rabbitmq-server.servicesystemctl start rabbitmq-server.service
添加 openstack 用户:
[root@controller ~]# rabbitmqctl add_user openstack RABBIT_PASSCreating user "openstack" ...用合适的密码替换 RABBIT_DBPASS。
给openstack用户配置写和读权限:
[root@controller ~]# rabbitmqctl set_permissions openstack ".*" ".*" ".*"Setting permissions for user "openstack" in vhost "/" ...
3.8 Memcached服务部署
官方文档:https://docs.openstack.org/mitaka/zh_CN/install-guide-rdo/environment-memcached.html
安装memcached软件包
[root@controller ~]# yum -y install memcached python-memcached
配置memcached配置文件
[root@controller ~]# cat /etc/sysconfig/memcachedPORT="11211"USER="memcached"MAXCONN="1024"CACHESIZE="64"OPTIONS="-l 10.0.0.11" <--修改位置,配置为memcached主机地址或网段信息
启动Memcached服务,并且配置它随机启动。
systemctl enable memcached.servicesystemctl start memcached.service
3.9 验证以上部署的服务是否正常
查看端口信息
[root@controller ~]# netstat -lntupActive Internet connections (only servers)Proto Recv-Q Send-Q Local Address Foreign Address State PID/Program nametcp 0 0 0.0.0.0:25672 0.0.0.0:* LISTEN 17164/beamtcp 0 0 10.0.0.11:3306 0.0.0.0:* LISTEN 16985/mysqldtcp 0 0 10.0.0.11:11211 0.0.0.0:* LISTEN 17962/memcachedtcp 0 0 0.0.0.0:4369 0.0.0.0:* LISTEN 1/systemdtcp 0 0 0.0.0.0:22 0.0.0.0:* LISTEN 1402/sshdtcp6 0 0 :::5672 :::* LISTEN 17164/beamtcp6 0 0 :::22 :::* LISTEN 1402/sshdudp 0 0 0.0.0.0:123 0.0.0.0:* 1681/chronydudp 0 0 127.0.0.1:323 0.0.0.0:* 1681/chronydudp 0 0 10.0.0.11:11211 0.0.0.0:* 17962/memcachedudp6 0 0 ::1:323 :::* 1681/chronyd
端口信息说明
chronyd服务 123(提供给其他机器)、323(与上游同步端口) Mariadb 数据库 3306数据接口 rabbitmq 消息队列 4369、25672(高可用架构使用)、5672(程序写端口) memcached token保存 11211
4. Keystone认证服务配置
官方文档:https://docs.openstack.org/mitaka/zh_CN/install-guide-rdo/keystone-install.html
认证管理:授权管理和服务目录服务管理提供单点整合。
目录服务:相当于呼叫中心(前台)
在控制节点上安装和配置OpenStack身份认证服务,代码名称keystone。出现性能原因,这个配置部署Fernet令牌和Apache HTTP服务处理请求。
4.1 创建数据库
用数据库连接客户端以 root 用户连接到数据库服务器:
[root@controller ~]# mysql -u root -p
创建 keystone 数据库:
MariaDB [(none)]> CREATE DATABASE keystone;
对keystone数据库授予恰当的权限:
GRANT ALL PRIVILEGES ON keystone.* TO 'keystone'@'localhost' IDENTIFIED BY 'KEYSTONE_DBPASS';GRANT ALL PRIVILEGES ON keystone.* TO 'keystone'@'%' IDENTIFIED BY 'KEYSTONE_DBPASS';
添加完成后退出数据库客户端。
MariaDB [(none)]> exit
4.2 安装keystone
yum -y install openstack-keystone httpd mod_wsgi
安装的软件包为 keystone服务包,http服务,用于连接python程序与web服务的中间件
如何理解 CGI, WSGI? https://www.zhihu.com/question/19998865
4.3 修改配置文件
备份配置文件
[root@controller ~]# cp /etc/keystone/keystone.conf{,.bak}
精简化配置文件
[root@controller ~]# egrep -v '^#|^$' /etc/keystone/keystone.conf.bak >/etc/keystone/keystone.conf
手动修改配置文件
在[DEFAULT]部分,定义初始管理令牌的值
[DEFAULT]admin_token = ADMIN_TOKEN
在 [database] 部分,配置数据库访问
[database]connection = mysql+pymysql://keystone:KEYSTONE_DBPASS@controller/keystone
在[token]部分,配置Fernet UUID令牌的提供者
[token]provider = fernet 关于令牌类型的说明:https://www.abcdocker.com/abcdocker/1797
【自动化】**自动化配置-**配置文件(本文大量使用)
安装自动配置软件openstack-utils
yum install openstack-utils.noarch -y[root@controller ~]# rpm -ql openstack-utils/usr/bin/openstack-config
自动化配置命令
cp /etc/keystone/keystone.conf{,.bak}grep '^[a-Z\[]' /etc/keystone/keystone.conf.bak > /etc/keystone/keystone.confopenstack-config --set /etc/keystone/keystone.conf DEFAULT admin_token ADMIN_TOKENopenstack-config --set /etc/keystone/keystone.conf database connection mysql+pymysql://keystone:KEYSTONE_DBPASS@controller/keystoneopenstack-config --set /etc/keystone/keystone.conf token provider fernet
4.4 初始化身份认证服务的数据库(同步数据库)
[root@controller ~]# su -s /bin/sh -c "keystone-manage db_sync" keystone
验证数据库是否同步成功
[root@controller ~]# mysql keystone -e 'show tables'
4.5 初始化Fernet keys
[root@controller ~]# keystone-manage fernet_setup --keystone-user keystone --keystone-group keystone
命令执行后会在/etc/keystone/目录下生成fernet-keys 文件:
[root@controller ~]# ls /etc/keystone/default_catalog.templates keystone.conf.bak policy.jsonfernet-keys keystone-paste.ini sso_callback_template.htmlkeystone.conf logging.conf
4.6 配置 Apache HTTP 服务器
编辑/etc/httpd/conf/httpd.conf 文件,配置ServerName。
echo 'ServerName controller' >>/etc/httpd/conf/httpd.conf
创建配置文件 /etc/httpd/conf.d/wsgi-keystone.conf
注:keystone服务较为特殊,其他的服务可自行创建配置文件。
[root@controller ~]# cat /etc/httpd/conf.d/wsgi-keystone.confListen 5000Listen 35357<VirtualHost *:5000>WSGIDaemonProcess keystone-public processes=5 threads=1 user=keystone group=keystone display-name=%{GROUP}WSGIProcessGroup keystone-publicWSGIScriptAlias / /usr/bin/keystone-wsgi-publicWSGIApplicationGroup %{GLOBAL}WSGIPassAuthorization OnErrorLogFormat "%{cu}t %M"ErrorLog /var/log/httpd/keystone-error.logCustomLog /var/log/httpd/keystone-access.log combined<Directory /usr/bin>Require all granted</Directory></VirtualHost><VirtualHost *:35357>WSGIDaemonProcess keystone-admin processes=5 threads=1 user=keystone group=keystone display-name=%{GROUP}WSGIProcessGroup keystone-adminWSGIScriptAlias / /usr/bin/keystone-wsgi-adminWSGIApplicationGroup %{GLOBAL}WSGIPassAuthorization OnErrorLogFormat "%{cu}t %M"ErrorLog /var/log/httpd/keystone-error.logCustomLog /var/log/httpd/keystone-access.log combined<Directory /usr/bin>Require all granted</Directory></VirtualHost>
4.7 启动 Apache HTTP 服务并配置其随系统启动
systemctl enable httpd.servicesystemctl start httpd.service
4.8 创建服务实体和API端点
官方文档:https://docs.openstack.org/mitaka/zh_CN/install-guide-rdo/keystone-services.html
a.配置环境变量
配置认证令牌
export OS_TOKEN=ADMIN_TOKEN
配置端点URL
export OS_URL=http://controller:35357/v3
配置认证 API 版本
export OS_IDENTITY_API_VERSION=3
查看环境变量
[root@controller ~]# env |grep OS
命令集:
export OS_TOKEN=ADMIN_TOKENexport OS_URL=http://controller:35357/v3export OS_IDENTITY_API_VERSION=3env |grep OS
b.创建服务实体和API端点
创建命令
openstack service create --name keystone --description "OpenStack Identity" identity
执行过程
[root@controller ~]# openstack service create \> --name keystone --description "OpenStack Identity" identity+-------------+----------------------------------+| Field | Value |+-------------+----------------------------------+| description | OpenStack Identity || enabled | True || id | f08ec36b2b7340d6976fcb2bbd24e83b || name | keystone || type | identity |+-------------+----------------------------------+
c.创建认证服务的 API 端点
命令集
openstack endpoint create --region RegionOne identity public http://controller:5000/v3openstack endpoint create --region RegionOne identity internal http://controller:5000/v3openstack endpoint create --region RegionOne identity admin http://controller:35357/v3
执行过程
[root@controller ~]# openstack endpoint create --region RegionOne \> identity public http://controller:5000/v3+--------------+----------------------------------+| Field | Value |+--------------+----------------------------------+| enabled | True || id | e27dd713753f47b8a1062ac50ca33845 || interface | public || region | RegionOne || region_id | RegionOne || service_id | f08ec36b2b7340d6976fcb2bbd24e83b || service_name | keystone || service_type | identity || url | http://controller:5000/v3 |+--------------+----------------------------------+[root@controller ~]# openstack endpoint create --region RegionOne \> identity internal http://controller:5000/v3+--------------+----------------------------------+| Field | Value |+--------------+----------------------------------+| enabled | True || id | 71b7435fa2df4c58bb6ca5cc38a434a7 || interface | internal || region | RegionOne || region_id | RegionOne || service_id | f08ec36b2b7340d6976fcb2bbd24e83b || service_name | keystone || service_type | identity || url | http://controller:5000/v3 |+--------------+----------------------------------+[root@controller ~]# openstack endpoint create --region RegionOne \> identity admin http://controller:35357/v3+--------------+----------------------------------+| Field | Value |+--------------+----------------------------------+| enabled | True || id | cf58eee084c04777a520d487adc1a88f || interface | admin || region | RegionOne || region_id | RegionOne || service_id | f08ec36b2b7340d6976fcb2bbd24e83b || service_name | keystone || service_type | identity || url | http://controller:35357/v3 |+--------------+----------------------------------+
4.9 创建域、项目、用户和角色
官方文档https://docs.openstack.org/mitaka/zh_CN/install-guide-rdo/keystone-users.html
a.创建域default
openstack domain create --description "Default Domain" default
b.在你的环境中,为进行管理操作,创建管理的项目、用户和角色
创建 admin 项目
openstack project create --domain default --description "Admin Project" admin
创建 admin 用户
openstack user create --domain default --password-prompt admin
创建 admin 角色
openstack role create admin
添加admin 角色到 admin 项目和用户上
openstack role add --project admin --user admin admin
命令集:
openstack domain create --description "Default Domain" defaultopenstack project create --domain default --description "Admin Project" adminopenstack user create --domain default --password ADMIN_PASS adminopenstack role create adminopenstack role add --project admin --user admin admin
c.创建servers项目
[root@controller ~]# openstack project create --domain default --description "Service Project" service+-------------+----------------------------------+| Field | Value |+-------------+----------------------------------+| description | Service Project || domain_id | df6407ae93bb407d876f2ee4787ede79 || enabled | True || id | cd2107aa3a8f4066a871ca029641cfd7 || is_domain | False || name | service || parent_id | df6407ae93bb407d876f2ee4787ede79 |+-------------+----------------------------------+
验证之前的所有操作
命令集:
openstack service listopenstack endpoint list | grep keystone |wc -lopenstack domain listopenstack project listopenstack user listopenstack role list
查看服务列表
[root@controller ~]# openstack service list+----------------------------------+----------+----------+| ID | Name | Type |+----------------------------------+----------+----------+| f08ec36b2b7340d6976fcb2bbd24e83b | keystone | identity |+----------------------------------+----------+----------+
查看当前的域
[root@controller ~]# openstack domain list+----------------------------------+---------+---------+----------------+| ID | Name | Enabled | Description |+----------------------------------+---------+---------+----------------+| df6407ae93bb407d876f2ee4787ede79 | default | True | Default Domain |+----------------------------------+---------+---------+----------------+
查看集合
[root@controller ~]# openstack project list+----------------------------------+---------+| ID | Name |+----------------------------------+---------+| cd2107aa3a8f4066a871ca029641cfd7 | service || d0dfbdbc115b4a728c24d28bc1ce1e62 | admin |+----------------------------------+---------+
查看当前的用户列表
[root@controller ~]# openstack user list+----------------------------------+-------+| ID | Name |+----------------------------------+-------+| d8f4a1d74f52482d8ebe2184692d2c1c | admin |+----------------------------------+-------+
查看当前的角色
[root@controller ~]# openstack role list+----------------------------------+-------+| ID | Name |+----------------------------------+-------+| 4de514c418ee480d898773e4f543b79d | admin |+----------------------------------+-------+
关于域、项目、用户和角色的说明:
| 类型 | 说明 |
|---|---|
| Domain | 表示 project 和 user 的集合,在公有云或者私有云中常常表示一个客户 |
| Group | 一个domain 中的部分用户的集合 |
| Project | 项目、IT基础设施资源的集合,比如虚机,卷,镜像等 |
| Role | 授权,角色,表示一个 user 对一个 project resource 的权限 |
| Token | 一个 user 对于某个目标(project 或者 domain)的一个有限时间段内的身份令牌 |
4.10 创建 OpenStack 客户端环境脚本
官方文档:https://docs.openstack.org/mitaka/zh_CN/install-guide-rdo/keystone-openrc.html
编辑文件 admin-openrc 并添加如下内容
[root@controller ~]# vi admin-openrcexport OS_PROJECT_DOMAIN_NAME=defaultexport OS_USER_DOMAIN_NAME=defaultexport OS_PROJECT_NAME=adminexport OS_USERNAME=adminexport OS_PASSWORD=ADMIN_PASSexport OS_AUTH_URL=http://controller:35357/v3export OS_IDENTITY_API_VERSION=3export OS_IMAGE_API_VERSION=2
【重要】务必使用环境变量脚本
使用脚本创建环境变量
[root@controller ~]# source admin-openrc[root@controller ~]# env|grep OSHOSTNAME=controllerOS_USER_DOMAIN_NAME=defaultOS_IMAGE_API_VERSION=2OS_PROJECT_NAME=adminOS_IDENTITY_API_VERSION=3OS_PASSWORD=ADMIN_PASSOS_AUTH_URL=http://controller:35357/v3OS_USERNAME=adminOS_PROJECT_DOMAIN_NAME=default
5. 镜像服务glance部署
官方文档:https://docs.openstack.org/mitaka/zh_CN/install-guide-rdo/glance.html
5.1 创库授权
参考文档:https://docs.openstack.org/mitaka/zh_CN/install-guide-rdo/glance-install.html
# 登陆mysql数据库[root@controller ~]# mysql
创建 glance 数据库:
CREATE DATABASE glance;
对glance数据库授予恰当的权限:
GRANT ALL PRIVILEGES ON glance.* TO 'glance'@'localhost' IDENTIFIED BY 'GLANCE_DBPASS';GRANT ALL PRIVILEGES ON glance.* TO 'glance'@'%' IDENTIFIED BY 'GLANCE_DBPASS';
5.2 创建glance用户和授权
[重要]加载环境变量
注:每次使用openstack管理命令时都依赖与环境变量
[root@controller ~]# . admin-openrc
创建 glance 用户
openstack user create --domain default --password GLANCE_PASS glance
添加 admin 角色到 glance 用户和 service 项目上
openstack role add --project service --user glance admin
5.3 创建镜像服务的 API 端点,并注册
创建glance服务实体
openstack service create --name glance --description "OpenStack Image" image
执行过程
[root@controller ~]# openstack service create --name glance --description "OpenStack Image" image+-------------+----------------------------------+| Field | Value |+-------------+----------------------------------+| description | OpenStack Image || enabled | True || id | 30357ca18e5046b98dbc0dd4f1e7d69c || name | glance || type | image |+-------------+----------------------------------+
创建镜像服务的 API 端点
命令集
openstack endpoint create --region RegionOne image public http://controller:9292openstack endpoint create --region RegionOne image internal http://controller:9292openstack endpoint create --region RegionOne image admin http://controller:9292
执行过程
[root@controller ~]# openstack endpoint create --region RegionOne image public http://controller:9292+--------------+----------------------------------+| Field | Value |+--------------+----------------------------------+| enabled | True || id | 671486d2528448e9a4067ab04a15e015 || interface | public || region | RegionOne || region_id | RegionOne || service_id | 30357ca18e5046b98dbc0dd4f1e7d69c || service_name | glance || service_type | image || url | http://controller:9292 |+--------------+----------------------------------+[root@controller ~]# openstack endpoint create --region RegionOne image internal http://controller:9292+--------------+----------------------------------+| Field | Value |+--------------+----------------------------------+| enabled | True || id | 8ff6131b7e1b4234bb4f34daecbbd615 || interface | internal || region | RegionOne || region_id | RegionOne || service_id | 30357ca18e5046b98dbc0dd4f1e7d69c || service_name | glance || service_type | image || url | http://controller:9292 |+--------------+----------------------------------+[root@controller ~]# openstack endpoint create --region RegionOne image admin http://controller:9292+--------------+----------------------------------+| Field | Value |+--------------+----------------------------------+| enabled | True || id | 4a1b3341a0604dbfb710eaa63aab626a || interface | admin || region | RegionOne || region_id | RegionOne || service_id | 30357ca18e5046b98dbc0dd4f1e7d69c || service_name | glance || service_type | image || url | http://controller:9292 |+--------------+----------------------------------+
5.4 安装glance软件包
yum install openstack-glance -y
服务说明:
glance-api 负责镜像的上传、下载、查看、删除 glance-registry 修改镜像的源数据:镜像所需的配置
5.5 修改glance相关配置文件
/etc/glance/glance-api.conf # 接收镜像API的调用,诸如镜像发现、恢复、存储。 /etc/glance/glance-registry.conf #存储、处理和恢复镜像的元数据,元数据包括项诸如大小和类型。
1、编辑文件 /etc/glance/glance-registry.conf
[database] 部分,配置数据库访问
[database]...connection = mysql+pymysql://glance:GLANCE_DBPASS@controller/glance
[keystone_authtoken] 和 [paste_deploy] 部分,配置认证服务访问
[keystone_authtoken]...auth_uri = http://controller:5000auth_url = http://controller:35357memcached_servers = controller:11211auth_type = passwordproject_domain_name = defaultuser_domain_name = defaultproject_name = serviceusername = glancepassword = GLANCE_PASS[paste_deploy]...flavor = keystone
[glance_store] 部分,配置本地文件系统存储和镜像文件位置
[glance_store]...stores = file,httpdefault_store = filefilesystem_store_datadir = /var/lib/glance/images/
命令集
cp /etc/glance/glance-api.conf{,.bak}grep '^[a-Z\[]' /etc/glance/glance-api.conf.bak >/etc/glance/glance-api.confopenstack-config --set /etc/glance/glance-api.conf database connection mysql+pymysql://glance:GLANCE_DBPASS@controller/glanceopenstack-config --set /etc/glance/glance-api.conf glance_store stores file,httpopenstack-config --set /etc/glance/glance-api.conf glance_store default_store fileopenstack-config --set /etc/glance/glance-api.conf glance_store filesystem_store_datadir /var/lib/glance/images/openstack-config --set /etc/glance/glance-api.conf keystone_authtoken auth_uri http://controller:5000openstack-config --set /etc/glance/glance-api.conf keystone_authtoken auth_url http://controller:35357openstack-config --set /etc/glance/glance-api.conf keystone_authtoken memcached_servers controller:11211openstack-config --set /etc/glance/glance-api.conf keystone_authtoken auth_type passwordopenstack-config --set /etc/glance/glance-api.conf keystone_authtoken project_domain_name defaultopenstack-config --set /etc/glance/glance-api.conf keystone_authtoken user_domain_name defaultopenstack-config --set /etc/glance/glance-api.conf keystone_authtoken project_name serviceopenstack-config --set /etc/glance/glance-api.conf keystone_authtoken username glanceopenstack-config --set /etc/glance/glance-api.conf keystone_authtoken password GLANCE_PASSopenstack-config --set /etc/glance/glance-api.conf paste_deploy flavor keystone
2、编辑文件 /etc/glance/glance-registry.conf
[database] 部分,配置数据库访问
[database]...connection = mysql+pymysql://glance:GLANCE_DBPASS@controller/glance
[keystone_authtoken] 和 [paste_deploy] 部分,配置认证服务访问
[keystone_authtoken]...auth_uri = http://controller:5000auth_url = http://controller:35357memcached_servers = controller:11211auth_type = passwordproject_domain_name = defaultuser_domain_name = defaultproject_name = serviceusername = glancepassword = GLANCE_PASS[paste_deploy]...flavor = keystone
命令集
cp /etc/glance/glance-registry.conf{,.bak}grep '^[a-Z\[]' /etc/glance/glance-registry.conf.bak > /etc/glance/glance-registry.confopenstack-config --set /etc/glance/glance-registry.conf database connection mysql+pymysql://glance:GLANCE_DBPASS@controller/glanceopenstack-config --set /etc/glance/glance-registry.conf keystone_authtoken auth_uri http://controller:5000openstack-config --set /etc/glance/glance-registry.conf keystone_authtoken auth_url http://controller:35357openstack-config --set /etc/glance/glance-registry.conf keystone_authtoken memcached_servers controller:11211openstack-config --set /etc/glance/glance-registry.conf keystone_authtoken auth_type passwordopenstack-config --set /etc/glance/glance-registry.conf keystone_authtoken project_domain_name defaultopenstack-config --set /etc/glance/glance-registry.conf keystone_authtoken user_domain_name defaultopenstack-config --set /etc/glance/glance-registry.conf keystone_authtoken project_name serviceopenstack-config --set /etc/glance/glance-registry.conf keystone_authtoken username glanceopenstack-config --set /etc/glance/glance-registry.conf keystone_authtoken password GLANCE_PASSopenstack-config --set /etc/glance/glance-registry.conf paste_deploy flavor keystone
5.6 同步数据库
[root@controller ~]# su -s /bin/sh -c "glance-manage db_sync" glance
注:忽略输出中任何不推荐使用的信息。
检查数据库是否同步成功
[root@controller ~]# mysql glance -e "show tables" |wc -l21
5.7 启动glance服务
启动镜像服务、配置他们随机启动
systemctl enable openstack-glance-api.service openstack-glance-registry.servicesystemctl start openstack-glance-api.service openstack-glance-registry.service
5.8 验证glance服务操作
a.设置环境变量
. admin-openrc
b.下载源镜像
wget http://download.cirros-cloud.net/0.3.4/cirros-0.3.4-x86_64-disk.img
c.使用 QCOW2 磁盘格式, bare 容器格式上传镜像到镜像服务并设置公共可见,这样所有的项目都可以访问它
openstack image create "cirros" --file cirros-0.3.4-x86_64-disk.img --disk-format qcow2 --container-format bare --public
执行过程如下
[root@controller ~]# openstack image create "cirros" --file cirros-0.3.4-x86_64-disk.img --disk-format qcow2 --container-format bare --public+------------------+------------------------------------------------------+| Field | Value |+------------------+------------------------------------------------------+| checksum | ee1eca47dc88f4879d8a229cc70a07c6 || container_format | bare || created_at | 2018-01-23T10:20:19Z || disk_format | qcow2 || file | /v2/images/9d92c601-0824-493a-bc6e-cecb10e9a4c6/file || id | 9d92c601-0824-493a-bc6e-cecb10e9a4c6 || min_disk | 0 || min_ram | 0 || name | cirros || owner | d0dfbdbc115b4a728c24d28bc1ce1e62 || protected | False || schema | /v2/schemas/image || size | 13287936 || status | active || tags | || updated_at | 2018-01-23T10:20:20Z || virtual_size | None || visibility | public |+------------------+------------------------------------------------------+
查看镜像列表
[root@controller ~]# openstack image list+--------------------------------------+--------+--------+| ID | Name | Status |+--------------------------------------+--------+--------+| 9d92c601-0824-493a-bc6e-cecb10e9a4c6 | cirros | active |+--------------------------------------+--------+--------+
镜像位置,镜像上传后以id命名。
[root@controller ~]# ll -h /var/lib/glance/images/total 13M-rw-r----- 1 glance glance 13M Jan 23 18:20 9d92c601-0824-493a-bc6e-cecb10e9a4c6
6. 计算服务(nova)部署
官方文档:https://docs.openstack.org/mitaka/zh_CN/install-guide-rdo/nova.html
6.1 在控制节点安装并配置
参考文献:https://docs.openstack.org/mitaka/zh_CN/install-guide-rdo/nova-controller-install.html
1)在数据库中,创库,授权
数据库连接客户端以 root 用户连接到数据库服务器
mysql -u root -p
创建 nova_api 和 nova 数据库:
CREATE DATABASE nova_api;CREATE DATABASE nova;
对数据库进行正确的授权
GRANT ALL PRIVILEGES ON nova_api.* TO 'nova'@'localhost' IDENTIFIED BY 'NOVA_DBPASS';GRANT ALL PRIVILEGES ON nova_api.* TO 'nova'@'%' IDENTIFIED BY 'NOVA_DBPASS';GRANT ALL PRIVILEGES ON nova.* TO 'nova'@'localhost' IDENTIFIED BY 'NOVA_DBPASS';GRANT ALL PRIVILEGES ON nova.* TO 'nova'@'%' IDENTIFIED BY 'NOVA_DBPASS';
2)在keystone中创建用户并授权
加载环境变量
[root@controller ~]# . admin-openrc
创建用户
openstack user create --domain default --password NOVA_PASS nova
关联角色
openstack role add --project service --user nova admin
3)在keystone中创建服务实体,和注册API接口
创建服务实体
openstack service create --name nova --description "OpenStack Compute" compute
注册API接口
openstack endpoint create --region RegionOne compute public http://controller:8774/v2.1/%\(tenant_id\)sopenstack endpoint create --region RegionOne compute internal http://controller:8774/v2.1/%\(tenant_id\)sopenstack endpoint create --region RegionOne compute admin http://controller:8774/v2.1/%\(tenant_id\)s
4)安装软件包
yum -y install openstack-nova-api openstack-nova-conductor openstack-nova-console openstack-nova-novncproxy openstack-nova-scheduler
软件包说明
nova-api # 提供api接口 nova-scheduler # 调度 nova-conductor # 替代计算节点进入数据库操作 nova-consoleauth # 提供web界面版的vnc管理 nova-novncproxy # 提供web界面版的vnc管理 nova-compute # 调度libvirtd进行虚拟机生命周期的管理
5)修改配置文件
编辑/etc/nova/nova.conf文件并完成下面的操作:
在[DEFAULT]部分,只启用计算和元数据API:
[DEFAULT]...enabled_apis = osapi_compute,metadata
在[api_database]和[database]部分,配置数据库的连接:
[api_database]...connection = mysql+pymysql://nova:NOVA_DBPASS@controller/nova_api[database]...connection = mysql+pymysql://nova:NOVA_DBPASS@controller/nova
在 “[DEFAULT]” 和 “[oslo_messaging_rabbit]”部分,配置 “RabbitMQ” 消息队列访问
[DEFAULT]...rpc_backend = rabbit[oslo_messaging_rabbit]...rabbit_host = controllerrabbit_userid = openstackrabbit_password = RABBIT_PASS
在 “[DEFAULT]” 和 “[keystone_authtoken]” 部分,配置认证服务访问
[DEFAULT]...auth_strategy = keystone[keystone_authtoken]...auth_uri = http://controller:5000auth_url = http://controller:35357memcached_servers = controller:11211auth_type = passwordproject_domain_name = defaultuser_domain_name = defaultproject_name = serviceusername = novapassword = NOVA_PASS
在 [DEFAULT]部分,配置my_ip 来使用控制节点的管理接口的IP 地址。
[DEFAULT]...my_ip = 10.0.0.11
在 [DEFAULT] 部分,使能 Networking 服务:
[DEFAULT]...use_neutron = Truefirewall_driver = nova.virt.firewall.NoopFirewallDriver
在[vnc]部分,配置VNC代理使用控制节点的管理接口IP地址 :
[vnc]...vncserver_listen = $my_ipvncserver_proxyclient_address = $my_ip
在 [glance] 区域,配置镜像服务 API 的位置:
[glance]...api_servers = http://controller:9292
在 [oslo_concurrency] 部分,配置锁路径:
[oslo_concurrency]...lock_path = /var/lib/nova/tmp
命令集
cp /etc/nova/nova.conf{,.bak}grep '^[a-Z\[]' /etc/nova/nova.conf.bak >/etc/nova/nova.confopenstack-config --set /etc/nova/nova.conf DEFAULT enabled_apis osapi_compute,metadataopenstack-config --set /etc/nova/nova.conf DEFAULT rpc_backend rabbitopenstack-config --set /etc/nova/nova.conf DEFAULT auth_strategy keystoneopenstack-config --set /etc/nova/nova.conf DEFAULT my_ip 10.0.0.11openstack-config --set /etc/nova/nova.conf DEFAULT use_neutron Trueopenstack-config --set /etc/nova/nova.conf DEFAULT firewall_driver nova.virt.firewall.NoopFirewallDriveropenstack-config --set /etc/nova/nova.conf api_database connection mysql+pymysql://nova:NOVA_DBPASS@controller/nova_apiopenstack-config --set /etc/nova/nova.conf database connection mysql+pymysql://nova:NOVA_DBPASS@controller/novaopenstack-config --set /etc/nova/nova.conf glance api_servers http://controller:9292openstack-config --set /etc/nova/nova.conf keystone_authtoken auth_uri http://controller:5000openstack-config --set /etc/nova/nova.conf keystone_authtoken auth_url http://controller:35357openstack-config --set /etc/nova/nova.conf keystone_authtoken memcached_servers controller:11211openstack-config --set /etc/nova/nova.conf keystone_authtoken auth_type passwordopenstack-config --set /etc/nova/nova.conf keystone_authtoken project_domain_name defaultopenstack-config --set /etc/nova/nova.conf keystone_authtoken user_domain_name defaultopenstack-config --set /etc/nova/nova.conf keystone_authtoken project_name serviceopenstack-config --set /etc/nova/nova.conf keystone_authtoken username novaopenstack-config --set /etc/nova/nova.conf keystone_authtoken password NOVA_PASSopenstack-config --set /etc/nova/nova.conf oslo_concurrency lock_path /var/lib/nova/tmpopenstack-config --set /etc/nova/nova.conf oslo_messaging_rabbit rabbit_host controlleropenstack-config --set /etc/nova/nova.conf oslo_messaging_rabbit rabbit_userid openstackopenstack-config --set /etc/nova/nova.conf oslo_messaging_rabbit rabbit_password RABBIT_PASSopenstack-config --set /etc/nova/nova.conf vnc vncserver_listen '$my_ip'openstack-config --set /etc/nova/nova.conf vnc vncserver_proxyclient_address '$my_ip'
6)同步数据库
su -s /bin/sh -c "nova-manage api_db sync" novasu -s /bin/sh -c "nova-manage db sync" nova
注意:忽略执行过程中输出中任何不推荐使用的信息
[root@controller ~]# mysql nova_api -e 'show tables' |wc -l10[root@controller ~]# mysql nova -e 'show tables' |wc -l110
7)启动服务
设置开启自启动
systemctl enable openstack-nova-api.service openstack-nova-consoleauth.service openstack-nova-scheduler.service openstack-nova-conductor.service openstack-nova-novncproxy.service
启动服务
systemctl start openstack-nova-api.service openstack-nova-consoleauth.service openstack-nova-scheduler.service openstack-nova-conductor.service openstack-nova-novncproxy.service
查看服务状态
[root@controller ~]# systemctl status openstack-nova-api.service openstack-nova-consoleauth.service openstack-nova-scheduler.service openstack-nova-conductor.service openstack-nova-novncproxy.service |grep 'active (running)' |wc -l5
6.2 在计算节点安装和配置
查考文献:https://docs.openstack.org/mitaka/zh_CN/install-guide-rdo/nova-compute-install.html
1)安装软件包
yum -y install openstack-nova-compute
2)修改配置文件
编辑/etc/nova/nova.conf文件并完成下面的操作
在[DEFAULT] 和 [oslo_messaging_rabbit]部分,配置RabbitMQ消息队列的连接:
[DEFAULT]...rpc_backend = rabbit[oslo_messaging_rabbit]...rabbit_host = controllerrabbit_userid = openstackrabbit_password = RABBIT_PASS
在 “[DEFAULT]” 和 “[keystone_authtoken]” 部分,配置认证服务访问:
[DEFAULT]...auth_strategy = keystone[keystone_authtoken]...auth_uri = http://controller:5000auth_url = http://controller:35357memcached_servers = controller:11211auth_type = passwordproject_domain_name = defaultuser_domain_name = defaultproject_name = serviceusername = novapassword = NOVA_PASS
在 [DEFAULT] 部分,配置 my_ip 选项:
[DEFAULT]...my_ip = MANAGEMENT_INTERFACE_IP_ADDRESS
注意: 将其中的 MANAGEMENT_INTERFACE_IP_ADDRESS 替换为计算节点上的管理网络接口的IP 地址,例如 :ref:example architecture <overview-example-architectures>中所示的第一个节点 10.0.0.31
在 [DEFAULT] 部分,使能 Networking 服务:
[DEFAULT]...use_neutron = Truefirewall_driver = nova.virt.firewall.NoopFirewallDriver
在[vnc]部分,启用并配置远程控制台访问
[vnc]...enabled = Truevncserver_listen = 0.0.0.0vncserver_proxyclient_address = $my_ipnovncproxy_base_url = http://controller:6080/vnc_auto.html
在 [glance] 区域,配置镜像服务 API 的位置:
[glance]...api_servers = http://controller:9292
在 [oslo_concurrency] 部分,配置锁路径:
[oslo_concurrency]...lock_path = /var/lib/nova/tmp
命令集
cp /etc/nova/nova.conf{,.bak}grep '^[a-Z\[]' /etc/nova/nova.conf.bak >/etc/nova/nova.confopenstack-config --set /etc/nova/nova.conf DEFAULT enabled_apis osapi_compute,metadataopenstack-config --set /etc/nova/nova.conf DEFAULT rpc_backend rabbitopenstack-config --set /etc/nova/nova.conf DEFAULT auth_strategy keystoneopenstack-config --set /etc/nova/nova.conf DEFAULT my_ip 10.0.0.31openstack-config --set /etc/nova/nova.conf DEFAULT use_neutron Trueopenstack-config --set /etc/nova/nova.conf DEFAULT firewall_driver nova.virt.firewall.NoopFirewallDriveropenstack-config --set /etc/nova/nova.conf glance api_servers http://controller:9292openstack-config --set /etc/nova/nova.conf keystone_authtoken auth_uri http://controller:5000openstack-config --set /etc/nova/nova.conf keystone_authtoken auth_url http://controller:35357openstack-config --set /etc/nova/nova.conf keystone_authtoken memcached_servers controller:11211openstack-config --set /etc/nova/nova.conf keystone_authtoken auth_type passwordopenstack-config --set /etc/nova/nova.conf keystone_authtoken project_domain_name defaultopenstack-config --set /etc/nova/nova.conf keystone_authtoken user_domain_name defaultopenstack-config --set /etc/nova/nova.conf keystone_authtoken project_name serviceopenstack-config --set /etc/nova/nova.conf keystone_authtoken username novaopenstack-config --set /etc/nova/nova.conf keystone_authtoken password NOVA_PASSopenstack-config --set /etc/nova/nova.conf oslo_concurrency lock_path /var/lib/nova/tmpopenstack-config --set /etc/nova/nova.conf oslo_messaging_rabbit rabbit_host controlleropenstack-config --set /etc/nova/nova.conf oslo_messaging_rabbit rabbit_userid openstackopenstack-config --set /etc/nova/nova.conf oslo_messaging_rabbit rabbit_password RABBIT_PASSopenstack-config --set /etc/nova/nova.conf vnc enabled Trueopenstack-config --set /etc/nova/nova.conf vnc vncserver_listen 0.0.0.0openstack-config --set /etc/nova/nova.conf vnc vncserver_proxyclient_address '$my_ip'openstack-config --set /etc/nova/nova.conf vnc novncproxy_base_url http://controller:6080/vnc_auto.html
3)启动服务
确定您的计算节点是否支持虚拟机的硬件加速
[root@compute1 ~]# egrep -c '(vmx|svm)' /proc/cpuinfo1
说明:如果这个命令返回了 1 或更大的值,那么你的计算节点支持硬件加速且不需要额外的配置。
启动,开机自启动
systemctl enable libvirtd.service openstack-nova-compute.servicesystemctl start libvirtd.service openstack-nova-compute.service# 查看状态systemctl status libvirtd.service openstack-nova-compute.service
在控制节点查看计算节点状态
[root@controller ~]# source admin-openrc[root@controller ~]# openstack compute service list+----+------------------+------------+----------+---------+-------+----------------------------+| Id | Binary | Host | Zone | Status | State | Updated At |+----+------------------+------------+----------+---------+-------+----------------------------+| 1 | nova-scheduler | controller | internal | enabled | up | 2018-01-23T12:02:04.000000 || 2 | nova-conductor | controller | internal | enabled | up | 2018-01-23T12:02:03.000000 || 3 | nova-consoleauth | controller | internal | enabled | up | 2018-01-23T12:02:05.000000 || 6 | nova-compute | compute1 | nova | enabled | up | 2018-01-23T12:02:05.000000 |+----+------------------+------------+----------+---------+-------+----------------------------+
6.3 验证服务
在进行下一步操作之前,先验证之前部署的服务是否正常。
注意: 执行命令前需先加载环境变量脚本
# 检查认证服务openstack user list# 检查镜像服务openstack image list# 检查计算服务openstack compute service list
7. Networking(neutron)服务
官方文档:https://docs.openstack.org/mitaka/zh_CN/install-guide-rdo/neutron.html
7.1 安装并配置控制节点
以下全命令全在 controller 主机中执行
参考文献:https://docs.openstack.org/mitaka/zh_CN/install-guide-rdo/neutron-controller-install.html
1)在数据库中,创库,授权
连接到数据库服务器
mysql
创建neutron 数据库
CREATE DATABASE neutron;
对neutron 数据库授予合适的访问权限
GRANT ALL PRIVILEGES ON neutron.* TO 'neutron'@'localhost' IDENTIFIED BY 'NEUTRON_DBPASS';GRANT ALL PRIVILEGES ON neutron.* TO 'neutron'@'%' IDENTIFIED BY 'NEUTRON_DBPASS';
2)在keystone中创建用户并授权
创建neutron用户
openstack user create --domain default --password NEUTRON_PASS neutron
添加admin 角色到neutron 用户
openstack role add --project service --user neutron admin
3)在keystone中创建服务实体,和注册API接口
创建neutron服务实体
openstack service create --name neutron --description "OpenStack Networking" network
创建网络服务API端点
openstack endpoint create --region RegionOne network public http://controller:9696openstack endpoint create --region RegionOne network internal http://controller:9696openstack endpoint create --region RegionOne network admin http://controller:9696
4)安装软件包
这这里我选用的时’网络选项__1:公共网络‘ 该网络模式较为简单。
官方文档:https://docs.openstack.org/mitaka/zh_CN/install-guide-rdo/neutron-controller-install-option1.html
安装软件包
yum -y install openstack-neutron openstack-neutron-ml2 openstack-neutron-linuxbridge ebtables
5)修改配置文件
① 编辑/etc/neutron/neutron.conf 文件并完成如下操作
在 [database] 部分,配置数据库访问
[database]...connection = mysql+pymysql://neutron:NEUTRON_DBPASS@controller/neutron
在[DEFAULT]部分,启用ML2插件并禁用其他插件
[DEFAULT]...core_plugin = ml2service_plugins =
在 “[DEFAULT]” 和 “[oslo_messaging_rabbit]”部分,配置 “RabbitMQ” 消息队列的连接
[DEFAULT]...rpc_backend = rabbit[oslo_messaging_rabbit]...rabbit_host = controllerrabbit_userid = openstackrabbit_password = RABBIT_PASS
在 “[DEFAULT]” 和 “[keystone_authtoken]” 部分,配置认证服务访问
[DEFAULT]...auth_strategy = keystone[keystone_authtoken]...auth_uri = http://controller:5000auth_url = http://controller:35357memcached_servers = controller:11211auth_type = passwordproject_domain_name = defaultuser_domain_name = defaultproject_name = serviceusername = neutronpassword = NEUTRON_PASS
在[DEFAULT]和[nova]部分,配置网络服务来通知计算节点的网络拓扑变化
[DEFAULT]...notify_nova_on_port_status_changes = Truenotify_nova_on_port_data_changes = True[nova]...auth_url = http://controller:35357auth_type = passwordproject_domain_name = defaultuser_domain_name = defaultregion_name = RegionOneproject_name = serviceusername = novapassword = NOVA_PASS
在 [oslo_concurrency] 部分,配置锁路径
[oslo_concurrency]...lock_path = /var/lib/neutron/tmp
命令集
cp /etc/neutron/neutron.conf{,.bak}grep '^[a-Z\[]' /etc/neutron/neutron.conf.bak >/etc/neutron/neutron.confopenstack-config --set /etc/neutron/neutron.conf DEFAULT core_plugin ml2openstack-config --set /etc/neutron/neutron.conf DEFAULT service_pluginsopenstack-config --set /etc/neutron/neutron.conf DEFAULT rpc_backend rabbitopenstack-config --set /etc/neutron/neutron.conf DEFAULT auth_strategy keystoneopenstack-config --set /etc/neutron/neutron.conf DEFAULT notify_nova_on_port_status_changes Trueopenstack-config --set /etc/neutron/neutron.conf DEFAULT notify_nova_on_port_data_changes Trueopenstack-config --set /etc/neutron/neutron.conf database connection mysql+pymysql://neutron:NEUTRON_DBPASS@controller/neutronopenstack-config --set /etc/neutron/neutron.conf keystone_authtoken auth_uri http://controller:5000openstack-config --set /etc/neutron/neutron.conf keystone_authtoken auth_url http://controller:35357openstack-config --set /etc/neutron/neutron.conf keystone_authtoken memcached_servers controller:11211openstack-config --set /etc/neutron/neutron.conf keystone_authtoken auth_type passwordopenstack-config --set /etc/neutron/neutron.conf keystone_authtoken project_domain_name defaultopenstack-config --set /etc/neutron/neutron.conf keystone_authtoken user_domain_name defaultopenstack-config --set /etc/neutron/neutron.conf keystone_authtoken project_name serviceopenstack-config --set /etc/neutron/neutron.conf keystone_authtoken username neutronopenstack-config --set /etc/neutron/neutron.conf keystone_authtoken password NEUTRON_PASSopenstack-config --set /etc/neutron/neutron.conf nova auth_url http://controller:35357openstack-config --set /etc/neutron/neutron.conf nova auth_type passwordopenstack-config --set /etc/neutron/neutron.conf nova project_domain_name defaultopenstack-config --set /etc/neutron/neutron.conf nova user_domain_name defaultopenstack-config --set /etc/neutron/neutron.conf nova region_name RegionOneopenstack-config --set /etc/neutron/neutron.conf nova project_name serviceopenstack-config --set /etc/neutron/neutron.conf nova username novaopenstack-config --set /etc/neutron/neutron.conf nova password NOVA_PASSopenstack-config --set /etc/neutron/neutron.conf oslo_concurrency lock_path /var/lib/neutron/tmpopenstack-config --set /etc/neutron/neutron.conf oslo_messaging_rabbit rabbit_host controlleropenstack-config --set /etc/neutron/neutron.conf oslo_messaging_rabbit rabbit_userid openstackopenstack-config --set /etc/neutron/neutron.conf oslo_messaging_rabbit rabbit_password RABBIT_PASS
② 配置 Modular Layer 2 (ML2) 插件
编辑/etc/neutron/plugins/ml2/ml2_conf.ini文件并完成以下操作
在[ml2]部分,启用flat和VLAN网络
[ml2]...type_drivers = flat,vlan
在[ml2]部分,禁用私有网络
[ml2]...tenant_network_types =
在[ml2]部分,启用Linuxbridge机制
[ml2]...mechanism_drivers = linuxbridge
在[ml2] 部分,启用端口安全扩展驱动
[ml2]...extension_drivers = port_security
在[ml2_type_flat]部分,配置公共虚拟网络为flat网络
[ml2_type_flat]...flat_networks = provider
在 [securitygroup]部分,启用 ipset 增加安全组规则的高效性
[securitygroup]...enable_ipset = True
命令集
cp /etc/neutron/plugins/ml2/ml2_conf.ini{,.bak}grep '^[a-Z\[]' /etc/neutron/plugins/ml2/ml2_conf.ini.bak >/etc/neutron/plugins/ml2/ml2_conf.iniopenstack-config --set /etc/neutron/plugins/ml2/ml2_conf.ini ml2 type_drivers flat,vlanopenstack-config --set /etc/neutron/plugins/ml2/ml2_conf.ini ml2 tenant_network_typesopenstack-config --set /etc/neutron/plugins/ml2/ml2_conf.ini ml2 mechanism_drivers linuxbridgeopenstack-config --set /etc/neutron/plugins/ml2/ml2_conf.ini ml2 extension_drivers port_securityopenstack-config --set /etc/neutron/plugins/ml2/ml2_conf.ini ml2_type_flat flat_networks provideropenstack-config --set /etc/neutron/plugins/ml2/ml2_conf.ini securitygroup enable_ipset True
③ 配置Linuxbridge代理
编辑/etc/neutron/plugins/ml2/linuxbridge_agent.ini文件并且完成以下操作
在[linux_bridge]部分,将公共虚拟网络和公共物理网络接口对应起来
[linux_bridge]physical_interface_mappings = provider:PROVIDER_INTERFACE_NAME
注意:将PUBLIC_INTERFACE_NAME 替换为底层的物理公共网络接口,例如eth0。
在[vxlan]部分,禁止VXLAN覆盖网络
[vxlan]enable_vxlan = False
在 [securitygroup]部分,启用安全组并配置
[securitygroup]...enable_security_group = Truefirewall_driver = neutron.agent.linux.iptables_firewall.IptablesFirewallDriver
命令集
cp /etc/neutron/plugins/ml2/linuxbridge_agent.ini{,.bak}grep '^[a-Z\[]' /etc/neutron/plugins/ml2/linuxbridge_agent.ini.bak >/etc/neutron/plugins/ml2/linuxbridge_agent.iniopenstack-config --set /etc/neutron/plugins/ml2/linuxbridge_agent.ini linux_bridge physical_interface_mappings provider:eth0openstack-config --set /etc/neutron/plugins/ml2/linuxbridge_agent.ini securitygroup enable_security_group Trueopenstack-config --set /etc/neutron/plugins/ml2/linuxbridge_agent.ini securitygroup firewall_driver neutron.agent.linux.iptables_firewall.IptablesFirewallDriveropenstack-config --set /etc/neutron/plugins/ml2/linuxbridge_agent.ini vxlan enable_vxlan False
④ 配置DHCP代理
编辑/etc/neutron/dhcp_agent.ini文件并完成下面的操作
在[DEFAULT]部分,配置Linuxbridge驱动接口,DHCP驱动并启用隔离元数据,这样在公共网络上的实例就可以通过网络来访问元数据
[DEFAULT]...interface_driver = neutron.agent.linux.interface.BridgeInterfaceDriverdhcp_driver = neutron.agent.linux.dhcp.Dnsmasqenable_isolated_metadata = True
命令集
neutron.agent.linux.interface.BridgeInterfaceDriveropenstack-config --set /etc/neutron/dhcp_agent.ini DEFAULT dhcp_driver neutron.agent.linux.dhcp.Dnsmasqopenstack-config --set /etc/neutron/dhcp_agent.ini DEFAULT enable_isolated_metadata true
⑤ 配置元数据代理
编辑/etc/neutron/metadata_agent.ini文件并完成以下操作
在[DEFAULT] 部分,配置元数据主机以及共享密码
[DEFAULT]...nova_metadata_ip = controllermetadata_proxy_shared_secret = METADATA_SECRET
命令集
openstack-config --set /etc/neutron/metadata_agent.ini DEFAULT nova_metadata_ip controlleropenstack-config --set /etc/neutron/metadata_agent.ini DEFAULT metadata_proxy_shared_secret METADATA_SECRET
⑥ 为nove配置网络服务
再次编辑/etc/nova/nova.conf文件并完成以下操作
在[neutron]部分,配置访问参数,启用元数据代理并设置密码
[neutron]...url = http://controller:9696auth_url = http://controller:35357auth_type = passwordproject_domain_name = defaultuser_domain_name = defaultregion_name = RegionOneproject_name = serviceusername = neutronpassword = NEUTRON_PASSservice_metadata_proxy = Truemetadata_proxy_shared_secret = METADATA_SECRET
命令集
openstack-config --set /etc/nova/nova.conf neutron url http://controller:9696openstack-config --set /etc/nova/nova.conf neutron auth_url http://controller:35357openstack-config --set /etc/nova/nova.conf neutron auth_type passwordopenstack-config --set /etc/nova/nova.conf neutron project_domain_name defaultopenstack-config --set /etc/nova/nova.conf neutron user_domain_name defaultopenstack-config --set /etc/nova/nova.conf neutron region_name RegionOneopenstack-config --set /etc/nova/nova.conf neutron project_name serviceopenstack-config --set /etc/nova/nova.conf neutron username neutronopenstack-config --set /etc/nova/nova.conf neutron password NEUTRON_PASSopenstack-config --set /etc/nova/nova.conf neutron service_metadata_proxy Trueopenstack-config --set /etc/nova/nova.conf neutron metadata_proxy_shared_secret METADATA_SECRET
6)同步数据库
网络服务初始化脚本需要一个超链接 /etc/neutron/plugin.ini指向ML2插件配置文件/etc/neutron/plugins/ml2/ml2_conf.ini。
如果超链接不存在,使用下面的命令创建它
ln -s /etc/neutron/plugins/ml2/ml2_conf.ini /etc/neutron/plugin.ini
同步数据库
su -s /bin/sh -c "neutron-db-manage --config-file /etc/neutron/neutron.conf --config-file /etc/neutron/plugins/ml2/ml2_conf.ini upgrade head" neutron
7)启动服务
重启计算API 服务
systemctl restart openstack-nova-api.service
当系统启动时,启动 Networking 服务并配置它启动。
systemctl enable neutron-server.service neutron-linuxbridge-agent.service neutron-dhcp-agent.service neutron-metadata-agent.servicesystemctl start neutron-server.service neutron-linuxbridge-agent.service neutron-dhcp-agent.service neutron-metadata-agent.servicesystemctl status neutron-server.service neutron-linuxbridge-agent.service neutron-dhcp-agent.service neutron-metadata-agent.service
7.2 安装和配置计算节点
官方文档:https://docs.openstack.org/mitaka/zh_CN/install-guide-rdo/neutron-compute-install.html
1)安装组件
yum -y install openstack-neutron-linuxbridge ebtables ipset
2)修改配置文件
在计算节点配置选择 网络选项1:公共网络,与控制节点相同
① 编辑/etc/neutron/neutron.conf 文件并完成如下操作
在 “[DEFAULT]” 和 “[oslo_messaging_rabbit]”部分,配置 “RabbitMQ” 消息队列的连接
[DEFAULT]...rpc_backend = rabbit[oslo_messaging_rabbit]...rabbit_host = controllerrabbit_userid = openstackrabbit_password = RABBIT_PASS
在 “[DEFAULT]” 和 “[keystone_authtoken]” 部分,配置认证服务访问
[DEFAULT]...auth_strategy = keystone[keystone_authtoken]...auth_uri = http://controller:5000auth_url = http://controller:35357memcached_servers = controller:11211auth_type = passwordproject_domain_name = defaultuser_domain_name = defaultproject_name = serviceusername = neutronpassword = NEUTRON_PASS
在 [oslo_concurrency] 部分,配置锁路径
[oslo_concurrency]...lock_path = /var/lib/neutron/tmp
命令集
cp /etc/neutron/neutron.conf{,.bak}grep -Ev '^$|#' /etc/neutron/neutron.conf.bak >/etc/neutron/neutron.confopenstack-config --set /etc/neutron/neutron.conf DEFAULT rpc_backend rabbitopenstack-config --set /etc/neutron/neutron.conf DEFAULT auth_strategy keystoneopenstack-config --set /etc/neutron/neutron.conf keystone_authtoken auth_uri http://controller:5000openstack-config --set /etc/neutron/neutron.conf keystone_authtoken auth_url http://controller:35357openstack-config --set /etc/neutron/neutron.conf keystone_authtoken memcached_servers controller:11211openstack-config --set /etc/neutron/neutron.conf keystone_authtoken auth_type passwordopenstack-config --set /etc/neutron/neutron.conf keystone_authtoken project_domain_name defaultopenstack-config --set /etc/neutron/neutron.conf keystone_authtoken user_domain_name defaultopenstack-config --set /etc/neutron/neutron.conf keystone_authtoken project_name serviceopenstack-config --set /etc/neutron/neutron.conf keystone_authtoken username neutronopenstack-config --set /etc/neutron/neutron.conf keystone_authtoken password NEUTRON_PASSopenstack-config --set /etc/neutron/neutron.conf oslo_concurrency lock_path /var/lib/neutron/tmpopenstack-config --set /etc/neutron/neutron.conf oslo_messaging_rabbit rabbit_host controlleropenstack-config --set /etc/neutron/neutron.conf oslo_messaging_rabbit rabbit_userid openstackopenstack-config --set /etc/neutron/neutron.conf oslo_messaging_rabbit rabbit_password RABBIT_PASS
② 配置Linuxbridge代理
编辑/etc/neutron/plugins/ml2/linuxbridge_agent.ini文件并且完成以下操作
在[linux_bridge]部分,将公共虚拟网络和公共物理网络接口对应起来
[linux_bridge]physical_interface_mappings = provider:PROVIDER_INTERFACE_NAME
注意:将PUBLIC_INTERFACE_NAME 替换为底层的物理公共网络接口,例如eth0。 在[vxlan]部分,禁止VXLAN覆盖网络
[vxlan]enable_vxlan = False
在 [securitygroup]部分,启用安全组并配置
[securitygroup]...enable_security_group = Truefirewall_driver = neutron.agent.linux.iptables_firewall.IptablesFirewallDriver
命令集
cp /etc/neutron/plugins/ml2/linuxbridge_agent.ini{,.bak}grep '^[a-Z\[]' /etc/neutron/plugins/ml2/linuxbridge_agent.ini.bak >/etc/neutron/plugins/ml2/linuxbridge_agent.iniopenstack-config --set /etc/neutron/plugins/ml2/linuxbridge_agent.ini linux_bridge physical_interface_mappings provider:eth0openstack-config --set /etc/neutron/plugins/ml2/linuxbridge_agent.ini securitygroup enable_security_group Trueopenstack-config --set /etc/neutron/plugins/ml2/linuxbridge_agent.ini securitygroup firewall_driver neutron.agent.linux.iptables_firewall.IptablesFirewallDriveropenstack-config --set /etc/neutron/plugins/ml2/linuxbridge_agent.ini vxlan enable_vxlan False
③ 为计算节点配置网络服务
编辑/etc/nova/nova.conf文件并完成下面的操作
在[neutron] 部分,配置访问参数
[neutron]...url = http://controller:9696auth_url = http://controller:35357auth_type = passwordproject_domain_name = defaultuser_domain_name = defaultregion_name = RegionOneproject_name = serviceusername = neutronpassword = NEUTRON_PASS
命令集
openstack-config --set /etc/nova/nova.conf neutron url http://controller:9696openstack-config --set /etc/nova/nova.conf neutron auth_url http://controller:35357openstack-config --set /etc/nova/nova.conf neutron auth_type passwordopenstack-config --set /etc/nova/nova.conf neutron project_domain_name defaultopenstack-config --set /etc/nova/nova.conf neutron user_domain_name defaultopenstack-config --set /etc/nova/nova.conf neutron region_name RegionOneopenstack-config --set /etc/nova/nova.conf neutron project_name serviceopenstack-config --set /etc/nova/nova.conf neutron username neutronopenstack-config --set /etc/nova/nova.conf neutron password NEUTRON_PASS
3)启动服务
重启计算服务
systemctl restart openstack-nova-compute.service
启动Linuxbridge代理并配置它开机自启动
systemctl enable neutron-linuxbridge-agent.servicesystemctl start neutron-linuxbridge-agent.service
7.3 验证操作
官方验证方法
https://docs.openstack.org/mitaka/zh_CN/install-guide-rdo/neutron-verify.html https://docs.openstack.org/mitaka/zh_CN/install-guide-rdo/neutron-verify-option1.html
在这里,我只进行验证网络,网络正常说明服务正常
[root@controller ~]# neutron agent-list+--------------------------------------+--------------------+------------+-------------------+-------+----------------+---------------------------+| id | agent_type | host | availability_zone | alive | admin_state_up | binary |+--------------------------------------+--------------------+------------+-------------------+-------+----------------+---------------------------+| 3ab2f17f-737e-4c3f-86f0-2289c56a541b | DHCP agent | controller | nova | :-) | True | neutron-dhcp-agent || 4f64caf6-a9b0-4742-b0d1-0d961063200a | Linux bridge agent | controller | | :-) | True | neutron-linuxbridge-agent || 630540de-d0a0-473b-96b5-757afc1057de | Linux bridge agent | compute1 | | :-) | True | neutron-linuxbridge-agent || 9989ddcb-6aba-4b7f-9bd7-7d61f774f2bb | Metadata agent | controller | | :-) | True | neutron-metadata-agent |+--------------------------------------+--------------------+------------+-------------------+-------+----------------+---------------------------+
8. Dashboard(horizon-web界面)安装
官方文档:https://docs.openstack.org/mitaka/zh_CN/install-guide-rdo/horizon.html
8.1 安全并配置组件(单独主机安装)
[root@compute1 ~]# yum -y install openstack-dashboard
由于Dashboard服务需要使用到httpd服务,安装在控制节点,可能回影响到Keystone服务的正常运行,所以选择单独安装,与官方文档略有不同。
8.2 修改配置文件
编辑文件 /etc/openstack-dashboard/local_settings 并完成如下动作
在 controller 节点上配置仪表盘以使用 OpenStack 服务
OPENSTACK_HOST = "controller"# 指向认证服务的地址=keystone
允许所有主机访问仪表板
ALLOWED_HOSTS = ['*', ]
配置 memcached 会话存储服务
SESSION_ENGINE = 'django.contrib.sessions.backends.cache'CACHES = {'default': {'BACKEND': 'django.core.cache.backends.memcached.MemcachedCache','LOCATION': 'controller:11211',}}
启用第3版认证API:
OPENSTACK_KEYSTONE_URL = "http://%s:5000/v3" % OPENSTACK_HOST
启用对域的支持
OPENSTACK_KEYSTONE_MULTIDOMAIN_SUPPORT = True
配置API版本
OPENSTACK_API_VERSIONS = {"identity": 3,"image": 2,"volume": 2,}
通过仪表盘创建用户时的默认域配置为 default :
OPENSTACK_KEYSTONE_DEFAULT_DOMAIN = "default"
通过仪表盘创建的用户默认角色配置为 user
OPENSTACK_KEYSTONE_DEFAULT_ROLE = "user"
如果您选择网络选项1,需要禁用支持3层网络服务
OPENSTACK_NEUTRON_NETWORK = {...'enable_router': False,'enable_quotas': False,'enable_distributed_router': False,'enable_ha_router': False,'enable_lb': False,'enable_firewall': False,'enable_vpn': False,'enable_fip_topology_check': False,}
可以选择性地配置时区
TIME_ZONE = "Asia/Shanghai"
最终配置文件
wget https://files.cnblogs.com/files/clsn/local_settings.zip
文件详情:
# -*- coding: utf-8 -*-import osfrom django.utils.translation import ugettext_lazy as _from openstack_dashboard import exceptionsfrom openstack_dashboard.settings import HORIZON_CONFIGDEBUG = FalseTEMPLATE_DEBUG = DEBUG# WEBROOT is the location relative to Webserver root# should end with a slash.WEBROOT = '/dashboard/'#LOGIN_URL = WEBROOT + 'auth/login/'#LOGOUT_URL = WEBROOT + 'auth/logout/'## LOGIN_REDIRECT_URL can be used as an alternative for# HORIZON_CONFIG.user_home, if user_home is not set.# Do not set it to '/home/', as this will cause circular redirect loop#LOGIN_REDIRECT_URL = WEBROOT# If horizon is running in production (DEBUG is False), set this# with the list of host/domain names that the application can serve.# For more information see:# https://docs.djangoproject.com/en/dev/ref/settings/#allowed-hostsALLOWED_HOSTS = ['*', ]# Set SSL proxy settings:# Pass this header from the proxy after terminating the SSL,# and don't forget to strip it from the client's request.# For more information see:# https://docs.djangoproject.com/en/1.8/ref/settings/#secure-proxy-ssl-header#SECURE_PROXY_SSL_HEADER = ('HTTP_X_FORWARDED_PROTO', 'https')# If Horizon is being served through SSL, then uncomment the following two# settings to better secure the cookies from security exploits#CSRF_COOKIE_SECURE = True#SESSION_COOKIE_SECURE = True# The absolute path to the directory where message files are collected.# The message file must have a .json file extension. When the user logins to# horizon, the message files collected are processed and displayed to the user.#MESSAGES_PATH=None# Overrides for OpenStack API versions. Use this setting to force the# OpenStack dashboard to use a specific API version for a given service API.# Versions specified here should be integers or floats, not strings.# NOTE: The version should be formatted as it appears in the URL for the# service API. For example, The identity service APIs have inconsistent# use of the decimal point, so valid options would be 2.0 or 3.OPENSTACK_API_VERSIONS = {# "data-processing": 1.1,"identity": 3,"image": 2,"volume": 2,"compute": 2,}# Set this to True if running on multi-domain model. When this is enabled, it# will require user to enter the Domain name in addition to username for login.OPENSTACK_KEYSTONE_MULTIDOMAIN_SUPPORT = True# Overrides the default domain used when running on single-domain model# with Keystone V3. All entities will be created in the default domain.# NOTE: This value must be the ID of the default domain, NOT the name.# Also, you will most likely have a value in the keystone policy file like this# "cloud_admin": "rule:admin_required and domain_id:<your domain id>"# This value must match the domain id specified there.OPENSTACK_KEYSTONE_DEFAULT_DOMAIN = 'default'# Set this to True to enable panels that provide the ability for users to# manage Identity Providers (IdPs) and establish a set of rules to map# federation protocol attributes to Identity API attributes.# This extension requires v3.0+ of the Identity API.#OPENSTACK_KEYSTONE_FEDERATION_MANAGEMENT = False# Set Console type:# valid options are "AUTO"(default), "VNC", "SPICE", "RDP", "SERIAL" or None# Set to None explicitly if you want to deactivate the console.#CONSOLE_TYPE = "AUTO"# If provided, a "Report Bug" link will be displayed in the site header# which links to the value of this setting (ideally a URL containing# information on how to report issues).#HORIZON_CONFIG["bug_url"] = "http://bug-report.example.com"# Show backdrop element outside the modal, do not close the modal# after clicking on backdrop.#HORIZON_CONFIG["modal_backdrop"] = "static"# Specify a regular expression to validate user passwords.#HORIZON_CONFIG["password_validator"] = {# "regex": '.*',# "help_text": _("Your password does not meet the requirements."),#}# Disable simplified floating IP address management for deployments with# multiple floating IP pools or complex network requirements.#HORIZON_CONFIG["simple_ip_management"] = False# Turn off browser autocompletion for forms including the login form and# the database creation workflow if so desired.#HORIZON_CONFIG["password_autocomplete"] = "off"# Setting this to True will disable the reveal button for password fields,# including on the login form.#HORIZON_CONFIG["disable_password_reveal"] = FalseLOCAL_PATH = '/tmp'# Set custom secret key:# You can either set it to a specific value or you can let horizon generate a# default secret key that is unique on this machine, e.i. regardless of the# amount of Python WSGI workers (if used behind Apache+mod_wsgi): However,# there may be situations where you would want to set this explicitly, e.g.# when multiple dashboard instances are distributed on different machines# (usually behind a load-balancer). Either you have to make sure that a session# gets all requests routed to the same dashboard instance or you set the same# SECRET_KEY for all of them.SECRET_KEY='65941f1393ea1c265ad7'# We recommend you use memcached for development; otherwise after every reload# of the django development server, you will have to login again. To use# memcached set CACHES to something likeSESSION_ENGINE = 'django.contrib.sessions.backends.cache'CACHES = {'default': {'BACKEND': 'django.core.cache.backends.memcached.MemcachedCache','LOCATION': 'controller:11211',},}#CACHES = {# 'default': {# 'BACKEND': 'django.core.cache.backends.locmem.LocMemCache',# },#}# Send email to the console by defaultEMAIL_BACKEND = 'django.core.mail.backends.console.EmailBackend'# Or send them to /dev/null#EMAIL_BACKEND = 'django.core.mail.backends.dummy.EmailBackend'# Configure these for your outgoing email host#EMAIL_HOST = 'smtp.my-company.com'#EMAIL_PORT = 25#EMAIL_HOST_USER = 'djangomail'#EMAIL_HOST_PASSWORD = 'top-secret!'# For multiple regions uncomment this configuration, and add (endpoint, title).#AVAILABLE_REGIONS = [# ('http://cluster1.example.com:5000/v2.0', 'cluster1'),# ('http://cluster2.example.com:5000/v2.0', 'cluster2'),#]OPENSTACK_HOST = "controller"OPENSTACK_KEYSTONE_URL = "http://%s:5000/v3" % OPENSTACK_HOSTOPENSTACK_KEYSTONE_DEFAULT_ROLE = "user"# Enables keystone web single-sign-on if set to True.#WEBSSO_ENABLED = False# Determines which authentication choice to show as default.#WEBSSO_INITIAL_CHOICE = "credentials"# The list of authentication mechanisms which include keystone# federation protocols and identity provider/federation protocol# mapping keys (WEBSSO_IDP_MAPPING). Current supported protocol# IDs are 'saml2' and 'oidc' which represent SAML 2.0, OpenID# Connect respectively.# Do not remove the mandatory credentials mechanism.# Note: The last two tuples are sample mapping keys to a identity provider# and federation protocol combination (WEBSSO_IDP_MAPPING).#WEBSSO_CHOICES = (# ("credentials", _("Keystone Credentials")),# ("oidc", _("OpenID Connect")),# ("saml2", _("Security Assertion Markup Language")),# ("acme_oidc", "ACME - OpenID Connect"),# ("acme_saml2", "ACME - SAML2"),#)# A dictionary of specific identity provider and federation protocol# combinations. From the selected authentication mechanism, the value# will be looked up as keys in the dictionary. If a match is found,# it will redirect the user to a identity provider and federation protocol# specific WebSSO endpoint in keystone, otherwise it will use the value# as the protocol_id when redirecting to the WebSSO by protocol endpoint.# NOTE: The value is expected to be a tuple formatted as: (<idp_id>, <protocol_id>).#WEBSSO_IDP_MAPPING = {# "acme_oidc": ("acme", "oidc"),# "acme_saml2": ("acme", "saml2"),#}# Disable SSL certificate checks (useful for self-signed certificates):#OPENSTACK_SSL_NO_VERIFY = True# The CA certificate to use to verify SSL connections#OPENSTACK_SSL_CACERT = '/path/to/cacert.pem'# The OPENSTACK_KEYSTONE_BACKEND settings can be used to identify the# capabilities of the auth backend for Keystone.# If Keystone has been configured to use LDAP as the auth backend then set# can_edit_user to False and name to 'ldap'.## TODO(tres): Remove these once Keystone has an API to identify auth backend.OPENSTACK_KEYSTONE_BACKEND = {'name': 'native','can_edit_user': True,'can_edit_group': True,'can_edit_project': True,'can_edit_domain': True,'can_edit_role': True,}# Setting this to True, will add a new "Retrieve Password" action on instance,# allowing Admin session password retrieval/decryption.#OPENSTACK_ENABLE_PASSWORD_RETRIEVE = False# The Launch Instance user experience has been significantly enhanced.# You can choose whether to enable the new launch instance experience,# the legacy experience, or both. The legacy experience will be removed# in a future release, but is available as a temporary backup setting to ensure# compatibility with existing deployments. Further development will not be# done on the legacy experience. Please report any problems with the new# experience via the Launchpad tracking system.## Toggle LAUNCH_INSTANCE_LEGACY_ENABLED and LAUNCH_INSTANCE_NG_ENABLED to# determine the experience to enable. Set them both to true to enable# both.#LAUNCH_INSTANCE_LEGACY_ENABLED = True#LAUNCH_INSTANCE_NG_ENABLED = False# A dictionary of settings which can be used to provide the default values for# properties found in the Launch Instance modal.#LAUNCH_INSTANCE_DEFAULTS = {# 'config_drive': False,#}# The Xen Hypervisor has the ability to set the mount point for volumes# attached to instances (other Hypervisors currently do not). Setting# can_set_mount_point to True will add the option to set the mount point# from the UI.OPENSTACK_HYPERVISOR_FEATURES = {'can_set_mount_point': False,'can_set_password': False,'requires_keypair': False,}# The OPENSTACK_CINDER_FEATURES settings can be used to enable optional# services provided by cinder that is not exposed by its extension API.OPENSTACK_CINDER_FEATURES = {'enable_backup': False,}# The OPENSTACK_NEUTRON_NETWORK settings can be used to enable optional# services provided by neutron. Options currently available are load# balancer service, security groups, quotas, VPN service.OPENSTACK_NEUTRON_NETWORK = {'enable_router': False,'enable_quotas': False,'enable_ipv6': False,'enable_distributed_router': False,'enable_ha_router': False,'enable_lb': False,'enable_firewall': False,'enable_vpn': False,'enable_fip_topology_check': False,# Neutron can be configured with a default Subnet Pool to be used for IPv4# subnet-allocation. Specify the label you wish to display in the Address# pool selector on the create subnet step if you want to use this feature.'default_ipv4_subnet_pool_label': None,# Neutron can be configured with a default Subnet Pool to be used for IPv6# subnet-allocation. Specify the label you wish to display in the Address# pool selector on the create subnet step if you want to use this feature.# You must set this to enable IPv6 Prefix Delegation in a PD-capable# environment.'default_ipv6_subnet_pool_label': None,# The profile_support option is used to detect if an external router can be# configured via the dashboard. When using specific plugins the# profile_support can be turned on if needed.'profile_support': None,#'profile_support': 'cisco',# Set which provider network types are supported. Only the network types# in this list will be available to choose from when creating a network.# Network types include local, flat, vlan, gre, and vxlan.'supported_provider_types': ['*'],# Set which VNIC types are supported for port binding. Only the VNIC# types in this list will be available to choose from when creating a# port.# VNIC types include 'normal', 'macvtap' and 'direct'.# Set to empty list or None to disable VNIC type selection.'supported_vnic_types': ['*'],}# The OPENSTACK_HEAT_STACK settings can be used to disable password# field required while launching the stack.OPENSTACK_HEAT_STACK = {'enable_user_pass': True,}# The OPENSTACK_IMAGE_BACKEND settings can be used to customize features# in the OpenStack Dashboard related to the Image service, such as the list# of supported image formats.#OPENSTACK_IMAGE_BACKEND = {# 'image_formats': [# ('', _('Select format')),# ('aki', _('AKI - Amazon Kernel Image')),# ('ami', _('AMI - Amazon Machine Image')),# ('ari', _('ARI - Amazon Ramdisk Image')),# ('docker', _('Docker')),# ('iso', _('ISO - Optical Disk Image')),# ('ova', _('OVA - Open Virtual Appliance')),# ('qcow2', _('QCOW2 - QEMU Emulator')),# ('raw', _('Raw')),# ('vdi', _('VDI - Virtual Disk Image')),# ('vhd', _('VHD - Virtual Hard Disk')),# ('vmdk', _('VMDK - Virtual Machine Disk')),# ],#}# The IMAGE_CUSTOM_PROPERTY_TITLES settings is used to customize the titles for# image custom property attributes that appear on image detail pages.IMAGE_CUSTOM_PROPERTY_TITLES = {"architecture": _("Architecture"),"kernel_id": _("Kernel ID"),"ramdisk_id": _("Ramdisk ID"),"image_state": _("Euca2ools state"),"project_id": _("Project ID"),"image_type": _("Image Type"),}# The IMAGE_RESERVED_CUSTOM_PROPERTIES setting is used to specify which image# custom properties should not be displayed in the Image Custom Properties# table.IMAGE_RESERVED_CUSTOM_PROPERTIES = []# OPENSTACK_ENDPOINT_TYPE specifies the endpoint type to use for the endpoints# in the Keystone service catalog. Use this setting when Horizon is running# external to the OpenStack environment. The default is 'publicURL'.#OPENSTACK_ENDPOINT_TYPE = "publicURL"# SECONDARY_ENDPOINT_TYPE specifies the fallback endpoint type to use in the# case that OPENSTACK_ENDPOINT_TYPE is not present in the endpoints# in the Keystone service catalog. Use this setting when Horizon is running# external to the OpenStack environment. The default is None. This# value should differ from OPENSTACK_ENDPOINT_TYPE if used.#SECONDARY_ENDPOINT_TYPE = "publicURL"# The number of objects (Swift containers/objects or images) to display# on a single page before providing a paging element (a "more" link)# to paginate results.API_RESULT_LIMIT = 1000API_RESULT_PAGE_SIZE = 20# The size of chunk in bytes for downloading objects from SwiftSWIFT_FILE_TRANSFER_CHUNK_SIZE = 512 * 1024# Specify a maximum number of items to display in a dropdown.DROPDOWN_MAX_ITEMS = 30# The timezone of the server. This should correspond with the timezone# of your entire OpenStack installation, and hopefully be in UTC.TIME_ZONE = "Asia/Shanghai"# When launching an instance, the menu of available flavors is# sorted by RAM usage, ascending. If you would like a different sort order,# you can provide another flavor attribute as sorting key. Alternatively, you# can provide a custom callback method to use for sorting. You can also provide# a flag for reverse sort. For more info, see# http://docs.python.org/2/library/functions.html#sorted#CREATE_INSTANCE_FLAVOR_SORT = {# 'key': 'name',# # or# 'key': my_awesome_callback_method,# 'reverse': False,#}# Set this to True to display an 'Admin Password' field on the Change Password# form to verify that it is indeed the admin logged-in who wants to change# the password.#ENFORCE_PASSWORD_CHECK = False# Modules that provide /auth routes that can be used to handle different types# of user authentication. Add auth plugins that require extra route handling to# this list.#AUTHENTICATION_URLS = [# 'openstack_auth.urls',#]# The Horizon Policy Enforcement engine uses these values to load per service# policy rule files. The content of these files should match the files the# OpenStack services are using to determine role based access control in the# target installation.# Path to directory containing policy.json filesPOLICY_FILES_PATH = '/etc/openstack-dashboard'# Map of local copy of service policy files.# Please insure that your identity policy file matches the one being used on# your keystone servers. There is an alternate policy file that may be used# in the Keystone v3 multi-domain case, policy.v3cloudsample.json.# This file is not included in the Horizon repository by default but can be# found at# http://git.openstack.org/cgit/openstack/keystone/tree/etc/ \# policy.v3cloudsample.json# Having matching policy files on the Horizon and Keystone servers is essential# for normal operation. This holds true for all services and their policy files.#POLICY_FILES = {# 'identity': 'keystone_policy.json',# 'compute': 'nova_policy.json',# 'volume': 'cinder_policy.json',# 'image': 'glance_policy.json',# 'orchestration': 'heat_policy.json',# 'network': 'neutron_policy.json',# 'telemetry': 'ceilometer_policy.json',#}# TODO: (david-lyle) remove when plugins support adding settings.# Note: Only used when trove-dashboard plugin is configured to be used by# Horizon.# Trove user and database extension support. By default support for# creating users and databases on database instances is turned on.# To disable these extensions set the permission here to something# unusable such as ["!"].#TROVE_ADD_USER_PERMS = []#TROVE_ADD_DATABASE_PERMS = []# Change this patch to the appropriate list of tuples containing# a key, label and static directory containing two files:# _variables.scss and _styles.scss#AVAILABLE_THEMES = [# ('default', 'Default', 'themes/default'),# ('material', 'Material', 'themes/material'),#]LOGGING = {'version': 1,# When set to True this will disable all logging except# for loggers specified in this configuration dictionary. Note that# if nothing is specified here and disable_existing_loggers is True,# django.db.backends will still log unless it is disabled explicitly.'disable_existing_loggers': False,'handlers': {'null': {'level': 'DEBUG','class': 'logging.NullHandler',},'console': {# Set the level to "DEBUG" for verbose output logging.'level': 'INFO','class': 'logging.StreamHandler',},},'loggers': {# Logging from django.db.backends is VERY verbose, send to null# by default.'django.db.backends': {'handlers': ['null'],'propagate': False,},'requests': {'handlers': ['null'],'propagate': False,},'horizon': {'handlers': ['console'],'level': 'DEBUG','propagate': False,},'openstack_dashboard': {'handlers': ['console'],'level': 'DEBUG','propagate': False,},'novaclient': {'handlers': ['console'],'level': 'DEBUG','propagate': False,},'cinderclient': {'handlers': ['console'],'level': 'DEBUG','propagate': False,},'keystoneclient': {'handlers': ['console'],'level': 'DEBUG','propagate': False,},'glanceclient': {'handlers': ['console'],'level': 'DEBUG','propagate': False,},'neutronclient': {'handlers': ['console'],'level': 'DEBUG','propagate': False,},'heatclient': {'handlers': ['console'],'level': 'DEBUG','propagate': False,},'ceilometerclient': {'handlers': ['console'],'level': 'DEBUG','propagate': False,},'swiftclient': {'handlers': ['console'],'level': 'DEBUG','propagate': False,},'openstack_auth': {'handlers': ['console'],'level': 'DEBUG','propagate': False,},'nose.plugins.manager': {'handlers': ['console'],'level': 'DEBUG','propagate': False,},'django': {'handlers': ['console'],'level': 'DEBUG','propagate': False,},'iso8601': {'handlers': ['null'],'propagate': False,},'scss': {'handlers': ['null'],'propagate': False,},},}# 'direction' should not be specified for all_tcp/udp/icmp.# It is specified in the form.SECURITY_GROUP_RULES = {'all_tcp': {'name': _('All TCP'),'ip_protocol': 'tcp','from_port': '1','to_port': '65535',},'all_udp': {'name': _('All UDP'),'ip_protocol': 'udp','from_port': '1','to_port': '65535',},'all_icmp': {'name': _('All ICMP'),'ip_protocol': 'icmp','from_port': '-1','to_port': '-1',},'ssh': {'name': 'SSH','ip_protocol': 'tcp','from_port': '22','to_port': '22',},'smtp': {'name': 'SMTP','ip_protocol': 'tcp','from_port': '25','to_port': '25',},'dns': {'name': 'DNS','ip_protocol': 'tcp','from_port': '53','to_port': '53',},'http': {'name': 'HTTP','ip_protocol': 'tcp','from_port': '80','to_port': '80',},'pop3': {'name': 'POP3','ip_protocol': 'tcp','from_port': '110','to_port': '110',},'imap': {'name': 'IMAP','ip_protocol': 'tcp','from_port': '143','to_port': '143',},'ldap': {'name': 'LDAP','ip_protocol': 'tcp','from_port': '389','to_port': '389',},'https': {'name': 'HTTPS','ip_protocol': 'tcp','from_port': '443','to_port': '443',},'smtps': {'name': 'SMTPS','ip_protocol': 'tcp','from_port': '465','to_port': '465',},'imaps': {'name': 'IMAPS','ip_protocol': 'tcp','from_port': '993','to_port': '993',},'pop3s': {'name': 'POP3S','ip_protocol': 'tcp','from_port': '995','to_port': '995',},'ms_sql': {'name': 'MS SQL','ip_protocol': 'tcp','from_port': '1433','to_port': '1433',},'mysql': {'name': 'MYSQL','ip_protocol': 'tcp','from_port': '3306','to_port': '3306',},'rdp': {'name': 'RDP','ip_protocol': 'tcp','from_port': '3389','to_port': '3389',},}# Deprecation Notice:## The setting FLAVOR_EXTRA_KEYS has been deprecated.# Please load extra spec metadata into the Glance Metadata Definition Catalog.## The sample quota definitions can be found in:# <glance_source>/etc/metadefs/compute-quota.json## The metadata definition catalog supports CLI and API:# $glance --os-image-api-version 2 help md-namespace-import# $glance-manage db_load_metadefs <directory_with_definition_files>## See Metadata Definitions on: http://docs.openstack.org/developer/glance/# TODO: (david-lyle) remove when plugins support settings natively# Note: This is only used when the Sahara plugin is configured and enabled# for use in Horizon.# Indicate to the Sahara data processing service whether or not# automatic floating IP allocation is in effect. If it is not# in effect, the user will be prompted to choose a floating IP# pool for use in their cluster. False by default. You would want# to set this to True if you were running Nova Networking with# auto_assign_floating_ip = True.#SAHARA_AUTO_IP_ALLOCATION_ENABLED = False# The hash algorithm to use for authentication tokens. This must# match the hash algorithm that the identity server and the# auth_token middleware are using. Allowed values are the# algorithms supported by Python's hashlib library.#OPENSTACK_TOKEN_HASH_ALGORITHM = 'md5'# Hashing tokens from Keystone keeps the Horizon session data smaller, but it# doesn't work in some cases when using PKI tokens. Uncomment this value and# set it to False if using PKI tokens and there are 401 errors due to token# hashing.#OPENSTACK_TOKEN_HASH_ENABLED = True# AngularJS requires some settings to be made available to# the client side. Some settings are required by in-tree / built-in horizon# features. These settings must be added to REST_API_REQUIRED_SETTINGS in the# form of ['SETTING_1','SETTING_2'], etc.## You may remove settings from this list for security purposes, but do so at# the risk of breaking a built-in horizon feature. These settings are required# for horizon to function properly. Only remove them if you know what you# are doing. These settings may in the future be moved to be defined within# the enabled panel configuration.# You should not add settings to this list for out of tree extensions.# See: https://wiki.openstack.org/wiki/Horizon/RESTAPIREST_API_REQUIRED_SETTINGS = ['OPENSTACK_HYPERVISOR_FEATURES','LAUNCH_INSTANCE_DEFAULTS']# Additional settings can be made available to the client side for# extensibility by specifying them in REST_API_ADDITIONAL_SETTINGS# !! Please use extreme caution as the settings are transferred via HTTP/S# and are not encrypted on the browser. This is an experimental API and# may be deprecated in the future without notice.#REST_API_ADDITIONAL_SETTINGS = []# DISALLOW_IFRAME_EMBED can be used to prevent Horizon from being embedded# within an iframe. Legacy browsers are still vulnerable to a Cross-Frame# Scripting (XFS) vulnerability, so this option allows extra security hardening# where iframes are not used in deployment. Default setting is True.# For more information see:# http://tinyurl.com/anticlickjack#DISALLOW_IFRAME_EMBED = True
注:上传配置文件时需要注意配置文件权限问题
[root@compute1 ~]# ll /etc/openstack-dashboard/local_settings-rw-r----- 1 root apache 26505 Jan 24 11:10 /etc/openstack-dashboard/local_settings
8.3 启动服务
systemctl restart httpd.servicesystemctl enable httpd.service
8.4 验证操作
使用浏览器访问 [http://10.0.0.31/dashboard](http://10.0.0.31/dashboard) ,推荐使用火狐浏览器。<br />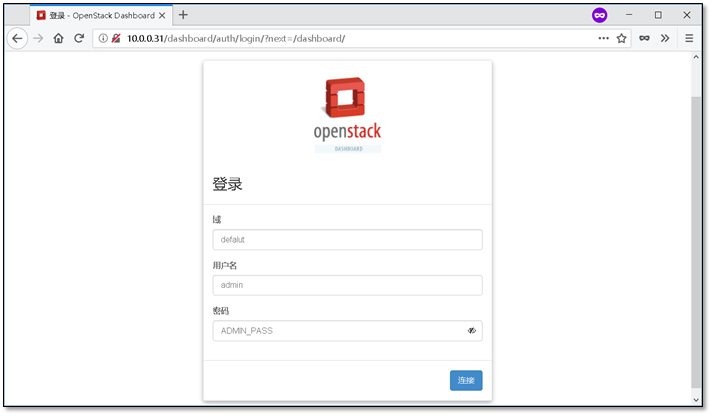<br />信息说明:第一次连接时速度较慢,耐心等待。
域:default 用户名:admin 密码:ADMIN_PASS
9. 启动第一台实例
官方文档:https://docs.openstack.org/mitaka/zh_CN/install-guide-rdo/launch-instance.html
9.1 创建虚拟网络
公有网络参考:https://docs.openstack.org/mitaka/zh_CN/install-guide-rdo/launch-instance-networks-provider.html
图 - 公共网络拓扑图-概述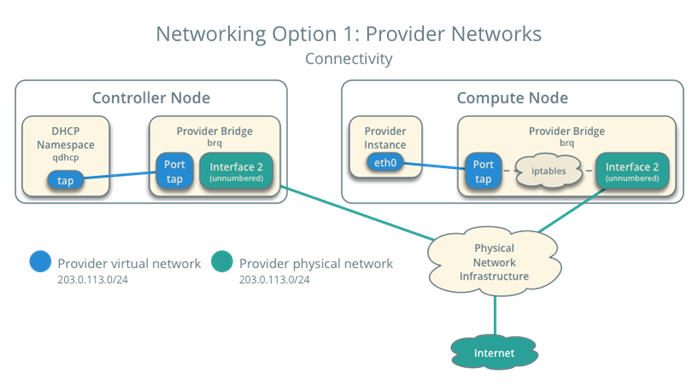
图 - 连接性
加载环境变量
. admin-openrc
创建网络
neutron net-create --shared --provider:physical_network provider --provider:network_type flat provider
在网络上创建出一个子网
语法说明:
neutron subnet-create --name provider --allocation-pool start=START_IP_ADDRESS,end=END_IP_ADDRESS --dns-nameserver DNS_RESOLVER --gateway PROVIDER_NETWORK_GATEWAY provider PROVIDER_NETWORK_CIDR
参数说明
使用提供者物理网络的子网CIDR标记替换
PROVIDER_NETWORK_CIDR。将
START_IP_ADDRESS和END_IP_ADDRESS使用你想分配给实例的子网网段的第一个和最后一个IP地址。这个范围不能包括任何已经使用的IP地址。将 DNS_RESOLVER 替换为DNS解析服务的IP地址。在大多数情况下,你可以从主机
/etc/resolv.conf文件选择一个使用。将
PUBLIC_NETWORK_GATEWAY替换为公共网络的网关,一般的网关IP地址以 ”.1” 结尾。
配置示例:
neutron subnet-create --name provider --allocation-pool start=10.0.0.101,end=10.0.0.250 --dns-nameserver 223.5.5.5 --gateway 10.0.0.254 provider 10.0.0.0/24
配置过程
[root@controller ~]# neutron subnet-create --name provider \> --allocation-pool start=10.0.0.101,end=10.0.0.250 \> --dns-nameserver 223.5.5.5 --gateway 10.0.0.254 \> provider 10.0.0.0/24Created a new subnet:+-------------------+----------------------------------------------+| Field | Value |+-------------------+----------------------------------------------+| allocation_pools | {"start": "10.0.0.101", "end": "10.0.0.250"} || cidr | 10.0.0.0/24 || created_at | 2018-01-24T03:41:27 || description | || dns_nameservers | 223.5.5.5 || enable_dhcp | True || gateway_ip | 10.0.0.254 || host_routes | || id | d507bf57-28e6-4af5-b54b-d969e76f4fd6 || ip_version | 4 || ipv6_address_mode | || ipv6_ra_mode | || name | provider || network_id | 54f942f7-cc28-4292-a4d6-e37b8833e35f || subnetpool_id | || tenant_id | d0dfbdbc115b4a728c24d28bc1ce1e62 || updated_at | 2018-01-24T03:41:27 |+-------------------+----------------------------------------------+
9.2 创建m1.nano规格的主机
官方文档: https://docs.openstack.org/mitaka/zh_CN/install-guide-rdo/launch-instance.html#create-m1-nano-flavor
默认的最小规格的主机需要512 MB内存。对于环境中计算节点内存不足4 GB的,我们推荐创建只需要64 MB的m1.nano规格的主机。
若单纯为了测试的目的,请使用m1.nano规格的主机来加载CirrOS镜像
配置命令
[root@controller ~]# openstack flavor create --id 0 --vcpus 1 --ram 64 --disk 1 m1.nano+----------------------------+---------+| Field | Value |+----------------------------+---------+| OS-FLV-DISABLED:disabled | False || OS-FLV-EXT-DATA:ephemeral | 0 || disk | 1 || id | 0 || name | m1.nano || os-flavor-access:is_public | True || ram | 64 || rxtx_factor | 1.0 || swap | || vcpus | 1 |+----------------------------+---------+
9.3 生成一个键值对,创建密钥对
生成密钥,并使用
ssh-keygen -q -N "" -f ~/.ssh/id_rsaopenstack keypair create --public-key ~/.ssh/id_rsa.pub mykey
分配密钥
[root@controller ~]# openstack keypair create --public-key ~/.ssh/id_rsa.pub mykey+-------------+-------------------------------------------------+| Field | Value |+-------------+-------------------------------------------------+| fingerprint | 4f:77:29:9d:4c:96:5c:45:e3:7c:5d:fa:0f:b0:bc:59 || name | mykey || user_id | d8f4a1d74f52482d8ebe2184692d2c1c |+-------------+-------------------------------------------------+
检查密钥对
[root@controller ~]# openstack keypair list+-------+-------------------------------------------------+| Name | Fingerprint |+-------+-------------------------------------------------+| mykey | 4f:77:29:9d:4c:96:5c:45:e3:7c:5d:fa:0f:b0:bc:59 |+-------+-------------------------------------------------+
9.4 增加安全组规则
允许 ICMP (ping)
openstack security group rule create --proto icmp default
允许安全 shell (SSH) 的访问
openstack security group rule create --proto tcp --dst-port 22 default
9.5 启动第一台云主机
官方文档:https://docs.openstack.org/mitaka/zh_CN/install-guide-rdo/launch-instance-provider.html
启动之前先进行基础环境的检查
一个实例指定了虚拟机资源的大致分配,包括处理器、内存和存储。
openstack flavor list
列出可用镜像
openstack image list
列出可用网络
openstack network list
列出可用的安全组
openstack security group list
获取网络id
[root@controller ~]# openstack network list+--------------------------------------+----------+--------------------------------------+| ID | Name | Subnets |+--------------------------------------+----------+--------------------------------------+| 54f942f7-cc28-4292-a4d6-e37b8833e35f | provider | d507bf57-28e6-4af5-b54b-d969e76f4fd6 |+--------------------------------------+----------+--------------------------------------+
启动云主机,注意net-id为创建的network ID
openstack server create --flavor m1.nano --image cirros \--nic net-id=54f942f7-cc28-4292-a4d6-e37b8833e35f --security-group default \--key-name mykey clsn
检查云主机的状况
[root@controller ~]# nova list+--------------------------------------+---------------+--------+------------+-------------+---------------------+| ID | Name | Status | Task State | Power State | Networks |+--------------------------------------+---------------+--------+------------+-------------+---------------------+| aa5bcbb8-64a7-44c8-b302-6e1ccd1af6ef | www.nmtui.com | ACTIVE | - | Running | provider=10.0.0.102 |+--------------------------------------+---------------+--------+------------+-------------+---------------------+
9.6 在WEB端进行查看
浏览器访问:http://10.0.0.31/dashboard/
查看云主机状态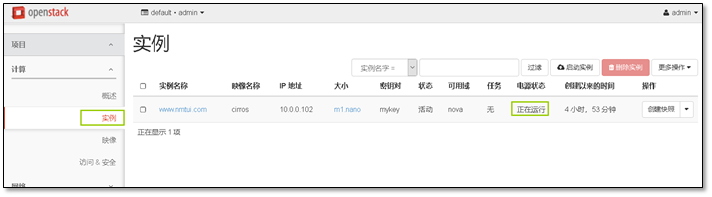
使用控制台登陆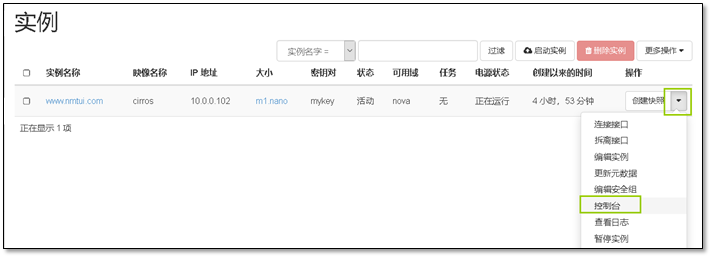
使用控制台登陆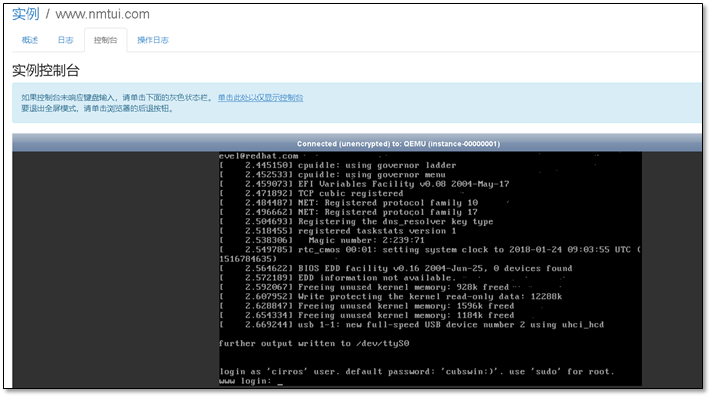
用户名为:cirros,密码为:cubswin:)
9.7 使用web界面创建一个实例
1、选择启动实例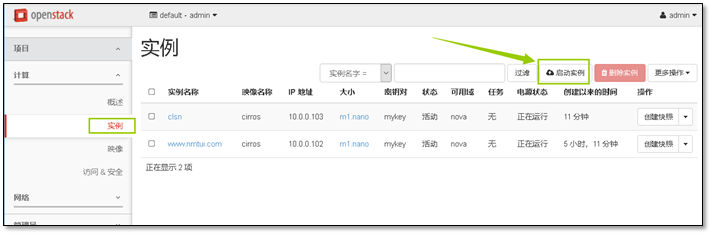
2、设置主机名称,点下一项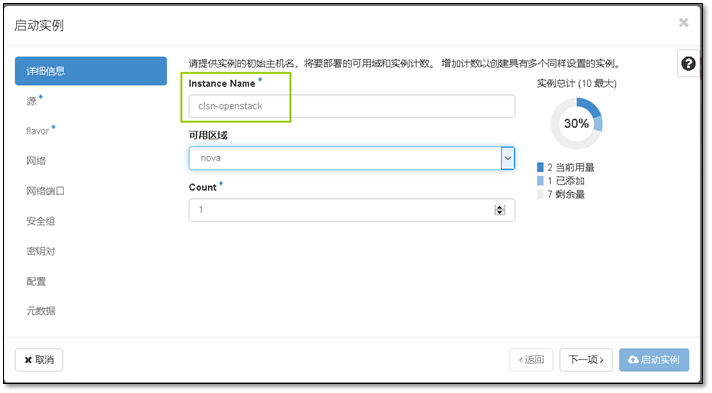
3、选择一个镜像
4、选择一个配置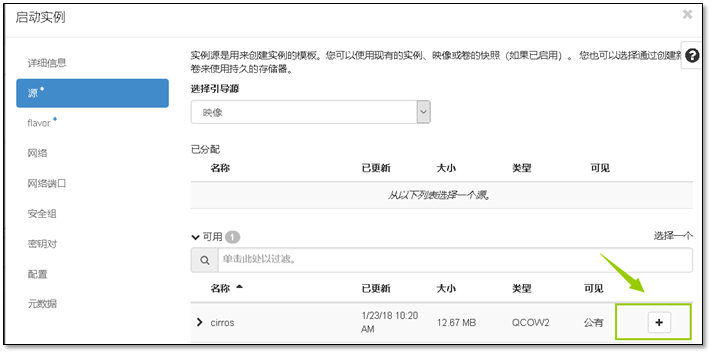
5、网络
6、安全组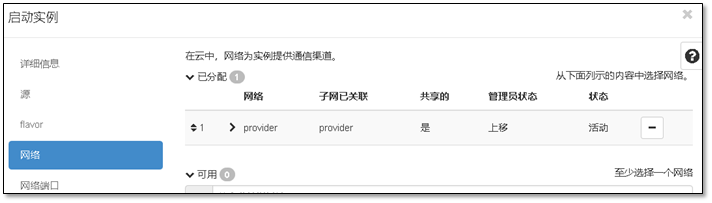
7、密钥对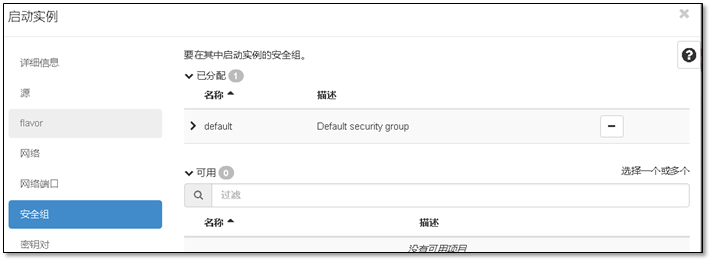
8、启动实例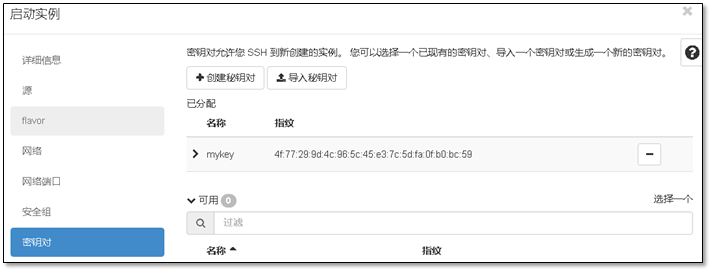
9、创建完成
10、查看主机列表
[root@controller ~]# nova list+--------------------------------------+----------------+--------+------------+-------------+---------------------+| ID | Name | Status | Task State | Power State | Networks |+--------------------------------------+----------------+--------+------------+-------------+---------------------+| ff46e8a7-9085-4afb-b7b7-193f37efb86d | clsn | ACTIVE | - | Running | provider=10.0.0.103 || d275ceac-535a-4c05-92ab-3040ed9fb9d8 | clsn-openstack | ACTIVE | - | Running | provider=10.0.0.104 || aa5bcbb8-64a7-44c8-b302-6e1ccd1af6ef | www.nmtui.com | ACTIVE | - | Running | provider=10.0.0.102 |+--------------------------------------+----------------+--------+------------+-------------+---------------------+
11、密钥连接测试
[root@controller ~]# ssh cirros@10.0.0.104The authenticity of host '10.0.0.104 (10.0.0.104)' can't be established.RSA key fingerprint is 9d:ca:25:cd:23:c9:f8:73:c6:26:84:53:46:56:67:63.Are you sure you want to continue connecting (yes/no)? yesWarning: Permanently added '10.0.0.104' (RSA) to the list of known hosts.$ hostnameclsn-openstack
10 cinder块存储服务
官方文档:https://docs.openstack.org/mitaka/zh_CN/install-guide-rdo/cinder.html
10.1 环境准备
为compute1计算节点添加两块硬盘,分别为:
sdb 8:16 0 30G 0 disksdc 8:32 0 20G 0 disk
10.2 安装并配置控制节点
1)在数据库中,创库,授权
创建 cinder 数据库
CREATE DATABASE cinder;
允许 cinder 数据库合适的访问权限
GRANT ALL PRIVILEGES ON cinder.* TO 'cinder'@'localhost' IDENTIFIED BY 'CINDER_DBPASS';GRANT ALL PRIVILEGES ON cinder.* TO 'cinder'@'%' IDENTIFIED BY 'CINDER_DBPASS';
2)在keystone中创建用户并授权
创建一个 cinder 用
openstack user create --domain default --password CINDER_PASS cinder
添加 admin 角色到 cinder 用户上。
openstack role add --project service --user cinder admin
3)在keystone中创建服务实体,和注册API接口
创建 cinder 和 cinderv2 服务实体
openstack service create --name cinder --description "OpenStack Block Storage" volumeopenstack service create --name cinderv2 --description "OpenStack Block Storage" volumev2
创建块设备存储服务的 API 入口点。注意:需要注册两个版本
# v1版本注册
openstack endpoint create --region RegionOne volume public http://controller:8776/v1/%\(tenant_id\)sopenstack endpoint create --region RegionOne volume internal http://controller:8776/v1/%\(tenant_id\)sopenstack endpoint create --region RegionOne volume admin http://controller:8776/v1/%\(tenant_id\)s
v2版本注册
openstack endpoint create --region RegionOne volumev2 public http://controller:8776/v2/%\(tenant_id\)sopenstack endpoint create --region RegionOne volumev2 internal http://controller:8776/v2/%\(tenant_id\)sopenstack endpoint create --region RegionOne volumev2 admin http://controller:8776/v2/%\(tenant_id\)s
4)安装软件包
yum -y install openstack-cinder
5)修改配置文件
编辑 /etc/cinder/cinder.conf,同时完成如下动作
在 [database] 部分,配置数据库访问
[database]...connection = mysql+pymysql://cinder:CINDER_DBPASS@controller/cinder
在 “[DEFAULT]” 和 “[oslo_messaging_rabbit]”部分,配置 “RabbitMQ” 消息队列访问
[DEFAULT]...rpc_backend = rabbit[oslo_messaging_rabbit]...rabbit_host = controllerrabbit_userid = openstackrabbit_password = RABBIT_PASS
在 “[DEFAULT]” 和 “[keystone_authtoken]” 部分,配置认证服务访问
[DEFAULT]...auth_strategy = keystone[keystone_authtoken]...auth_uri = http://controller:5000auth_url = http://controller:35357memcached_servers = controller:11211auth_type = passwordproject_domain_name = defaultuser_domain_name = defaultproject_name = serviceusername = cinderpassword = CINDER_PASS
在 [DEFAULT 部分,配置my_ip 来使用控制节点的管理接口的IP 地址
[DEFAULT]...my_ip = 10.0.0.11
在 [oslo_concurrency] 部分,配置锁路径
[oslo_concurrency]...lock_path = /var/lib/cinder/tmp
配置计算服务使用块设备存储
编辑文件 /etc/nova/nova.conf 并添加如下到其中
vim /etc/nova/nova.conf[cinder]os_region_name = RegionOne
6)同步数据库
su -s /bin/sh -c "cinder-manage db sync" cinder# 忽略输出中任何不推荐使用的信息。
7)启动服务
重启计算API 服务
systemctl restart openstack-nova-api.servicesystemctl status openstack-nova-api.service
启动块设备存储服务,并将其配置为开机自启
systemctl enable openstack-cinder-api.service openstack-cinder-scheduler.servicesystemctl start openstack-cinder-api.service openstack-cinder-scheduler.servicesystemctl status openstack-cinder-api.service openstack-cinder-scheduler.service
10.3 安装并配置一个存储节点
参考:https://docs.openstack.org/mitaka/zh_CN/install-guide-rdo/cinder-storage-install.html
1)安装lvm软件
安装支持的工具包
yum -y install lvm2
启动LVM的metadata服务并且设置该服务随系统启动
systemctl enable lvm2-lvmetad.servicesystemctl start lvm2-lvmetad.servicesystemctl status lvm2-lvmetad.service
2)创建物理卷
将之前添加的两块硬盘创建物理卷
pvcreate /dev/sdbpvcreate /dev/sdc
执行过程
[root@compute1 ~]# pvcreate /dev/sdbPhysical volume "/dev/sdb" successfully created.[root@compute1 ~]# pvcreate /dev/sdcPhysical volume "/dev/sdc" successfully created.
3)创建 LVM 卷组
vgcreate cinder-volumes-sata /dev/sdbvgcreate cinder-volumes-ssd /dev/sdc
查看创建出来的卷组
[root@compute1 ~]# vgsVG #PV #LV #SN Attr VSize VFreecinder-volumes-sata 1 0 0 wz--n- 30.00g 30.00gcinder-volumes-ssd 1 0 0 wz--n- 20.00g 20.00g
删除卷组方法
# vgremove vg-name
4)修改配置文件
只有实例可以访问块存储卷组。不过,底层的操作系统管理这些设备并将其与卷关联。
默认情况下,LVM卷扫描工具会扫描/dev 目录,查找包含卷的块存储设备。
如果项目在他们的卷上使用LVM,扫描工具检测到这些卷时会尝试缓存它们,可能会在底层操作系统和项目卷上产生各种问题。
编辑/etc/lvm/lvm.conf文件并完成下面的操作
devices {...# 在130行下增加如下行filter = [ "a/sdb/", "a/sdc/", "r/.*/"]
5)安装软件并配置组件
yum -y install openstack-cinder targetcli python-keystone
6)配置文件修改
编辑 /etc/cinder/cinder.conf,同时完成如下动作
在 [database] 部分,配置数据库访问
[database]...connection = mysql+pymysql://cinder:CINDER_DBPASS@controller/cinder
在 “[DEFAULT]” 和 “[oslo_messaging_rabbit]”部分,配置 “RabbitMQ” 消息队列访问
[DEFAULT]...rpc_backend = rabbit[oslo_messaging_rabbit]...rabbit_host = controllerrabbit_userid = openstackrabbit_password = RABBIT_PASS
在 “[DEFAULT]” 和 “[keystone_authtoken]” 部分,配置认证服务访问
[DEFAULT]...auth_strategy = keystone[keystone_authtoken]...auth_uri = http://controller:5000auth_url = http://controller:35357memcached_servers = controller:11211auth_type = passwordproject_domain_name = defaultuser_domain_name = defaultproject_name = serviceusername = cinderpassword = CINDER_PASS
在 [DEFAULT] 部分,配置 my_ip 选项
[DEFAULT]...my_ip = MANAGEMENT_INTERFACE_IP_ADDRESS
注意:将其中的MANAGEMENT_INTERFACE_IP_ADDRESS替换为存储节点上的管理网络接口的IP 地址
在[lvm]部分,配置LVM后端以LVM驱动结束,卷组cinder-volumes ,iSCSI 协议和正确的 iSCSI服务
[lvm]...volume_driver = cinder.volume.drivers.lvm.LVMVolumeDrivervolume_group = cinder-volumesiscsi_protocol = iscsiiscsi_helper = lioadm
在 [DEFAULT] 部分,启用 LVM 后端
[DEFAULT]...enabled_backends = lvm
在 [DEFAULT] 区域,配置镜像服务 API 的位置
[DEFAULT]...glance_api_servers = http://controller:9292
在 [oslo_concurrency] 部分,配置锁路径
[oslo_concurrency]...lock_path = /var/lib/cinder/tmp
配置文件最终内容
[root@compute1 ~]# cat /etc/cinder/cinder.conf[DEFAULT]glance_api_servers = http://10.0.0.32:9292enabled_backends = lvmrpc_backend = rabbitauth_strategy = keystonemy_ip = 10.0.0.31[BACKEND][BRCD_FABRIC_EXAMPLE][CISCO_FABRIC_EXAMPLE][COORDINATION][FC-ZONE-MANAGER][KEYMGR][cors][cors.subdomain][database]connection = mysql+pymysql://cinder:CINDER_DBPASS@controller/cinder[keystone_authtoken]auth_uri = http://controller:5000auth_url = http://controller:35357memcached_servers = controller:11211auth_type = passwordproject_domain_name = defaultuser_domain_name = defaultproject_name = serviceusername = cinderpassword = CINDER_PASS[matchmaker_redis][oslo_concurrency]lock_path = /var/lib/cinder/tmp[oslo_messaging_amqp][oslo_messaging_notifications][oslo_messaging_rabbit]rabbit_host = controllerrabbit_userid = openstackrabbit_password = RABBIT_PASS[oslo_middleware][oslo_policy][oslo_reports][oslo_versionedobjects][ssl][lvm]volume_driver = cinder.volume.drivers.lvm.LVMVolumeDrivervolume_group = cinder-volumes-sataiscsi_protocol = iscsiiscsi_helper = lioadm
7)启动服务
systemctl enable openstack-cinder-volume.service target.servicesystemctl start openstack-cinder-volume.service target.servicesystemctl status openstack-cinder-volume.service target.service
8)验证检查状态
[root@controller ~]# cinder service-list+------------------+--------------+------+---------+-------+----------------------------+-----------------+| Binary | Host | Zone | Status | State | Updated_at | Disabled Reason |+------------------+--------------+------+---------+-------+----------------------------+-----------------+| cinder-scheduler | controller | nova | enabled | up | 2018-01-25T11:01:41.000000 | - || cinder-volume | compute1@lvm | nova | enabled | up | 2018-01-25T11:01:40.000000 | - |+------------------+--------------+------+---------+-------+----------------------------+-----------------+
10.4 添加ssd盘配置信息
修改配置文件
[root@compute1 ~]# vim /etc/cinder/cinder.conf# 修改内容如下[DEFAULT]···enabled_backends = lvm,ssd[lvm]···volume_backend_name = sata[ssd]volume_driver = cinder.volume.drivers.lvm.LVMVolumeDrivervolume_group = cinder-volumes-ssdiscsi_protocol = iscsiiscsi_helper = lioadmvolume_backend_name = ssd
重启服务
[root@compute1 ~]# systemctl restart openstack-cinder-volume.service
检查cinder服务状态
[root@controller ~]# cinder service-list+------------------+--------------+------+---------+-------+----------------------------+-----------------+| Binary | Host | Zone | Status | State | Updated_at | Disabled Reason |+------------------+--------------+------+---------+-------+----------------------------+-----------------+| cinder-scheduler | controller | nova | enabled | up | 2018-01-25T11:45:42.000000 | - || cinder-volume | compute1@lvm | nova | enabled | up | 2018-01-25T11:45:21.000000 | - || cinder-volume | compute1@ssd | nova | enabled | up | 2018-01-25T11:45:42.000000 | - |+------------------+--------------+------+---------+-------+----------------------------+-----------------+
10.5 在Dashboard中如何创建硬盘
1、登陆浏览器dashboard,http://10.0.0.31/dashboard
选择创建卷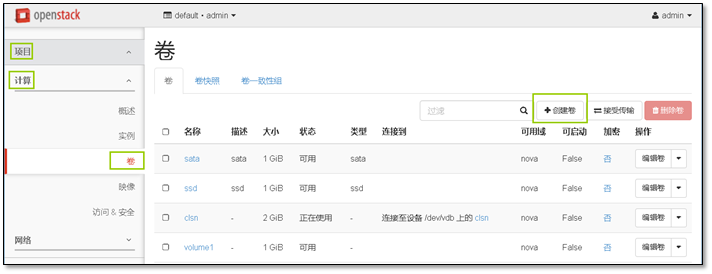
2)创建一个sata类型的卷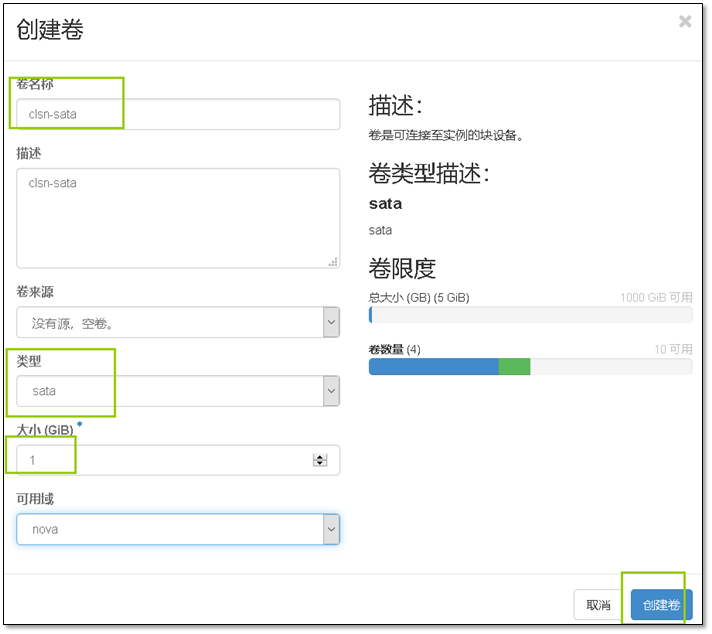
3)创建过程
创建完成
4)床啊进ssd类型卷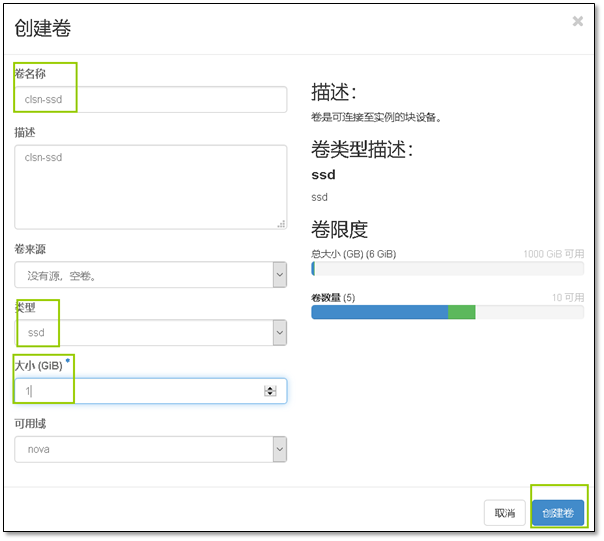
5)在查看创建的硬盘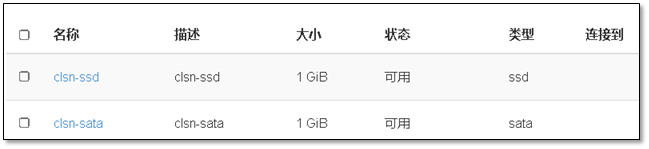
在命令行中查看添加的块存储
[root@compute1 ~]# lvsLV VG Attr LSize Pool Origin Data% Meta% Move Log Cpy%Sync Convertvolume-0ea47012-c0fb-4dc4-90e7-89427fe9e675 cinder-volumes-sata -wi-a----- 1.00gvolume-288efecb-6bf0-4409-9564-81b0a6edc9b8 cinder-volumes-sata -wi-a----- 1.00gvolume-ab347594-6402-486d-87a1-19358aa92a08 cinder-volumes-sata -wi-a----- 1.00gvolume-33ccbb43-8bd3-4006-849d-73fe6176ea90 cinder-volumes-ssd -wi-a----- 1.00gvolume-cfd0ac03-f03f-4fe2-b369-76dba946934d cinder-volumes-ssd -wi-a----- 1.00g
10.6 添加硬盘到虚拟机

连接到一个实例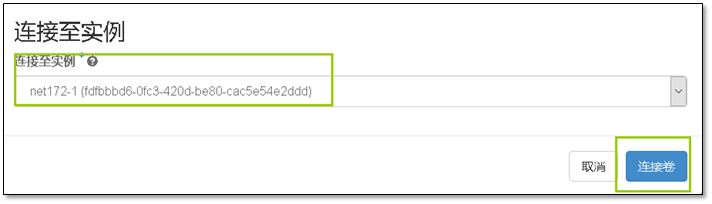
登陆虚拟机
[root@controller ~]# ssh cirros@172.16.1.101$ lsblkNAME MAJ:MIN RM SIZE RO TYPE MOUNTPOINTvda 253:0 0 1G 0 disk`-vda1 253:1 0 1011.9M 0 part /vdb 253:16 0 1G 0 disk
格式化磁盘
$ sudo mkfs.ext3 /dev/vdb$ sudo mount /dev/vdb /mnt/
创建文件测试
$ cd /mnt/$ sudo touch clsn$ lsclsn lost+found
11. 添加一台新的计算节点
11.1 主机基础环境配置
要求:主机的配置与之前的系统相同配置相同,推荐4G以上内存。
1)配置本地yum仓库(提高安装速度)
cd /opt/ && wget http://10.0.0.1:8080/openstack/openstack_rpm.tar.gztar xf openstack_rpm.tar.gzecho 'mount /dev/cdrom /mnt' >>/etc/rc.d/rc.localmount /dev/cdrom /mntchmod +x /etc/rc.d/rc.localcat >/etc/yum.repos.d/local.repo<<-'EOF'[local]name=localbaseurl=file:///mntgpgcheck=0[openstack]name=openstack-mitakabaseurl=file:///opt/repogpgcheck=0EOF
2)配置NTP时间服务
# 安装软件yum install chrony -y# 修改配置信息,同步chrony服务sed -ri.bak '/server/s/^/#/g;2a server 10.0.0.11 iburst' /etc/chrony.conf# 启动,设置自启动systemctl enable chronyd.servicesystemctl start chronyd.service
3)安装OpenStack的包操作
#安装 OpenStack 客户端:yum -y install python-openstackclient#安装 openstack-selinux 软件包yum -y install openstack-selinux
11.2 安装配置计算服务
安装nova软件包
yum -y install openstack-nova-compute
命令集修改配置文件
yum install openstack-utils -ycp /etc/nova/nova.conf{,.bak}grep '^[a-Z\[]' /etc/nova/nova.conf.bak >/etc/nova/nova.confopenstack-config --set /etc/nova/nova.conf DEFAULT enabled_apis osapi_compute,metadataopenstack-config --set /etc/nova/nova.conf DEFAULT rpc_backend rabbitopenstack-config --set /etc/nova/nova.conf DEFAULT auth_strategy keystoneopenstack-config --set /etc/nova/nova.conf DEFAULT my_ip 10.0.0.32openstack-config --set /etc/nova/nova.conf DEFAULT use_neutron Trueopenstack-config --set /etc/nova/nova.conf DEFAULT firewall_driver nova.virt.firewall.NoopFirewallDriveropenstack-config --set /etc/nova/nova.conf glance api_servers http://controller:9292openstack-config --set /etc/nova/nova.conf keystone_authtoken auth_uri http://controller:5000openstack-config --set /etc/nova/nova.conf keystone_authtoken auth_url http://controller:35357openstack-config --set /etc/nova/nova.conf keystone_authtoken memcached_servers controller:11211openstack-config --set /etc/nova/nova.conf keystone_authtoken auth_type passwordopenstack-config --set /etc/nova/nova.conf keystone_authtoken project_domain_name defaultopenstack-config --set /etc/nova/nova.conf keystone_authtoken user_domain_name defaultopenstack-config --set /etc/nova/nova.conf keystone_authtoken project_name serviceopenstack-config --set /etc/nova/nova.conf keystone_authtoken username novaopenstack-config --set /etc/nova/nova.conf keystone_authtoken password NOVA_PASSopenstack-config --set /etc/nova/nova.conf oslo_concurrency lock_path /var/lib/nova/tmpopenstack-config --set /etc/nova/nova.conf oslo_messaging_rabbit rabbit_host controlleropenstack-config --set /etc/nova/nova.conf oslo_messaging_rabbit rabbit_userid openstackopenstack-config --set /etc/nova/nova.conf oslo_messaging_rabbit rabbit_password RABBIT_PASSopenstack-config --set /etc/nova/nova.conf vnc enabled Trueopenstack-config --set /etc/nova/nova.conf vnc vncserver_listen 0.0.0.0openstack-config --set /etc/nova/nova.conf vnc vncserver_proxyclient_address '$my_ip'openstack-config --set /etc/nova/nova.conf vnc novncproxy_base_url http://controller:6080/vnc_auto.html
11.3 配置neutron网络
安装neutron相关组件
yum -y install openstack-neutron-linuxbridge ebtables ipset
修改neutron配置
cp /etc/neutron/neutron.conf{,.bak}grep -Ev '^$|#' /etc/neutron/neutron.conf.bak >/etc/neutron/neutron.confopenstack-config --set /etc/neutron/neutron.conf DEFAULT rpc_backend rabbitopenstack-config --set /etc/neutron/neutron.conf DEFAULT auth_strategy keystoneopenstack-config --set /etc/neutron/neutron.conf keystone_authtoken auth_uri http://controller:5000openstack-config --set /etc/neutron/neutron.conf keystone_authtoken auth_url http://controller:35357openstack-config --set /etc/neutron/neutron.conf keystone_authtoken memcached_servers controller:11211openstack-config --set /etc/neutron/neutron.conf keystone_authtoken auth_type passwordopenstack-config --set /etc/neutron/neutron.conf keystone_authtoken project_domain_name defaultopenstack-config --set /etc/neutron/neutron.conf keystone_authtoken user_domain_name defaultopenstack-config --set /etc/neutron/neutron.conf keystone_authtoken project_name serviceopenstack-config --set /etc/neutron/neutron.conf keystone_authtoken username neutronopenstack-config --set /etc/neutron/neutron.conf keystone_authtoken password NEUTRON_PASSopenstack-config --set /etc/neutron/neutron.conf oslo_concurrency lock_path /var/lib/neutron/tmpopenstack-config --set /etc/neutron/neutron.conf oslo_messaging_rabbit rabbit_host controlleropenstack-config --set /etc/neutron/neutron.conf oslo_messaging_rabbit rabbit_userid openstackopenstack-config --set /etc/neutron/neutron.conf oslo_messaging_rabbit rabbit_password RABBIT_PASS
配置Linuxbridge代理
cp /etc/neutron/plugins/ml2/linuxbridge_agent.ini{,.bak}grep '^[a-Z\[]' /etc/neutron/plugins/ml2/linuxbridge_agent.ini.bak >/etc/neutron/plugins/ml2/linuxbridge_agent.iniopenstack-config --set /etc/neutron/plugins/ml2/linuxbridge_agent.ini linux_bridge physical_interface_mappings provider:eth0openstack-config --set /etc/neutron/plugins/ml2/linuxbridge_agent.ini securitygroup enable_security_group Trueopenstack-config --set /etc/neutron/plugins/ml2/linuxbridge_agent.ini securitygroup firewall_driver neutron.agent.linux.iptables_firewall.IptablesFirewallDriveropenstack-config --set /etc/neutron/plugins/ml2/linuxbridge_agent.ini vxlan enable_vxlan False
再次配置 nova 服务
openstack-config --set /etc/nova/nova.conf neutron url http://controller:9696openstack-config --set /etc/nova/nova.conf neutron auth_url http://controller:35357openstack-config --set /etc/nova/nova.conf neutron auth_type passwordopenstack-config --set /etc/nova/nova.conf neutron project_domain_name defaultopenstack-config --set /etc/nova/nova.conf neutron user_domain_name defaultopenstack-config --set /etc/nova/nova.conf neutron region_name RegionOneopenstack-config --set /etc/nova/nova.conf neutron project_name serviceopenstack-config --set /etc/nova/nova.conf neutron username neutronopenstack-config --set /etc/nova/nova.conf neutron password NEUTRON_PASS
11.4 启动计算节点
启动nova服务,设置开机自启动
systemctl enable libvirtd.service openstack-nova-compute.servicesystemctl start libvirtd.service openstack-nova-compute.service
启动Linuxbridge代理并配置它开机自启动
systemctl enable neutron-linuxbridge-agent.servicesystemctl start neutron-linuxbridge-agent.service
查看状态
systemctl status libvirtd.service openstack-nova-compute.servicesystemctl stauts neutron-linuxbridge-agent.service
11.5 验证之前的操作
在控制节点验证配置
neutron agent-list
验证网络配置
[root@controller ~]# neutron agent-list+----------------------+--------------------+------------+-------------------+-------+----------------+-------------------------+| id | agent_type | host | availability_zone | alive | admin_state_up | binary |+----------------------+--------------------+------------+-------------------+-------+----------------+-------------------------+| 3ab2f17f-737e-4c3f- | DHCP agent | controller | nova | :-) | True | neutron-dhcp-agent || 86f0-2289c56a541b | | | | | | || 4f64caf6-a9b0-4742-b | Linux bridge agent | controller | | :-) | True | neutron-linuxbridge- || 0d1-0d961063200a | | | | | | agent || 630540de-d0a0-473b- | Linux bridge agent | compute1 | | :-) | True | neutron-linuxbridge- || 96b5-757afc1057de | | | | | | agent || 9989ddcb-6aba-4b7f- | Metadata agent | controller | | :-) | True | neutron-metadata-agent || 9bd7-7d61f774f2bb | | | | | | || af40d1db-ff24-4201-b | Linux bridge agent | compute2 | | :-) | True | neutron-linuxbridge- || 0f2-175fc1542f26 | | | | | | agent |+----------------------+--------------------+------------+-------------------+-------+----------------+-------------------------+
验证计算节点
[root@controller ~]# openstack compute service list+----+------------------+------------+----------+---------+-------+----------------------------+| Id | Binary | Host | Zone | Status | State | Updated At |+----+------------------+------------+----------+---------+-------+----------------------------+| 1 | nova-scheduler | controller | internal | enabled | up | 2018-01-24T06:06:02.000000 || 2 | nova-conductor | controller | internal | enabled | up | 2018-01-24T06:06:04.000000 || 3 | nova-consoleauth | controller | internal | enabled | up | 2018-01-24T06:06:03.000000 || 6 | nova-compute | compute1 | nova | enabled | up | 2018-01-24T06:06:05.000000 || 7 | nova-compute | compute2 | nova | enabled | up | 2018-01-24T06:06:00.000000 |+----+------------------+------------+----------+---------+-------+----------------------------+
12. Glance镜像服务迁移
将glance服务迁移到其他节点上,减轻控制节点压力,提高性能。
12.1 数据库迁移
本次glance迁移到compute2节点上
安装数据库
yum -y install mariadb mariadb-server python2-PyMySQL
修改数据库配置文件
[root@compute2 ~]# vim /etc/my.cnf.d/openstack.cnf[mysqld]bind-address = 10.0.0.32default-storage-engine = innodbinnodb_file_per_tablemax_connections = 4096collation-server = utf8_general_cicharacter-set-server = utf8
启动数据库,并设置开机自启动
systemctl enable mariadb.servicesystemctl start mariadb.service
【重要】为了保证数据库服务的安全性,运行mysql_secure_installation脚本
mysql_secure_installation
12.2 镜像glance 数据库迁移
在控制节点的数据库将glance库导出,文件传到计算节点
[root@controller ~]# mysqldump -B glance > glance.sql[root@controller ~]# rsync -avz glance.sql 10.0.0.32:/opt/
以下操作在compute2节点上进行操作
导入数据库:
[root@compute2 ~]# mysqlMariaDB [(none)]> source /opt/glance.sql
重新创建glance授权用户
GRANT ALL PRIVILEGES ON glance.* TO 'glance'@'localhost' IDENTIFIED BY 'GLANCE_DBPASS';GRANT ALL PRIVILEGES ON glance.* TO 'glance'@'%' IDENTIFIED BY 'GLANCE_DBPASS';
12.3 安装glance服务
参考文档https://docs.openstack.org/mitaka/zh_CN/install-guide-rdo/glance.html
安装glance相关软件包
yum -y install openstack-glance
编辑配置文件 /etc/glance/glance-api.conf
注意:修改其中的数据库指向地址,修改为copmute2上的数据库。
批量修改命令集:
yum install openstack-utils -ycp /etc/glance/glance-api.conf{,.bak}grep '^[a-Z\[]' /etc/glance/glance-api.conf.bak >/etc/glance/glance-api.confopenstack-config --set /etc/glance/glance-api.conf database connection mysql+pymysql://glance:GLANCE_DBPASS@10.0.0.32/glanceopenstack-config --set /etc/glance/glance-api.conf glance_store stores file,httpopenstack-config --set /etc/glance/glance-api.conf glance_store default_store fileopenstack-config --set /etc/glance/glance-api.conf glance_store filesystem_store_datadir /var/lib/glance/images/openstack-config --set /etc/glance/glance-api.conf keystone_authtoken auth_uri http://controller:5000openstack-config --set /etc/glance/glance-api.conf keystone_authtoken auth_url http://controller:35357openstack-config --set /etc/glance/glance-api.conf keystone_authtoken memcached_servers controller:11211openstack-config --set /etc/glance/glance-api.conf keystone_authtoken auth_type passwordopenstack-config --set /etc/glance/glance-api.conf keystone_authtoken project_domain_name defaultopenstack-config --set /etc/glance/glance-api.conf keystone_authtoken user_domain_name defaultopenstack-config --set /etc/glance/glance-api.conf keystone_authtoken project_name serviceopenstack-config --set /etc/glance/glance-api.conf keystone_authtoken username glanceopenstack-config --set /etc/glance/glance-api.conf keystone_authtoken password GLANCE_PASSopenstack-config --set /etc/glance/glance-api.conf paste_deploy flavor keystone
编辑配置文件 /etc/glance/glance-registry.conf
注意:修改其中的数据库指向地址,修改为copmute2上的数据库。
批量修改命令集:
yum install openstack-utils -ycp /etc/glance/glance-registry.conf{,.bak}grep '^[a-Z\[]' /etc/glance/glance-registry.conf.bak > /etc/glance/glance-registry.confopenstack-config --set /etc/glance/glance-registry.conf database connection mysql+pymysql://glance:GLANCE_DBPASS@10.0.0.32/glanceopenstack-config --set /etc/glance/glance-registry.conf keystone_authtoken auth_uri http://controller:5000openstack-config --set /etc/glance/glance-registry.conf keystone_authtoken auth_url http://controller:35357openstack-config --set /etc/glance/glance-registry.conf keystone_authtoken memcached_servers controller:11211openstack-config --set /etc/glance/glance-registry.conf keystone_authtoken auth_type passwordopenstack-config --set /etc/glance/glance-registry.conf keystone_authtoken project_domain_name defaultopenstack-config --set /etc/glance/glance-registry.conf keystone_authtoken user_domain_name defaultopenstack-config --set /etc/glance/glance-registry.conf keystone_authtoken project_name serviceopenstack-config --set /etc/glance/glance-registry.conf keystone_authtoken username glanceopenstack-config --set /etc/glance/glance-registry.conf keystone_authtoken password GLANCE_PASSopenstack-config --set /etc/glance/glance-registry.conf paste_deploy flavor keystone
12.4 迁移原有镜像文件
将原glance上的镜像文件,传输到compute2。
[root@controller ~]# cd /var/lib/glance/images/[root@controller ~]# rsync -avz `pwd`/ 10.0.0.32:`pwd`/
【注意权限】传输过后,在compute2上查看权限
[root@compute2 ~]# cd /var/lib/glance/images/[root@compute2 ~]# chown glance:glance *
12.5 修改现有keystone中 glance服务注册信息
备份数据库endpoint表数据
[root@controller ~]# mysqldump keystone endpoint > endpoint.sql
修改keystone注册信息
cp endpoint.sql{,.bak}sed -i 's#http://controller:9292#http://10.0.0.32:9292#g' endpoint.sql
重新将修改后的sql文件导入数据库
[root@controller ~]# mysql keystone < endpoint.sql
12.6 修改nova节点配置文件
将所有的节点上的配置文件都进行修改
sed -i 's#api_servers = http://controller:9292#api_servers = http://10.0.0.32:9292#g' /etc/nova/nova.conf
控制节点重启
systemctl restart openstack-nova-api.service openstack-nova-consoleauth.service openstack-nova-scheduler.service openstack-nova-conductor.service openstack-nova-novncproxy.service
计算节点重启
systemctl restart openstack-nova-compute.service
停掉glance原节点的服务
systemctl stop openstack-glance-api.service openstack-glance-registry.service
12.7 验证操作
在copmute2节点启动glance服务
systemctl start openstack-glance-api.service openstack-glance-registry.service
查看镜像列表
[root@controller ~]# openstack image list+--------------------------------------+----------+--------+| ID | Name | Status |+--------------------------------------+----------+--------+| 68222030-a808-4d05-978f-1d4a6f85f7dd | clsn-img | active || 9d92c601-0824-493a-bc6e-cecb10e9a4c6 | cirros | active |+--------------------------------------+----------+--------+
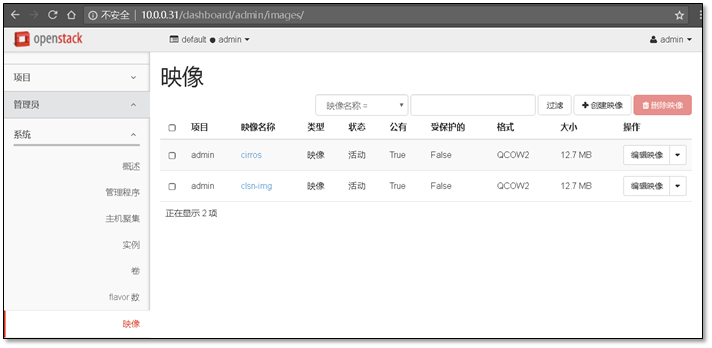
13. 添加一个新的网段并让它能够上网
13.1 环境准备
1)为openstack服务机器机器添加一块新的网卡(所有机器操作)。
网卡选择LAN区段,并保证所有的机器在同一个LAN区段当中。
2)主机修改配置,启动eth1网卡(所有节点操作)
查看网卡设备
[root@compute1 ~]# ls /proc/sys/net/ipv4/conf/all brq2563bcef-c6 brq54f942f7-cc default eth0 eth1 lo[root@compute1 ~]# cp /etc/sysconfig/network-scripts/ifcfg-eth{0,1}
修改网卡配置
[root@compute1 ~]# vim /etc/sysconfig/network-scripts/ifcfg-eth1TYPE=EthernetBOOTPROTO=noneNAME=eth1DEVICE=eth1ONBOOT=yesIPADDR=172.16.1.31NETMASK=255.255.255.0
启动网卡
[root@compute1 ~]# ifup eth0
13.2 配置neutron服务
再增加一个faulte网络,这里添加的名为net172
[root@controller ~]# vim /etc/neutron/plugin.ini[DEFAULT][ml2]type_drivers = flat,vlantenant_network_types =mechanism_drivers = linuxbridgeextension_drivers = port_security[ml2_type_flat]flat_networks = provider,net172[ml2_type_geneve][ml2_type_gre][ml2_type_vlan][ml2_type_vxlan][securitygroup]enable_ipset = True
修改桥接配置,添加eth1信息
[root@controller ~]# vim /etc/neutron/plugins/ml2/linuxbridge_agent.ini[DEFAULT][agent][linux_bridge]physical_interface_mappings = provider:eth0,net172:eth1[securitygroup]enable_security_group = Truefirewall_driver = neutron.agent.linux.iptables_firewall.IptablesFirewallDriver[vxlan]enable_vxlan = False
将桥接配置文件发往各个节点
[root@controller ~]# rsync -avz /etc/neutron/plugins/ml2/linuxbridge_agent.ini 10.0.0.31:/etc/neutron/plugins/ml2/linuxbridge_agent.ini····
13.3 重启服务
在控制节点重启网络服务
[root@controller ~]# systemctl restart neutron-server.service neutron-linuxbridge-agent.service
在其他计算节点重启网络服务
[root@compute1 ~]# systemctl restart neutron-linuxbridge-agent.service
查看当前网络状态
[root@controller ~]# neutron agent-list+----------------------+--------------------+------------+-------------------+-------+----------------+-------------------------+| id | agent_type | host | availability_zone | alive | admin_state_up | binary |+----------------------+--------------------+------------+-------------------+-------+----------------+-------------------------+| 3ab2f17f-737e-4c3f- | DHCP agent | controller | nova | :-) | True | neutron-dhcp-agent || 86f0-2289c56a541b | | | | | | || 4f64caf6-a9b0-4742-b | Linux bridge agent | controller | | :-) | True | neutron-linuxbridge- || 0d1-0d961063200a | | | | | | agent || 630540de-d0a0-473b- | Linux bridge agent | compute1 | | :-) | True | neutron-linuxbridge- || 96b5-757afc1057de | | | | | | agent || 9989ddcb-6aba-4b7f- | Metadata agent | controller | | :-) | True | neutron-metadata-agent || 9bd7-7d61f774f2bb | | | | | | || af40d1db-ff24-4201-b | Linux bridge agent | compute2 | | :-) | True | neutron-linuxbridge- || 0f2-175fc1542f26 | | | | | | agent |+----------------------+--------------------+------------+-------------------+-------+----------------+-------------------------+
13.4 配置iptables服务器作子网网关
主机信息
[root@route ~]# uname -r3.10.0-327.el7.x86_64[root@route ~]# hostname -I10.0.0.2 172.16.1.2
配置内核转发
[root@route ~]# echo 'net.ipv4.ip_forward=1' >>/etc/sysctl.conf[root@route ~]# sysctl -pnet.ipv4.ip_forward = 1
配置iptables转发规则
iptables -t nat -A POSTROUTING -s 172.16.1.0/24 -o eth0 -j MASQUERADE
13.5 web界面创建子网
1)选择创建网络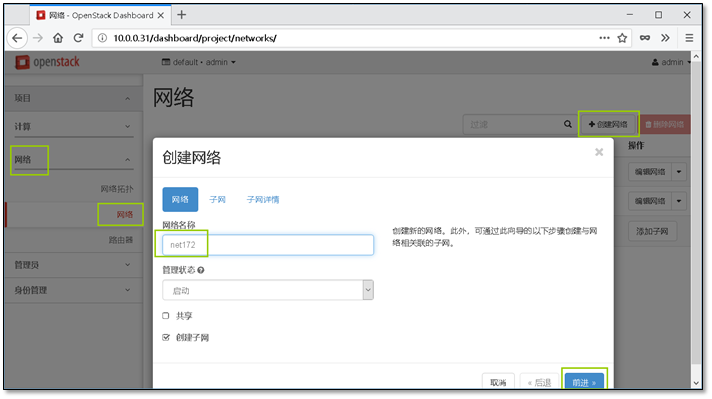
2)配置在子网
网关选择搭建的iptables服务器,经由iptables服务器进行代理上网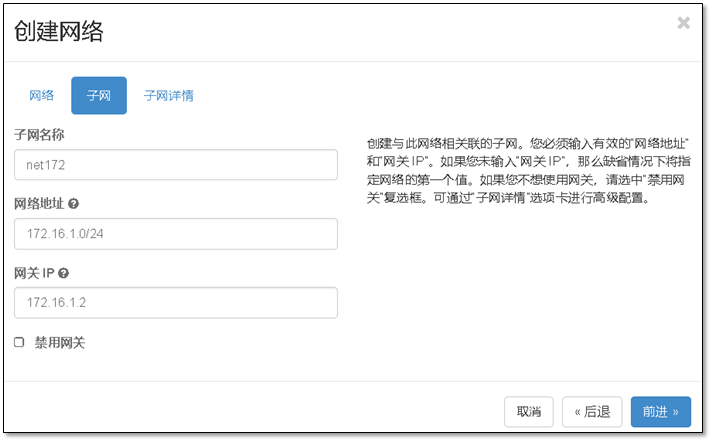
3)配置子网IP地范围,配置完成子网创建成功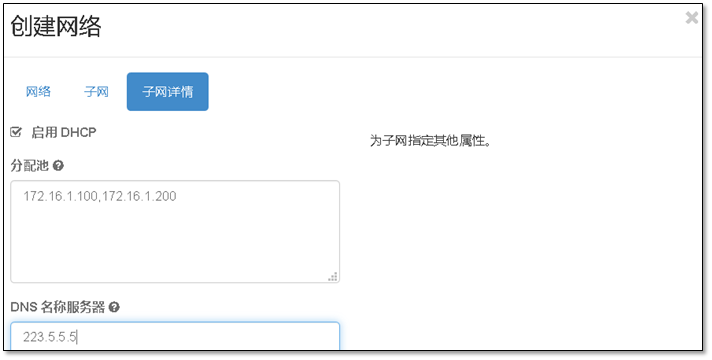
4)创建一个新的实例测试子网
注意:在创建时,网络选择刚刚创建的net172网络
实例创建完成
5)登陆控制台
查看网关信息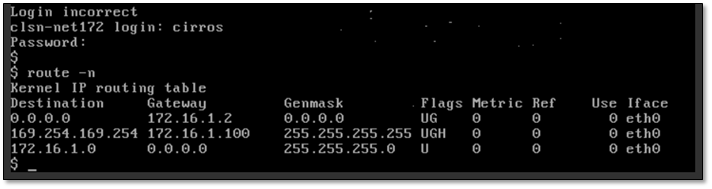
检测网络连通性
至此一个新的子网创建成功
14. Cinder服务对接NFS配置
NFS服务介绍参考文档:http://www.cnblogs.com/clsn/p/7694456.html
14.1 NFS服务部署
注意:实验环境使用控制节点做nfs服务器,在生产环境中,需配置高性能存储服务器。
安装nfs相关软件包
yum install nfs-utils rpcbind -y
配置nfs服务
[root@controller ~]# cat /etc/exports/data 10.0.0.0/24(rw,async,no_root_squash,no_all_squash)# 创建目录[root@controller ~]# mkdir /data
启动nfs服务,并设置开机自启动
systemctl restart rpcbindsystemctl restart nfssystemctl enable rpcbind nfssystemctl status rpcbind nfs
14.2 测试NFS的可用性
在计算节点查看nfs信息
[root@compute1 ~]# showmount -e 10.0.0.11Export list for 10.0.0.11:/data 10.0.0.0/24
进行挂载测试
[root@compute1 ~]# mount 10.0.0.11:/data /srv
写入文件
[root@compute1 ~]# cd /srv/[root@compute1 srv]# touch clsn
在服务端查看文件是否写入成功。
[root@controller data]# lltotal 0-rw-r--r-- 1 root root 0 Jan 26 15:35 clsn
14.3 修改Cinder节点配置文件
首先我们需要知道,cinder是通过在cinder.conf配置文件来配置驱动从而使用不同的存储介质的, 所以如果我们使用NFS作为存储介质,那么就需要配置成NFS的驱动,
那么问题来了,如何找到NFS的驱动呢?请看下面查找步骤:
[root@controller ~]# cd /usr/lib/python2.7/site-packages/cinder # 切换到cinder的模块包里[root@controller cinder]# cd volume/drivers/ # 找到卷的驱动[root@controller drivers]# grep Nfs nfs.py # 过滤下Nfs就能找到class NfsDriver(driver.ExtendVD, remotefs.RemoteFSDriver): # 这个class定义的类就是Nfs的驱动名字了
驱动找到了,现在修改cinder配置添加nfs服务器信息
[root@compute1 ~]# vim /etc/cinder/cinder.conf[DEFAULT]···enabled_backends = lvm,ssd,nfs[nfs]volume_driver = cinder.volume.drivers.nfs.NfsDrivernfs_shares_config = /etc/cinder/nfs_sharesvolume_backend_name = nfs
写nfs信息文件
[root@compute1 ~]# cat /etc/cinder/nfs_shares10.0.0.11:/data# 修改权限chown root:cinder /etc/cinder/nfs_shareschmod 640 /etc/cinder/nfs_shares
14.4 重启服务
重启cinder-volume服务
[root@compute1 ~]# systemctl restart openstack-cinder-volume
查看挂载信息
[root@compute1 ~]# df -hFilesystem Size Used Avail Use% Mounted on/dev/sda2 48G 4.0G 45G 9% /devtmpfs 480M 0 480M 0% /devtmpfs 489M 0 489M 0% /dev/shmtmpfs 489M 13M 477M 3% /runtmpfs 489M 0 489M 0% /sys/fs/cgroup/dev/sr0 4.1G 4.1G 0 100% /mnttmpfs 98M 0 98M 0% /run/user/010.0.0.11:/data 48G 2.9G 46G 6% /var/lib/cinder/mnt/490717a467bd12d34ec324c86a4f35b3
在控制节点验证服务是否正常
[root@controller ~]# cinder service-list+------------------+--------------+------+---------+-------+----------------------------+-----------------+| Binary | Host | Zone | Status | State | Updated_at | Disabled Reason |+------------------+--------------+------+---------+-------+----------------------------+-----------------+| cinder-scheduler | controller | nova | enabled | up | 2018-01-26T13:18:45.000000 | - || cinder-volume | compute1@lvm | nova | enabled | up | 2018-01-26T13:18:42.000000 | - || cinder-volume | compute1@nfs | nova | enabled | up | 2018-01-26T13:18:42.000000 | - || cinder-volume | compute1@ssd | nova | enabled | up | 2018-01-26T13:18:42.000000 | - || cinder-volume | compute2@lvm | nova | enabled | up | 2018-01-26T13:18:50.000000 | - |+------------------+--------------+------+---------+-------+----------------------------+-----------------+
14.5 添加NFS存储卷
1)创建nfs类型卷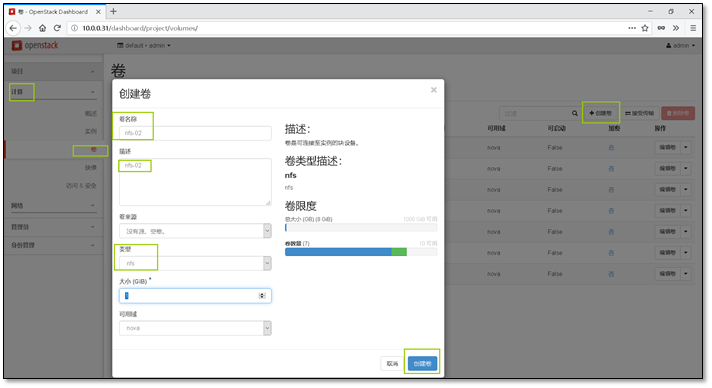
2)创建成功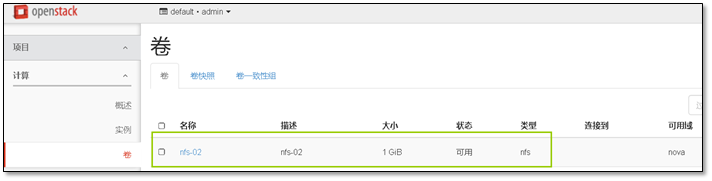
3)查看卷的详细信息
在nfs服务端,查找到标识一致的文件
[root@controller ~]# ll /data/total 0-rw-r--r-- 1 root root 0 Jan 26 15:35 clsn-rw-rw-rw- 1 root root 1073741824 Jan 26 21:23 volume-8c55c9bf-6ab2-4828-a14e-76bd525ba4ad
15. OpenStack中的VXLAN网络
本次的配置时基于” 网络选项1:公共网络“ 进行配置。配置参考 “网络选项2:私有网络“。
15.1 前期准备
1)添加网卡eth2 (所有节点操作)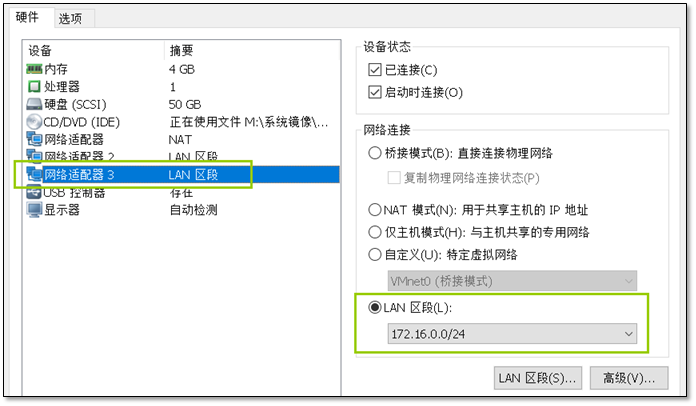
2)配置网卡,配置网段172.16.0.x。
cp /etc/sysconfig/network-scripts/ifcfg-eth{1,2}vim /etc/sysconfig/network-scripts/ifcfg-eth2TYPE=EthernetBOOTPROTO=noneNAME=eth2DEVICE=eth2ONBOOT=yesIPADDR=172.16.0.XNETMASK=255.255.255.0
3)启动网卡
ifup eth2
15.2 修改控制节点配置
参考文档:https://docs.openstack.org/mitaka/zh_CN/install-guide-rdo/neutron-controller-install-option2.html
1)安装组件
yum -y install openstack-neutron openstack-neutron-ml2 openstack-neutron-linuxbridge ebtables
2)修改配置文件
修改 /etc/neutron/neutron.conf
[DEFAULT]...core_plugin = ml2service_plugins = routerallow_overlapping_ips = True
配置 Modular Layer 2 (ML2) 插件,修改/etc/neutron/plugins/ml2/ml2_conf.ini
在[ml2]部分,启用flat,VLAN以及VXLAN网络
[ml2]...type_drivers = flat,vlan,vxlan
在``[ml2]``部分,启用VXLAN私有网络
[ml2]...tenant_network_types = vxlan
在[ml2]部分,启用Linuxbridge和layer-2机制:
[ml2]...mechanism_drivers = linuxbridge,l2population
在[ml2_type_vxlan]部分,为私有网络配置VXLAN网络识别的网络范围
[ml2_type_vxlan]...vni_ranges = 1:1000
配置Linuxbridge代理,修改 /etc/neutron/plugins/ml2/linuxbridge_agent.ini
[vxlan]enable_vxlan = Truelocal_ip = 172.16.0.11l2_population = True
配置layer-3代理,编辑/etc/neutron/l3_agent.ini文件并完成以下操作:
在[DEFAULT]部分,配置Linuxbridge接口驱动和外部网络网桥
[DEFAULT]...interface_driver = neutron.agent.linux.interface.BridgeInterfaceDriverexternal_network_bridge =
同步数据库
su -s /bin/sh -c "neutron-db-manage --config-file /etc/neutron/neutron.conf \--config-file /etc/neutron/plugins/ml2/ml2_conf.ini upgrade head" neutron
启动服务
systemctl restart neutron-server.service \neutron-linuxbridge-agent.service neutron-dhcp-agent.service \neutron-metadata-agent.service# 启动l3网络systemctl enable neutron-l3-agent.servicesystemctl start neutron-l3-agent.service
检查网络状态
[root@controller ~]# neutron agent-list+----------------------+--------------------+------------+-------------------+-------+----------------+-------------------------+| id | agent_type | host | availability_zone | alive | admin_state_up | binary |+----------------------+--------------------+------------+-------------------+-------+----------------+-------------------------+| 3ab2f17f-737e-4c3f- | DHCP agent | controller | nova | :-) | True | neutron-dhcp-agent || 86f0-2289c56a541b | | | | | | || 4f64caf6-a9b0-4742-b | Linux bridge agent | controller | | :-) | True | neutron-linuxbridge- || 0d1-0d961063200a | | | | | | agent || 630540de-d0a0-473b- | Linux bridge agent | compute1 | | :-) | True | neutron-linuxbridge- || 96b5-757afc1057de | | | | | | agent || 9989ddcb-6aba-4b7f- | Metadata agent | controller | | :-) | True | neutron-metadata-agent || 9bd7-7d61f774f2bb | | | | | | || af40d1db-ff24-4201-b | Linux bridge agent | compute2 | | :-) | True | neutron-linuxbridge- || 0f2-175fc1542f26 | | | | | | agent || b08be87c-4abe-48ce- | L3 agent | controller | nova | :-) | True | neutron-l3-agent || 983f-0bb08208f6de | | | | | | |+----------------------+--------------------+------------+-------------------+-------+----------------+-------------------------+
15.3 修改配置计算节点文件
配置Linuxbridge代理,添加配置
vim /etc/neutron/plugins/ml2/linuxbridge_agent.ini[vxlan]enable_vxlan = Truelocal_ip = OVERLAY_INTERFACE_IP_ADDRESSl2_population = True
重启服务
systemctl restart neutron-linuxbridge-agent.service
再次检查网络状态
[root@controller ~]# neutron agent-list+----------------------+--------------------+------------+-------------------+-------+----------------+-------------------------+| id | agent_type | host | availability_zone | alive | admin_state_up | binary |+----------------------+--------------------+------------+-------------------+-------+----------------+-------------------------+| 3ab2f17f-737e-4c3f- | DHCP agent | controller | nova | :-) | True | neutron-dhcp-agent || 86f0-2289c56a541b | | | | | | || 4f64caf6-a9b0-4742-b | Linux bridge agent | controller | | :-) | True | neutron-linuxbridge- || 0d1-0d961063200a | | | | | | agent || 630540de-d0a0-473b- | Linux bridge agent | compute1 | | :-) | True | neutron-linuxbridge- || 96b5-757afc1057de | | | | | | agent || 9989ddcb-6aba-4b7f- | Metadata agent | controller | | :-) | True | neutron-metadata-agent || 9bd7-7d61f774f2bb | | | | | | || af40d1db-ff24-4201-b | Linux bridge agent | compute2 | | :-) | True | neutron-linuxbridge- || 0f2-175fc1542f26 | | | | | | agent || b08be87c-4abe-48ce- | L3 agent | controller | nova | :-) | True | neutron-l3-agent || 983f-0bb08208f6de | | | | | | |+----------------------+--------------------+------------+-------------------+-------+----------------+-------------------------+
15.4 修改dashboard开启路由界面显示
该操作是在web界面开启route功能
vim /etc/openstack-dashboard/local_settingsOPENSTACK_NEUTRON_NETWORK = {'enable_router': True,····
重启dashboard服务
systemctl restart httpd.service
15.5 配置VXLAN网络
1)查看现在网络拓扑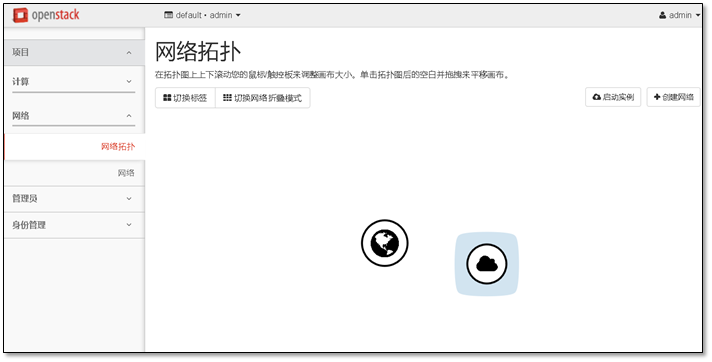
2)编辑网络配置,开启外部网络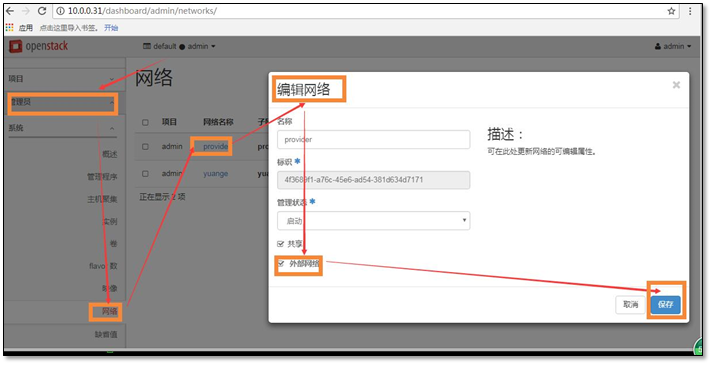
3)配置网络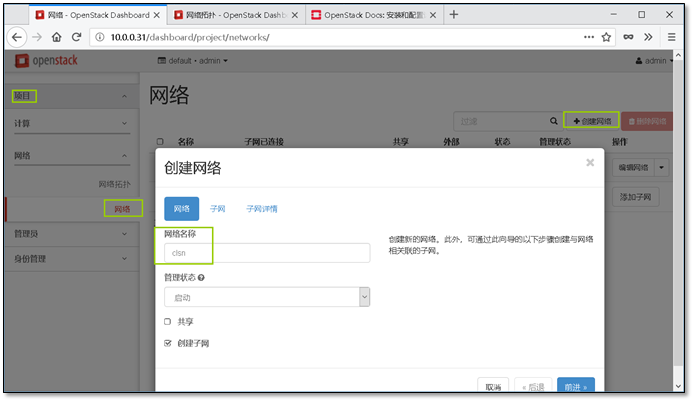
4)配置子网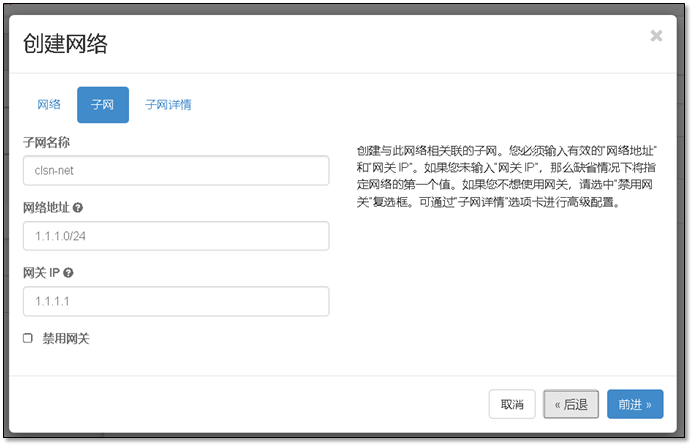
5)创建路由器
创建路由时,注意配置外部网络连接.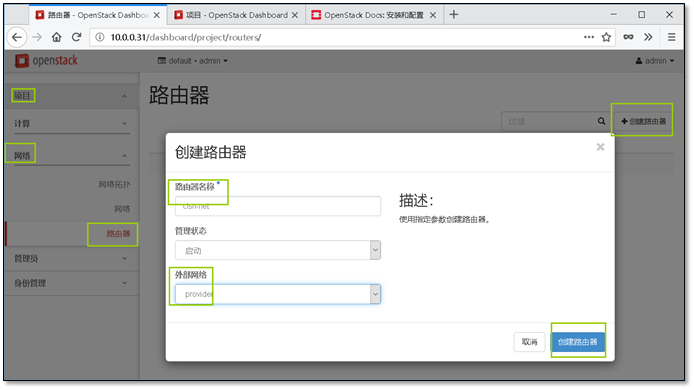
路由器实质为创建命名空间
查看命名空间列表
[root@controller ~]# ip netnsqdhcp-ac1f482b-5c37-4da2-8922-c8d02e3ad27bqrouter-546678a3-7277-42a6-9ddd-a060e3d3198dqdhcp-2563bcef-c6b0-43f1-9b17-1eca15472893qdhcp-54f942f7-cc28-4292-a4d6-e37b8833e35f
进入命名空间
[root@controller ~]# ip netns exec qrouter-546678a3-7277-42a6-9ddd-a060e3d3198d /bin/bash
6)为路由器添加接口连接子网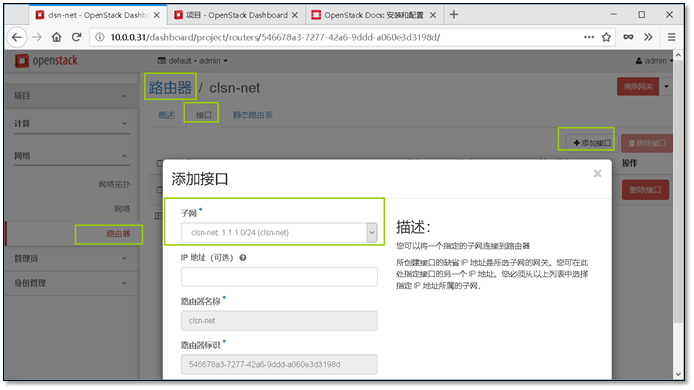
7)创建一台实例,使用配置的VXLAN网络
注意选择配置vxlan的网络配置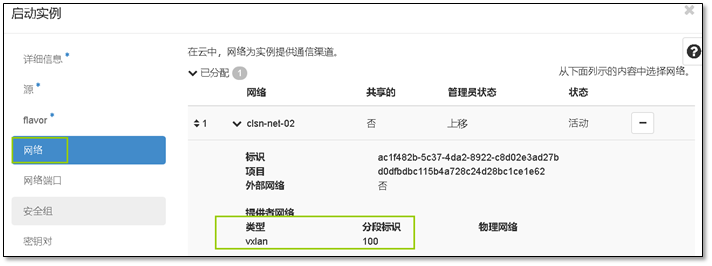
8)为创建的实例配置浮动IP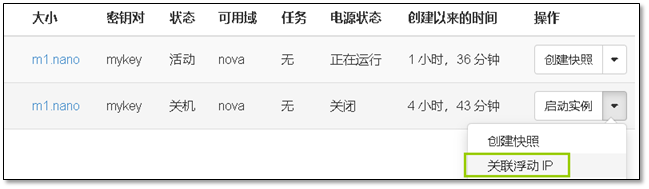
配置浮动IP后的实例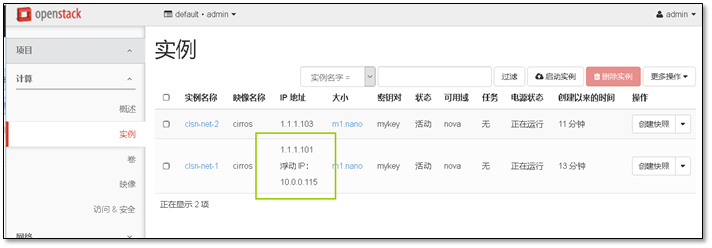
15.6 连接浮动IP测试
使用ssh连接主机,由于之前定制的进行root密码进行修改可以使用root用户直接进行 连接。
[root@compute2 ~]# ssh root@10.0.0.115root@10.0.0.115's password:# ip a1: lo: <LOOPBACK,UP,LOWER_UP> mtu 16436 qdisc noqueuelink/loopback 00:00:00:00:00:00 brd 00:00:00:00:00:00inet 127.0.0.1/8 scope host loinet6 ::1/128 scope hostvalid_lft forever preferred_lft forever2: eth0: <BROADCAST,MULTICAST,UP,LOWER_UP> mtu 1450 qdisc pfifo_fast qlen 1000link/ether fa:16:3e:fc:70:31 brd ff:ff:ff:ff:ff:ffinet 1.1.1.101/24 brd 1.1.1.255 scope global eth0inet6 fe80::f816:3eff:fefc:7031/64 scope linkvalid_lft forever preferred_lft forever# ping baidu.com -c1PING baidu.com (111.13.101.208): 56 data bytes64 bytes from 111.13.101.208: seq=0 ttl=127 time=5.687 ms--- baidu.com ping statistics ---1 packets transmitted, 1 packets received, 0% packet lossround-trip min/avg/max = 5.687/5.687/5.687 ms
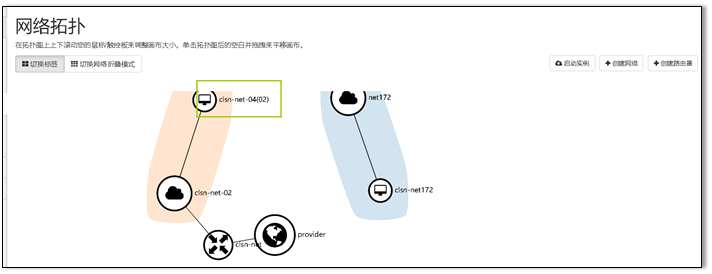
16. openstack API应用
官方API列表:https://docs.openstack.org/pike/api/
官方提供了丰富的API接口,方便用户的使用。可以使用curl命令调用API
curl命令是Linux下一个可以使用多种协议收发数据的工具,包括http协议。openstack的API接口都是URL地址:http://controller:35357/v3可以使用curl命令进行调用。
16.1 获取token方法
获取token
[root@controller ~]# openstack token issue |awk '/ id /{print $4}'gAAAAABaa0MpXNGCHgaytnvyPMbIF3IecIu9jA4WeMaL1kLWueNYs_Q1APXwdXDU7K34wdLg0I1spUIzDhAkst-Qdrizn_L3N5YBlApUrkY7gSw96MkKpTTDjUhIgm0eAD85Ayi6TL_1HmJJQIhm5ERY91zcKi9dvl73jj0dFNDWRqD9Cc9_oPA
将获取token给变量复制
token=` token=`openstack token issue |awk '/ id /{print $4}'`
16.2 常用获取命令
参考:http://www.qstack.com.cn/archives/168.html
使用api端口查看镜像列表
curl -H "X-Auth-Token:$token" -H "Content-Type: application/json" http://10.0.0.32:9292/v2/images
获取roles列表
curl -H "X-Auth-Token:$token" -H "Content-Type: application/json" http://10.0.0.11:35357/v3/roles
获取主机列表
curl -H "X-Auth-Token:$token" -H "Content-Type: application/json" http://10.0.0.11:8774/v2.1/servers
获取网络列表
curl -H "X-Auth-Token:$token" -H "Content-Type: application/json" http://10.0.0.11:9696/v2.0/networks
获取子网列表
curl -H "X-Auth-Token:$token" -H "Content-Type: application/json" http://10.0.0.11:9696/v2.0/subnets
下载一个镜像
curl -o clsn.qcow2 -H "X-Auth-Token:$token" -H "Content-Type: application/json" http://10.0.0.11:9292/v2/images/eb9e7015-d5ef-48c7-bd65-88a144c59115/file
17. 附录
17.1 附录-常见错误
1、配置用户时的错误
【错误】Multiple service matches found for ‘identity’, use an ID to be more specific. 解决办法: openstack endpoint list # 查看列表 openstack endpoint delete ‘id’ # 利用ID删除API 端点 openstack service list # 查看服务列表
2、用户管理时错误
HTTP 503错误: glance日志位置: /var/log/glance/ 用户删除后,重新重建用户后,再关联次角色 openstack role add —project service —user glance admin
3、未加载环境变量时出错
[root@controller ~]# openstack user list Missing parameter(s): Set a username with —os-username, OS_USERNAME, or auth.username Set an authentication URL, with —os-auth-url, OS_AUTH_URL or auth.auth_url Set a scope, such as a project or domain, set a project scope with —os-project-name, OS_PROJECT_NAME or auth.project_name, set a domain scope with —os-domain-name, OS_DOMAIN_NAME or auth.domain_name
17.2 附录-OpenStack组件使用的默认端口号
| OpenStack service | Default ports | Port type |
|---|---|---|
| Block Storage (cinder) | 8776 | publicurl and adminurl |
| Compute (nova) endpoints | 8774 | publicurl and adminurl |
| Compute API (nova-api) | 8773, 8775 | |
| Compute ports for access to virtual machine consoles | 5900-5999 | |
| Compute VNC proxy for browsers ( openstack-nova-novncproxy) | 6080 | |
| Compute VNC proxy for traditional VNC clients (openstack-nova-xvpvncproxy) | 6081 | |
| Proxy port for HTML5 console used by Compute service | 6082 | |
| Data processing service (sahara) endpoint | 8386 | publicurl and adminurl |
| Identity service (keystone) administrative endpoint | 35357 | adminurl |
| Identity service public endpoint | 5000 | publicurl |
| Image service (glance) API | 9292 | publicurl and adminurl |
| Image service registry | 9191 | |
| Networking (neutron) | 9696 | publicurl and adminurl |
| Object Storage (swift) | 6000, 6001, 6002 | |
| Orchestration (heat) endpoint | 8004 | publicurl and adminurl |
| Orchestration AWS CloudFormation-compatible API (openstack-heat-api-cfn) | 8000 | |
| Orchestration AWS CloudWatch-compatible API (openstack-heat-api-cloudwatch) | 8003 | |
| Telemetry (ceilometer) | 8777 | publicurl and adminurl |
17.3 附录-openstack组件使用的默认端口号
| Service | Default port | Used by |
|---|---|---|
| HTTP | 80 | OpenStack dashboard (Horizon) when it is not configured to use secure access. |
| HTTP alternate | 8080 | OpenStack Object Storage (swift) service. |
| HTTPS | 443 | Any OpenStack service that is enabled for SSL, especially secure-access dashboard. |
| rsync | 873 | OpenStack Object Storage. Required. |
| iSCSI target | 3260 | OpenStack Block Storage. Required. |
| MySQL database service | 3306 | Most OpenStack components. |
| Message Broker (AMQP traffic) | 5672 25672 |
OpenStack Block Storage, Networking, Orchestration, and Compute. |
| NTP(chrony) | 123,323 | 时间同步 |
| memcached | 11211 | 缓存服务器 |
17.4 附录-openstack新建云主机流程图

虚拟机启动过程文字表述如下:
1. 界面或命令行通过RESTful API向keystone获取认证信息。2. keystone通过用户请求认证信息,并生成auth-token返回给对应的认证请求。3. 界面或命令行通过RESTful API向nova-api发送一个boot instance的请求(携带auth-token)。4. nova-api接受请求后向keystone发送认证请求,查看token是否为有效用户和token。5. keystone验证token是否有效,如有效则返回有效的认证和对应的角色(注:有些操作需要有角色权限才能操作)。6. 通过认证后nova-api和数据库通讯。7. 初始化新建虚拟机的数据库记录。8. nova-api通过rpc.call向nova-scheduler请求是否有创建虚拟机的资源(Host ID)。9. nova-scheduler进程侦听消息队列,获取nova-api的请求。10. nova-scheduler通过查询nova数据库中计算资源的情况,并通过调度算法计算符合虚拟机创建需要的主机。11. 对于有符合虚拟机创建的主机,nova-scheduler更新数据库中虚拟机对应的物理主机信息。12. nova-scheduler通过rpc.cast向nova-compute发送对应的创建虚拟机请求的消息。13. nova-compute会从对应的消息队列中获取创建虚拟机请求的消息。14. nova-compute通过rpc.call向nova-conductor请求获取虚拟机消息。(Flavor)15. nova-conductor从消息队队列中拿到nova-compute请求消息。16. nova-conductor根据消息查询虚拟机对应的信息。17. nova-conductor从数据库中获得虚拟机对应信息。18. nova-conductor把虚拟机信息通过消息的方式发送到消息队列中。19. nova-compute从对应的消息队列中获取虚拟机信息消息。20. nova-compute通过keystone的RESTfull API拿到认证的token,并通过HTTP请求glance-api获取创建虚拟机所需要镜像。21. glance-api向keystone认证token是否有效,并返回验证结果。22. token验证通过,nova-compute获得虚拟机镜像信息(URL)。23. nova-compute通过keystone的RESTfull API拿到认证k的token,并通过HTTP请求neutron-server获取创建虚拟机所需要的网络信息。24. neutron-server向keystone认证token是否有效,并返回验证结果。25. token验证通过,nova-compute获得虚拟机网络信息。26. nova-compute通过keystone的RESTfull API拿到认证的token,并通过HTTP请求cinder-api获取创建虚拟机所需要的持久化存储信息。27. cinder-api向keystone认证token是否有效,并返回验证结果。28. token验证通过,nova-compute获得虚拟机持久化存储信息。29. nova-compute根据instance的信息调用配置的虚拟化驱动来创建虚拟机。
17.5 附录-MetaData IP 169.254.169.254说明
查考文献:http://server.51cto.com/sVirtual-516706.htm
OpenStack metadata
要理解如何实现的,我们需要先了解OpenStack的metadata。metadata字面上是元数据,主要用来给客户提供一个可以修改设置OpenStack instence(云主机)的机制,就像我们想在虚拟机放置一个公钥这样的需求,或者设置主机名等都可以通过metadata来实现。让我来梳理一下思路:
1.OpenStack有一个叫做Metadata的东东。 2.我们创建虚拟机时候设置的主机名、密钥对,都保存在Metadata中。 3.虚拟机创建后,在启动的时候获取Metadata,并进行系统配置。
虚拟机如何取到Metadata?
那么虚拟机到底是怎么取到这个metadata呢?让我们在虚拟机试试这个。
$ curl http://169.254.169.2541.02007-01-192007-03-012007-08-292007-10-102007-12-152008-02-012008-09-012009-04-04latest
为啥是169.254.169.254?
或许你和我有一样的疑问,为啥这个meatadata的ip地址是169.254.169.254呢?
这个就要提到Amazon了。因为metadata是亚马逊提出来的。然后大家再给亚马逊定制各种操作系统镜像的时候获取metadata的api地址就写的是169.254.169.254。
为了这些镜像也能在OpenStack上运行,为了兼容它。OpenStack就保留了这个地址。其实早期的OpenStack版本是通过iptables NAT来映射169.254.169.254到真实API的IP地址上。
不过现在更灵活了,直接在虚拟机里面增加了一条路由条目来实现,让虚拟机顺利的访问到这个IP地址。关于这个IP的产生需要了解到‘命名空间’的概念,关于命名空间可以参考这篇博文: http://blog.csdn.net/preterhuman_peak/article/details/40857117
进入命名空间
[root@controller ~]# ip netns exec qdhcp-54f942f7-cc28-4292-a4d6-e37b8833e35f /bin/bash[root@controller ~]#[root@controller ~]# ifconfiglo: flags=73<UP,LOOPBACK,RUNNING> mtu 65536inet 127.0.0.1 netmask 255.0.0.0inet6 ::1 prefixlen 128 scopeid 0x10<host>loop txqueuelen 0 (Local Loopback)RX packets 3 bytes 1728 (1.6 KiB)RX errors 0 dropped 0 overruns 0 frame 0TX packets 3 bytes 1728 (1.6 KiB)TX errors 0 dropped 0 overruns 0 carrier 0 collisions 0ns-432508f9-da: flags=4163<UP,BROADCAST,RUNNING,MULTICAST> mtu 1500inet 10.0.0.101 netmask 255.255.255.0 broadcast 10.0.0.255inet6 fe80::f816:3eff:fedb:5a54 prefixlen 64 scopeid 0x20<link>ether fa:16:3e:db:5a:54 txqueuelen 1000 (Ethernet)RX packets 3609 bytes 429341 (419.2 KiB)RX errors 0 dropped 0 overruns 0 frame 0TX packets 777 bytes 89302 (87.2 KiB)TX errors 0 dropped 0 overruns 0 carrier 0 collisions 0
命名空间中的进程
[root@controller ~]# netstat -lntupActive Internet connections (only servers)Proto Recv-Q Send-Q Local Address Foreign Address State PID/Program nametcp 0 0 0.0.0.0:80 0.0.0.0:* LISTEN 31094/python2tcp 0 0 10.0.0.101:53 0.0.0.0:* LISTEN 41418/dnsmasqtcp 0 0 169.254.169.254:53 0.0.0.0:* LISTEN 41418/dnsmasqtcp6 0 0 fe80::f816:3eff:fedb:53 :::* LISTEN 41418/dnsmasqudp 0 0 10.0.0.101:53 0.0.0.0:* 41418/dnsmasqudp 0 0 169.254.169.254:53 0.0.0.0:* 41418/dnsmasqudp 0 0 0.0.0.0:67 0.0.0.0:* 41418/dnsmasqudp6 0 0 fe80::f816:3eff:fedb:53 :::* 41418/dnsmasq
17.6 附录-将控制节点秒变计算节点
1)在控制节点操作
yum -y install openstack-nova-compute
2)修改nova配置文件
[root@controller ~]# vim /etc/nova/nova.conf[vnc]...enabled = Truevncserver_listen = 0.0.0.0vncserver_proxyclient_address = $my_ipnovncproxy_base_url = http://controller:6080/vnc_auto.html
3)启动计算节点服务
systemctl enable libvirtd.service openstack-nova-compute.servicesystemctl start libvirtd.service openstack-nova-compute.service
17.7 附录-如何把实例转换为镜像
需求说明:将一台配置好的服务器,做成镜像,利用该镜像创建新的实例
1)对实例进行拍摄快照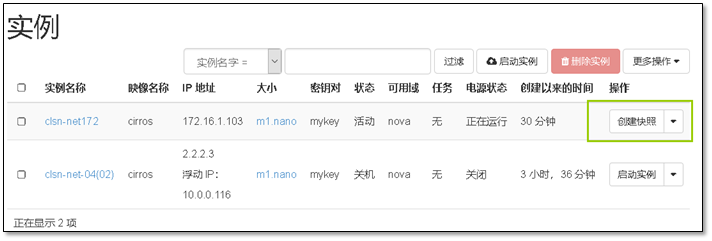
设置快照名称
快照创建文件
但是这里显示的快照名字让人很不爽,下面就将他改为映像。
2)查看进行上的标识信息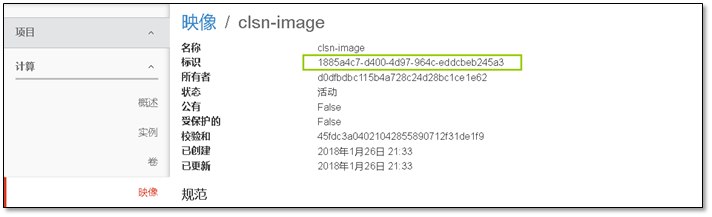
3)在glace服务端查看镜像文件
[root@compute2 ~]# ll /var/lib/glance/images/ -htotal 1.9G-rw-r----- 1 glance glance 1.1G Jan 26 16:27 1473524b-df75-45f5-afc2-83ab3e6915cc-rw-r----- 1 glance glance 22M Jan 26 21:33 1885a4c7-d400-4d97-964c-eddcbeb245a3-rw-r----- 1 glance glance 857M Jan 26 09:37 199bae53-fc7b-4eeb-a02a-83e17ae73e20-rw-r----- 1 glance glance 13M Jan 25 11:31 68222030-a808-4d05-978f-1d4a6f85f7dd-rw-r----- 1 glance glance 13M Jan 23 18:20 9d92c601-0824-493a-bc6e-cecb10e9a4c6
将生成的镜像文件移动到其他目录
[root@compute2 ~]# mv /var/lib/glance/images/1885a4c7-d400-4d97-964c-eddcbeb245a3 /root
4)在web界面删除刚刚生成的快照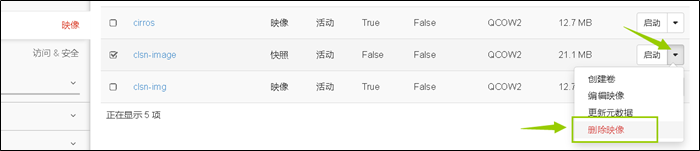
5)将镜像文件重新上传
[root@compute2 ~]# . admin-openrc[root@compute2 ~]# openstack image create "clsn-image-upload" --file 1885a4c7-d400-4d97-964c-eddcbeb245a3 --disk-format qcow2 --container-format bare --public+------------------+------------------------------------------------------+| Field | Value |+------------------+------------------------------------------------------+| checksum | 45fdc3a04021042855890712f31de1f9 || container_format | bare || created_at | 2018-01-26T13:46:15Z || disk_format | qcow2 || file | /v2/images/ab30d820-94e5-4567-8110-605759745112/file || id | ab30d820-94e5-4567-8110-605759745112 || min_disk | 0 || min_ram | 0 || name | clsn-image-upload || owner | d0dfbdbc115b4a728c24d28bc1ce1e62 || protected | False || schema | /v2/schemas/image || size | 22085632 || status | active || tags | || updated_at | 2018-01-26T13:46:40Z || virtual_size | None || visibility | public |+------------------+------------------------------------------------------+
6)在查看刚才创建的镜像
7)使用新镜像创建一台实例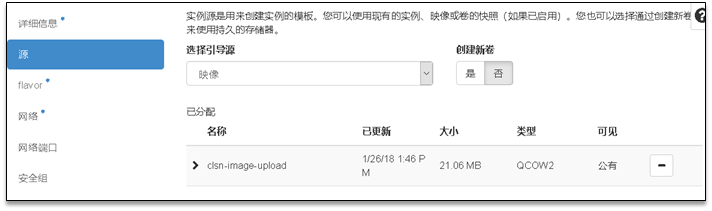
至此实例转换为镜像完成
1.18 参考文献
[1] [openstack官方参考文档] https://docs.openstack.org/mitaka/zh_CN/install-guide-rdo/ [2] https://zh.wikipedia.org/wiki/%e9%9b%b2%e7%ab%af%e9%81%8b%e7%ae%97 [3] http://www.ruanyifeng.com/blog/2017/07/iaas-paas-saas.html [4] https://wiki.openstack.org/wiki/Main_Page [5] https://zh.wikipedia.org/wiki/OpenStack [6] https://www.cnblogs.com/pythonxiaohu/p/5861409.html [7] https://linux.cn/article-5019-1.html [8] https://www.cnblogs.com/endoresu/p/5018688.html [9] https://developer.openstack.org/api-ref/compute/

若有收获,就点个赞吧
0 人点赞
