ELK 是一套日志收集套件,它其实有由 Elasticsearch、Logstash 和 Kibana 三个软件组成,通过 ELK 可以收集系统日志、网站日志、应用系统日志等各种日志数据,并且还可以对日志进行过滤、清洗,然后进行集中存放并可用于实时检索、分析,这是 ELK 的基础功能。
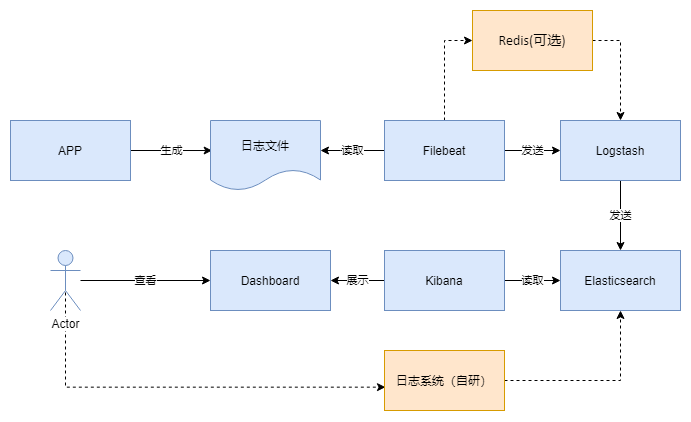
框架

流程
环境
Windos 也能部署,但是个人建议能用 Linux 尽量用 Linux,以 CentOS 7 为例
CentOS 7 系统初始化
Java

部署
https://www.elastic.co/cn/downloads/
Elasticsearch(检索分析)
https://www.elastic.co/cn/downloads/elasticsearch
导入密钥
rpm --import https://artifacts.elastic.co/GPG-KEY-elasticsearch
编辑 vim /etc/yum.repos.d/elasticsearch.repo
[elasticsearch]name=Elasticsearch repository for 7.x packagesbaseurl=https://artifacts.elastic.co/packages/7.x/yumgpgcheck=1gpgkey=https://artifacts.elastic.co/GPG-KEY-elasticsearchenabled=0autorefresh=1type=rpm-md
yum install --enablerepo=elasticsearch elasticsearch 进行安装
修改配置
vim /etc/elasticsearch/elasticsearch.yml,取消以下两行的注释:
## 设置节点名称node.name: node-1## 设置内存是否使用交换分区bootstrap.memory_lock: true/false## 上述如果为 false 需要追加配置bootstrap.system_call_filter: false## 设置允许所有 ip 可以访问network.host: 0.0.0.0## 开启监听的端口为 9200http.port: 9200## 初始时 Master 节点选取cluster.initial_master_nodes: ["node-1"]
xpack.security.enabled: truexpack.security.transport.ssl.enabled: truexpack.security.authc.api_key.enabled: truexpack.security.authc.accept_default_password: false
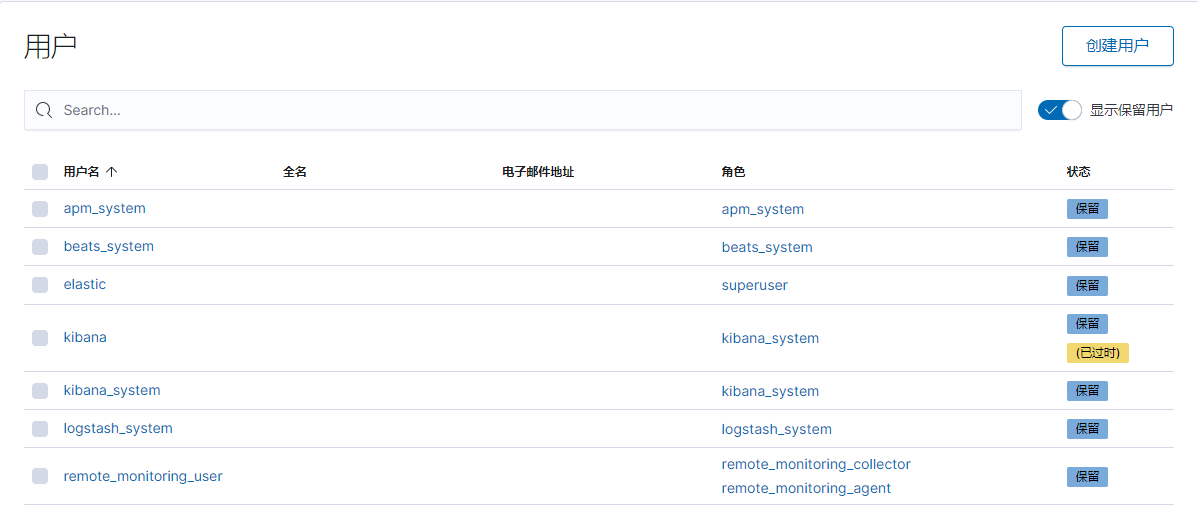
内置账号
elastic 为 elasticsearch 超级管理员,拥有所有权限
kibana 用于 kibana 组件获取相关信息用于 web 展示
logstash_system 用于 logstash 服务获取 elasticsearch 的监控数据
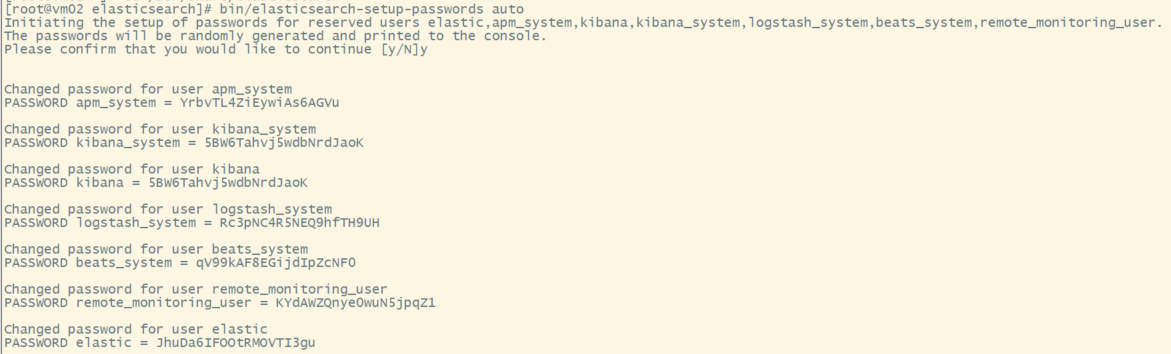
设置密码:
cd /usr/share/elasticsearchbin/elasticsearch-setup-passwords auto | interactive
修改用户密码
curl -XPOST -H 'Content-type: application/json' -u elastic:JhuDa6IFOOtRMOVTI3gu 'http://127.0.0.1:9200/_xpack/security/user/elastic/_password?pretty' -d '{"password": "123456"}'
运行
systemctl daemon-reloadsystemctl enable elasticsearchsystemctl start elasticsearch## 运行成功以后输入以下语句检测是否成功netstat -lantp | grep 9200
报错
bootstrap check failure [1] of [2]: memory locking requested for elasticsearch process but memory is not lockedbootstrap check failure [2] of [2]: the default discovery settings are unsuitable for production use; at least one of [discovery.seed_hosts, discovery.seed_providers, cluster.initial_master_nodes] must be configured
没有对 ElasticSearch 发现进行配置,至少需要配置 discovery.seed_hosts、discovery.seed_providers、cluster.initial_master_nodes 中的一个:
discovery.seed_hosts:集群节点列表,每个值应采用 host:port 或 host 的形式(其中 port 默认为设置 transport.profiles.default.port,如果未设置则返回 transport.port)discovery.seed_providers:集群节点列表的提供者,作用就是获取 discovery.seed_hosts,比如使用文件指定节点列表cluster.initial_master_nodes:初始化时 master 节点的选举列表,一般使用 node.name(节点名称)配置指定,配置旨在第一次启动有效,启动之后会保存,下次启动会读取保存的数据
Logstash(过滤转发)
https://www.elastic.co/cn/downloads/logstashvim /etc/yum.repos.d/logstash.repo
[logstash-7.x]name=Elastic repository for 7.x packagesbaseurl=https://artifacts.elastic.co/packages/7.x/yumgpgcheck=1gpgkey=https://artifacts.elastic.co/GPG-KEY-elasticsearchenabled=1autorefresh=1type=rpm-md
配置
vim /etc/logstash/logstash.yml
##设置数据的存储路径path.data: /var/lib/logstashhttp.enabled: truehttp.host: 127.0.0.1http.port: 9600##设置管道配置文件路径path.config: /etc/logstash/conf.d##设置日志文件的存储路径path.logs: /log/ls-log##设置日志级别和路径log.level: debugpath.logs: /var/log/logstash
运行
systemctl daemon-reloadsystemctl enable logstashsystemctl start logstash## 运行成功以后输入以下语句检测是否成功netstat -lantp | grep 5601
报错
Kibana(挖掘可视)
https://www.elastic.co/cn/downloads/kibanavim /etc/yum.repos.d/kibana.repo
[kibana-7.x]name=Kibana repository for 7.x packagesbaseurl=https://artifacts.elastic.co/packages/7.x/yumgpgcheck=1gpgkey=https://artifacts.elastic.co/GPG-KEY-elasticsearchenabled=1autorefresh=1type=rpm-md
修改配置
vim /etc/kibana/kibana.yml,取消以下注释,并修改相应的内容:
##kibana 页面映射在 5601 端口server.port: 5601##许所有 ip 访问 5601 端口server.host: "0.0.0.0"##Elasticsearch 所在的 ip 及监听的地址elasticsearch.url: "http://localhost:9200"elasticsearch.username: "kibana_system"elasticsearch.password: "5BW6Tahvj5wdbNrdJaoK"kibana.index: ".kibana"##设置中文i18n.locale: "zh-CN"
xpack.security.enabled: truexpack.ingestManager.fleet.tlsCheckDisabled: truexpack.security.encryptionKey: "xN2dWHheUoUoNoToBGqhjgBJH2Q5FrHN"
运行
systemctl daemon-reloadsystemctl enable kibanasystemctl start kibana## 运行成功以后输入以下语句检测是否成功netstat -lantp | grep 5601
Beats(数据采集)
轻量型数据采集器,Beats 是一个免费且开放的平台,集合了多种单一用途数据采集器;它们从成百上千或成千上万台机器和系统向 Logstash 或 Elasticsearch 发送数据。
Filebeat
https://www.elastic.co/cn/downloads/beats/filebeat
Filebeat 是一个轻量级的日志采集器,由于 logstash 比较消耗资源,不适合在每台主机上部署 logstash
vim /etc/yum.repos.d/elastic.repo
[elastic-7.x]name=Elastic repository for 7.x packagesbaseurl=https://artifacts.elastic.co/packages/7.x/yumgpgcheck=1gpgkey=https://artifacts.elastic.co/GPG-KEY-elasticsearchenabled=1autorefresh=1type=rpm-md
配置
vim /etc/filebeat/filebeat.yml
enabled:truepaths:程序日志路径output.redis:日志输出地方hosts:redis 所在服务器 IPport:redis 端口key:redis 中的 key
运行
systemctl enable filebeatsystemctl start filebeat
Metricbeat
轻量型指标采集器,用于从系统和服务收集指标;Metricbeat 能够以一种轻量型的方式,输送各种系统和服务统计数据,从 CPU 到内存,从 Redis 到 Nginx,不一而足。
https://www.elastic.co/cn/downloads/beats/metricbeat
缓冲队列
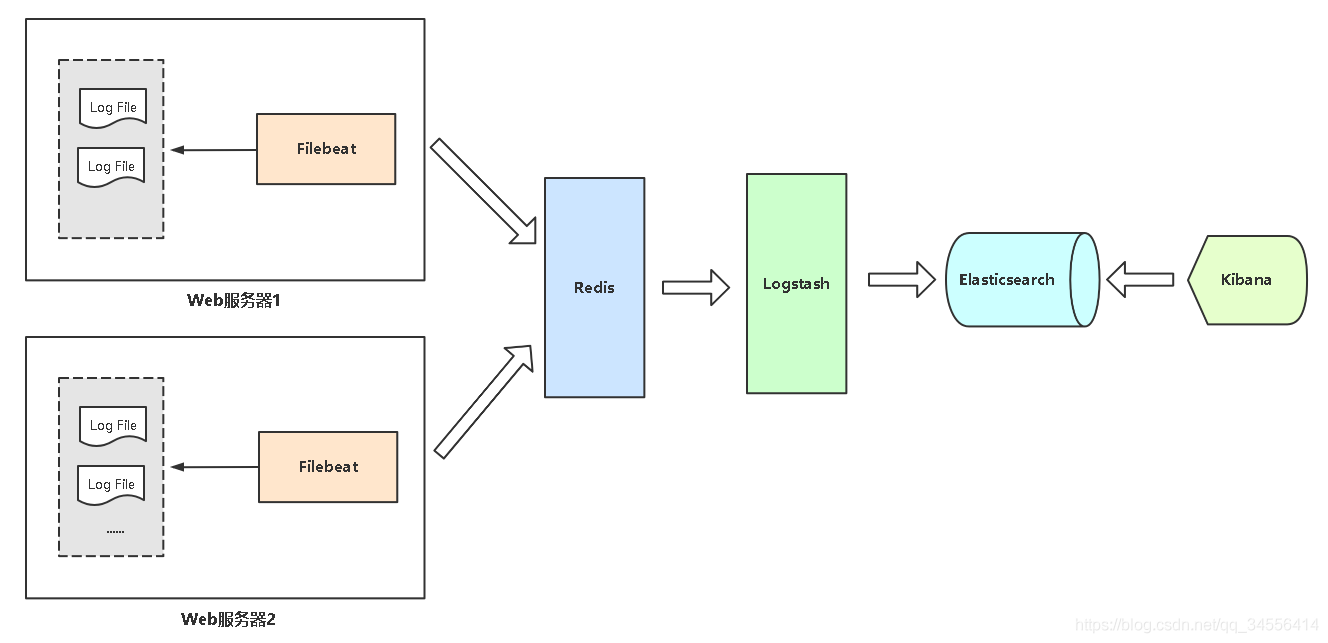
Redis
安装并配置 Redis
yum install -y redissystemctl start redissystemctl enable redis
vim /etc/redis.conf#任何地址 IP 都可以登录 Redisbind 0.0.0.0#关闭 Redis 保护机制否则在没有密码校验情况下 Redis 远程登录失败protected-mode no#认证密码requirepass 123456#超时时间timeout 120#开启后台运行daemonize yes
Filebeat 采集的日志推送到 Redis
vim /etc/filebeat/filebeat.ymlfilebeat.inputs:- type: logenabled: truepaths:- /var/log/nginx/*.logtags: ["nginx"]fields_under_root: truefields:project: microserviceapp: productoutput.redis:hosts: ["xxx.xxx.xxx.xxx:6379"]password: 123456key: "filebeat"db: 0datatype: "list"systemctl restart filebeatjournalctl -u filebeat -f

若有收获,就点个赞吧
0 人点赞
