在正式介绍 BLoC之前, 为什么我们需要状态管理。如果你已经对此十分清楚,那么建议直接跳过这一节。
如果我们的应用足够简单,Flutter 作为一个声明式框架,你或许只需要将 数据 映射成 视图 就可以了。你可能并不需要状态管理,就像下面这样。
但是随着功能的增加,你的应用程序将会有几十个甚至上百个状态。这个时候你的应用应该会是这样。
我们很难再清楚的测试维护我们的状态,因为它看上去实在是太复杂了!而且还会有多个页面共享同一个状态,例如当你进入一个文章点赞,退出到外部缩略展示的时候,外部也需要显示点赞数,这时候就需要同步这两个状态。Flutter 实际上在一开始就为我们提供了一种状态管理方式,那就是 StatefulWidget。但是我们很快发现,它正是造成上述原因的罪魁祸首。
在 State 属于某一个特定的 Widget,在多个 Widget 之间进行交流的时候,虽然你可以使用 callback 解决,但是当嵌套足够深的话,我们增加非常多可怕的垃圾代码。
这时候,我们便迫切的需要一个架构来帮助我们理清这些关系,状态管理框架应运而生。
BLoC 是什么
旨在使用Widget更加简单,更加快捷,方便不同开发者都能使用,可以记录组件的各种状态,方便测试,让许多开发者遵循相同的模式和规则在一个代码库中无缝工作。
如何使用
简单例子
老规矩,我们写一个增加和减小的数字的例子,首先定义一个存储数据的Model,我们继承Equtable来方便与操作符==的判断,Equtable实现了使用props是否相等来判断两个对象是否相等,当然我们也可以自己重写操作符==来实现判断两个对象是否相等。
自己实现操作符如下:
@overridebool operator ==(Object other) {if (other is Model)return this.count == other.count &&age == other.count &&name == other.name;return false;}
使用Equtable操作符==关键代码如下:
// ignore: must_be_immutableclass Model extends Equatable {int count;int age;String name;List<String> list;Model({this.count = 0, this.name, this.list, this.age = 0});@overrideList<Object> get props => [count, name, list, age];Model addCount(int value) {return clone()..count = count + value;}Model addAge(int value) {return clone()..age = age + value;}Model clone() {return Model(count: count, name: name, list: list, age: age);}}
构造一个装载Model数据的Cubit:
class CounterCubit extends Cubit<Model> {CounterCubit() : super(Model(count: 0, name: '老王'));void increment() {print('CounterCubit +1');emit(state.addCount(1));}void decrement() {print('CounterCubit -1');emit(state.clone());}void addAge(int v) {emit(state.addAge(v));}void addCount(int v) {emit(state.addCount(v));}}
数据准备好之后准备展示了,首先在需要展示数据小部件上层包裹一层BlocProvider,关键代码:
BlocProvider(create: (_) => CounterCubit(),child: BaseBLoCRoute(),)
要是多个model的话和Provider写法基本一致。
MultiBlocProvider(providers: [BlocProvider(create: (_) => CounterCubit(),),BlocProvider(create: (_) => CounterCubit2(),),],child: BaseBLoCRoute(),)
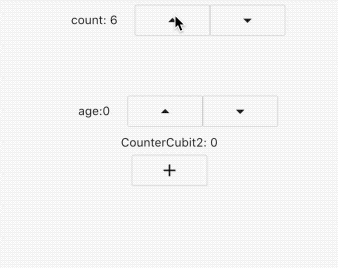
然后在展示数字的widget上开始展示数据了,BlocBuilder<CounterCubit, Model>中CounterCubit是载体,Model是数据,使用builder回调来刷新UI,刷新UI的条件是buildWhen: (m1, m2) => m1.count != m2.count,当条件满足时进行回调builder.
BlocBuilder<CounterCubit, Model>(builder: (_, count) {print('CounterCubit1 ');return Row(mainAxisAlignment: MainAxisAlignment.center,children: <Widget>[Padding(child: Text('count: ${count.count}',),padding: EdgeInsets.all(20),),OutlineButton(child: Icon(Icons.arrow_drop_up),onPressed: () {context.bloc<CounterCubit>().addCount(1);},),OutlineButton(child: Icon(Icons.arrow_drop_down),onPressed: () {context.bloc<CounterCubit>().addCount(-1);},)],);},buildWhen: (m1, m2) => m1.count != m2.count,)
监听状态变更
/// 监听状态变更void initState() {Bloc.observer = SimpleBlocObserver();super.initState();}/// 观察者来观察 事件的变化 可以使用默认的 [BlocObserver]class SimpleBlocObserver extends BlocObserver {@overridevoid onEvent(Bloc bloc, Object event) {print(event);super.onEvent(bloc, event);}@overridevoid onChange(Cubit cubit, Change change) {print(change);super.onChange(cubit, change);}@overridevoid onTransition(Bloc bloc, Transition transition) {print(transition);super.onTransition(bloc, transition);}@overridevoid onError(Cubit cubit, Object error, StackTrace stackTrace) {print(error);super.onError(cubit, error, stackTrace);}}

局部刷新
布局刷新是使用BlocBuilder来实现的,BlocBuilder<CounterCubit, Model>中CounterCubit是载体,Model是数据,使用builder回调来刷新UI,刷新UI的条件是buildWhen: (m1, m2) => m1.count != m2.count,当条件满足时进行回调builder.
本例子是多个model,多个局部UI刷新
Widget _body() {return Center(child: CustomScrollView(slivers: <Widget>[SliverToBoxAdapter(child: BlocBuilder<CounterCubit, Model>(builder: (_, count) {print('CounterCubit1 ');return Row(mainAxisAlignment: MainAxisAlignment.center,children: <Widget>[Padding(child: Text('count: ${count.count}',),padding: EdgeInsets.all(20),),OutlineButton(child: Icon(Icons.arrow_drop_up),onPressed: () {context.bloc<CounterCubit>().addCount(1);},),OutlineButton(child: Icon(Icons.arrow_drop_down),onPressed: () {context.bloc<CounterCubit>().addCount(-1);},)],);},buildWhen: (m1, m2) => m1.count != m2.count,),),SliverToBoxAdapter(child: SizedBox(height: 50,),),SliverToBoxAdapter(child: BlocBuilder<CounterCubit, Model>(builder: (_, count) {print('CounterCubit age build ');return Row(mainAxisAlignment: MainAxisAlignment.center,children: <Widget>[Padding(child: Text('age:${count.age}',),padding: EdgeInsets.all(20),),OutlineButton(child: Icon(Icons.arrow_drop_up),onPressed: () {context.bloc<CounterCubit>().addAge(1);},),OutlineButton(child: Icon(Icons.arrow_drop_down),onPressed: () {context.bloc<CounterCubit>().addAge(-1);},)],);},buildWhen: (m1, m2) => m1.age != m2.age,),),SliverToBoxAdapter(child: BlocBuilder<CounterCubit2, Model>(builder: (_, count) {print('CounterCubit2 ');return Column(children: <Widget>[Text('CounterCubit2: ${count.age}'),OutlineButton(child: Icon(Icons.add),onPressed: () {context.bloc<CounterCubit2>().addAge(1);},)],);},),)],),);}
当我们点击加好或者减号已经被SimpleBlocObserver监听到,看下打印信息,每次model变更都会通知监听者。
flutter: Change { currentState: Model, nextState: Model }flutter: CounterCubit2flutter: Change { currentState: Model, nextState: Model }flutter: CounterCubit2
复杂状态变更,监听和刷新UI
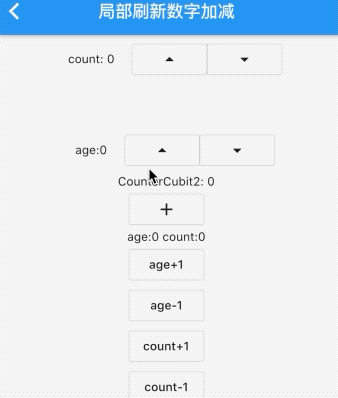
一个加减例子,每次加减我们在当前组件中监听,当状态变更的时候如何实现刷新UI,而且当age+count == 10的话返回上一页。
要满足此功能的话,同一个部件至少要listener和builder,正好官方提供的BlocConsumer可以实现,如果只需要监听则需要使用BlocListener,简单来说是BlocConsumer=BlocListener+BlocBuilder.
看关键代码:
BlocConsumer<CounterCubit, Model>(builder: (ctx, state) {return Column(children: <Widget>[Text('age:${context.bloc<CounterCubit>().state.age} count:${context.bloc<CounterCubit>().state.count}'),OutlineButton(child: Text('age+1'),onPressed: () {context.bloc<CounterCubit>().addAge(1);},),OutlineButton(child: Text('age-1'),onPressed: () {context.bloc<CounterCubit>().addAge(-1);},),OutlineButton(child: Text('count+1'),onPressed: () {context.bloc<CounterCubit>().addCount(1);},),OutlineButton(child: Text('count-1'),onPressed: () {context.bloc<CounterCubit>().addCount(-1);},)],);}, listener: (ctx, state) {if (state.age + state.count == 10) Navigator.maybePop(context);})
效果如下:
复杂情况(Cubit)
登陆功能(继承 Cubit)
我们再编写一个完整登陆功能,分别用到BlocListener用来监听是否可以提交数据,用到BlocBuilder用来刷新UI,名字输入框和密码输入框分别用BlocBuilder包裹,实现局部刷新,提交按钮用BlocBuilder包裹用来展示可用和不可用状态。
此为
bloc_login的官方例子的简单版本,想要了解更多请查看官方版本
观察者
观察者其实一个APP只需要写一次即可,一般在APP初始化配置即可。
我们这里只提供打印状态变更信息。
class DefaultBlocObserver extends BlocObserver {@overridevoid onChange(Cubit cubit, Change change) {if (kDebugMode)print('${cubit.toString()} new:${change.toString()} old:${cubit.state.toString()}');super.onChange(cubit, change);}}
在初始化指定观察者
@overridevoid initState() {Bloc.observer=DefaultBlocObserver();super.initState();}
或者使用默认观察者
Bloc.observer = BlocObserver();
State(Model)
存储数据的state(Model),这里我们需要账户信息,密码信息,是否可以点击登录按钮,是否正在登录这些信息。
enum LoginState {success,faild,isLoading,}enum BtnState { available, unAvailable }class LoginModel extends Equatable {final String name;final String password;final LoginState state;LoginModel({this.name, this.password, this.state});@overrideList<Object> get props => [name, password, state, btnVisiable];LoginModel copyWith({String name, String pwd, LoginState loginState}) {return LoginModel(name: name ?? this.name,password: pwd ?? this.password,state: loginState ?? this.state);}bool get btnVisiable =>(password?.isNotEmpty ?? false) && (name?.isNotEmpty ?? false);@overrideString toString() {return '$props';}}
Cubit
装载state的类,当state变更需要调用emit(state),state的变更条件是==,所以我们上边的state(Model)继承了Equatable,Equatable内部实现了操作符==函数,我们只需要将它所需props重写即可。
class LoginCubit extends Cubit<LoginModel> {LoginCubit(state) : super(state);void login() async {emit(state.copyWith(loginState: LoginState.isLoading));await Future.delayed(Duration(seconds: 2));if (state.btnVisiable == true)emit(state.copyWith(loginState: LoginState.success));emit(state.copyWith(loginState: LoginState.faild));}void logOut() async {emit(state.copyWith(name: null,pwd: null,));}void changeName({String name}) {emit(state.copyWith(name: name, pwd: state.password, loginState: state.state));}void changePassword({String pwd}) {emit(state.copyWith(name: state.name, pwd: pwd, loginState: state.state));}}
构造view
关键还是得看如何构造UI,首先输入框分别使用BlocBuilder包裹实现局部刷新,局部刷新的关键还是buildWhen得写的漂亮,密码输入框的话只需要判断密码是否改变即可,账号的话只需要判断账号是否发生改变即可,
按钮也是如此,在UI外层使用listener来监听状态变更,取所需要的状态跳转新的页面或者弹窗。
首先看下输入框关键代码:
class TextFiledNameRoute extends StatelessWidget {@overrideWidget build(BuildContext context) {return BlocBuilder<LoginCubit, LoginModel>(builder: (BuildContext context, LoginModel state) {return TextField(onChanged: (v) {context.bloc<LoginCubit>().changeName(name: v);},decoration: InputDecoration(labelText: 'name',errorText: state.name?.isEmpty ?? false ? 'name不可用' : null),);},buildWhen: (previos, current) => previos.name != current.name);}}class TextFiledPasswordRoute extends StatelessWidget {@overrideWidget build(BuildContext context) {return BlocBuilder<LoginCubit, LoginModel>(builder: (BuildContext context, LoginModel state) {return TextField(onChanged: (v) {context.bloc<LoginCubit>().changePassword(pwd: v);},decoration: InputDecoration(labelText: 'password',errorText:state.password?.isEmpty ?? false ? 'password不可用' : null),);},buildWhen: (previos, current) => previos.password != current.password);}}
按钮根据不同的状态来显示可用或不可用或正在提交的动画效果。
class LoginButton extends StatelessWidget {@overrideWidget build(BuildContext context) {return BlocBuilder<LoginCubit, LoginModel>(builder: (BuildContext context, LoginModel state) {switch (state.state) {case LoginState.isLoading:return const CircularProgressIndicator();default:return RaisedButton(child: const Text('login'),onPressed: state.btnVisiable? () {context.bloc<LoginCubit>().login();}: null,);}},buildWhen: (previos, current) =>previos.btnVisiable != current.btnVisiable ||(current.state != previos.state));}}
小部件写好了,那么我们将他们组合起来
class BaseLoginPageRoute extends StatelessWidget {@overrideWidget build(BuildContext context) {return BlocProvider(create: (_) => LoginCubit(LoginModel()),child: BaseLoginPage(),);}static String routeName = '/BaseLoginPageRoute';MaterialPageRoute get route =>MaterialPageRoute(builder: (_) => BaseLoginPageRoute());}class BaseLoginPage extends StatefulWidget {BaseLoginPage({Key key}) : super(key: key);@override_BaseLoginPageState createState() => _BaseLoginPageState();}class _BaseLoginPageState extends State<BaseLoginPage> {@overrideWidget build(BuildContext context) {return Scaffold(appBar: AppBar(title: Text('loginBLoC Cubit'),),body: _body(),);}Widget _body() {return BlocListener<LoginCubit, LoginModel>(listener: (context, state) {if (state.state == LoginState.success) {Scaffold.of(context)..hideCurrentSnackBar()..showSnackBar(const SnackBar(content: Text('登陆成功')));}},child: Center(child: Column(children: <Widget>[TextFiledNameRoute(),TextFiledPasswordRoute(),const SizedBox(height: 20,),LoginButton()],),),);}@overridevoid initState() {Bloc.observer = BlocObserver();super.initState();}}
这里我们实现了登陆成功弹出snackBar.
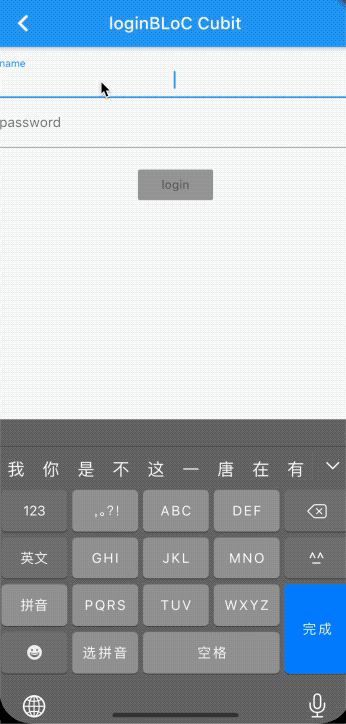
看下效果图哦:
复杂情况(Bloc)
情况1都我们手动emit(state),那么有没有使用流技术来直接监听的呢?答案是有,那么我们再实现一遍使用bloc的登陆功能。
state(数据载体)
首先我们使用 一个抽象类来定义事件,然后各种小的事件都继承它,比如:NameEvent装载了姓名信息,PasswordEvent装载了密码信息,SubmittedEvent装载了提交信息,简单来讲,event就是每一个按钮点击事件或者valueChange事件触发的动作,最好下载代码之后自己对比下,然后自己从简单例子写,此为稍微复杂情况,看下关键代码:
/// 登陆相关的事件abstract class LoginEvent extends Equatable {const LoginEvent();@overrideList<Object> get props => [];}/// 修改密码class LoginChagnePassword extends LoginEvent {final String password;const LoginChagnePassword({this.password});@overrideList<Object> get props => [password];}/// 修改账户class LoginChagneName extends LoginEvent {final String name;const LoginChagneName({this.name});@overrideList<Object> get props => [name];}/// 提交事件class LoginSubmitted extends LoginEvent {const LoginSubmitted();@overrideList<Object> get props => [];}
存储数据的state,在LoginBloc中将event转换成state,那么state需要存储什么数据呢?需要存储账户信息、密码、登陆状态等信息。
/// 事件变更状态[正在请求,报错,登陆成功,初始化]enum Login2Progress { isRequesting, error, success, init }/// 存储数据的model 在[bloc]中称作[state]class LoginState2 extends Equatable {final String name;final String password;final Login2Progress progress;LoginState2({this.name, this.password, this.progress = Login2Progress.init});@overrideList<Object> get props => [name, password, btnVisiable, progress];LoginState2 copyWith({String name, String pwd, Login2Progress login2progress}) {return LoginState2(name: name ?? this.name,password: pwd ?? this.password,progress: login2progress ?? this.progress);}/// 使用 [UserName] &&[UserPassword]来校验规则bool get btnVisiable => nameVisiable && passwordVisiable;bool get nameVisiable => UserName(name).visiable;bool get passwordVisiable => UserPassword(password).visiable;/// 是否展示名字错误信息bool get showNameErrorText {if (name?.isEmpty ?? true) return false;return nameVisiable == false;}/// 是否展示密码错误信息bool get showPasswordErrorText {if (password?.isEmpty ?? true) return false;return passwordVisiable == false;}@overrideString toString() {return '$props';}}
event和state写好了,怎么将event转换成state呢?首先新建一个类继承Bloc,覆盖函数mapEventToState,利用这个函数参数event来对state,进行转换,中间因为用到了虚拟的网络登陆,耗时操作和状态变更,所以使用了yield*返回了另外一个流函数。
class LoginBloc extends Bloc<LoginEvent, LoginState2> {LoginBloc(initialState) : super(initialState);@overrideStream<LoginState2> mapEventToState(event) async* {if (event is LoginChagneName) {yield _mapChangeUserNameToState(event, state);} else if (event is LoginChagnePassword) {yield _mapChangePasswordToState(event, state);} else if (event is LoginSubmitted) {yield* _mapSubmittedToState(event, state);}}/// 改变密码LoginState2 _mapChangePasswordToState(LoginChagnePassword event, LoginState2 state2) {return state2.copyWith(pwd: event.password ?? '');}/// 改变名字LoginState2 _mapChangeUserNameToState(LoginChagneName event, LoginState2 state2) {return state2.copyWith(name: event.name ?? '');}/// 提交Stream<LoginState2> _mapSubmittedToState(LoginSubmitted event, LoginState2 state2) async* {try {if (state2.name.isNotEmpty && state2.password.isNotEmpty) {yield state2.copyWith(login2progress: Login2Progress.isRequesting);await Future.delayed(Duration(seconds: 2));yield state2.copyWith(login2progress: Login2Progress.success);yield state2.copyWith(login2progress: Login2Progress.init);}} on Exception catch (e) {yield state2.copyWith(login2progress: Login2Progress.error);}}}
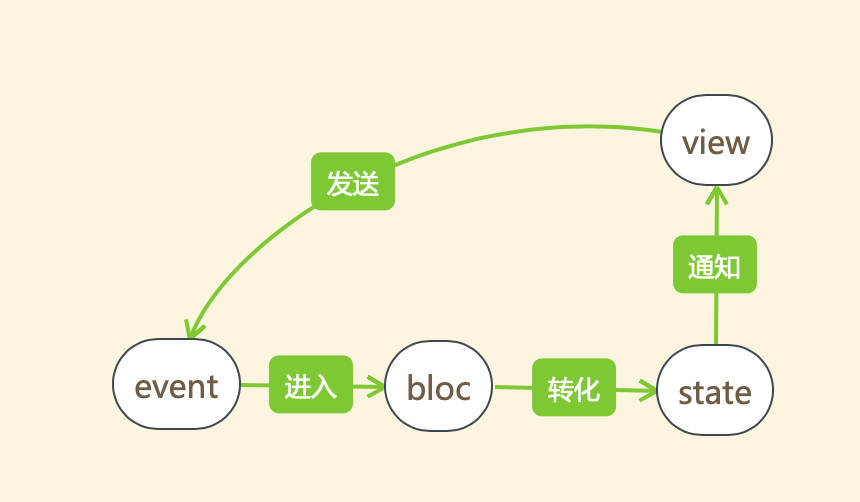
state和event事件整理成图方便理解一下:
构造view
样式我们还是使用上边的 ,但是发送事件却不一样,原因是继承bloc其实是实现了EventSink的接口,使用add()触发监听。
class TextFiledNameRoute extends StatelessWidget {@overrideWidget build(BuildContext context) {return BlocBuilder<LoginBloc, LoginState2>(builder: (BuildContext context, LoginState2 state) {return TextField(onChanged: (v) {context.bloc<LoginBloc>().add(LoginChagneName(name: v));},textAlign: TextAlign.center,decoration: InputDecoration(labelText: 'name',errorText:(state.showNameErrorText == true) ? 'name不可用' : null),);},buildWhen: (previos, current) => previos.name != current.name);}}
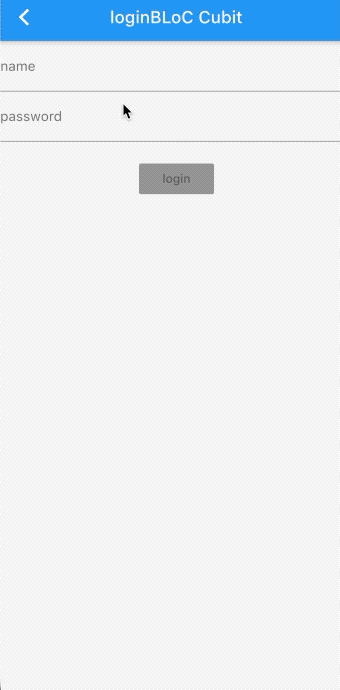
完整的效果是:
BLoC 流程
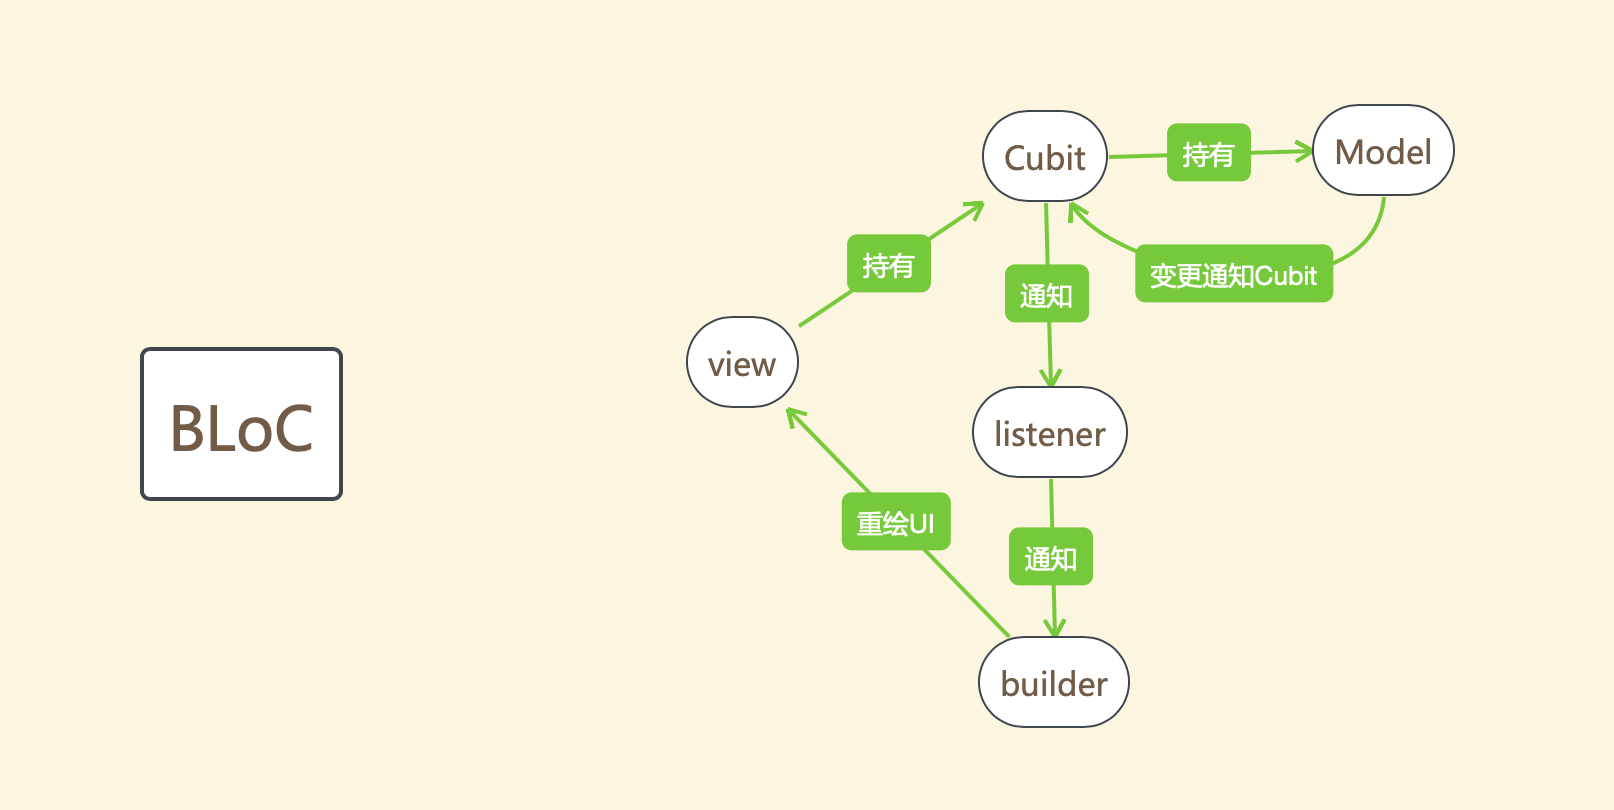
首先view部件持有Cubit,Cubit持有状态(Model),当状态(Model)发生变更时通知Cubit,Cubit依次通知listener、BlocBulder.builder进行刷新UI,每次状态变更都会通知BlocObserver,可以做到全局的状态监听。
千言万语不如一张图:
参考

若有收获,就点个赞吧
0 人点赞
