- 前言
- 具体流程
- 读取训练数据
- 合并两个训练数据和训练标签
- 使用布尔判断 判断train中是否存在空值 并剔除
- 将na值替换为空字符串
- 加载stop_words停用词
- 创建翻译表,后续用于去除英文标点
- # 去除英文标点
- tokens = [w.translate(table) for w in tokens] # translate 和 maketrans 连用 具体百度
- 调用分词函数对训练集和测试集中的标题和文本进行分词
- 连接所有分词,为后续训练词向量做准备
- sequence = tokenizer.texts_to_sequences(train_content)
- traincontent = pad_sequences(sequence, maxlen=512)
- sequence = tokenizer.texts_to_sequences(test_content)
- testcontent = pad_sequences(sequence, maxlen=512)
- 3.模型训练
- to_categorical是tf的one-hot编码转换,因为 loss用的 categorical_crossentropy
- loos用 sparse_categorical_crossentropy 就不用转换
- 可以直接用的干货
前言
数据来源:
2019年CCF互联网新闻情感分析大赛
https://www.datafountain.cn/competitions/350/
数据集附件:
链接:https://pan.baidu.com/s/1ePKyHyE8AGN3vW_1vg9-yg
提取码:2021
具体工具:
深度学习框架使用 tensorflow2.4.0自然语言处理库 gensim3.8.3分词工具 jieba 0.42.1
代码哪里不懂点哪里:python菜鸟教程更像一个查询手册
https://www.runoob.com/python3/python3-tutorial.html
具体流程
![[2]使用BiLSTM进行情感分析 - 图1](/uploads/projects/armor-novr7@work/77d2fd3b3e3c6e79edfd99aa9d412905.jpeg)
1. 数据预处理
1.1 读取数据
这里通过read_csv读取数据集,因为train_data和train_label是分开的,使用pd.merge()进行合并
- pd.merge(x,y,how=”left”,on=”id”)详解:
- notnull() :是否为空,返回对应布尔值
- fillna(value):找到空值并替换为value ```python import pandas as pd import numpy as np
读取训练数据
train_data = pd.read_csv(‘Train_DataSet.csv’) train_label = pd.read_csv(‘Train_DataSet_Label.csv’) test = pd.read_csv(‘Test_DataSet.csv’)
合并两个训练数据和训练标签
train = pd.merge(train_data, train_label, how=’left’, on=’id’)
使用布尔判断 判断train中是否存在空值 并剔除
train = train[(train.label.notnull()) & (train.content.notnull())]
将na值替换为空字符串
train[‘title’] = train[‘title’].fillna(‘’) train[‘content’] = train[‘content’].fillna(‘’) test[‘title’] = test[‘title’].fillna(‘’) test[‘content’] = test[‘content’].fillna(‘’)
<a name="Hxtx6"></a>### 1.2 文本无效字符和标签过滤其中 text_filter(text) 函数可以存储到工具库,方便下次使用- re.sub(正则表达式,被替换字符串,替换字符串)- str.strip():去除字符串首尾的空格```pythonimport re# 文本过滤函数def text_filter(text):# re.sub(正则表达式,被替换字符串,替换字符串)text = re.sub("[A-Za-z0-9\!\=\?\%\[\]\,\(\)\>\<:<\/#\. -----\_]", "", text)text = text.replace('图片', '')text = text.replace('\xa0', '') # 删除nbsp# 去除html标签cleanr = re.compile('<.*?>')text = re.sub(cleanr, ' ', text)# 去除其他字符r1 = "\\【.*?】+|\\《.*?》+|\\#.*?#+|[.!/_,$&%^*()<>+""'?@|:~{}#]+|[——!\\\,。=?、:“”‘’¥……()《》【】]"text = re.sub(r1,'',text)# 去除字符串首尾的空格text = text.strip()return text# 文本清理函数def clean_text(data):# 标题文本data['title'] = data['title'].apply(lambda x: text_filter(x))# 正文文本data['content'] = data['content'].apply(lambda x: text_filter(x))return data# run clean_texttrain = clean_text(train)test = clean_text(test)
1.3 分词和停用词
- str.maketrans(x,y,z):三个参数 x、y、z,第三个参数 z 必须是字符串,其字符将被映射为 None,即删除该字符;如果 z 中字符与 x 中字符重复,该重复的字符在最终结果中还是会被删除。 也就是无论是否重复,只要有第三个参数 z,z 中的字符都会被删除。
- string.punctuation:所有的标点符号
- [token for token in tokens if token not in stop_words] :列表表达式:如果tokens中的token不在stop_words中那么就返回此token ```python import jieba import string
加载stop_words停用词
stop_words = pd.read_table(‘stop.txt’, header=None)[0].tolist()
创建翻译表,后续用于去除英文标点
table = str.maketrans(“”,””,string.punctuation) def cut_text(sentence): tokens = list(jieba.cut(sentence))
# 去除停用词 列表tokens = [token for token in tokens if token not in stop_words]
# 去除英文标点
tokens = [w.translate(table) for w in tokens] # translate 和 maketrans 连用 具体百度
return tokens
调用分词函数对训练集和测试集中的标题和文本进行分词
train_title = [cut_text(sent) for sent in train.title.values] train_content = [cut_text(sent) for sent in train.content.values] test_title = [cut_text(sent) for sent in test.title.values] test_content = [cut_text(sent) for sent in test.content.values]
连接所有分词,为后续训练词向量做准备
all_doc = train_title + train_content + test_title + test_content
<a name="wGCmK"></a>### 1.4 使用gensim训练词向量这一系列代码可以直接使用,训练自己的词向量,经过测试样本量越大效越好。本次比赛分词后vacob_size大约为29244```pythonimport gensimimport timeclass EpochSaver(gensim.models.callbacks.CallbackAny2Vec):'''用于保存模型, 打印损失函数等等'''def __init__(self, save_path):self.save_path = save_path # 模型存储路径self.epoch = 0 # 轮次self.pre_loss = 0 # 前一轮损失self.best_loss = 999999999.9 # 最佳损失self.since = time.time() # 跑一轮的持续时间def on_epoch_end(self, model):self.epoch += 1cum_loss = model.get_latest_training_loss() # 返回的是从第一个epoch累计的epoch_loss = cum_loss - self.pre_loss # epoch-loss = 当前损失 - 前一轮损失time_taken = time.time() - self.since # 持续时间print("Epoch %d, loss: %.2f, time: %dmin %ds" %(self.epoch, epoch_loss, time_taken//60, time_taken%60)) # 打印一轮的结果,时间采用分秒# 记录best_loss,并通过best_loss进行early_stopif self.best_loss > epoch_loss:self.best_loss = epoch_lossprint("Better model. Best loss: %.2f" % self.best_loss) # 打印最佳损失model.save(self.save_path) # 保存模型print("Model %s save done!" % self.save_path)self.pre_loss = cum_lossself.since = time.time()# 下面的代码可以加载训练好的词向量# model_word2vec = gensim.models.Word2Vec.load('final_word2vec_model')
创建word2vec训练器并使用build_vocab把单词导入到词库
model_word2vec = gensim.models.Word2Vec(min_count=1,window=5,size=256,workers=4,batch_words=1000)since = time.time()model_word2vec.build_vocab(all_doc, progress_per=2000)time_elapsed = time.time() - sinceprint('Time to build vocab: {:.0f}min {:.0f}s'.format(time_elapsed // 60, time_elapsed % 60))
- 训练词向量并保存
```python
since = time.time()
model_word2vec.train(all_doc, total_examples=model_word2vec.corpus_count,
time_elapsed = time.time() - since print(‘Time to train: {:.0f}min {:.0f}s’.format(time_elapsed // 60, time_elapsed % 60))epochs=20, compute_loss=True, report_delay=60*10,callbacks=[EpochSaver('./final_word2vec_model')])
<a name="4EaGw"></a>### 1.5 编码为TF.Tokenizer格式Tokenizer是tensorflow的分词器,里面有封装完整的词典索引等。<br />参考博客:[https://dengbocong.blog.csdn.net/article/details/108038858](https://dengbocong.blog.csdn.net/article/details/108038858)```python# 转化为Tokenizerfrom tensorflow.keras.preprocessing.text import Tokenizertokenizer = Tokenizer()tokenizer.fit_on_texts(train_title + test_title)# tokenizer.fit_on_texts(train_content + test_content)
1.6 构造Embedding_matrix矩阵
from tqdm import tqdm# 转化成词向量矩阵,利用新的word2vec模型vocab_size = len(tokenizer.word_index) # 词库大小error_count=0embedding_matrix = np.zeros((vocab_size + 1, 256))for word, i in tqdm(tokenizer.word_index.items()):if word in model_word2vec:embedding_matrix[i] = model_word2vec.wv[word]else:error_count += 1
1.7 padding编码
- padding用于补齐较短的文本,或截断较长的文本 ```python from tensorflow.keras.preprocessing.sequence import pad_sequences
sequence = tokenizer.texts_to_sequences(train_title) traintitle = pad_sequences(sequence, maxlen=30) sequence = tokenizer.texts_to_sequences(test_title) testtitle = pad_sequences(sequence, maxlen=30)
sequence = tokenizer.texts_to_sequences(train_content)
traincontent = pad_sequences(sequence, maxlen=512)
sequence = tokenizer.texts_to_sequences(test_content)
testcontent = pad_sequences(sequence, maxlen=512)
<a name="yfsLq"></a>## 2.构造模型- [https://zhuanlan.zhihu.com/p/95293440](https://zhuanlan.zhihu.com/p/95293440) Keras.metrics中的accuracy总结<a name="eCprd"></a>### 2.1 BiLSTM```pythonfrom tensorflow.keras.layers import *from tensorflow.keras.models import Model, Sequentialfrom tensorflow.keras import initializers, regularizers, constraints, optimizers, layersmodel = Sequential([layers.Embedding(input_dim=len(tokenizer.word_index) + 1,output_dim=256,input_length=30,weights=[embedding_matrix]),layers.Bidirectional(LSTM(32, return_sequences = True)),layers.GlobalMaxPool1D(),layers.Dense(20, activation="relu"),layers.Dropout(0.05),layers.Dense(3, activation="softmax"),])model.compile(loss='categorical_crossentropy',optimizer='adam',metrics=['categorical_accuracy'])model.summary()
2.2 TextCNN
Attention 别人写的代码
import numpy as npfrom tensorflow.keras.preprocessing.text import Tokenizerfrom tensorflow.keras import Input, Model,backend as Kfrom tensorflow.keras.layers import Embedding, Dense, Attention, Bidirectional, LSTMfrom tensorflow.keras import initializers, regularizers, constraintsfrom tensorflow.keras.layers import Layerclass Attention(Layer):def __init__(self, step_dim,W_regularizer=None, b_regularizer=None,W_constraint=None, b_constraint=None,bias=True, **kwargs):"""Keras Layer that implements an Attention mechanism for temporal data.Supports Masking.Follows the work of Raffel et al. [https://arxiv.org/abs/1512.08756]# Input shape3D tensor with shape: `(samples, steps, features)`.# Output shape2D tensor with shape: `(samples, features)`.:param kwargs:Just put it on top of an RNN Layer (GRU/LSTM/SimpleRNN) with return_sequences=True.The dimensions are inferred based on the output shape of the RNN.Example:# 1model.add(LSTM(64, return_sequences=True))model.add(Attention())# next add a Dense layer (for classification/regression) or whatever...# 2hidden = LSTM(64, return_sequences=True)(words)sentence = Attention()(hidden)# next add a Dense layer (for classification/regression) or whatever..."""self.supports_masking = Trueself.init = initializers.get('glorot_uniform')self.W_regularizer = regularizers.get(W_regularizer)self.b_regularizer = regularizers.get(b_regularizer)self.W_constraint = constraints.get(W_constraint)self.b_constraint = constraints.get(b_constraint)self.bias = biasself.step_dim = step_dimself.features_dim = 0super(Attention, self).__init__(**kwargs)def build(self, input_shape):assert len(input_shape) == 3self.W = self.add_weight(shape=(input_shape[-1],),initializer=self.init,name='{}_W'.format(self.name),regularizer=self.W_regularizer,constraint=self.W_constraint)self.features_dim = input_shape[-1]if self.bias:self.b = self.add_weight(shape=(input_shape[1],),initializer='zero',name='{}_b'.format(self.name),regularizer=self.b_regularizer,constraint=self.b_constraint)else:self.b = Noneself.built = Truedef compute_mask(self, input, input_mask=None):# do not pass the mask to the next layersreturn Nonedef call(self, x, mask=None):features_dim = self.features_dimstep_dim = self.step_dime = K.reshape(K.dot(K.reshape(x, (-1, features_dim)), K.reshape(self.W, (features_dim, 1))), (-1, step_dim)) # e = K.dot(x, self.W)if self.bias:e += self.be = K.tanh(e)a = K.exp(e)# apply mask after the exp. will be re-normalized nextif mask is not None:# cast the mask to floatX to avoid float64 upcasting in theanoa *= K.cast(mask, K.floatx())# in some cases especially in the early stages of training the sum may be almost zero# and this results in NaN's. A workaround is to add a very small positive number ε to the sum.a /= K.cast(K.sum(a, axis=1, keepdims=True) + K.epsilon(), K.floatx())a = K.expand_dims(a)c = K.sum(a * x, axis=1)return cdef compute_output_shape(self, input_shape):return input_shape[0], self.features_dim
TextCNN
# from keras import Input, Modelfrom tensorflow.keras.layers import Embedding, Dense, Conv1D, GlobalMaxPooling1D, Concatenate, Dropoutclass TextCNN(object):def __init__(self, maxlen, max_features, embedding_dims,class_num=1,last_activation='sigmoid'):self.maxlen = maxlenself.max_features = max_featuresself.embedding_dims = embedding_dimsself.class_num = class_numself.last_activation = last_activationdef get_model(self):input = Input((self.maxlen,))# Embedding part can try multichannel as same as origin paperembedding = Embedding(self.max_features, self.embedding_dims, input_length=self.maxlen,weights=[embedding_matrix])(input)convs = []for kernel_size in [3, 4, 5]:c = Conv1D(128, kernel_size, activation='relu')(embedding)c = GlobalMaxPooling1D()(c)convs.append(c)x = Concatenate()(convs)output = Dense(self.class_num, activation=self.last_activation)(x)model = Model(inputs=input, outputs=output)return modelmodel = TextCNN(maxlen=30, max_features=len(tokenizer.word_index) + 1,embedding_dims=256, class_num=3, last_activation='softmax').get_model()# metric_F1score 在下面model.compile('adam', 'categorical_crossentropy', metrics=['accuracy',metric_F1score])model.summary()
2.3 Atention-BiLSTM
Atention-BiLSTM
class TextAttBiRNN(object):def __init__(self, maxlen, max_features, embedding_dims,class_num=1,last_activation='sigmoid'):self.maxlen = maxlenself.max_features = max_featuresself.embedding_dims = embedding_dimsself.class_num = class_numself.last_activation = last_activationdef get_model(self):input = Input((self.maxlen,))embedding = Embedding(self.max_features, self.embedding_dims,input_length=self.maxlen, weights=[embedding_matrix])(input)x = Bidirectional(LSTM(128,return_sequences=True))(embedding) # LSTM or GRUx = Attention(self.maxlen)(x)output = Dense(self.class_num, activation=self.last_activation)(x)model = Model(inputs=input, outputs=output)return modelpassmodel = TextAttBiRNN(maxlen=30, max_features=len(tokenizer.word_index) + 1,embedding_dims=256, class_num=3, last_activation='softmax').get_model()model.compile('adam', 'categorical_crossentropy', metrics=['categorical_accuracy'])model.summary()
3.模型训练
3.1 评价标准
import tensorflow as tf# F1值指标def metric_F1score(y_true,y_pred):TP=tf.reduce_sum(y_true*tf.round(y_pred))TN=tf.reduce_sum((1-y_true)*(1-tf.round(y_pred)))FP=tf.reduce_sum((1-y_true)*tf.round(y_pred))FN=tf.reduce_sum(y_true*(1-tf.round(y_pred)))precision=TP/(TP+FP)recall=TP/(TP+FN)F1score=2*precision*recall/(precision+recall)return F1score
3.2 训练集切分
- 输入:traintitle时刚才padding过得sequence
- 输出:label从原始csv中获取
- 划分比例:训练集:测试机 == 5:1 ```python import tensorflow as tf from sklearn.model_selection import train_test_split
label = train[‘label’].astype(int)
train_X, val_X, train_Y, val_Y = train_test_split(traintitle, label, shuffle=True, test_size=0.2,random_state=42)
to_categorical是tf的one-hot编码转换,因为 loss用的 categorical_crossentropy
loos用 sparse_categorical_crossentropy 就不用转换
train_Y = tf.keras.utils.to_categorical(train_Y)
<a name="4OCkC"></a>### 3.3 模型训练- 其他参数自己设定```python# 模型训练history = model.fit(train_X,train_Y,batch_size=128,epochs=10,validation_split=0.1,validation_freq=1,)
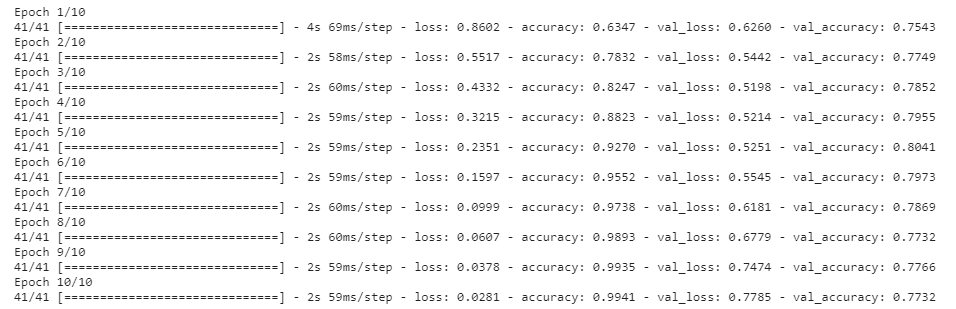
3.4 校验模型效果
from sklearn.metrics import f1_scorepred_val = model.predict(val_X)print(f1_score(val_Y, np.argmax(pred_val, axis=1), average='macro'))

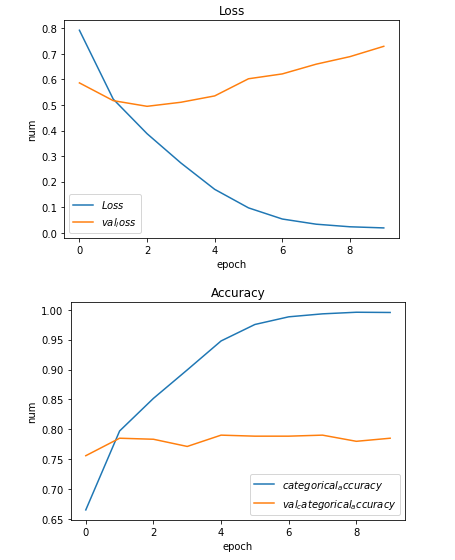
3.5 可视化损失和F1值
import matplotlib.pyplot as plt# 画出损失函数def show_loss_acc_img(history):# 损失plt.plot(history.history['loss'], label="$Loss$")plt.plot(history.history['val_loss'], label='$val_loss$')plt.title('Loss')plt.xlabel('epoch')plt.ylabel('num')plt.legend()plt.show()# 准确率plt.plot(history.history['categorical_accuracy'], label="$categorical_accuracy$")plt.plot(history.history['val_categorical_accuracy'], label='$val_categorical_accuracy$')plt.title('Accuracy')plt.xlabel('epoch')plt.ylabel('num')plt.legend()plt.show()passshow_loss_acc_img(history)
3.6 预测测试集情感极性
# 预测测试集极性pred_val = model.predict(testtitle)# 保存预测文件submission = pd.DataFrame(test.id.values,columns=["id"])submission["label"] = np.argmax(pred_val, axis=1)submission.to_csv("submission.csv",index=False)
可以直接用的干货
1. 使用正则去除文本的html和其他符号
import re# 文本过滤函数def text_filter(text):# re.sub(正则表达式,被替换字符串,替换字符串)text = re.sub("[A-Za-z0-9\!\=\?\%\[\]\,\(\)\>\<:<\/#\. -----\_]", "", text)text = text.replace('图片', '')text = text.replace('\xa0', '') # 删除nbsp# 去除html标签cleanr = re.compile('<.*?>')text = re.sub(cleanr, ' ', text)# 去除其他字符r1 = "\\【.*?】+|\\《.*?》+|\\#.*?#+|[.!/_,$&%^*()<>+""'?@|:~{}#]+|[——!\\\,。=?、:“”‘’¥……()《》【】]"text = re.sub(r1,'',text)# 去除字符串首尾的空格text = text.strip()return text
2. 使用gensim训练自己的词向量
参考博客:
[1] https://www.jianshu.com/p/5f04e97d1b27 使用TSEN降维后打印词向量图片
[2] https://www.cnblogs.com/johnnyzen/p/10900040.html gensim.models.Word2Vec参数详解
#!/usr/bin/env python# -*- encoding: utf-8 -*-'''@File : word2vecgensim.py@Contact : htkstudy@163.com@Modify Time @Author @Version @Desciption------------ ------- -------- -----------2021/3/9 8:55 Armor(htk) 1.0 None'''import gensimimport timefrom sklearn.manifold import TSNEfrom matplotlib.font_manager import *import matplotlib.pyplot as pltclass EpochSaver(gensim.models.callbacks.CallbackAny2Vec):'''用于保存模型, 打印损失函数等等'''def __init__(self, save_path):self.save_path = save_path # 模型存储路径self.epoch = 0 # 轮次self.pre_loss = 0 # 前一轮损失self.best_loss = 999999999.9 # 最佳损失self.since = time.time() # 跑一轮的持续时间def on_epoch_end(self, model):self.epoch += 1cum_loss = model.get_latest_training_loss() # 返回的是从第一个epoch累计的epoch_loss = cum_loss - self.pre_loss # epoch-loss = 当前损失 - 前一轮损失time_taken = time.time() - self.since # 持续时间print("Epoch %d, loss: %.2f, time: %dmin %ds" %(self.epoch, epoch_loss, time_taken // 60, time_taken % 60)) # 打印一轮的结果,时间采用分秒# 记录best_loss,并通过best_loss进行early_stopif self.best_loss > epoch_loss:self.best_loss = epoch_lossprint("Better model. Best loss: %.2f" % self.best_loss) # 打印最佳损失model.save(self.save_path) # 保存模型print("Model %s save done!" % self.save_path)self.pre_loss = cum_lossself.since = time.time()pass# 加载以训练好的词向量def load_model_word2vec(save_path):model_word2vec = gensim.models.Word2Vec.load(save_path)# 下面的代码可以加载训练好的词向量# model_word2vec = gensim.models.Word2Vec.load('final_word2vec_model')return model_word2vecdef print_since_time(since):time_elapsed = time.time() - sinceprint('Time to build vocab: {:.0f}min {:.0f}s'.format(time_elapsed // 60, time_elapsed % 60))def show_word2vec_2D(model_word2vec,random_word):# 训练TSNE降维 注意model_word2vec.wv[random_word]中 random_word 必须是字符串构成的listX_tsne = TSNE(n_components=2, learning_rate=100).fit_transform(model_word2vec.wv[random_word])# 解决负号'-'显示为方块的问题plt.figure(figsize=(14, 8))myfont = FontProperties(fname='C:\Windows\Fonts\simsun.ttc') # 加载字体plt.scatter(X_tsne[:, 0], X_tsne[:, 1]) # 创建散点图for i in range(len(X_tsne)):x = X_tsne[i][0]y = X_tsne[i][1]plt.text(x, y, random_word[i], fontproperties=myfont, size=16) # 输出坐标标签plt.show()passif __name__=="__main__":# 自己处理输入 注意input_doc 不能是一维,构造成这样的形式input_doc = [[]]input_doc = [['`', '广告', '联系', '微', '信号', '花都区', '租房', '满', '一年', '有望', '确保', '学位', '信息', '时报讯', '记者', '崔小远', '近日','发布', '下称', '了解', '今年', '花都区', '公办', '小学', '计划', '招收', '班级', '公办', '初中', '计划', '招收', '班级', ';', '民办小学', '花都区','班级', '民办', '初中', '计划', '招收', '班级', '对比', '年', '招生', '细则', '今年', '招生', '规模', '总体', '变化', '不', '大', '计划', '招收','了解', '花都区', '招生', '时间', '安排', '月', '日', '~', '月', '日', '花都区', '公办', '小学', '网上', '报名', ';','教育局','~', '积分', '入学', '网上', '报名', ';', '月', '日', '~', '月', '日', '花都区', '民办小学', '网上', '报名', ';','~', '花都区', '小区', '配套', '业主', '非', '广州市', '户籍', '适龄', '子女', '报名', '保障', '区内', '明确', '未来', '十年','承租人', '子女', '入学', '方面', '提出', '具有', '广州市', '户籍', '含', '政策性', '照顾', '生', '广州市', '无', '自有', '产权', '住房', '含', '城乡','自建房', '租赁', '房屋', '所在地', '唯一', '居住地', '房屋', '租赁', '合同', '登记', '备案', '连续', '满', '一年', '截止', '日期', '申请', '入学', '内在','年月日', '以上', '申请', '时', '租赁', '合同', '有效', '状态', '承租人', '适龄', '子女', '花都区', '教育局', '确保', '学位', '供给', '年', '当中', '已经','增城', '花都', '从化', '张', '病床', '条件', '建立', '专业', '精神病', '医院', '来源', '花都', '早晨', '区卫计局', '广州', '花都', '发布', '今日', '花都','花都', '求职', '招聘', '群', '添加', '时', '注明', '招定', '求职', '小编', '工资', '大拇指', '挂钩', '点', '一下', '一分钱', '求', '打赏', '记得', '加']]# 训练模型主题 -----------------------------------------------model_word2vec = gensim.models.Word2Vec(min_count=1,window=5,size=256,workers=4,batch_words=1000)since = time.time() # 计时开始model_word2vec.build_vocab(input_doc, progress_per=2000) # 从一连串的句子中建立词汇,progress_per表示多少单词展示一次print_since_time(since) #计时结束,打印耗时since = time.time()model_word2vec.train(input_doc,total_examples=model_word2vec.corpus_count,epochs=20,compute_loss=True,report_delay=60 * 10,callbacks=[EpochSaver('./final_word2vec_model')]) # model_word2vec模型存储print_since_time(since) #计时结束,打印耗时# 打印词向量图片show_word2vec_2D(model_word2vec, input_doc[0])# model_word2vec = load_model_word2vec(./final_word2vec_model)# print(model_word2vec)# # 计算两个词语之间的相似度# y2 = model_word2vec.wv.similarity(u"租赁", u"承租人")# print(y2)# # 打印词语相似度# for i in model_word2vec.wv.most_similar(u"建立"):# print(i[0], i[1])
使用TSNE打印词向量的效果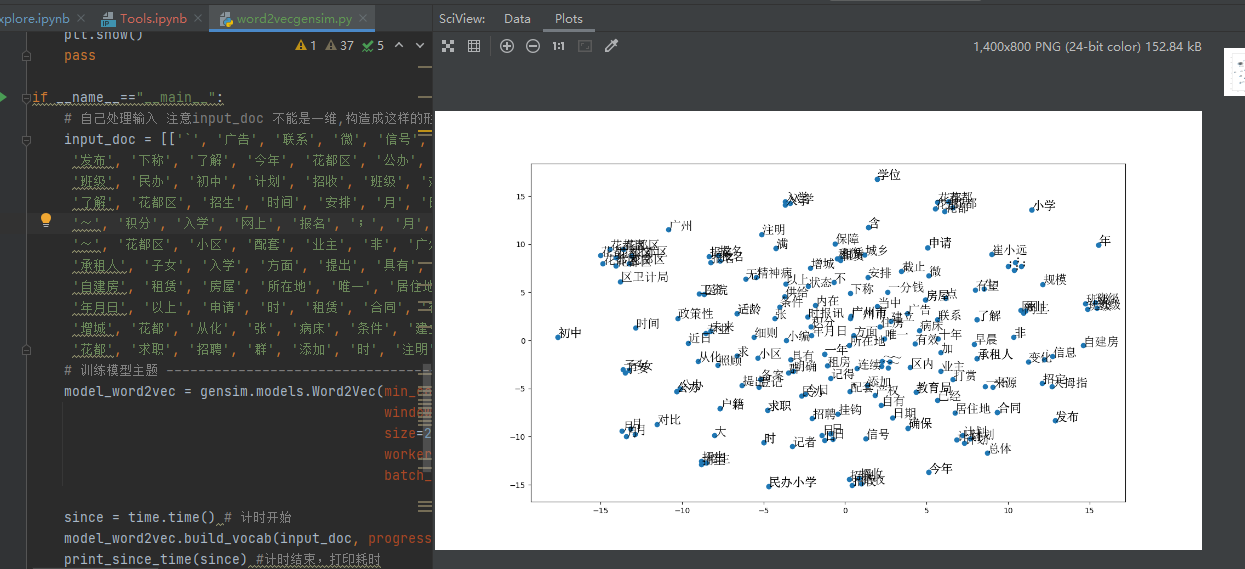

若有收获,就点个赞吧
0 人点赞
