- 使用GitHub
- 一. 注册GitHub
- https://github.com/ ,点击Sign up进行注册;">1.1 浏览器访问github官网 : https://github.com/ ,点击Sign up进行注册;
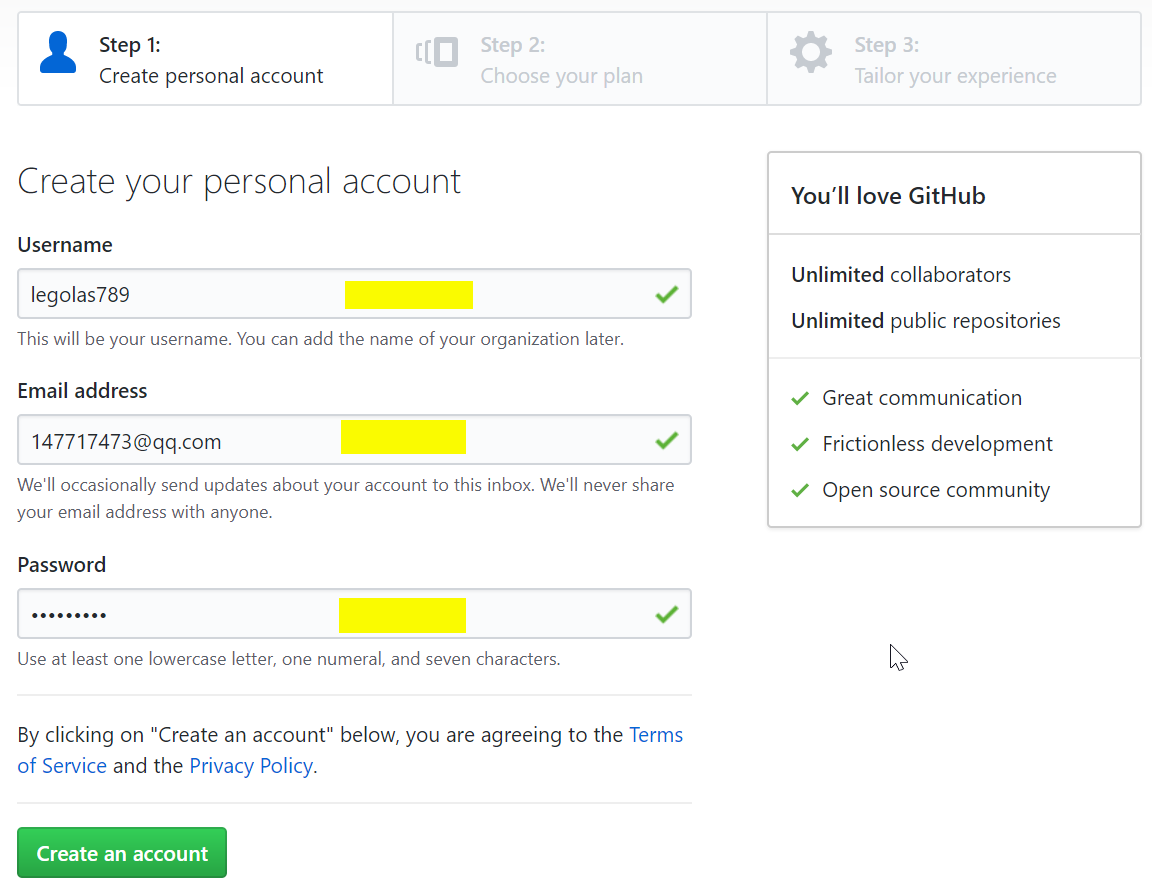
- 1.2 填写个人信息,进行注册;
- 1.3 选择仓库类型,默认免费,点击底下Continue注册;
- 1.4 描述一下你自己,当然,这一步可以跳过;
- 1.5 用户创建完成,可以创建新的项目。
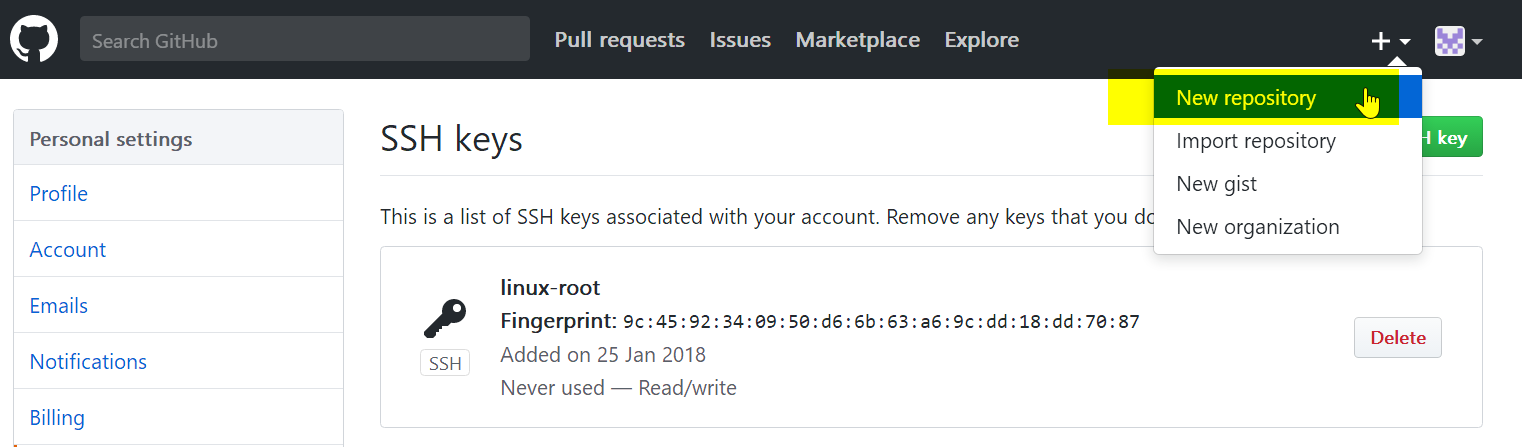
- 二. 添加密钥
- 三. 创建仓库
- 开发人员合作使用git和gitlab开发项目
- 二. 使用git和gitlab开发项目
使用GitHub
Git人人都是中心,那他们怎么交互数据呢?
- 使用GitHub或者码云等公共代码仓库;
- 使用GitLab私有仓库
GitHub托管服务
Github顾名思义是一个Git版本库的托管服务,是目前全球最大的软件仓库,拥有上百万的开发者用户,也是软件开发和寻找资源的最佳途径,Github不仅可以托管各种Git版本仓库,还拥有了更美观的Web界面,您的代码文件可以被任何人克隆,使得开发者为开源项贡献代码变得更加容易,当然也可以付费购买私有库,这样高性价比的私有库真的是帮助到了很多团队和企业。
一. 注册GitHub
1.1 浏览器访问github官网 : https://github.com/ ,点击Sign up进行注册;

1.2 填写个人信息,进行注册;
1.3 选择仓库类型,默认免费,点击底下Continue注册;

1.4 描述一下你自己,当然,这一步可以跳过;

1.5 用户创建完成,可以创建新的项目。

注意:创建新的项目之前要现验证邮箱。
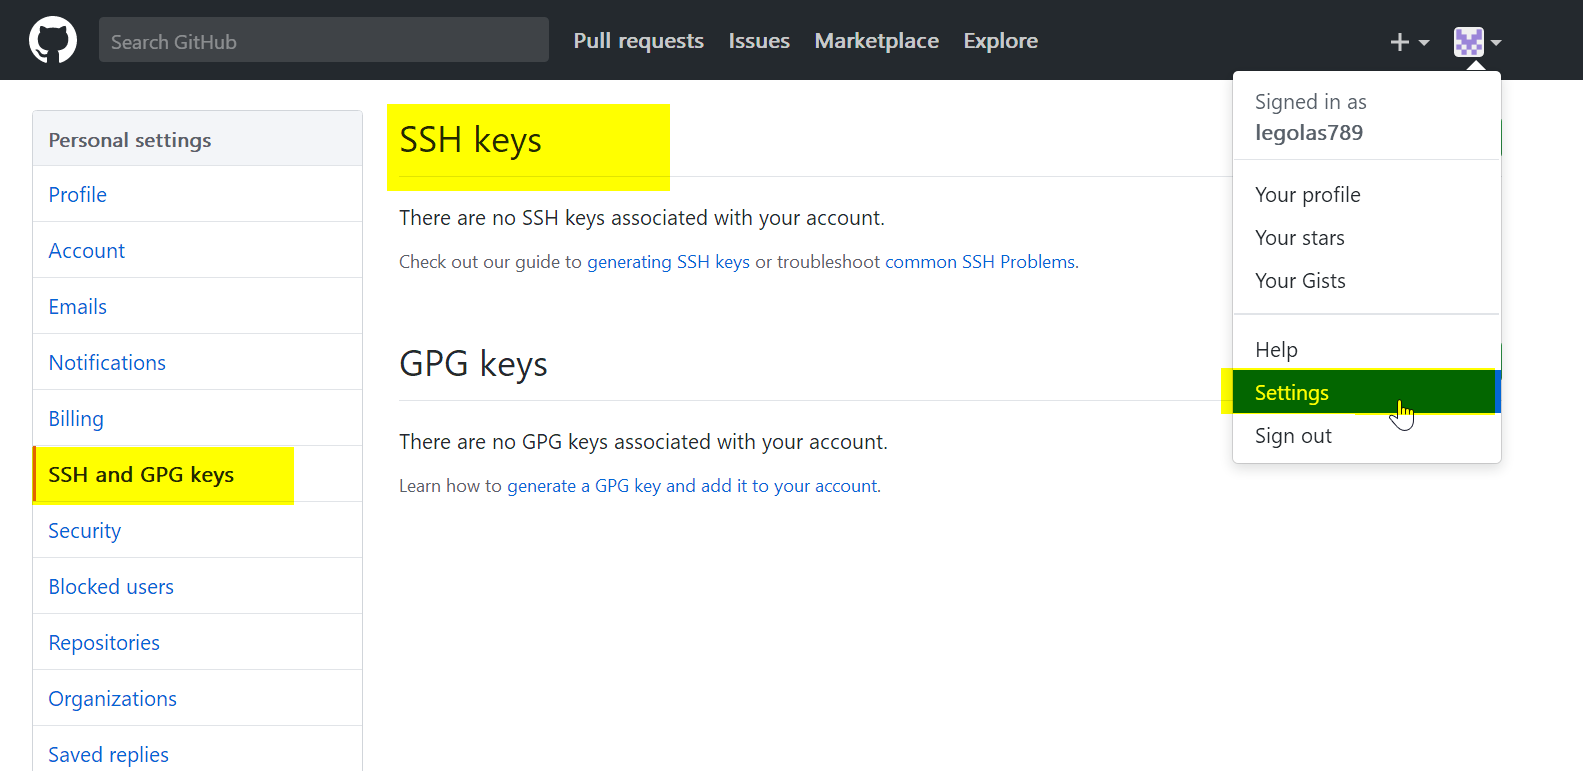
二. 添加密钥
2.1 选择设置settings;
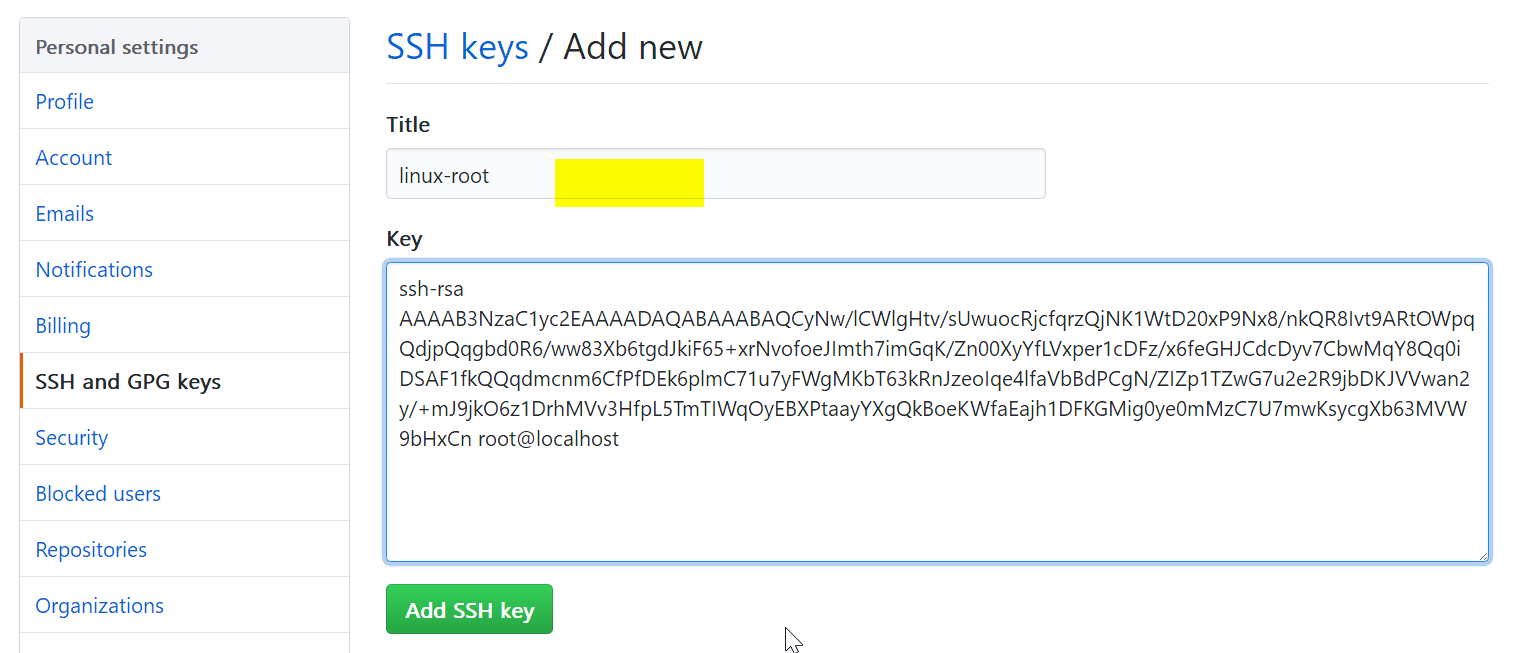
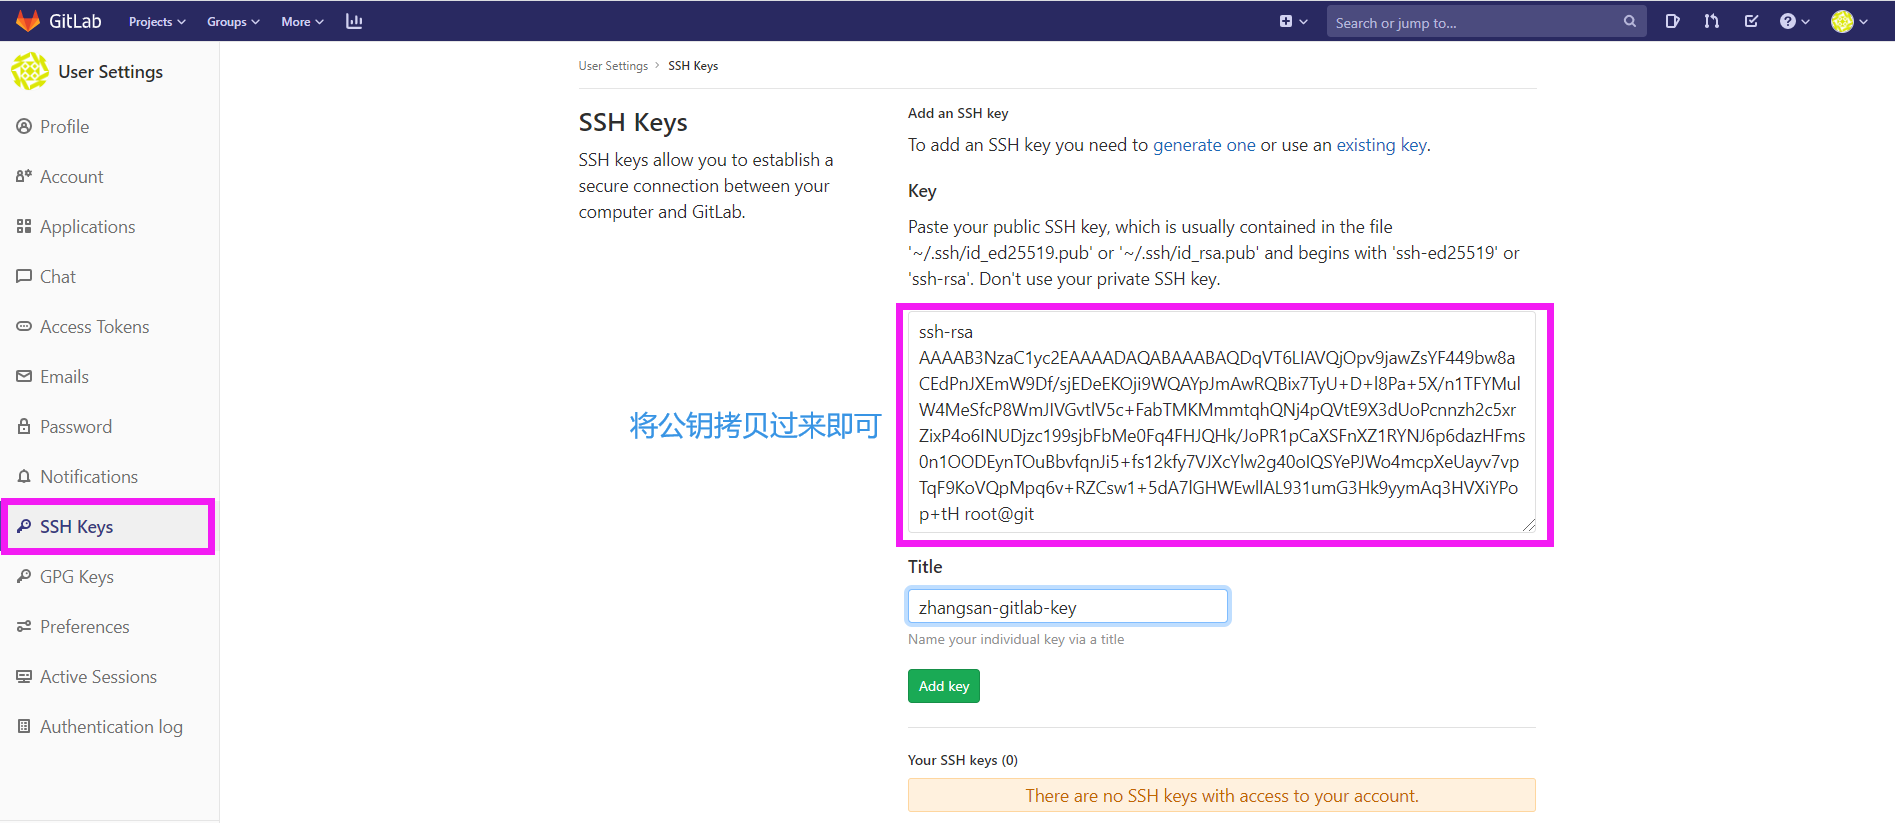
2.2 获取自己主机(linux)上的密钥:
[root@git ~]# ssh-keygenGenerating public/private rsa key pair.Enter file in which to save the key (/root/.ssh/id_rsa):Created directory '/root/.ssh'.Enter passphrase (empty for no passphrase):Enter same passphrase again:Your identification has been saved in /root/.ssh/id_rsa.Your public key has been saved in /root/.ssh/id_rsa.pub.The key fingerprint is:SHA256:ZBWuT8A85XibVGPUrv27CHq9W5sfuQ7bKopBw9zmFzw root@gitThe key's randomart image is:+---[RSA 2048]----+| +o=. || o * o .. || O = . || oo.*.o . || =So+E o || . +o + . .|| . ..o.. = || o oo..* *|| . oo .*=O=|+----[SHA256]-----+[root@git ~]# cat .ssh/id_rsa.pubssh-rsa AAAAB3NzaC1yc2EAAAADAQABAAABAQDqVT6LIAVQjOpv9jawZsYF449bw8aCEdPnJXEmW9Df/sjEDeEKOji9WQAYpJmAwRQBix7TyU+D+l8Pa+5X/n1TFYMulW4MeSfcP8WmJIVGvtlV5c+FabTMKMmmtqhQNj4pQVtE9X3dUoPcnnzh2c5xrZixP4o6INUDjzc199sjbFbMe0Fq4FHJQHk/JoPR1pCaXSFnXZ1RYNJ6p6dazHFms0n1OODEynTOuBbvfqnJi5+fs12kfy7VJXcYlw2g40oIQSYePJWo4mcpXeUayv7vpTqF9KoVQpMpq6v+RZCsw1+5dA7lGHWEwllAL931umG3Hk9yymAq3HVXiYPop+tH root@git[root@git ~]#
2.3 密钥创建完成后进行添加
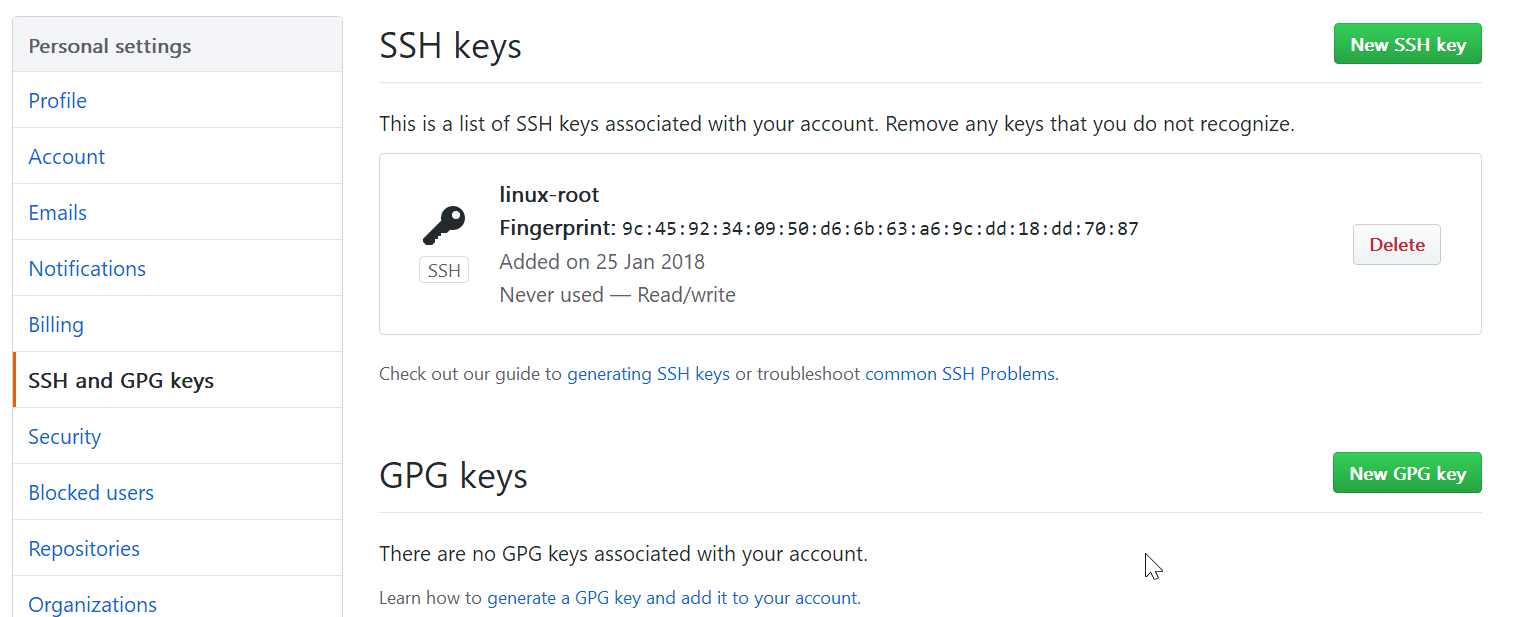
2.4 密钥添加成功
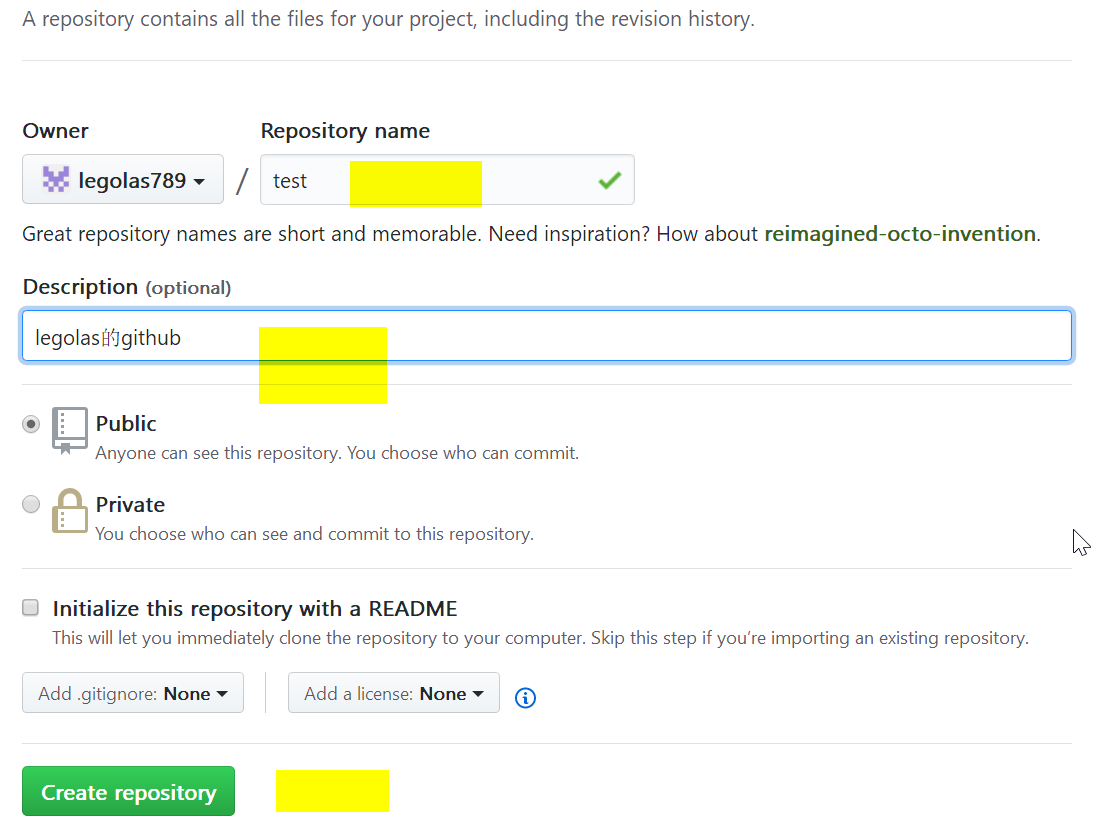
三. 创建仓库
准备工作已经完毕,右上角点击创建一个新的仓库
创建仓库,输入个人信息:
根据上面的提示,创建一个代码仓库:
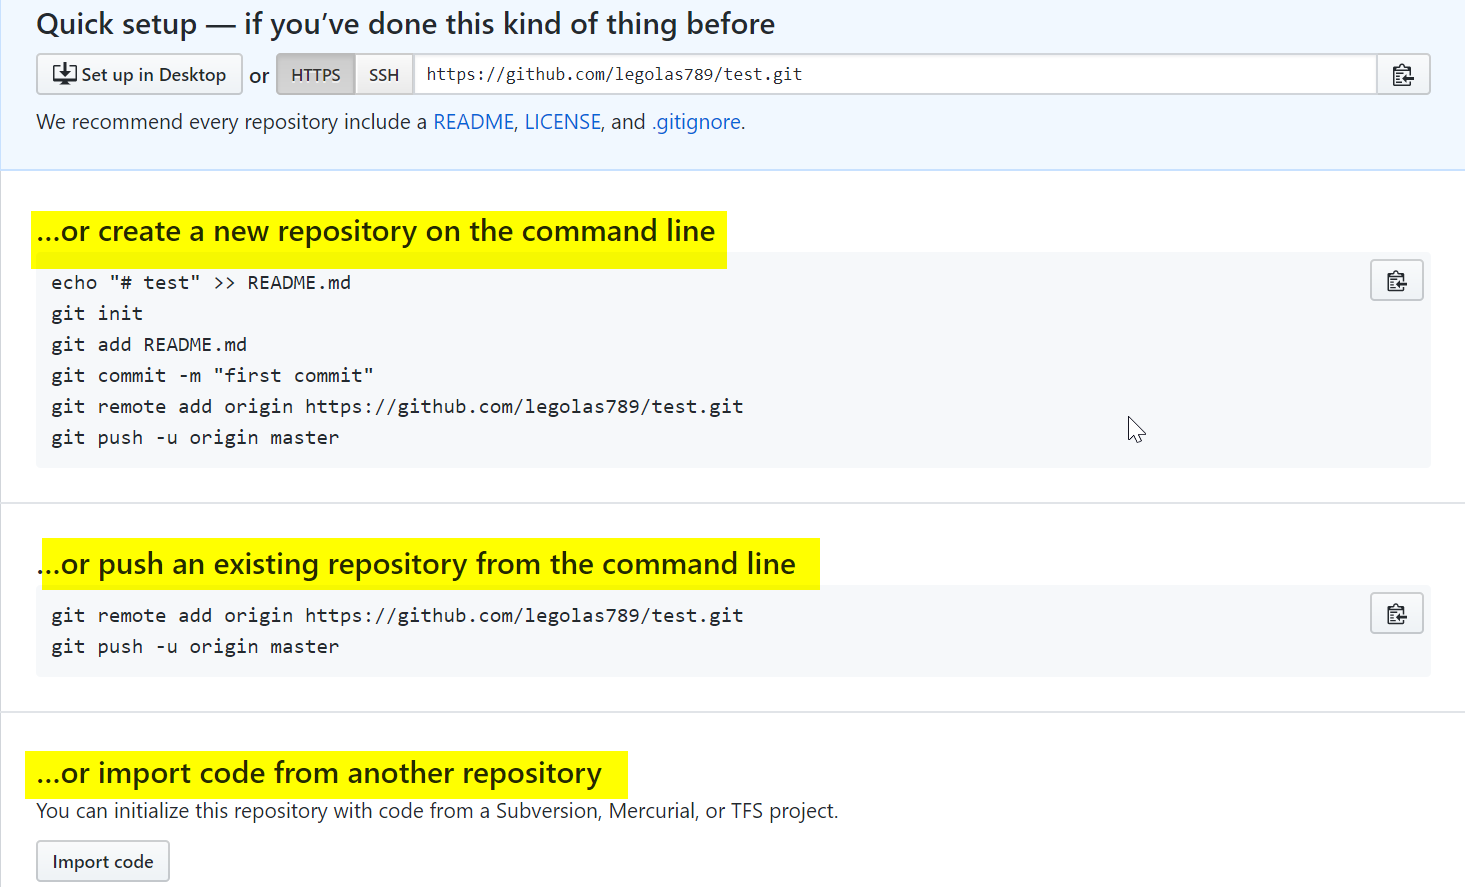
在个人主机上进行推送测试:

推送完成,刷新界面就可以发现,推送上去的README.md文件
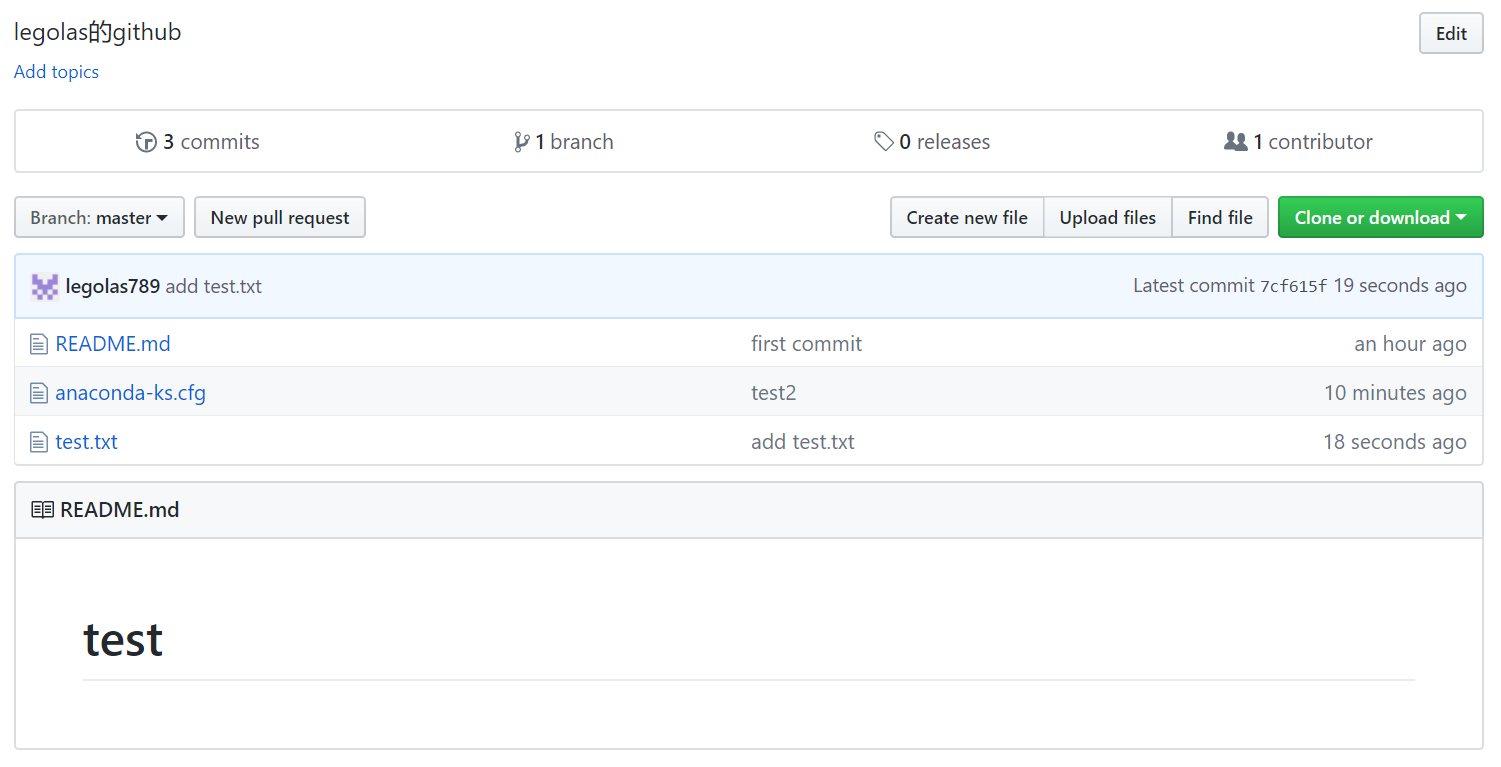
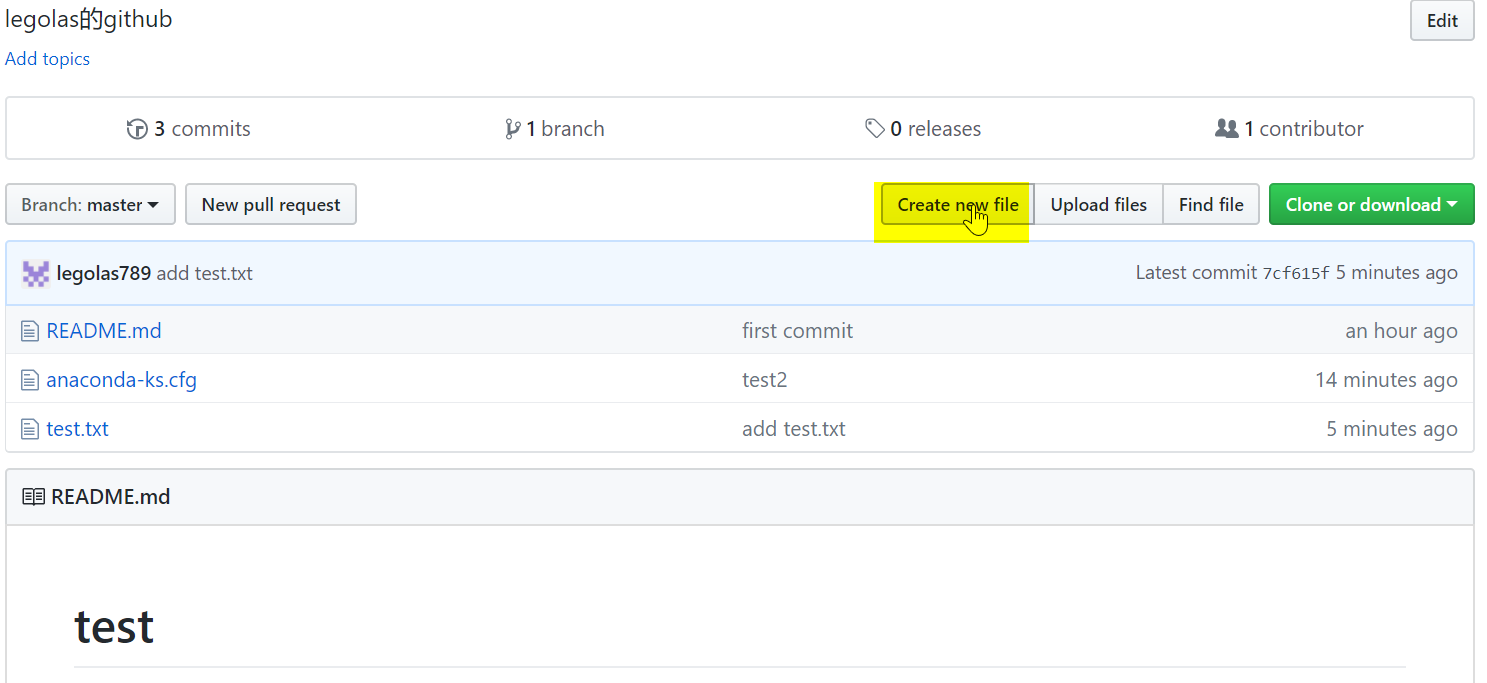
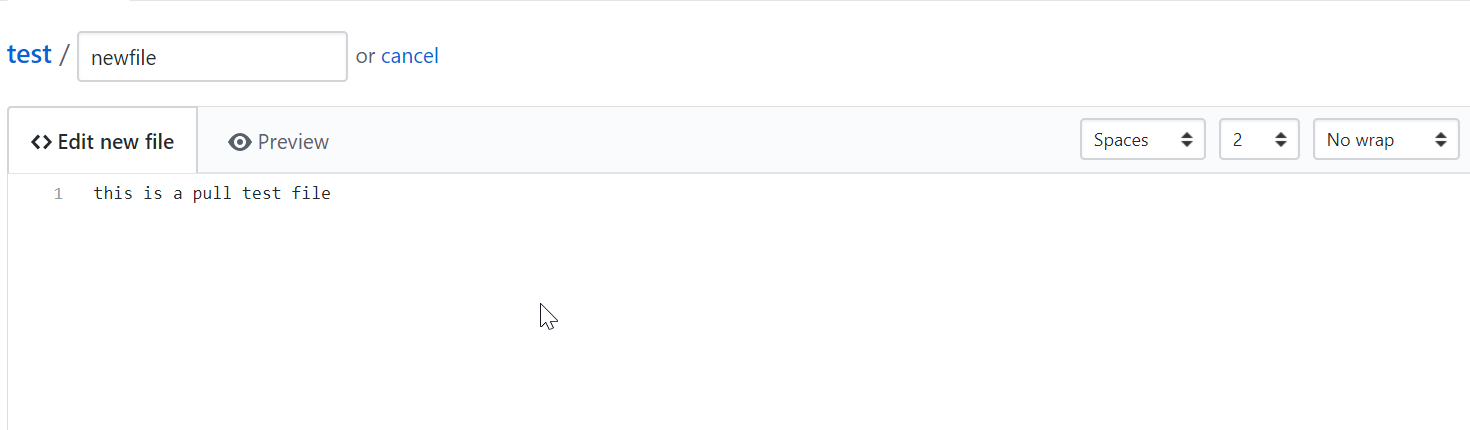
创建新文件,进行拉取测试
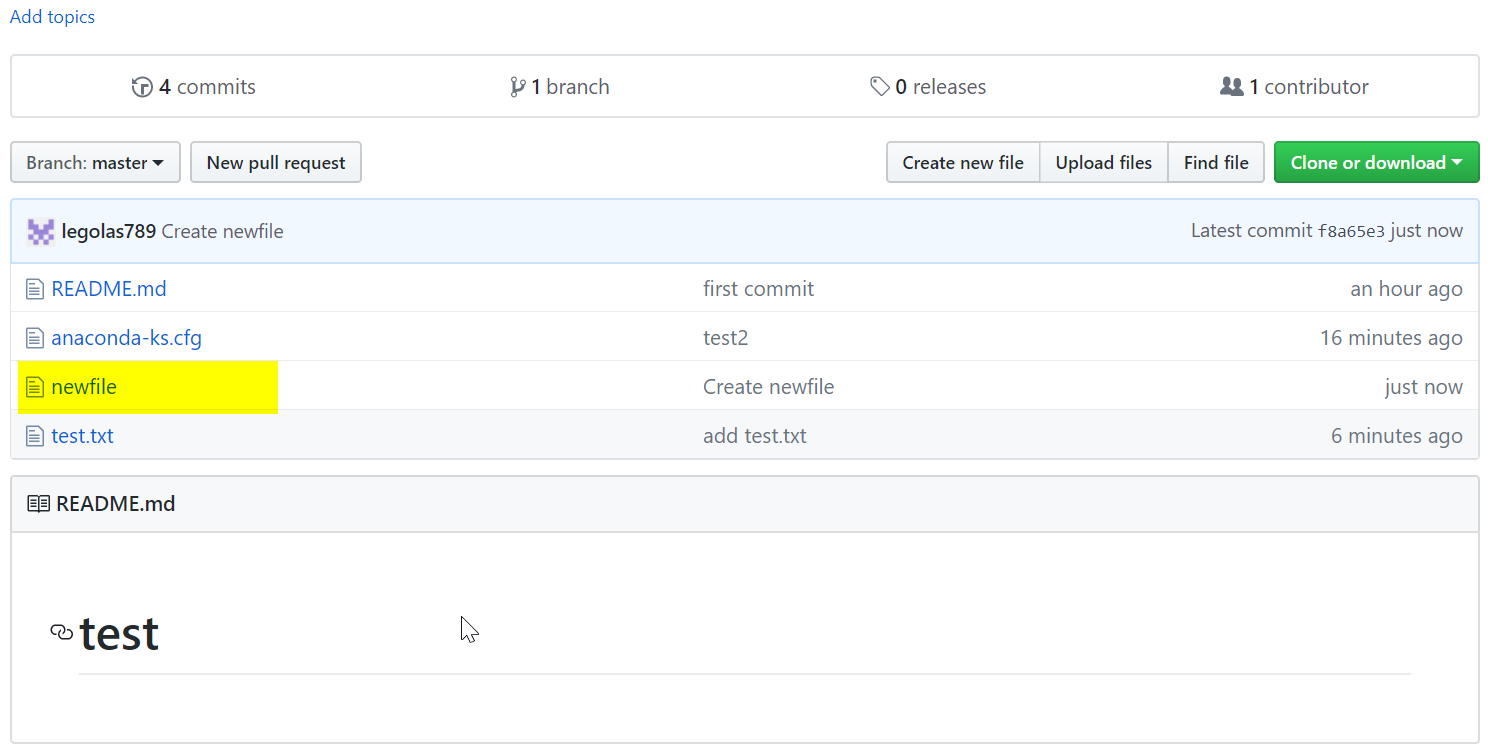
创建好后点击下面的commit即可
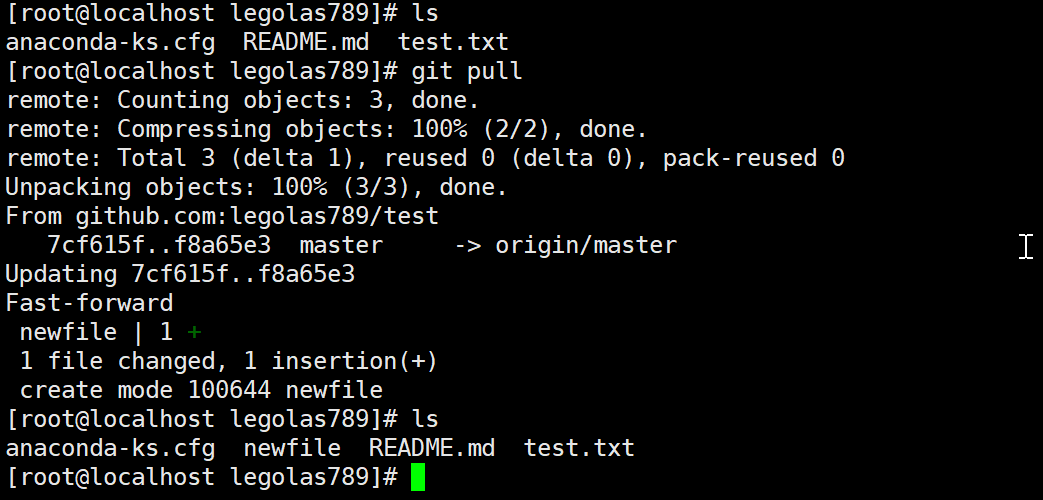
github添加成功,进行拉取测试
拉取文件测试
小结:
关联远程仓库的命令:
git remote add origin git@github.com:legolas789/test.git #SSH方式git remote add origin https://github.com/legolas789/test.git #HTTPS方式
其中origin代表的是远程仓库的名字,这是Git默认的叫法,也可以改成别的,但是origin这个名字一看就知道是远程库。
查看远程仓库的情况:
[root@git Task-sheet]# git remote -vorigin git@github.com:legolas999/Task-sheet.git (fetch)origin git@github.com:legolas999/Task-sheet.git (push)
把本地库的所有内容推送到远程库上:实际上是把当前分支master推送到远程
[root@git Task-sheet]# git push -u origin master
开发人员合作使用git和gitlab开发项目
GitLab 是利用 Ruby on Rails 一个开源的版本管理系统,实现一个自托管的 Git 项目仓库,可通过 Web 界面进行访问公开的或者私人项目。它拥有与 Github 类似的功能,能够浏览源代码,管理缺陷和注释。可以管理团队对仓库的访问,它非常易于浏览提交过的版本并提供一个文件历史库。团队成员可以利用内置的简单聊天程序(Wall)进行交流。它还提供一个代码片段收集功能可以轻松实现代码复用,便于日后有需要的时候进行查找。
一. 安装配置gitlab
- 官方安装文档 https://about.gitlab.com/installation/
- 国内软件镜像站 https://mirrors.tuna.tsinghua.edu.cn/gitlab-ce/yum/
1.1 使用docker搭建gitlab
在服务器上直接安装gitlab,会装入Git,Redis,postgresql,nginx等。如果主机已有redis、nginx等,配置会比较麻烦。而且以后gitlab的备份和迁移都不方便。如果将gitlab进行Docker化部署,所有服务如redis,postgresql等放在一个docker容器里,将配置、数据等文件挂载在宿主机上,备份和迁移时候只要复制docker镜像和挂载的数据目录即可。
1.1.1 下载gitlab-ce官方镜像
[root@git Task-sheet]# docker pull gitlab/gitlab-ce[root@git Task-sheet]# docker imagesREPOSITORY TAG IMAGE ID CREATED SIZEgitlab/gitlab-ce latest 719e7e45b1e2 46 hours ago 1.89GB
1.1.2 启动docker容器:
[root@git ~]# docker run -d -p 2222:22 -p 8080:80 -p 8443:443 \> --volume /home/gitlab/config:/etc/gitlab \> --volume /home/gitlab/logs:/var/log/gitlab \> --volume /home/gitlab/data:/var/opt/gitlab \> --restart always \> --name gitlab \> gitlab/gitlab-ce
调整默认配置文件
# vim /home/gitlab/config/gitlab.rb##外部访问的URL地址external_url 'http://192.168.154.50:8080'##SSH方式访问仓库的调整gitlab_rails['gitlab_ssh_host'] = '192.168.154.50'gitlab_rails['gitlab_shell_ssh_port'] = 2222##侦听端口设置nginx['listen_port'] = 80
官方配置文档: https://docs.gitlab.com/omnibus/settings/configuration.html
调整完配置文件,重启docker容器
[root@git config]# docker restart gitlabgitlab
1.1.3 防火墙放行端口:
[root@git ~]# firewall-cmd --add-port=8443/tcp --permanent[root@git ~]# firewall-cmd --add-port=2222/tcp --permanent[root@git ~]# firewall-cmd --add-port=8080/tcp --permanent[root@git ~]# firewall-cmd --reloadsuccess
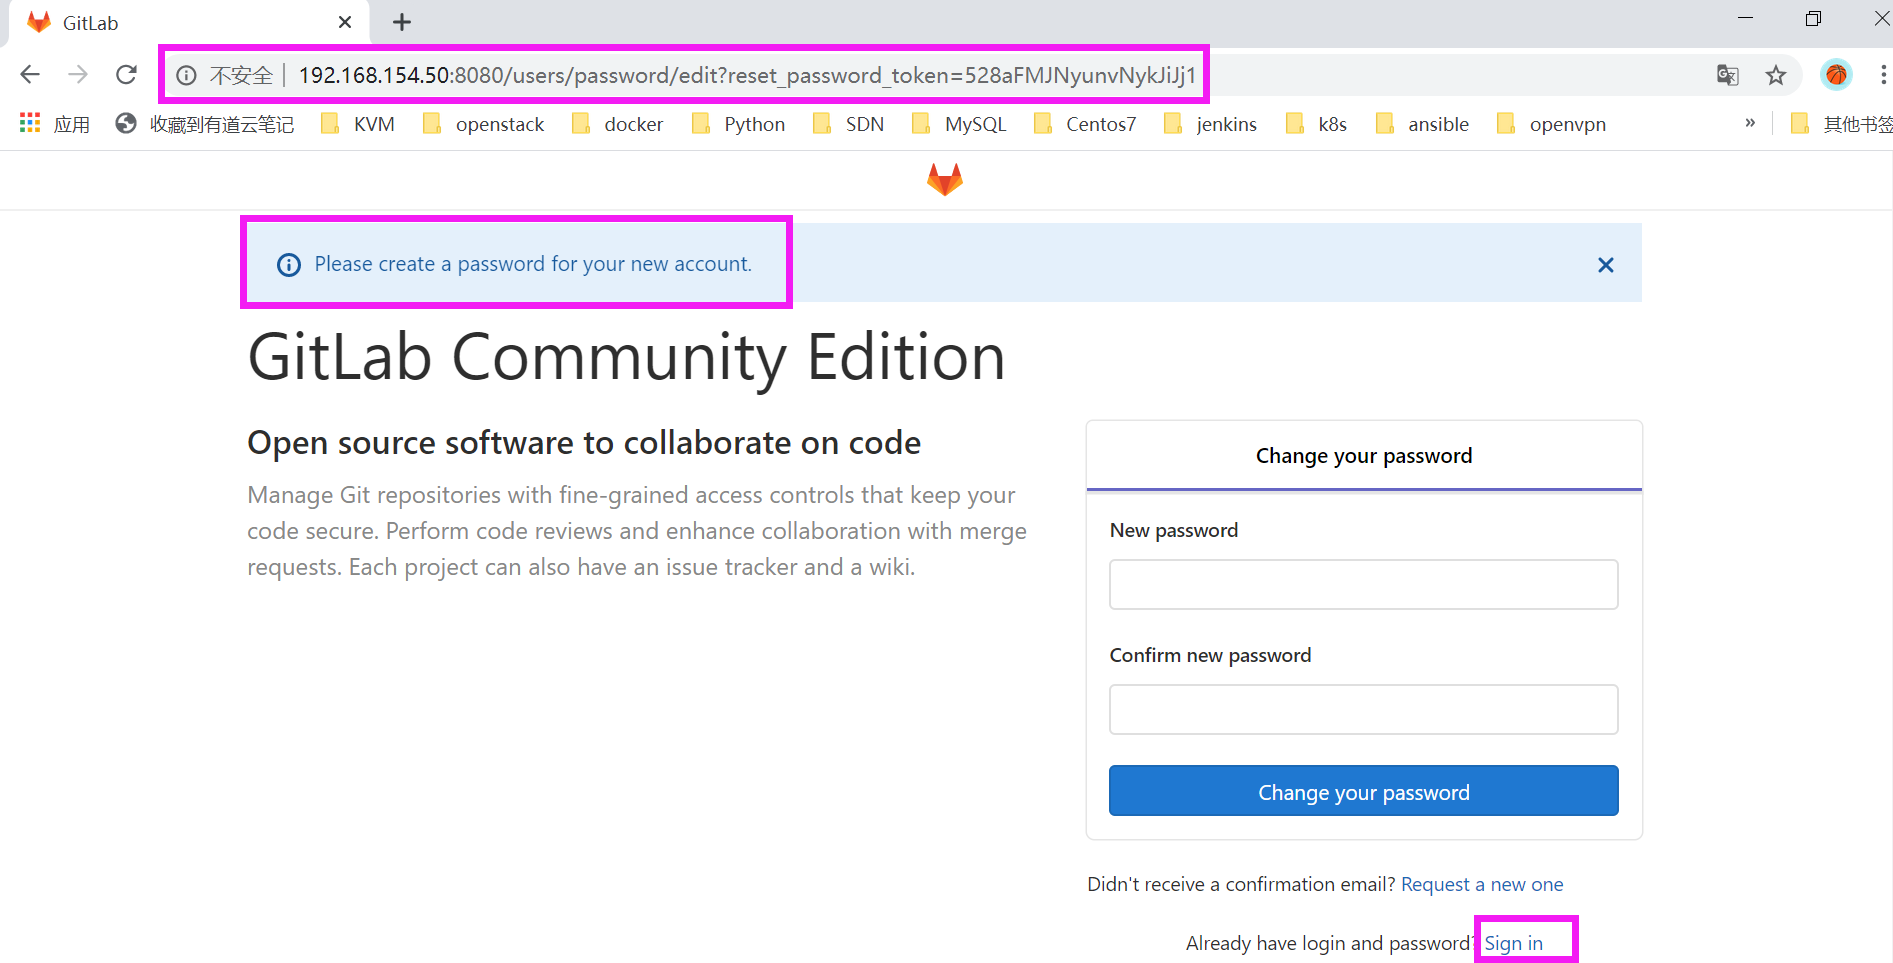
1.1.4 登录
访问主机地址的8080端口
默认登陆的用户是root,需要设置新密码才可以登陆:
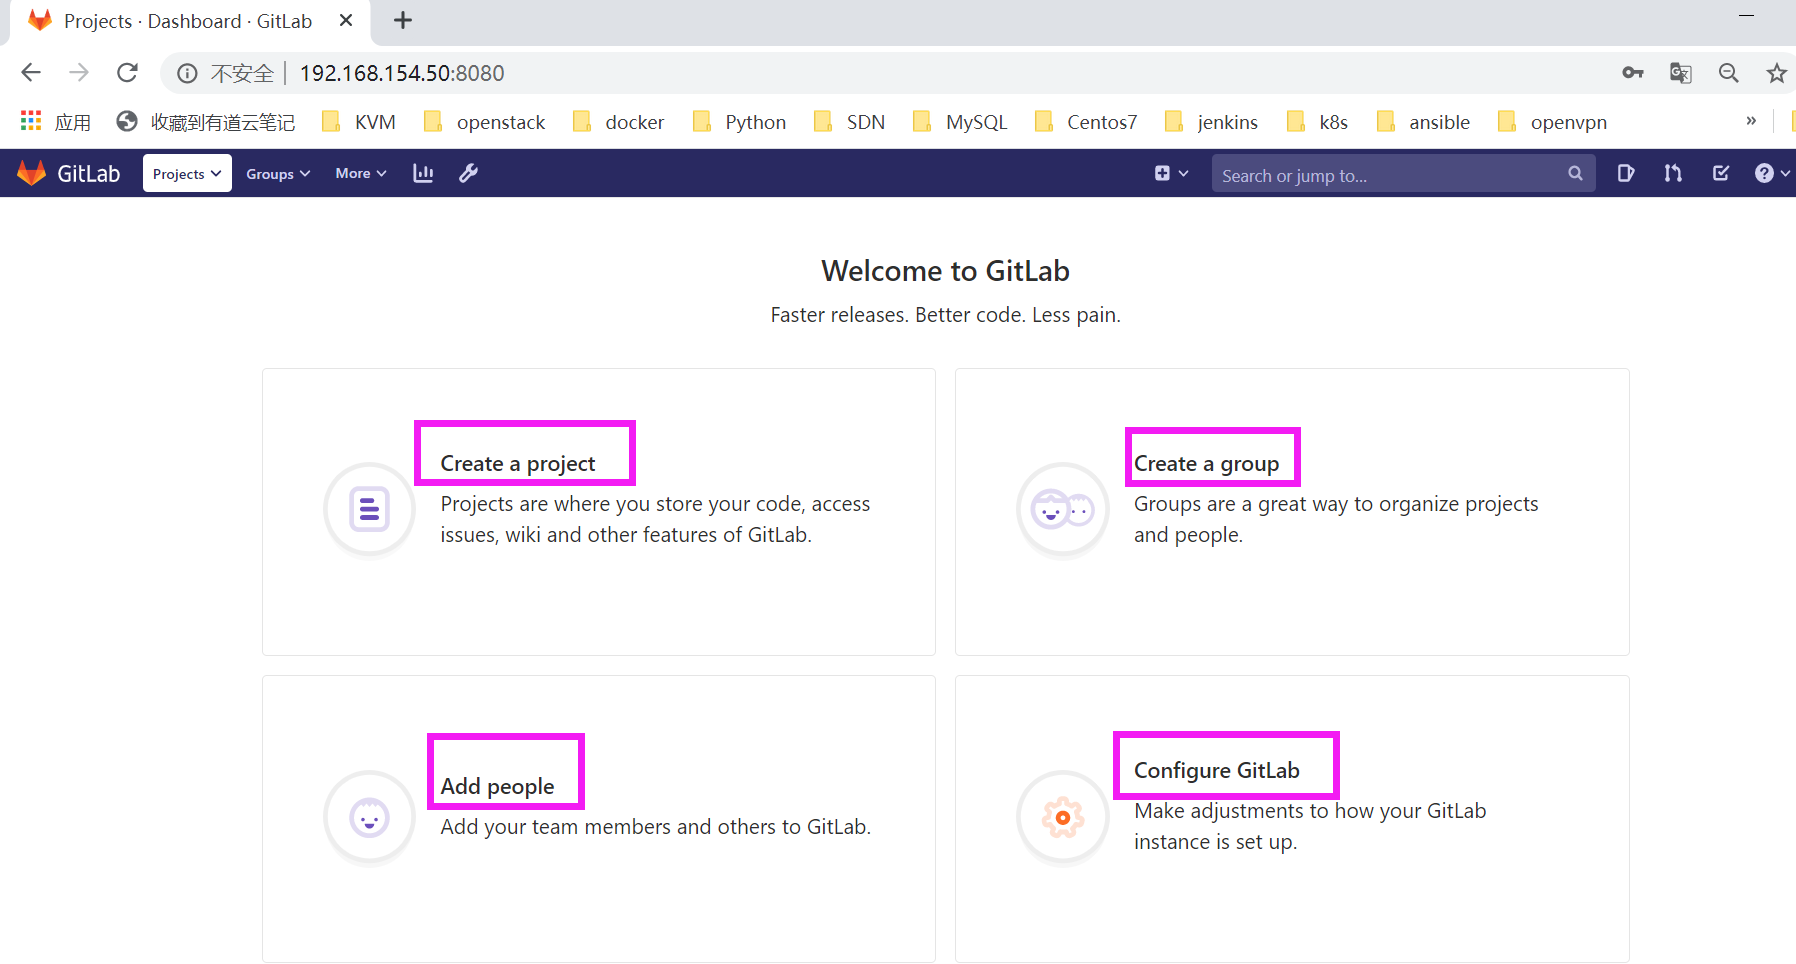
登陆后的结果:
1.2 gitlab基本操作
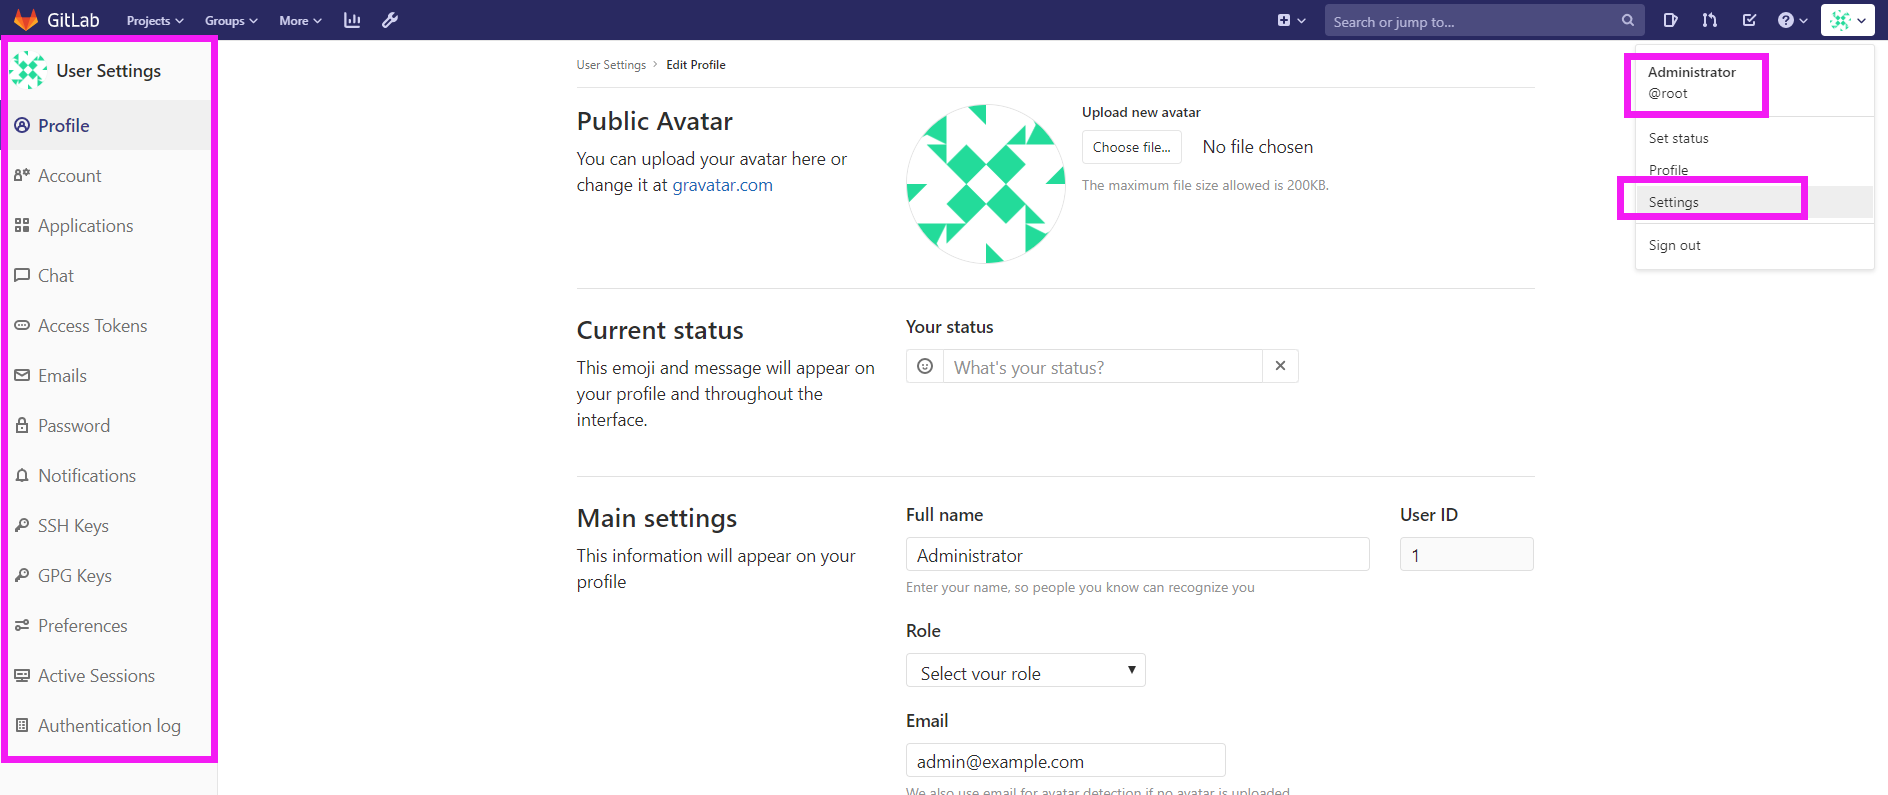
1.2.1 做为管理员可以查看和设置很多事情
1.2.2 可以在注册界面进行用户注册
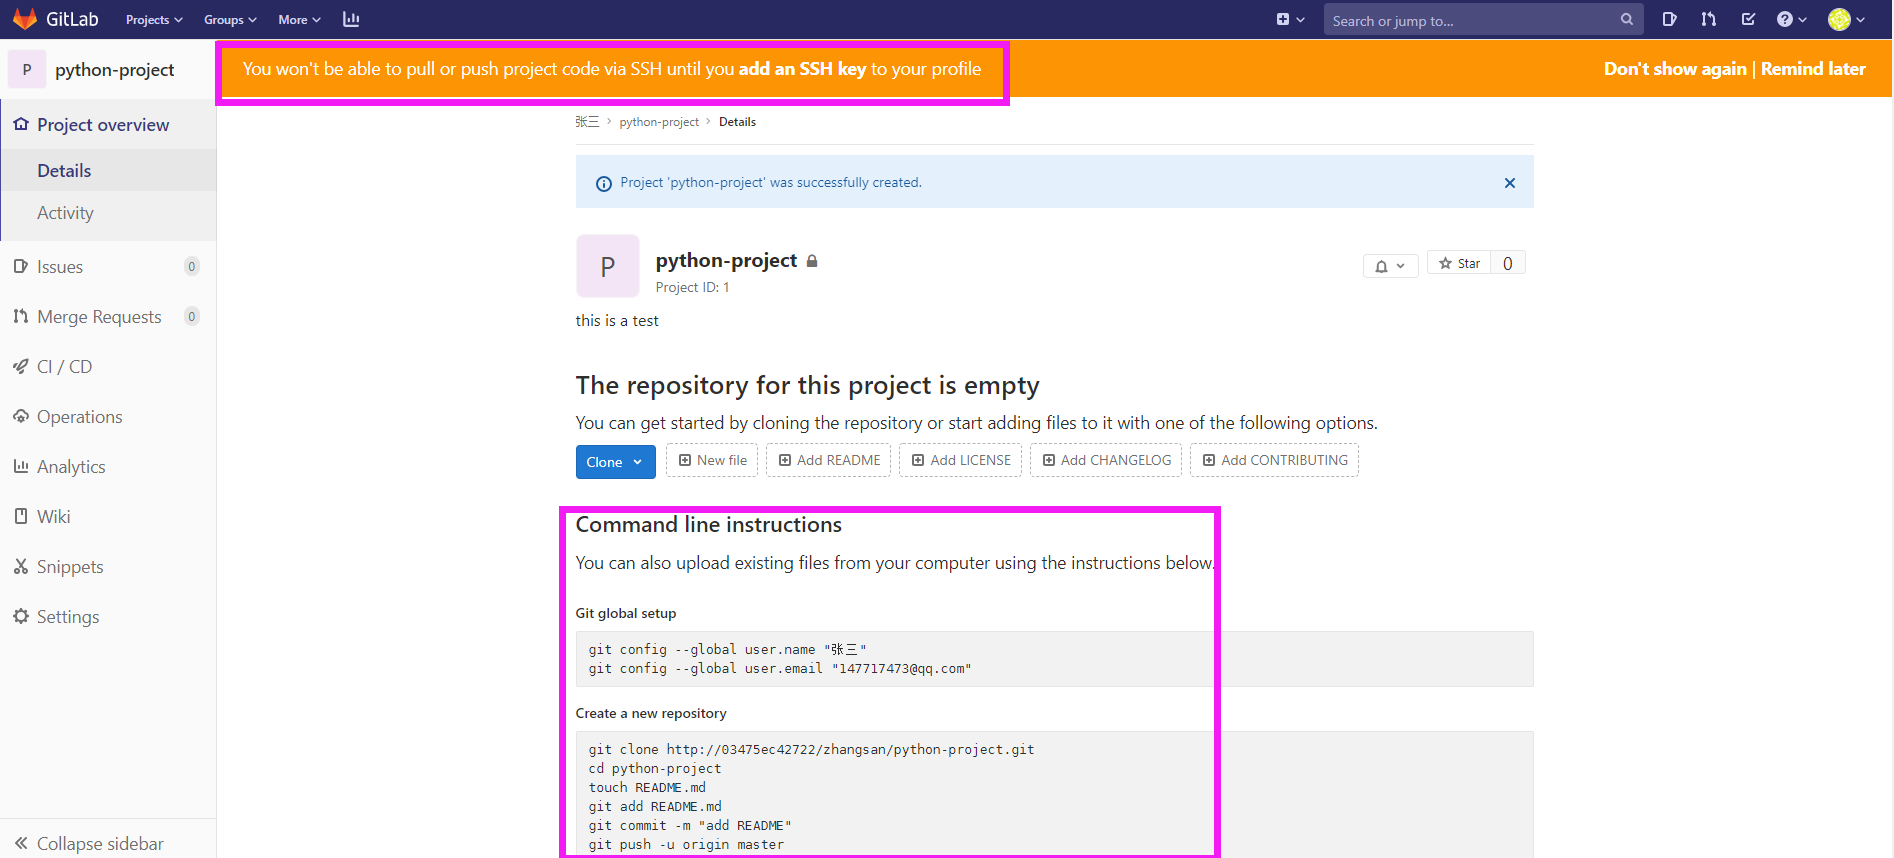
1.2.3 注册成功后,可以创建项目
创建完成后会提示没有添加ssh密钥,不能够通过SSH方式pull、push项目代码:
1.2.4 将密钥添加到web界面的用户中
1.2.5 客户端操作
Git全局设置
git config --global user.name "张三"git config --global user.email "147717473@qq.com"
创建一个新的仓库
[root@git ~]# mkdir zhangsan-pro[root@git ~]# cd zhangsan-pro[root@git zhangsan-pro]# git clone ssh://git@192.168.154.50:2222/zhangsan/python-project.gitCloning into 'python-project'...warning: You appear to have cloned an empty repository.[root@git zhangsan-pro]# lspython-project[root@git python-project]# git remote -vorigin ssh://git@192.168.154.50:2222/zhangsan/python-project.git (fetch)origin ssh://git@192.168.154.50:2222/zhangsan/python-project.git (push)[root@git python-project]# echo 'this is a test file' > README.md[root@git python-project]# git add README.md[root@git python-project]# git commit -m 'add README'[master (root-commit) edf5b20] add README1 file changed, 1 insertion(+)create mode 100644 README.md[root@git python-project]# git push -u origin masterCounting objects: 3, done.Writing objects: 100% (3/3), 235 bytes | 0 bytes/s, done.Total 3 (delta 0), reused 0 (delta 0)To ssh://git@192.168.154.50:2222/zhangsan/python-project.git* [new branch] master -> masterBranch master set up to track remote branch master from origin.
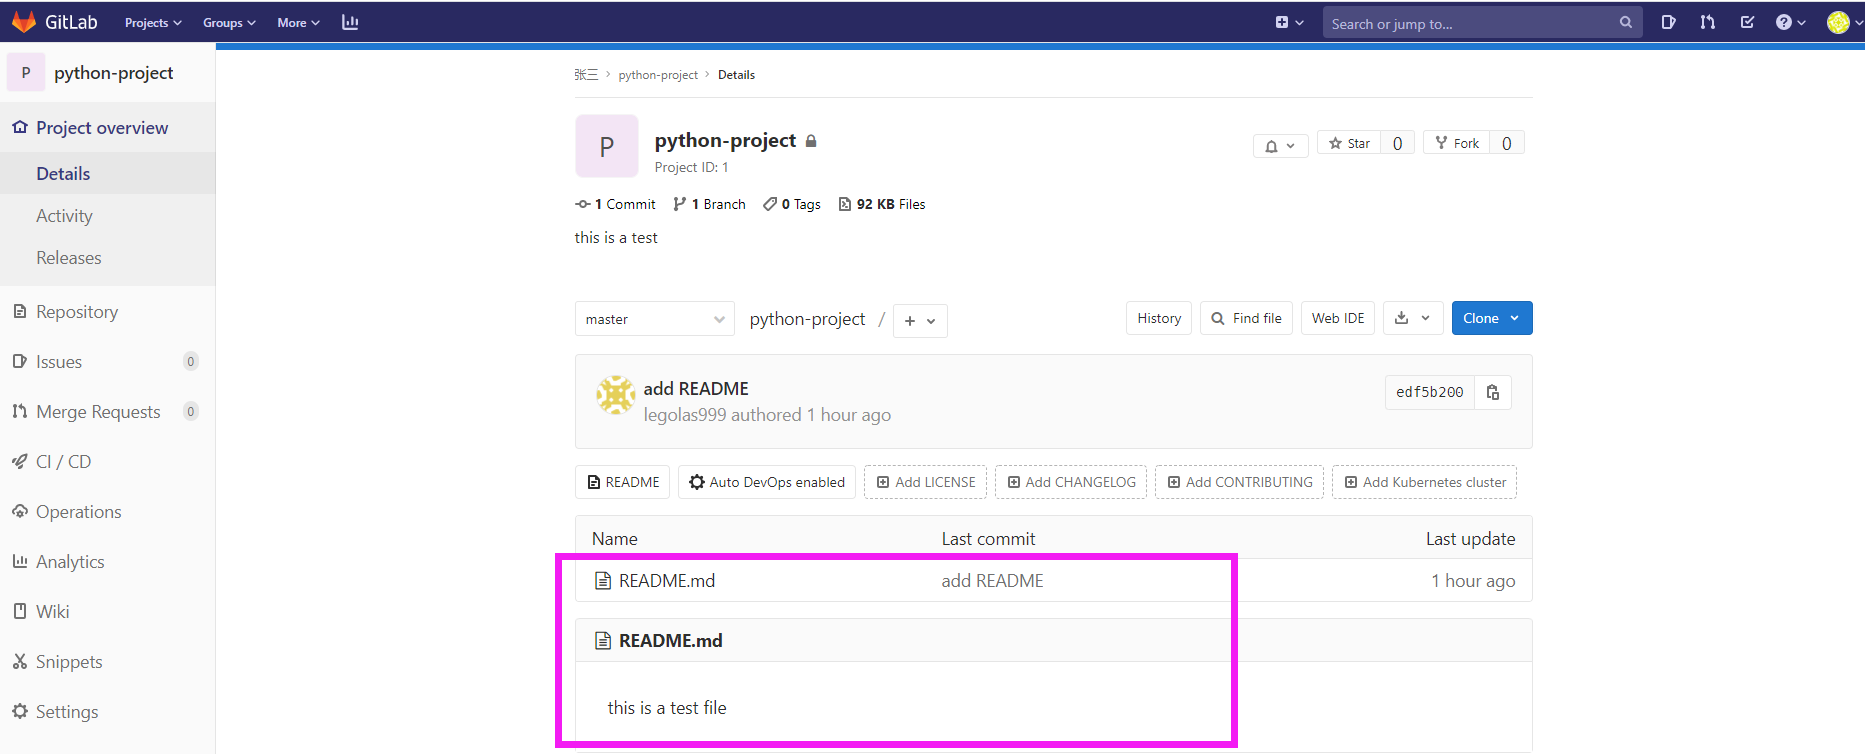
在Gitlab服务器上可以查看到新添加的文件:
1.2.6 gitlab常用管理命令:
##关闭gitlab:# gitlab-ctl stop##启动gitlab:# gitlab-ctl start##重启gitlab:# gitlab-ctl restart##可以使用gitlab-ctl管理gitlab,例如查看gitlab状态:# gitlab-ctl status##查看配置# gitlab-ctl show-config## 重新配置# gitlab-ctl reconfigure##查看帮助# gitlab-ctl --help
二. 使用git和gitlab开发项目
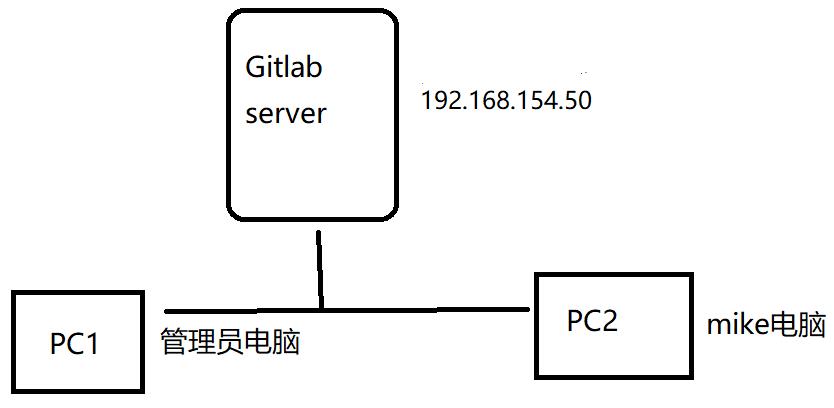
工作环境:
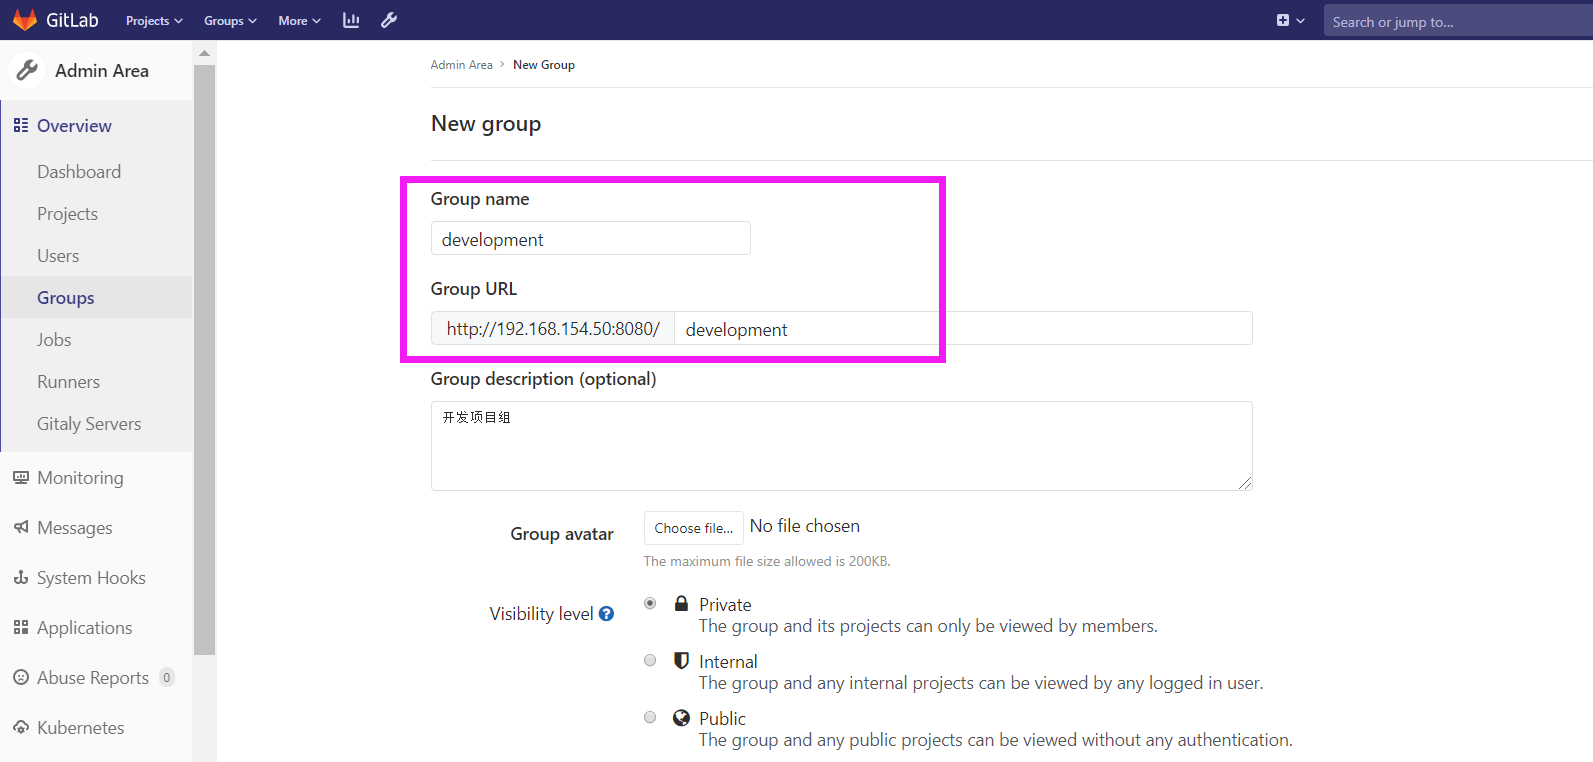
2.1 首先管理员登陆gitlab,创建组,创建用户,并将用户加入到组
- 组名:development
- 用户:mike
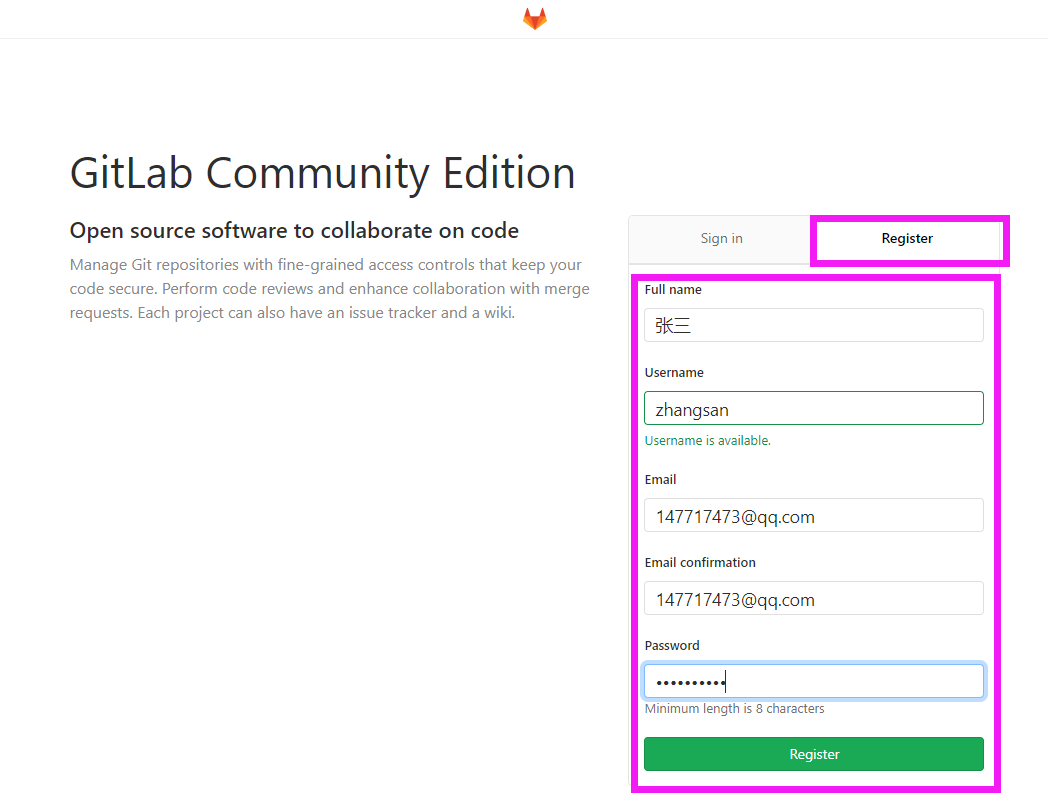
用户mike登录注册账号

创建组development,并将mike加入
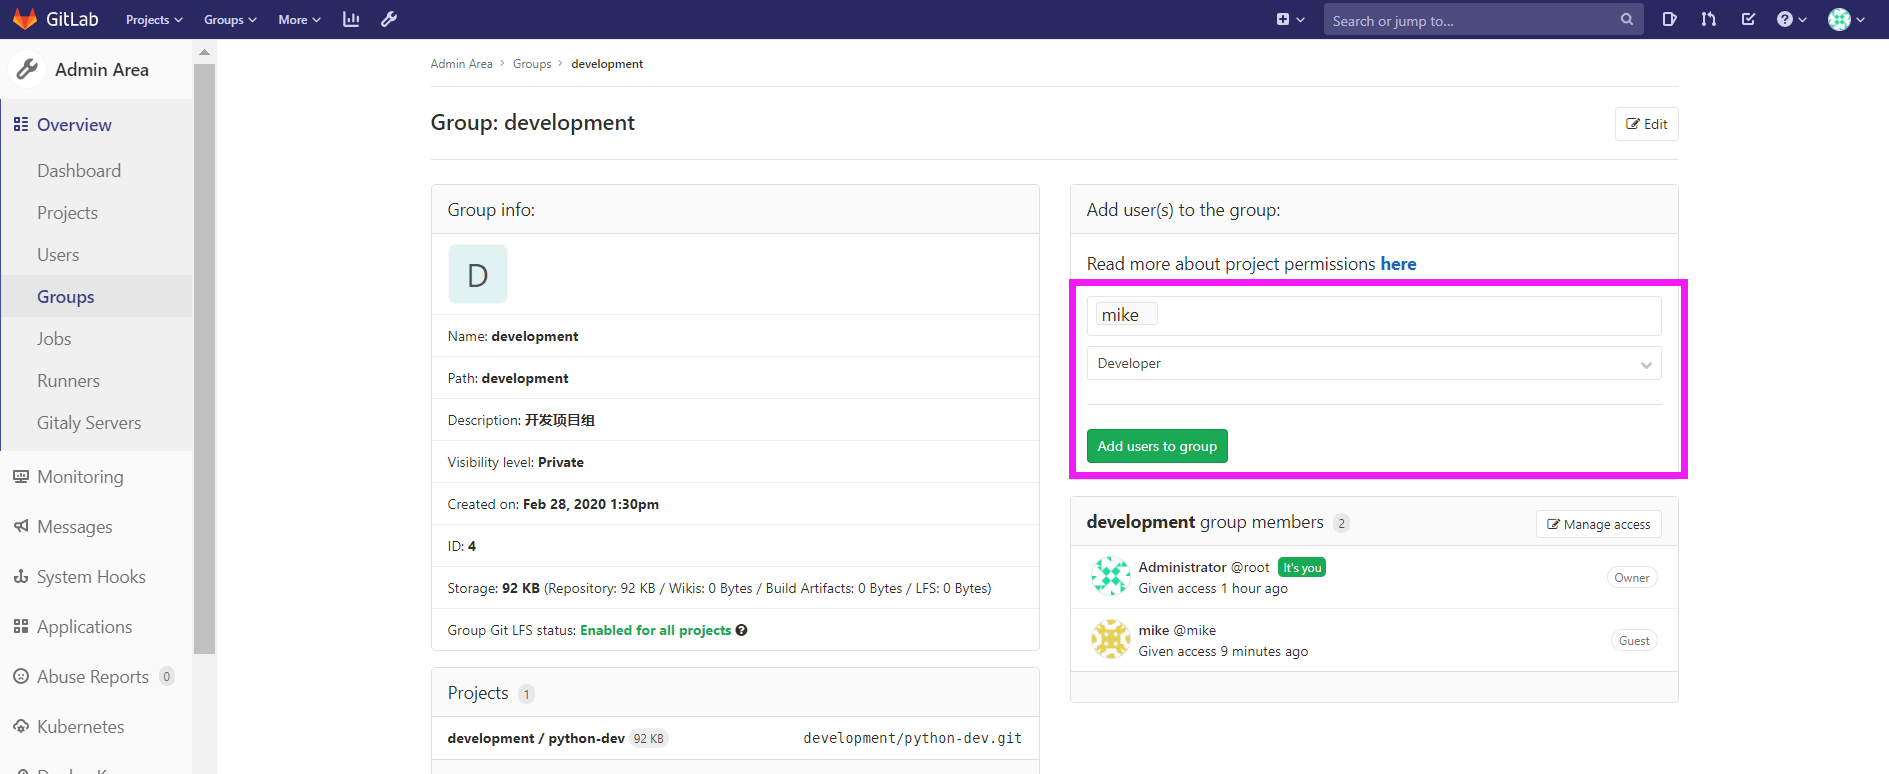
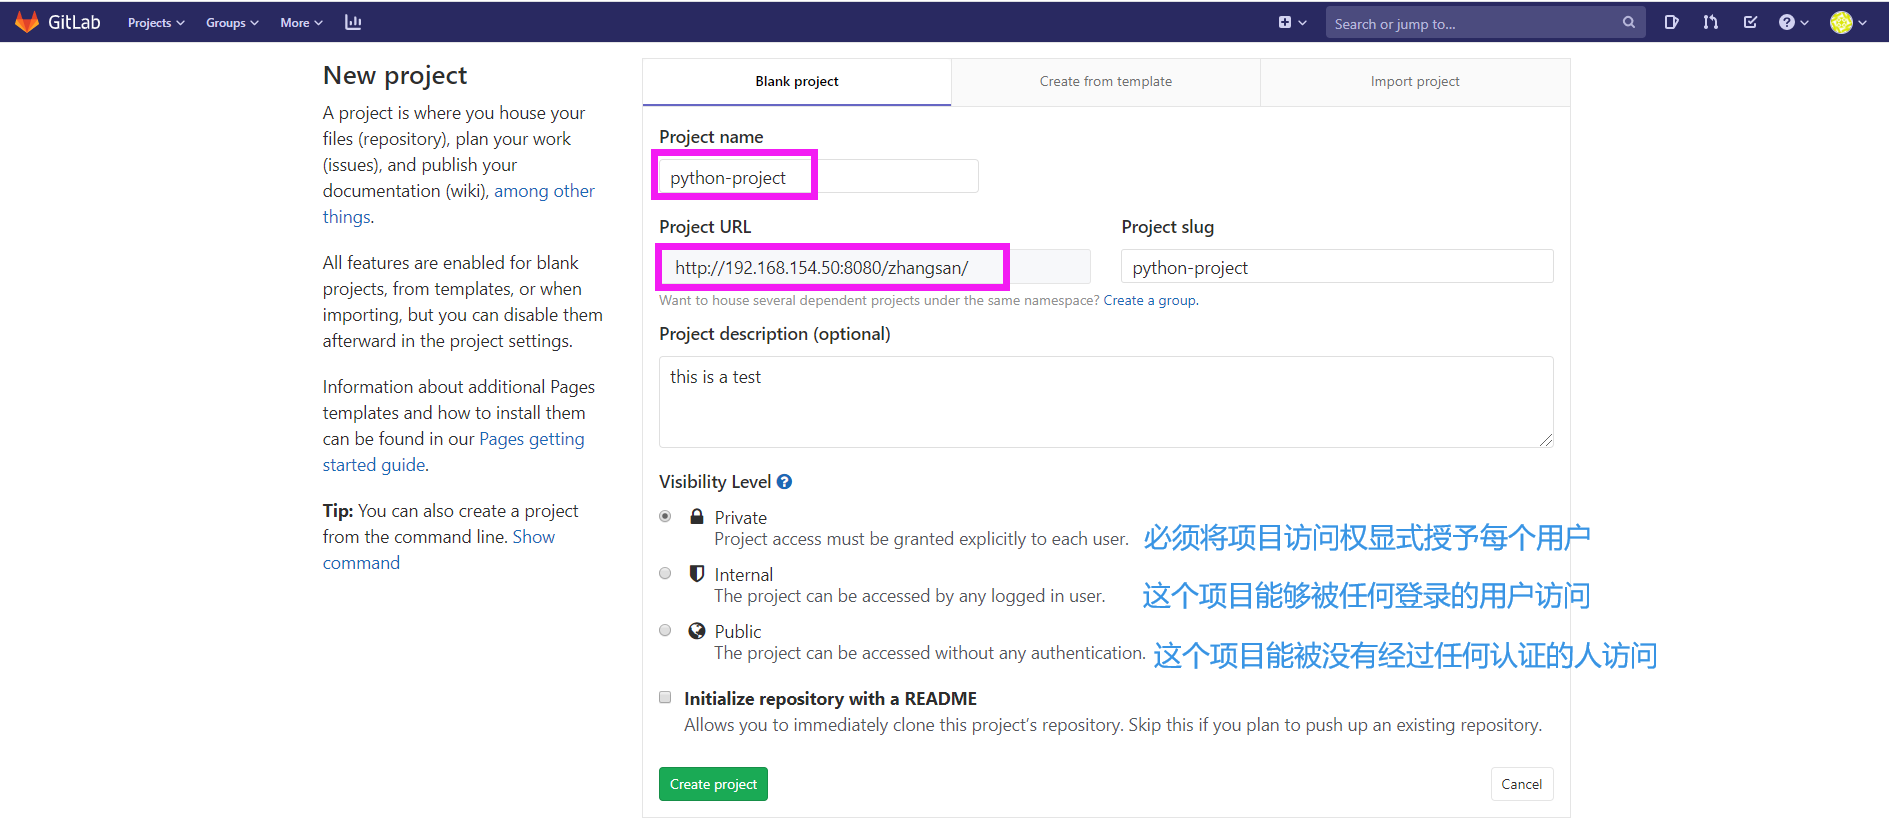
2.2 创建新项目:python-dev

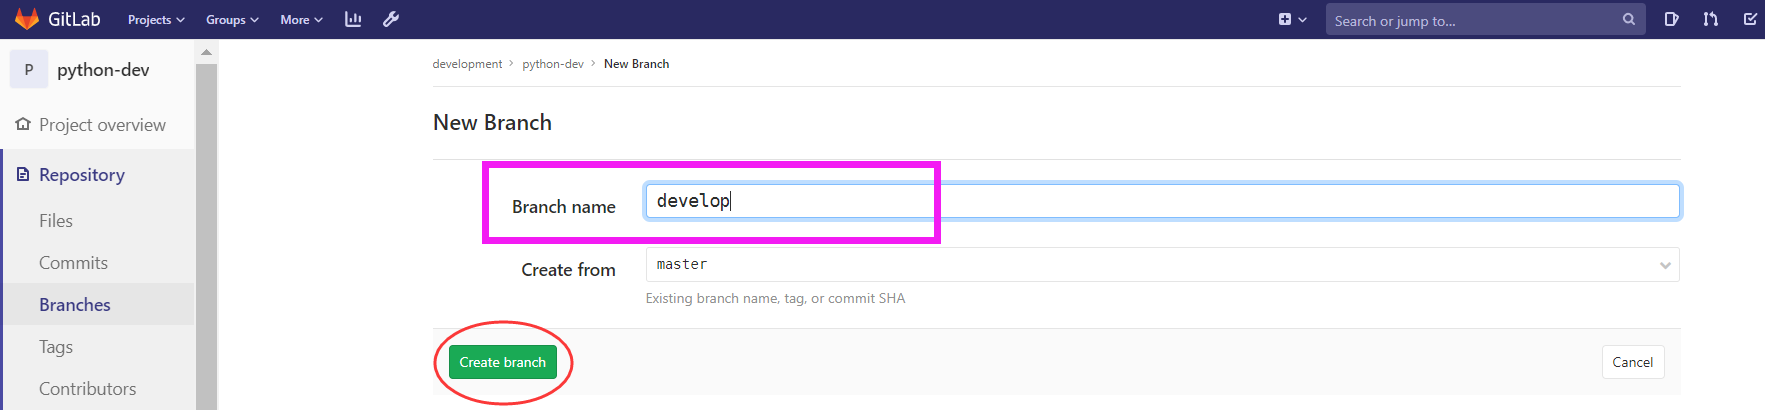
并添加一个README测试文件
并初始一个新分支:develop
2.3 管理员登陆自己的电脑,从gitlab克隆自己的本地仓库
[root@git ~]# git config --local user.name 'administrator'[root@git ~]# git config --local user.email 'admin@example.com'[root@git ~]# mkdir administrator-pro[root@git ~]# cd administrator-pro/[root@git administrator-pro]# git clone http://192.168.154.50:8080/development/python-dev.git##切换到develop分支,这个分支作为开发环境,稳定后可以合并到master分支[root@git administrator-pro]# cd python-dev/[root@git python-dev]# git branch* master[root@git python-dev]# git checkout develop分支 develop 设置为跟踪来自 origin 的远程分支 develop。切换到一个新分支 'develop'[root@git python-dev]# git branch* developmaster[root@git python-dev]# lsREADME
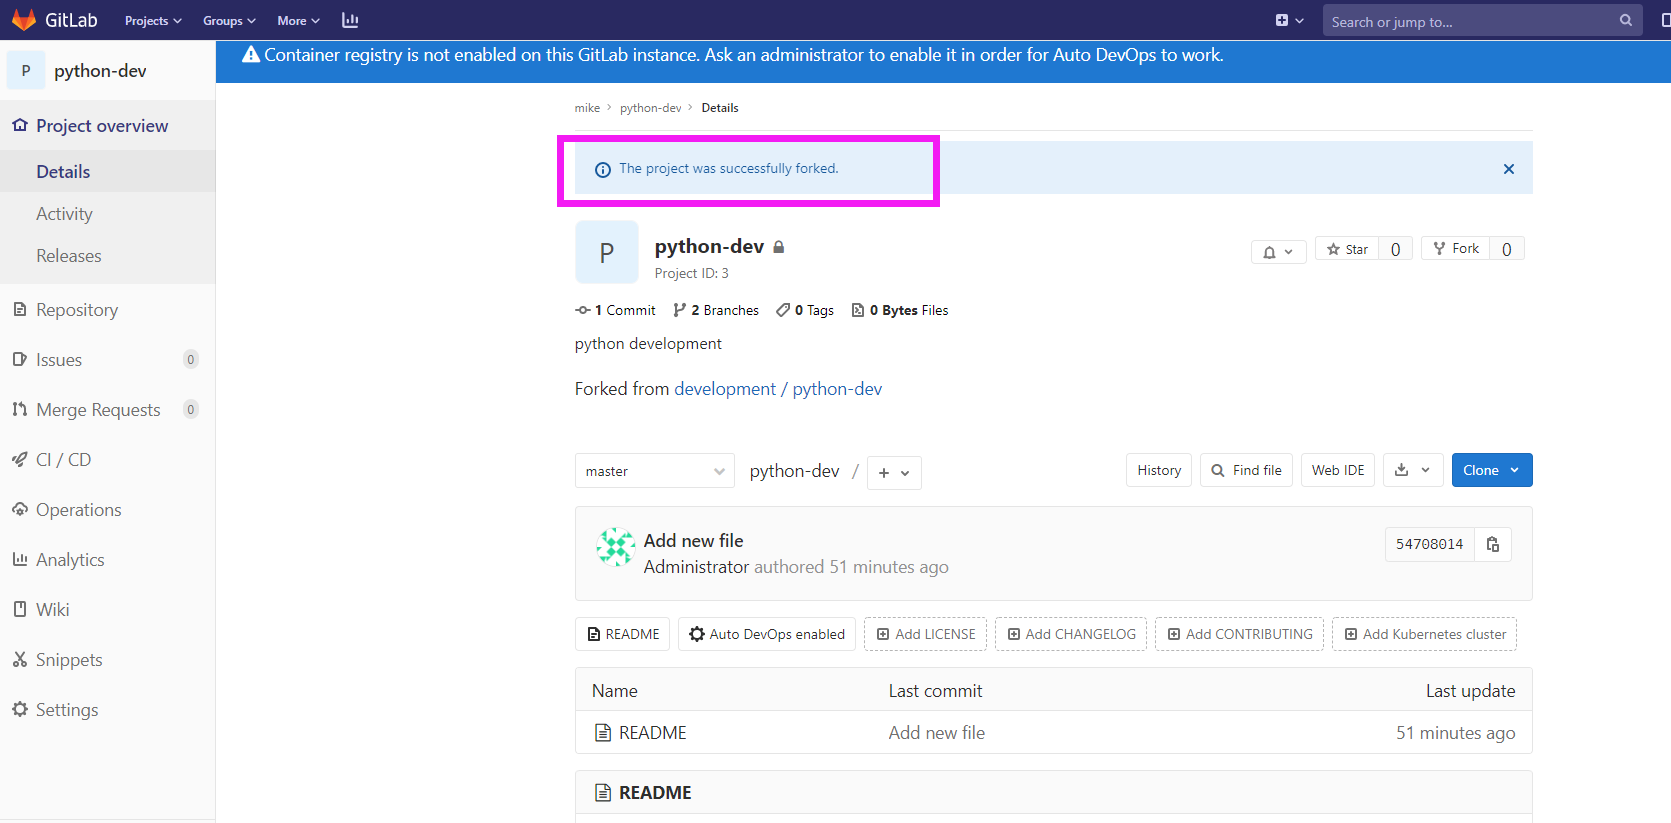
2.4 mike登陆到gitlab,fork项目
登录成功后,点击fork,选择自己的账号,即可成功fork
2.5 mike登陆自己的电脑,将自己fork的gitlab库克隆到本地库
[root@git ~]# git config --global user.name 'mike'[root@git ~]# git config --global user.email 'lqr888888@aliyun.com'[root@git ~]# mkdir mike-pro[root@git ~]# cd mike-pro/root@git mike-pro]# git clone http://192.168.154.50:8080/mike/python-dev.git[root@git mike-pro]# cd python-dev/[root@git python-dev]# lsREADME
2.6 开始开发项目功能
假设现在要开发一个“讨论”功能
##先切换到develop分支[root@git python-dev]# git checkout develop分支 develop 设置为跟踪来自 origin 的远程分支 develop。切换到一个新分支 'develop'[root@git python-dev]# git branch* developmaster##分出一个功能分支:[root@git python-dev]# git checkout -b feature-discusz切换到一个新分支 'feature-discusz'##生成代码并提交[root@git python-dev]# echo 'new feature for discuze' > new.py[root@git python-dev]# git add .[root@git python-dev]# git commit -m 'new feature'[feature-discusz b9db125] new feature1 file changed, 1 insertion(+)create mode 100644 new.py
多次测试,没有问题后,合并到develop分支,并提交到gitlab仓库
##切换到develop分支[root@git python-dev]# git checkout develop切换到分支 'develop'##合并分支feature-discuss,完成后删除[root@git python-dev]# git merge --no-ff feature-discuszMerge made by the 'recursive' strategy.new.py | 1 +1 file changed, 1 insertion(+)create mode 100644 new.py[root@git python-dev]# git branch -d feature-discusz已删除分支 feature-discusz(曾为 b9db125)。##提交到gitlab仓库[root@git python-dev]# git push -u origin developUsername for 'http://192.168.154.50:8080': mikePassword for 'http://mike@192.168.154.50:8080':Counting objects: 5, done.Delta compression using up to 4 threads.Compressing objects: 100% (3/3), done.Writing objects: 100% (4/4), 395 bytes | 0 bytes/s, done.Total 4 (delta 1), reused 0 (delta 0)remote:remote: To create a merge request for develop, visit:remote: http://192.168.154.50:8080/mike/python-dev/-/merge_requests/new?merge_request%5Bsource_branch%5D=developremote:To http://192.168.154.50:8080/mike/python-dev.git5470801..1d0a611 develop -> develop分支 develop 设置为跟踪来自 origin 的远程分支 develop。
2.7 mike登陆到gitlab查看代码并创建合并请求
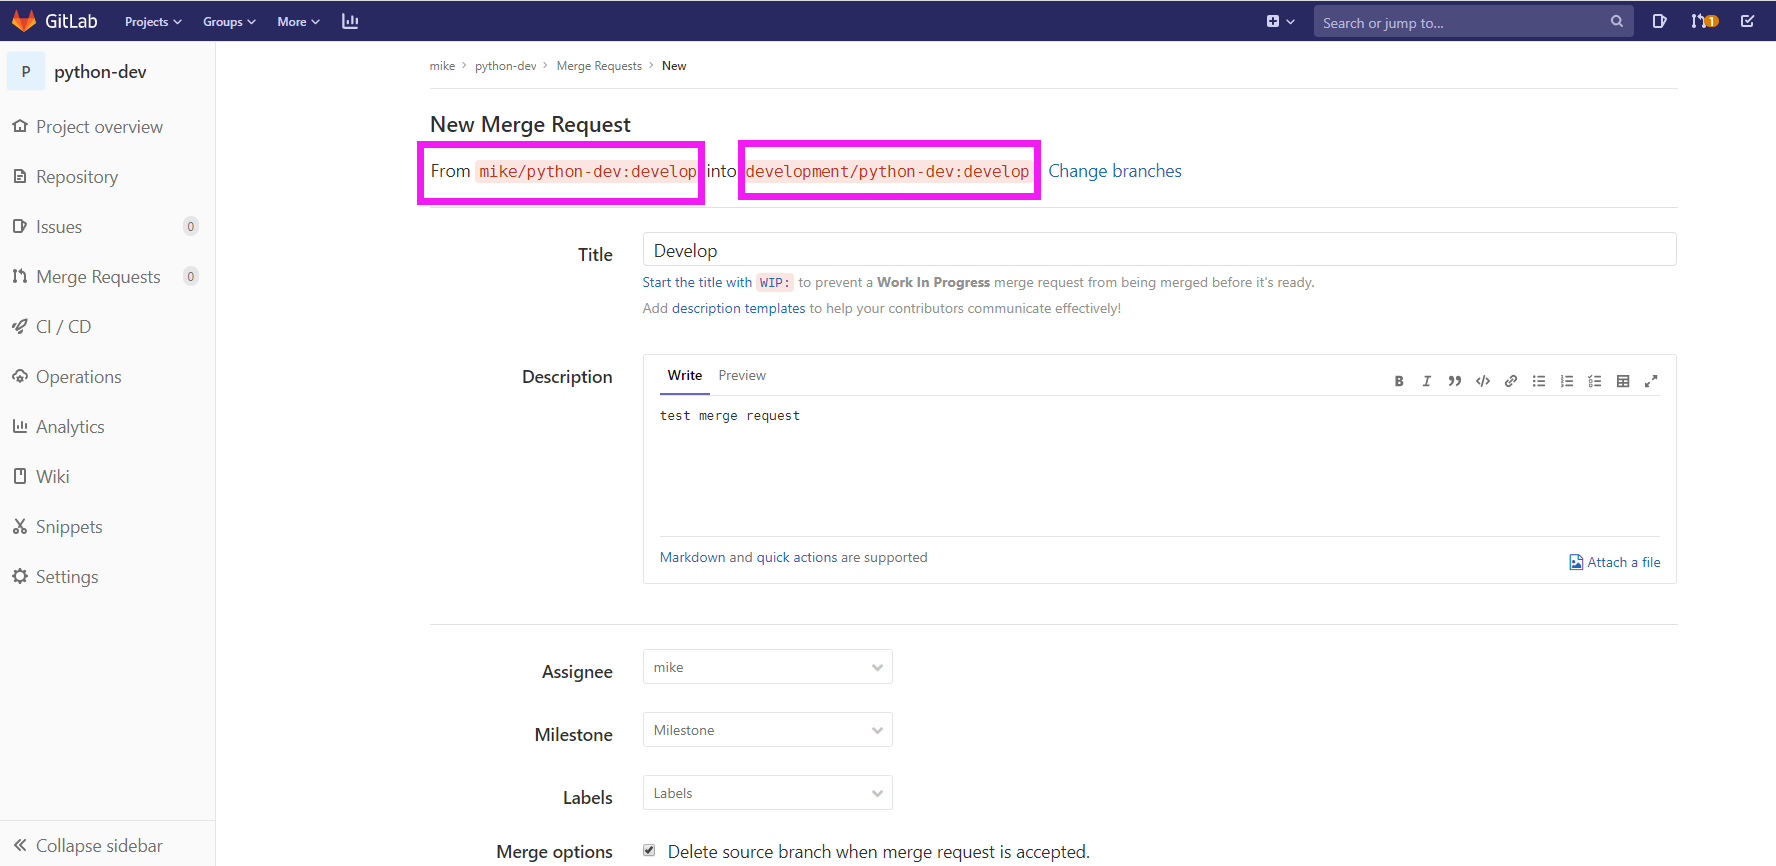
2.8 管理员登陆gitlab,会看到代码合并请求
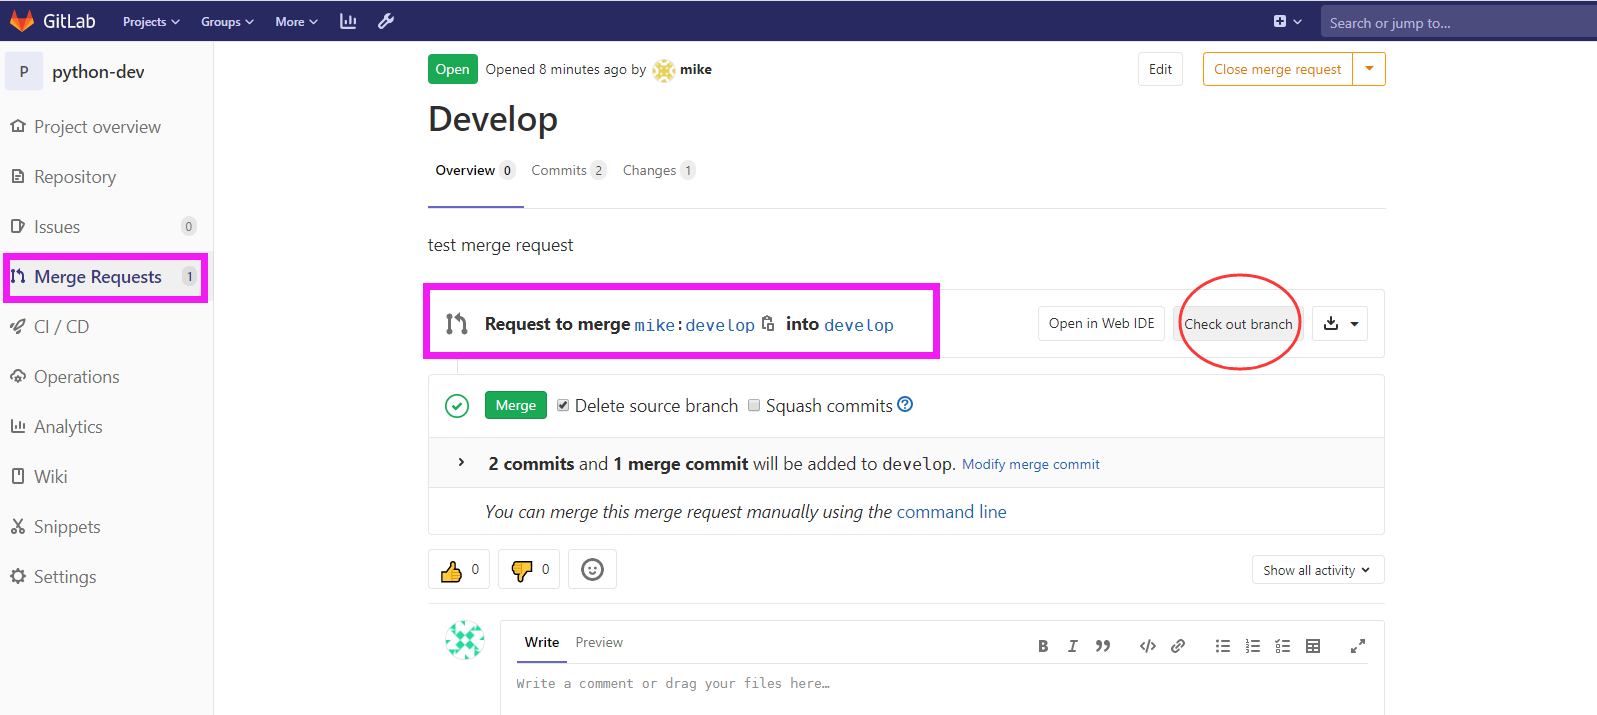
点击:check out branch,会提示后续操作步骤
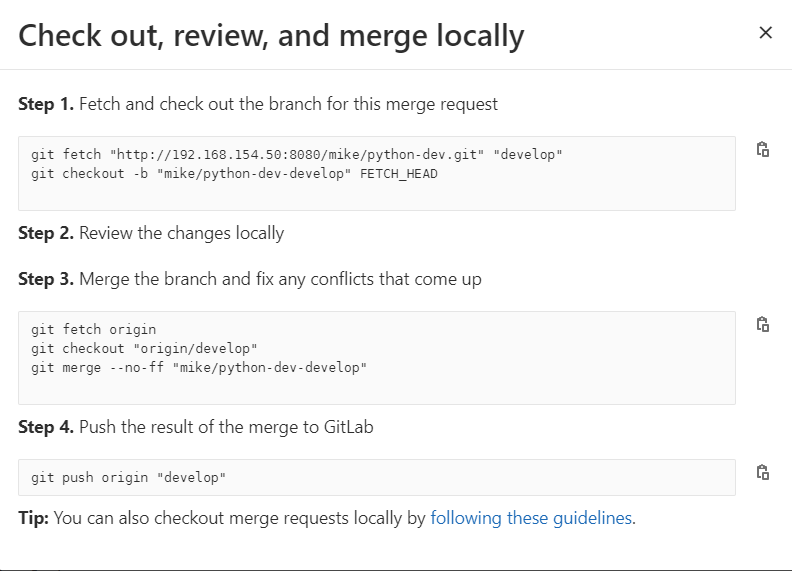
2.9 管理员review代码并合并
管理员登录主机,进入项目目录:
[root@git administrator-pro]# cd python-dev/[root@git python-dev]# lsREADME[root@git python-dev]# git branch* developmaster
获取并检查这个分支的合并请求
[root@git python-dev]# git fetch http://192.168.154.50:8080/mike/python-dev.git developUsername for 'http://192.168.154.50:8080': rootPassword for 'http://root@192.168.154.50:8080':remote: Enumerating objects: 5, done.remote: Counting objects: 100% (5/5), done.remote: Compressing objects: 100% (3/3), done.remote: Total 4 (delta 1), reused 0 (delta 0), pack-reused 0Unpacking objects: 100% (4/4), done.来自 http://192.168.154.50:8080/mike/python-dev* branch develop -> FETCH_HEAD[root@git python-dev]# git checkout -b mike/python-dev-develop FETCH_HEAD切换到一个新分支 'mike/python-dev-develop'[root@git python-dev]# git branchdevelopmaster* mike/python-dev-develop[root@git python-dev]# lsnew.py README
管理员审查代码,没有问题后,合并分支并修复出现的任何冲突
[root@git python-dev]# git checkout develop[root@git python-dev]# git merge --no-ff mike/python-dev-developMerge made by the 'recursive' strategy.new.py | 1 +1 file changed, 1 insertion(+)create mode 100644 new.py[root@git python-dev]# lsnew.py README
推送到Gitlab仓库
[root@git python-dev]# git push origin developUsername for 'http://192.168.154.50:8080': rootPassword for 'http://root@192.168.154.50:8080':Counting objects: 1, done.Writing objects: 100% (1/1), 242 bytes | 0 bytes/s, done.Total 1 (delta 0), reused 0 (delta 0)remote:remote: To create a merge request for develop, visit:remote: http://192.168.154.50:8080/development/python-dev/-/merge_requests/new?merge_request%5Bsource_branch%5D=developremote:To http://192.168.154.50:8080/development/python-dev.git5470801..6422714 develop -> develop

若有收获,就点个赞吧
0 人点赞
