使用PHPUnit做单元测试
PHPUnit是最流行的PHP测试框架。配置是使用非常简单。此外,这个框架支持代码覆盖率报告,还有需要额外的插件。上一小节中的Codeception使用PHPUnit来工作,并写单元测试。在这个小节中,我们将会使用PHPUnit测试创建一个购物车扩展示例。
准备
按照官方指南http://www.yiiframework.com/doc-2.0/guide-start-installation.html的描述,使用Composer包管理器创建一个新的yii2-app-basic应用。
如何做…
首先,我们必须为我们的扩展创建一个新的空目录。
准备扩展结构
- 首先,为你的扩展创建目录结构:
book└── cart├── src└── tests
为了将这个扩展做为一个Composer包,准备book/cart/composer.json:
{"name": "book/cart","type": "yii2-extension","require": {"yiisoft/yii2": "~2.0"},"require-dev": {"phpunit/phpunit": "4.*"},"autoload": {"psr-4": {"book\\cart\\": "src/","book\\cart\\tests\\": "tests/"}},"extra": {"asset-installer-paths": {"npm-asset-library": "vendor/npm","bower-asset-library": "vendor/bower"}}}
- 在
book/cart/.gitignore文件中添加如下内容:
/vendor/composer.lock
- 添加如下内容到PHPUnit默认配置文件中
book/cart/phpunit.xml.dist:
<?xml version="1.0" encoding="utf-8"?><phpunit bootstrap="./tests/bootstrap.php"colors="true"convertErrorsToExceptions="true"convertNoticesToExceptions="true"convertWarningsToExceptions="true"stopOnFailure="false"><testsuites><testsuite name="Test Suite"><directory>./tests</directory></testsuite></testsuites><filter><whitelist><directory suffix=".php">./src/</directory></whitelist></filter></phpunit>
- 安装扩展的所有依赖:
composer install
- 现在我们可以获取如下结构:
book└── cart├── src├── tests├── .gitignore├── composer.json├── phpunit.xml.dist└── vendor
写扩展代码
为了写扩展代码,执行如下步骤:
- 在
src文件夹中,创建book\cart\Cart类:
<?phpnamespace book\cart;use book\cart\storage\StorageInterface;use yii\base\Component;use yii\base\InvalidConfigException;class Cart extends Component{/*** @var StorageInterface*/private $_storage;/*** @var array*/private $_items;public function setStorage($storage){if (is_array($storage)) {$this->_storage = \Yii::createObject($storage);} else {$this->_storage = $storage;}}public function add($id, $amount = 1){$this->loadItems();if (isset($this->_items[$id])) {$this->_items[$id] += $amount;} else {$this->_items[$id] = $amount;}$this->saveItems();}public function set($id, $amount){$this->loadItems();$this->_items[$id] = $amount;$this->saveItems();}public function remove($id){$this->loadItems();if (isset($this->_items[$id])) {unset($this->_items[$id]);}$this->saveItems();}public function clear(){$this->loadItems();$this->_items = [];$this->saveItems();}public function getItems(){$this->loadItems();return $this->_items;}public function getCount(){$this->loadItems();return count($this->_items);}public function getAmount(){$this->loadItems();return array_sum($this->_items);}private function loadItems(){if ($this->_storage === null) {throw new InvalidConfigException('Storage must be set');}if ($this->_items === null) {$this->_items = $this->_storage->load();}}private function saveItems(){$this->_storage->save($this->_items);}}
- 在
src/storage子文件夹中创建StorageInterface接口:
<?phpnamespace book\cart\storage;interface StorageInterface{/*** @return array*/public function load();/*** @param array $items*/public function save(array $items);}
以及SessionStorage类:
<?phpnamespace book\cart\storage;use Yii;class SessionStorage implements StorageInterface{public $sessionKey = 'cart';public function load(){return Yii::$app->session->get($this->sessionKey, []);}public function save(array $items){Yii::$app->session->set($this->sessionKey, $items);}}}
- 现在我们可以得到如下结构:
book└── cart├── src│ ├── storage│ │ ├── SessionStorage.php│ │ └── StorageInterface.php│ └── Cart.php├── tests├── .gitignore├── composer.json├── phpunit.xml.dist└── vendor
写扩展测试
为了实施这个扩展测试,执行如下步骤:
- 为PHPUnit添加
book/cart/tests/bootstrap.php入口:
<?phpdefined('YII_DEBUG') or define('YII_DEBUG', true);defined('YII_ENV') or define('YII_ENV', 'test');require(__DIR__ . '/../vendor/autoload.php');require(__DIR__ . '/../vendor/yiisoft/yii2/Yii.php');
- 在每一个测试前,通过初始化Yii应用创建一个测试基类,然后在销毁应用时释放:
<?phpnamespace book\cart\tests;use yii\di\Container;use yii\web\Application;abstract class TestCase extends \PHPUnit_Framework_TestCase{protected function setUp(){parent::setUp();$this->mockApplication();}protected function tearDown(){$this->destroyApplication();parent::tearDown();}protected function mockApplication(){new Application(['id' => 'testapp','basePath' => __DIR__,'vendorPath' => dirname(__DIR__) . '/vendor',]);}protected function destroyApplication(){\Yii::$app = null;\Yii::$container = new Container();}}
- 添加一个基于内存的干净的fake类,这个类继承
StorageInterface接口:
<?phpnamespace book\cart\tests\storage;use book\cart\storage\StorageInterface;class FakeStorage implements StorageInterface{private $items = [];public function load(){return $this->items;}public function save(array $items){$this->items = $items;}}
它将会存储一些条目到一个私有变量中,而不是一个真正的session中。它允许我们能独立运行这个测试(不需要真正的存储驱动),并提高测试性能。
- 添加
CartTest类:
<?phpnamespace book\cart\tests;use book\cart\Cart;use book\cart\tests\storage\FakeStorage;class CartTest extends TestCase{/*** @var Cart*/private $cart;public function setUp(){parent::setUp();$this->cart = new Cart(['storage' => newFakeStorage()]);}public function testEmpty(){$this->assertEquals([], $this->cart->getItems());$this->assertEquals(0, $this->cart->getCount());$this->assertEquals(0, $this->cart->getAmount());}public function testAdd(){$this->cart->add(5, 3);$this->assertEquals([5 => 3], $this->cart->getItems());$this->cart->add(7, 14);$this->assertEquals([5 => 3, 7 => 14],$this->cart->getItems());$this->cart->add(5, 10);$this->assertEquals([5 => 13, 7 => 14],$this->cart->getItems());}public function testSet(){$this->cart->add(5, 3);$this->cart->add(7, 14);$this->cart->set(5, 12);$this->assertEquals([5 => 12, 7 => 14],$this->cart->getItems());}public function testRemove(){$this->cart->add(5, 3);$this->cart->remove(5);$this->assertEquals([], $this->cart->getItems());}public function testClear(){$this->cart->add(5, 3);$this->cart->add(7, 14);$this->cart->clear();$this->assertEquals([], $this->cart->getItems());}public function testCount(){$this->cart->add(5, 3);$this->assertEquals(1, $this->cart->getCount());$this->cart->add(7, 14);$this->assertEquals(2, $this->cart->getCount());}public function testAmount(){$this->cart->add(5, 3);$this->assertEquals(3, $this->cart->getAmount());$this->cart->add(7, 14);$this->assertEquals(17, $this->cart->getAmount());}public function testEmptyStorage(){$cart = new Cart();$this->setExpectedException('yii\base\InvalidConfigException');$cart->getItems();}}
- 添加一个独立的测试,用于检查
SessionStorage类:
<?phpnamespace book\cart\tests\storage;use book\cart\storage\SessionStorage;use book\cart\tests\TestCase;class SessionStorageTest extends TestCase{/*** @var SessionStorage*/private $storage;public function setUp(){parent::setUp();$this->storage = new SessionStorage(['key' => 'test']);}public function testEmpty(){$this->assertEquals([], $this->storage->load());}public function testStore(){$this->storage->save($items = [1 => 5, 6 => 12]);$this->assertEquals($items, $this->storage->load());}}
- 现在我们可以得到如下结构:
book└── cart├── src│ ├── storage│ │ ├── SessionStorage.php│ │ └── StorageInterface.php│ └── Cart.php├── tests│ ├── storage│ │ ├── FakeStorage.php│ │ └── SessionStorageTest.php│ ├── bootstrap.php│ ├── CartTest.php│ └── TestCase.php├── .gitignore├── composer.json├── phpunit.xml.dist└── vendor
运行测试
在使用composer install命令安装所有的依赖时,Composer包管理器安装了PHPUnit包到vendor文件中,并将可执行的文件phpunit放在了vendor/bin子文件夹中。
现在我们可以运行如下脚本:
cd book/cartvendor/bin/phpunit
我们可以看到如下测试报告:
PHPUnit 4.8.26 by Sebastian Bergmann and contributors...........Time: 906 ms, Memory: 11.50MBOK (10 tests, 16 assertions)
每一个点都对应了一次成功的测试。
class Cart extends Component{…public function remove($id){$this->loadItems();if (isset($this->_items[$id])) {// unset($this->_items[$id]);}$this->saveItems();}...}
'components' => [// …'cart' => ['class' => 'book\cart\Cart','storage' => ['class' => 'book\cart\storage\SessionStorage',],],],
再次运行测试:
PHPUnit 4.8.26 by Sebastian Bergmann and contributors....F......Time: 862 ms, Memory: 11.75MBThere was 1 failure:1) book\cart\tests\CartTest::testRemoveFailed asserting that two arrays are equal.--- Expected+++ Actual@@ @@Array (+ 5 => 3)/book/cart/tests/CartTest.php:52FAILURES!Tests: 10, Assertions: 16, Failures: 1
在这个例子中,我们看到了一次失败(用F标记),以及一次错误报告。
分析代码覆盖率
你必须安装XDebug PHP扩展,https://xdebug.org。例如,在Ubuntu或者Debian上,你可以在终端中,输入如下命令:
sudo apt-get install php5-xdebug
在Windows上,你必须打开php.ini文件,并添加自定义代码到PHP安装路径中:
[xdebug]zend_extension_ts=C:/php/ext/php_xdebug.dll
或者,如果你使用非线程安全的版本,输入如下内容:
[xdebug]zend_extension=C:/php/ext/php_xdebug.dll
安装过XDebug以后,使用--coverage-html标志再次运行测试,并指定一个报告路径:
vendor/bin/phpunit --coverage-html tests/_output
在浏览器中打开tests/_output/index.html,你将会看到每一个路径和类的一个明确的覆盖率报告:
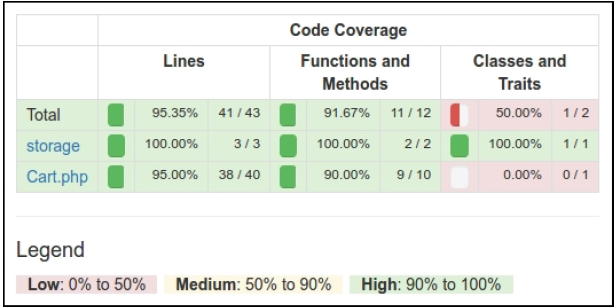
你可以点击任何类,并分析代码的哪一行在测试期间还没有被执行。例如,打开Cart类报告:

在我们的例子中,我们忘记测试从数组配置中创建storage。
组件的使用
在Packagist上发布扩展后,我们可以安装一个one-to-any项目:
composer require book/cart
此外,在应用的配置文件中激活组件:
'components' => [// …'cart' => ['class' => 'book\cart\Cart','storage' => ['class' => 'book\cart\storage\SessionStorage',],],],
另外一种方法,不需要在Packagist上发布扩展,我们必须设置@book alias,从而激活正确的类自动加载:
$config = ['id' => 'basic','basePath' => dirname(__DIR__),'bootstrap' => ['log'],'aliases' => ['@book' => dirname(__DIR__) . '/book',],'components' => ['cart' => ['class' => 'book\cart\Cart','storage' => ['class' => 'book\cart\storage\SessionStorage',],],// ...],]
无论如何,我们可以在我们的项目中以Yii::$app->cart组件的方式使用它:
工作原理…
在创建我们自己的测试前,你必须创建一个子目录,并在你的项目的根目录中添加phpinit.xml或者phpunit.xml.dist文件:
<?xml version="1.0" encoding="utf-8"?><phpunit bootstrap="./tests/bootstrap.php"colors="true"convertErrorsToExceptions="true"convertNoticesToExceptions="true"convertWarningsToExceptions="true"stopOnFailure="false"><testsuites><testsuite name="Test Suite"><directory>./tests</directory></testsuite></testsuites><filter><whitelist><directory suffix=".php">./src/</directory></whitelist></filter></phpunit>
如果第二个文件在工作目录中不存在,PHPUnit从第二个文件中加载配置。此外,你可以通过创建bootstrap.php文件来初始化autoloader和你框架的环境:
<?phpdefined('YII_DEBUG') or define('YII_DEBUG', true);defined('YII_ENV') or define('YII_ENV', 'test');require(__DIR__ . '/../vendor/autoload.php');require(__DIR__ . '/../vendor/yiisoft/yii2/Yii.php');
最后,你可以通过Composer安装PHPUnit(局部或者全局),并在有XML配置文件的目录中使用phpunit控制台命令。
PHPUnit扫描测试文件,并找到一*Test.php为后缀的文件。所有的测试类必须继承PHPUnit_Framework_TestCase类,并包含以test*为前缀的公共方法:
class MyTest extends TestCase{public function testSomeFunction(){$this->assertTrue(true);}}
在你的测试中,你可以用任何已有的assert*方法:
$this->assertEqual('Alex', $model->name);$this->assertTrue($model->validate());$this->assertFalse($model->save());$this->assertCount(3, $items);$this->assertArrayHasKey('username', $model->getErrors());$this->assertNotNull($model->author);$this->assertInstanceOf('app\models\User', $model->author);
此外,你可以复写setUp()或者tearDown()方法,用来添加表达式,它将在每一个测试方法之前或者之后运行。
例如,你可以通过重新初始化Yii应用定义自己的基类TestCase:
<?phpnamespace book\cart\tests;use yii\di\Container;use yii\web\Application;abstract class TestCase extends \PHPUnit_Framework_TestCase{protected function setUp(){parent::setUp();$this->mockApplication();}protected function tearDown(){$this->destroyApplication();parent::tearDown();}protected function mockApplication(){new Application(['id' => 'testapp','basePath' => __DIR__,'vendorPath' => dirname(__DIR__) . '/vendor',]);}protected function destroyApplication(){\Yii::$app = null;\Yii::$container = new Container();}}
现在你可以在你的子类中扩展这个类。你的test方法在会在一个自己的应用实例中运行。它会帮助你避免副作用,并创建独立了测试。
注意
Yii 2.0.*使用旧版的PHPUnit 4.*,用于兼容PHP5.4。
参考
- 所有关于PHPUnit使用方法的信息,参考官方文档https://phpunit.de/manual/current/en/index.html
- 使用Codeception测试应用小节

若有收获,就点个赞吧
0 人点赞
