1 什么是LAMP
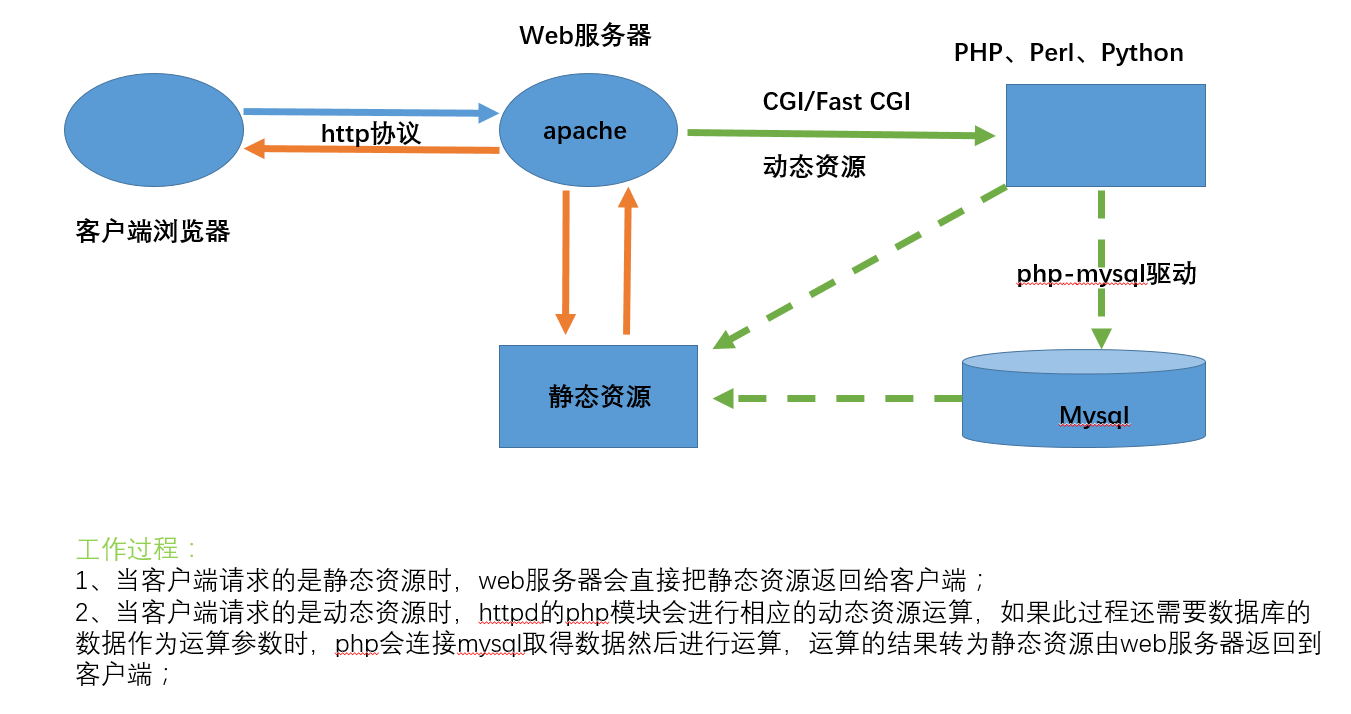
LAMP是指一组通常一起使用来运行动态网站或者服务器的自由软件名称首字母缩写:
Linux,操作系统
Apache,网页服务器
MariaDB或MySQL,数据库管理系统(或者数据库服务器)
PHP、Perl或Python,脚本语言
2 安装Apache httpd Web 服务器程序
2.1 准备工作
准备两台虚拟机,分别是WebServer和DBserver,分别配置好软件仓库(本地软件仓库)
主要步骤如下:
#先放入光盘到光驱中,记得要连接上[root@dbserver ~]# mkdir /media/cdrom[root@dbserver ~]# mount /dev/cdrom /media/cdrom[root@dbserver ~]# cd /etc/yum.repos.d[root@dbserver yum.repos.d]# mkdir ./backup[root@dbserver yum.repos.d]# mv *.repo ./backup[root@dbserver yum.repos.d]# cp ./backup/CentOS-Media.repo ./[root@dbserver yum.repos.d]# ls[root@dbserver yum.repos.d]# vi CentOS-Media.repo#修改如下内容:gpgcheck=0enabled=1#修改完成后保存[root@dbserver yum.repos.d]# yum clean all[root@dbserver yum.repos.d]# yum makecache
2.2 在WebServer上安装httpd应用程序
[root@webserver yum.repos.d]# yum -y install httpd*[root@webserver yum.repos.d]# systemctl start httpd[root@webserver yum.repos.d]# systemctl enable httpd[root@webserver yum.repos.d]# firewall-cmd --permanent --add-service=http#firewall-cmd是CentOS7 默认的防火墙管理命令#--add-service=http 允许(开放)http(80)端口#--permanent 表示设置是持久生效的[root@webserver yum.repos.d]# firewall-cmd --reload#重新加载防火墙的配置文件[root@webserver yum.repos.d]# cd /var/www/html[root@webserver html]# touch index.html[root@webserver html]# echo "<h1>WELCOME TO MY WebSite.</h1>" > index.html[root@webserver html]# cat index.html<h1>WELCOME TO MY WebSite.</h1>
配置完成后在客户端进行测试,能够打开这个网站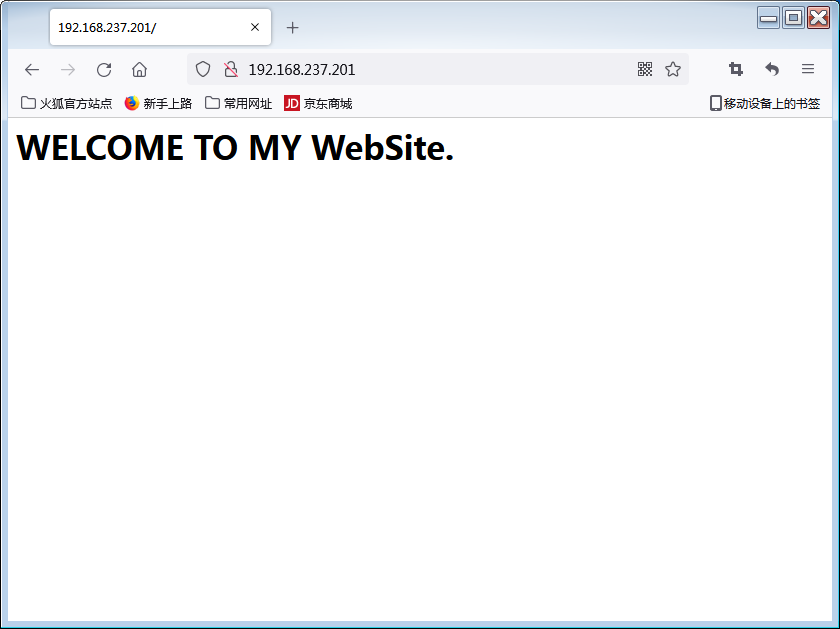
3 安装PHP应用程序服务器
3.1 安装php应用程序
[root@webserver html]# yum -y install php[root@webserver html]# yum -y install php-mysql[root@webserver html]# systemctl restart httpd
yum -y install php
# yum -y install php-mysql
# systemctl restart httpd
3.2 写一个测试页,测试PHP
[root@webserver html]# cd /var/www/html[root@webserver html]# touch info.php[root@webserver html]# vi info.php
编写测试PHP的页面文件info.php,内容如下:
<?phpphpinfo();?>
info.php
在客户端浏览器输入http://Web服务器IP地址/info.php进行测试。能看到如下页面,则表示安装成功。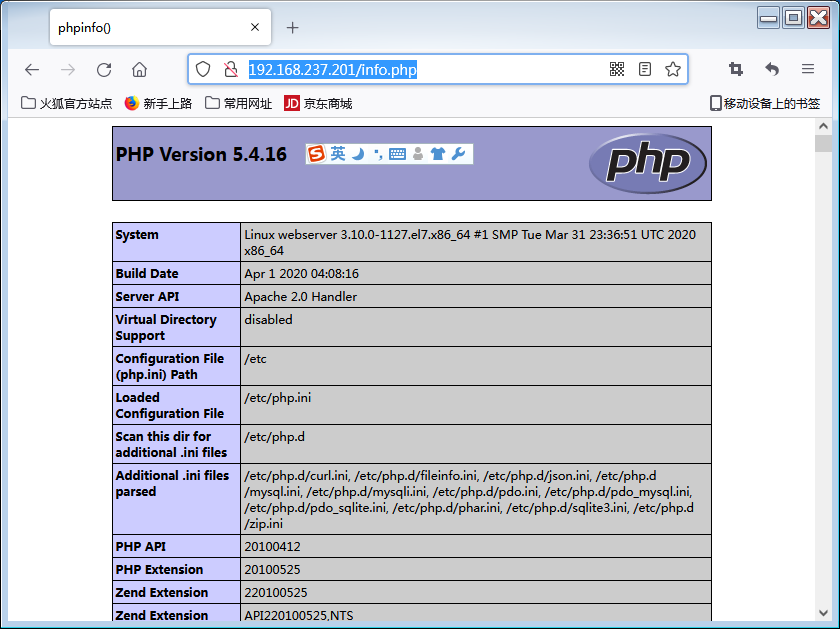
4 安装MariaDB数据库服务器
4.1 在DBServer上安装mariadb
[root@dbserver ~]# yum -y install mariadb*[root@dbserver ~]# systemctl start mariadb[root@dbserver ~]# systemctl enable mariadb[root@dbserver ~]# firewall-cmd --permanent --add-service=mysql#开放mariadb的服务端口3306(与mysql一样)[root@dbserver ~]# firewall-cmd --reload[root@dbserver ~]# setenforce 0#关闭SELinux
运行mysql_secure_installation脚本程序,初始化mariadb服务器
[root@dbserver ~]# mysql_secure_installation#然后按照如下步骤完成配置Enter current password for root (enter for none):<回车>Set root password? [Y/n] yNew password:<输入密码>Re-enter new password: <再次输入密码>Remove anonymous users? [Y/n] yDisallow root login remotely? [Y/n]yRemove test database and access to it? [Y/n] yReload privilege tables now? [Y/n] y
4.2 导入employees数据库
(1)下载employees数据库文件(ftp://192.168.179.231/工具软件)employees_db.tar.gz
(2)将employees_db.tar.gz上传到DBServer的/root目录
(3)在DBServer上导入employees数据库
[root@dbserver ~]# cd /root[root@dbserver ~]# lsanaconda-ks.cfg employees_db.tar.gz env3.6.10 env3.8.3 perl5[root@dbserver ~]# tar -xzvf employees_db.tar.gz[root@dbserver ~]# cd employees_db[root@dbserver employees_db]# mysql -u root -pEnter password:......MariaDB [(none)]>MariaDB [(none)]> source employees.sql
(4)在数据库服务器中创建用户账户devel
MariaDB [employees]> create user devel@'%' identified by "123456";Query OK, 0 rows affected (0.00 sec)#创建数据库服务器的访问账户devel@'%'
5 测试数据库的连接
5.1 测试PHP程序和数据库的连接
在WebServer上准备测试数据库连接的PHP程序
在/var/www/html目录中创建testdb.php文件
[root@webserver ~]# cd /var/www/html[root@webserver html]# lsindex.html info.php[root@webserver html]# touch testdb.php[root@webserver html]# vi testdb.php[root@webserver html]# setenforce 0#关闭SELinux
内容如下:
<?php$link=mysql_connect('192.168.8.201','devel','123456');if(!$link){echo "数据库连接失败!";die('Could not connect:' . mysql_error());}elseecho "数据连接成功!";mysql_close();?>
testdb.php
在客户端浏览器输入”http://192.168.237.201/testdb.php"进行测试。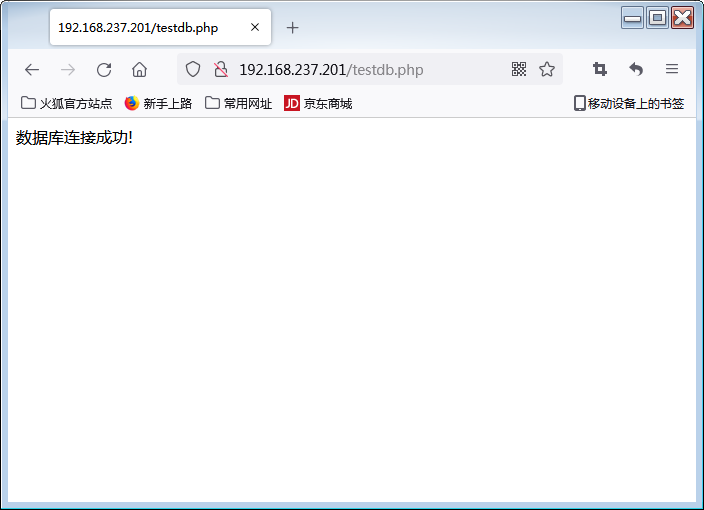
5.2 测试PHP程序读取数据库中的数据
在DBServer上为devel@’%’授予emplpyees数据库的访问权限
[root@dbserver ~]# mysql -u root -pEnter password:...MariaDB [(none)]> grant select on employees.* to devel@'%';Query OK, 0 rows affected (0.00 sec)MariaDB [(none)]> show grants for devel@'%';+------------------------------------------------------------------------------------------------------+| Grants for devel@% |+------------------------------------------------------------------------------------------------------+| GRANT USAGE ON *.* TO 'devel'@'%' IDENTIFIED BY PASSWORD '*6BB4837EB74329105EE4568DDA7DC67ED2CA2AD9' || GRANT SELECT ON `employees`.* TO 'devel'@'%' |+------------------------------------------------------------------------------------------------------+2 rows in set (0.00 sec)
在WebServer上准备测试数据库读取的PHP程序在/var/www/html目录中创建getinfo.php文件,内容如下:
<HTML><HEAD><TITLE>用PHP从表中读取数据</TITLE></HEAD><BODY><?php$id=mysql_connect("192.168.237.202","devel","123456");mysql_select_db("employees",$id);mysql_query("SET CHARACTER SET gbk");$query="SELECT dept_no,emp_no FROM dept_manager";$result=mysql_query($query,$id);echo "<table border=1 width=200><tr><td>部门编号</td><td>管理员工号</td></tr>";$datanum = mysql_num_rows($result);echo "表中共有".$datanum."条数据<br>";for($i=1;$i<=$datanum;$i++){$info=mysql_fetch_array($result,MYSQL_ASSOC);echo "<tr><td>".$info['dept_no']."</td>";echo "<td>".$info['emp_no']."</td></tr>";}echo "</table>";mysql_close($id);?></BODY></HTML>
getinfo.php
在客户端浏览器输入 “http://192.168.237.201/getinfo.php“ 进行测试。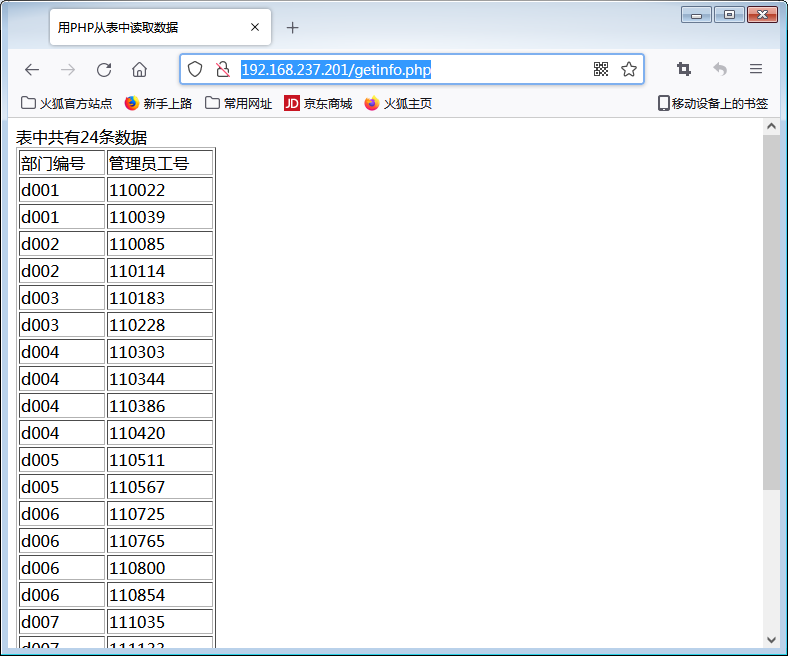

若有收获,就点个赞吧
0 人点赞
