一、引言
模块之间的耦合度多高,导致一个模块宕机后,全部功能都不能用了,并且同步通讯的成本过高,用户体验差。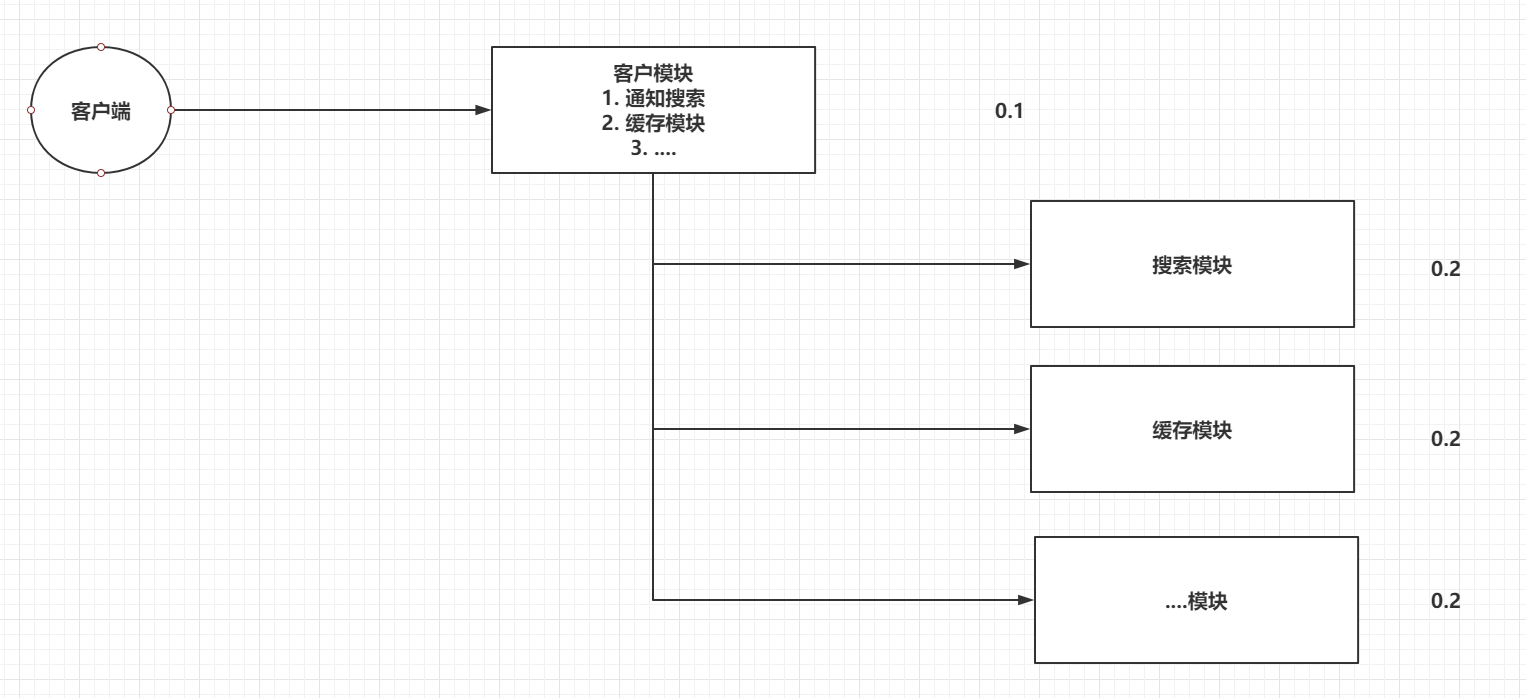
二、RabbitMQ介绍
市面上比较火爆的几款MQ:
ActiveMQ,RocketMQ,Kafka分布式消息队列,RabbitMQ。
- 语言的支持:ActiveMQ,RocketMQ只支持Java语言,Kafka可以支持多们语言,RabbitMQ支持多种语言。
- 效率方面:ActiveMQ,RocketMQ,Kafka效率都是毫秒级别,RabbitMQ是微秒级别的。
- 消息丢失,消息重复问题: RabbitMQ针对消息的持久化,和重复问题都有比较成熟的解决方案。
- 学习成本:RabbitMQ非常简单。
RabbitMQ是由Rabbit公司去研发和维护的,最终是在Pivotal。
RabbitMQ严格的遵循AMQP协议,高级消息队列协议,帮助我们在进程之间传递异步消息。
视频 sip remp
https://www.rabbitmq.com/getstarted.html
三、RabbitMQ安装
version: "3.1"services:rabbitmq:image: daocloud.io/library/rabbitmq:managementrestart: alwayscontainer_name: rabbitmqports:- 5672:5672- 15672:15672volumes:- ./data:/var/lib/rabbitmq
四、RabbitMQ架构【重点】
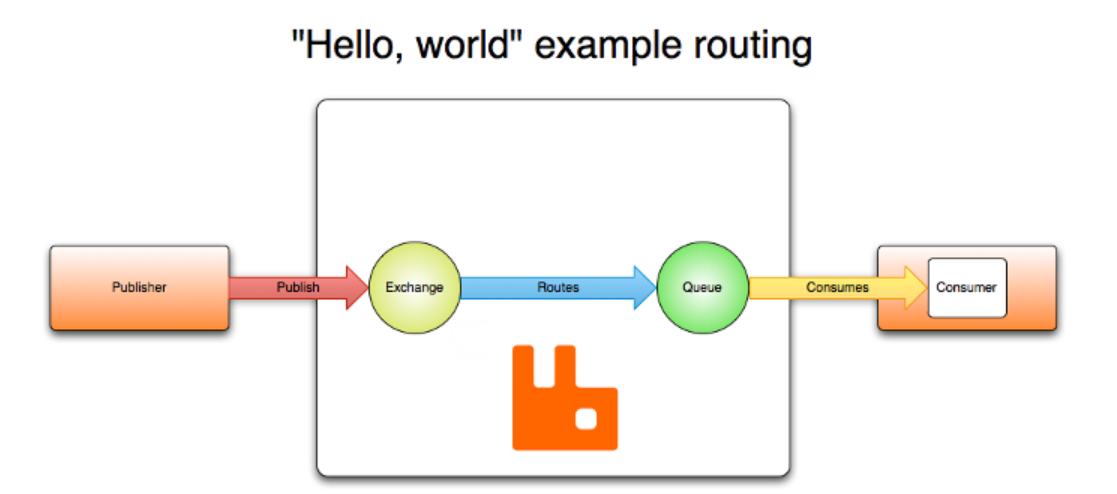
4.1 官方的简单架构图
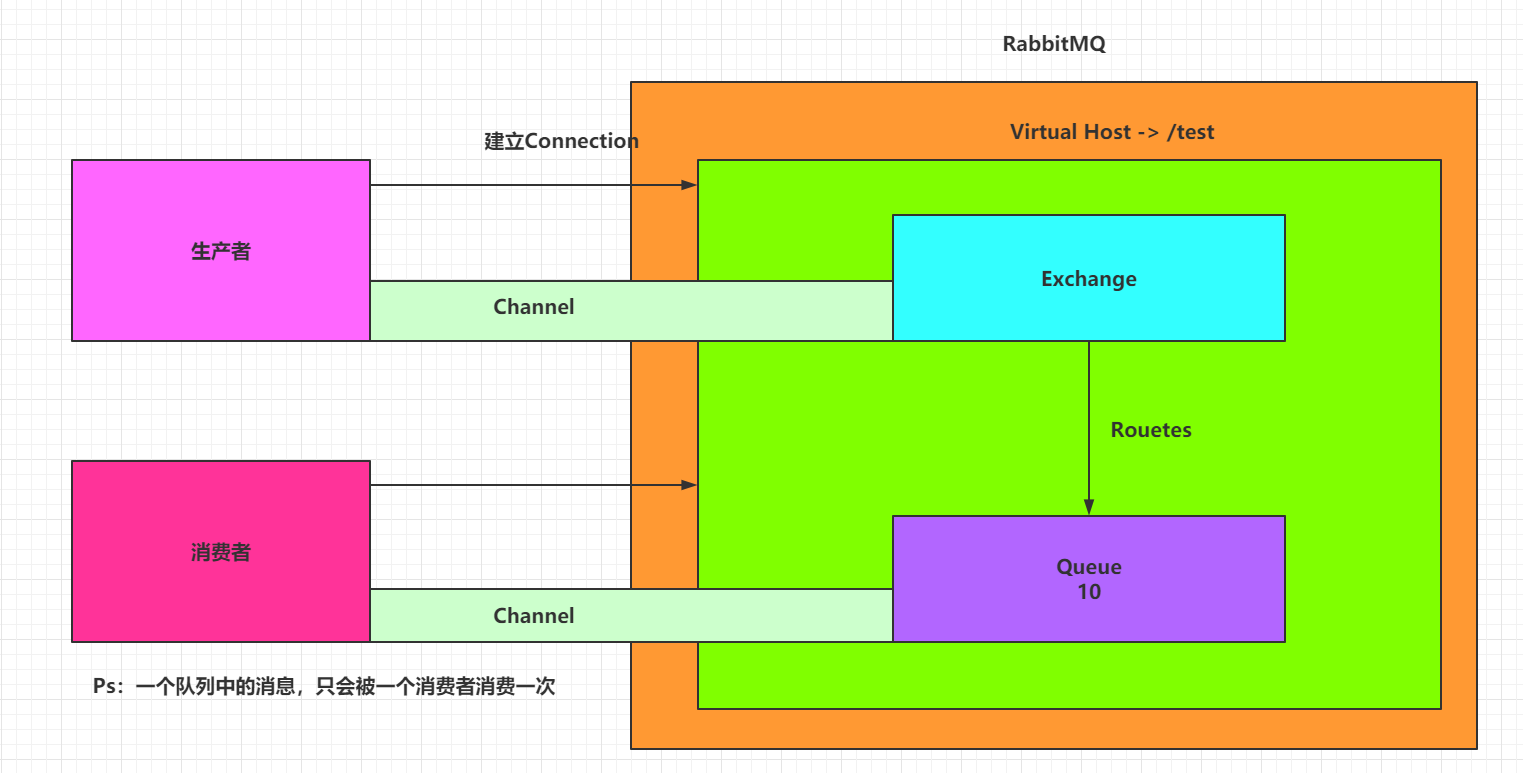
- Publisher - 生产者:发布消息到RabbitMQ中的Exchange
- Consumer - 消费者:监听RabbitMQ中的Queue中的消息
- Exchange - 交换机:和生产者建立连接并接收生产者的消息 (丢失处理config)
- Queue - 队列:Exchange会将消息分发到指定的Queue,Queue和消费者进行交互(丢失处理return)
Routes - 路由:交换机以什么样的策略将消息发布到Queue
4.2 RabbitMQ的完整架构图
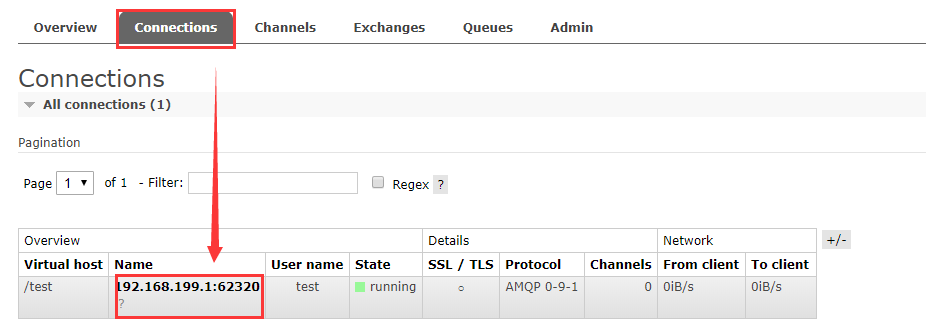
4.3 查看图形化界面并创建一个Virtual Host
默认账户:guest guest
创建一个全新的用户和全新的Virtual Host,并且将test用户设置上可以操作/test的权限
ip+port
http://162.14.64.72:15672/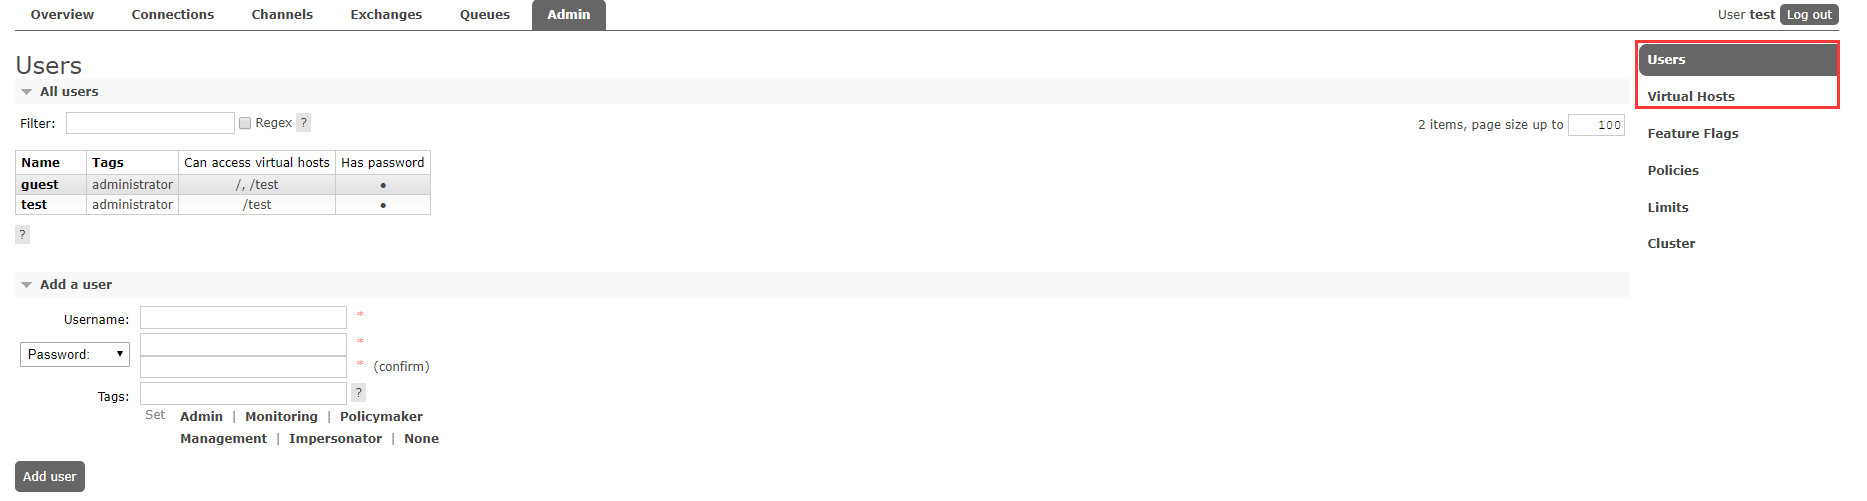
五、RabbitMQ的使用【重点】
5.1 RabbitMQ的通讯方式
5.2 Java连接RabbitMQ
5.2.2 导入依赖
<dependencies><dependency><groupId>com.rabbitmq</groupId><artifactId>amqp-client</artifactId><version>5.6.0</version></dependency><dependency><groupId>junit</groupId><artifactId>junit</artifactId><version>4.12</version></dependency></dependencies>
5.2.3 创建工具类连接RabbitMQ
public static Connection getConnection(){// 创建Connection工厂ConnectionFactory factory = new ConnectionFactory();factory.setHost("192.168.199.109");factory.setPort(5672);factory.setUsername("test");factory.setPassword("test");factory.setVirtualHost("/test");// 创建ConnectionConnection conn = null;try {conn = factory.newConnection();} catch (Exception e) {e.printStackTrace();}// 返回return conn;}
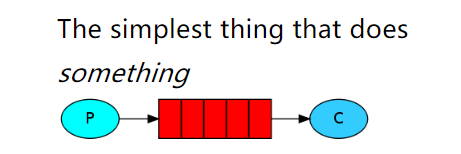
5.3 Hello-World
一个生产者,一个默认的交换机,一个队列,一个消费者
创建生产者,创建一个channel,发布消息到exchange,指定路由规则。@Testpublic void publish() throws Exception {//1. 获取ConnectionConnection connection = RabbitMQClient.getConnection();//2. 创建ChannelChannel channel = connection.createChannel();//3. 发布消息到exchange,同时指定路由的规则String msg = "Hello-World!";// 参数1:指定exchange,使用""。// 参数2:指定路由的规则,使用具体的队列名称。// 参数3:指定传递的消息所携带的properties,使用null。// 参数4:指定发布的具体消息,byte[]类型channel.basicPublish("","HelloWorld",null,msg.getBytes());// Ps:exchange是不会帮你将消息持久化到本地的,Queue才会帮你持久化消息。System.out.println("生产者发布消息成功!");//4. 释放资源channel.close();connection.close();}
创建消费者,创建一个channel,创建一个队列,并且去消费当前队列
@Testpublic void consume() throws Exception {//1. 获取连接对象Connection connection = RabbitMQClient.getConnection();//2. 创建channelChannel channel = connection.createChannel();//3. 声明队列-HelloWorld//参数1:queue - 指定队列的名称//参数2:durable - 当前队列是否需要持久化(true)//参数3:exclusive - 是否排外(conn.close() - 当前队列会被自动删除,当前队列只能被一个消费者消费)//参数4:autoDelete - 如果这个队列没有消费者在消费,队列自动删除//参数5:arguments - 指定当前队列的其他信息channel.queueDeclare("HelloWorld",true,false,false,null);//4. 开启监听QueueDefaultConsumer consume = new DefaultConsumer(channel){@Overridepublic void handleDelivery(String consumerTag, Envelope envelope, AMQP.BasicProperties properties, byte[] body) throws IOException {System.out.println("接收到消息:" + new String(body,"UTF-8"));}};//参数1:queue - 指定消费哪个队列//参数2:autoAck - 指定是否自动ACK (true,接收到消息后,会立即告诉RabbitMQ)//参数3:consumer - 指定消费回调channel.basicConsume("HelloWorld",true,consume);System.out.println("消费者开始监听队列!");// System.in.read();System.in.read();//5. 释放资源channel.close();connection.close();}
5.4 Work(工作)
一个生产者,一个默认的交换机,一个队列,两个消费者
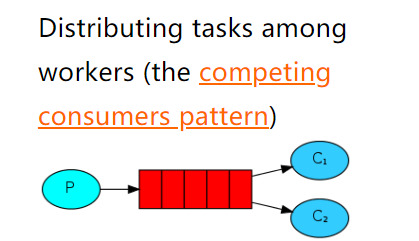
只需要在消费者端,添加Qos能力以及更改为手动ack即可让消费者,根据自己的能力去消费指定的消息,而不是默认情况下由RabbitMQ平均分配了,生产者不变,正常发布消息到默认的exchange,并指定routing
消费者指定Qos和手动ack//1 指定当前消费者,一次消费多少个消息channel.basicQos(1);DefaultConsumer consumer = new DefaultConsumer(channel){@Overridepublic void handleDelivery(String consumerTag, Envelope envelope, AMQP.BasicProperties properties, byte[] body) throws IOException {try {Thread.sleep(100);} catch (InterruptedException e) {e.printStackTrace();}System.out.println("消费者1号接收到消息:" + new String(body,"UTF-8"));//2. 手动ackchannel.basicAck(envelope.getDeliveryTag(),false);}};//3. 指定手动ackchannel.basicConsume("Work",false,consumer);
5.5 Publish/Subscribe(发布/订阅)
一个生产者,一个交换机,两个队列,两个消费者
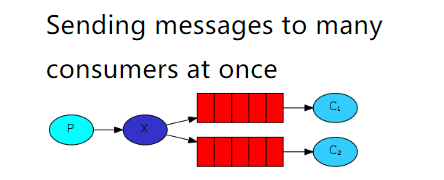
声明一个Fanout类型的exchange,并且将exchange和queue绑定在一起,绑定的方式就是直接绑定。
让生产者创建一个exchange并且指定类型,和一个或多个队列绑定到一起。//3. 创建exchange - 绑定某一个队列//参数1: exchange的名称//参数2: 指定exchange的类型 FANOUT - pubsub , DIRECT - Routing , TOPIC - Topicschannel.exchangeDeclare("pubsub-exchange", BuiltinExchangeType.FANOUT);channel.queueBind("pubsub-queue1","pubsub-exchange","");channel.queueBind("pubsub-queue2","pubsub-exchange","");
消费者还是正常的监听某一个队列即可。
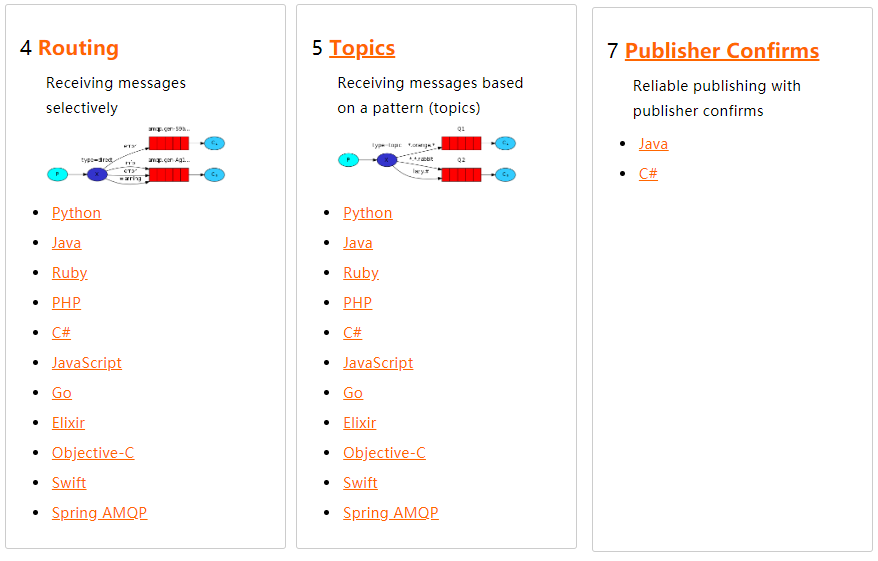
5.6 Routing(路由)
一个生产者,一个交换机,两个队列,两个消费者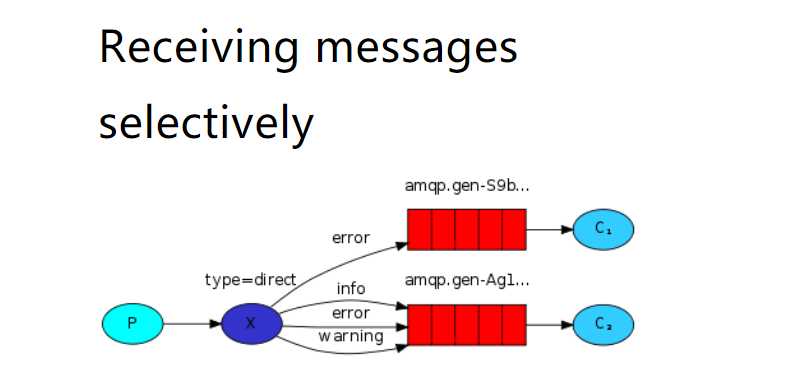
生产者在创建DIRECT类型的exchange后,根据RoutingKey去绑定相应的队列,并且在发送消息时,指定消息的具体RoutingKey即可。
//3. 创建exchange, routing-queue-error,routing-queue-info,channel.exchangeDeclare("routing-exchange", BuiltinExchangeType.DIRECT);channel.queueBind("routing-queue-error","routing-exchange","ERROR");channel.queueBind("routing-queue-info","routing-exchange","INFO");//4. 发布消息到exchange,同时指定路由的规则channel.basicPublish("routing-exchange","ERROR",null,"ERROR".getBytes());channel.basicPublish("routing-exchange","INFO",null,"INFO1".getBytes());channel.basicPublish("routing-exchange","INFO",null,"INFO2".getBytes());channel.basicPublish("routing-exchange","INFO",null,"INFO3".getBytes());
消费者没有变化
5.7 Topic
一个生产者,一个交换机,两个队列,两个消费者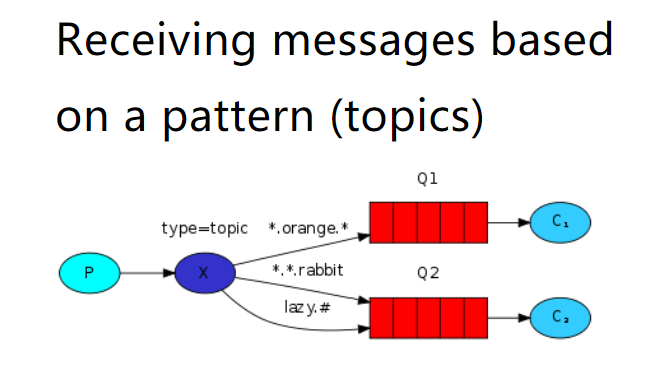
生产者创建Topic的exchange并且绑定到队列中,这次绑定可以通过和#关键字,对指定RoutingKey内容,编写时注意格式 xxx.xxx.xxx去编写, -> 一个xxx,而# -> 代表多个xxx.xxx,在发送消息时,指定具体的RoutingKey到底是什么。
route:xxx.xxx.xxx
实例:yellow.zgq.qj
.zgq.
bule.#(zgq.qj)0
//2. 创建exchange并指定绑定方式channel.exchangeDeclare("topic-exchange", BuiltinExchangeType.TOPIC);channel.queueBind("topic-queue-1","topic-exchange","*.red.*");channel.queueBind("topic-queue-2","topic-exchange","fast.#");channel.queueBind("topic-queue-2","topic-exchange","*.*.rabbit");//3. 发布消息到exchange,同时指定路由的规则channel.basicPublish("topic-exchange","fast.red.monkey",null,"红快猴子".getBytes());channel.basicPublish("topic-exchange","slow.black.dog",null,"黑漫狗".getBytes());channel.basicPublish("topic-exchange","fast.white.cat",null,"快白猫".getBytes());
消费者只是监听队列,没变化。
六、RabbitMQ整合SpringBoot【重点】
6.1 SpringBoot整合RabbitMQ
6.1.1 创建SpringBoot工程
6.1.2 导入依赖
<dependencies><dependency><groupId>org.springframework.boot</groupId><artifactId>spring-boot-starter-web</artifactId></dependency><dependency><groupId>org.springframework.boot</groupId><artifactId>spring-boot-starter-amqp</artifactId></dependency><dependency><groupId>org.springframework.boot</groupId><artifactId>spring-boot-starter-test</artifactId></dependency></dependencies>
6.1.3 编写配置文件
spring:rabbitmq:host: 192.168.199.109port: 5672username: testpassword: testvirtual-host: /test
6.1.4 声明exchange、queue
@Configurationpublic class RabbitMQConfig {//1. 创建exchange - topic@Beanpublic TopicExchange getTopicExchange(){return new TopicExchange("boot-topic-exchange",true,false);}//2. 创建queue@Beanpublic Queue getQueue(){return new Queue("boot-queue",true,false,false,null);}//3. 绑定在一起@Beanpublic Binding getBinding(TopicExchange topicExchange,Queue queue){return BindingBuilder.bind(queue).to(topicExchange).with("*.red.*");}}
6.1.5 发布消息到RabbitMQ
import org.junit.jupiter.api.Test;import org.springframework.amqp.rabbit.core.RabbitTemplate;import org.springframework.beans.factory.annotation.Autowired;import org.springframework.boot.test.context.SpringBootTest;import javax.annotation.Resource;@SpringBootTestpublic class TestBootRabbitMQ {@Autowiredprivate RabbitTemplate rabbitTemplate;@Testpublic void pulisher(){rabbitTemplate.convertAndSend("boot-exchange","yellow.zgq.xj","周高强被洗脚仙人跳!!!");}}@Autowiredprivate RabbitTemplate rabbitTemplate;@Testvoid contextLoads() {rabbitTemplate.convertAndSend("boot-topic-exchange","slow.red.dog","红色大狼狗!!");}
6.1.6 创建消费者监听消息
@Componentpublic class Consumer {@RabbitListener(queues = "boot-queue")public void getMessage(Object message){System.out.println("接收到消息:" + message);}}
6.2 手动Ack
6.2.1 添加配置文件
spring:rabbitmq:listener:simple:acknowledge-mode: manual
6.2.2 手动ack
@RabbitListener(queues = "boot-queue")public void getMessage(String msg, Channel channel, Message message) throws IOException {System.out.println("接收到消息:" + msg);int i = 1 / 0;// 手动ackchannel.basicAck(message.getMessageProperties().getDeliveryTag(),false);}
七、RabbitMQ的其他操作
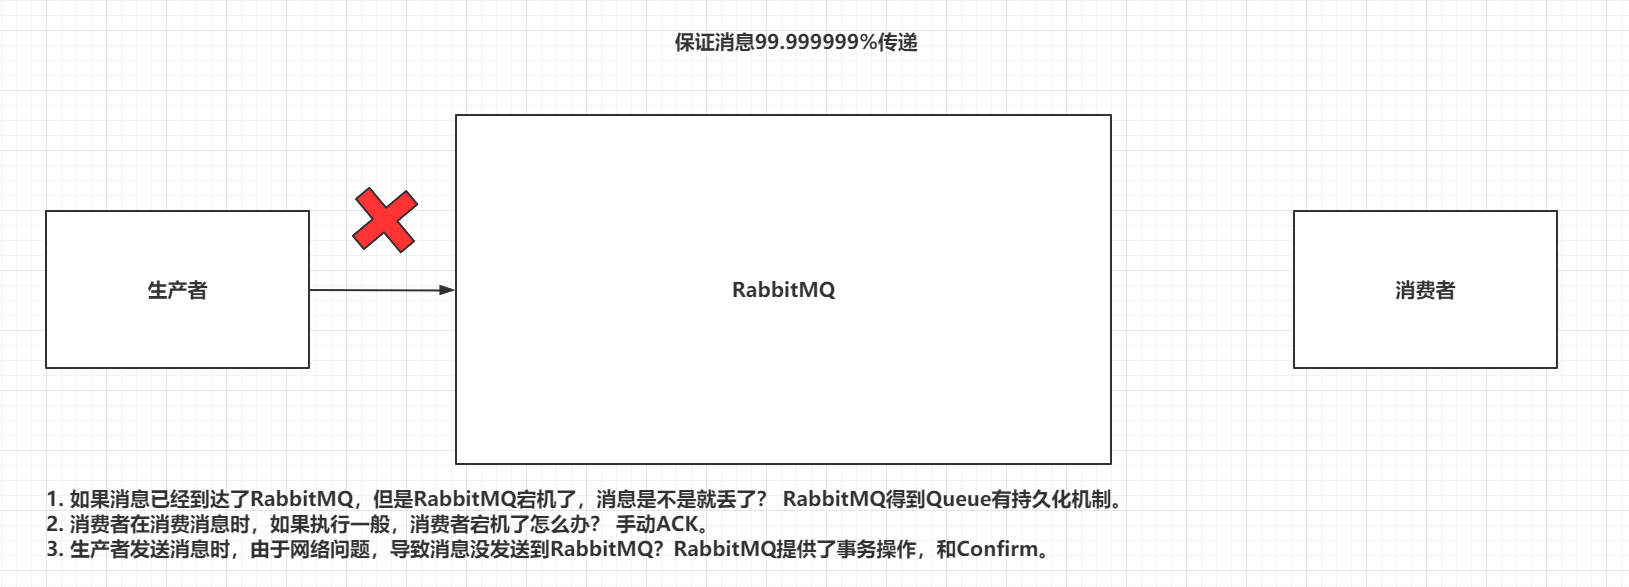
7.1 消息的可靠性
RabbitMQ的事务:事务可以保证消息100%传递,可以通过事务的回滚去记录日志,后面定时再次发送当前消息。事务的操作,效率太低,加了事务操作后,比平时的操作效率至少要慢100倍。
RabbitMQ除了事务,还提供了Confirm的确认机制,这个效率比事务高很多。
7.1.1 普通Confirm方式
//3.1 开启confirmchannel.confirmSelect();//3.2 发送消息String msg = "Hello-World!";channel.basicPublish("","HelloWorld",null,msg.getBytes());//3.3 判断消息发送是否成功if(channel.waitForConfirms()){System.out.println("消息发送成功");}else{System.out.println("发送消息失败");}
7.1.2 批量Confirm方式。
//3.1 开启confirmchannel.confirmSelect();//3.2 批量发送消息for (int i = 0; i < 1000; i++) {String msg = "Hello-World!" + i;channel.basicPublish("","HelloWorld",null,msg.getBytes());}//3.3 确定批量操作是否成功channel.waitForConfirmsOrDie(); // 当你发送的全部消息,有一个失败的时候,就直接全部失败 抛出异常IOException
7.1.3 异步Confirm方式。
//3.1 开启confirmchannel.confirmSelect();//3.2 批量发送消息for (int i = 0; i < 1000; i++) {String msg = "Hello-World!" + i;channel.basicPublish("","HelloWorld",null,msg.getBytes());}//3.3 开启异步回调channel.addConfirmListener(new ConfirmListener() {@Overridepublic void handleAck(long deliveryTag, boolean multiple) throws IOException {System.out.println("消息发送成功,标识:" + deliveryTag + ",是否是批量" + multiple);}@Overridepublic void handleNack(long deliveryTag, boolean multiple) throws IOException {System.out.println("消息发送失败,标识:" + deliveryTag + ",是否是批量" + multiple);}});
7.1.4 Return机制
Confirm只能保证消息到达exchange,无法保证消息可以被exchange分发到指定queue。
而且exchange是不能持久化消息的,queue是可以持久化消息。
采用Return机制来监听消息是否从exchange送到了指定的queue中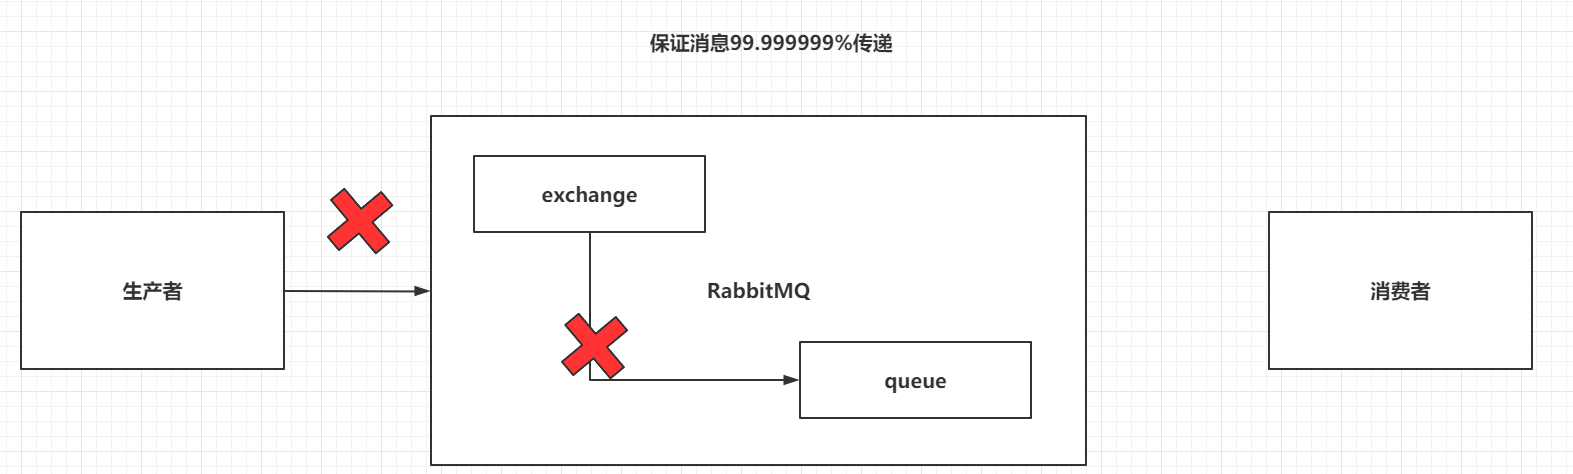
开启Return机制,并在发送消息时,指定mandatory为true
// 开启return机制channel.addReturnListener(new ReturnListener() {@Overridepublic void handleReturn(int replyCode, String replyText, String exchange, String routingKey, AMQP.BasicProperties properties, byte[] body) throws IOException {// 当消息没有送达到queue时,才会执行。System.out.println(new String(body,"UTF-8") + "没有送达到Queue中!!");}});// 在发送消息时,指定mandatory参数为truechannel.basicPublish("","HelloWorld",true,null,msg.getBytes());
7.2 SpringBoot实现
7.2.1 编写配置文件
spring:rabbitmq:publisher-confirm-type: simplepublisher-returns: true
7.2.2 开启Confirm和Return
@Componentpublic class PublisherConfirmAndReturnConfig implements RabbitTemplate.ConfirmCallback ,RabbitTemplate.ReturnCallback {@Autowiredprivate RabbitTemplate rabbitTemplate;@PostConstruct // init-methodpublic void initMethod(){rabbitTemplate.setConfirmCallback(this);rabbitTemplate.setReturnCallback(this);}@Overridepublic void confirm(CorrelationData correlationData, boolean ack, String cause) {if(ack){System.out.println("消息已经送达到Exchange");}else{System.out.println("消息没有送达到Exchange");}}@Overridepublic void returnedMessage(Message message, int replyCode, String replyText, String exchange, String routingKey) {System.out.println("消息没有送达到Queue");}}
7.3 避免消息重复消费 (作业)
重复消费消息,会对非幂等行操作造成问题
重复消费消息的原因是,消费者没有给RabbitMQ一个ack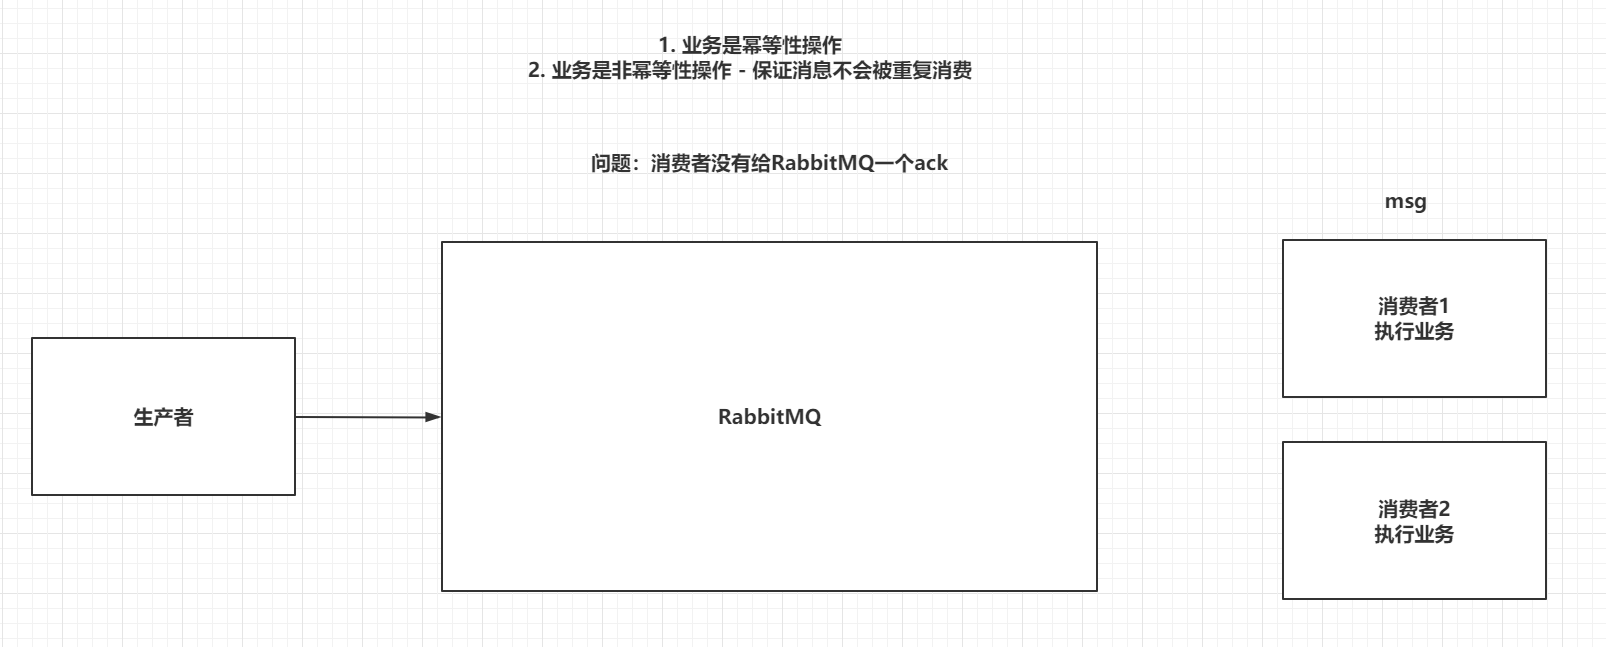
为了解决消息重复消费的问题,可以采用Redis,在消费者消费消息之前,现将消息的id放到Redis中,
id-0(正在执行业务)
id-1(执行业务成功)
如果ack失败,在RabbitMQ将消息交给其他的消费者时,先执行setnx,如果key已经存在,获取他的值,如果是0,当前消费者就什么都不做,如果是1,直接ack。
极端情况:第一个消费者在执行业务时,出现了死锁,在setnx的基础上,再给key设置一个生存时间。
生产者,发送消息时,指定messageId
AMQP.BasicProperties properties = new AMQP.BasicProperties().builder().deliveryMode(1) //指定消息书否需要持久化 1 - 需要持久化 2 - 不需要持久化.messageId(UUID.randomUUID().toString()).build();String msg = "Hello-World!";channel.basicPublish("","HelloWorld",true,properties,msg.getBytes());
消费者,在消费消息时,根据具体业务逻辑去操作redis
DefaultConsumer consume = new DefaultConsumer(channel){@Overridepublic void handleDelivery(String consumerTag, Envelope envelope, AMQP.BasicProperties properties, byte[] body) throws IOException {Jedis jedis = new Jedis("192.168.199.109",6379);String messageId = properties.getMessageId();//1. setnx到Redis中,默认指定value-0String result = jedis.set(messageId, "0", "NX", "EX", 10);if(result != null && result.equalsIgnoreCase("OK")) {System.out.println("接收到消息:" + new String(body, "UTF-8"));//2. 消费成功,set messageId 1jedis.set(messageId,"1");channel.basicAck(envelope.getDeliveryTag(),false);}else {//3. 如果1中的setnx失败,获取key对应的value,如果是0,return,如果是1String s = jedis.get(messageId);if("1".equalsIgnoreCase(s)){channel.basicAck(envelope.getDeliveryTag(),false);}}}};
7.4 SpringBoot如何实现
7.4.1 导入依赖
<dependency><groupId>org.springframework.boot</groupId><artifactId>spring-boot-starter-data-redis</artifactId></dependency>
7.4.2 编写配置文件
spring:redis:host: 192.168.199.109port: 6379
7.4.3 修改生产者
@Testvoid contextLoads() throws IOException {CorrelationData messageId = new CorrelationData(UUID.randomUUID().toString());rabbitTemplate.convertAndSend("boot-topic-exchange","slow.red.dog","红色大狼狗!!",messageId);System.in.read();}
7.4.4 修改消费者
@Autowiredprivate StringRedisTemplate redisTemplate;@RabbitListener(queues = "boot-queue")public void getMessage(String msg, Channel channel, Message message) throws IOException {//0. 获取MessageIdString messageId = message.getMessageProperties().getHeader("spring_returned_message_correlation");//1. 设置key到Redisif(redisTemplate.opsForValue().setIfAbsent(messageId,"0",10, TimeUnit.SECONDS)) {//2. 消费消息System.out.println("接收到消息:" + msg);//3. 设置key的value为1redisTemplate.opsForValue().set(messageId,"1",10,TimeUnit.SECONDS);//4. 手动ackchannel.basicAck(message.getMessageProperties().getDeliveryTag(),false);}else {//5. 获取Redis中的value即可 如果是1,手动ackif("1".equalsIgnoreCase(redisTemplate.opsForValue().get(messageId))){channel.basicAck(message.getMessageProperties().getDeliveryTag(),false);}}}
* 完结

若有收获,就点个赞吧
0 人点赞
