- Ansible自动化管理
- 1 基础介绍
- 2 为什么使用Ansible?
- 3 什么是Ansible
- 4 Ansible特点
- 5 Ansible架构介绍
- 6 安装并配置Ansible
- 7 Ansible 主机清单详解
- 8 Ansible配置文件
- 9 Ansible语法格式
- 10 Ansible命令执行过程
- 11 Ansible主要模块详解
- 12 Ansible playbook的编写
Ansible自动化管理
1 基础介绍
Ansible是新出现的自动化运维工具,基于Python开发,集合了众多运维工具(Puppet、Cfengine、Chef、Func、Fabric)的优点,实现了批量系统配置、批量程序部署、批量运行命令等功能。
2 为什么使用Ansible?
简单、方便、容易学习、 register。
Ansible有配置文件,可以多线程直接实现。不需要写脚本,类似实时复制的sersync。
3 什么是Ansible
Ansible是一个用来批量部署远程主机上服务的工具。这里“远程主机”是指任何可以通过SSH登录的主机,所以他即可以是远程虚拟机或物理机,也可以是本地主机。
Ansible通过SSH协议实现管理节点与远程节点之间的通信。理论上来说,只要能通过SSH登录到远程主机来完成的操作,都可以通过Ansible实现批量自动化操作。
涉及命令管理操作:复制文件、安装服务、服务启动停止管理、配置管理等等。
4 Ansible特点
Ansible基于Python语言实现,由Paramiko和PyYAML两个关键模块构建。
- 安装部署过程特别简单,学习曲线很平坦。
- 不需要单独安装客户端,只是利用现有的SSHD服务即可。
- 不需要服务端
- Ansible playbook,采用yaml配置,提前编排自动化任务。
- Ansible功能模块较多,对于自动化的场景支持丰富。
- 幂等性:一个任务执行1遍和执行N遍效果一样,不因重复执行带来意外情况
5 Ansible架构介绍
- 连接插件connectior plugins用于连接主机,用来连接被管理端
- 核心模块core modules 连接主机实现操作,它依赖于具体的模块来做具体的事情
- 插件plugins,完成模块功能的补充。
- 剧本 playbooks,Ansible的配置文件,将多个任务定义在剧本中,由Ansible自动执行
- 主机清单inventor,定义Ansible需要操作主机的范围
最重要的一点是Ansible是模块化的,它所有的操作都依赖于模块
6 安装并配置Ansible
#1、安装Ansible[root@jumpserver-10 ~]# yum install epel-release -y[root@jumpserver-10 ~]# yum install ansible -y[root@jumpserver-10 ~]# rpm -qa|grep libselinux-python #确定服务端和客户端是否安装libselinux-python-2.5-14.1.el7.x86_64#ansible配置文件介绍/etc/ansible/ansible.cfg 主配置文件,配置ansible工作特性/etc/ansible/hosts 主机清单/etc/ansible/roles/ 存放角色的目录#2、配置Ansible hosts文件[root@jumpserver-10 ~]# cp /etc/ansible/hosts{,.bak} #先备份hosts文件[root@jumpserver-10 ~]# tail /etc/ansible/hosts[NFS] #模块名称,可以自定义192.168.89.31 #需要批量部署的IP地址[BACKUP]192.168.89.41#/etc/ansible/hosts #主机列表的配置文件,用于定义被管理主机的认证信息,列如ssh登录用户名、密码以及key相关信息#/etc/ansible/ansible.cfg #ansible的配置文件#3、基于密码的批量操作[root@jumpserver-10 ~]# vim /etc/ansible/hosts[NFS_pass]192.168.89.31 ansible_ssh_user=root ansible_ssh_pass=123456 ansible_ssh_port=1314[root@jumpserver-10 ~]# ansible NFS_pass -m command -a "free -m"192.168.89.31 | CHANGED | rc=0 >>total used free shared buff/cache availableMem: 976 130 305 7 540 643Swap: 2047 0 2047#基于这种方式,/etc/ssh/sshd_config配置文件里的PasswordAuthentication必须为yes,否则无法通过密码的方式批量执行#要想执行上面命令成功,要先解决yes/no的问题#4、基于SSH秘钥的认证(企业一般使用这种)[root@jumpserver-10 .ssh]# vim /etc/ansible/hosts #只需添加IP地址[NFS]192.168.89.31[root@jumpserver-10 ~]# ssh-keygen #生成公钥和私钥[root@jumpserver-10 ~]# cd .ssh/#以下两种发送私钥方法都可以,但是推荐第二种[root@jumpserver-10 .ssh]# ssh-copy-id -i id_rsa.pub root@192.168.89.31[root@jumpserver-10 .ssh]# sshpass -p123456 ssh-copy-id -i ~/.ssh/id_rsa.pub root@192.168.89.31[root@jumpserver-10 .ssh]# cat /root/.ssh/known_hosts #查看是否有31的秘钥认证信息192.168.89.31 ecdsa-sha2-nistp256 AAAAE2VjZHNhLXNoYTItbmlzdHAyNTYAAAAIbmlzdHAyNTYAAABBBMRZn7E3MOkCDmhaTDyK+MBBqMwTbsq5Ik+9jEf4/y2qGuIz5+wTEtjqQy62eEaihrNcvpZ2tgZ5ic/t4kevr7c=[root@jumpserver-10 ~]# ansible NFS -m command -a "free -m" #然后根据NFS模块执行192.168.89.31 | CHANGED | rc=0 >>total used free shared buff/cache availableMem: 976 130 305 7 540 643Swap: 2047 0 2047#问题一:[root@jumpserver-10 ~]# > .ssh/known_hosts #清空known_hosts文件[root@jumpserver-10 ~]# ansible NFS -m command -a "free -m" #执行ansible192.168.89.31 | FAILED | rc=-1 >>Using a SSH password instead of a key is not possible because Host Key checking is enabled and sshpass does not support this. Please add this host's fingerprint to your known_hosts file to manage this host.以上错误就是因为known_hosts没有相对应主机的ssh缓存地址,解决问题如下:[root@jumpserver-10 ~]# vim /etc/ansible/ansible.cfghost_key_checking = False #取消注释[root@jumpserver-10 ~]# > .ssh/known_hosts[root@jumpserver-10 ~]# ansible NFS -m command -a "free -m"192.168.89.31 | CHANGED | rc=0 >>total used free shared buff/cache availableMem: 976 130 305 7 540 643Swap: 2047 0 2047
6.1 Ansible相关工具
- /usr/bin/ansible:主程序,临时命令执行工具
- /usr/bin/ansible-doc:模块功能查看工具,相当于man
- /usr/bin/ansible-playbook:定制自动化任务,编排剧本工具,相当于脚本
- /usr/bin/ansible-pull:远程执行命令的工具
- /usr/bin/ansible-vault:文件加密工具
- /usr/bin/ansible-console:基于Console界面与用户交互的执行工具
- /usr/bin/ansible-galaxy:下载/上传优秀代码或Roles模块的官网平台
6.1.1 ansible-doc
此工具用来显示模块帮助,相当于man
ansible-doc -l #列出可用模块ansible-doc -s 模块 #显示指定模块的帮助文档
6.1.2 ansible
#ansible选项说明--version #显示版本-m module #指定模块,默认为command-v #详细过程--list-hosts #显示主机列表-k #提示输入ssh连接密码,默认key验证-C #检查,并不执行-T #执行命令的超时时间,默认10s-u #执行远程执行的用户-b #代替旧版的sudo切换--become-user=USERNAME #指定sudo的runas用户,默认为root-K #提示输入sudo时的口令
6.1.3 ansible-playbook
此工具用于执行编写好的playbook任务
ansible-playbook -C hello.yml #检查yml文件中的语法ansible-playbook hello.yml #执行playbook
7 Ansible 主机清单详解
#1、基于IP的方式[root@iflytek-m01 ~]# vim /etc/ansible/hosts10.0.0.4110.0.0.31#2、基于主机组的方式[web]10.0.0.4110.0.0.31#3、基于主机名符号匹配设置[web]10.0.0.[7:9] #表示10.0.0.7到10.0.0.9#4、基于非标准远程端口的方式[web]10.0.0.41:131410.0.0.31:1314#5、基于变量的方式[web]10.0.0.41 ansible_ssh_port=1314 ansible_ssh_user=root ansible_ssh-pass=iflytek10.0.0.31 ansible_ssh_port=1314 ansible_ssh_user=root ansible_ssh-pass=iflytek[nfs]iflytek-41 ansible_ssh_host=10.0.0.41 ansible_ssh_port=1314注释:ansible_ssh_port=1314 #定义被远程主机的端口ansible_ssh_user=root #定义被远程主机的用户名ansible_ssh-pass=iflytek #定义被远程主机的密码ansible_ssh_host=10.0.0.41 #定义被远程主机的主机映射关系#6、主机组名嵌入式配置[backup]10.0.0.31[nfs]iflytek-41 ansible_ssh_host=10.0.0.41 ansible_ssh_port=1314[rsync:children] #把两个主机名一起配置到一个模块里backupnfs#7、嵌入式变量信息[web:vars]ansible_ssh_port=1314ansible_ssh_user=rootansible_ssh-pass=iflytekansible_ssh_host=10.0.0.41[web]web01
8 Ansible配置文件
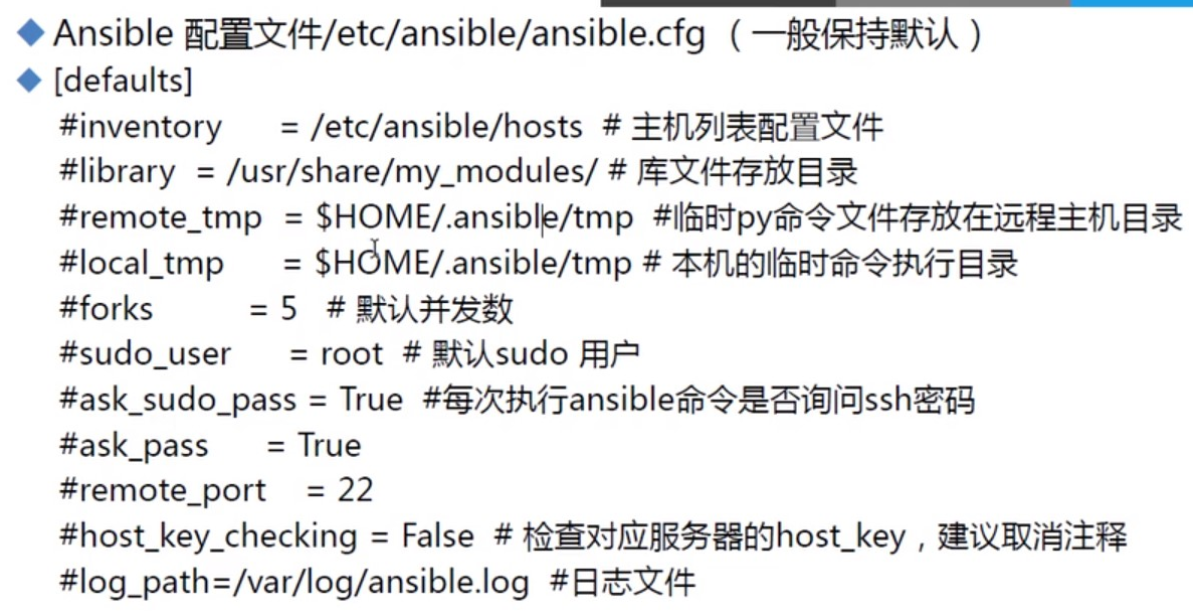
#module_name = command #默认模块command,可以修改为shell模块
8.1 Ansible配置文件的优先级
优先级如下:1.首先找执行ansible命令的当前目录中,是否有 ansible.cfg文件./ansible.cfg2.如果找不到,再找当前用户的家目录下是否有 .ansible.cfg~/.ansible.cfg3.如果还找不到,就找 /etc/ansible/ansible.cfg/etc/ansible/ansible.cfg要检查当前使用的是哪个配置文件。ansible --version 命令中,会显示config file = /etc/ansible/ansible.cfg
9 Ansible语法格式
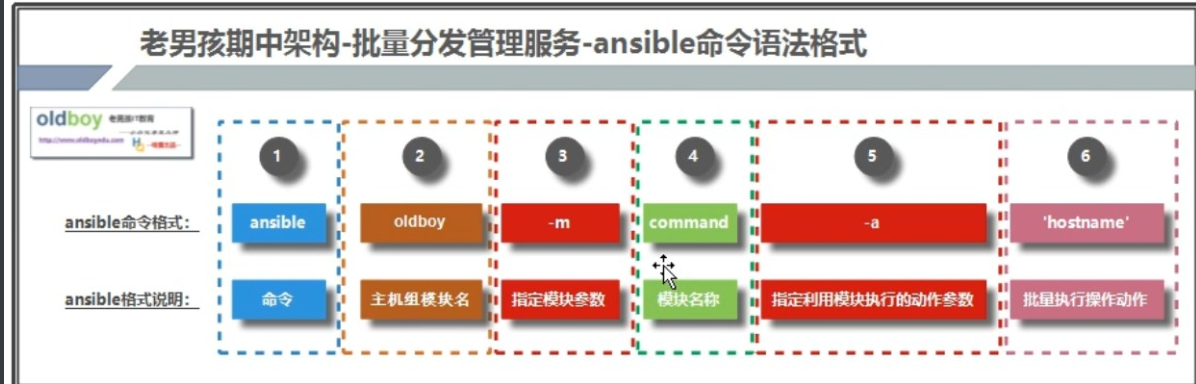
#ansible的主机列表格式:匹配主机的列表:ALL:表示所有Inventory中的所有主机--- absible all -m ping*:通配符--- ansible "*" -m ping--- ansible 10.0.0.* -m ping--- absible "*servers*" -m ping或关系--- ansible "webserver:appservers" -m ping--- ansible "10.0.0.10:10.0.0.20" -m ping逻辑与--- ansible "webserver:&dbserver" -m ping #在webserver组并且在dbserver组中的主机逻辑非--- ansible 'webserver:!dbserver' -m ping #在webserver组,但不在dbserver组中的主机。注意:此处为单引号综合逻辑--- ansible 'webserver:dbserver:&appserver:!ftpserver' -m ping正则表达式--- ansible "webserver:&dbserver" -m ping--- absible "~(web|db).*\.magedu\.com" -m ping
10 Ansible命令执行过程
- ansible命令执行过程
1、加载自己的配置文件,默认/etc/ansible/ansible.cfg
2、加载自己对应的模块文件,如command
3、通过ansible将模块或命令生成对应的临时py文件,并将该文件传输至远程服务器的对应执行用户$HOME/.ansible/tmp/ansible-tmp-数字/XXX.PY文件
4、给文件+x执行
5、执行并返回结果
6、删除临时py文件,sleep 0退出 - 执行状态:
1、绿色:执行成功并且不需要做改变的操作
2、黄色:执行成功并且对目标主机做变更
3、红色:执行失败
11 Ansible主要模块详解
11.1 command模块
#第一个模块:command(默认模块)command - Executes a command on a remote node #在一个远程主机上执行一个命令[root@m01-201 ansible]# ansible 10.0.0.41 -m command -a "hostname"10.0.0.41 | CHANGED | rc=0 >>nfs-41#command扩展应用:chdir:在执行命令之前,对目录进行切换[root@m01-201 ansible]# ansible 10.0.0.41 -m command -a "chdir=/tmp touch xujun.txt"creates:如果文件存在,则不执行后面的命令[root@m01-201 ansible]# ansible 10.0.0.41 -m command -a "creates=/tmp/xujun.txt touch /tmp/oldboy.txt"10.0.0.41 | SUCCESS | rc=0 >>skipped, since /tmp/xujun.txt existsremoves:如果文件存在,则执行后面的命令[root@m01-201 ansible]# ansible 10.0.0.41 -m command -a "removes=/tmp/xujun.txt touch /tmp/oldboy.txt"10.0.0.41 | CHANGED | rc=0 >>command注意事项:不能使用特殊符号:"<", ">", "|", ";" and "&"不能使用变量:$HOME如果需要这些功能,请使用shell模块
11.2 shell模块
#第二个模块:shellshell:在节点上执行命令操作,包括可以执行特殊符号[root@m01-201 ansible]# ansible 10.0.0.41 -m shell -a "cd /etc;pwd"10.0.0.41 | CHANGED | rc=0 >>/etc#shell扩展应用:chdir:在执行命令之前,对目录进行切换[root@m01-201 ansible]# ansible 10.0.0.41 -m shell -a "chdir=/tmp touch xujun.txt"creates:如果文件存在,则不执行后面的命令[root@m01-201 ansible]# ansible 10.0.0.41 -m shell -a "creates=/tmp/xujun.txt touch /tmp/oldboy.txt"10.0.0.41 | SUCCESS | rc=0 >>skipped, since /tmp/xujun.txt existsremoves:如果文件存在,则执行后面的命令[root@m01-201 ansible]# ansible 10.0.0.41 -m shell -a "removes=/tmp/xujun.txt touch /tmp/oldboy.txt"10.0.0.41 | CHANGED | rc=0 >>注意:要查看变量名,需要使用单引号[root@iflytek-18 ~]# ansible mysql -m shell -a 'echo $HOSTNAME'192.168.1.65 | CHANGED | rc=0 >>mysql-65
11.3 script模块
#第三个模块:scriptscript:在远程节点上运行一个脚本#第一步:创建脚本[root@iflytek-m01 scripts]# cat /scripts/htop.sh#!/bin/bashyum install htop -y#第二步:执行ansible命令[root@iflytek-m01 scripts]# ansible 10.0.0.41 -m script -a "/scripts/htop.sh"10.0.0.41 | CHANGED => {"changed": true,"rc": 0,"stderr": "Shared connection to 10.0.0.41 closed.\r\n","stderr_lines": ["Shared connection to 10.0.0.41 closed."],"正在解决依赖关系","--> 正在检查事务","---> 软件包 htop.x86_64.0.2.2.0-3.el7 将被 安装","--> 解决依赖关系完成","","依赖关系解决","","================================================================================"," Package 架构 版本 源 大小","================================================================================","正在安装:"," htop x86_64 2.2.0-3.el7 epel 103 k","","事务概要","================================================================================","安装 1 软件包","","总下载量:103 k","安装大小:218 k","Downloading packages:","","htop-2.2.0-3.el7.x86_64.rp 0% [ ] 0.0 B/s | 0 B --:-- ETA ","警告:/var/cache/yum/x86_64/7/epel/packages/htop-2.2.0-3.el7.x86_64.rpm: 头V3 RSA/SHA256 Signature, 密钥 ID 352c64e5: NOKEY","htop-2.2.0-3.el7.x86_64.rpm 的公钥尚未安装","","htop-2.2.0-3.el7.x86_64.rpm | 103 kB 00:00 ","从 file:///etc/pki/rpm-gpg/RPM-GPG-KEY-EPEL-7 检索密钥","导入 GPG key 0x352C64E5:"," 用户ID : \"Fedora EPEL (7) <epel@fedoraproject.org>\""," 指纹 : 91e9 7d7c 4a5e 96f1 7f3e 888f 6a2f aea2 352c 64e5"," 软件包 : epel-release-7-11.noarch (@extras)"," 来自 : /etc/pki/rpm-gpg/RPM-GPG-KEY-EPEL-7","Running transaction check","Running transaction test","Transaction test succeeded","Running transaction",""," 正在安装 : htop-2.2.0-3.el7.x86_64 [ ] 1/1"," 正在安装 : htop-2.2.0-3.el7.x86_64 [######### ] 1/1"," 正在安装 : htop-2.2.0-3.el7.x86_64 [################### ] 1/1"," 正在安装 : htop-2.2.0-3.el7.x86_64 [######################## ] 1/1"," 正在安装 : htop-2.2.0-3.el7.x86_64 [######################### ] 1/1"," 正在安装 : htop-2.2.0-3.el7.x86_64 [############################ ] 1/1"," 正在安装 : htop-2.2.0-3.el7.x86_64 [############################### ] 1/1"," 正在安装 : htop-2.2.0-3.el7.x86_64 [################################ ] 1/1"," 正在安装 : htop-2.2.0-3.el7.x86_64 1/1 ",""," 验证中 : htop-2.2.0-3.el7.x86_64 1/1 ","","已安装:"," htop.x86_64 0:2.2.0-3.el7 ","","完毕!"]}说明:script和command模块参数一致
11.4 copy模块
#第四个模块:copycopy:将文件或者数据信息进行批量分发[root@iflytek-m01 scripts]# ansible 10.0.0.41 -m copy -a "src=/scripts/htop.sh dest=/scripts/"copy扩展参数:#第一个扩展参数owner:指定文件的属主group:指定文件的属组注意:指定文件的属主和属组之前,被管理端需要有对应的属主和属组[root@iflytek-m01 scripts]# ansible 10.0.0.41 -m copy -a "src=/scripts/htop.sh dest=/scripts/ owner=xujun group=xujun"#第二个扩展参数mode:指定传输文件的权限[root@iflytek-m01 scripts]# ansible 10.0.0.41 -m copy -a "src=/scripts/htop.sh dest=/scripts/ mode=600"#第三个扩展参数backup:在传输文件时,对远程主机源文件进行备份[root@iflytek-m01 scripts]# ansible 10.0.0.41 -m copy -a "src=/scripts/htop.sh dest=/scripts/ backup=yes"#第四个扩展参数content:传输文件并直接编辑文件的信息[root@iflytek-m01 scripts]# ansible 10.0.0.41 -m copy -a "content='yum install htop -y' dest=/scripts/htop.sh"注意:copy模块复制目录信息src后面目录没有/:将目录本身以及目录下面的内容都进行远程传输复制[root@iflytek-m01 scripts]# ansible 10.0.0.41 -m copy -a "src=/scripts dest=/scripts"src后面目录有/:只将目录下面的内容都进行远程传输复制[root@iflytek-m01 scripts]# ansible 10.0.0.41 -m copy -a "src=/scripts/ dest=/scripts"
11.5 file模块
#第五个模块:filefile:设置文件属性信息基本用法:[root@iflytek-m01 scripts]# ansible 10.0.0.41 -m file -a "dest=/scripts/htop.sh owner=xujun group=xujun mode=600"#第一个扩展参数:state:利用模块创建数据信息(文件、目录、链接文件)=absent --->删除数据信息 ansible 10.0.0.41 -m file -a "dest=/oldboy/xujun_link.txt state=absent"=directory ---> 创建目录 ansible 10.0.0.41 -m file -a "dest=/oldboy state=directory"=hard --->创建一个硬链接信息 ansible 10.0.0.41 -m file -a "src=/oldboy/xujun.txt dest=/oldboy/xujun_hard.txt state=hard"=link --->创建一个软链接信息 ansible 10.0.0.41 -m file -a "src=/oldboy/xujun.txt dest=/oldboy/xujun_link.txt state=link"=touch --->创建一个文件信息 ansible 10.0.0.41 -m file -a "dest=/oldboy/xujun.txt state=touch"#第二个扩展参数:recurse:权限信息递归创建。默认是no,如果需要递归创建选择yes[root@iflytek-m01 scripts]# ansible 10.0.0.41 -m file -a "dest=/oldboy/ owner=xujun group=xujun mode=700 recurse=yes"
11.6 fetch模块
#第六个模块:fetchfetch:批量拉取数据基本用法:[root@iflytek-m01 ~]# ansible 10.0.0.41 -m fetch -a "src=/scripts/oldboy.txt dest=/scripts/"[root@iflytek-m01 scripts]# lsoldboy.txt[root@iflytek-m01 scripts]# pwd #会在要被拉取的目录下,创建一个拉取端的IP目录/scripts/10.0.0.41/scripts
11.7 yum模块
#第七个模块:yumyum:批量安装软件name --- 指定安装软件名称state --- 指定是否安装软件installed --- 安装软件removed --- 卸载软件基本用法:[root@iflytek-m01 scripts]# ansible 10.0.0.41 -m yum -a "name=iotop state=installed"#示列一:安装当前最新的Apache软件,如果存在则更新ansible oldboy -m yum -a "name=httpd state=latest"#示例二、安装当前最新的Apache软件,通过epel仓库安装ansible oldboy -m yum -a "name=httpd state=latest enablerepo=epel"#示例三、通过公网URL安装rpm软件ansible oldboy -m yum -a "name=https://mirrors.aliyun.com/zabbix/zabbix/4.2/rhel/7/x86_64/zabbix-agent-4.2.3-2.el7.x86_64.rpm state=latest"#示例四、更新所有的软件包,但排除和kernel相关的ansible oldboy -m yum -a "name=* state=latest exclude=kernel*,foo*"#示例五、删除Apache软件ansible oldboy -m yum -a "name=httpd state=absent"
11.8 service模块
#第八个模块:serviceservice:管理服务的运行状态name --- 指定服务的服务名称state --- 指定服务状态started 启动restarted 重启stopped 停止enabled --- 指定服务是否开启自启动yes 开启自启动no 不开启自启动基本用法:[root@iflytek-m01 scripts]# ansible 10.0.0.41 -m service -a "name=firewalld state=started"#示例一、启动Httpd服务[root@ansible ~]# ansible oldboy -m service -a "name=httpd state=started"#示例二、重载Httpd服务[root@ansible ~]# ansible oldboy -m service -a "name=httpd state=reloaded"#示例三、重启Httpd服务[root@ansible ~]# ansible oldboy -m service -a "name=httpd state=restarted"#示例四、停止Httpd服务[root@ansible ~]# ansible oldboy -m service -a "name=httpd state=stopped"#示例五、启动Httpd服务,并加入开机自启[root@ansible ~]# ansible oldboy -m service -a "name=httpd state=started enabled=yes"
11.9 cron模块
#第九个模块:croncron:批量设置多个主机的定时任务信息minute:设置分钟信息(0-59,*,*/2)hour:设置小时信息(0-23,*,*/2)day:设置日期信息(1-31,*,*/2)month:设置月份信息(1-12,*,*/2)weekday:设置周信息(0-6:0表示星期天)job:用于定义定时任务需要干的事情name:设置定时任务的注释信息基本用法:[root@iflytek-m01 scripts]# ansible 10.0.0.41 -m cron -a "name='time sync' minute=5 job='/usr/sbin/ntpdate ntp1.aliyun.com >/dev/null 2>&1'"扩展用法:1、state:批量删除定时任务[root@iflytek-m01 scripts]# ansible 10.0.0.41 -m cron -a "name='date sync' state=absent" #批量删除定时任务[root@iflytek-m01 scripts]# ansible 10.0.0.41 -a "crontab -l" #查看是否还有定时任务10.0.0.41 | CHANGED | rc=0 >>注意:ansible可以删除的定时任务,只能是ansible设置好的定时任务2、disabled:注释定时任务---yes 开启注释---no 关闭注释[root@iflytek-m01 scripts]# ansible 10.0.0.41 -m cron -a "name='date sync' job='/usr/sbin/ntpdate ntp1.aliyun.com >/dev/null 2>&1' disabled=yes"[root@iflytek-m01 scripts]# ansible 10.0.0.41 -a "crontab -l"10.0.0.41 | CHANGED | rc=0 >>#Ansible: date sync#* * * * * /usr/sbin/ntpdate ntp1.aliyun.com >/dev/null 2>&1
11.10 mount模块
#第十个模块:mountmount:批量进行挂载操作常用参数:src --- 需要挂载的存储设备或文件信息常用参数:path --- 指定目标挂载点目录常用参数:fstype --- 指定挂载时的文件系统类型常用参数:state参数选项:present/mounted --- 进行挂载present:不会实现立即挂载,修改fstab文件,实现开机自动挂载mounted:会实现立即挂载,并且会修改fstab文件,实现开机自动挂载参数选项:absent/unmounted --- 进行卸载absent:会实现立即卸载,并且会删除fstab文件信息,禁止开机自动挂载unmounted:会实现立即卸载,但是不会删除fstab文件信息基本用法:[root@iflytek-m01 scripts]# ansible 10.0.0.41 -m mount -a "src=/dev/sdb path=/iflytek fstype=xfs state=present"
11.11 user模块
#第十一个模块:useruser:实现批量创建用户基本用法:[root@iflytek-m01 scripts]# ansible 10.0.0.41 -m user -a "name=oldboy"10.0.0.41 | CHANGED => {[root@iflytek-m01 scripts]# ansible 10.0.0.41 -a "id oldboy"10.0.0.41 | CHANGED | rc=0 >>uid=1001(oldboy) gid=1001(oldboy) 组=1001(oldboy)扩展用法:1、uid:指定用户uid信息[root@iflytek-m01 scripts]# ansible 10.0.0.41 -m user -a "name=oldboy01 uid=1314"[root@iflytek-m01 scripts]# ansible 10.0.0.41 -a "id oldboy01"10.0.0.41 | CHANGED | rc=0 >>uid=1314(oldboy01) gid=1314(oldboy01) 组=1314(oldboy01)2、group:指定用户组信息groups:指定多个用户组信息[root@iflytek-m01 scripts]# ansible 10.0.0.41 -m user -a "name=oldboy02 group=oldboy01"[root@iflytek-m01 scripts]# ansible 10.0.0.41 -a "id oldboy02"10.0.0.41 | CHANGED | rc=0 >>uid=1315(oldboy02) gid=1314(oldboy01) 组=1314(oldboy01)[root@iflytek-m01 scripts]# ansible 10.0.0.41 -m user -a "name=oldboy03 groups=oldboy01"[root@iflytek-m01 scripts]# ansible 10.0.0.41 -a "id oldboy03"10.0.0.41 | CHANGED | rc=0 >>uid=1316(oldboy03) gid=1316(oldboy03) 组=1316(oldboy03),1314(oldboy01)3、批量创建虚拟用户create_home:是否创建家目录shell:指定创建的shell[root@iflytek-m01 scripts]# ansible 10.0.0.41 -m user -a "name=rsync create_home=no shell=/sbin/nologin"[root@iflytek-m01 scripts]# ansible 10.0.0.41 -a "tail -1 /etc/passwd"10.0.0.41 | CHANGED | rc=0 >>rsync:x:1317:1317::/home/rsync:/sbin/nologin4、给指定用户创建密码password:给用户指定密码,但是这个指定是明文的,所以指定密码之前,要把密码变成密文的[root@iflytek-m01 scripts]# ansible all -i localhost, -m debug -a "msg={{ '123456' | password_hash('sha512','oldboy') }}" #指定密码为密文localhost | SUCCESS => {"msg": "$6$oldboy$MVd3DevkLcimrBLdMICrBY8HF82Wtau5cI8D2w4Zs6P1cCfMTcnnyAmmJc7mQaE9zuHxk8JFTRgYMGv9uKW7j1"}[root@iflytek-m01 scripts]# ansible 10.0.0.41 -m user -a 'name=oldboy05 password=$6$oldboy$MVd3DevkLcimrBLdMICrBY8HF82Wtau5cI8D2w4Zs6P1cCfMTcnnyAmmJc7mQaE9zuHxk8JFTRgYMGv9uKW7j1'5、删除指定用户ansible oldboy -m user -a 'name=oldboy05 state=absent remove=yes'#remove:把指定用户对应的家目录删除
11.12 ping模块
#第十二个模块:pingping:用于判断远程主机是否在线基础用法:[root@m01-201 ~]# ansible all -m ping10.0.0.41 | SUCCESS => {"ansible_facts": {"discovered_interpreter_python": "/usr/bin/python"},"changed": false,"ping": "pong" #返回pong,说明成功}
11.13 get_url模块
#第十三个模块:get_url 用于将文件或软件从http、https或ftp下载到本地节点上常用参数:dest: 指定将文件下载的绝对路径---必须url: 文件的下载地址(网址)---必须url_username: 用于http基本认证的用户名url_password: 用于http基本认证的密码validate_certs: 如果否,SSL证书将不会验证。这只应在使用自签名证书的个人控制站点上使用owner: 指定属主group: 指定属组mode: 指定权限[admin@node1 ~]$ ansible NFS -m get_url -a "url=http://nginx.org/download/nginx-1.12.2.tar.gz dest=/tmp/"192.168.20.136 | SUCCESS => {"changed": true,"checksum_dest": null,"checksum_src": "6b41d63befa4f52b0724b533e6292a6671b71fdc","dest": "/tmp/nginx-1.12.2.tar.gz","gid": 1010,"group": "admin","md5sum": "4d2fc76211435f029271f1cf6d7eeae3","mode": "0664","msg": "OK (981687 bytes)","owner": "admin","secontext": "unconfined_u:object_r:user_tmp_t:s0","size": 981687,"src": "/tmp/tmpk78fBY","state": "file","status_code": 200,"uid": 1010,"url": "http://nginx.org/download/nginx-1.12.2.tar.gz"}
11.14 group模块
#第十四个模块:group 管理远程主机上的组name参数:必须参数,用于指定要操作的组名称state参数:用于指定组的状态,两个值可选,present,absent,默认为present,设置为absent,表示删除组gid参数:用于指定组的gid示列:#1、创建news基本组,指定uid为9999ansible oldboy -m group -a "name=news gid=9999 state=present"#2、创建http系统组,指定uid为8888ansible oldboy -m group -a "name=http gid=8888 system=yes state=present"#3、删除news基本组ansible oldboy -m group -a "name=http state=absent"
11.15 selinux模块
#第十五个模块:selinux 配置selinux模式和策略conf参数:默认值/etc/selinux/configpolicy参数:默认值null 设置selinux的策略state参数:选项 enforcing、permissive、disabled示列:ansible oldboy -m selinux -a "state=disabled" -i hosts
11.16 firewalld模块
#第十六个模块:firewalld 配置防火墙模式和策略示例一 永久放行https的流量,只有重启才会生效ansible oldboy -m firewalld -a "zone=public service=https permanent=yes state=enabled"示例二 永久放行8081端口的流量,只有重启才会生效ansible oldboy -m firewalld -a "zone=public port=8080/tcp permanent=yes state=enabled"示例三 放行8080-8090的所有tcp端口流量,临时和永久都生效.ansible oldboy -m firewalld -a "zone=public port=8080-8090/tcp permanent=yes immediate=yes state=enabled"
11.17 unarchive模块
#第十七个模块:unarchive模块功能:解包解压缩实现有两种用法:1、将ansible主机上的压缩包传到远程主机后解压缩至特定目录,设置copy=yes2、将远程主机上的某个压缩包解压缩到指定路径下,设置copy=nocopy:默认为yes,当copy=yes,拷贝的文件是从ansible主机复制到远程主机上,如果设置为copy=no,会在远程主机上寻找src源文件src:源路径,可以使ansible主机上路径,也可以是远程主机上的路径,如果是远程主机上的路径,则需要设置copy=nodest:远程主机上的目标路径mode:设置解压缩后的文件权限案例一:把ansible主机上的tar包传至远程主机上,并解压至/root目录下[root@iflytek-18 ~]# ansible mysql -m unarchive -a "src=/root/192.168.1.65.tar.gz dest=/root"案例二:下载互联网的压缩包,并解压在远端服务器上[root@iflytek-18 ~]# ansible mysql -m unarchive -a "src=https://example.com/example.zip dest=/data copy=no"
11.18 archive模块
#第十八个模块:archive模块功能:打包压缩path:要压缩的文件或目录dest:压缩后的文件format:bz2,gz,tar,xz,zip 指定打包的类型案例一:[root@iflytek-18 ~]# ansible mysql -m archive -a "path=/root/192.168.1.65 dest=/tmp/192.168.1.65.tar.gz"
12 Ansible playbook的编写
Playbook英文翻译过来就是剧本的意思。
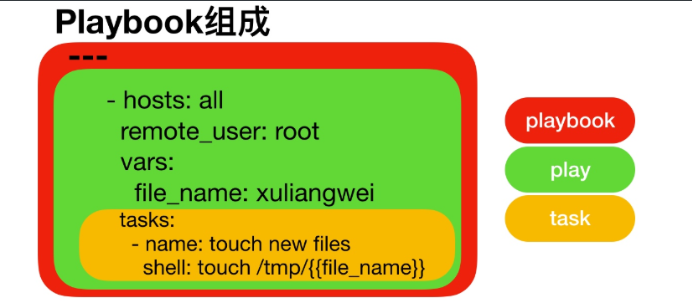
12.1 Playbook的组成部分
play:定义的是主机的角色
hosts:执行的远程主机列表
tasks:定义的是具体执行的任务
variables:内置变量或自定义变量在playbook中调用
handlers和notify结合使用,由特定条件触发的操作,满足条件方才执行,否则不执行
tags标签:指定某条任务执行,用于选择运行playbook中的部分代码。ansible具有幂等性,因此会自动跳过没有变化的部分,即便如此,有些代码为测试其确实没有发生变化的时间依然会非常的长。此时,如果确信其没有变化,就可以通过tags跳过此些代码片段。
playbook:由一个或多个play组成,一个play可以包含多个task任务
简单理解为:使用不同的模块完成一件事情
12.2 Playbook编写规范
再说Playbook编写规范之前,我们要说一下YAML语言
12.2.1 YMAL语言介绍
YAML:YAML通俗来理解,就是一种标记语言。YAML是一个可读性高的用来表达资料序列的格式。YAML参考了其他多种语言,包括:XML、C语言、Python、Perl以及电子邮件格式RFC2822等。Clark Evans在2001年首次发表了这种语言,目前很多最新的软件比较流行采用此格式的文件存放配置信息,如:Ubuntu、Ansible、Docker等。
12.2.2 YAML语言特性
- YAML的可读性好
- YAML和脚本语言的交互性好
- YAML使用实现语言的数据类型
- YAML有一个一致的信息模型
- YAML易于实现
- YAML可以基于流来处理
- YAML表达能力强,扩展性好
12.2.3 Playbook语言规范
1.合理的缩进,两个空格表示一个缩进
标题一标题二
注意:在ansible中一定不能用tab进行缩进
2.冒号的使用方法
hosts: 172.16.1.41
tasks:
注意:使用冒号时后面要有空格,以冒号结尾,冒号出现在注释说明中,后面不需要加上空格
3.短横线应用 - (列表功能)
- 张三男- 打游戏- 运动- 李四女学习湖南注意:使用短横线构成列表信息,短横线后面需要有空格
4.剧本中一个name标识下面只能写一个模块任务信息,如果写一个以上,会有报错
5.剧本中尽量不要大量使用shell模块
12.2.4 playbook命令
ansible-playbook file.yml#主要选项:-C #检测语法,不执行任务--list-hosts #列出执行任务的主机--list-tags #列出tag--list-tasks #列出task--limit 主机列表 #只针对主机列表中的特定主机执行-v -vv -vvv #显示过程
12.3 playbook实战
剧本一键安装rsnync
管理端:1、创建剧本目录[root@iflytek-m01 ~]# mkdir /etc/ansible/ansible-playbook2、创建剧本[root@iflytek-m01 ~]# cd /etc/ansible/ansible-playbook[root@iflytek-m01 ansible-playbook]# vim rsync_server.yaml#说明:剧本文件扩展名尽量写为yaml#1.方便识别文件是一个剧本文件#2.文件编写时会有颜色提示[root@iflytek-m01 ansible-playbook]# cat rsync_server.yaml- hosts: 10.0.0.31tasks:- name: 01-install rsyncyum: name=rsync state=installed- name: 02-copy rsyncd.confcopy: src=/playbook/rsyncd.conf dest=/etc/- name: 03-useradd nameuser: name=rsync create_home=no shell=/sbin/nologin- name: 04-systemctl start rsyncdservice: name=rsyncd state=started enabled=yes- name: 05-mkdir /backupfile: dest=/backup state=directory owner=rsync group=rsync recurse=yes- name: 06-touch rsync.passwordcopy: src=/playbook/rsync.password dest=/etc/ mode=600- hosts: 10.0.0.41tasks:- name: 01-install rsyncyum: name=rsync state=installed- name: 02-copy rsyncd.confcopy: content=oldboy dest=/etc/rsync.password mode=600- name: 03-mkdir /backupfile: dest=/backup3、执行剧本之前,先检查语法格式[root@iflytek-m01 ansible-playbook]# ansible-playbook --syntax-check rsync_server.yaml #检测语法格式playbook: rsync_server.yaml[root@iflytek-m01 ansible-playbook]# ansible-playbook -C rsync_server.yaml #模拟运行剧本,查看剧本是否运行正常PLAY [10.0.0.41] ****************************************************************************************************************************************************************************TASK [Gathering Facts] **********************************************************************************************************************************************************************ok: [10.0.0.41]TASK [yum] **********************************************************************************************************************************************************************************changed: [10.0.0.41]TASK [copy] *********************************************************************************************************************************************************************************changed: [10.0.0.41]PLAY RECAP **********************************************************************************************************************************************************************************10.0.0.41 : ok=3 changed=2 unreachable=0 failed=0 skipped=0 rescued=0 ignored=04、运行剧本[root@iflytek-m01 ansible-playbook]# ansible-playbook rsync_server.yaml
剧本一键安装nfs
[root@md-68 playbook]# cd /etc/ansible/playbook/[root@md-68 playbook]# lsexports.j2 nfs.yaml[root@md-68 playbook]# cat nfs.yaml- hosts: 192.168.1.31tasks:- name: install rpcbindyum:name: rpcbindstate: installed- name: install nfs-utilsyum:name: nfs-utilsstate: installed- name: copy configure exportscopy:src: ./exports.j2dest: /etc/exportsbackup: yes- name: make dirfile:dest: /datastate: directoryowner: nfsnobodygroup: nfsnobodyrecurse: yes- name: start service rbcbindservice:name: rpcbindstate: startedenabled: yes- name: start service nfsservice:name: nfsstate: startedenabled: yes- hosts: 192.168.1.41tasks:- name: install rpcbindyum:name: rpcbindstate: installed- name: install nfs-utilsyum:name: nfs-utilsstate: installed- name: start service rbcbindservice:name: rpcbindstate: startedenabled: yes- name: start service nfsservice:name: nfsstate: startedenabled: yes- name: mount nfsmount:src: 192.168.1.31:/datapath: /datafstype: nfsopts: defaultsstate: mounted[root@md-68 playbook]# ansible-playbook --syntax-check nfs.yamlplaybook: nfs.yaml[root@md-68 playbook]# ansible-playbook nfs.yaml
剧本一键安装nginx
[root@md-68 playbook]# cat nginx.yaml- hosts: 192.168.1.7tasks:- name: Install nginxyum:name: nginxstate: installed- name: service nginx startservice:name: nginxstate: startedenabled: yes[root@md-68 playbook]# ansible-playbook --syntax-check nfs.yamlplaybook: nfs.yaml[root@md-68 playbook]# ansible-playbook nfs.yaml
12.4 playbook中使用handler和notify
12.4.1 handlers和notify结合触发条件
- handlers(触发器):定义一些task列表,与之前剧本中task没有关系,只有资源发生变化才会采取一定的操作
- notify:notify中调用handler中定义的操作
12.4.2 案例
1、yum安装nginx[root@iflytek-18 playbook]# tree.├── files│ └── nginx.conf└── nginx.yaml[root@iflytek-18 playbook]# cat nginx.yaml- hosts: mysqltasks:- name: install nginx packageyum: name=nginx- name: copy conf filecopy: src=files/nginx.conf dest=/etc/nginx/nginx.conf- name: start serviceservice: name=nginx state=started enabled=yes[root@iflytek-18 playbook]# ansible-playbook nginx.yaml #运行playbook#这时候nginx 80端口是起来的[root@iflytek-18 files]# ansible mysql -m shell -a "ss -lntp|grep 80"192.168.1.65 | CHANGED | rc=0 >>LISTEN 0 128 *:80 *:* users:(("nginx",pid=14010,fd=6),("nginx",pid=14009,fd=6))2、我们修改nginx配置文件,只修改端口[root@iflytek-18 files]# grep listen nginx.conflisten 81 default_server;[root@iflytek-18 playbook]# ansible-playbook nginx.yaml3、然后我们查看远端的nginx服务器[root@mysql-65 ~]# grep "listen" /etc/nginx/nginx.conflisten 81 default_server; #说明配置文件的确是修改了[root@mysql-65 ~]# ss -lntp|grep nginx #但是nginx并没有重启,这个是因为ansible的幂等性导致的LISTEN 0 128 *:80 *:* users:(("nginx",pid=14010,fd=6),("nginx",pid=14009,fd=6))所以为了解决这个问题,我们需要引入handlers和notify#####################################################################################################[root@iflytek-18 playbook]# cat nginx.yaml- hosts: mysqltasks:- name: install nginx packageyum: name=nginx- name: copy conf filecopy: src=files/nginx.conf dest=/etc/nginx/nginx.confnotify: restart service #这边的值必须和下面handlers中的name相匹配- name: start serviceservice: name=nginx state=started enabled=yeshandlers:- name: restart serviceservice: name=nginx state=restarted[root@iflytek-18 playbook]# ansible-playbook nginx.yaml最后的结果:[root@mysql-65 nginx]# ss -lntp|grep nginxLISTEN 0 128 *:82 *:* users:(("nginx",pid=15210,fd=6),("nginx",pid=15208,fd=6))我们可以看到端口的确是更改了。所以只要碰到修改配置文件操作的,需要重启服务的,一般都需要使用handlers和notify
12.5 playbook中使用tags组件
在playbook文件中,可以利用tags组件,为特定task指定标签,当在执行playbook时,可以只执行tags的task,而非整个playbook文件
1、修改nginx配置文件[root@iflytek-18 files]# grep listen nginx.conflisten 8080 default_server;2、修改playbook文件[root@iflytek-18 playbook]# cat nginx.yaml- hosts: mysqltasks:- name: install nginx packageyum: name=nginx- name: copy conf filecopy: src=files/nginx.conf dest=/etc/nginx/nginx.conftags: conf #定义一个conf标签- name: start servicetags: service #定义一个service标签service: name=nginx state=started enabled=yes3、执行playbook[root@iflytek-18 playbook]# ansible-playbook -t conf,service nginx.yaml
12.6 playbook中使用变量
12.6.1 变量的定义
仅能由字母、数字和下划线组成,且只能以字母开头
variable=value
范列:
http_port=80
12.6.2 变量的调用方式
通过{{ variable_name }} 调用变量,且变量名前后建议加空格,有时用“{{ variable_name }}”才生效
12.6.3 变量来源
使用setup模块中变量
注意:本模块自动在playbook调用,不要用ansible命令调用
#案例:使用setup中的变量
[root@iflytek-18 playbook]# cat var.yaml
- hosts: mysql

  tasks:
    - name: create log file
      file: name=/data/{{ ansible_nodename }}.log state=touch mode=600

[root@iflytek-18 playbook]# ansible-playbook var.yaml
通过命令行指定变量,优先级最高
[root@iflytek-18 playbook]# vim var2.yml
- hosts: webserver
  remote_user: root
  tasks:
    - name: install packages
      yum: name={{ pkname }} state=present

]# ansible-playbook -e pkname="nginx" var2.yml
在playbook文件中定义变量
]# vim var3.yml
- hosts: webserver
  remote_user: root
  vars:
    - username: user1
    - groupname: group1

  tasks:
    - name: create group
      group: name={{ groupname }} state=present
    - name: create user
      user: name={{ username }} group={{ groupname }} state=present

]# ansible-playbook var3.yml
使用变量文件
可以在一个独立的playbook文件中定义变量,在另一个playbook文件中引用变量文件中的变量,比playbook中定义的变量优化级高
]# vim vars.yml
package_name: mariadb-server
service_name: mariadb


]# vim var4.yml
- hosts: webserver
  remote_user: root
  vars_files:
    - /etc/ansible/test/playbook/vars.yml

  tasks:
    - name: install packages
      yum: name={{ package_name }}
    - name: start service
      service: name={{ service_name }} state=started enabled=yes
通过inventory主机清单进行变量定义
============================== group vars ==============================
在项目目录下创建两个变量的目录,host_vars group_vars
#1)在当前的项目目录中创建两个变量的目录
[root@ansible project1]# mkdir host_vars
[root@ansible project1]# mkdir group_vars

#2)在group_vars目录中创建一个文件,文件名与inventory清单中的组名称要保持完全一致。
[root@ansible project1]# cat group_vars/oldboy
web_packages: wget
ftp_packages: tree

#3)编写playbook,只需在playbook文件中使用变量即可。
[root@ansible project1]# cat f4.yml
- hosts: oldboy
  tasks:
    - name: Install Rpm Packages "{{ web_packages }}" "{{ ftp_packages }}"
      yum:
        name:
          - "{{ web_packages }}"
          - "{{ ftp_packages }}"
        state: present

注意必须在group_vars目录之外创建yml文件,这样才能识别group_vars/oldboy文件中的变量名

注意: 默认情况下,group_vars目录中文件名与hosts清单中的组名保持一致.
     比如在group_vars目录中创建了oldboy组的变量,其他组是无法使用oldboy组的变量
     系统提供了一个特殊组,all,只需要在group_vars目录下建立一个all文件,编写好变量,所有组都可使用.

============================== host vars ==============================
#1)在host_vars目录中创建一个文件,文件名与inventory清单中的主机名称要保持完全一致
[root@ansible project1]# cat hosts
[oldboy]
10.0.0.64
10.0.0.68

#2)在host_vars目录中创建文件,给10.0.0.64主机定义变量
[root@ansible project1]# cat host_vars/10.0.0.64
web_packages: wget
ftp_packages: tree

#3)准备一个playbook文件调用host主机变量
[root@ansible project1]# cat f4.yml
- hosts: 10.0.0.64
  tasks:
    - name: Install Rpm Packages "{{ web_packages }}" "{{ ftp_packages }}"
      yum:
        name:
          - "{{ web_packages }}"
          - "{{ ftp_packages }}"
        state: present

- hosts: 10.0.0.68
  tasks:
    - name: Install Rpm Packages "{{ web_packages }}" "{{ ftp_packages }}"
      yum:
        name:
          - "{{ web_packages }}"
          - "{{ ftp_packages }}"
        state: present

注意必须在host_vars目录之外创建yml文件,这样才能识别host_vars/10.0.0.64文件中的变量名
host_vars 特殊的变量目录,针对单个主机进行变量.
group_vars 特殊的变量目录,针对inventory主机清单中的组进行变量定义. 对A组定义的变量 B组无法调用
group_vars/all 特殊的变量文件,可以针对所有的主机组定义变量.
12.6.4 变量的优先级
外置传参 ---> playbook(vars_files ---> vars) ---> inventory(host_vars --> group_vars/group_name ---> group_vars-all)
12.7 ansible变量注册
[root@m01 project1]# cat vars_9.yml
- hosts: oldboy

  tasks:
    - name: Installed Httpd Server
      yum: name=httpd state=present

    - name: Service Httpd Server
      service: name=httpd state=started

    - name: Check Httpd Server
      shell: ps aux|grep httpd
      register: check_httpd  #把上面的ps aux|grep httpd写进check_httpd变量中

    - name: OutPut Variables
      debug:
        msg: "{{ check_httpd.stdout_lines }}" #通过debug模块中的msg方法输出变量的所有内容
12.8 Facts概述
Ansible Facts 是 Ansible 在被托管主机上自动收集的变量。它是通过在执行 Ad-Hoc 以及 Playbook 时使用 setup 模块进行收集的,并且这个操作是默认的。
因为这个收集托管主机上的 Facts 比较耗费时间,所以可以在不需要的时候关闭 setup 模块。收集的 Facts 中包含了托管主机特有的信息,这些信息可以像变量一样在 Playbook 中使用。
收集的 Facts 中包含了以下常用的信息:
主机名、内核版本、网卡接口、IP 地址、操作系统版本、环境变量、CPU 核数、可用内存、可用磁盘 等等……。
使用场景
- 通过 facts 检查 CPU,生成对应的 Nginx 配置文件
- 通过 facts 检查内存情况,定义不同的 MySQL 配置文件或 Redis 配置文件
- 通过 facts 检查主机 hostname,生成不同的 zabbix 配置文件
12.8.1 获取指定受控端的facts信息
[root@es-161 roles]# ansible all -m setup
10.0.0.64 | SUCCESS => {
    "ansible_facts": {
        "ansible_all_ipv4_addresses": [
            "10.0.0.64"
        ],
        "ansible_all_ipv6_addresses": [
            "fe80::63af:74b9:89f6:61a7"
        ],
        "ansible_apparmor": {
            "status": "disabled"
        },
.......
12.8.2 如何在playbook中关闭facts
[yun@ansi-manager object03]$ cat test_facts.yml
---
# facts 使用
- hosts: proxyservers
  # 关闭 facts 变量
  gather_facts: no

  # 这时就不能取到 ansible_hostname、ansible_eth0.ipv4.address、ansible_eth1 ['ipv4']['address'] 变量信息
  tasks:
    - name: "get ansible facts var"
      debug:
        msg: "This host name is {{ ansible_hostname }} ,eth0: {{ ansible_eth0.ipv4.address }}, eth1: {{ ansible_eth1['ipv4']['address'] }}"
12.8.3 案列:获取主机名和网卡信息
#获取受控端的主机名、外网地址
[root@es-161 roles]# cat vars10.yml
- hosts: oldboy
  tasks:
    - name: "get ansible facts var"
      debug:
        msg: "This host name is {{ ansible_hostname }} ,ens33: {{ ansible_ens33.ipv4.address }}"

[root@es-161 roles]# ansible-playbook vars10.yml
PLAY [oldboy] *******************************************************************************************************************************************************************************

TASK [Gathering Facts] **********************************************************************************************************************************************************************
ok: [10.0.0.64]

TASK [get ansible facts var] ****************************************************************************************************************************************************************
ok: [10.0.0.64] => {
    "msg": "This host name is mysql-64 ,ens33: 10.0.0.64"
}

PLAY RECAP **********************************************************************************************************************************************************************************
10.0.0.64                  : ok=2    changed=0    unreachable=0    failed=0    skipped=0    rescued=0    ignored=0
12.9 template模板
12.9.1 template模板作用
template模块使用了[Jinjia2](http://jinja.pocoo.org/docs/)模版语言,进行文档内变量的替换的模块。
template模块用法和copy模块用法基本一致,它主要用于复制配置文件。可以按需求修改配置文件内容来复制模板到被控主机上。
template功能:可以根据和参考模块文件,动态生成相类似的配置文件
template文件必须存放于templates目录下,且命名为 .j2 结尾
yaml/yml 文件需和templates目录平级,目录结构如下示例:
./
├── temnginx.yml
└── templates
└── nginx.conf.j2
12.9.2 范例
#修改文件nginx.conf.j2
mkdir templates
vim templates/nginx.conf.j2
worker_processes {{ ansible_processor_vcpus }};

vim temnginx2.yml
---
- hosts: websrvs
  remote_user: root

  tasks:
    - name: install nginx
      yum: name=nginx
    - name: template config to remote hosts
      template: src=nginx.conf.j2 dest=/etc/nginx/nginx.conf
    - name: start service
      service: name=nginx state=started enable=yes

ansible-playbook temnginx2.yml


#范例2 template算术运算
[root@ansible ansible]#vim templates/nginx.conf.j2
worker_processes {{ ansible_processor_vcpus**3 }};

[root@ansible ansible]#cat templnginx.yml
---
- hosts: websrvs
  remote_user: root

  tasks:
    - name: install nginx
      yum: name=nginx
    - name: template config to remote hosts
      template: src=nginx.conf.j2 dest=/etc/nginx/nginx.conf
      notify: restart nginx
    - name: start service
      service: name=nginx state=started enabled=yes

  handlers:
    - name: restart nginx
      service: name=nginx state=restarted

ansible-playbook  templnginx.yml --limit 10.0.0.8
12.10 roles角色
12.10.1 roles角色简介
角色是ansible自1.2版本引入的新特性,用于层次性、结构化地组织playbook。roles能够根据层次型结构自动装载变量文件、tasks以及handlers等。要使用roles只需要在playbook中使用include指令即可。简单来讲,roles就是通过分别将变量、文件、任务、模板及处理器放置于单独的目录中,并可以便捷地include它们的一种机制。角色一般用于基于主机构建服务的场景中,但也可以是用于构建守护进程等场景中。
运维复杂的场景:建议使用roles,代码复用度高。
roles:多个角色的集合, 可以将多个的role,分别放至roles目录下的独立子目录中
roles/
mysql/
httpd/
nginx/
redis/
12.10.2 Ansible Roles目录结构
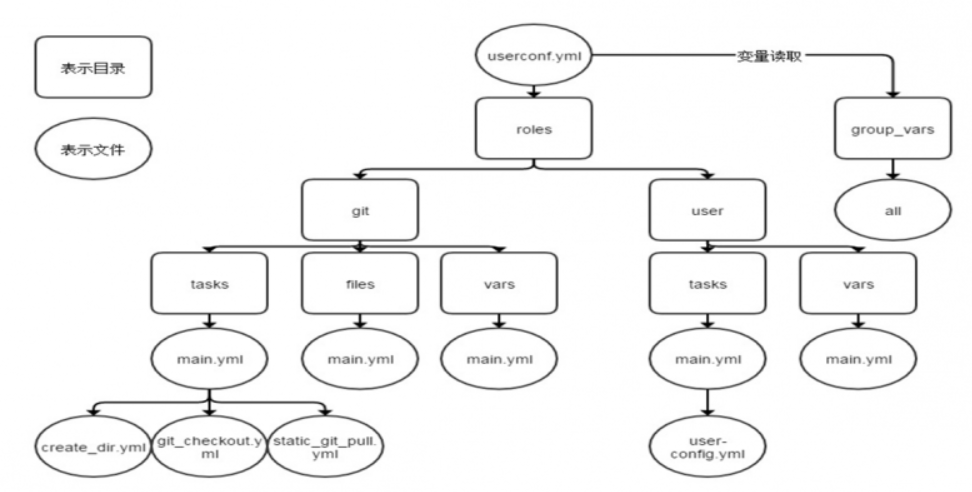
Roles各目录作用
roles/project/ :项目名称,有以下子目录
- files/ :存放由copy或script模块等调用的文件
- templates/:template模块查找所需要模板文件的目录
- tasks/:定义task,role的基本元素,至少应该包含一个名为main.yml的文件;其它的文件需要在此文件中通过include进行包含
- handlers/:至少应该包含一个名为main.yml的文件;其它的文件需要在此文件中通过include进行包含
- vars/:定义变量,至少应该包含一个名为main.yml的文件;其它的文件需要在此文件中通过include进行包含
- meta/:定义当前角色的特殊设定及其依赖关系,至少应该包含一个名为main.yml的文件,其它文件需在此文件中通过include进行包含
- default/:设定默认变量时使用此目录中的main.yml文件,比vars的优先级低
12.10.3 创建role
创建role的步骤:
(1) 创建以roles命名的目录
(2) 在roles目录中分别创建以各角色名称命名的目录,如webservers等
(3) 在每个角色命名的目录中分别创建files、handlers、meta、tasks、templates和vars目录;用不到的目录可以创建为空目录,也可以不创建
(4) 在playbook文件中,调用各角色
针对大型项目使用Roles进行编排,范例:roles的目录结构:
nginx-role.yml
roles/
└── nginx
     ├── files
     │    └── main.yml
     ├── tasks
     │    ├── groupadd.yml
     │    ├── install.yml
     │    ├── main.yml
     │    ├── restart.yml
     │    └── useradd.yml
     └── vars
          └── main.yml
12.10.4 playbook调用角色
调用方法1:
---
- hosts: websrvs
  remote_user: root
  roles:
    - mysql
    - memcached
    - nginx
调用方法2:
键role用于指定角色名称,后续的k/v用于传递变量给角色
---
- hosts: all
  remote_user: root
  roles:
    - mysql
    - { role: nginx, username: nginx }
调用方法3:
还可基于条件测试实现角色调用
---
- hosts: all
  remote_user: root
  roles:
    - { role: nginx, username: nginx, when: ansible_distribution_major_version == ‘7’  }
12.10.5 企业实战案例
12.10.5.1 案例1:实现Nginx角色
mkdir -pv  /data/ansible/roles/nginx/{tasks,handlers,templates,vars}

#创建task文件
cd /data/ansible/roles/nginx/

vim tasks/main.yml
- include: install.yml
- include: config.yml
- include: index.yml
- include: service.yml

vim  tasks/install.yml
- name: install
  yum: name=nginx

vim tasks/config.yml
- name: config file for centos7
  template: src=nginx7.conf.j2 dest=/etc/nginx/nginx.conf
  when: ansible_distribution_major_version=="7"
  notify: restart
- name: config file for centos8
  template: src=nginx8.conf.j2 dest=/etc/nginx/nginx.conf
  when: ansible_distribution_major_version=="8"
  notify: restart

vim  tasks/index.yml
- name: index.html
  copy: src=roles/httpd/files/index.html dest=/usr/share/nginx/html/

vim tasks/service.yml
- name: start service
  service: name=nginx state=started enabled=yes

#创建handler文件
cat handlers/main.yml
- name: restart
  service: name=nginx state=restarted

#创建两个template文件
cat templates/nginx7.conf.j2
...省略...
user {{user}};
worker_processes {{ansible_processor_vcpus+3}};   #修改此行
error_log /var/log/nginx/error.log;
pid /run/nginx.pid;
...省略...

cat templates/nginx8.conf.j2
...省略...
user nginx;
worker_processes {{ansible_processor_vcpus**3}};  #修改此行
error_log /var/log/nginx/error.log;
pid /run/nginx.pid;
...省略...

#创建变量文件
vim vars/main.yml
user: daemon

#目录结构如下

tree /data/ansible/roles/nginx/
/data/ansible/roles/nginx/
├── handlers
│   └── main.yml
├── tasks
│   ├── config.yml
│   ├── file.yml
│   ├── install.yml
│   ├── main.yml
│   └── service.yml
├── templates
│   ├── nginx7.conf.j2
│   └── nginx8.conf.j2
└── vars
    └── main.yml

4 directories, 9 files

#在playbook中调用角色
vim /data/ansible/role_nginx.yml
---
#nginx role
- hosts: websrvs

  roles:
    - role: nginx

#运行playbook
ansible-playbook  /data/ansible/role_nginx.yml
12.10.5.2 案例2:实现mysql5.6
[root@ansible ~]#cat /data/ansible/roles/mysql/files/my.cnf
[mysqld]
socket=/tmp/mysql.sock
user=mysql
symbolic-links=0
datadir=/data/mysql
innodb_file_per_table=1
log-bin
pid-file=/data/mysql/mysqld.pid

[client]
port=3306
socket=/tmp/mysql.sock

[mysqld_safe]
log-error=/var/log/mysqld.log

[root@ansible ~]#cat /data/ansible/roles/mysql/files/secure_mysql.sh
#!/bin/bash
/usr/local/mysql/bin/mysql_secure_installation <<EOF

y
magedu
magedu
y
y
y
y
EOF

[root@ansible ~]#chmod +x  /data/ansible/roles/mysql/files/secure_mysql.sh

[root@ansible ~]#ls /data/ansible/roles/mysql/files/
my.cnf  mysql-5.6.46-linux-glibc2.12-x86_64.tar.gz  secure_mysql.sh

[root@ansible ~]#cat /data/ansible/roles/mysql/tasks/main.yml
- include: install.yml
- include: group.yml
- include: user.yml
- include: unarchive.yml
- include: link.yml
- include: data.yml
- include: config.yml
- include: service.yml
- include: path.yml
- include: secure.yml

[root@ansible ~]#cat /data/ansible/roles/mysql/tasks/install.yml
- name: install packages
  yum: name=libaio,perl-Data-Dumper,perl-Getopt-Long
[root@ansible ~]#cat /data/ansible/roles/mysql/tasks/group.yml
- name: create mysql group
  group: name=mysql gid=306
[root@ansible ~]#cat /data/ansible/roles/mysql/tasks/user.yml
- name: create mysql user
  user: name=mysql uid=306 group=mysql shell=/sbin/nologin system=yes create_home=no home=/data/mysql
[root@ansible ~]#cat /data/ansible/roles/mysql/tasks/unarchive.yml
- name: copy tar to remote host and file mode
  unarchive: src=mysql-5.6.46-linux-glibc2.12-x86_64.tar.gz dest=/usr/local/ owner=root group=root
[root@ansible ~]#cat /data/ansible/roles/mysql/tasks/link.yml
- name: mkdir /usr/local/mysql
  file: src=/usr/local/mysql-5.6.46-linux-glibc2.12-x86_64 dest=/usr/local/mysql state=link
[root@ansible ~]#cat /data/ansible/roles/mysql/tasks/data.yml
- name: data dir
  shell: chdir=/usr/local/mysql/  ./scripts/mysql_install_db --datadir=/data/mysql --user=mysql
[root@ansible ~]#cat /data/ansible/roles/mysql/tasks/config.yml
- name: config my.cnf
  copy: src=my.cnf  dest=/etc/my.cnf
[root@ansible ~]#cat /data/ansible/roles/mysql/tasks/service.yml
- name: service script
  shell: /bin/cp /usr/local/mysql/support-files/mysql.server /etc/init.d/mysqld;chkconfig --add mysqld;chkconfig mysqld on;/etc/init.d/mysqld start

[root@ansible ~]#cat /data/ansible/roles/mysql/tasks/path.yml
- name: PATH variable
  copy: content='PATH=/usr/local/mysql/bin:$PATH' dest=/etc/profile.d/mysql.sh

[root@ansible ~]#cat /data/ansible/roles/mysql/tasks/secure.yml
- name: secure script
  script: secure_mysql.sh

[root@ansible ~]#tree /data/ansible/roles/mysql/
/data/ansible/roles/mysql/
├── files
│   ├── my.cnf
│   ├── mysql-5.6.46-linux-glibc2.12-x86_64.tar.gz
│   └── secure_mysql.sh
└── tasks
    ├── config.yml
    ├── data.yml
    ├── group.yml
    ├── install.yml
    ├── link.yml
    ├── main.yml
    ├── path.yml
    ├── secure.yml
    ├── service.yml
    ├── unarchive.yml
    └── user.yml

2 directories, 14 files

[root@ansible ~]#cat /data/ansible/mysql_roles.yml
- hosts: dbsrvs
  remote_user: root

  roles:
    - {role: mysql,tags: ["mysql","db"]}
    - {role: nginx,tage: ["nginx","web"]}

[root@ansible ~]#ansible-playbook -t mysql /data/ansible/mysql_roles.yml

若有收获,就点个赞吧
0 人点赞
