第九章 Nginx的虚拟主机实战
9.1 什么是虚拟主机
说起虚拟主机,想必对于程序猿来说,这个东西并不陌生。阿里云,腾讯云,百度云等云服务器厂商都提供虚拟主机服务,使得普通人可以以很低的价格拥有自己的主机,我们可以搭建自己的网站,博客等。
那么究竟是什么是虚拟主机呢?不知道大家是不是真正的理解这个概念。
我们看一下维基百科对虚拟主机的解释:
虚拟主机(英语:virtual hosting)或称共享主机(shared web hosting),又称虚拟服务器,是一种在单一主机或主机群上,实现多网域服务的方法,可以运行多个网站或服务的技术。虚拟主机之间完全独立,并可由用户自行管理,虚拟并非指不存在,而是指空间是由实体的服务器延伸而来,其硬件系统可以是基于服务器群,或者单个服务器。
其实简单的来说,虚拟主机就是多个网站使用同一个物理服务器,每一个服务器都可以单独的向外界提供服务,互不影响。虚拟主机之间完全独立,在外界看来,每一台虚拟主机都和一台独立的主机表现的完全一致。
虚拟主机的出现,对互联网来说是一个非常重要的贡献,由于可以让多个虚拟主机共享一台物理主机的所有资源,所以让每个用户承担的成本也大大的降低了。
Nginx作为一个广泛应用的Web服务器,支持三种形式的虚拟主机配置:
- 基于端口号的主机配置
- 基于
ip的主机配置 - 基于域名的主机配置
我们逐个介绍这几种配置方式。
9.2 基于端口号的主机配置
所谓基于端口的主机配置就是多个虚拟主机的ip地址相同,但是他们的端口不同,我们可以通过端口号来访问不同的虚拟主机。
我们以8081, 8082,8083三个端口为例来了解这种配置。
1、为每一个端口号创建目录
1. 在/usr/local/nginx/html/目录下面创建port子目录2. 在port下面创建8081,8082,8083三个子目录、3. 每个子目录分别创建各个端口的index文件
[root@nginx-07 html]# cd /usr/local/nginx/html/[root@nginx-07 html]# mkdir -p port[root@nginx-07 html]# cd port/[root@nginx-07 port]# mkdir -p 8081 8082 8083[root@nginx-07 port]# tree /usr/local/nginx/html/port//usr/local/nginx/html/port/├── 8081├── 8082└── 80833 directories, 0 files[root@nginx-07 port]# echo "8081 port" > 8081/index.html[root@nginx-07 port]# echo "8082 port" > 8082/index.html[root@nginx-07 port]# echo "8083 port" > 8083/index.html[root@nginx-07 port]# tree /usr/local/nginx/html/port//usr/local/nginx/html/port/├── 8081│ └── index.html├── 8082│ └── index.html└── 8083└── index.html3 directories, 3 files
2、修改配置文件
修改/usr/local/nginx/conf目录下面的nginx.conf文件,如下:
server {listen 8081;server_name localhost;location / {root html/port/8081/;index index.html index.htm;}error_page 500 502 503 504 /50x.html;location = /50x.html {root html;}}server {listen 8082;server_name localhost;location / {root html/port/8082/;index index.htm index.html;}error_page 500 502 503 504 /50x.html;location = /50x.html {root html;}}server {listen 8083;server_name localhost;location / {root html/port/8083/;index inde.htm index.html;}error_page 500 502 503 504 /50x.html;location = /50x.html {root html;}}
3、启动nginx并进行请求
我们启动nginx之后,查看系统的端口情况如下: 可以看到,三个端口都已经被监听了。
[root@nginx-07 sbin]# ss -lntp|grep nginxLISTEN 0 128 *:8081 *:* users:(("nginx",pid=29853,fd=10),("nginx",pid=20542,fd=10))LISTEN 0 128 *:8082 *:* users:(("nginx",pid=29853,fd=11),("nginx",pid=20542,fd=11))LISTEN 0 128 *:8083 *:* users:(("nginx",pid=29853,fd=12),("nginx",pid=20542,fd=12))
4、测试端口
我们可以通过curl命令测试各个端口,如下:
[root@nginx-07 sbin]# curl http://localhost:8081/index.html8081 port[root@nginx-07 sbin]# curl http://localhost:8082/index.html8082 port[root@nginx-07 sbin]# curl http://localhost:8083/index.html8083 port
9.3 基于IP的虚拟主机
所谓基于IP的虚拟主机就是将虚拟主机绑定到不同的IP地址。我们可以通过不同的IP地址访问不同的虚拟主机。但是这种模式企业里面用的比较少,所以我们只需要了解一下即可。
1、配置IP
一般情况下,我们自己的电脑都只会有最多两个网卡,这个时候我们可以使用ifconfig命令来增加几个虚拟网卡来完成本次实验。如下: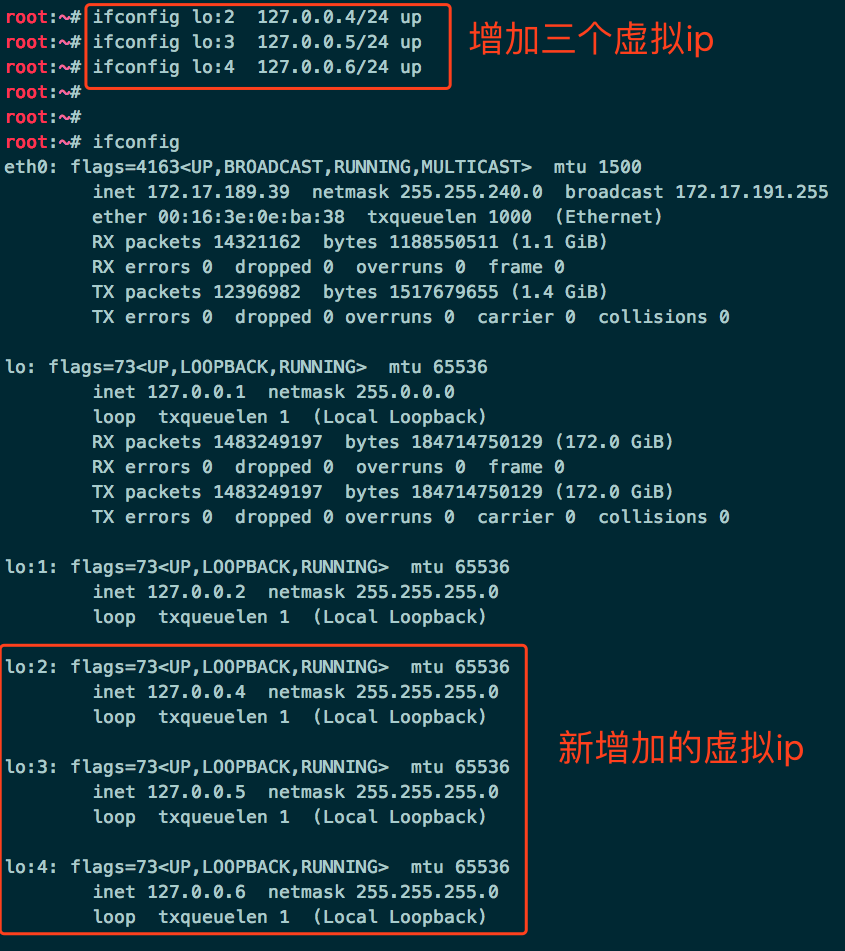
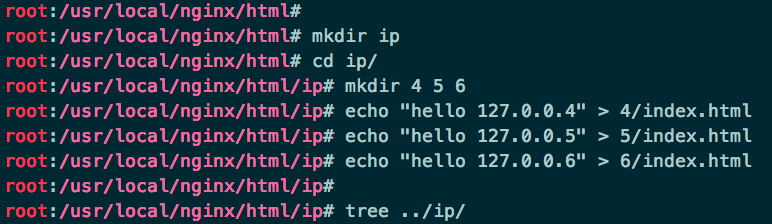
2、为每个IP设置目录
3、修改配置文件
针对每一个IP,设置配置文件: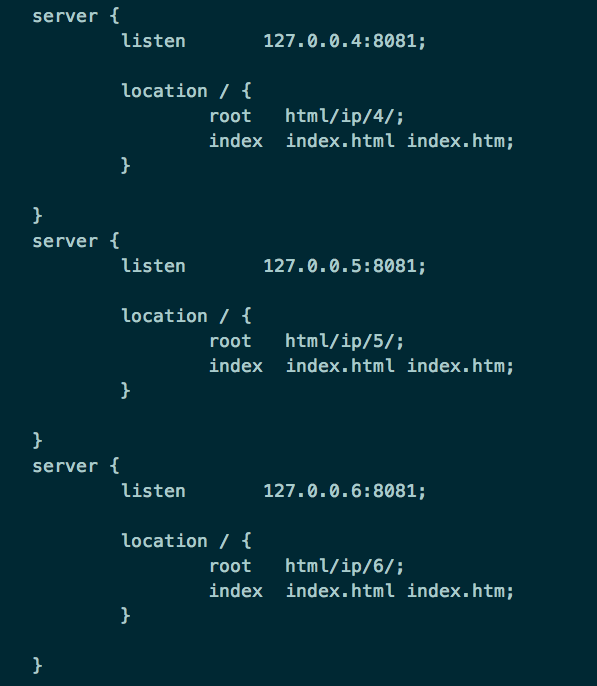
4、测试各个IP
启动Nginx,并使用不同的IP进行访问,得到的结果如下: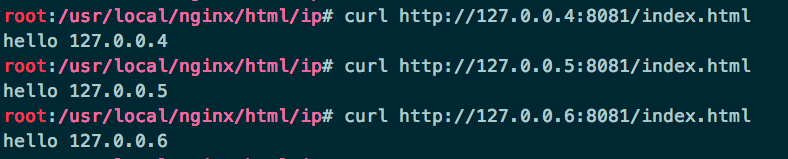
9.4 基于域名的虚拟主机
所谓基于域名的虚拟主机是非常广泛的一种使用方式,绝大多数公司都是使用该种方式配置的虚拟主机。
1、配置域名
在/etc/hosts文件中配置三个域名,分别如下:
[root@nginx-07 sbin]# cat /etc/hosts127.0.0.1 www.hr.com127.0.0.1 www.platmis.com127.0.0.1 www.napi.com
2、为域名创建目录
我们为每个域名创建一个单独的目录,创建index文件,如下:
[root@nginx-07 html]# mkdir -p domain[root@nginx-07 html]# cd domain[root@nginx-07 domain]# mkdir -p hr platmis napi[root@nginx-07 domain]# echo "hello www.hr.com" > hr/index.html[root@nginx-07 domain]# echo "hello www.platmis.com" > platmis/index.html[root@nginx-07 domain]# echo "hello www.napi.com" > napi/index.html[root@nginx-07 domain]# tree.├── hr│ └── index.html├── napi│ └── index.html└── platmis└── index.html3 directories, 3 files
3、修改配置文件
对上面三个虚拟主机进行配置,如下:
user nobody;worker_processes 1;events {worker_connections 1024;}http {include mime.types;default_type application/octet-stream;sendfile on;keepalive_timeout 65;server {listen 80;server_name www.hr.com;location / {root html/domain/hr/;index index.html index.htm;}error_page 500 502 503 504 /50x.html;location = /50x.html {root html;}}server {listen 80;server_name www.platmis.com;location / {root html/domain/platmis/;index index.htm index.html;}error_page 500 502 503 504 /50x.html;location = /50x.html {root html;}}server {listen 80;server_name www.napi.com;location / {root html/domain/napi/;index inde.htm index.html;}error_page 500 502 503 504 /50x.html;location = /50x.html {root html;}}}
我们对三个域名都监听了相同的IP地址和端口号。
4、测试域名
重启nginx之后,查看80端口,如下:
[root@nginx-07 conf]# ss -lntp|grep nginxLISTEN 0 128 *:80 *:* users:(("nginx",pid=31139,fd=7),("nginx",pid=20542,fd=7))
可以看到,nginx监听了80端口,我们分别测试三个域名:
[root@nginx-07 conf]# curl http://www.hr.com/index.htmlhello www.hr.com[root@nginx-07 conf]# curl http://www.platmis.com/index.htmlhello www.platmis.com[root@nginx-07 conf]# curl http://www.napi.com/index.htmlhello www.napi.com
从结果中可以看到,虽然三个域名监听了相同的IP地址和端口号,但是通过域名进行访问的时候,nginx可以完美的区分不同的域名。
在本文中,我们介绍了Nginx支持的三种虚拟主机形式,根据我个人的经验来看,几乎所有的公司使用的都是最后一种,也就是基于域名的主机配置方式,这些东西并不难,大家注重理解就可以了。

若有收获,就点个赞吧
0 人点赞
