主从介绍
MySQL主从又叫做Replication、AB复制。简单讲就是A和B两台机器做主从后,在A上写数据,另外一台B也会跟着写数据,两者数据实时同步的。
MySQL主从是基于binlog的,主上须开启binlog才能进行主从。
主从过程大致有3个步骤:
1)主将更改操作记录到binlog里
2)从将主的binlog事件(sql语句)同步到从本机上并记录在relaylog里中继日志
3)从根据relaylog里面的sql语句按顺序执行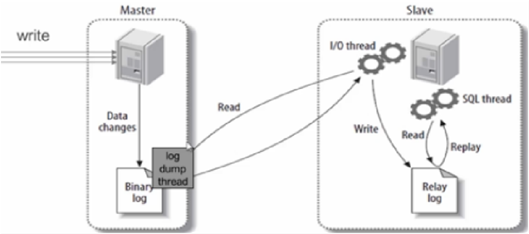
- 主服务器上有一个log dump线程,用来和从的I/O线程传递binlog;
- 从服务器上有两个线程,其中I/O线程用来同步主的binlog并生成relaylog,另外一个SQL线程用来把relaylog里面的sql语句落地。
使用场景
1、数据的备份。
单纯的读。当主服务器损坏,从服务器可以顶替
2、主从同时被使用
当主的服务器压力过大,从节点也被用来读数据。配置
准备
| 主机名 | IP | MySQL版本 | centos版本 | | —- | —- | —- | —- | | server | 192.168.200.50 | mysql-5.6.47-linux-glibc2.12-x86_64.tar.gz | centos7.2-1511 | | client | 192.168.200.40 | | |
过程
主节点配置
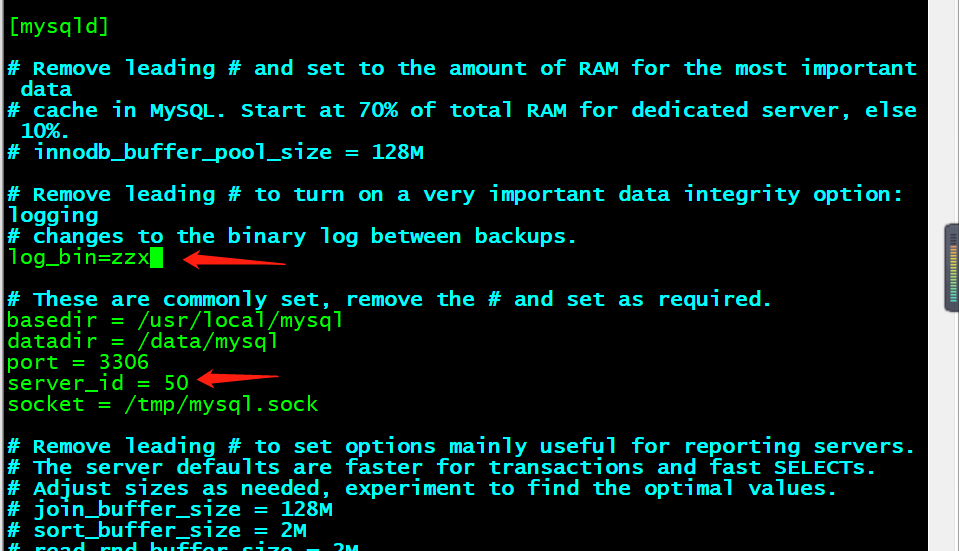
# .err结尾的文件为错误日志[root@server ~]# ls -a /data/mysql/. ibdata1 lnmp.err performance_schema test.. ib_logfile0 lnmp.pid server.errauto.cnf ib_logfile1 mysql server.pid# 修改配置文件 /etc/my.cnf 确定有log_bin 和server_id[root@server ~]# vim /etc/my.cnflog_bin=zzxserver_id = 50[root@server ~]# service mysqld restartShutting down MySQL.. SUCCESS!Starting MySQL. SUCCESS!# 可以看到多出log_bin名为开头的两个文件,zzx.000001、zzx.index# 这两个文件为bin_log文件和索引文件 可以参考流程图[root@server ~]# ls -a /data/mysql/. ibdata1 lnmp.err performance_schema test.. ib_logfile0 lnmp.pid server.err zzx.000001auto.cnf ib_logfile1 mysql server.pid zzx.index# 备份mysql库(加入环境变量)[root@lnmp ~]# mysqldump -uroot -p123456 mysql > /tmp/mysql.sqlWarning: Using a password on the command line interface can be insecure.# 创建一个库保存数据[root@lnmp ~]# mysql -uroot -p123456 -e "create database kei"Warning: Using a password on the command line interface can be insecure.# 将mysql库恢复成新建的库,作为测试数据[root@lnmp ~]# mysql -uroot -p123456 kei < /tmp/mysql.sqlWarning: Using a password on the command line interface can be insecure.# 创建主从用户 权限[root@lnmp ~]# mysql -uroot -p123456mysql> grant replication slave on *.* to 'repl'@192.168.200.40 identified by '000000';mysql> flush privileges;mysql> show master status;+------------+----------+--------------+------------------+-------------------+| File | Position | Binlog_Do_DB | Binlog_Ignore_DB | Executed_Gtid_Set |+------------+----------+--------------+------------------+-------------------+| zzx.000001 | 410 | | | |+------------+----------+--------------+------------------+-------------------+


从节点配置
# 从节点修改配置文件,确保有server_id 这个字段,我这里直接克隆主节点# 字段id不要一样,一般以ip最后一位结尾[root@client ~]# vim /etc/my.cnfserver_id = 50[root@lnmp ~]# mysql -uroot -p123456mysql> stop slave;# 在主上将文件拷贝到从上,并在从上查看文件大小是否一致[root@lnmp ~]# scp /tmp/mysql.sql root@192.168.200.40:/tmp/The authenticity of host '192.168.200.40 (192.168.200.40)' can't be established.ECDSA key fingerprint is 36:87:11:e2:ab:8e:59:29:54:40:82:00:04:35:c8:88.Are you sure you want to continue connecting (yes/no)? yesWarning: Permanently added '192.168.200.40' (ECDSA) to the list of known hosts.root@192.168.200.40's password:mysql.sql 100% 683KB 683.3KB/s 00:00# 创建一个和主一样的库[root@lnmp ~]# mysql -uroot -p123456 -e "create database kei"Warning: Using a password on the command line interface can be insecure.# 将文件内容导入库[root@lnmp ~]# mysql -uroot -p123456 kei < /tmp/mysql.sqlWarning: Using a password on the command line interface can be insecure.# 创建连接, 主节点信息,bin_log文件名及大小mysql> change master to master_host='192.168.200.50',master_user='repl',master_password='000000',master_log_file='zzx.000001',master_log_pos=410;mysql> start slave;mysql> show slave status\G*************************** 1. row ***************************Slave_IO_State:Master_Host: 192.168.200.50Master_User: replMaster_Port: 3306Connect_Retry: 60Master_Log_File: zzx.000001Read_Master_Log_Pos: 699937Relay_Log_File: lnmp-relay-bin.000001Relay_Log_Pos: 4Relay_Master_Log_File: zzx.000001Slave_IO_Running: NoSlave_SQL_Running: NoReplicate_Do_DB:Replicate_Ignore_DB:Replicate_Do_Table:Replicate_Ignore_Table:Replicate_Wild_Do_Table:Replicate_Wild_Ignore_Table:Last_Errno: 0Last_Error:Skip_Counter: 0Exec_Master_Log_Pos: 699937Relay_Log_Space: 120Until_Condition: NoneUntil_Log_File:Until_Log_Pos: 0Master_SSL_Allowed: NoMaster_SSL_CA_File:Master_SSL_CA_Path:Master_SSL_Cert:Master_SSL_Cipher:Master_SSL_Key:Seconds_Behind_Master: NULLMaster_SSL_Verify_Server_Cert: NoLast_IO_Errno: 0Last_IO_Error:Last_SQL_Errno: 0Last_SQL_Error:Replicate_Ignore_Server_Ids:Master_Server_Id: 0Master_UUID:Master_Info_File: /data/mysql/master.infoSQL_Delay: 0SQL_Remaining_Delay: NULLSlave_SQL_Running_State:Master_Retry_Count: 86400Master_Bind:Last_IO_Error_Timestamp:Last_SQL_Error_Timestamp:Master_SSL_Crl:Master_SSL_Crlpath:Retrieved_Gtid_Set:Executed_Gtid_Set:Auto_Position: 01 row in set (0.00 sec)
测试
# 主节点创建一个库,测试操作在这个库进行[root@lnmp ~]# mysql -uroot -p123456mysql> create database zzx;mysql> show databases;+--------------------+| Database |+--------------------+| information_schema || kei || mysql || performance_schema || test || zzx |+--------------------+6 rows in set (0.00 sec)# 从节点查看同步信息[root@lnmp ~]# mysql -uroot -p123456mysql> show databases;+--------------------+| Database |+--------------------+| information_schema || kei || mysql || performance_schema || test || zzx |+--------------------+6 rows in set (0.01 sec)


Bash
复制代码

若有收获,就点个赞吧
0 人点赞
