容器PaaS平台集成
本章我们主要讲述Jenkins与需求管理平台Jira集成。这篇文章是我根据我们当前团队的情况进行定制的,可能有些内容与大家不太一样。重点是告诉大家如何实现集成?关于细节问题可自由定制。 在这里要告诉大家的是思路。
目录
当前我做实验的集群是 v1.17.0。
部署jenkins
下载github仓库中的yml文件进行部署 文件地址: https://github.com/zeyangli/devops-on-k8s/blob/master/jenkins.yml 创建命令: kubectl create –f jenkins.yml
创建一个Deployment部署jenkins, 保留1个副本。 使用镜像jenkins/jenkins:2.211,开放端口30080,开发slave通信端口30081。volume以hostPath方式挂载到了容器中JENKINS_HOME。
kind: DeploymentapiVersion: apps/v1metadata:labels:k8s-app: jenkinsname: jenkinsnamespace: devopsspec:replicas: 1revisionHistoryLimit: 10selector:matchLabels:k8s-app: jenkinstemplate:metadata:labels:k8s-app: jenkinsnamespace: devopsname: jenkinsspec:hostAliases:- ip: "192.168.1.200"hostnames:- "updates.jenkins-ci.org"containers:- name: jenkinsimage: jenkins/jenkins:2.211imagePullPolicy: Alwaysports:- containerPort: 30080name: webprotocol: TCP- containerPort: 30081name: agentprotocol: TCPresources:limits:cpu: 1000mmemory: 2Girequests:cpu: 500mmemory: 512MilivenessProbe:httpGet:path: /loginport: 30080initialDelaySeconds: 60timeoutSeconds: 5failureThreshold: 12readinessProbe:httpGet:path: /loginport: 30080initialDelaySeconds: 60timeoutSeconds: 5failureThreshold: 12volumeMounts:- name: jenkins-homemountPath: /var/lib/jenkinsenv:- name: JENKINS_HOMEvalue: /var/lib/jenkins- name: JENKINS_OPTSvalue: --httpPort=30080- name: JENKINS_SLAVE_AGENT_PORTvalue: "30081"volumes:- name: jenkins-homehostPath:path: /data/devops/jenkinstype: DirectoryserviceAccountName: jenkins
创建一个service,使用nodePort方式暴露端口
---kind: ServiceapiVersion: v1metadata:labels:k8s-app: jenkinsname: jenkinsnamespace: devopsspec:type: NodePortports:- name: webport: 30080targetPort: 30080nodePort: 30080- name: slaveport: 30081targetPort: 30081nodePort: 30081selector:k8s-app: jenkins
创建RBAC,授权。
---apiVersion: v1kind: ServiceAccountmetadata:labels:k8s-app: jenkinsname: jenkinsnamespace: devops---kind: RoleapiVersion: rbac.authorization.k8s.io/v1beta1metadata:name: jenkinsnamespace: devopsrules:- apiGroups: [""]resources: ["pods","configmaps","namespaces"]verbs: ["create","delete","get","list","patch","update","watch"]- apiGroups: [""]resources: ["pods/exec"]verbs: ["create","delete","get","list","patch","update","watch"]- apiGroups: [""]resources: ["pods/log"]verbs: ["get","list","watch"]- apiGroups: [""]resources: ["secrets"]verbs: ["get"]---apiVersion: rbac.authorization.k8s.io/v1beta1kind: RoleBindingmetadata:name: jenkinsnamespace: devopsroleRef:apiGroup: rbac.authorization.k8s.iokind: Rolename: jenkinssubjects:- kind: ServiceAccountname: jenkinsnamespace: devops
静态slave
静态slave是在Kubernetes中创建一个固定的pod运行,跟之前我们用VM主机添加agent是一样的。
首先我们登陆Jenkins,创建一个agent,然后获取secret信息。

我们创建一个Deployment部署slave。在这里使用的镜像是jenkinsci/jnlp-slave:3.36-1,我在这里挂载了Docker和kubectl方便在pod中构建镜像和使用kubectl命令。挂载本地的一个目录用于workspace。 定义了环境变量JENKINS_URL,JENKINS_SECRET,JENKINS_AGENT_NAME,JENKINS_AGENT_WORKDIR。
---kind: DeploymentapiVersion: apps/v1metadata:labels:k8s-app: jenkinsagentname: jenkinsagentnamespace: devopsspec:replicas: 1revisionHistoryLimit: 10selector:matchLabels:k8s-app: jenkinsagenttemplate:metadata:labels:k8s-app: jenkinsagentnamespace: devopsname: jenkinsagentspec:containers:- name: jenkinsagentimage: jenkinsci/jnlp-slave:3.36-1securityContext:privileged: trueimagePullPolicy: IfNotPresentresources:limits:cpu: 1000mmemory: 2Girequests:cpu: 500mmemory: 512MivolumeMounts:- name: jenkinsagent-workdirmountPath: /home/jenkins/workspace- name: buildtoolsmountPath: /home/jenkins/buildtools- name: dockersockmountPath: "/var/run/docker.sock"- name: dockercmdmountPath: /usr/bin/docker- name: kubectlconfigmountPath: /home/jenkins/.kube/config- name: kubectlcmdmountPath: /usr/bin/kubectlenv:- name: JENKINS_URLvalue: http://192.168.1.200:30080- name: JENKINS_SECRETvalue: 5639cac0bf16bf15735d44bc435793417365f4dfa8fc72fb12737f3787091ae8- name: JENKINS_AGENT_NAMEvalue: build01- name: JENKINS_AGENT_WORKDIRvalue: /home/jenkins/workspacevolumes:- name: jenkinsagent-workdirhostPath:path: /data/devops/jenkins/workspacetype: Directory- name: buildtoolshostPath:path: /usr/local/buildtoolstype: Directory- name: kubectlconfighostPath:path: /root/.kube/config- name: kubectlcmdhostPath:path: /usr/bin/kubectl- name: dockersockhostPath:path: /var/run/docker.sock- name: dockercmdhostPath:path: /usr/bin/docker
动态slave
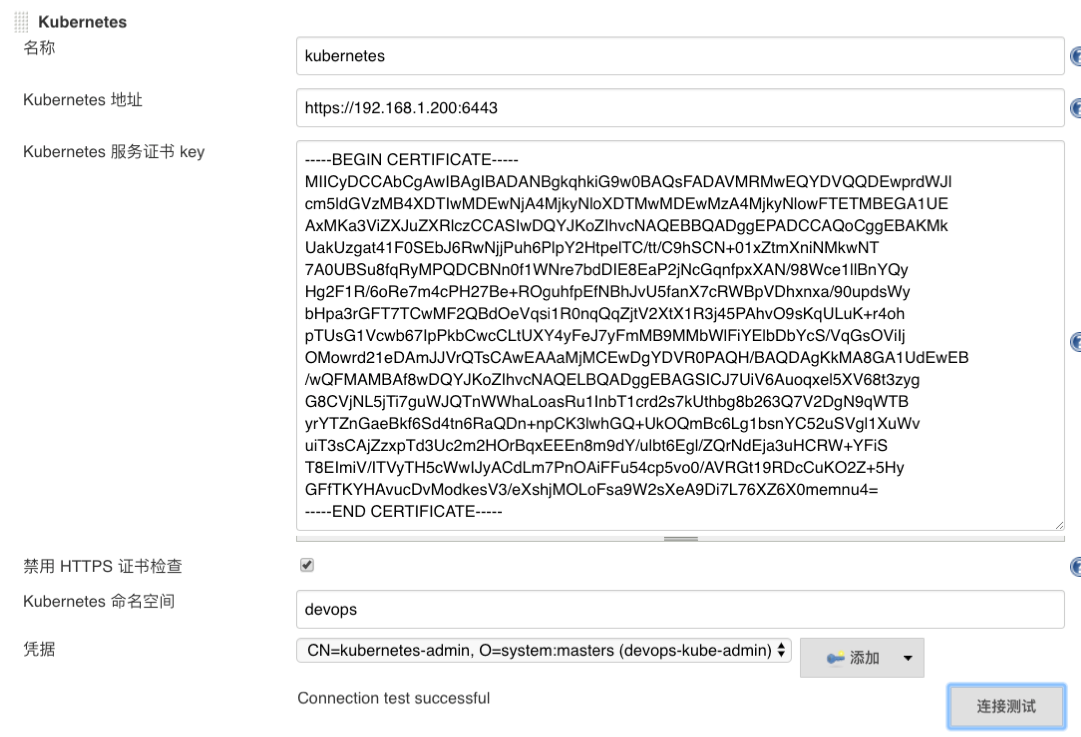
安装kubernetes插件(安装完成后最好重启一下)。配置插件信息 系统设置 -> 最后面 Cloud ->增加一个云。
制作Kubernetes证书
- 进入集群服务器 .kube/config
- 复制config文件中的certificate-authority-data内容,生成base64文件 ca.crt
- 复制config文件中的client-certificate-data内容,生成base64文件 client.crt
复制config文件中的client-key-data内容,生成base64文件 client.key
- echo zzzzzzzzz | base64 –d > client.key
生成证书(会输入密码需要记住后面jenkins需要配置)
- openssl pkcs12 -export -out cert.pfx -inkey client.key -in client.crt -certfile ca.crt
- 下载证书 cert.pfx
Jenkins新建凭据
新建凭据 证书类型 上传刚刚下载的证书。并输入证书密码

将ca.crt 内容复制到 服务证书key 选择证书凭据 测试连接
编写Jenkinsfile测试
文件地址: https://github.com/zeyangli/devops-on-k8s/blob/master/jenkinsfile/jenkinsslave.jenkinsfile
关于Jenkinsfile的写法还有一种使用podtemplate感觉只是对yaml做了包装,学习成本高于原生yaml。所以这里直接使用了yaml定义的。
pipeline{agent{kubernetes{label "test01"cloud 'kubernetes'yaml '''---kind: PodapiVersion: v1metadata:labels:k8s-app: jenkinsagentname: jenkinsagentnamespace: devopsspec:containers:- name: jenkinsagentimage: jenkinsci/jnlp-slave:3.36-1imagePullPolicy: IfNotPresentresources:limits:cpu: 1000mmemory: 2Girequests:cpu: 500mmemory: 512MivolumeMounts:- name: jenkinsagent-workdirmountPath: /home/jenkins/workspace- name: buildtoolsmountPath: /home/jenkins/buildtoolsenv:- name: JENKINS_AGENT_WORKDIRvalue: /home/jenkins/workspacevolumes:- name: jenkinsagent-workdirhostPath:path: /data/devops/jenkins/workspacetype: Directory- name: buildtoolshostPath:path: /usr/local/buildtoolstype: Directory'''}}stages{stage("test"){steps{script{sh "sleep 30"}}}}}
赶快运行一下吧! 相信你已经成功了。

若有收获,就点个赞吧
0 人点赞
