需求管理平台集成
本章我们主要讲述Jenkins与需求管理平台Jira集成。这篇文章是我根据我们当前团队的情况进行定制的,可能有些内容与大家不太一样。重点是告诉大家如何实现集成?关于细节问题可自由定制。 在这里要告诉大家的是思路。
目录
在这里先说一下,当前的现状。我们使用Jira的Git插件能够实现在Jira上面新建Gitlab分支(实现需求与代码基线关联),这个操作需要手动完成。使用Jira中的Git插件实现集成,能够实现在Jira系统对应的任务下面创建分支,或开发人员在创建分支的时候分支名称包含Jira ID则可以自动关联。 通过上面的描述你应该发现了存在的一些问题,例如:插件不稳定,资源消耗大。手动创建分支,增加了人员成本。
来我们先看下当前的分支策略(每个团队可能会有自己的一套分支策略)。
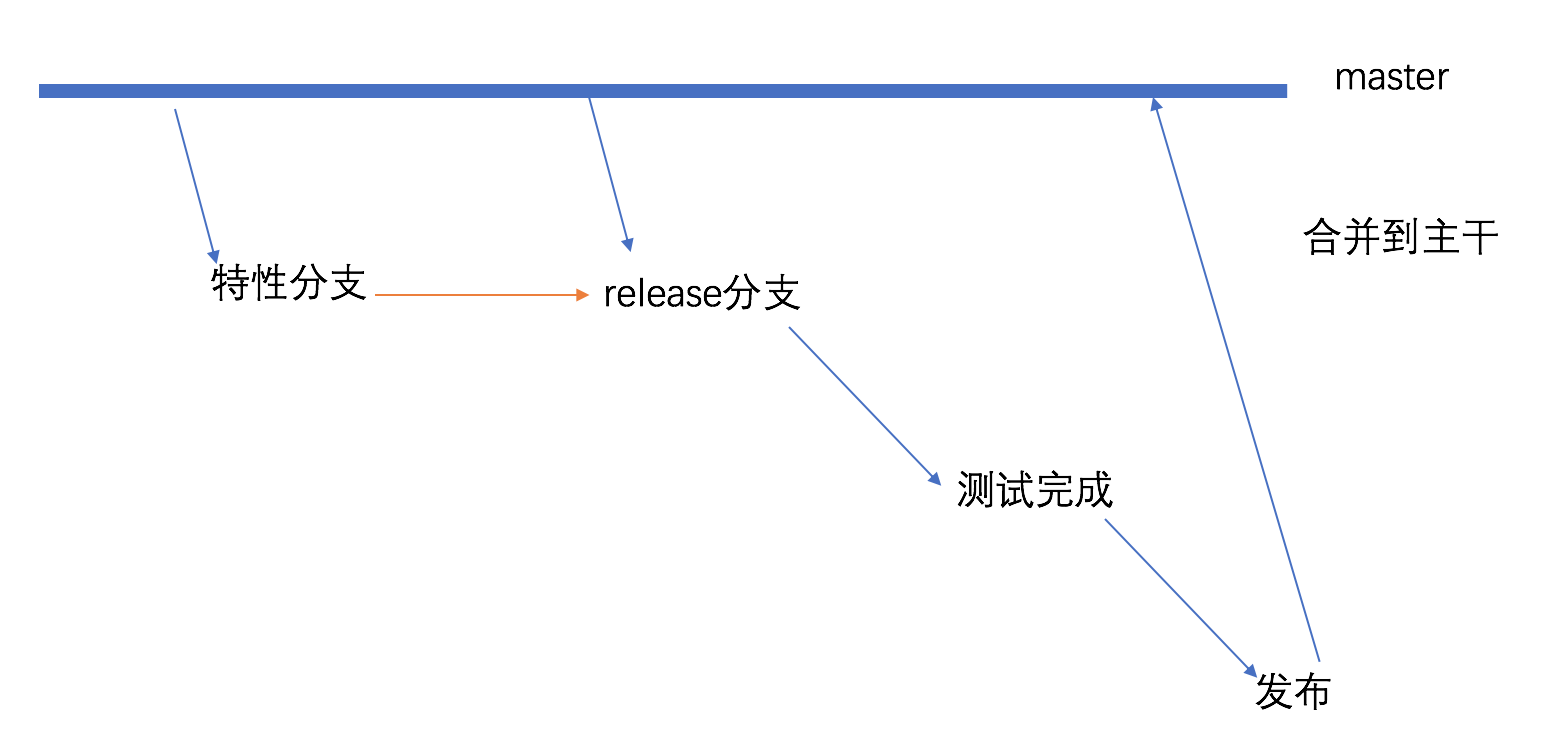
开发人员在特性分支进行开发,基于master分支创建一个版本分支(用于发布)。特性分支在特性环境验证通过后,将特性分支合并到版本分支,此时通过版本分支进行UAT测试环境、STAG预生产环境验证测试,测试通过通过版本分支发布PROD生产环境。生产环境发布完成后,将版本分支合并到master分支。
为解决上述问题,制作了改进方案。 我们想实现在Jira中创建故事或者任务(Jira中的issue)时自动在对应的代码库创建分支,故事或者任务在关联到发布(Jira中的release)之后自动在代码库中创建一个release分支和特性分支到release分支的合并请求。
工具链调研分析
其实我们需要配置的是通过Jira的Webhook 触发Jenkins来操作Gitlab系统。主要有三个点:
- Jenkins项目配置触发器接收触发请求
- Jira系统配置webHook触发Jenkins
- Jenkins封装GitlabAPI完成相关操作
Jira调研与分析-webhook
关于Jira的webhook挺强大的几乎所有的事件都能支持,我们进入jira系统的管理页面,选择webhook。
填写配置触发器URL(Jenkins项目触发器地址)、通过JQL(Jira的一种查询语言类似于SQL)配置触发的项目、选择触发事件。


Jira调研与分析-webhookevent
在上面我们知道有webhook的概念,我们来分析要完成我们的需求所需要的事件类型。其实这些数据是在webhook中传递。Jira的事件类型如上图所示有很多,在这里我们用到了 问题创建jira:issue_created、问题更新jira:issue_update。
- 创建任务或者故事属于
jira:issue_created事件。 - 任务或者故事关联上版本属于
jira:issue_updated事件。
来一起看下Jira的webhook传递的JSON数据,如下图所示:
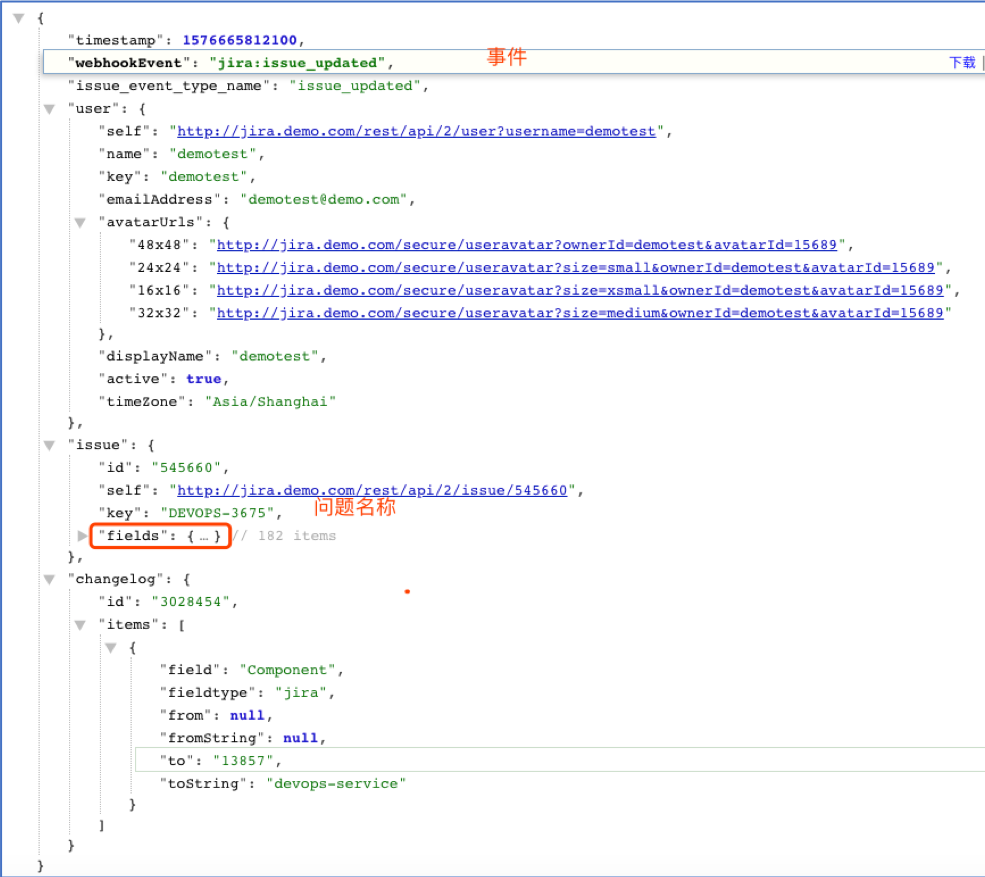
到此可以总结为Jira的功能已经完全满足了我们的需求。
Gitlab调研与分析
关于Gitlab要做的事情有2点,分别为:
- 创建分支(branch)
- 创建合并请求(merge request)
我们可以参考Gitlab的接口文档 https://docs.gitlab.com/ce/api/api_resources.html, 找出我们所需要的API。如下所示:
# 获取项目ID接口api/v4/projects?search=projectName# 创建分支接口api/v4/projects/${projectId}/repository/branches?branch=${newBranch}&ref=${refBranch}# 创建合并请求接口api/v4/projects/${projectId}/merge_requests
{{% notice info %}}
我们找到了以上三个接口,是不是疑问获取项目ID接口是用来做什么的呢? 其实这个就是用来通过项目名称获取项目的ID的。要想创建分支或者合并请求都是需要项目的ID的。项目名称就是Jira中的模块名称,也就是在Jira创建issue的时候必须要给此issue关联一个模块。后续我们根据此模块名称调用gitlab接口查询获取ID,以便进行后续的操作。
{{% /notice %}}
Jenkins调研与分析- Generic Webhook Trigger
我们使用Generic Webhook Trigger来完成此次任务, 对于Jenkins来说,需要做的有3点:
- 配置触发器接收来自Jira的请求
- 分析Jira请求中传递的数据
- 封装Gitlab API完成相关操作
分析数据 获取hook中参数-获取问题名称-获取模块名称等数据

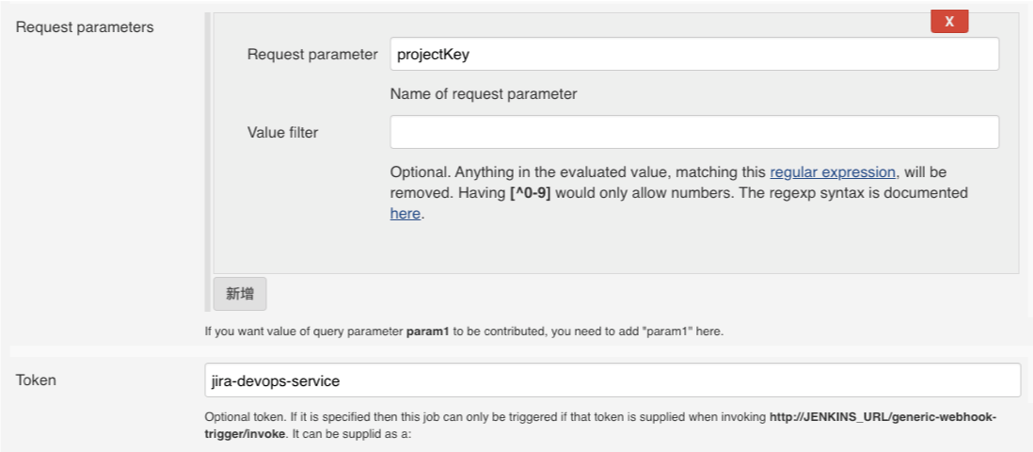
配置触发器 生成项目唯一Token-使用项目名称标识

配置触发过滤器 过滤触发请求-限制只有故事任务等触发(在Jira中issue类型有很多种,这里可以灵活定义)

实践
上面的技术点你是否清楚了呢? 接下来我们要上战场实践了。
创建issue自动创建gitlab分支
我想大概过程是这样的:
- Jira: 我来创建与gitlab项目名称一致的模块。然后我来创建issue关联上模块。
- 此时通过webhook触发了Jenkins的项目。
- Jenkins: 我来接收来自Jira的请求,我在请求中获取到
issueName,components等参数。 - Jenkins: 通过gitlab查询项目接口根据
components来获取gitlab项目的ID。 - Jenkins: 然后根据以获取的项目ID和
issueName参数,通过gitlab创建分支接口创建分支。
技术实现细节是这样的
要想实现在gitlab中创建分支,接口我们已经找到了,但是如何获取每个issue所关联的项目名称呢?我们自己维护一个关系表?当一个issue需要关联多个项目呢? 此时我们需要用到jira中的模块。使用jira中的模块来作为gitlab中的项目(命名一致),我们在创建issue的同时需要关联模块(必须关联,否则创建不了哦)。所以第一件事情是在Jira中创建模块,模块命名同Gitlab项目名称
此时我创建了一个模块demo-maven-service(我的gitlab项目名称也是这个)

然后我(Jira)来创建issues,我创建一个任务,然后关联demo-maven-service模块 。此时证明:这个任务关联的是demo-maven-service这个代码库。也就是我要在demo-maven-service项目下创建一个issueName同名的分支(特性分支)。

触发Jenkins项目: Jenkins 根据模块(components)在对应的仓库中创建分支(IssueName)。JIRA更新issues,Jenkins 根据模块(components)在对应的仓库中创建分支(issuesName)。

我的Jenkinsfile内容如下: 在这里我引入了我们自己封装好的gitlab.groovy,首先第一个步骤是FileterData分析数据,写了一个 switch语句来根据不同的event来获取不同的数据。jira:issue_created问题创建事件,我们需要获取的参数有问题名称、触发人、关联模块、关联版本。 然后第二个步骤是CreateBranch,我们通过gitlab的接口获取项目的ID,因为一个issue可能关联多个模块,所以这里是个list列表,后面遍历这个列表然后创建在对应的项目中创建分支。
#!groovy@Library('jenkinslibrary') _def gitlab = new org.devops.gitlab()pipeline {agent { node { label "master"}}stages{stage("FileterData"){steps{script{response = readJSON text: """${webHookData}"""println(response)env.eventType = response["webhookEvent"]switch(eventType) {case "jira:issue_created":env.issueName = response['issue']['key']env.userName = response['user']['name']env.moduleNames = response['issue']['fields']['components']env.fixVersion = response['issue']['fields']['fixVersions']currentBuild.description = " Trigger by ${userName} ${eventType} ${issueName} "breakdefault:println("hello")}}}}stage("CreateBranch"){when {anyOf {environment name: 'eventType', value: 'jira:issue_created' //issue 创建 /更新environment name: 'eventType', value: 'jira:issue_updated'}}steps{script{def projectIds = []println(issueName)//获取项目Iddef projects = readJSON text: """${moduleNames}"""for ( project in projects){println(project["name"])projectName = project["name"]currentBuild.description += "\n project: ${projectName}"repoName = projectName.split("-")[0]try {projectId = gitlab.GetProjectID(repoName, projectName)println(projectId)projectIds.add(projectId)} catch(e){println(e)println("未获取到项目ID,请检查模块名称!")}}println(projectIds)for (id in projectIds){println("新建特性分支--> ${id} --> ${issueName}")currentBuild.description += "\n 新建特性分支--> ${id} --> ${issueName}"gitlab.CreateBranch(id,"master","${issueName}")}}}}}}
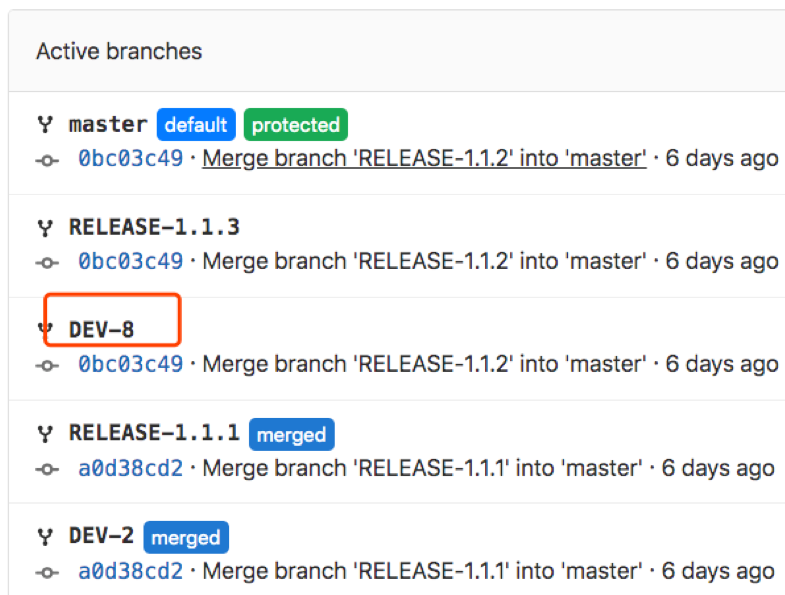
最终效果,登录gitlab进入项目中你应该能够看到跟当前issue同名的一个特性分支。
{{% notice info %}} 为了避免重复创建分支导致流水线失败,我们需要在写gitlab方法时加上一个try catch捕获异常。 {{% /notice %}}
自动创建合并请求
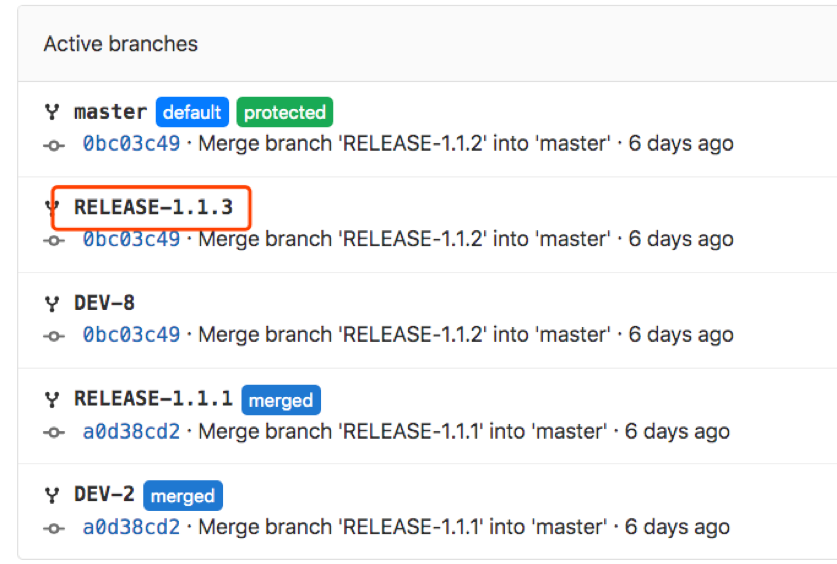
JIRA更新issues到版本中。 Jenkins根据issues中的模块信息,在对应的仓库中创建release分支(fixVersion),并创建特性分支(issueName)到release分支的MR。 jira的issue更新事件有两个情况第一种是增加关联的模块,还有一种是将issue关联了版本。
我们先来创建一个版本
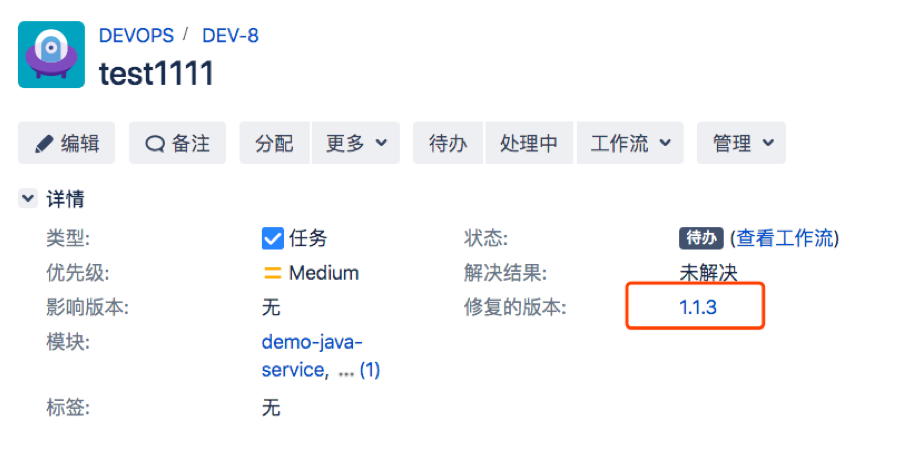
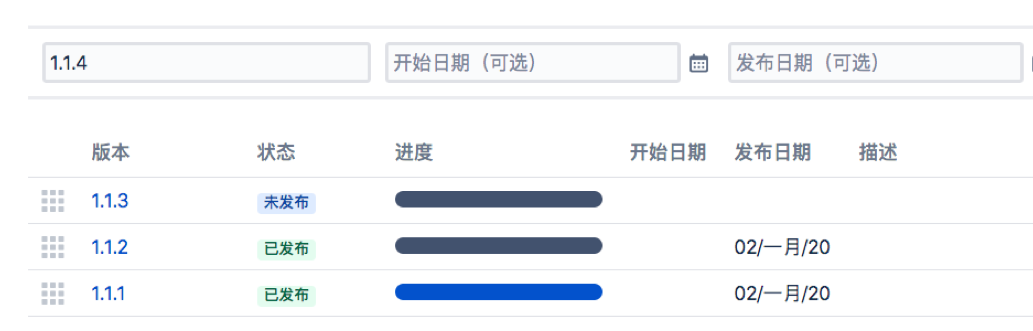 然后将issue关联一个版本
完善Jenkinsfile
@Library('jenkinslibrary') _def gitlab = new org.devops.gitlab()pipeline {agent { node { label "master"}}stages{stage("FileterData"){steps{script{response = readJSON text: """${webHookData}"""println(response)env.eventType = response["webhookEvent"]switch(eventType) {case "jira:issue_created":env.issueName = response['issue']['key']env.userName = response['user']['name']env.moduleNames = response['issue']['fields']['components']env.fixVersion = response['issue']['fields']['fixVersions']currentBuild.description = " Trigger by ${userName} ${eventType} ${issueName} "breakcase "jira:issue_updated":env.issueName = response['issue']['key']env.userName = response['user']['name']env.moduleNames = response['issue']['fields']['components']env.fixVersion = response['issue']['fields']['fixVersions']currentBuild.description = " Trigger by ${userName} ${eventType} ${issueName} "breakdefault:println("hello")}}}}stage("CreateBranchOrMR"){when {anyOf {environment name: 'eventType', value: 'jira:issue_created' //issue 创建 /更新environment name: 'eventType', value: 'jira:issue_updated'}}steps{script{def projectIds = []println(issueName)fixVersion = readJSON text: """${fixVersion}"""println(fixVersion.size())//获取项目Iddef projects = readJSON text: """${moduleNames}"""for ( project in projects){println(project["name"])projectName = project["name"]currentBuild.description += "\n project: ${projectName}"repoName = projectName.split("-")[0]try {projectId = gitlab.GetProjectID(repoName, projectName)println(projectId)projectIds.add(projectId)} catch(e){println(e)println("未获取到项目ID,请检查模块名称!")}}println(projectIds)if (fixVersion.size() == 0) {for (id in projectIds){println("新建特性分支--> ${id} --> ${issueName}")currentBuild.description += "\n 新建特性分支--> ${id} --> ${issueName}"gitlab.CreateBranch(id,"master","${issueName}")}} else {fixVersion = fixVersion[0]['name']println("Issue关联release操作,Jenkins创建合并请求")currentBuild.description += "\n Issue关联release操作,Jenkins创建合并请求 \n ${issueName} --> RELEASE-${fixVersion}"for (id in projectIds){println("创建RELEASE-->${id} -->${fixVersion}分支")gitlab.CreateBranch(id,"master","RELEASE-${fixVersion}")println("创建合并请求 ${issueName} ---> RELEASE-${fixVersion}")gitlab.CreateMr(id,"${issueName}","RELEASE-${fixVersion}","${issueName}--->RELEASE-${fixVersion}")}}}}}}}
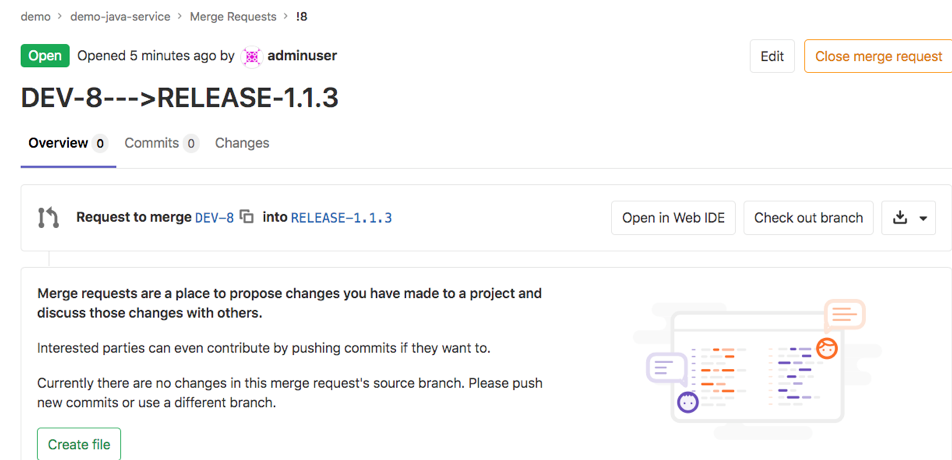
Gitlab效果:查看合并请求
总结
通过以上两个实践,相信你已经知道了如何实现系统间的集成,没错主要是通过webhook和api。 接下来如果有需求可以独立去灵活定义了哦。

若有收获,就点个赞吧
0 人点赞
