Re何为设计?
描述
- 小即是美
- 让每个程序只做好一件事
- 快速建立原型
- 舍弃高效率而取可移植性
- 采取文本来存储数据
- 充分利用软件的杠杆效应(软件复用)
- 使用shell脚本来提高杠杆效应和可移植性
- 避免强制性的用户界面
-
小准则
允许用户定制环境
- 尽量使操作系统内核小而轻量化
- 使用小写字母并尽量简短
- 沉默是金(返回空而不是 ‘no file’)
- 各部分之和大于整体
- 寻求90%的解决方案
五大设计原则
S - 单一职责原则
- 一个程序只做好一件事
- 如果功能过于复杂就拆分开,每个部分保持独立
O - 开放封闭原则
- 对扩展开放, 对修改封闭
- 增加需求时, 扩展新代码,而非修改已有代码
- 这是软件设计的终极目标
L - 李氏置换原则
- 子类能覆盖父类
- 父类能出现的地方子类就能出现
I - 接口独立原则
- 保持接口的单一独立,避免出现“胖接口” (也有例外:外观模式)
- 类似于单一职责原则 ,这里更关注接口
D - 依赖倒置原则
- 面向接口编程,依赖于抽象而不依赖于具体
- 使用方只关注接口而不关注具体类的实现
S0体现较多,详细介绍
LID体现较少,但是要了解其用意
例子: 用Promise来说明SO
result.then(function (img) {console.log('img width', img, width)return img}).then(function (img) {console.log('img.height', img.height)}).catch(function (еx) {//统一捕获异常console. log(ex)})
单一职责原则: 每个then中的逻辑只做好一件事
开放封闭原则: 如果新增需求,扩展then
对扩展开放,对修改封闭
23种设计模式分类
创建型
工厂模式(工厂方法模式,抽象工厂模式,建造者模式)
单例模式
原型模式
结构型
适配器模式
桥接模式
装饰器模式
组合模式
代理模式
享元模式
外观模式
行为型
策略模式
迭代器模式
模板方法模式
职责连模式
观察者模式
命令模式
备忘录模式
中介者模式
状态模式
解释器模式
访问者模式
工厂模式
- 工厂的目的在于判别接口最终用那类来实例化
- 产生实例的过程不用new 关键字
- 最终达到的效果是,多态,和类与类之间的松耦合
场景:
- jQuery $(‘div’)
- React.createElement
- vue异步组件
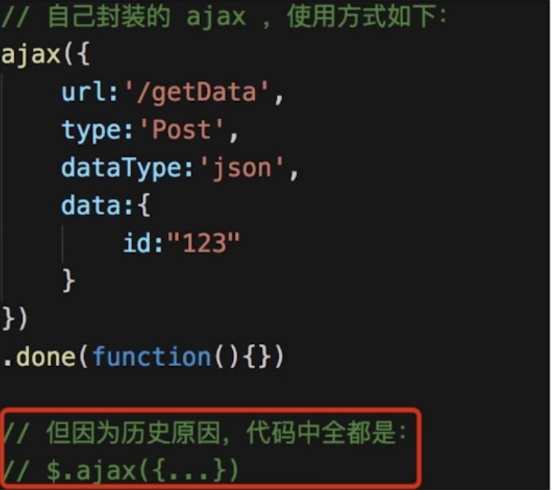
$(‘div’)和 new $(‘div’)有何区别(不使用工厂模式的缺点)?
- 后者书写麻烦,JQuery的链式调用将成噩梦
- 一旦jQuery名字变化,将是灾难的
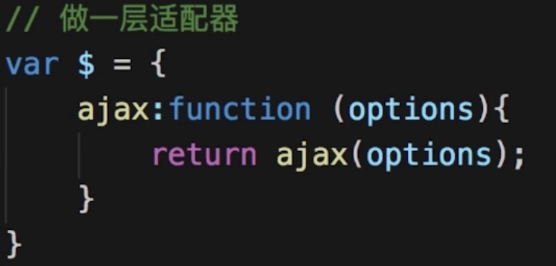
// 1 jQuery工厂模式class jQuery {constructor(selector) {let slice = Array.prototype.slicelet dom = slice.call(document.querySelectorAll(selector))let len = dom ? dom.length : 0for (let i = 0; i < len; i++){this[i] = dom[i]}this.length = lenthis.selector = selector || ''}append (node) {}addClass(name) {}// ......}window.$ = function (selector) {return new jQuery(selector)}// 2 React工厂模式class Vnode (tag, attrs, children) {// ...省略内部代码...}React.createElement = function(tag, attrs, children) {return new Vnode(tag, attrs, children)}// 3 vue异步组件Vue.component('async-example', function (resolve, reject) {setTimeout(() => {resolve({template: '<div>I am async!</div>'})}, 1000)})// 构造函数和创建者分离 符合开放封闭原则
单例模式
- 系统中被唯一使用
- 一个类只有一个实例
场景
- 购物车(登录框)
- vuex和redux中的store
符合单一职责原则
class SingleObject {login() {console.log('login...')}}SingleObject.getInstance = (function () {let instancereturn function () {if (!instance) {instance = new SingleObject();}return instance}})()// 测试const obj1 = SingleObject.getInstance()obj1.login()const obj2 = SingleObject.getInstance()obj2.login()console.log(obj1 === obj2)// let obj3 = new SingleObject() // 严格的说单例模式不能new, js只能这样模拟
适配器模式
旧接口格式和使用者不兼容,中间加一个适配器做转换接口
将旧接口和使用者分离 符合开放封闭原则
class Adaptee {specificRequest() {return '德国标准的插头'}}class Target {constructor () {this.adaptee = new Adaptee()}request () {let info = this.adaptee.specificRequest()return `${info} -> 转换器 -> 中国标准的插头`}}// 测试let target = new Target()target.request()
场景
- 封装旧接口
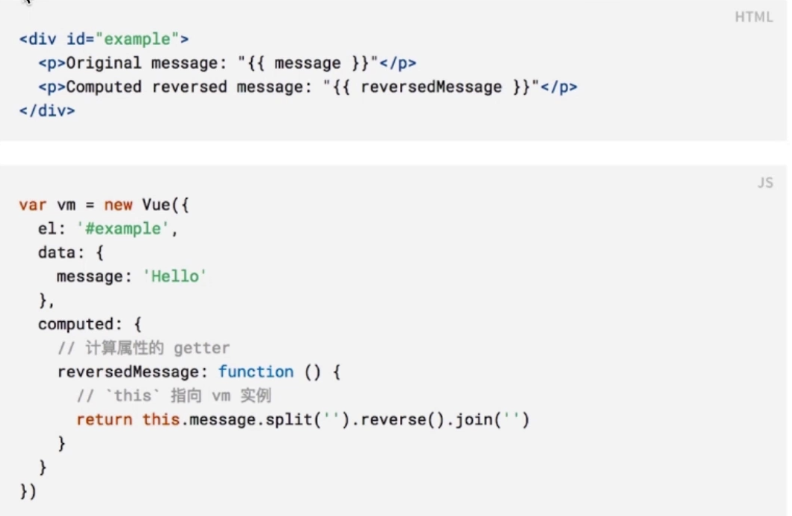
- vue computed方法
装饰器模式
为对象添加新功能
不改变原有的结构和功能
将现有对象和装饰器进行分离,两者独立存在,符合开放封闭原则
场景
- es7装饰器
- core-decrators
- mixin ```javascript @testable class MyTestableClass { // … }
function testable(target) { target.isTestable = true; }
alert(MyTestableClass.isTestable)
// 装饰器的原理 @decorator class A {} // 等同于 class A {} A = decorator(A) || A;
// 装饰器用于方法,添加日志
// 这个示例跑起来需要babel 后面提供附件
// npx babel d.js —out-file d.c.js
// node d.c.js
function log(target, name, descriptor) {
let oldValue = descriptor.value
descriptor.value = function () {
console.log(calling ${name} width, arguments)
return oldValue.apply(this, arguments)
}
return descriptor
}
class MyMath { @log add(a, b) { return a + b } } const m = new MyMath() console.log(m.add(2, 4))
log装饰器案例 [decrator-fn.zip](https://www.yuque.com/attachments/yuque/0/2020/zip/190178/1601120276829-9162089c-1702-400c-a59a-428c7145ce92.zip?_lake_card=%7B%22src%22%3A%22https%3A%2F%2Fwww.yuque.com%2Fattachments%2Fyuque%2F0%2F2020%2Fzip%2F190178%2F1601120276829-9162089c-1702-400c-a59a-428c7145ce92.zip%22%2C%22name%22%3A%22decrator-fn.zip%22%2C%22size%22%3A1566%2C%22type%22%3A%22application%2Fzip%22%2C%22ext%22%3A%22zip%22%2C%22status%22%3A%22done%22%2C%22uid%22%3A%221601120276526-0%22%2C%22progress%22%3A%7B%22percent%22%3A99%7D%2C%22percent%22%3A0%2C%22id%22%3A%22PGMw6%22%2C%22card%22%3A%22file%22%7D)<a name="EC1a4"></a># 代理模式使用者无权访问目标对象<br />中间加代理,通过代理做授权和控制<br />代理类和目标类分离,隔离开目标类和使用者--符合开放封闭原则<br />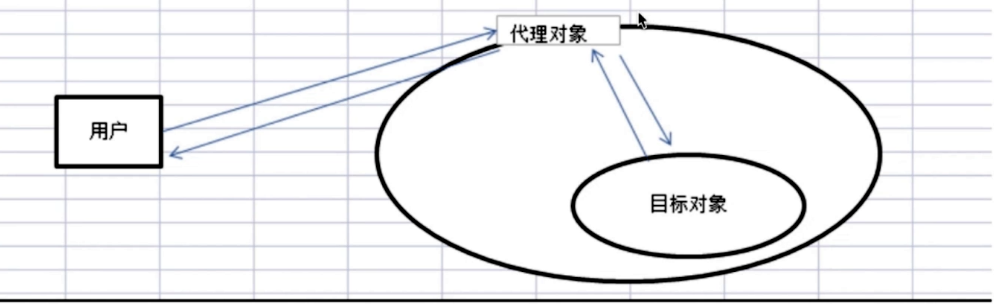<br />示例- 科学上网,访问github.com- 明星经纪人 [proxy.js](https://www.yuque.com/attachments/yuque/0/2020/js/190178/1601264639040-0a4a217b-f030-4add-ac38-5cf16f91d008.js?_lake_card=%7B%22src%22%3A%22https%3A%2F%2Fwww.yuque.com%2Fattachments%2Fyuque%2F0%2F2020%2Fjs%2F190178%2F1601264639040-0a4a217b-f030-4add-ac38-5cf16f91d008.js%22%2C%22name%22%3A%22proxy.js%22%2C%22size%22%3A768%2C%22type%22%3A%22text%2Fjavascript%22%2C%22ext%22%3A%22js%22%2C%22status%22%3A%22done%22%2C%22uid%22%3A%221601264638925-0%22%2C%22progress%22%3A%7B%22percent%22%3A99%7D%2C%22percent%22%3A0%2C%22id%22%3A%22vKKJt%22%2C%22card%22%3A%22file%22%7D)场景- **网页事件代理**- **jQuery $.proxy**- **ES6 Proxy**```javascriptclass ReadImg {constructor(name) {this.fileName = name}display () {console.log('display...' + this.fileName)}loadFromDisk() {console.log('loading...', this.fileName)}}class ProxyImg {constructor(filename) {this.realImg = new ReadImg(filename)}display () {this.realImg.display()}}// testlet proxyImg = new ProxyImg('1.png')proxyImg.display()


代理模式 VS 适配器模式
适配器模式: 提供一个不同的接口(如不同版本的插头)
代理模式: 提供一个模一样的接口
代理模式 VS 装饰器模式
装饰器模式: 扩展功能,原有功能不变且可直接使用
代理模式: 显示原有功能,但是经过限制或者阉割之后的
观察者模式
- 发布&订阅
- 一对多
主题和观察者分离,不是主动触发而是被动监听,两者解耦
class Observer {constructor(name) {this.name = name}update (msg) {console.log(`${this.name} get msg: ${msg}`);}}class Subject {constructor(name) {this.name = namethis.observers = []}addObserver (observer) {this.observers.push(observer)}removeObserver (observer) {this.observers = this.observers.filter(item => item != observer)}notifyAll() {this.observers.forEach(observer => {observer.update(`${this.name} ~ msg by nofifyAll`)})}}var ob1 = new Observer('Alice'),ob2 = new Observer('Bob');var sub = new Subject('winter is coming');sub.addObserver(ob1);sub.addObserver(ob2);sub.notifyAll();sub.removeObserver(ob1)sub.notifyAll();
场景
网页事件绑定
// <button>btn</button>$('#btn1').click(function () {console.log(1)})$('#btn1').click(function () {console.log(2)})
Promise
jQuery callbacks
var callbacks = $.Callbacks()callbacks.add(function (info){console.log('fn1', info)})callbacks.add(function (info) {console.log('fn2', info)})callbacks.fire('google')callbacks.fire('fire')
nodejs自定义事件
const EventEmitter = require('events').EventEmitterconst emitter1 = new EventEmitter()emitter1.on('some', () => {// 监听 some事件console.log('some event is occured 1')})emitter1.on('some', (val) => {// 监听 some事件console.log('some event is occured 2', val)})// 触发some事件emitter1.emit('some', 'hello')
nodejs中 处理http请求;多进程通信
vue和React组件生命周期触发
vue watch
发布订阅模式
和观察者模式很类似,发布订阅模式其实属于广义上的观察者模式。在观察者模式中,观察者需要直接订阅目标事件。在目标发出内容改变的事件后,直接接收事件并作出响应。
而在发布订阅模式中,发布者和订阅者之间多了一个调度中心。调度中心一方面从发布者接收事件,另一方面向订阅者发布事件,订阅者需要在调度中心中订阅事件。通过调度中心实现了发布者和订阅者关系的解耦。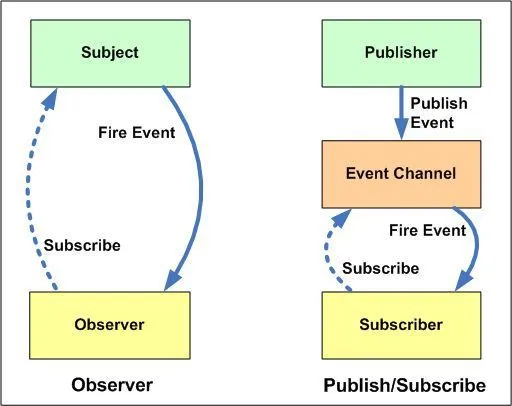
class Publisher {constructor(name) {this.name = namethis.observers = []}addObserver (observer) {this.observers.push(observer)return this}removeObserver (observer) {this.observers = this.observers.filter(item => item !==observer)return this}notifyAllObservers(msg) {this.observers.forEach(observer => {observer.update(msg)})}}class EventChannel {constructor(name) {this.name = namethis.events = {}}addPublisher(eventName, event) {this.events[eventName] = eventreturn this}addEventListener(eventName, person) {this.events[eventName].addObserver(person)return this}removeEventListener(eventName, person) {this.events[eventName].removeObserver(person)return this}notify(eventName, msg) {this.events[eventName].notifyAllObservers(msg)}}class Subscriber {constructor(name) {this.name = name}update (msg) {console.log(`通知 ${this.name} ${msg}`)}}const p1 = new Publisher('e1', '报刊1')const p2 = new Publisher('e2', '报刊2')const ec = new EventChannel('大厅中心')const s1 = new Subscriber('张三')const s2 = new Subscriber('李四')ec.addPublisher('e1', p1)ec.addPublisher('e2', p2)ec.addEventListener('e1', s1)ec.addEventListener('e1', s2)ec.addEventListener('e2', s2)ec.notify('e1', '报刊1更新内容了')ec.notify('e2', '报刊2更新内容了')ec.removeEventListener('e1', s2)ec.notify('e1', '报刊1又有内容更新了')// 以上代码是个人手写的发布订阅模式,如有错误,感谢各位大佬批评指证
参考资料 观察者模式-发布订阅模式-及其实现
迭代器模式
- 顺序访问一个集合
- 使用者无需知道集合的内部结构(封装)
迭代器对象和目标对象进行分离,迭代器将使用者和目标对象隔离开,符合开闭原则
class Iterator {constructor(conatiner) {this.list = conatiner.listthis.index = 0}next() {if (this.hasNext()) {return this.list[this.index++]}return null}hasNext() {if (this.index >= this.list.length) {return false}return true}}class Container {constructor(list) {this.list = list}getIterator() {return new Iterator(this)}}// 测试代码// 遍历数组const container = new Container([1, 2, 3, 4, 5])const iterator = container.getIterator()while(iterator.hasNext()) {console.log(iterator.next())}// 遍历类数组const container2 = new Container({0: 1, 1: 'str', length: 2})const iterator2 = container2.getIterator()while(iterator2.hasNext()) {console.log(iterator2.next())}
场景:
- jQuery each
- ES6 Iterator (Array Map Set String TypedArray arguements NodeList)
状态模式
- 一个对象有状态变化
- 每次状态变化都会触发一个逻辑
- 不能总是使用if.. else来控制
将状态对象和主题对象分离,状态的变化逻辑单独处理
示例
交通信号灯交不同颜色的变化
class State {constructor(color) {this.color = color}handle(context) {console.log(`turn to ${this.color} light`)context.setState(this)}}class Context {constructor() {this.state = null}setState(state) {this.state = state}getState() {return this.state}}// 测试代码let context = new Context()let greed = new State('greed')let yellow = new State('yellow')let red = new State('red')// 绿灯亮了greed.handle(context)console.log(context.getState())// 黄灯亮了yellow.handle(context)console.log(context.getState())// 红灯亮了red.handle(context)console.log(context.getState())
场景
- 有限状态机
- 有限个状态、以及在在写状态之间的变化
- https://github.com/jakesgordon/javascript-state-machine
用水的状态举例子
 ```javascript
// npm install —save-dev javascript-state-machine
const StateMachine = require(‘javascript-state-machine’);
```javascript
// npm install —save-dev javascript-state-machine
const StateMachine = require(‘javascript-state-machine’);
const fsm = new StateMachine({ init: ‘solid’, transitions: [ { name: ‘melt’, from: ‘solid’, to: ‘liquid’ }, { name: ‘freeze’, from: ‘liquid’, to: ‘solid’ }, { name: ‘vaporize’, from: ‘liquid’, to: ‘gas’ }, { name: ‘condense’, from: ‘gas’, to: ‘liquid’ } ], methods: { onMelt: function() { console.log(‘I melted 溶化’) }, onFreeze: function() { console.log(‘I froze 固化’) }, onVaporize: function() { console.log(‘I vaporized 气化’) }, onCondense: function() { console.log(‘I condensed 液化’) } } });
console.log(fsm.state) fsm.melt() console.log(fsm.state)
- 写一个简单的Promise [03-state-machine-2.html](https://www.yuque.com/attachments/yuque/0/2020/html/190178/1601287252117-8c8d4f22-e6b4-4a52-8aaa-80f6d4d81d48.html?_lake_card=%7B%22src%22%3A%22https%3A%2F%2Fwww.yuque.com%2Fattachments%2Fyuque%2F0%2F2020%2Fhtml%2F190178%2F1601287252117-8c8d4f22-e6b4-4a52-8aaa-80f6d4d81d48.html%22%2C%22name%22%3A%2203-state-machine-2.html%22%2C%22size%22%3A2629%2C%22type%22%3A%22text%2Fhtml%22%2C%22ext%22%3A%22html%22%2C%22status%22%3A%22done%22%2C%22uid%22%3A%221601287251798-0%22%2C%22progress%22%3A%7B%22percent%22%3A99%7D%2C%22percent%22%3A0%2C%22id%22%3A%22U0iUj%22%2C%22card%22%3A%22file%22%7D)<a name="FTfoA"></a># 原型模式clone自己生成一个新对象<br />java默认有clone接口,不用自己实现```javascript// 原型 对象const prototype = {getName () {return this.first + ' ' + this.last},say () {console.log('hello')}}// 基于原型创建 xlet x = Object.create(prototype)x.first = 'A'x.last = 'B'console.log(x.getName())x.say()
桥接模式
把抽象化与实现解耦,使二者可以独立变化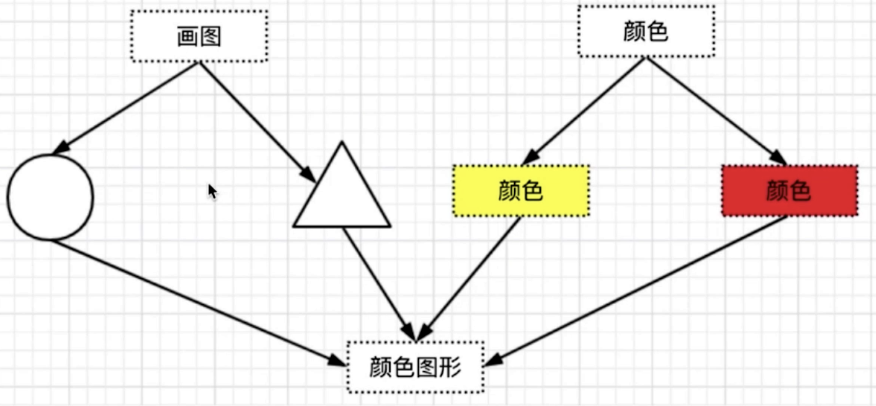
class Color {constructor(name) {this.name = name}}class Shape {constructor(name, color) {this.name = namethis.color = color}draw() {console.log(`${this.color.name} ${this.name}`)}}let red = new Color('red')let yellow = new Color('yellow')let circle = new Shape('circle', red)circle.draw()let triangle = new Shape('triangle', yellow)triangle.draw()
组合模式
生成树形结构,表示 “整理-部分” 关系,让整体和部分都具有一 致的操作方式
- 整体和单个节点的操作是一致的
- 整体和单个节点的数据结构也保持一致
虚拟DOM中的Vnode是这种方式,但数据类型单一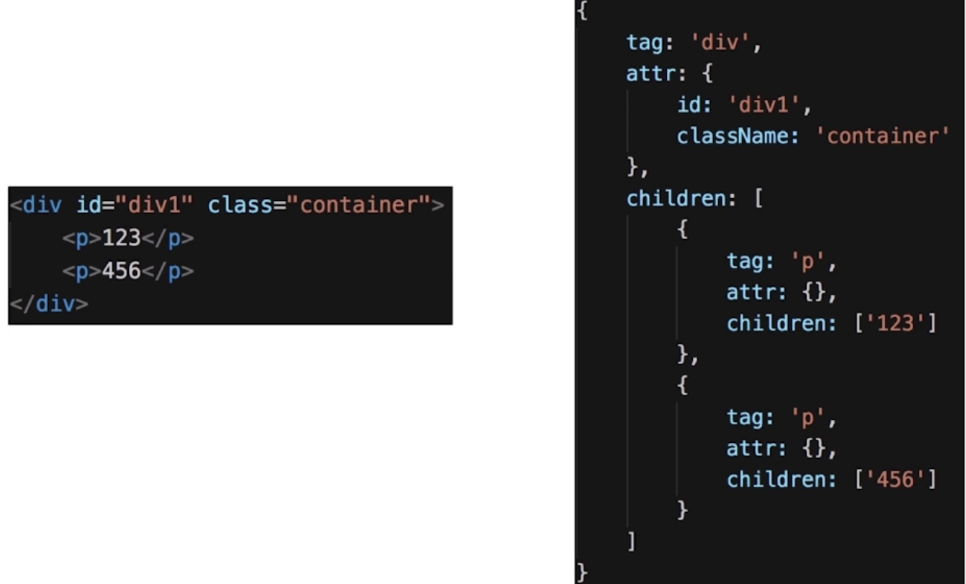
/**有这样一个需求*有一个学校有2个班(一班,二班)*每个班级分2个小组(一班一组,一班二组,二班一组,二班二组)*学校计算机教室有限,每一个小组分着来上课.*考试的时候大家一起考*请用程序来模拟这个需求*/interface CompositeInterface {getChildByName(name: string): any[];add(child: object): CompositeInterface}interface StudentInterface {goToClass(name: string | undefined): void;finishClass(name: string): void;}class Composite implements CompositeInterface, StudentInterface {private childsprivate nameprivate typeconstructor(name) {this.name = name;this.childs = []this.type = "com";}getChildByName(name: string) {//涉及到递归let toChilds: any[] = [];if(!name) {this.childs.forEach(child => {if(child.type === "com"){toChilds = toChilds.concat(child.getChildByName());}else{toChilds.push(child);}})} else {for (let i = 0; i < this.childs.length; i++) {if(this.childs[i].name == name) {if(this.childs[i].type === "com") {toChilds = toChilds.concat(this.childs[i].getChildByName());break;}else{toChilds.push(this.childs[i]);break;}} else {if(this.childs[i].type === "com") {toChilds = toChilds.concat(this.childs[i].getChildByName(name));}}}}return toChilds;}add (child: object) {this.childs.push(child);return this}goToClass (name: string = '') {const toChilds = this.getChildByName(name);toChilds.forEach(child => child.goToClass())}finishClass (name: string){const toChilds = this.getChildByName(name);toChilds.forEach(child => child.finishClass())}}class Student implements StudentInterface{private name: stringprivate type: stringconstructor(name) {this.name = name;this.type = 'stu';//默认是叶子}// 得到相关的所有孩子节点getChildByName(name){if(this.name == name){return this;}else{return null;}}// 增加子节点add(child){throw new Error("add 不成被初始化(在叶子了中)");}// 去上课goToClass(name = ''){console.log(this.name + " 去上课");}// 下课finishClass(name){console.log(this.name + " 下课");}}//测试const a = new Student("a");const b = new Student("b");const c = new Student("c");const d = new Student("d");const e = new Student("e");const f = new Student("f");const g = new Student("g");const h = new Student("h");const i = new Student("i");const one = new Composite("一班");const oneOne = new Composite("一班一组");oneOne.add(a).add(b);const oneTwo = new Composite("一班二组");oneTwo.add(c).add(d);one.add(oneOne).add(oneTwo);const two = new Composite("二班");const twoOne = new Composite("二班一组");twoOne.add(e).add(f);const twoTwo = new Composite("二班二组");twoTwo.add(g).add(h).add(i);two.add(twoOne).add(twoTwo);const school = new Composite("计算机学校");school.add(one).add(two);//客户端调用APIschool.goToClass();console.log("-------------------------");school.goToClass("一班");console.log("-------------------------");school.goToClass("二班一组");console.log("-------------------------");school.goToClass("a");
享元模式
享元模式是一个为了提高性能(空间复杂度)的设计模式
它使用于解决程序会生产大量的相类似的对象而耗用大量的内存的问题
<!-- 无限下拉列表,将事件代理到高层节点上 --><!-- 如果都绑定到`<a>`标签,对内存开销太大 --><div id="div1"><a href="#">a1</a><a href="#">a2</a><a href="#">a3</a><a href="#">a4</a><!-- 无限下拉列表 --></div><script>var div1 = document.getElementById('div1')div1.addEventListener('click', function (e) {var target = e.targetif(e.nodeName === 'A') {alert(target.innerHTML)}})</script>
富文本A标签拦截示例 test.html
策略模式
不同策略分开处理
避免出现大量if..else或者switch..case
class OrdinaryUser {buy () {console.log('普通用户购买')}}class MemberUser {buy () {console.log('会员用户购买')}}class VipUser {buy () {console.log('VIP 用户购买')}}const u1 = new OrdinaryUser()u1.buy()const u2 = new MemberUser()u2.buy()const u3 = new VipUser()u3.buy()
模板方法模式
class Action {handle () {this.handle1()this.handle2()this.handle3()}handle1 () {console.log('handle1')}handle2 () {console.log('handle2')}handle3 () {console.log('handle3')}}
职责链模式
- 一步操作可能分位多个职责角色来完成
把这些角色都分开,然后用一个链串起来
class Action {constructor(name) {this.name = namethis.nextAction = null}setNextAction(action){this.nextAction = action}handle() {console.log(`${this.name} 审批`)if(this.nextAction !== null) {this.nextAction.handle()}}}let a1 = new Action('组长')let a2 = new Action('经理')let a3 = new Action('总监')a1.setNextAction(a2)a2.setNextAction(a3)a1.handle()
场景
职责链模式和业务结合较多, JS中能联想到链式操作
- jQuery的链式操作Promise.then 的链式操作
命令模式
执行命令时,发布者和执行者分开,中间加入命令对象,作为中转站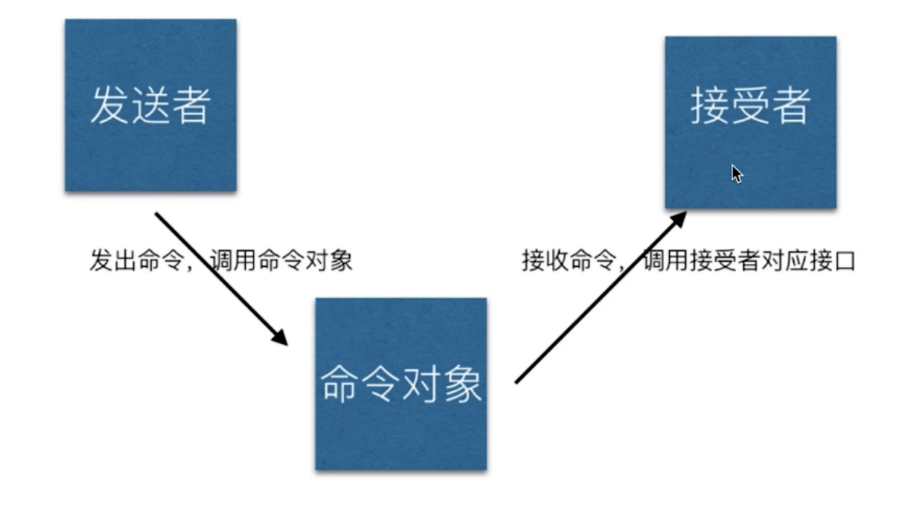
class Receiver {exec () {console.log('执行')}}class Command {constructor(receiver) {this.receiver = receiver}cmd () {console.log('执行命令')this.receiver.exec()}}class Invoker {constructor(command) {this.command = command}invoke () {console.log('开始')this.command.cmd()}}// 士兵let soldier = new Receiver()// 小号手let trumpeter = new Command(soldier)// 将军let general = new Invoker(trumpeter)general.invoke()
真的不要乱用这个模式 ,因为它使你简单调用写法变得非常的复杂和有些那一些难理解,但当你的业务出现了 (回退操作)(重做操作)的需求的时候你就要考虑使用这个模式了
这里有个例子用于 编辑器撤销重做功能command.html
备忘录模式
随时记录一个对象的状态变化,随时可以恢复之前的某个状态(如撤销功能)
状态对象和使用者分开 解耦
// 状态备忘class Momento {constructor(content) {this.content = content}getContent() {return this.content}}// 备忘列表class CareTaker {constructor() {this.list = []}add (memento) {this.list.push(memento)}get(index) {return this.list[index]}}// 编辑器class Editor {constructor() {this.content = null}setContent(content) {this.content = content}getContent () {return this.content}saveContentToMemento() {return new Momento(this.content)}getContentFromMemento(memento) {this.content = memento.getContent()}}//let editor = new Editor()let careTaker = new CareTaker()editor.setContent('111')editor.setContent('222')careTaker.add(editor.saveContentToMemento()) // 存储editor.setContent('333')careTaker.add(editor.saveContentToMemento())// 存储editor.setContent('444')console.log(editor.getContent())editor.getContentFromMemento(careTaker.get(1)) // 撤销console.log(editor.getContent())editor.getContentFromMemento(careTaker.get(0))console.log(editor.getContent())
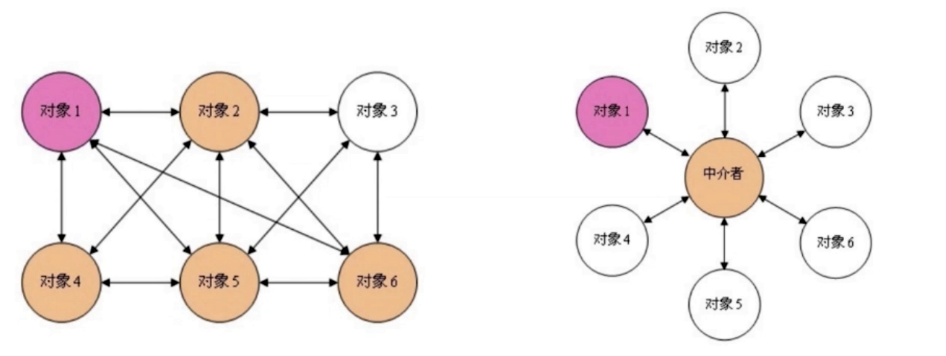
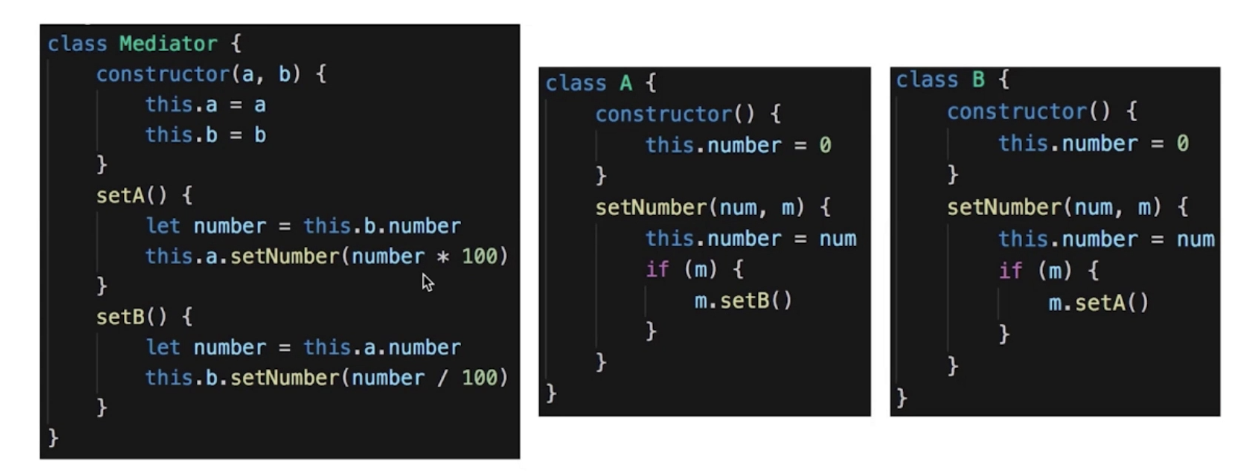
中介者模式
访问者模式
将数据操作和数据结构进行分离
解释器模式
描述语言语法如何定义,如何解析和编译,用于专业场景

若有收获,就点个赞吧
0 人点赞
