- 一、概述">一、概述
- 三、常用 Dockerfile 操作指令">三、常用 Dockerfile 操作指令
- 1)镜像构建(
**<font style="color:rgb(81, 81, 81);">docker build</font>**)">1)镜像构建(**<font style="color:rgb(81, 81, 81);">docker build</font>**) - 2)运行容器测试(
**<font style="color:rgb(81, 81, 81);">docker run</font>**)">2)运行容器测试(**<font style="color:rgb(81, 81, 81);">docker run</font>**) - 3)
**<font style="color:rgb(81, 81, 81);">ARG</font>**">3)**<font style="color:rgb(81, 81, 81);">ARG</font>** - 4)
**<font style="color:rgb(81, 81, 81);">FROM</font>**">4)**<font style="color:rgb(81, 81, 81);">FROM</font>** - 5)
**<font style="color:rgb(81, 81, 81);">MAINTAINER</font>**(已弃用)">5)**<font style="color:rgb(81, 81, 81);">MAINTAINER</font>**(已弃用) - 6)
**<font style="color:rgb(81, 81, 81);">VOLUME</font>**">6)**<font style="color:rgb(81, 81, 81);">VOLUME</font>** - 7)
**<font style="color:rgb(81, 81, 81);">RUN</font>**">7)**<font style="color:rgb(81, 81, 81);">RUN</font>** - 8)
**<font style="color:rgb(81, 81, 81);">COPY</font>**">8)**<font style="color:rgb(81, 81, 81);">COPY</font>** - 9)
**<font style="color:rgb(81, 81, 81);">ADD</font>**">9)**<font style="color:rgb(81, 81, 81);">ADD</font>** - 10)
**<font style="color:rgb(81, 81, 81);">ENV</font>**">10)**<font style="color:rgb(81, 81, 81);">ENV</font>** - 11)
**<font style="color:rgb(81, 81, 81);">WORKDIR</font>**">11)**<font style="color:rgb(81, 81, 81);">WORKDIR</font>** - 12)
**<font style="color:rgb(81, 81, 81);">USER</font>**">12)**<font style="color:rgb(81, 81, 81);">USER</font>** - 13)
**<font style="color:rgb(81, 81, 81);">EXPOSE</font>**">13)**<font style="color:rgb(81, 81, 81);">EXPOSE</font>** - 14)
**<font style="color:rgb(81, 81, 81);">CMD</font>**">14)**<font style="color:rgb(81, 81, 81);">CMD</font>** - 15)
**<font style="color:rgb(81, 81, 81);">ENTRYPOINT</font>**">15)**<font style="color:rgb(81, 81, 81);">ENTRYPOINT</font>** - 16)
**<font style="color:rgb(81, 81, 81);">HEALTHCHECK</font>**">16)**<font style="color:rgb(81, 81, 81);">HEALTHCHECK</font>** - 17)
**<font style="color:rgb(81, 81, 81);">ONBUILD</font>**">17)**<font style="color:rgb(81, 81, 81);">ONBUILD</font>** - 18)
**<font style="color:rgb(81, 81, 81);">LABEL</font>**">18)**<font style="color:rgb(81, 81, 81);">LABEL</font>**
- 1)镜像构建(
- 四、
**<font style="color:rgb(81, 81, 81);">ARG</font>**和**<font style="color:rgb(81, 81, 81);">ENV</font>**的区别">四、**<font style="color:rgb(81, 81, 81);">ARG</font>**和**<font style="color:rgb(81, 81, 81);">ENV</font>**的区别 - 五、
**<font style="color:rgb(81, 81, 81);">CMD</font>**,**<font style="color:rgb(81, 81, 81);">ENTRYPOINT</font>**,**<font style="color:rgb(81, 81, 81);">command</font>**,**<font style="color:rgb(81, 81, 81);">args</font>**场景测试">五、**<font style="color:rgb(81, 81, 81);">CMD</font>**,**<font style="color:rgb(81, 81, 81);">ENTRYPOINT</font>**,**<font style="color:rgb(81, 81, 81);">command</font>**,**<font style="color:rgb(81, 81, 81);">args</font>**场景测试- 1)
**<font style="color:rgb(81, 81, 81);">command</font>**和**<font style="color:rgb(81, 81, 81);">args</font>**不存在场景测试">1)**<font style="color:rgb(81, 81, 81);">command</font>**和**<font style="color:rgb(81, 81, 81);">args</font>**不存在场景测试 - 2)
**<font style="color:rgb(81, 81, 81);">command</font>**存在,但**<font style="color:rgb(81, 81, 81);">args</font>**不存在场景测试">2)**<font style="color:rgb(81, 81, 81);">command</font>**存在,但**<font style="color:rgb(81, 81, 81);">args</font>**不存在场景测试 - 3)
**<font style="color:rgb(81, 81, 81);">command</font>**不存在,但**<font style="color:rgb(81, 81, 81);">args</font>**存在场景测试">3)**<font style="color:rgb(81, 81, 81);">command</font>**不存在,但**<font style="color:rgb(81, 81, 81);">args</font>**存在场景测试 - 4)
**<font style="color:rgb(81, 81, 81);">command</font>**和**<font style="color:rgb(81, 81, 81);">args</font>**都存在场景测试">4)**<font style="color:rgb(81, 81, 81);">command</font>**和**<font style="color:rgb(81, 81, 81);">args</font>**都存在场景测试
- 1)
一、概述
Dockerfile 是一个用来构建镜像的文本文件,文本内容包含了一条条构建镜像所需的指令和说明。 官方文档:https://docs.docker.com/engine/reference/builder/ Dockerfile 示例:https://github.com/dockerfile/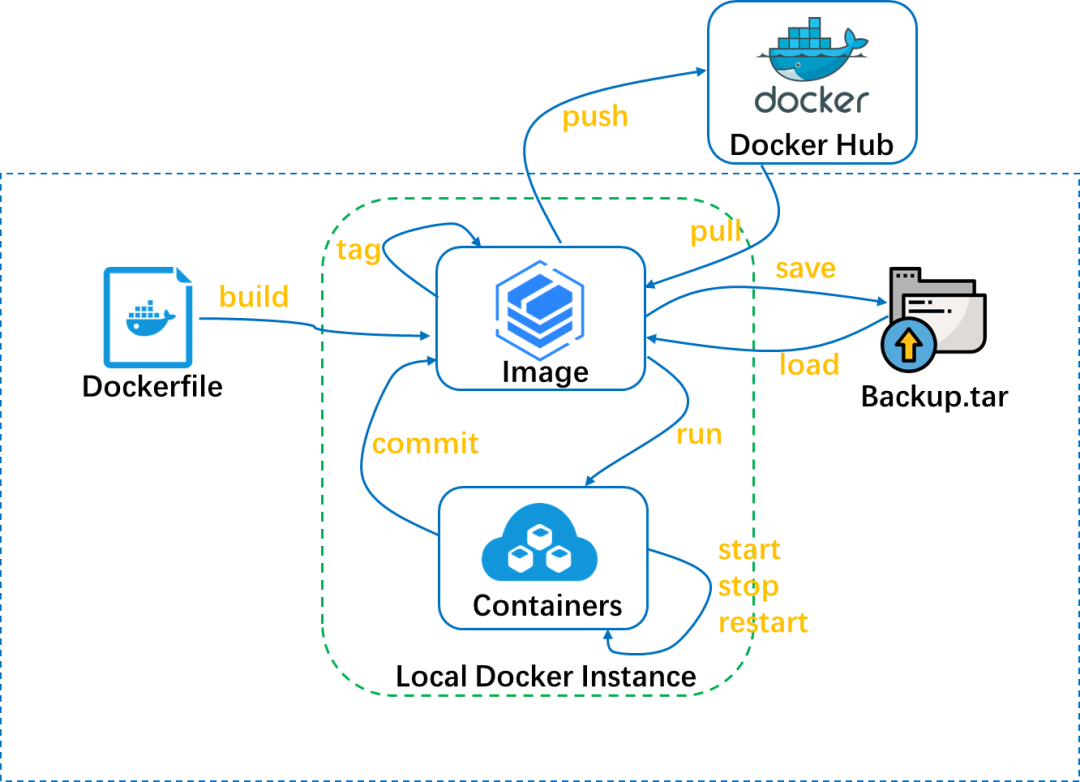 ## 二、Dockerfile 结构
Dockerfile 结构主要分为四部分:
## 二、Dockerfile 结构
Dockerfile 结构主要分为四部分:
- 基础镜像信息
- 维护者信息
- 镜像操作指令
- 容器启动时执行指令 (
**<font style="color:rgb(1, 1, 1);">CMD</font>**/**<font style="color:rgb(1, 1, 1);">ENTRYPOINT</font>**)
三、常用 Dockerfile 操作指令
**<font style="color:rgb(155, 110, 35);background-color:rgb(255, 245, 227);">ARG</font>**—— 定义创建镜像过程中使用的变量 ,唯一一个可以在**<font style="color:rgb(1, 1, 1);">FROM</font>**之前定义 。**<font style="color:rgb(155, 110, 35);background-color:rgb(255, 245, 227);">FROM</font>**——基于某个镜像,**<font style="color:rgb(155, 110, 35);background-color:rgb(255, 245, 227);">FROM</font>**前面只能有一个或多个**<font style="color:rgb(155, 110, 35);background-color:rgb(255, 245, 227);">ARG</font>**指令 。**<font style="color:rgb(155, 110, 35);background-color:rgb(255, 245, 227);">MAINTAINER</font>**(已弃用) —— 镜像维护者姓名或邮箱地址 。**<font style="color:rgb(155, 110, 35);background-color:rgb(255, 245, 227);">VOLUME</font>****<font style="color:rgb(1, 1, 1);"></font>**—— 指定容器挂载点到宿主机自动生成的目录或其他容器**<font style="color:rgb(155, 110, 35);background-color:rgb(255, 245, 227);">RUN</font>**——执行镜像里的命令,跟在 liunx 执行命令一样,只需要在前面加上**<font style="color:rgb(1, 1, 1);">RUN</font>**关键词就行。**<font style="color:rgb(155, 110, 35);background-color:rgb(255, 245, 227);">COPY</font>**——复制本地(宿主机)上的文件到镜像。**<font style="color:rgb(155, 110, 35);background-color:rgb(255, 245, 227);">ADD</font>**——复制并解压(宿主机)上的压缩文件到镜像。**<font style="color:rgb(155, 110, 35);background-color:rgb(255, 245, 227);">ENV</font>**——设置环境变量。**<font style="color:rgb(155, 110, 35);background-color:rgb(255, 245, 227);">WORKDIR</font>****<font style="color:rgb(1, 1, 1);"></font>**—— 为**<font style="color:rgb(1, 1, 1);">RUN</font>**、**<font style="color:rgb(1, 1, 1);">CMD</font>**、**<font style="color:rgb(1, 1, 1);">ENTRYPOINT</font>**、**<font style="color:rgb(1, 1, 1);">COPY</font>**和**<font style="color:rgb(1, 1, 1);">ADD</font>**设置工作目录,就是切换目录 。**<font style="color:rgb(155, 110, 35);background-color:rgb(255, 245, 227);">USER</font>**—— 为**<font style="color:rgb(1, 1, 1);">RUN</font>**、**<font style="color:rgb(1, 1, 1);">CMD</font>**、和**<font style="color:rgb(1, 1, 1);">ENTRYPOINT</font>**执行命令指定运行用户。**<font style="color:rgb(155, 110, 35);background-color:rgb(255, 245, 227);">EXPOSE</font>****<font style="color:rgb(1, 1, 1);"></font>**—— 声明容器的服务端口(仅仅是声明) 。**<font style="color:rgb(155, 110, 35);background-color:rgb(255, 245, 227);">CMD</font>**—— 容器启动后执行的命令 ,多个**<font style="color:rgb(1, 1, 1);">CMD</font>**只会执行最后一个,跟**<font style="color:rgb(1, 1, 1);">ENTRYPOINT</font>**的区别是,**<font style="color:rgb(1, 1, 1);">CMD</font>**可以作为**<font style="color:rgb(1, 1, 1);">ENTRYPOINT</font>**的参数,且会被 yaml 文件里的 command 覆盖。**<font style="color:rgb(155, 110, 35);background-color:rgb(255, 245, 227);">ENTRYPOINT</font>**—— 容器启动后执行的命令 ,多个只会执行最后一个。**<font style="color:rgb(155, 110, 35);background-color:rgb(255, 245, 227);">HEALTHCHECH</font>****<font style="color:rgb(1, 1, 1);"></font>**—— 健康检查 。**<font style="color:rgb(155, 110, 35);background-color:rgb(255, 245, 227);">ONBUILD</font>**——它后面跟的是其它指令,比如**<font style="color:rgb(155, 110, 35);background-color:rgb(255, 245, 227);">RUN</font>**,**<font style="color:rgb(155, 110, 35);background-color:rgb(255, 245, 227);">COPY</font>**等,而这些指令,在当前镜像构建时并不会被执行。只有当以当前镜像为基础镜像,去构建下一级镜像的时候才会被执行。**<font style="color:rgb(155, 110, 35);background-color:rgb(255, 245, 227);">LABEL</font>**——LABEL 指令用来给镜像添加一些元数据(metadata),以键值对的形式 ,替换**<font style="color:rgb(1, 1, 1);">MAINTAINER</font>**。
1)镜像构建(**<font style="color:rgb(81, 81, 81);">docker build</font>**)
docker build -t text:v1 . --no-cache# 要在构建后将映像标记到多个存储库中,请在运行命令-t时添加多个参数docker build -t shykes/myapp:1.0.2 -t shykes/myapp:latest .### 参数解释# -t:指定镜像名称# . :当前目录Dockerfile# -f:指定Dockerfile路径# --no-cache:不缓存
2)运行容器测试(**<font style="color:rgb(81, 81, 81);">docker run</font>**)
# 非交互式运行docker run centos:7.4.1708 /bin/echo "Hello world"### 交互式执行# -t: 在新容器内指定一个伪终端或终端。#-i: 允许你对容器内的标准输入 (STDIN) 进行交互。# 会登录到docker环境中,交互式docker run -it centos:7.4.1708 /bin/bash# -d:后台执行,加了 -d 参数默认不会进入容器docker run -itd centos:7.4.1708 /bin/bash### 进入容器# 在使用 -d 参数时,容器启动后会进入后台。此时想要进入容器,可以通过以下指令进入:#docker exec -it :推荐大家使用 docker exec -it 命令,因为此命令会退出容器终端,但不会导致容器的停止。#docker attach:容器退出,会导致容器的停止。docker exec -it b2c0235dc53 /bin/bashdocker attach b2c0235dc53
3)**<font style="color:rgb(81, 81, 81);">ARG</font>**
构建参数,与 <font style="color:rgb(89, 89, 89);background-color:rgb(255, 245, 227);">ENV</font> 作用一致。不过作用域不一样。<font style="color:rgb(89, 89, 89);background-color:rgb(255, 245, 227);">ARG</font> 设置的环境变量仅对 Dockerfile 内有效,也就是说只有 <font style="color:rgb(89, 89, 89);background-color:rgb(255, 245, 227);">docker build</font> 的过程中有效,构建好的镜像内不存在此环境变量。唯一一个可以在 <font style="color:rgb(89, 89, 89);background-color:rgb(255, 245, 227);">FROM</font> 之前定义 。构建命令 <font style="color:rgb(89, 89, 89);background-color:rgb(255, 245, 227);">docker build</font> 中可以用 <font style="color:rgb(89, 89, 89);background-color:rgb(255, 245, 227);">--build-arg <参数名>=<值></font> 来覆盖。
语法格式:
示例:
ARG <参数名>[=<默认值>]
# 在FROM之前定义ARG,只在 FROM 中生效ARG VERSION=lasterFROM centos:${VERSION}# 在FROM之后使用,得重新定义,不需要赋值ARG VERSIONRUN echo $VERSION >/tmp/image_version
4)**<font style="color:rgb(81, 81, 81);">FROM</font>**
定制的镜像都是基于 <font style="color:rgb(89, 89, 89);background-color:rgb(255, 245, 227);">FROM</font> 的镜像 ,【必选项】
语法格式:
如果引用多平台图像,可选
FROM [--platform=<platform>] <image> [AS <name>]FROM [--platform=<platform>] <image>[:<tag>] [AS <name>]FROM [--platform=<platform>] <image>[@<digest>] [AS <name>]
<font style="color:rgb(155, 110, 35);background-color:rgb(255, 245, 227);">--platform</font>标志可用于指定图像的平台。<font style="color:rgb(155, 110, 35);background-color:rgb(255, 245, 227);">FROM</font>例如,linux/amd64、 linux/arm64或windows/amd64。默认情况下,使用构建请求的目标平台。全局构建参数可用于此标志的值,例如允许将阶段强制为原生构建平台 ( <font style="color:rgb(155, 110, 35);background-color:rgb(255, 245, 227);">--platform=$BUILDPLATFORM</font>),并使用它交叉编译到阶段内的目标平台。
示例:
ARG VERSION=latestFROM busybox:$VERSION# FROM --platform="linux/amd64" busybox:$VERSIONARG VERSIONRUN echo $VERSION > image_version
5)**<font style="color:rgb(81, 81, 81);">MAINTAINER</font>**(已弃用)
镜像维护者信息
语法格式:
示例:
MAINTAINER <name>
LABEL org.opencontainers.image.authors="SvenDowideit@home.org.au"
6)**<font style="color:rgb(81, 81, 81);">VOLUME</font>**
定义匿名数据卷。在启动容器时忘记挂载数据卷,会自动挂载到匿名卷。
作用:
- 避免重要的数据,因容器重启而丢失,这是非常致命的。
- 避免容器不断变大。
- 在启动容器
**<font style="color:rgb(1, 1, 1);">docker run</font>**的时候,可以通过**<font style="color:rgb(1, 1, 1);">-v</font>**参数修改挂载点。
示例:
# 后面路径是容器内的路径,对应宿主机的目录是随机的VOLUME ["<路径1>", "<路径2>"...]VOLUME <路径>
FROM ubuntuRUN mkdir /myvolRUN echo "hello world" > /myvol/greetingVOLUME /myvol
7)**<font style="color:rgb(81, 81, 81);">RUN</font>**
用于执行后面跟着的命令行命令。
语法格式:
**<font style="color:rgb(155, 110, 35);background-color:rgb(255, 245, 227);">RUN</font>****<font style="color:rgb(1, 1, 1);"></font>**(shell形式,命令在 shell 中运行,默认**<font style="color:rgb(155, 110, 35);background-color:rgb(255, 245, 227);">/bin/sh -c</font>**在 Linux 或**<font style="color:rgb(155, 110, 35);background-color:rgb(255, 245, 227);">cmd /S /C</font>**Windows 上)**<font style="color:rgb(155, 110, 35);background-color:rgb(255, 245, 227);">RUN ["executable", "param1", "param2"]</font>**(执行形式)
# 以下三种写法等价RUN /bin/bash -c 'source $HOME/.bashrc; \echo $HOME'RUN /bin/bash -c 'source $HOME/.bashrc; echo $HOME'RUN ["/bin/bash", "-c", "source $HOME/.bashrc; echo $HOME"]
8)**<font style="color:rgb(81, 81, 81);">COPY</font>**
拷贝(宿主机)文件或目录到容器中,跟 <font style="color:rgb(89, 89, 89);background-color:rgb(255, 245, 227);">ADD</font> 类似,但不具备自动下载或解压的功能 。所有新文件和目录都使用 0 的 UID 和 GID 创建,除非可选<font style="color:rgb(155, 110, 35);background-color:rgb(255, 245, 227);">--chown</font>标志指定给定的用户名、组名或 UID/GID 组合以请求复制内容的特定所有权。
语法格式:
示例:
COPY [--chown=<user>:<group>] <src>... <dest>COPY [--chown=<user>:<group>] ["<src>",... "<dest>"]
# 添加所有以“hom”开头的文件:COPY hom* /mydir/# ?替换为任何单个字符,例如“home.txt”。COPY hom?.txt /mydir/# 使用相对路径,并将“test.txt”添加到<WORKDIR>/relativeDir/:COPY test.txt relativeDir/# 使用绝对路径,并将“test.txt”添加到/absoluteDir/COPY test.txt /absoluteDir/# 修改文件权限COPY --chown=55:mygroup files* /somedir/COPY --chown=bin files* /somedir/COPY --chown=1 files* /somedir/COPY --chown=10:11 files* /somedir/
9)**<font style="color:rgb(81, 81, 81);">ADD</font>**
拷贝文件或目录到容器中,如果是 URL 或压缩包便会自动下载或自动解压 。
<font style="color:rgb(58, 58, 58);">ADD</font> 指令和 <font style="color:rgb(58, 58, 58);">COPY</font> 的使用格类似(同样需求下,官方推荐使用 <font style="color:rgb(58, 58, 58);">COPY</font>)。功能也类似,不同之处如下:
**<font style="color:black;">ADD</font>**的优点**:在执行 <源文件> 为 tar 压缩文件的话,压缩格式为 gzip, bzip2 以及 xz 的情况下,会自动复制并解压到 <目标路径>。****<font style="color:black;">ADD</font>**的缺点**:在不解压的前提下,无法复制 tar 压缩文件。会令镜像构建缓存失效,从而可能会令镜像构建变得比较缓慢。具体是否使用,可以根据是否需要自动解压来决定。**
示例:
ADD [--chown=<user>:<group>] <src>... <dest>ADD [--chown=<user>:<group>] ["<src>",... "<dest>"]
# 通配符ADD hom* /mydir/# 相对路径,拷贝到WORKDIR目录下relativeDir/ADD test.txt relativeDir/# 绝对路径ADD test.txt /absoluteDir/# 更改权限ADD --chown=55:mygroup files* /somedir/ADD --chown=bin files* /somedir/ADD --chown=1 files* /somedir/ADD --chown=10:11 files* /somedir/
<font style="color:rgb(58, 58, 58);">ADD</font> 和 <font style="color:rgb(58, 58, 58);">COPY</font> 的区别和使用场景:
**<font style="color:rgb(1, 1, 1);">ADD</font>**支持添加远程 url 和自动提取压缩格式的文件,**<font style="color:rgb(1, 1, 1);">COPY</font>**只允许从本机中复制文件**<font style="color:rgb(1, 1, 1);">COPY</font>**支持从其他构建阶段中复制源文件(**<font style="color:rgb(1, 1, 1);">--from</font>**)- 根据官方 Dockerfile 最佳实践,除非真的需要从远程 url 添加文件或自动提取压缩文件才用
**<font style="color:rgb(1, 1, 1);">ADD</font>**,其他情况一律使用**<font style="color:rgb(1, 1, 1);">COPY</font>**
10)**<font style="color:rgb(81, 81, 81);">ENV</font>**
设置环境变量,定义了环境变量,那么在后续的指令中,就可以使用这个环境变量。
语法格式:
示例:
ENV <key1>=<value1> <key2>=<value2>...# 省略"="此语法不允许在单个ENV指令中设置多个环境变量,并且可能会造成混淆。ENV <key> <value>
ENV JAVA_HOME=/usr/local/jdkENV MY_NAME="John Doe" MY_DOG=Rex\ The\ Dog \MY_CAT=fluffy# 此语法不允许在单个ENV指令中设置多个环境变量,并且可能会造成混淆。ENV JAVA_HOME /usr/local/jdk
11)**<font style="color:rgb(81, 81, 81);">WORKDIR</font>**
指定工作目录。用 <font style="color:rgb(89, 89, 89);background-color:rgb(255, 245, 227);">WORKDIR</font> 指定的工作目录,会在构建镜像的每一层中都存在。(<font style="color:rgb(89, 89, 89);background-color:rgb(255, 245, 227);">WORKDIR</font> 指定的工作目录,必须是提前创建好的)。
语法格式:
示例:
WORKDIR <工作目录路径>
FROM busyboxENV FOO=/barWORKDIR ${FOO} # WORKDIR /bar
12)**<font style="color:rgb(81, 81, 81);">USER</font>**
用于指定执行后续命令的用户和用户组,这边只是切换后续命令执行的用户(用户和用户组必须提前已经存在)。
语法格式:
示例:
USER <用户名>[:<用户组>]USER <UID>[:<GID>]
FROM busyboxRUN groupadd --system --gid=9999 admin && useradd --system --home-dir /home/admin --uid=9999 --gid=admin adminUSER admin:admin# USER 9999:9999
13)**<font style="color:rgb(81, 81, 81);">EXPOSE</font>**
暴露端口 ,仅仅只是声明端口。
作用:
- 帮助镜像使用者理解这个镜像服务的守护端口,以方便配置映射。
- 在运行时使用随机端口映射时,也就是
**<font style="color:rgb(1, 1, 1);">docker run -P</font>**时,会自动随机映射**<font style="color:rgb(1, 1, 1);">EXPOSE</font>**的端口。
示例:
# 默认情况下,EXPOSE假定 TCP。EXPOSE <port> [<port>/<protocol>...]
EXPOSE 80/TCP 443/TCPEXPOSE 80 443EXPOSE 80/tcpEXPOSE 80/udp
14)**<font style="color:rgb(81, 81, 81);">CMD</font>**
类似于 <font style="color:rgb(89, 89, 89);background-color:rgb(255, 245, 227);">RUN</font> 指令,用于运行程序,但二者运行的时间点不同:<font style="color:rgb(89, 89, 89);background-color:rgb(255, 245, 227);">CMD</font> 在构建镜像时不会执行,在容器运行时运行。
语法格式:
推荐使用第二种格式,执行过程比较明确。第一种格式实际上在运行的过程中也会自动转换成第二种格式运行,并且默认可执行文件是 sh。 示例:
CMD <shell 命令>CMD ["<可执行文件或命令>","<param1>","<param2>",...]CMD ["<param1>","<param2>",...] # 该写法是为 ENTRYPOINT 指令指定的程序提供默认参数
CMD cat /etc/profileCMD ["/bin/sh","-c","/etc/profile"]
注意:如果 Dockerfile 中如果存在多个 <font style="color:rgb(89, 89, 89);background-color:rgb(255, 245, 227);">CMD</font> 指令,仅最后一个生效。
15)**<font style="color:rgb(81, 81, 81);">ENTRYPOINT</font>**
类似于 <font style="color:rgb(89, 89, 89);background-color:rgb(255, 245, 227);">CMD</font> 指令,但其不会被 <font style="color:rgb(89, 89, 89);background-color:rgb(255, 245, 227);">docker run</font> 的命令行参数指定的指令所覆盖,而且这些命令行参数会被当作参数送给 <font style="color:rgb(89, 89, 89);background-color:rgb(255, 245, 227);">ENTRYPOINT</font> 指令指定的程序。但是,如果运行 <font style="color:rgb(89, 89, 89);background-color:rgb(255, 245, 227);">docker run</font> 时使用了 <font style="color:rgb(89, 89, 89);background-color:rgb(255, 245, 227);">--entrypoint</font> 选项,将覆盖 <font style="color:rgb(89, 89, 89);background-color:rgb(255, 245, 227);">ENTRYPOINT</font> 指令指定的程序。在 k8s 中 <font style="color:rgb(89, 89, 89);background-color:rgb(255, 245, 227);">command</font> 也会覆盖 <font style="color:rgb(89, 89, 89);background-color:rgb(255, 245, 227);">ENTRYPOINT</font> 指令指定的程序
语法格式:
示例:
# exec形式,这是首选形式:ENTRYPOINT ["executable", "param1", "param2"]# 外壳形式:ENTRYPOINT command param1 param2
FROM ubuntuENTRYPOINT ["top", "-b"]# CMD作为ENTRYPOINT参数CMD ["-c"]# 与下面的等价ENTRYPOINT ["top", "-b -c"]ENTRYPOINT top -b -c
注意:如果 Dockerfile 中如果存在多个 <font style="color:rgb(89, 89, 89);background-color:rgb(255, 245, 227);">ENTRYPOINT</font> 指令,仅最后一个生效。
16)**<font style="color:rgb(81, 81, 81);">HEALTHCHECK</font>**
用于指定某个程序或者指令来监控 docker 容器服务的运行状态。
语法格式:
选项
HEALTHCHECK [OPTIONS] CMD command(通过在容器内运行命令检查容器运行状况)HEALTHCHECK NONE(禁用从基础映像继承的任何运行状况检查)
<font style="color:rgb(155, 110, 35);background-color:rgb(255, 245, 227);">CMD</font>有:
**<font style="color:rgb(155, 110, 35);background-color:rgb(255, 245, 227);">--interval=DURATION</font>**(默认**30s**:):间隔,频率**<font style="color:rgb(155, 110, 35);background-color:rgb(255, 245, 227);">--timeout=DURATION</font>**(默认**30s**:):超时时间**<font style="color:rgb(155, 110, 35);background-color:rgb(255, 245, 227);">--start-period=DURATION</font>**(默认**0s**:):为需要时间引导的容器提供初始化时间, 在此期间探测失败将不计入最大重试次数。**<font style="color:rgb(155, 110, 35);background-color:rgb(255, 245, 227);">--retries=N</font>**(默认**3**:):重试次数
<font style="color:rgb(155, 110, 35);background-color:rgb(255, 245, 227);">exit status</font>指示容器的运行状况。可能的值为:
- 0:健康状态,容器健康且已准备完成。
- 1:不健康状态,容器工作不正常。
- 2:保留,不要使用此退出代码。
FROM nginxMAINTAINER SecurititHEALTHCHECK --interval=5s --timeout=3s \CMD curl -f http://localhost/ || exit 1CMD ["usr/sbin/nginx", "-g", "daemon off;"]
17)**<font style="color:rgb(81, 81, 81);">ONBUILD</font>**
<font style="color:rgb(155, 110, 35);background-color:rgb(255, 245, 227);">ONBUILD</font> 是一个特殊的指令,它后面跟的是其它指令,比如 <font style="color:rgb(155, 110, 35);background-color:rgb(255, 245, 227);">RUN</font>, <font style="color:rgb(155, 110, 35);background-color:rgb(255, 245, 227);">COPY</font> 等,而这些指令,在当前镜像构建时并不会被执行。只有当以当前镜像为基础镜像,去构建下一级镜像的时候才会被执行。
示例:
ONBUILD <其它指令>
FROM node:slimRUN mkdir /appWORKDIR /appONBUILD COPY ./package.json /appONBUILD RUN [ "npm", "install" ]ONBUILD COPY . /app/CMD [ "npm", "start" ]
18)**<font style="color:rgb(81, 81, 81);">LABEL</font>**
<font style="color:rgb(89, 89, 89);background-color:rgb(255, 245, 227);">LABEL</font> 指令用来给镜像添加一些元数据(metadata),以键值对的形式。用来替代 <font style="color:rgb(89, 89, 89);background-color:rgb(255, 245, 227);">MAINTAINER</font>。
示例:比如可以添加镜像的作者
LABEL <key>=<value> <key>=<value> <key>=<value> ...
LABEL org.opencontainers.image.authors="runoob"
四、**<font style="color:rgb(81, 81, 81);">ARG</font>** 和 **<font style="color:rgb(81, 81, 81);">ENV</font>** 的区别
**<font style="color:rgb(1, 1, 1);">ARG</font>**定义的变量只会存在于镜像构建过程,启动容器后并不保留这些变量**<font style="color:rgb(1, 1, 1);">ENV</font>**定义的变量在启动容器后仍然保留
五、**<font style="color:rgb(81, 81, 81);">CMD</font>**,**<font style="color:rgb(81, 81, 81);">ENTRYPOINT</font>**,**<font style="color:rgb(81, 81, 81);">command</font>**,**<font style="color:rgb(81, 81, 81);">args</font>** 场景测试
当用户同时在 kubernetes 中的 yaml 文件中写了<font style="color:rgb(155, 110, 35);background-color:rgb(255, 245, 227);">command</font>和<font style="color:rgb(155, 110, 35);background-color:rgb(255, 245, 227);">args</font>的时候,默认是会覆盖DockerFile中的命令行和参数,完整的情况分类如下:
1)**<font style="color:rgb(81, 81, 81);">command</font>** 和 **<font style="color:rgb(81, 81, 81);">args</font>** 不存在场景测试
如果 <font style="color:rgb(89, 89, 89);background-color:rgb(255, 245, 227);">command</font> 和 <font style="color:rgb(89, 89, 89);background-color:rgb(255, 245, 227);">args</font> 都没有写,那么用DockerFile默认的配置。
Dockerfile
/tmp/test.sh
FROM centosCOPY test.sh /RUN chmod +x /test.sh### ENTRYPOINT将作为的子命令启动/bin/sh -c,它不会传递参数,要传递参数只能这样传参# ENTRYPOINT ["/bin/sh","-c","/test.sh ENTRYPOINT"]ENTRYPOINT ["/test.sh","ENTRYPOINT"]CMD ["CMD"]
构建
#!/bin/bashecho $*
yaml 编排
docker build -t test1:v1 -f Dockerfile .
执行
cat << EOF > test1.yamlapiVersion: apps/v1kind: Deploymentmetadata:name: testspec:replicas: 1selector:matchLabels:app: testtemplate:metadata:labels:app: testspec:nodeName: local-168-182-110containers:- name: testimage: test:v1#command: ['/bin/sh','-c','/test.sh']#args: ['args']EOF
kubectl apply -f test.yaml
2)**<font style="color:rgb(81, 81, 81);">command</font>** 存在,但 **<font style="color:rgb(81, 81, 81);">args</font>** 不存在场景测试
如果 <font style="color:rgb(89, 89, 89);background-color:rgb(255, 245, 227);">command</font> 写了,但 <font style="color:rgb(89, 89, 89);background-color:rgb(255, 245, 227);">args</font> 没有写,那么 Docker 默认的配置会被忽略而且仅仅执行.yaml文件的 <font style="color:rgb(89, 89, 89);background-color:rgb(255, 245, 227);">command</font>(不带任何参数的)。
cat << EOF > test2.yamlapiVersion: apps/v1kind: Deploymentmetadata:name: test2spec:replicas: 1selector:matchLabels:app: test2template:metadata:labels:app: test2spec:nodeName: local-168-182-110containers:- name: test2image: test:v1# ['/bin/sh','-c','/test.sh command','hello'],加了'/bin/sh','-c',也是不能外部传参,不会输出hello,只能通过这样传参,['/bin/sh','-c','/test.sh command'];CMD里面的参数会被忽略command: ['/test.sh']# command带参数# command: ['/test.sh','command']#args: ['args']EOF
3)**<font style="color:rgb(81, 81, 81);">command</font>** 不存在,但 **<font style="color:rgb(81, 81, 81);">args</font>** 存在场景测试
如果 <font style="color:rgb(89, 89, 89);background-color:rgb(255, 245, 227);">command</font> 没写,但 <font style="color:rgb(89, 89, 89);background-color:rgb(255, 245, 227);">args</font> 写了,那么 Docker 默认配置的 <font style="color:rgb(89, 89, 89);background-color:rgb(255, 245, 227);">ENTRYPOINT</font> 的命令行会被执行,但是调用的参数是.yaml中的 <font style="color:rgb(89, 89, 89);background-color:rgb(255, 245, 227);">args</font>,<font style="color:rgb(89, 89, 89);background-color:rgb(255, 245, 227);">CMD</font> 的参数会被覆盖,但是 <font style="color:rgb(89, 89, 89);background-color:rgb(255, 245, 227);">ENTRYPOINT</font> 自带的参数还是会执行的。
cat << EOF > test3.yamlapiVersion: apps/v1kind: Deploymentmetadata:name: test3spec:replicas: 1selector:matchLabels:app: test3template:metadata:labels:app: test3spec:nodeName: local-168-182-110containers:- name: test3image: test:v1# ['/bin/sh','-c','/test.sh command','hello'],加了'/bin/sh','-c',也是不能外部传参,不会输出hello,只能通过这样传参,['/bin/sh','-c','/test.sh command'];CMD里面的参数会被忽略# command: ['/test.sh']# command带参数# command: ['/test.sh','command']args: ['args']EOF
4)**<font style="color:rgb(81, 81, 81);">command</font>** 和 **<font style="color:rgb(81, 81, 81);">args</font>** 都存在场景测试
如果如果 <font style="color:rgb(89, 89, 89);background-color:rgb(255, 245, 227);">command</font> 和 <font style="color:rgb(89, 89, 89);background-color:rgb(255, 245, 227);">args</font> 都写了,那么 Docker 默认的配置被忽略,使用.yaml的配置。
镜像构建 Dockerfile 的介绍就到这里了。
cat << EOF > test4.yamlapiVersion: apps/v1kind: Deploymentmetadata:name: test4spec:replicas: 1selector:matchLabels:app: test4template:metadata:labels:app: test4spec:nodeName: local-168-182-110containers:- name: test4image: test:v1# ['/bin/sh','-c','/test.sh command','hello'],加了'/bin/sh','-c',也是不能外部传参,不会输出hello,只能通过这样传参,['/bin/sh','-c','/test.sh command'];CMD里面的参数会被忽略# command: ['/test.sh']# command带参数,command和args都会带上command: ['/test.sh','command']args: ['args']EOF

若有收获,就点个赞吧
0 人点赞
