基本认识
什么是 DOM Diff ?
就是对比两个虚拟节点(新虚拟节点和旧虚拟节点),然后找出差异,形成一个补丁 patch 对象,然后根据 patch 对象去把真实的 DOM 进行匹配,所以最终还是要操作 DOM。但是这么做的目的是为了用最小的代价去操作 DOM,毕竟只要操作 DOM 就会产生一定的性能。
什么是虚拟节点呢?
简单理解就是一个普通的对象,把真实的节点通过对象的方式进行描述。
例如:
const vDom = {tag: 'span',attrs: {},children: "123"}
无论是 Vue 的template模版还是 React 的JSX,最终都会转换为虚拟节点,当更改数据的时候就会产生新的虚拟节点,然后就会进行对比,产生一个补丁,最后根据补丁去更新真实的 DOM。
例如我们有这么一段 HTML 内容,我们想要进行一些内容的更改:
然后 DOM Diff 就会根据一定的算法规则进行对比,规则如下:
1、只会一级一级的去对比,不会进行跨级对比。
也就是说,先对比第一层的ul,再对比第二层的li,但是上图中li属性data-id="1"就不会进行对比,因为它们不是一个层级。
如果是下面的结构,就可以逐一的进行对比:
2、对比时会按照生成虚拟节点时候的标识(索引)进行对比。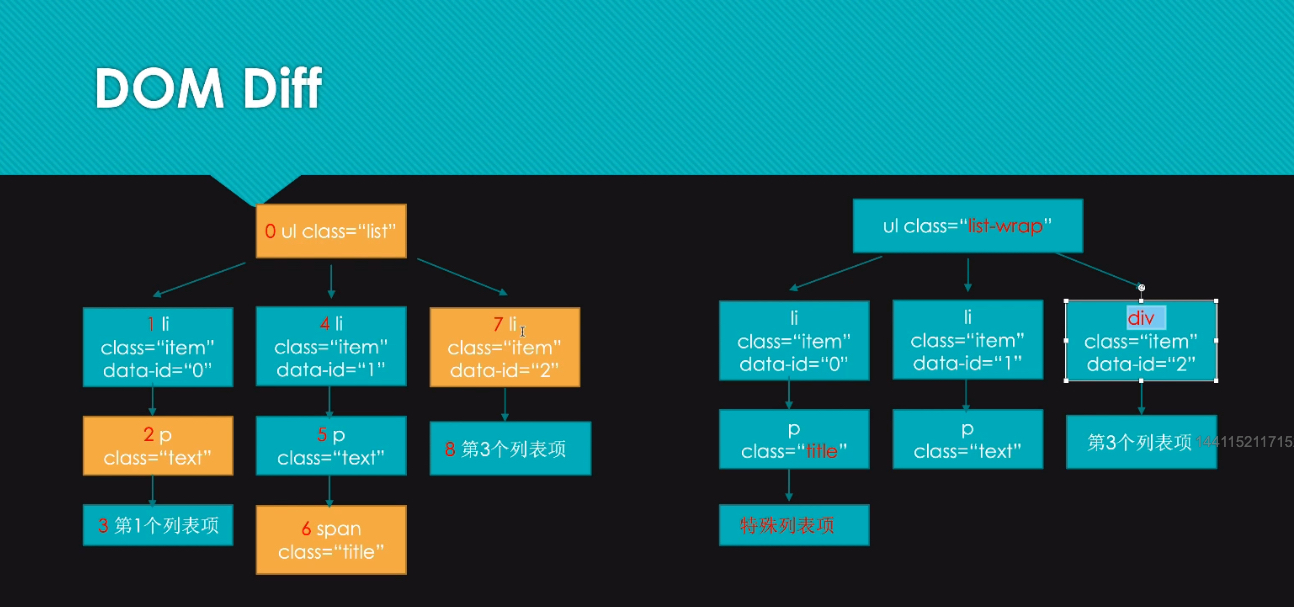
3、当 DOM 的位置发生变化时,是可以进行替换的,不需要重新渲染li节点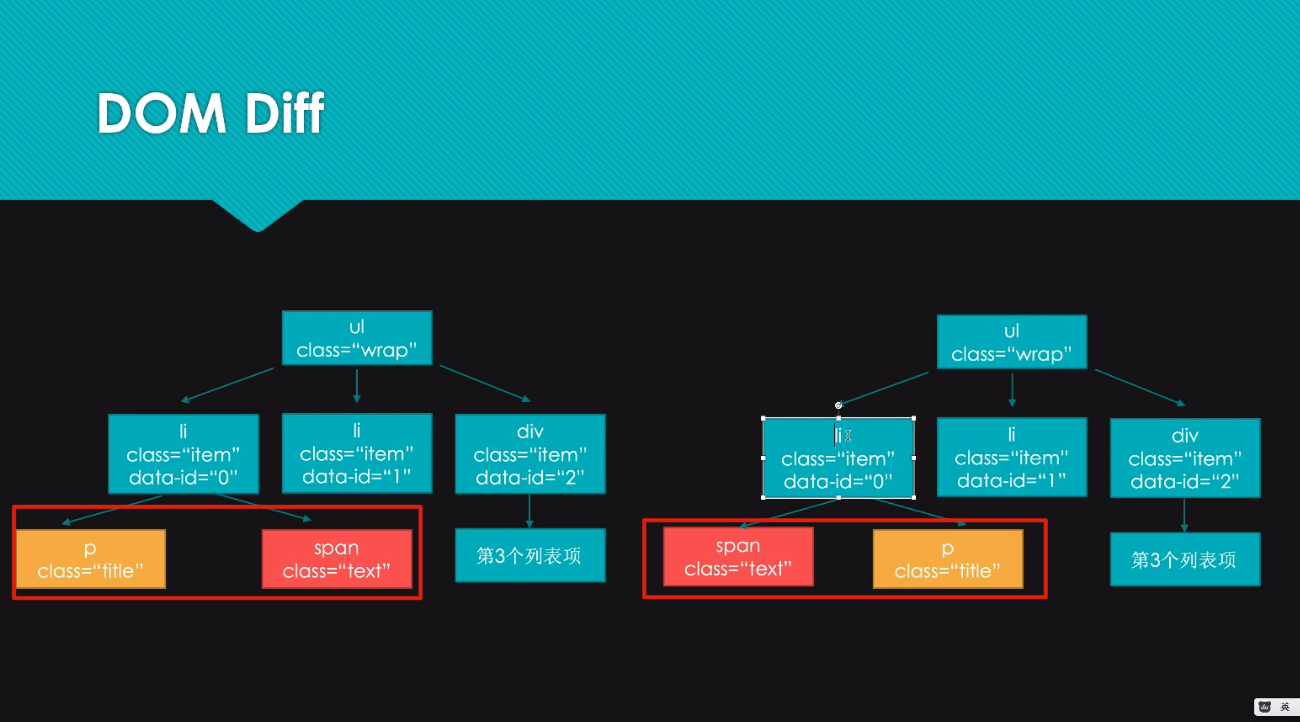
4、Diff 是深度遍历的
遍历的时候会先遍历ul,然后遍历左侧第一列的li以及li的子级,然后再遍历中间列的li以及li的子级…整个过程是从上往下深度遍历的,而不是从左到右广度遍历。
模拟一个 h 函数
例如我们想要用自己写的函数来创建一段这样的虚拟节点对象: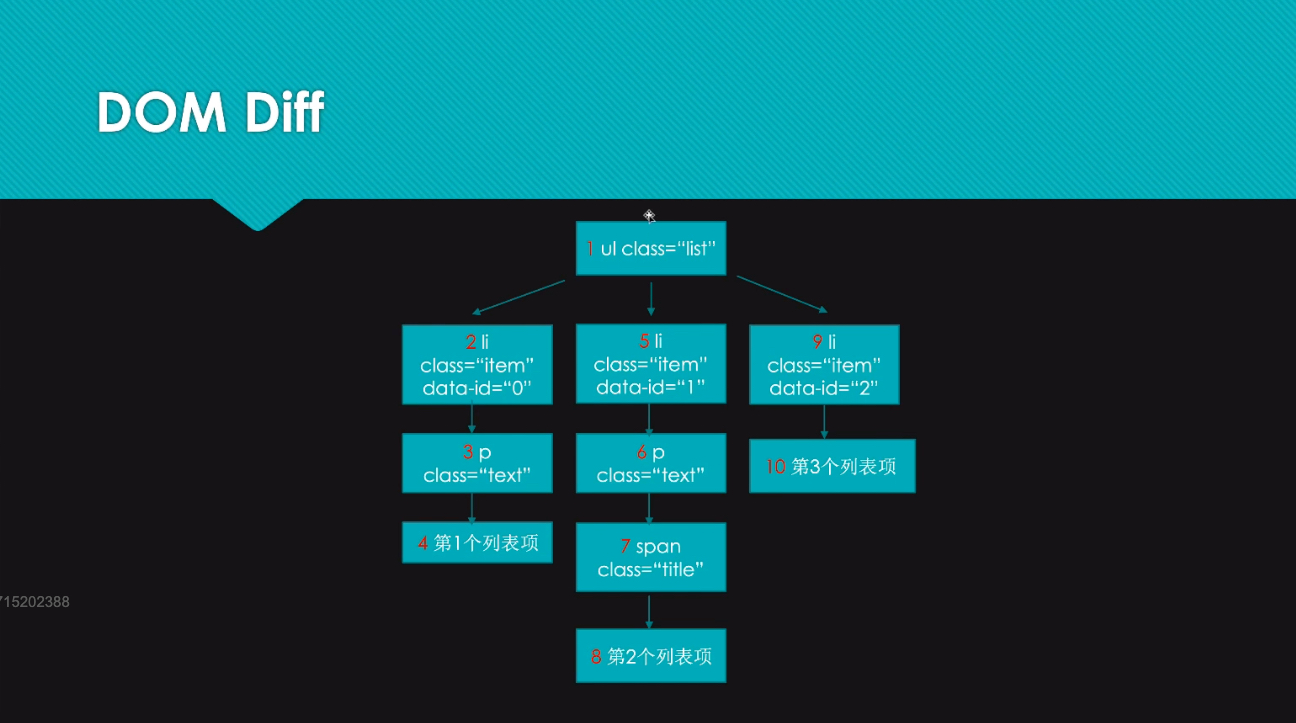
import { createElement } from "./virtualDom";const vDom = createElement("ul",{class: "list",style: "width: 300px; height: 300px; background-color: orange"},[createElement("li", { class: "item", "data-index": 0 }, [createElement("p", { class: "text" }, ["第1个列表项"])]),createElement("li", { class: "item", "data-index": 1 }, [createElement("p", { class: "text" }, [createElement("span", { class: "title" }, ["第2个列表项"])])]),createElement("li", { class: "item", "data-index": 2 }, ["第3个列表项"])]);console.log(vDom);
可以看到上面这段代码使用createElement()函数来创建一个虚拟节点,那么首先肯定是要去实现这个createElement()函数:
1、我们新建一个virtualDom.js文件,该文件内只负责虚拟 DOM 相关的事情。
import Element from "./Element";function createElement(type, props, children) {// 实例化一个元素对象return new Element(type, props, children);}export { createElement };
class Element {constructor(type, props, children) {this.type = type;this.props = props;this.children = children;}}export default Element;
这样结果如下: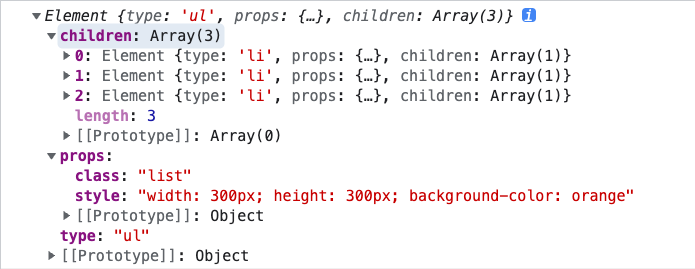
这样就实现了一个虚拟节点树啦。
2、拿到虚拟节点树以后,我们写一个render()函数去把我们刚才生成的虚拟节点渲染为一个真实的 DOM:
import { createElement, render } from "./virtualDom";const vDom = createElement("ul",{class: "list",style: "width: 300px; height: 300px; background-color: orange"},[createElement("li", { class: "item", "data-index": 0 }, [createElement("p", { class: "text" }, ["第1个列表项"])]),createElement("li", { class: "item", "data-index": 1 }, [createElement("p", { class: "text" }, [createElement("span", { class: "title" }, ["第2个列表项"])])]),createElement("li", { class: "item", "data-index": 2 }, ["第3个列表项"])]);const rDom = render(vDom);console.log(rDom);
import Element from "./Element";function setAtrrs(node, prop, value) {// 单独封装这个函数是因为某些运输的值需要特殊的处理,例如:// <input type="text" />// input 的 value 属性不能通过 setAttribute() 方法去设置,而是 input.value 去设置switch (prop) {case "value":// 如果节点是 <input /> 或者 <textarea></textarea>if (node.tagName === "INPUT" || node.tagName === "TEXTAREA") {node.value = value;} else {node.setAttribute(prop, value);}break;case "style":node.style.cssText = value;break;default:node.setAttribute(prop, value);break;}}// 创建元素对象function createElement(type, props, children) {return new Element(type, props, children);}// 渲染函数function render(vDom) {// 因为每一个节点对象上有这 3 个属性,我们可以进行解构const { type, props, children } = vDom;// 然后根据对应的类型去创建 DOMconst el = document.createElement(type);// 遍历 prop 对象,单独去设置元素的属性,因为某些属性比较特殊for (const key in props) {setAttrs(el, key, props[key]);}// 处理完当前元素,我们就要去处理子元素// 例如 { type: "ul", children: [{ type: "li"}, { type: "li"}]}children.map((c) => {// 判断子元素是不是 Element 构造函数的实例对象// 如果是就把子元素进行递归处理,否则就创建一个普通的文本节点c = c instanceof Element ? render(c) : document.createTextNode(c);、// 最后添加到父元素上el.appendChild(c);});return el;}// 我们还需要把 setAttrs 也导出,因为后面会用到export { createElement, render, setAttrs };
当把vDom传递给render()执行后,我们就能得到真正的 DOM 节点了。
3、最后我们把这个节点渲染到页面上就行了。同样的,我需要把它交给一个函数去处理。
import { createElement, render, renderDOM } from "./virtualDom";const vDom = createElement("ul",{class: "list",style: "width: 300px; height: 300px; background-color: orange"},[createElement("li", { class: "item", "data-index": 0 }, [createElement("p", { class: "text" }, ["第1个列表项"])]),createElement("li", { class: "item", "data-index": 1 }, [createElement("p", { class: "text" }, [createElement("span", { class: "title" }, ["第2个列表项"])])]),createElement("li", { class: "item", "data-index": 2 }, ["第3个列表项"])]);const rDom = render(vDom);renderDOM(rDom, document.getElementById("app"));
import Element from "./Element";// 设置属性function setAtrrs(node, prop, value) {switch (prop) {case "value":if (node.tagName === "INPUT" || node.tagName === "TEXTAREA") {node.value = value;} else {node.setAttribute(prop, value);}break;case "style":node.style.cssText = value;break;default:node.setAttribute(prop, value);break;}}// 创建元素对象function createElement(type, props, children) {return new Element(type, props, children);}// 渲染虚拟节点function render(vDom) {const { type, props, children } = vDom;const el = document.createElement(type);for (const key in props) {setAtrrs(el, key, props[key]);}children.map((c) => {c = c instanceof Element ? render(c) : document.createTextNode(c);el.appendChild(c);});return el;}// 渲染真实 DOMfunction renderDOM(rDom, rootEL) {rootEL.appendChild(rDom);}export { createElement, render, renderDOM, setAtrrs };
renderDOM()函数内部很简单,就是把渲染完成后的真实 DOM 直接挂载到一个根元素上就可以了。
这样我们就完成了对一个虚拟节点的解析渲染了。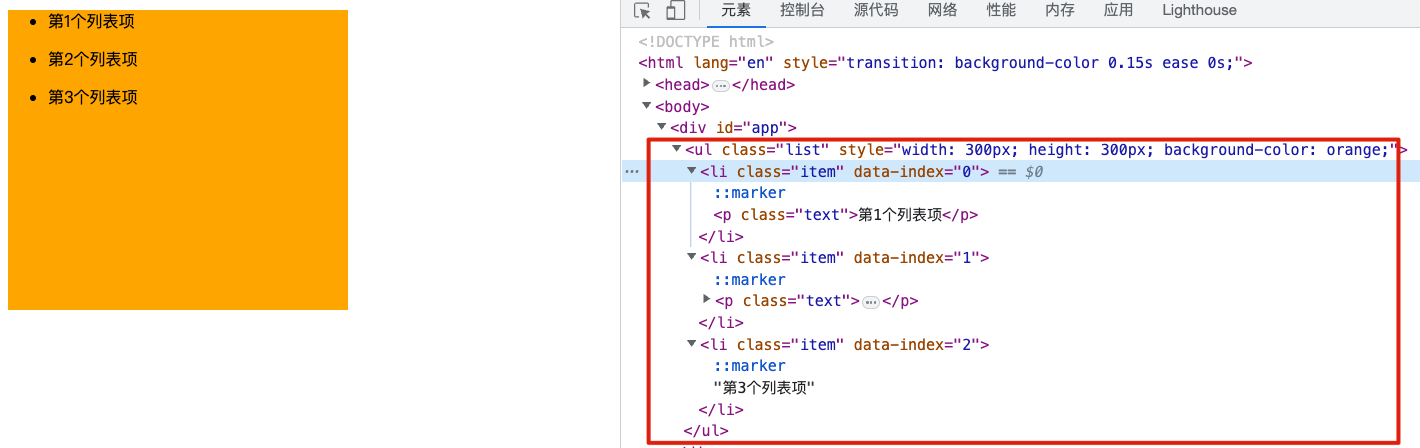
模拟一个 diff 函数
假如我现在要对以上的 DOM 进行更改,更改内容如下:
根据图片上的内容,可以得出更改的内容:
1、序号为 0 的ul的class属性变更为 list-warp
2、序号为 2 的p的class属性变更为 title
3、序号为 3 的文本内容变更为“特殊列表项”
4、序号为 6 的span元素进行了删除
5、序号为 7 的li元素类型变更为div元素
综上,我们可以把这些变更的内容,通过对象来记录下:
const patches = {0: [{type: "ATTR",attrs: {class: "list-wrap"}}],2: [{type: "ATTR",attrs: {class: "title"}}],3: [{type: "TEXT",text: "特殊列表项"}],6: [{type: "REMOVE",index: 6}],7: [{type: "REPLACE",newNode: {}}]};
因为一个元素的变更不可能为 1 个,所以我们把每个元素的变更保持为一个数组的方式。
下面是代码的变更操作:
const vDom1 = createElement("ul",{class: "list",style: "width: 300px; height: 300px; background-color: orange"},[createElement("li", { class: "item", "data-index": 0 }, [createElement("p", { class: "text" }, ["第1个列表项"])]),createElement("li", { class: "item", "data-index": 1 }, [createElement("p", { class: "text" }, [createElement("span", { class: "title" }, ["第2个列表项"])])]),createElement("li", { class: "item", "data-index": 2 }, ["第3个列表项"])]);const vDom2 = createElement("ul",{class: "list-wrap",style: "width: 300px; height: 300px; background-color: orange"},[createElement("li", { class: "item", "data-index": 0 }, [createElement("p", { class: "title" }, ["特殊列表项"])]),createElement("li", { class: "item", "data-index": 1 }, [createElement("p", { class: "text" }, [// span 进行了删除])]),createElement("div", { class: "item", "data-index": 2 }, ["第3个列表项"])]);
1、下面我们想开始对vDom1和vDom2进行对比
我们通过一个叫做domDiff()的方法去进行对比,拿到结果。
import { createElement, render, renderDOM } from "./virtualDom";import { domDiff } from "./domDiff";const vDom1 = createElement("ul",{class: "list",style: "width: 300px; height: 300px; background-color: orange"},[createElement("li", { class: "item", "data-index": 0 }, [createElement("p", { class: "text" }, ["第1个列表项"])]),createElement("li", { class: "item", "data-index": 1 }, [createElement("p", { class: "text" }, [createElement("span", { class: "title" }, ["第2个列表项"])])]),createElement("li", { class: "item", "data-index": 2 }, ["第3个列表项"])]);const vDom2 = createElement("ul",{class: "list-wrap",style: "width: 300px; height: 300px; background-color: orange"},[createElement("li", { class: "item", "data-index": 0 }, [createElement("p", { class: "title" }, ["特殊列表项"])]),createElement("li", { class: "item", "data-index": 1 }, [createElement("p", { class: "text" }, [// span 进行了删除])]),createElement("div", { class: "item", "data-index": 2 }, ["第3个列表项"])]);const rDom = render(vDom1);renderDOM(rDom, document.getElementById("app"));const patch = domDiff(vDom1, vDom2);console.log(patch)
2、然后我要去实现这个domDiff()方法最后返回patch差异对象。
import { REMOVE, REPLACE, TEXT, ATTR } from "./patchTypes";let patches = {}; // 一个全局的 patch 对象let vnIndex = 0;function domDiff(oldVDOM, newVDOM) {let index = 0;// 给 vNodeWalk 函数一个初始化的下标,结合我们本文的案例// 就是给 ul 一个 index="0"vNodeWalk(oldVDOM, newVDOM, index);return patches;}function vNodeWalk(oldNode, newNode, index) {// 每一个元素的更改内容let vnPatch = [];if (!newNode) {// 如果没有新的节点,说明旧的节点被删除了vnPatch.push({type: REMOVE,index});} else if (typeof oldNode === "string" && typeof newNode === "string") {// 如果旧节点和新节点都是字符串if (oldNode !== newNode) {vnPatch.push({type: TEXT,text: newNode});}} else if (oldNode.type !== newNode.type) {// 如果节点的类型不同,说明节点发生了变化vnPatch.push({type: REPLACE,newNode});} else if (oldNode.type === newNode.type) {// 如果节点类型一样,那就是看属性是否发生了变化const attrPatch = attrsWalk(oldNode.props, newNode.props);if (Object.keys(attrPatch).length > 0) {vnPatch.push({type: ATTR,attrs: attrPatch});}childrenWalk(oldNode.children, newNode.children);}if (vnPatch.length > 0) {patches[index] = vnPatch;}}// 让子级去递归 difffunction childrenWalk(oldChildren, newChildren) {if (!oldChildren) {return false;}oldChildren.forEach((el, index) => {// 这里的 vnIndex 是全局的 index// 因为 diff 是深度遍历的,所以是 ul>li>p 这样遍历的// 所以当每个元素的子元素遍历的时候都会去操作这个 index// 因为 ul 有一个默认的 index=0 所以我们不关心 ul// ul 的子元素是 li ,所以 li.index=1 > p.index=2 > ...// 这样深度遍历,所以 vnIndex 就是作为一个全局的 index ,每次遍历都会进行改变vNodeWalk(el, newChildren[index], ++vnIndex);});}// 处理元素的属性function attrsWalk(oldProps, newProps) {let attrPatch = {};// 判断是否更改for (const key in oldProps) {if (oldProps[key] !== newProps[key]) {attrPatch[key] = newProps[key];}}// 判断是否新增for (const key in newProps) {if (!oldProps.hasOwnProperty(key)) {attrPatch[key] = newProps[key];}}return attrPatch;}export { domDiff };
以上代码中,我们主要是通过domDiff()方法作为入口,然后使用vNodeWalk()方法去判断每一种类型的变化,最终把最有节点的变化都保存到了patches对象中,该对象的结构和我们上文中定义的patches对象结构是一致的!
另外,关于上面代码,你需要理解的是vnIndex的作用。因为我们介绍 DOM Diff 的时候说过了,其一个特点是深度优先遍历,所以上面代码中我们首次执行vNodeWalk()方法的是就传递了一个初始化的index,也就是给ul元素绑定了一个index。然后ul元素对比完就会执行childrenWalk()方法,然后就会去自加vnIndex全局下标,对应本文案例就是给li绑定index=1,然后li又执行完又去执行childrenWalk(),然后再操作vnIndex,这时p元素就是index=2。
执行完第一次子元素,就去执行第二层子元素,这时同样还是操作vnIndex…
简单画了这么一个草图。
通过domDiff的对比,我们最终得到了和上文中一样的patch对象: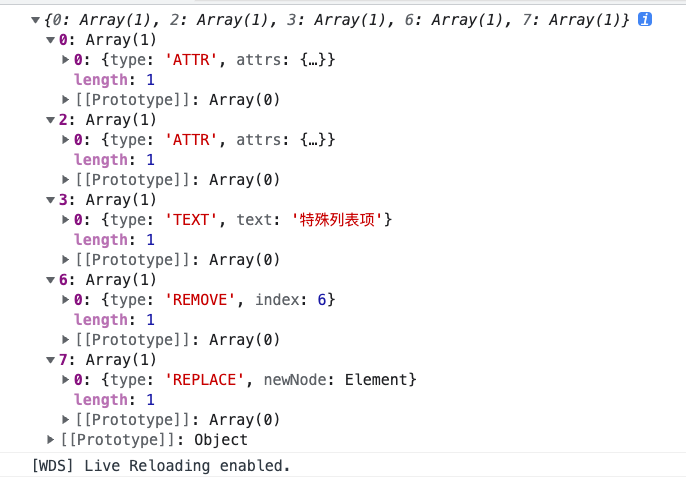
3、那么最后一步肯定就是要去对应真实的 DOM 进行操作了。
import { createElement, render, renderDOM } from "./virtualDom";import { domDiff } from "./domDiff";import { doPatch } from "./doPatch.js";const vDom1 = createElement("ul",{class: "list",style: "width: 300px; height: 300px; background-color: orange"},[createElement("li", { class: "item", "data-index": 0 }, [createElement("p", { class: "text" }, ["第1个列表项"])]),createElement("li", { class: "item", "data-index": 1 }, [createElement("p", { class: "text" }, [createElement("span", { class: "title" }, ["第2个列表项"])])]),createElement("li", { class: "item", "data-index": 2 }, ["第3个列表项"])]);const vDom2 = createElement("ul",{class: "list-wrap",style: "width: 300px; height: 300px; background-color: orange"},[createElement("li", { class: "item", "data-index": 0 }, [createElement("p", { class: "title" }, ["特殊列表项"])]),createElement("li", { class: "item", "data-index": 1 }, [createElement("p", { class: "text" }, [// span 进行了删除])]),createElement("div", { class: "item", "data-index": 2 }, ["第3个列表项"])]);const rDom = render(vDom1);renderDOM(rDom, document.getElementById("app"));const patch = domDiff(vDom1, vDom2);doPatch(rDom, patch);
我们继续写一个doPatch()方法,让这个方法去做对应的渲染。
import { ATTR, TEXT, REPLACE, REMOVE } from "./patchTypes";import { setAttrs, render } from "./virtualDom";import Element from "./Element";let finalPatches = {}; // 全局的 patch 对象let rnIndex = 0; // 全局的 indexfunction doPatch(rDom, patches) {finalPatches = patches;rNodeWalk(rDom);}function rNodeWalk(rNode) {// 这里的 rnIndex 和 domDiff 里的 vnIndex 作用是一样的const rnPatch = finalPatches[rnIndex++];const childNodes = rNode.childNodes;if (rnPatch) {// 先去处理自己patchAction(rNode, rnPatch);}// 然后让子元素去递归[...childNodes].map((c) => {rNodeWalk(c);});}function patchAction(rNode, rnPatch) {rnPatch.map((p) => {switch (p.type) {case ATTR:for (let key in p.attrs) {const value = p.attrs[key];// 如果有值就调用 virtualDom 文件的 setAttrs() 对属性进行设置或者覆盖if (value) {setAttrs(rNode, key, value);} else {// 否则进行删除rNode.removeAttribute(key);}}break;case TEXT:// 直接进行替换rNode.textContent = p.text;break;case REPLACE:const newNode =p.newNode instanceof Element? render(p.newNode): document.createTextNode(p.newNode);// 替换为新的元素rNode.parentNode.replaceChild(newNode, rNode);break;case REMOVE:// 删除rNode.parentNode.removeChild(rNode);break;default:break;}});}export { doPatch };
这样就完成了替换!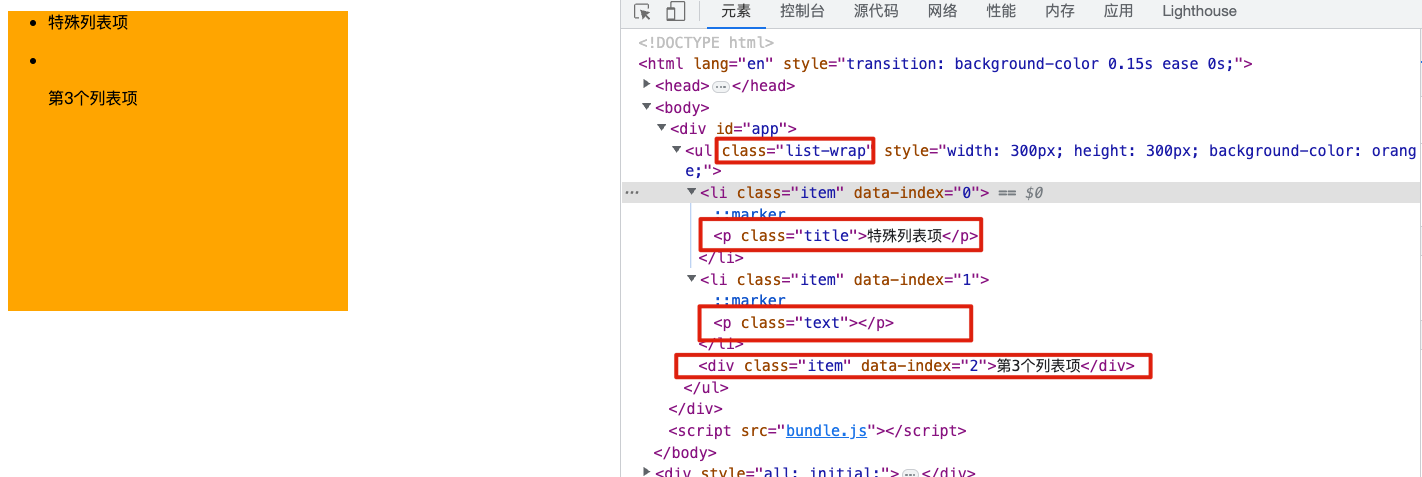

若有收获,就点个赞吧
0 人点赞
