第四章 实战入门
本章节将介绍如何在kubernetes集群中部署一个nginx服务,并且能够对其进行访问。
Namespace
Namespace是kubernetes系统中的一种非常重要资源,它的主要作用是用来实现**多套环境的资源隔离**或者**多租户的资源隔离**。默认情况下,kubernetes集群中的所有的Pod都是可以相互访问的。但是在实际中,可能不想让两个Pod之间进行互相的访问,那此时就可以将两个Pod划分到不同的namespace下。kubernetes通过将集群内部的资源分配到不同的Namespace中,可以形成逻辑上的"组",以方便不同的组的资源进行隔离使用和管理。可以通过kubernetes的授权机制,将不同的namespace交给不同租户进行管理,这样就实现了多租户的资源隔离。此时还能结合kubernetes的资源配额机制,限定不同租户能占用的资源,例如CPU使用量、内存使用量等等,来实现租户可用资源的管理。

kubernetes在集群启动之后,会默认创建几个namespace
[root@master ~]# kubectl get namespaceNAME STATUS AGEdefault Active 45h # 所有未指定Namespace的对象都会被分配在default命名空间kube-node-lease Active 45h # 集群节点之间的心跳维护,v1.13开始引入(少用)kube-public Active 45h # 此命名空间下的资源可以被所有人访问(包括未认证用户)(少用)kube-system Active 45h # 所有由Kubernetes系统创建的资源都处于这个命名空间(集群组件也是以pod形式存在这个ns中)
下面来看namespace资源的具体操作:
查看
# 1 查看所有的ns 命令:kubectl get ns[root@master ~]# kubectl get nsNAME STATUS AGEdefault Active 45hkube-node-lease Active 45hkube-public Active 45hkube-system Active 45h# 2 查看指定的ns 命令:kubectl get ns ns名称[root@master ~]# kubectl get ns defaultNAME STATUS AGEdefault Active 45h# 3 指定输出格式 命令:kubectl get ns ns名称 -o 格式参数# kubernetes支持的格式有很多,比较常见的是wide、json、yaml[root@master ~]# kubectl get ns default -o yamlapiVersion: v1kind: Namespacemetadata:creationTimestamp: "2020-04-05T04:44:16Z"name: defaultresourceVersion: "151"selfLink: /api/v1/namespaces/defaultuid: 7405f73a-e486-43d4-9db6-145f1409f090spec:finalizers:- kubernetesstatus:phase: Active# 4 查看ns详情 命令:kubectl describe ns ns名称[root@master ~]# kubectl describe ns defaultName: defaultLabels: <none>Annotations: <none>Status: Active # Active 命名空间正在使用中 Terminating 表示正在删除命名空间# ResourceQuota 针对namespace做的资源限制# LimitRange针对namespace中的每个组件做的资源限制No resource quota.No LimitRange resource.
创建
# 创建namespace[root@master ~]# kubectl create ns devnamespace/dev created
删除
# 删除namespace[root@master ~]# kubectl delete ns devnamespace "dev" deleted
配置方式
首先准备一个yaml文件:ns-dev.yaml
apiVersion: v1kind: Namespacemetadata:name: dev
然后就可以执行对应的创建和删除命令了:
创建:kubectl create -f ns-dev.yaml删除:kubectl delete -f ns-dev.yaml
Pod
Pod是kubernetes集群进行管理的最小单元,程序要运行必须部署在容器中,而容器必须存在于Pod中。
Pod可以认为是容器的封装,一个Pod中可以存在一个或者多个容器。

kubernetes在集群启动之后,集群中的各个组件也都是以Pod方式运行的。可以通过下面命令查看:
[root@master ~]# kubectl get pod -n kube-systemNAMESPACE NAME READY STATUS RESTARTS AGEkube-system coredns-6955765f44-68g6v 1/1 Running 0 2d1hkube-system coredns-6955765f44-cs5r8 1/1 Running 0 2d1hkube-system etcd-master 1/1 Running 0 2d1hkube-system kube-apiserver-master 1/1 Running 0 2d1hkube-system kube-controller-manager-master 1/1 Running 0 2d1hkube-system kube-flannel-ds-amd64-47r25 1/1 Running 0 2d1hkube-system kube-flannel-ds-amd64-ls5lh 1/1 Running 0 2d1hkube-system kube-proxy-685tk 1/1 Running 0 2d1hkube-system kube-proxy-87spt 1/1 Running 0 2d1hkube-system kube-scheduler-master 1/1 Running 0 2d1h
创建并运行
kubernetes没有提供单独运行Pod的命令,都是通过Pod控制器来实现的
# 命令格式: kubectl run (pod控制器名称) [参数]# --image 指定Pod的镜像# --port 指定端口# --namespace 指定namespace[root@master ~]# kubectl run nginx --image=nginx:1.17.1 --port=80 --namespace devdeployment.apps/nginx created
查看pod信息
# 查看Pod基本信息[root@master ~]# kubectl get pods -n devNAME READY STATUS RESTARTS AGEnginx-5ff7956ff6-fg2db 1/1 Running 0 43s# 查看Pod的详细信息[root@master ~]# kubectl describe pod nginx-5ff7956ff6-fg2db -n devName: nginx-5ff7956ff6-fg2dbNamespace: devPriority: 0Node: node1/192.168.109.101Start Time: Wed, 08 Apr 2020 09:29:24 +0800Labels: pod-template-hash=5ff7956ff6run=nginxAnnotations: <none>Status: RunningIP: 10.244.1.23IPs:IP: 10.244.1.23Controlled By: ReplicaSet/nginx-5ff7956ff6Containers:nginx:Container ID: docker://4c62b8c0648d2512380f4ffa5da2c99d16e05634979973449c98e9b829f6253cImage: nginx:1.17.1Image ID: docker-pullable://nginx@sha256:485b610fefec7ff6c463ced9623314a04ed67e3945b9c08d7e53a47f6d108dc7Port: 80/TCPHost Port: 0/TCPState: RunningStarted: Wed, 08 Apr 2020 09:30:01 +0800Ready: TrueRestart Count: 0Environment: <none>Mounts:/var/run/secrets/kubernetes.io/serviceaccount from default-token-hwvvw (ro)Conditions:Type StatusInitialized TrueReady TrueContainersReady TruePodScheduled TrueVolumes:default-token-hwvvw:Type: Secret (a volume populated by a Secret)SecretName: default-token-hwvvwOptional: falseQoS Class: BestEffortNode-Selectors: <none>Tolerations: node.kubernetes.io/not-ready:NoExecute for 300snode.kubernetes.io/unreachable:NoExecute for 300sEvents:Type Reason Age From Message---- ------ ---- ---- -------Normal Scheduled <unknown> default-scheduler Successfully assigned dev/nginx-5ff7956ff6-fg2db to node1Normal Pulling 4m11s kubelet, node1 Pulling image "nginx:1.17.1"Normal Pulled 3m36s kubelet, node1 Successfully pulled image "nginx:1.17.1"Normal Created 3m36s kubelet, node1 Created container nginxNormal Started 3m36s kubelet, node1 Started container nginx
访问Pod
# 获取podIP[root@master ~]# kubectl get pods -n dev -o wideNAME READY STATUS RESTARTS AGE IP NODE ...nginx-5ff7956ff6-fg2db 1/1 Running 0 190s 10.244.1.23 node1 ...#访问POD[root@master ~]# curl http://10.244.1.23:80<!DOCTYPE html><html><head><title>Welcome to nginx!</title></head><body><p><em>Thank you for using nginx.</em></p></body></html>
删除指定Pod
# 删除指定Pod[root@master ~]# kubectl delete pod nginx-5ff7956ff6-fg2db -n devpod "nginx-5ff7956ff6-fg2db" deleted# 此时,显示删除Pod成功,但是再查询,发现又新产生了一个[root@master ~]# kubectl get pods -n devNAME READY STATUS RESTARTS AGEnginx-5ff7956ff6-jj4ng 1/1 Running 0 21s# 这是因为当前Pod是由Pod控制器创建的,控制器会监控Pod状况,一旦发现Pod死亡,会立即重建# 此时要想删除Pod,必须删除Pod控制器# 先来查询一下当前namespace下的Pod控制器[root@master ~]# kubectl get deploy -n devNAME READY UP-TO-DATE AVAILABLE AGEnginx 1/1 1 1 9m7s# 接下来,删除此PodPod控制器[root@master ~]# kubectl delete deploy nginx -n devdeployment.apps "nginx" deleted# 稍等片刻,再查询Pod,发现Pod被删除了[root@master ~]# kubectl get pods -n devNo resources found in dev namespace.
配置操作
创建一个pod-nginx.yaml,内容如下:
apiVersion: v1kind: Podmetadata:name: nginxnamespace: devspec:containers:- image: nginx:1.17.1name: podports:- name: nginx-portcontainerPort: 80protocol: TCP
然后就可以执行对应的创建和删除命令了:
创建:kubectl create -f pod-nginx.yaml删除:kubectl delete -f pod-nginx.yaml
Label
Label是kubernetes系统中的一个重要概念。它的作用就是在资源上添加标识,用来对它们进行区分和选择。
Label的特点:
- 一个Label会以key/value键值对的形式附加到各种对象上,如Node、Pod、Service等等
- 一个资源对象可以定义任意数量的Label ,同一个Label也可以被添加到任意数量的资源对象上去
- Label通常在资源对象定义时确定,当然也可以在对象创建后动态添加或者删除
可以通过Label实现资源的多维度分组,以便灵活、方便地进行资源分配、调度、配置、部署等管理工作。
一些常用的Label 示例如下:
- 版本标签:”version”:”release”, “version”:”stable”……
- 环境标签:”environment”:”dev”,”environment”:”test”,”environment”:”pro”
- 架构标签:”tier”:”frontend”,”tier”:”backend”
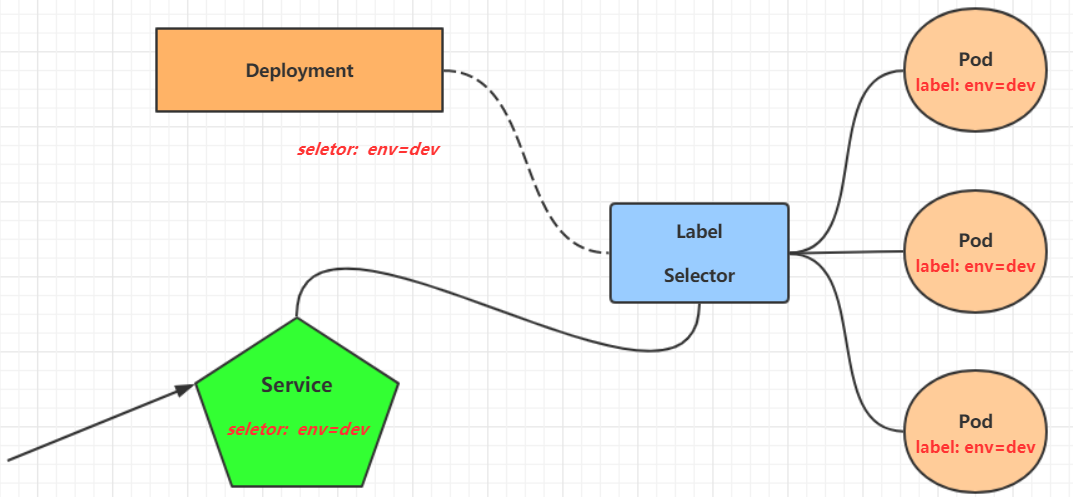
标签定义完毕之后,还要考虑到标签的选择,这就要使用到Label Selector,即:
Label用于给某个资源对象定义标识Label Selector用于查询和筛选拥有某些标签的资源对象
当前有两种Label Selector:
- 基于等式的Label Selector
name = slave: 选择所有包含Label中key=”name”且value=”slave”的对象
env != production: 选择所有包括Label中的key=”env”且value不等于”production”的对象 - 基于集合的Label Selector
name in (master, slave): 选择所有包含Label中的key=”name”且value=”master”或”slave”的对象
name not in (frontend): 选择所有包含Label中的key=”name”且value不等于”frontend”的对象
标签的选择条件可以使用多个,此时将多个Label Selector进行组合,使用逗号”,”进行分隔即可。例如:
name=slave,env!=productionname not in (frontend),env!=production
命令方式
# 为pod资源打标签[root@master ~]# kubectl label pod nginx-pod version=1.0 -n devpod/nginx-pod labeled# 为pod资源更新标签[root@master ~]# kubectl label pod nginx-pod version=2.0 -n dev --overwritepod/nginx-pod labeled# 查看标签[root@master ~]# kubectl get pod nginx-pod -n dev --show-labelsNAME READY STATUS RESTARTS AGE LABELSnginx-pod 1/1 Running 0 10m version=2.0# 筛选标签[root@master ~]# kubectl get pod -n dev -l version=2.0 --show-labelsNAME READY STATUS RESTARTS AGE LABELSnginx-pod 1/1 Running 0 17m version=2.0[root@master ~]# kubectl get pod -n dev -l version!=2.0 --show-labelsNo resources found in dev namespace.#删除标签[root@master ~]# kubectl label pod nginx-pod version- -n dev(注意version后面的 - 不能丢)pod/nginx-pod labeled
配置方式
apiVersion: v1kind: Podmetadata:name: nginxnamespace: devlabels:version: "3.0"env: "test"spec:containers:- image: nginx:1.17.1name: podports:- name: nginx-portcontainerPort: 80protocol: TCP
然后就可以执行对应的更新命令了:kubectl apply -f pod-nginx.yaml
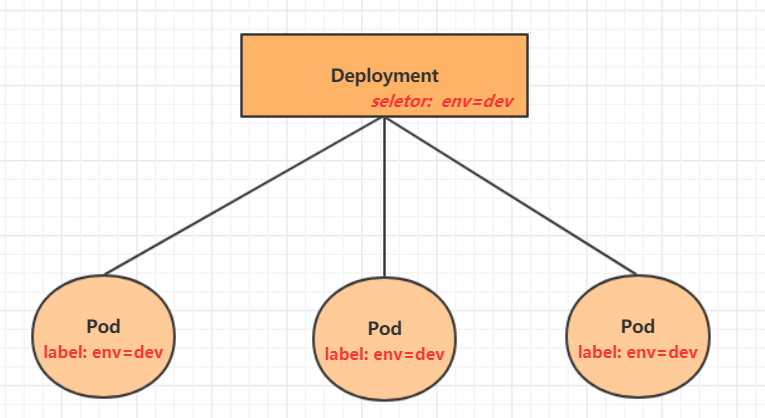
Deployment
在kubernetes中,Pod是最小的控制单元,但是kubernetes很少直接控制Pod,一般都是通过Pod控制器来完成的。Pod控制器用于pod的管理,确保pod资源符合预期的状态,当pod的资源出现故障时,会尝试进行重启或重建pod。在kubernetes中Pod控制器的种类有很多,本章节只介绍一种:Deployment。
命令操作
# 命令格式: kubectl run deployment名称 [参数]# --image 指定pod的镜像# --port 指定端口# --replicas 指定创建pod数量# --namespace 指定namespace[root@master ~]# kubectl run nginx --image=nginx:1.17.1 --port=80 --replicas=3 -n devdeployment.apps/nginx created# 查看创建的Pod[root@master ~]# kubectl get pods -n devNAME READY STATUS RESTARTS AGEnginx-5ff7956ff6-6k8cb 1/1 Running 0 19snginx-5ff7956ff6-jxfjt 1/1 Running 0 19snginx-5ff7956ff6-v6jqw 1/1 Running 0 19s# 查看deployment的信息[root@master ~]# kubectl get deploy -n devNAME READY UP-TO-DATE AVAILABLE AGEnginx 3/3 3 3 2m42s# UP-TO-DATE:成功升级的副本数量# AVAILABLE:可用副本的数量[root@master ~]# kubectl get deploy -n dev -o wideNAME READY UP-TO-DATE AVAILABLE AGE CONTAINERS IMAGES SELECTORnginx 3/3 3 3 2m51s nginx nginx:1.17.1 run=nginx# 查看deployment的详细信息[root@master ~]# kubectl describe deploy nginx -n devName: nginxNamespace: devCreationTimestamp: Wed, 08 Apr 2020 11:14:14 +0800Labels: run=nginxAnnotations: deployment.kubernetes.io/revision: 1Selector: run=nginxReplicas: 3 desired | 3 updated | 3 total | 3 available | 0 unavailableStrategyType: RollingUpdateMinReadySeconds: 0RollingUpdateStrategy: 25% max unavailable, 25% max surgePod Template:Labels: run=nginxContainers:nginx:Image: nginx:1.17.1Port: 80/TCPHost Port: 0/TCPEnvironment: <none>Mounts: <none>Volumes: <none>Conditions:Type Status Reason---- ------ ------Available True MinimumReplicasAvailableProgressing True NewReplicaSetAvailableOldReplicaSets: <none>NewReplicaSet: nginx-5ff7956ff6 (3/3 replicas created)Events:Type Reason Age From Message---- ------ ---- ---- -------Normal ScalingReplicaSet 5m43s deployment-controller Scaled up replicaset nginx-5ff7956ff6 to 3# 删除[root@master ~]# kubectl delete deploy nginx -n devdeployment.apps "nginx" deleted
配置操作
创建一个deploy-nginx.yaml,内容如下:
apiVersion: apps/v1kind: Deploymentmetadata:name: nginxnamespace: devspec:replicas: 3selector:matchLabels:run: nginxtemplate:metadata:labels:run: nginxspec:containers:- image: nginx:1.17.1name: nginxports:- containerPort: 80protocol: TCP
然后就可以执行对应的创建和删除命令了:
创建:kubectl create -f deploy-nginx.yaml删除:kubectl delete -f deploy-nginx.yaml
Service
通过上节课的学习,已经能够利用Deployment来创建一组Pod来提供具有高可用性的服务。
虽然每个Pod都会分配一个单独的Pod IP,然而却存在如下两问题:
- Pod IP 会随着Pod的重建产生变化
- Pod IP 仅仅是集群内可见的虚拟IP,外部无法访问
这样对于访问这个服务带来了难度。因此,kubernetes设计了Service来解决这个问题。
Service可以看作是一组同类Pod对外的访问接口。借助Service,应用可以方便地实现服务发现和负载均衡。
操作一:创建集群内部可访问的Service
# 暴露Service[root@master ~]# kubectl expose deploy nginx --name=svc-nginx1 --type=ClusterIP --port=80 --target-port=80 -n devservice/svc-nginx1 exposed# 查看service[root@master ~]# kubectl get svc svc-nginx1 -n dev -o wideNAME TYPE CLUSTER-IP EXTERNAL-IP PORT(S) AGE SELECTORsvc-nginx1 ClusterIP 10.109.179.231 <none> 80/TCP 3m51s run=nginx# 这里产生了一个CLUSTER-IP,这就是service的IP,在Service的生命周期中,这个地址是不会变动的# 可以通过这个IP访问当前service对应的POD[root@master ~]# curl 10.109.179.231:80<!DOCTYPE html><html><head><title>Welcome to nginx!</title></head><body><h1>Welcome to nginx!</h1>.......</body></html>
操作二:创建集群外部也可访问的Service
# 上面创建的Service的type类型为ClusterIP,这个ip地址只用集群内部可访问# 如果需要创建外部也可以访问的Service,需要修改type为NodePort[root@master ~]# kubectl expose deploy nginx --name=svc-nginx2 --type=NodePort --port=80 --target-port=80 -n devservice/svc-nginx2 exposed# 此时查看,会发现出现了NodePort类型的Service,而且有一对Port(80:31928/TC)[root@master ~]# kubectl get svc svc-nginx2 -n dev -o wideNAME TYPE CLUSTER-IP EXTERNAL-IP PORT(S) AGE SELECTORsvc-nginx2 NodePort 10.100.94.0 <none> 80:31928/TCP 9s run=nginx# 接下来就可以通过集群外的主机访问 节点IP:31928访问服务了# 例如在的电脑主机上通过浏览器访问下面的地址http://192.168.109.100:31928/
删除Service
[root@master ~]# kubectl delete svc svc-nginx1 -n devservice "svc-nginx1" deleted
配置方式
创建一个svc-nginx.yaml,内容如下:
apiVersion: v1kind: Servicemetadata:name: svc-nginxnamespace: devspec:clusterIP: 10.109.179.231ports:- port: 80protocol: TCPtargetPort: 80selector:run: nginxtype: ClusterIP
然后就可以执行对应的创建和删除命令了:
创建:kubectl create -f svc-nginx.yaml删除:kubectl delete -f svc-nginx.yaml
小结 至此,已经掌握了Namespace、Pod、Deployment、Service资源的基本操作,有了这些操作,就可以在kubernetes集群中实现一个服务的简单部署和访问了,但是如果想要更好的使用kubernetes,就需要深入学习这几种资源的细节和原理。
第五章 Pod详解
本章节将详细介绍Pod资源的各种配置(yaml)和原理。
Pod介绍
Pod结构
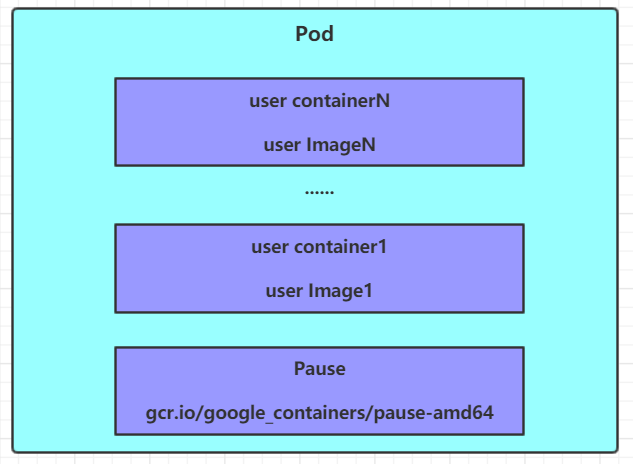
每个Pod中都可以包含一个或者多个容器,这些容器可以分为两类:
- 用户程序所在的容器,数量可多可少
- Pause容器,这是每个Pod都会有的一个根容器,它的作用有两个:
- 可以以它为依据,评估整个Pod的健康状态
- 可以在根容器上设置Ip地址,其它容器都此Ip(Pod IP),以实现Pod内部的网路通信
md
这里是Pod内部的通讯,Pod的之间的通讯采用虚拟二层网络技术来实现,我们当前环境用的是Flannel
Pod定义
下面是Pod的资源清单:
apiVersion: v1 #必选,版本号,例如v1kind: Pod #必选,资源类型,例如 Podmetadata: #必选,元数据name: string #必选,Pod名称namespace: string #Pod所属的命名空间,默认为"default"labels: #自定义标签列表- name: stringspec: #必选,Pod中容器的详细定义containers: #必选,Pod中容器列表- name: string #必选,容器名称image: string #必选,容器的镜像名称imagePullPolicy: [ Always|Never|IfNotPresent ] #获取镜像的策略command: [string] #容器的启动命令列表,如不指定,使用打包时使用的启动命令args: [string] #容器的启动命令参数列表workingDir: string #容器的工作目录volumeMounts: #挂载到容器内部的存储卷配置- name: string #引用pod定义的共享存储卷的名称,需用volumes[]部分定义的的卷名mountPath: string #存储卷在容器内mount的绝对路径,应少于512字符readOnly: boolean #是否为只读模式ports: #需要暴露的端口库号列表- name: string #端口的名称containerPort: int #容器需要监听的端口号hostPort: int #容器所在主机需要监听的端口号,默认与Container相同protocol: string #端口协议,支持TCP和UDP,默认TCPenv: #容器运行前需设置的环境变量列表- name: string #环境变量名称value: string #环境变量的值resources: #资源限制和请求的设置limits: #资源限制的设置cpu: string #Cpu的限制,单位为core数,将用于docker run --cpu-shares参数memory: string #内存限制,单位可以为Mib/Gib,将用于docker run --memory参数requests: #资源请求的设置cpu: string #Cpu请求,容器启动的初始可用数量memory: string #内存请求,容器启动的初始可用数量lifecycle: #生命周期钩子postStart: #容器启动后立即执行此钩子,如果执行失败,会根据重启策略进行重启preStop: #容器终止前执行此钩子,无论结果如何,容器都会终止livenessProbe: #对Pod内各容器健康检查的设置,当探测无响应几次后将自动重启该容器exec: #对Pod容器内检查方式设置为exec方式command: [string] #exec方式需要制定的命令或脚本httpGet: #对Pod内个容器健康检查方法设置为HttpGet,需要制定Path、portpath: stringport: numberhost: stringscheme: stringHttpHeaders:- name: stringvalue: stringtcpSocket: #对Pod内个容器健康检查方式设置为tcpSocket方式port: numberinitialDelaySeconds: 0 #容器启动完成后首次探测的时间,单位为秒timeoutSeconds: 0 #对容器健康检查探测等待响应的超时时间,单位秒,默认1秒periodSeconds: 0 #对容器监控检查的定期探测时间设置,单位秒,默认10秒一次successThreshold: 0failureThreshold: 0securityContext:privileged: falserestartPolicy: [Always | Never | OnFailure] #Pod的重启策略nodeName: <string> #设置NodeName表示将该Pod调度到指定到名称的node节点上nodeSelector: obeject #设置NodeSelector表示将该Pod调度到包含这个label的node上imagePullSecrets: #Pull镜像时使用的secret名称,以key:secretkey格式指定- name: stringhostNetwork: false #是否使用主机网络模式,默认为false,如果设置为true,表示使用宿主机网络volumes: #在该pod上定义共享存储卷列表- name: string #共享存储卷名称 (volumes类型有很多种)emptyDir: {} #类型为emtyDir的存储卷,与Pod同生命周期的一个临时目录。为空值hostPath: string #类型为hostPath的存储卷,表示挂载Pod所在宿主机的目录path: string #Pod所在宿主机的目录,将被用于同期中mount的目录secret: #类型为secret的存储卷,挂载集群与定义的secret对象到容器内部scretname: stringitems:- key: stringpath: stringconfigMap: #类型为configMap的存储卷,挂载预定义的configMap对象到容器内部name: stringitems:- key: stringpath: string
#小提示:# 在这里,可通过一个命令来查看每种资源的可配置项# kubectl explain 资源类型 查看某种资源可以配置的一级属性# kubectl explain 资源类型.属性 查看属性的子属性[root@master ~]# kubectl explain podKIND: PodVERSION: v1FIELDS:apiVersion <string>kind <string>metadata <Object>spec <Object>status <Object>[root@master ~]# kubectl explain pod.metadataKIND: PodVERSION: v1RESOURCE: metadata <Object>FIELDS:annotations <map[string]string>clusterName <string>creationTimestamp <string>deletionGracePeriodSeconds <integer>deletionTimestamp <string>finalizers <[]string>generateName <string>generation <integer>labels <map[string]string>managedFields <[]Object>name <string>namespace <string>ownerReferences <[]Object>resourceVersion <string>selfLink <string>uid <string>
在kubernetes中基本所有资源的一级属性都是一样的,主要包含5部分:
- apiVersion
版本,由kubernetes内部定义,版本号必须可以用 kubectl api-versions 查询到 - kind
类型,由kubernetes内部定义,版本号必须可以用 kubectl api-resources 查询到 - metadata

若有收获,就点个赞吧
0 人点赞
