1、为什么要学习redux?
随着Javascript的应用开发日趋复杂,javascript需要管理比任何时候都要多的state(状态)。
- javascript需要管理的状态越来越多,越来越复杂;
- 这些状态包括服务器返回的数据、缓存数据、用户操作产生的数据等等,也包括一些UI的状态,比如某些元素是否被选中,是否显示加载动态,当前分页的数据。
管理不断变化的state状态是非常困难的:
- 状态之间相互存在依赖,一个状态的变化会引起另一个状态的变化,view页面也有可能会引起状态的变化。
2、redux是什么?
:::info
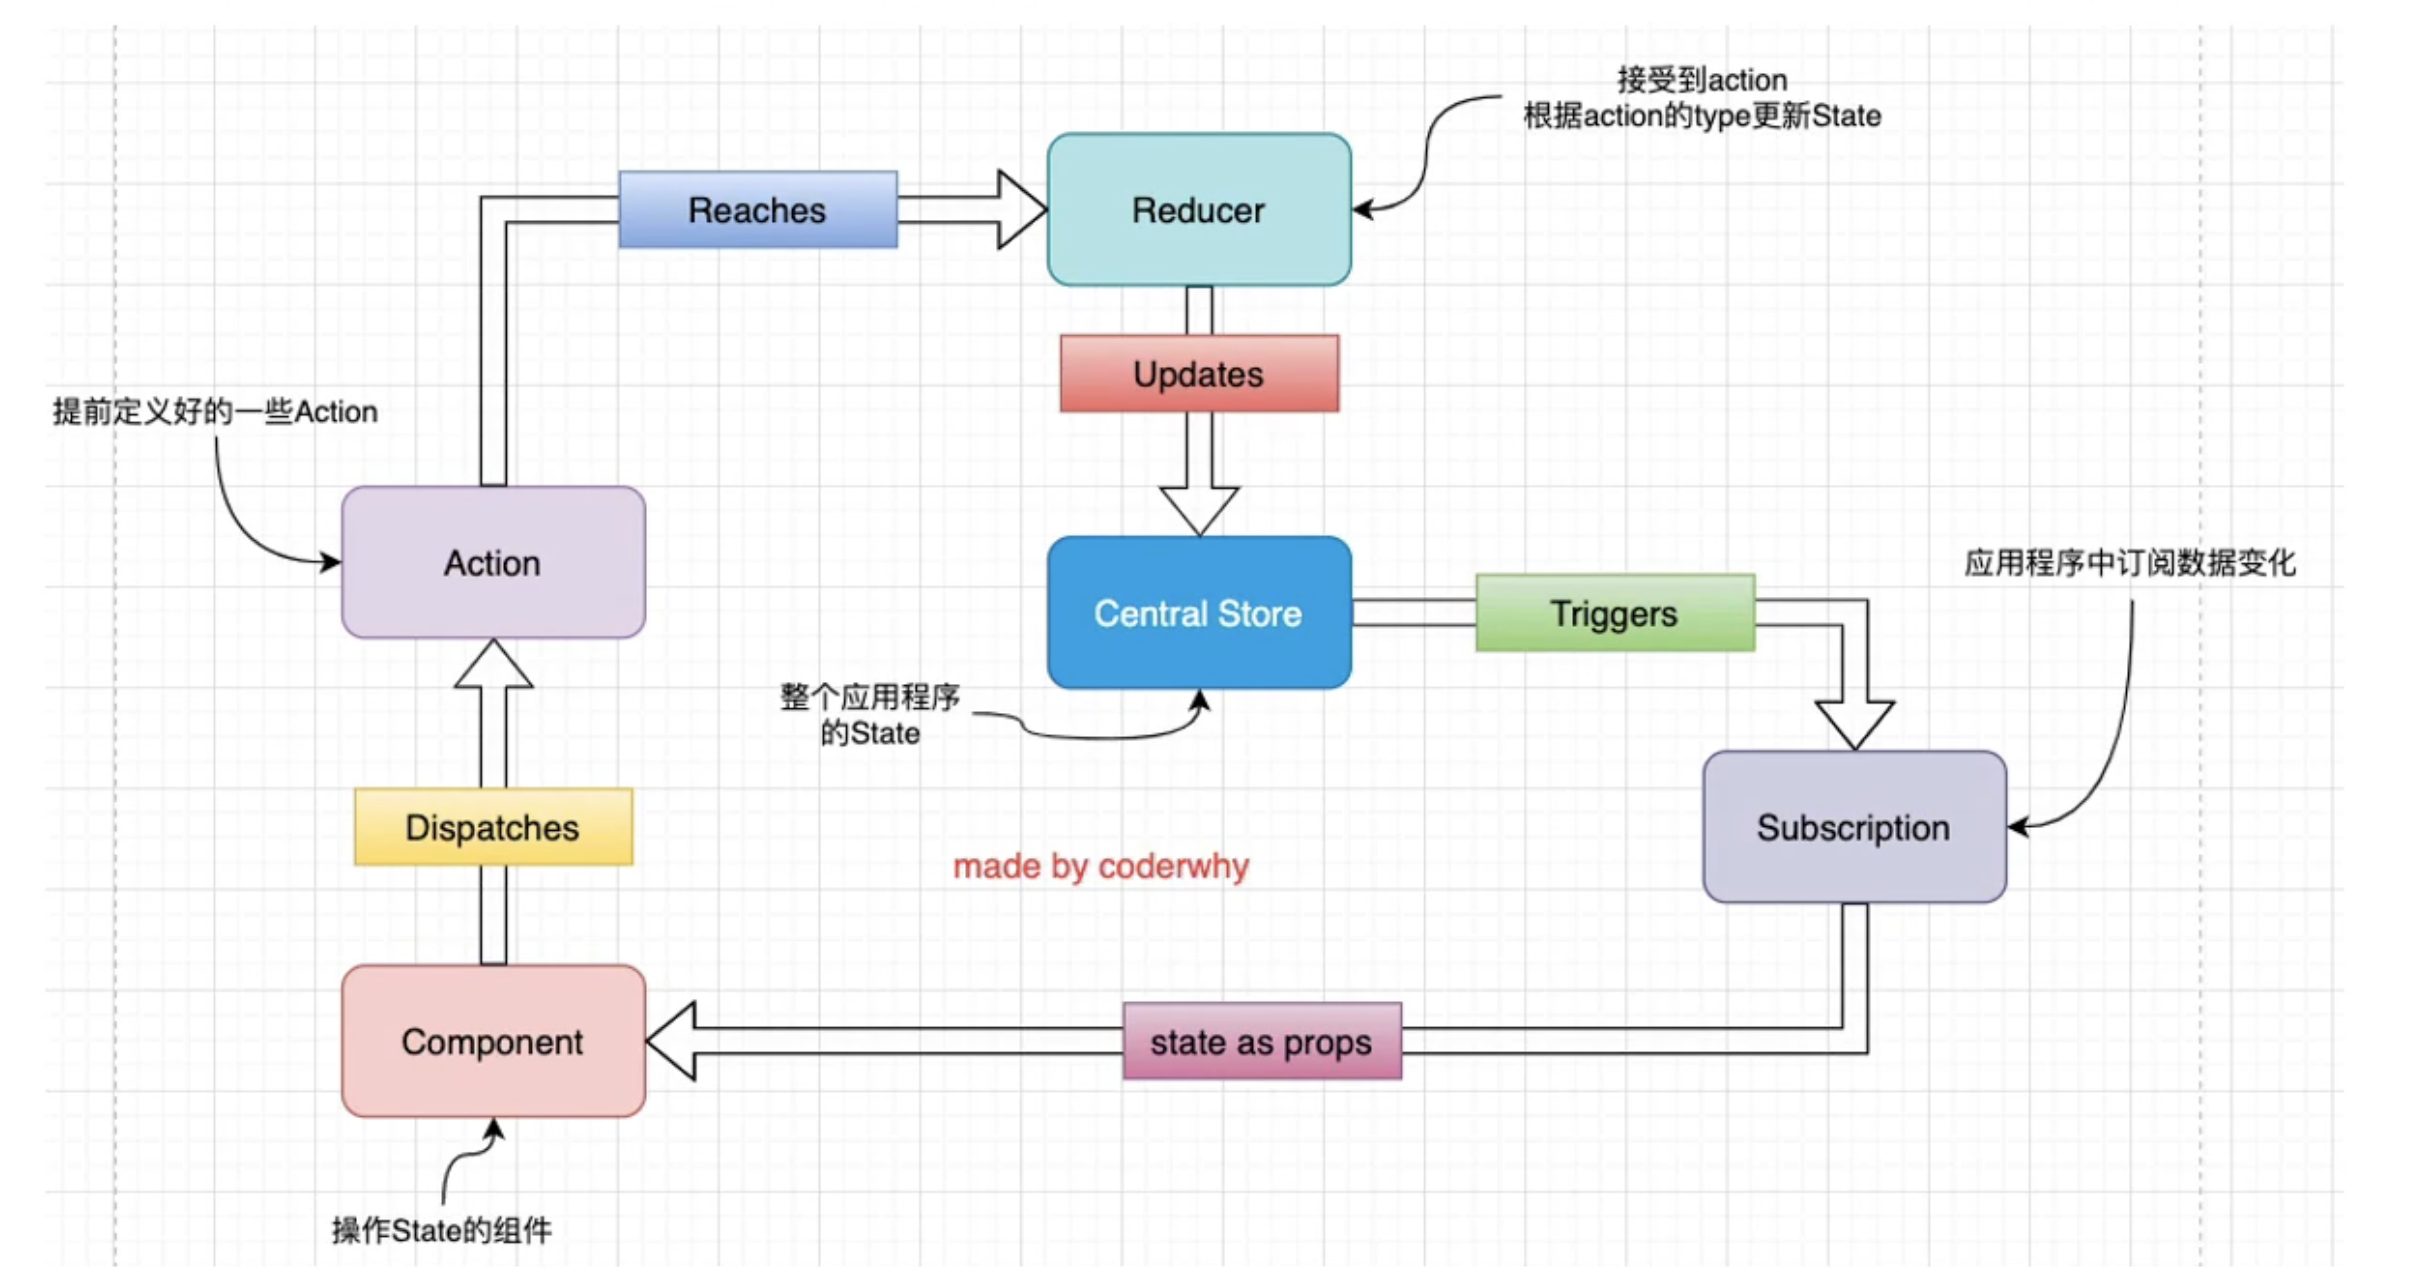
Redux是一个流行的JavaScript框架,为应用程序提供一个可预测的状态容器。Redux基于简化版本的Flux框架,Flux是Facebook开发的一个框架。在标准的MVC框架中,数据可以在UI组件和存储之间双向流动,而Redux严格限制了数据只能在一个方向上流动。redux的工作原理汝下图所示:
:::
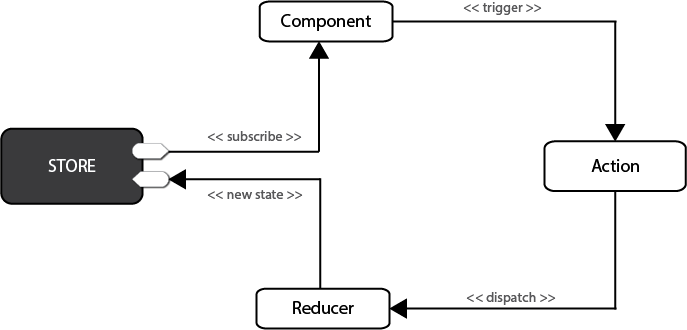
在Redux中,所有的数据(比如state)被保存在一个被称为store的容器中 → 在一个应用程序中只能有一个。store本质上是一个状态树,保存了在应用中需要保存的状态。任何UI组件都可以直接从store访问特定对象的状态。要通过本地或远程组件更改状态,需要分发一个action。分发在这里意味着将可执行信息发送到store。当一个store接收到一个action,它将把这个action代理给相关的reducer。reducer是一个纯函数,它可以查看之前的状态,执行一个action并且返回一个新的状态。
3、使用redux完成计数器的案例
计数器对应的状态就是当前的数字,行为就是增加或者减少,我们使用redux来管理这个计数器案例。
// redux的具体使用 计数器案例// 1、引入redux 在这里需要使用require()函数来引入 在脚手架中可直接使用commonjs的语法const redux = require('redux')// 2、定义redux需要管理的状态const defaultStatus = {counter: 200}// 3、定义需要修改状态的行为actionconst action1 = { type: 'INCREMENT' }const action2 = { type: 'DECREMENT' }// 4、创建reducer 形成为(state,action)=> state的纯函数function reducer(state = defaultStatus, action) {switch (action.type) {case 'INCREMENT':return {...state, counter: state.counter + 1 }case 'DECREMENT':return {...state, counter: state.counter - 1 }default:return state}}// 5、创建redux的store来存放应用的状态api是 { subscribe, dispatch, getState }let store = redux.createStore(reducer)// 6、可以手动订阅更新 也可以事件绑定到视图层 事件订阅后 就会回调事件订阅的函数 回调函数就会自动执行store.subscribe(() => {const newState = store.getState().counterconsole.log('订阅获取最新的状态', newState)})// 7、改变内部state唯一方法是 dispatch一个action action可以被序列化 用于记录和储存下来 后期还可以以回放的形式执行store.dispatch(action1)store.dispatch(action2)
总结:使用redux管理状态的几个步骤 1、引入redux,引入的方式是不相同的 2、创建我们需要管理的初始化状态(一般为一个对象) 3、创建我们修改数据的行为action(一般为一个对象,里面定义修改数据的方法类型,修改的数据) 4、创建reducer纯函数,将我们的状态与行为联系在一起,根据不同的行为,内部处理以后,返回新的状态(注意:不能修改原始的状态) 5、使用redux来创建全局的状态管理仓库store,将我们的纯函数reducer作为参数传入进去 6、订阅store仓库中state发生变化的事件,订阅后将获取store中最新的状态 7、使用store来派发修改状态的行为。
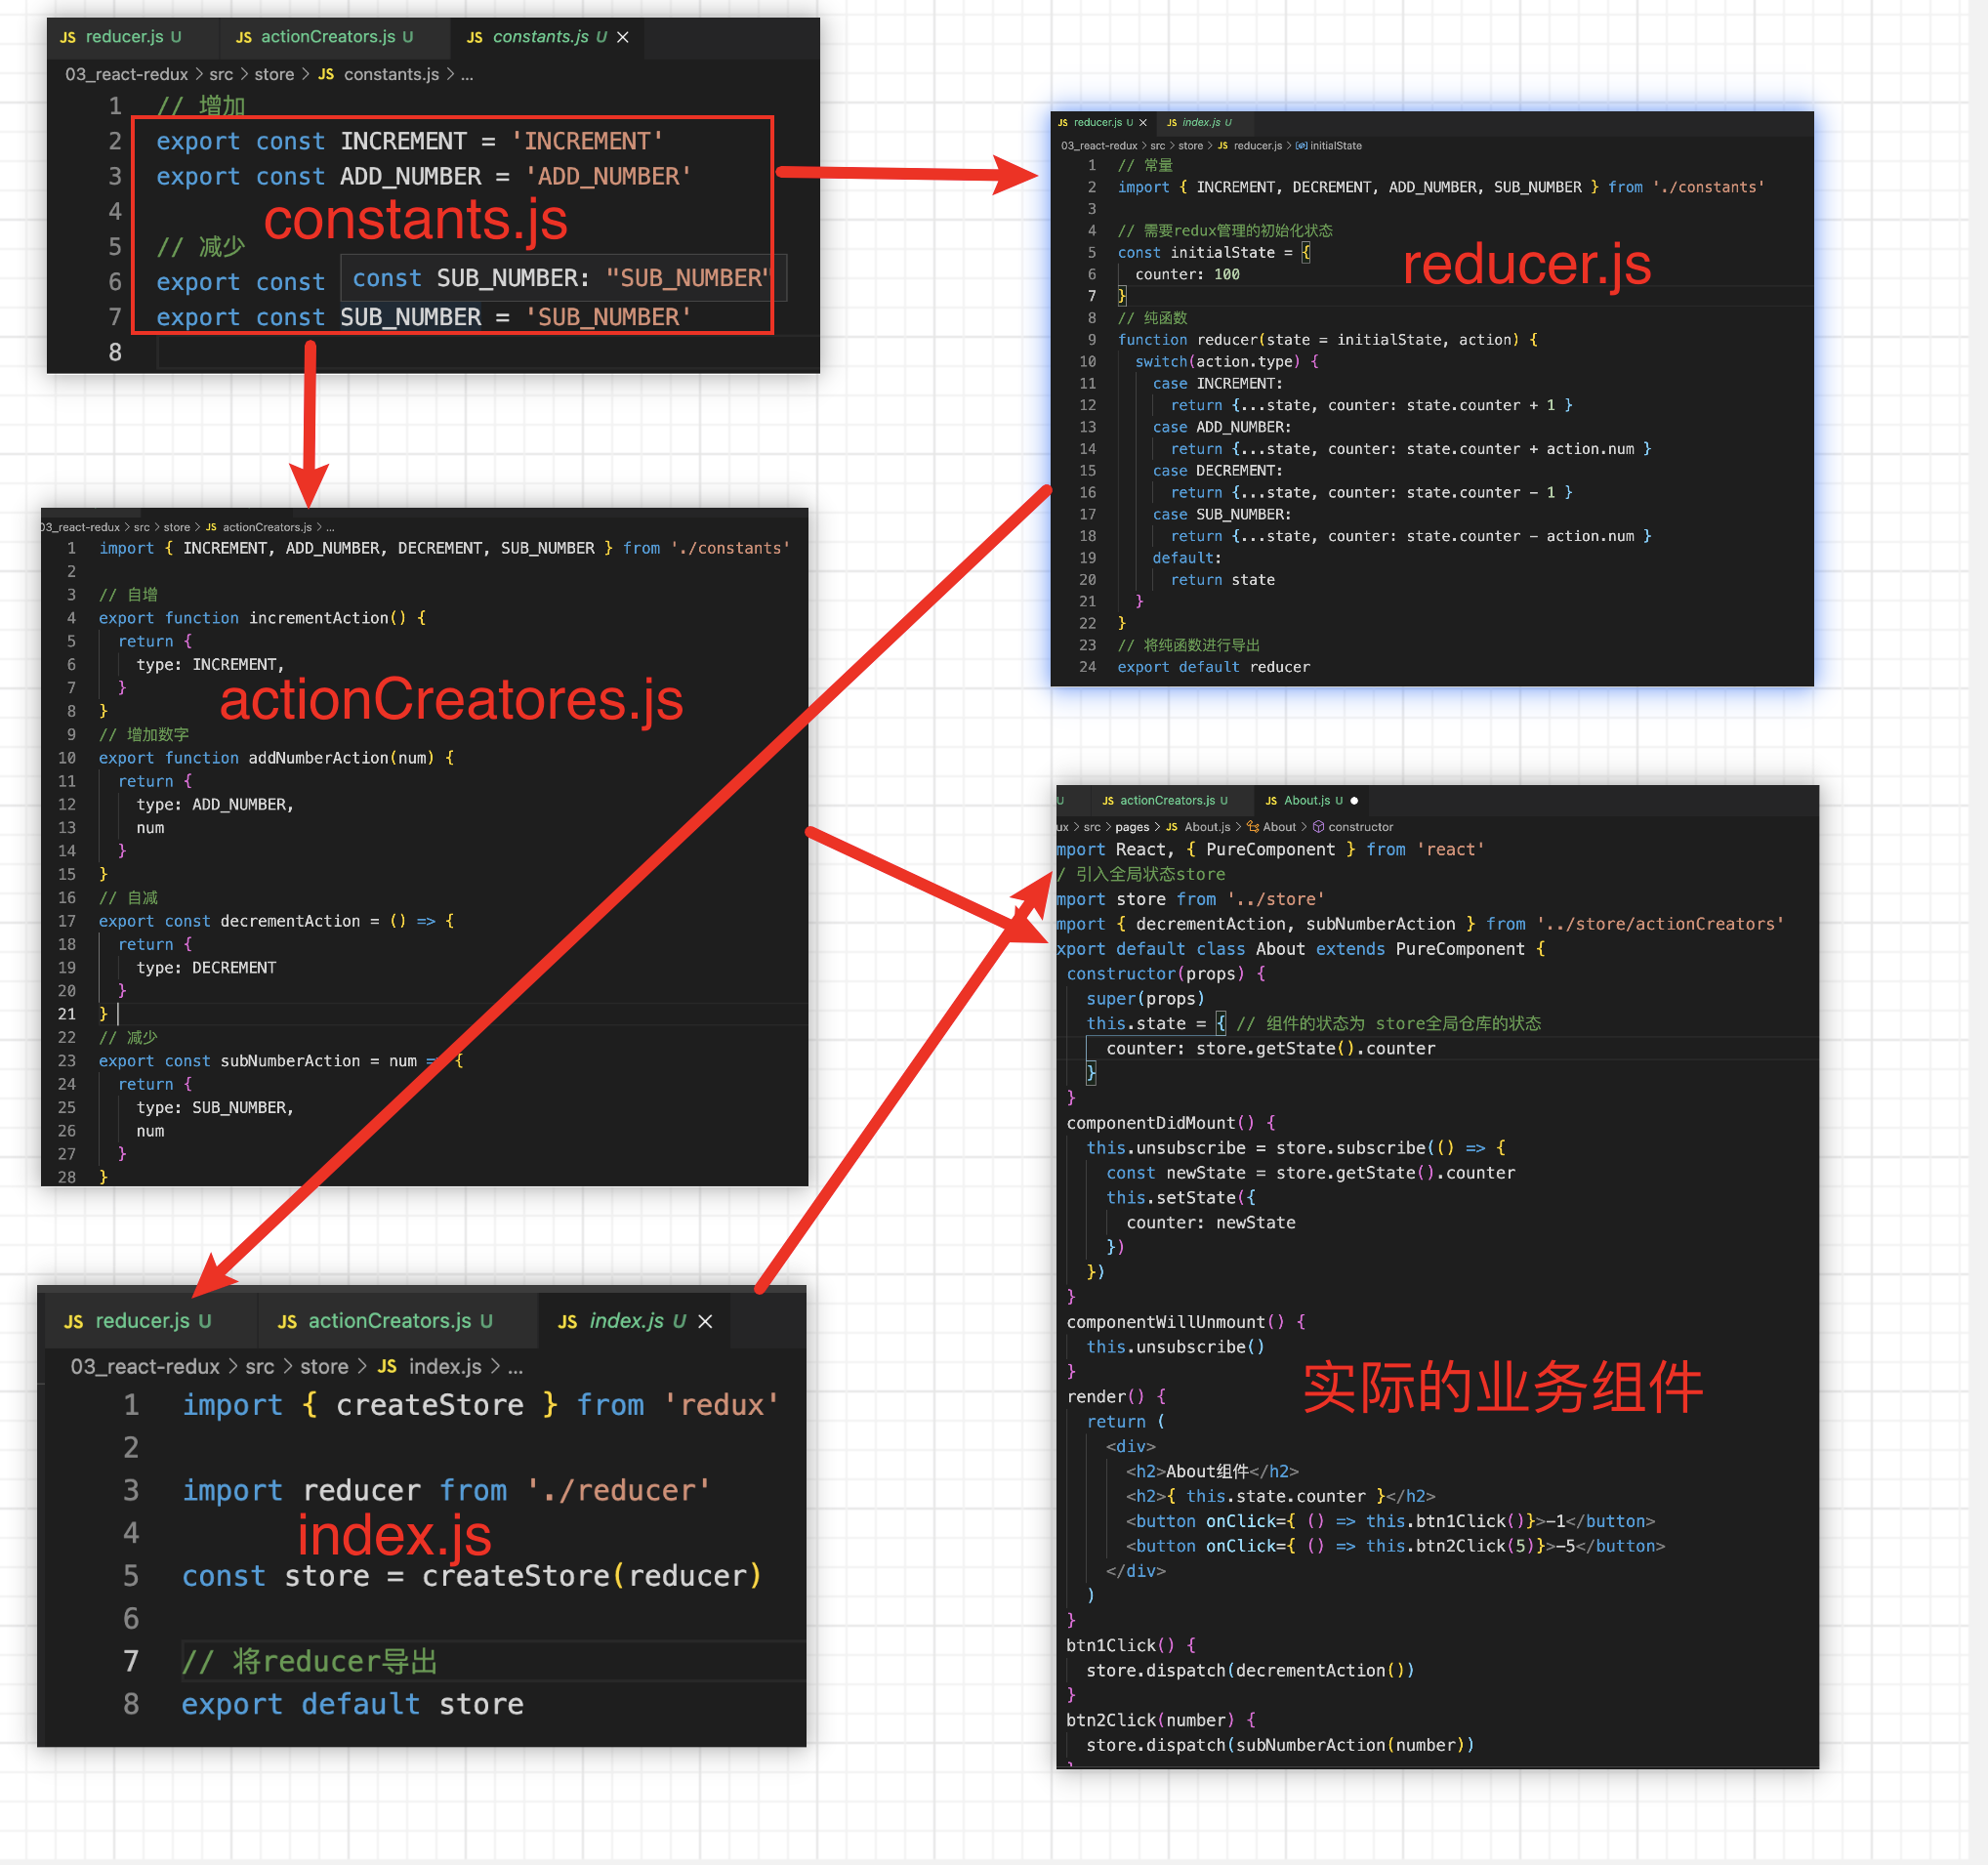
4、拆分redux、模块化开发
在项目中对redux进行相应的拆分,分为不同的模块,使不同的模块完成不同的功能。
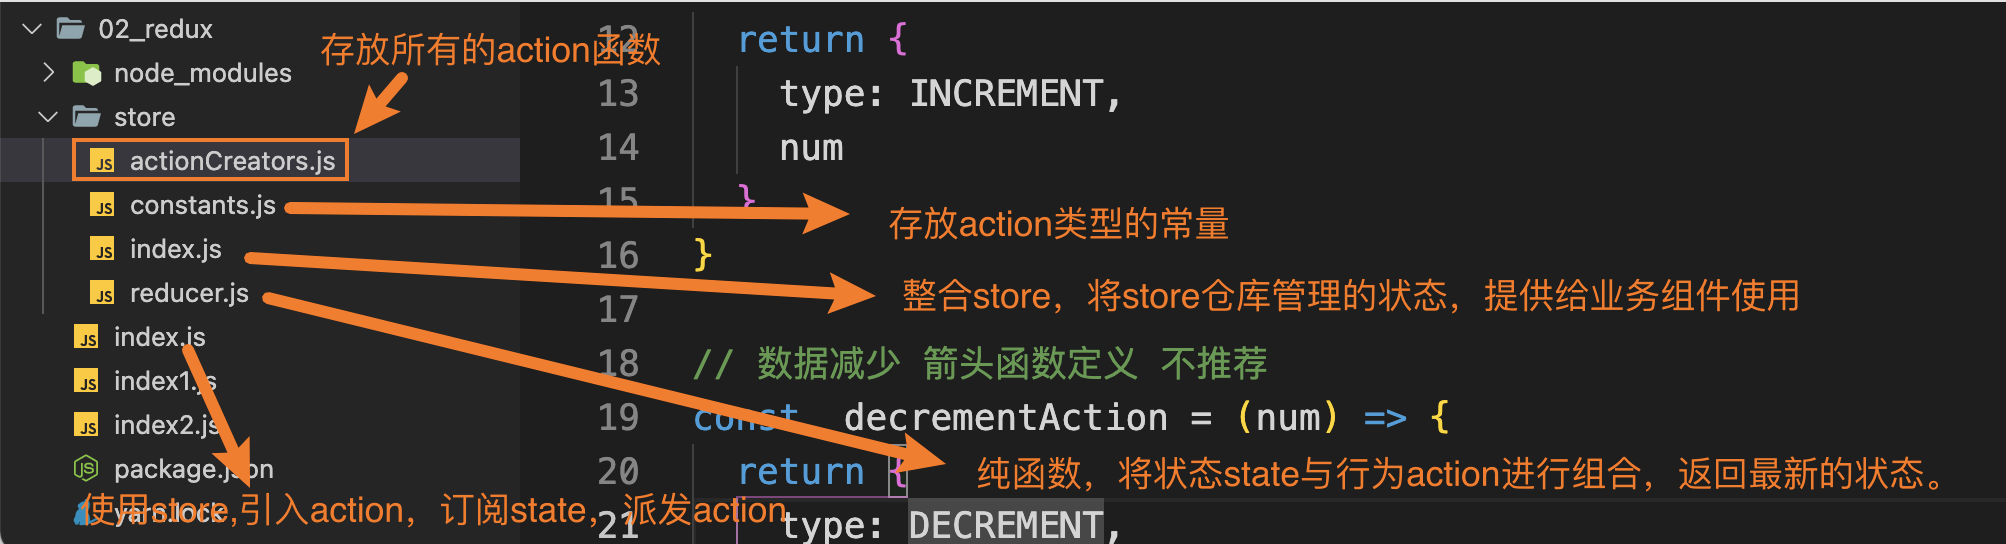
4.1 actionCreators.js文件
作用:定义生成action对象的函数。
// 定义修改数据的行为// 引入常量import {INCREMENT,DECREMENT,MUL} from './constants.js'// 数据增加 普通函数定义 不推荐function incrementAction(num) {return {type: INCREMENT,num}}// 数据减少 箭头函数定义 不推荐const decrementAction = (num) => {return {type: DECREMENT,num}}// 数据相乘 箭头函数定义 简写形式 推荐写法const mulAction = num => ({type: MUL,num})// 将定义的函数进行导出export { incrementAction, decrementAction, mulAction }
4.2 constants.js
作用:定义action的类型,进行导出,在实际的业务组件和reducer纯函数中使用。
export const INCREMENT = 'INCREMENT'export const DECREMENT = 'DECREMENT'export const MUL = 'MUL'
4.3 reducer.js纯函数
作用:将我们需要管理的状态和需要派发的行为进行结合,根据派发行为的不同,返回不同的数据状态。
// 1、需要定义redux管理的初始化状态// 2、引入修改状态的行为action// 引入actionimport {INCREMENT,DECREMENT,MUL} from './constants.js'// 定义初始化状态const defaultStatus = {counter: 100}// 定义纯函数reducerfunction reducer(state = defaultStatus, action) {switch(action.type) {case INCREMENT:return {...state, counter: state.counter + action.num }case DECREMENT:return {...state, counter: state.counter - action.num }case MUL:return {...state, counter: state.counter * action.num }default:return state}}// 将reducer函数默认导出export default reducer;
4.3 index.js文件-store数据仓库的入口文件
原理:引入redux,创建store数据仓库,管理传入的状态,将reducer纯函数作为参数传入,再将store进行导出,提供给我们实际的业务组件使用。
// 在这里应该将store进行导出 提供给业务组件使用 在业务组件中只需要使用store进行dispatch派发action即可// 需要引入reduximport redux from 'redux'// 引入纯函数reducer纯函数作为参数import reducer from './reducer.js'const store = redux.createStore(reducer)export default store;
4.4 业务组件使用store的步骤
方法:引入store, 引入actionCreators文件,订阅store事件,并且派发相应的行为。
// 当作业务组件使用 直接使用store 调用store来派发行为// 引入storeimport store from "./store/index.js"// 导入入actionimport {incrementAction,decrementAction,mulAction} from "./store/actionCreators.js"// 订阅store状态发生变化的事件store.subscribe(() => {// 获取最新的状态值const newState = store.getState();console.log(newState);})// 派发修改状态的行为store.dispatch(incrementAction(200));store.dispatch(decrementAction(200));store.dispatch(mulAction(5));
4.5 在react组件中使用的步骤
步骤: 1、在react组件的生命周期中,componentDidMount中使用store进行数据的订阅。订阅完成后,一旦我们的数据发生了变化,我们的订阅事件就会发生回调,此时数据更新后,我们调用this.setState()函数,就会重新调用render方法,界面就会更新。 2、在dom元素挂载以后,监听页面的相关的事件或者在其它的时机使用store来派发行为。再次更新页面数据。
4.6 redux使用的流程图
需要注意的事项:
1、redux推荐我们全局只创建一个store对象,不需要创建多个。
4.7 在node中,由于低版本的node不支持ES6的导入(import)和导出(export)的功能,在node的13.X版本下,我们需要进行一些特殊的配置,让node支持我们平时习惯使用的ES Module的功能,对package.json文件进行具体的配置,见下图:
截图: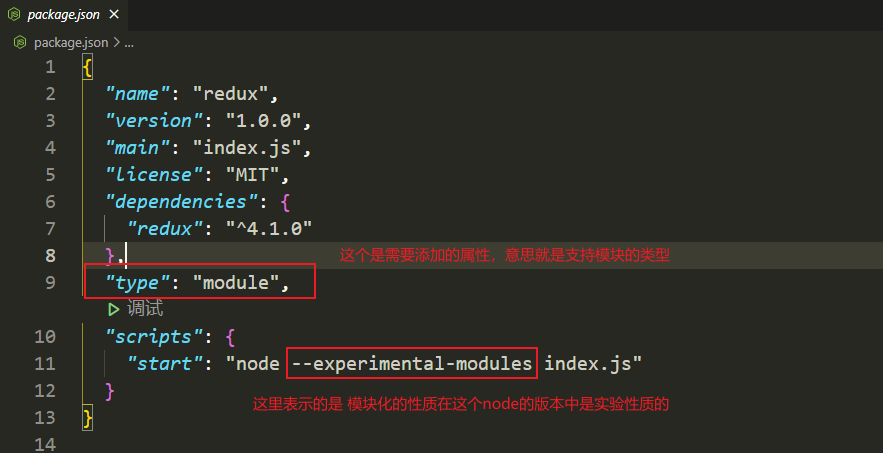
5、redu在组件中的使用
5.1 计数器案例
原理:数据的原始状态保存在redux中,创建store状态仓库,向外暴露store,那么我们的组件就可以根据store来获取最新的状态。同时,在组件挂载完毕以后,组件可以订阅subscribe全局仓库store书记的变化,一旦数据发生变化,我们使用setState来修改状态,组件就会重新进行渲染。我们就可以获取到最新的状态。同时在组件中我们可以进行dom元素的监听,可以利用stote来派发相应事件,修改redux中的状态。
About组件
import React, { PureComponent } from 'react'// 引入全局状态storeimport store from '../store'import { addAction, subAction } from '../store/actionCreators'export default class About extends PureComponent {constructor(props) {super(props)this.state = {// 组件的状态为 store全局仓库的状态counter: store.getState().counter}}componentDidMount() {this.unsubscribe = store.subscribe(() => {const newState = store.getState().counterthis.setState({counter: newState})})}componentWillUnmount() {this.unsubscribe()}render() {return (<div><h2>About组件</h2><h2>{ this.state.counter }</h2><button onClick={ () => this.btn1Click()}>增加增加</button><button onClick={ () => this.btn2Click()}>降低降低</button></div>)}btn1Click() {store.dispatch(addAction())}btn2Click() {store.dispatch(subAction())}}
组件Home
import React, { PureComponent } from 'react'// 引用全局状态import store from '../store'import { addAction, subAction } from '../store/actionCreators'export default class Home extends PureComponent {constructor(props) {super(props)this.state = {// 将全局的状态分发到组件中 在组件中可直接进行展示counter: store.getState().counter}}componentDidMount() {// 订阅事件 调用渲染函数 更新页面的数据this.unsubscribe = store.subscribe(() => {const newState = store.getState().counter// 修改页面 获取最新的状态数据this.setState({counter: newState})})}componentWillUnmount() {// 组件卸载的时候 取消订阅事件this.unsubscribe()}render() {return (<div><h2>Home组件</h2><h2>{ this.state.counter }</h2><button onClick={ () => this.btn1Click() }>数据增加</button><button onClick={ () => this.btn2Click() }>数据降低</button></div>)}btn1Click() {// 派发事件store.dispatch(addAction())}btn2Click() {store.dispatch(subAction())}}
5.2 计数器案例-自己封装的connect高阶函数
原理:在我们实际的业务组件中,组件A和组件B都有相同的逻辑,这个逻辑是,实际的业务组件先引入我们的状态仓库store,因为在这个仓库中我们可以获取我们最新的状态,我们可以监听、订阅我们状态发生变化的时机,订阅后数据发生变化的时候,我们可以更新页面数据,那么我们页面的数据就是最新的数据。在组件将要卸载的时候,我们可以取消订阅的事件。在DOM的事件中,我们事件的监听都有自己的回调函数,那么在监听后我们可以dispatch来派发action, 派发action, 就意味这可以修改相应的数据。一旦我们的数据发生了变化,订阅事件就会重新被激活,页面就会重新进行渲染,这就是内部的逻辑。 存在的问题:在上述的逻辑中,我们可以看出,我们实际的每个业务组件都需要相同的操作逻辑,获取store中的状态,将store中的状态保存为组件自身的状态,然后监听、订阅store发生的变化,然后修改组件自身的状态,更新页面,在组件卸载的时候,取消订阅,在操作DOM的时候,使用store来派发事件,修改store中的状态,页面重新进行渲染。所有的组件,都是这一套的逻辑,缺点是代码的重复率太高了,相同的代码有多个地方。而且整个流程操作比较复杂。 解决方案:抽象出一个高阶组件(实际上是一个函数),将我们业务组件需要做的事情,全部抽取到高阶组件中,业务组件实际需要完成的事情,都在高阶组件中完成,高阶组件将新的状态和修改状态的方法全部通过props传递到实际的业务组件中,我们的业务组件就可以直接使用。实际上,我们的第三方插件就是react-redux就是用来干这件事情的。
import { PureComponent } from "react";import store from '../store'function connect(mapStateToProps, mapDispatchToProps) {return function enhanceHOC(WrappedComponent) {return class extends PureComponent {constructor(props) {super(props)this.staste = {storeState: mapStateToProps(store.getState())}}componentDidMount() {// 订阅store发生的变化并更新数据this.unsubscribe = store.subscribe(() => {this.setState({storeState: mapStateToProps(store.getState())})})}componentWillUnmount() {this.unsubscribe()}storerender() {return <WrappedComponent {...this.props}{...mapStateToProps(store.getState())}{...mapDispatchToProps(store.dispatch)} />}}}}// 将connect函数进行导出export default connect;
在组件中使用,将公用的代码抽取出去了
About组件:
import React, { PureComponent } from 'react'import connect from '../utils/connect'import {incrementAction, addNumberAction} from '../store/actionCreators'class About extends PureComponent {render() {return (<div><h2>about组件</h2><h2>当前技术:{this.props.counter}</h2><button onClick={() => this.props.btn1Click() }>+1</button><button onClick={() => this.props.btn2Click(5) }>+5</button></div>)}}const mapStateToProps = state => {return {counter: state.counter}}const mapDispatchToProps = dispatch => {return {btn1Click() {dispatch(incrementAction())},btn2Click(num) {dispatch(addNumberAction(num))}}}export default connect(mapStateToProps, mapDispatchToProps)(About)
Home组件:
import React, { PureComponent } from 'react'// 引入connect函数import connect from '../utils/connect'import {decrementAction, subNumberAction} from '../store/actionCreators'class About extends PureComponent {render() {return (<div><h2>Home组件</h2><h2>当前技术:{this.props.counter}</h2><button onClick={() => this.props.increment() }>-1</button><button onClick={() => this.props.addNumber(5) }>-5</button></div>)}}const mapStateToProps = state => {return {counter: state.counter}}const mapDispatchToProps = dispatch => {return {increment() {dispatch(decrementAction())},addNumber(num) {dispatch(subNumberAction(num))}}}// 函数柯里化export default connect(mapStateToProps, mapDispatchToProps)(About)
5.3 计数器案例-抽取store(创建StoreContext)
上述代码的缺点:在我们自己封装的高阶函数中,还是存在对store的依赖,当把它看成是一个工具函数的时候,我们就不应该直接使用实际的业务数据,我们需要在使用的时候,应该从他的上一级组件进行传入,而不是直接对业务数据进行直接的引入。所以我们引入context函数。 context作用:创建一个context上下文对象,对使用store的组件进行包裹,然后通过组件标签的props属性来传递store,在实际的业务组件中就可以使用this.context来直接获取store的值,然后对这个store的值进行订阅,转发到实际的业务组件中去。这就是原理。
import React from 'react';// 创建context上下文对象const StoreContext = React.createContext()export default StoreContext
5.4 计数器案例-修改context函数的用法
import { PureComponent } from "react";// 这里就不需要了// import store from '../store'// 引入contextimport StoreContext from './context'# 在这个高阶函数中 就不需要使用store 而是通过context来接收值 我们会在组件的外面的包裹一层context的高阶函数 context作为生产者 为我们提供状态数据 那么我们的业务组件也就是我们的消费者直接通过this。context来获取最新的状态即可。function connect(mapStateToProps, mapDispatchToProps) {return function enhanceHOC(WrappedComponent) {class EnhanceComponent extends PureComponent {constructor(props, context) {super(props, context)this.staste = {storeState: mapStateToProps(context.getState())}}componentDidMount() {// 订阅store发生的变化并更新数据this.unsubscribe = this.context.subscribe(() => {this.setState({storeState: mapStateToProps(this.context.getState())})})}componentWillUnmount() {this.unsubscribe()}render() {return <WrappedComponent {...this.props}{...mapStateToProps(this.context.getState())}{...mapDispatchToProps(this.context.dispatch)} />}}# 接收context传递的参数EnhanceComponent.contextType = StoreContext// 将组件返回return EnhanceComponent}}// 将connect函数进行导出export default connect;
5.5 在组件中使用context
import React, { PureComponent } from 'react'import About from './16_react-redux/pages/About'import Home from './16_react-redux/pages/Home'// 引入StoreContextimport StoreContext from './16_react-redux/utils/context'// 引入storeimport store from './16_react-redux/store'export default class App extends PureComponent {render() {return (<div>{/* 为组件提供context */}<StoreContext.Provider value={store}><About /><hr/><Home /></StoreContext.Provider></div>)}}# 注意 在这里使用的是StoreContext组件 传递的是一个value的值,那么在我们的子组件中,直接就可以使用this.context使用就可以 不需要使用 this.context.store 非常重要
6、使用react-redux来改造计数器案例
原理:redux代替我们封装了connect函数和context函数
# 在父组件中进行使用 数据传递给子组件import React, { PureComponent } from 'react'import About from './16_react-redux/pages/About'import Home from './16_react-redux/pages/Home'// 引入StoreContext// import StoreContext from './16_react-redux/utils/context'// 引入store// import store from './16_react-redux/store'# 使用react-redux中的Provider 直接react-redux提供的高阶组件Provider 将组件映射为标签即可,将我们实际的业务组件放置于这个Provider高阶组件中即可import { Provider } from 'react-redux'import store from './16_react-redux/store'export default class App extends PureComponent {render() {return (<div>{/* 为组件提供context */}# 需要注意的是 我们在使用context的时候,在高阶组件中传值使用的是value属性,但是在react-redux中,他要求我们必须 使用store来传递数据 非常重要 不用这个属性的话 数据将无法进行传递<Provider store={store}><About /><hr/><Home /></Provider></div>)}}
6.1 在具体的业务组件中进行使用
import React, { PureComponent } from 'react'// import connect from '../utils/connect'// 引入react-redux中的connect函数 非常重要# import { connect } from 'react-redux'import {incrementAction, addNumberAction} from '../store/actionCreators'class About extends PureComponent {render() {return (<div><h2>about组件</h2><h2>当前技术:{this.props.counter}</h2><button onClick={() => this.props.btn1Click() }>+1</button><button onClick={() => this.props.btn2Click(5) }>+5</button></div>)}}const mapStateToProps = state => {return {counter: state.counter}}const mapDispatchToProps = dispatch => {return {btn1Click() {dispatch(incrementAction())},btn2Click(num) {dispatch(addNumberAction(num))}}}// 使用react-redux中的contect函数export default connect(mapStateToProps, mapDispatchToProps)(About)
6.2 react-redux在react框架中使用总结
// react-redux的使用原理总结:1、安装react-redux第三方库yarn add react-redux2、在具体的业务组件中直接使用connect函数import { connect } from 'react-redux'// 定义变量const mapStateToProps = {}const mapStateToDispatch = {}export default connect(mapStateToProps, mapStateToDispatch)(ComponentName)3、在跟组件中向下传递storeimport store from 'store/index.js';使用Providerimport { Provider } from 'react-redux';映射为相应的标签 相当于将store以全局变量的方式都传递给了所有的子组件<Provider store={store}><App /><Provider>4、在类组件中可以直接使用this.props的属性来访问全局传入的store对象在函数式组件中直接使用props来接收跟组件传递过来的参数
7、组件中的异步操作
在之前简单的案例中,redux中保存的counter是一个本地定义的数据:
- 我们可以直接通过同步的操作来dispatch action,state就会被立即更新。
- 但是真实开发中,redux中保存的很多数据可能来自服务器,我们需要进行异步的请求,再将数据保存到redux中。
在之前学习网络请求的时候我们讲过,网络请求可以在class组件的componentDidMount中发送,所以我们可以有这样的结构: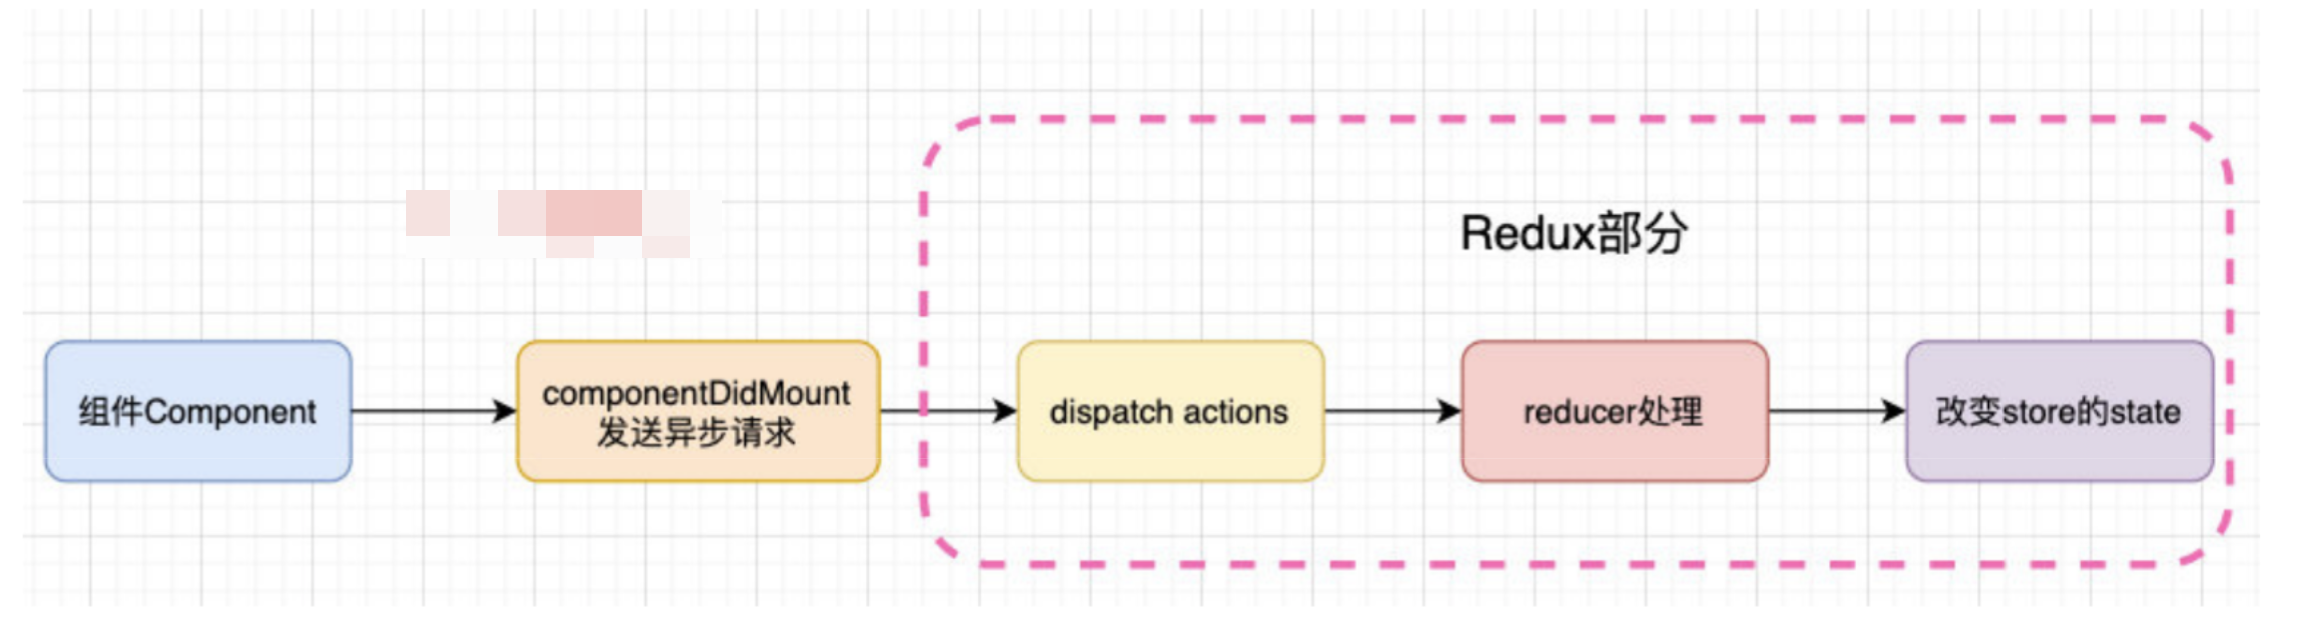
7.1 在react的redux中发送异步的网络请求
import React, { PureComponent } from 'react'// 引入react-redux中的connect函数import { connect } from 'react-redux'import {incrementAction, addNumberAction,changeBannerAction, changeRecommendAction} from '../store/actionCreators'// 在react中发送响应的网络请求// 引入axiosimport axios from 'axios'class About extends PureComponent {componentDidMount() {axios({url: 'http://123.207.32.32:8000/home/multidata'}).then(res => {console.log(res.data);// 轮播图列表const banner = res.data.data.banner.list// 推荐列表const recommend = res.data.data.recommend.list// 可以通过action派发事件this.props.changeBanner(banner)this.props.changeRecommend(recommend)})}render() {return (<div><h2>about组件</h2><h2>当前技术:{this.props.counter}</h2><button onClick={() => this.props.btn1Click() }>+1</button><button onClick={() => this.props.btn2Click(5) }>+5</button></div>)}}const mapStateToProps = state => {return {counter: state.counter}}const mapDispatchToProps = dispatch => {return {btn1Click() {dispatch(incrementAction())},btn2Click(num) {dispatch(addNumberAction(num))},changeBanner(banner) {dispatch(changeBannerAction(banner))},changeRecommend(recommend) {dispatch(changeRecommendAction(recommend))}}}export default connect(mapStateToProps, mapDispatchToProps)(About)
7.2 actionCreateor.js文件
import { INCREMENT, ADD_NUMBER, DECREMENT, SUB_NUMBER, CHANGE_BANNER, CHANGE_RECOMMEND } from './constants'export const incrementAction = () => ({type: INCREMENT,})export const addNumberAction = num => ({type: ADD_NUMBER,num})export const decrementAction = () => ({type: DECREMENT})export const subNumberAction = num => ({type: SUB_NUMBER,num})// 修改banner的actionexport const changeBannerAction = banner => {return {type: CHANGE_BANNER,banner}}// 修改推荐数据的actionexport const changeRecommendAction = recommend => {return {type: CHANGE_RECOMMEND,recommend}}
7.3 constants.js常量文件
const INCREMENT = 'INCREMENT';const ADD_NUMBER = 'ADD_NUMBER';const DECREMENT = 'DECREMENT';const SUB_NUMBER = 'SUB_NUMBER';// 修改banner和recommendconst CHANGE_BANNER = 'CHANGE_BANNER';const CHANGE_RECOMMEND = 'CHANGE_RECOMMEND'export {INCREMENT,ADD_NUMBER,DECREMENT,SUB_NUMBER,CHANGE_BANNER,CHANGE_RECOMMEND}
7.4 reducer.js处理函数文件
import { INCREMENT, ADD_NUMBER, DECREMENT, SUB_NUMBER, CHANGE_BANNER, CHANGE_RECOMMEND } from './constants'const defaultState = {counter: 100,banner: [],recommend: []}function reducer(state = defaultState, action) {switch(action.type) {case INCREMENT:return {...state, counter: state.counter + 1 }case ADD_NUMBER:return {...state, counter: state.counter + action.num }case DECREMENT:return {...state, counter: state.counter - 1 }case SUB_NUMBER:return {...state, counter: state.counter - action.num }// 处理banner和recommendcase CHANGE_BANNER:return {...state, banner: action.banner }case CHANGE_RECOMMEND:return {...state, recommend: action.recommend }default:return state}}export default reducer;
7.5 在其他的组件中使用react-redux中的数据
import React, { PureComponent } from 'react'// 引入connect函数// import connect from '../utils/connect'import { connect } from 'react-redux'import {decrementAction, subNumberAction} from '../store/actionCreators'class About extends PureComponent {render() {return (<div><h2>Home组件</h2><h2>当前技术:{this.props.counter}</h2><button onClick={() => this.props.increment() }>-1</button><button onClick={() => this.props.addNumber(5) }>-5</button><hr/><h2>轮播图</h2><ul>{this.props.banner.map(item => {return (<li key={item.acm}><span>{ item.title }</span><a href={item.image} style={{ marginLeft: '10px'}}>点击查看图片</a></li>)})}</ul><h2>推荐列表</h2><ul>{this.props.recommend.map(item => <li key={item.acm}>{item.title}</li>)}</ul></div>)}}const mapStateToProps = state => {return {counter: state.counter,# 非常重要banner: state.banner,recommend: state.recommend}}const mapDispatchToProps = dispatch => {return {increment() {dispatch(decrementAction())},addNumber(num) {dispatch(subNumberAction(num))}}}// 函数柯里化export default connect(mapStateToProps, mapDispatchToProps)(About)
7.6 在组件中使用react-redux的步骤总结
在组件中异步请求的数据如何交给我们的redux进行管理? 1、在类组件的生命周期函数componentDidMount() 中发送异步请求,并获取相应的异步数据。 2、将我们需要dispatch派发action的地方定义一个方法,这个方法将在组件中映射为mapStateToDispatch(),我们的组件获取了异步数据后,调用这个方法、派发相应的action。 3、当派发了相应的action后,就会自动调用我们的reducer方法,reducer函数集那个会根据我们action.type的类型对数据进行保存和相应的处理。此时我们的数据就实时的保存进了redux的store中了。 4、在其它的业务组件中如何使用store中的state,我们需要的数据在在mapStateToProps()中声明即可。那么此时我们的store中的状态就会映射为相应状态,只需要在组件中使用我们的props即可。

若有收获,就点个赞吧
0 人点赞
