常见的服务注册中心: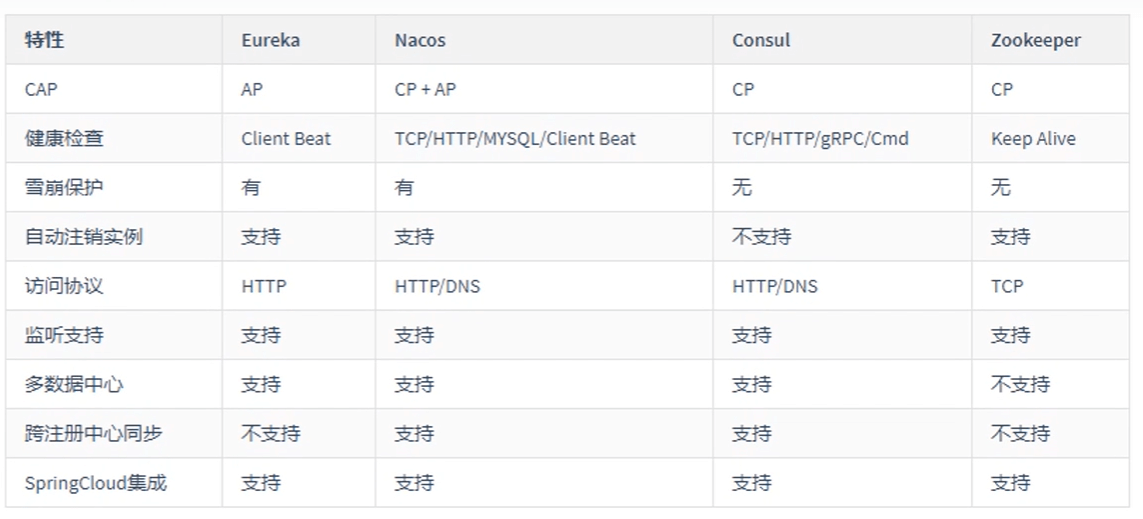
Consul 官网:https://www.consul.io/
Consul 服务注册中心:Consul 是 HashiCorp 公司推出的开源工具,用于实现分布式系统的服务发现与配置。与其他分布式服务注册与发现的方案,Consul 的方案更“一站式”,内置了服务注册于发现框架、分布一致性协议实现、健康检查、Key/Value存储、多数据中心方案,不再需要依赖其它工具(比如 Zookeeper 等)
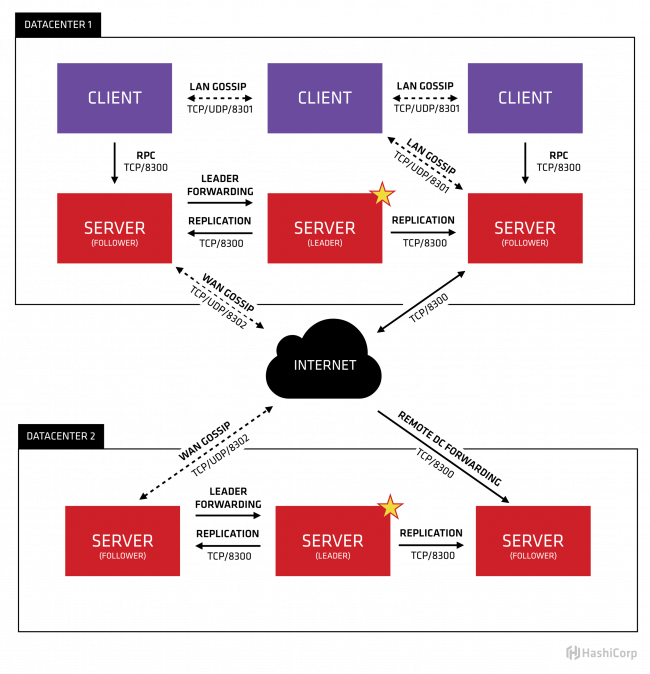
Consul 角色
- client:客户端,无状态,将 HTTP 和 DNS 接口请求转发给局域网内的服务端集群
- server:服务端,保存配置信息,高可用集群,每个数据中心的 server 数量推荐为 3 个或者 5 个(奇数个)
Consul 工作原理
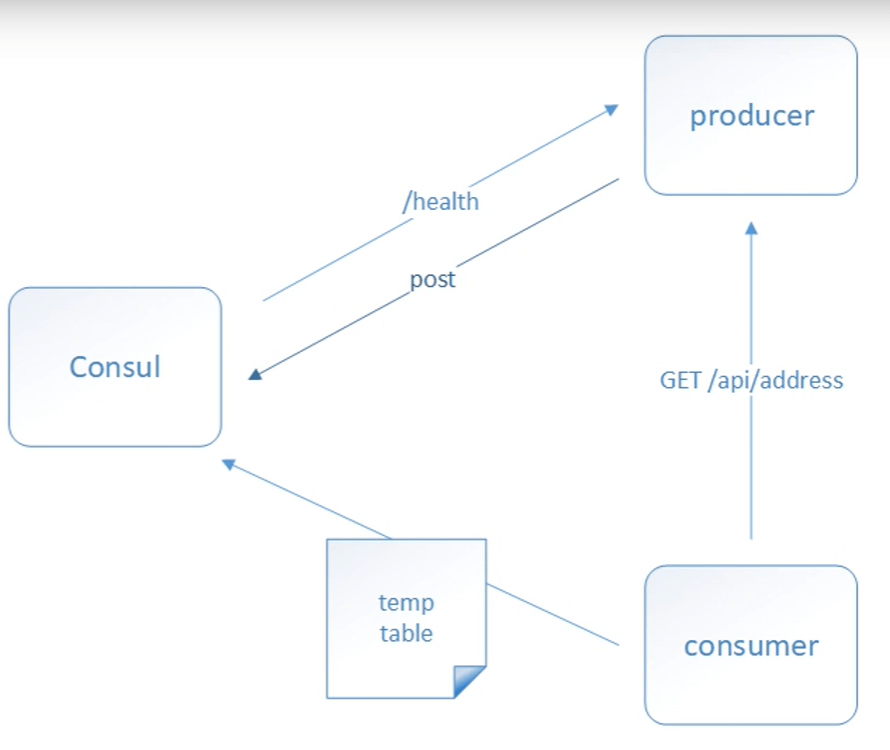
- 服务发现以及注册:当服务 Producer 启动后,会将自己的 ip/host 等信息通过发送请求告知 consul,consul 接收到 Producer 的注册信息后,每个 10 秒(默认)会向 Producer 发送一个健康检查的请求,检验 Producer 是否健康
- 服务调用:当Consumer请求Producer时,会先从 Consul 中拿存储 Product 服务的 IP 和 Port 的临时表(temp table),从 temp table 表中任选一个 Producer 的 IP 和 Port ,然后根据这个 IP 和 Port,发送访问请求;temp table表只包含通过了健康检查的 Producer 信息,并且每隔 10s (默认)更新
Consul 安装
Linux 下载地址:https://releases.hashicorp.com/consul/1.9.1/consul_1.9.1_linux_amd64.zip
Windows 下载地址:https://releases.hashicorp.com/consul/1.9.1/consul_1.9.1_windows_amd64.zip
1、单节点:
在 Windows 下使用 cmd 启动:
- -server:以服务端身份启动
- -bind:绑定到哪个ip,针对多网卡的主机
- -client:指定客户端访问的ip,0.0.0.0表示不限制客户端ip
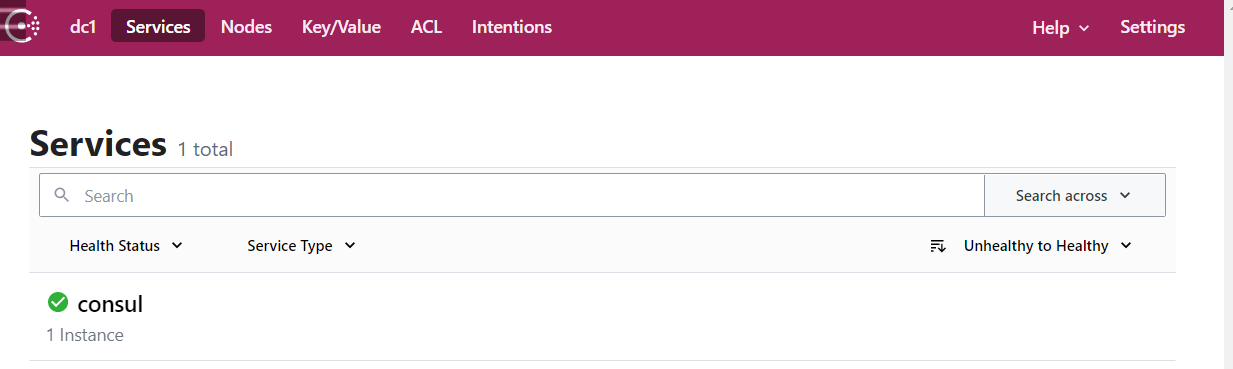
访问管理后台:http://localhost:8500# -dev表示开发模式运行,-server表示服务模式运行# -client=0.0.0.0表示允许所有的IP访问consul agent -dev -client=0.0.0.0
1、创建父项目:
<packaging>pom</packaging><parent><groupId>org.springframework.boot</groupId><artifactId>spring-boot-starter-parent</artifactId><version>2.4.1</version></parent><dependencyManagement><dependencies><dependency><groupId>org.springframework.cloud</groupId><artifactId>spring-cloud-dependencies</artifactId><version>2020.0.0</version></dependency></dependencies></dependencyManagement>
2、创建 service-provider 模块,并导入依赖:
<dependencies><!-- spring cloud consul 依赖 --><dependency><groupId>org.springframework.cloud</groupId><artifactId>spring-cloud-starter-consul-discovery</artifactId></dependency><!-- spring boot web 依赖 --><dependency><groupId>org.springframework.boot</groupId><artifactId>spring-boot-starter-web</artifactId></dependency><!-- spring boot actuator 依赖 --><dependency><groupId>org.springframework.boot</groupId><artifactId>spring-boot-starter-actuator</artifactId></dependency><!-- lombok依赖 --><dependency><groupId>org.projectlombok</groupId><artifactId>lombok</artifactId><scope>provided</scope></dependency><!-- spring boot test 依赖 --><dependency><groupId>org.springframework.boot</groupId><artifactId>spring-boot-starter-test</artifactId><exclusions><exclusion><groupId>org.junit.vintage</groupId><artifactId>junit-vintage-engine</artifactId></exclusion></exclusions></dependency></dependencies>
3、创建配置类
# 服务端口server:port: 9000spring:application:name: service-provider-consul #应用名称# 配置Consul注册中心cloud:consul:# 注册中心的访问地址host: localhostport: 8500# 服务提供者信息discovery:register: true # 是否需要注册instance-id: ${spring.application.name}-01 # 注册实例id(必须唯一)service-name: ${spring.application.name} # 服务名称port: ${server.port} # 服务端口prefer-ip-address: true # 是否使用ip地址注册ip-address: ${spring.cloud.client.ip-address} # 服务请求ip
3、实体类:ProductDto
@Data@NoArgsConstructor@AllArgsConstructorpublic class ProductDto implements Serializable {private Integer id;private String productName;private Integer productNum;private Double productPrice;}
4、Service:
@Servicepublic class ProductService {public List<ProductDto> selectProductList() {return Arrays.asList(new ProductDto(1, "华为手机", 2, 5888D),new ProductDto(2, "联想笔记本", 1, 6888D),new ProductDto(3, "小米平板", 5, 2666D));}}
5、Controller:
@RestController@RequestMapping("/product")public class ProductController {@Autowiredprivate ProductService productService;@GetMapping("/list")public List<ProductDto> selectProductList() {return productService.selectProductList();}}
6、启动类
@SpringBootApplicationpublic class ServiceProviderConsulApp {public static void main(String[] args) {SpringApplication.run(ServiceProviderConsulApp.class, args);}}

若有收获,就点个赞吧
0 人点赞
