1.缓存常见类型
服务端缓存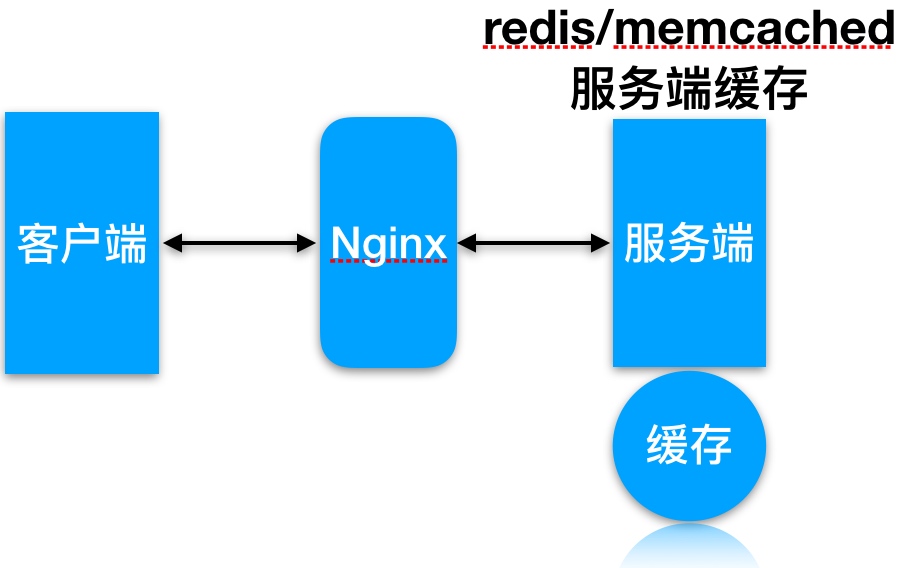
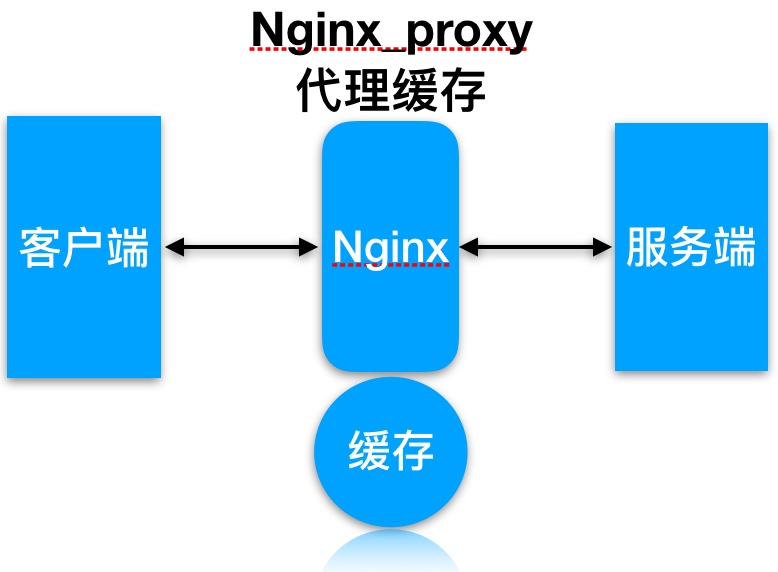
代理缓存, 获取服务端内容进行缓存
客户端浏览器缓存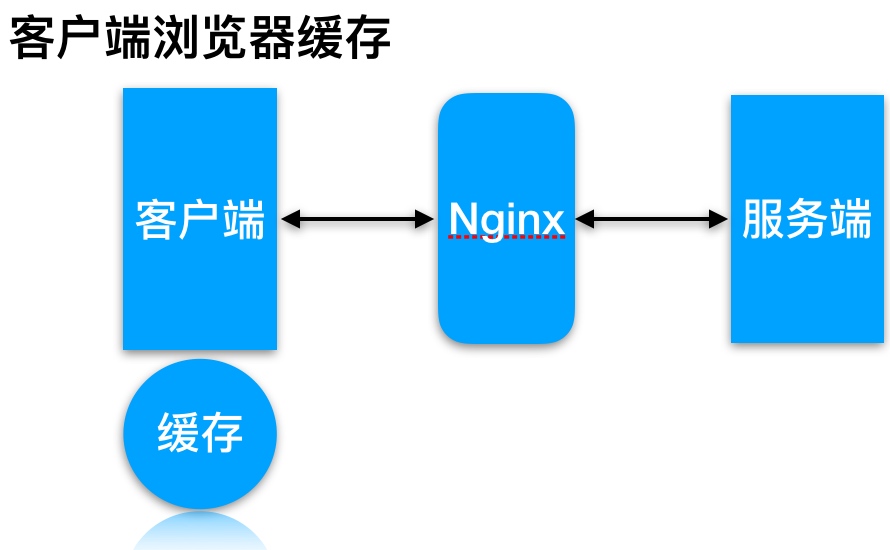
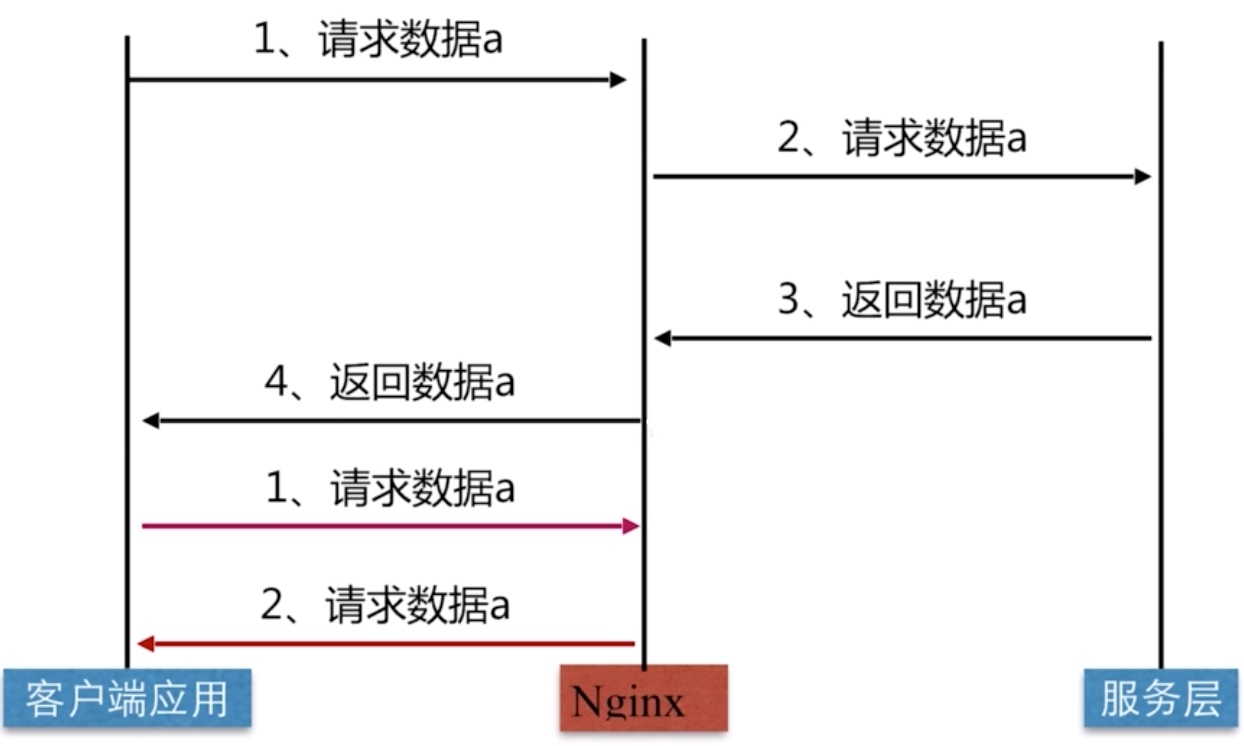
Nginx代理缓存原理
2.缓存配置语法
1.proxy_cache配置语法
Syntax: proxy_cache zone | off;Default: proxy_cache off;Context: http, server, location#1.缓存路径Syntax: proxy_cache_path path [levels=levels][use_temp_path=on|off] keys_zone=name:size [inactive=time][max_size=size] [manager_files=number] [manager_sleep=time][manager_threshold=time][loader_files=number] [loader_sleep=time] [loader_threshold=time] [purger=on|off][purger_files=number] [purger_sleep=time] [purger_threshold=time];Default: —Context: http#2.缓存过期周期Syntax: proxy_cache_valid [code ...] time;Default: —Context: http, server, location#示例proxy_cache_valid 200 302 10m;proxy_cache_valid 404 1m;#3.缓存的维度Syntax: proxy_cache_key string;Default: proxy_cache_key $scheme$proxy_host$request_uri;Context: http, server, location#示例proxy_cache_key "$host$request_uri $cookie_user";proxy_cache_key $scheme$proxy_host$uri$is_args$args;
3.缓存配置实践
1.缓存准备
| 操作系统 | 应用服务 | 外网地址 | 内网地址 |
|---|---|---|---|
| CentOS7.5 | Nginx Proxy | 10.0.0.5 | 172.16.1.5 |
| CentOS7.5 | Nginx Web | 172.16.1.7 |
2.web节点准备
#建立相关目录[root@web01 ~]# mkdir -p /soft/code{1..3}#建立相关html文件[root@web01 ~]# for i in {1..3};do echo Code1-Url$i > /soft/code1/url$i.html;done[root@web01 ~]# for i in {1..3};do echo Code2-Url$i > /soft/code2/url$i.html;done[root@web01 ~]# for i in {1..3};do echo Code3-Url$i > /soft/code3/url$i.html;done#配置Nginx[root@web01 ~]# cat /etc/nginx/conf.d/web_node.confserver {listen 8081;root /soft/code1;index index.html;}server {listen 8082;root /soft/code2;index index.html;}server {listen 8083;root /soft/code3;index index.html;}#检查监听端口[root@web01 ~]# netstat -lntp|grep 80tcp 0 0 0.0.0.0:8081 0.0.0.0:* LISTEN 50922/nginx: mastertcp 0 0 0.0.0.0:8082 0.0.0.0:* LISTEN 50922/nginx: mastertcp 0 0 0.0.0.0:8083 0.0.0.0:* LISTEN 50922/nginx: master
3.代理配置缓存
[root@lb01 ~]# mkdir /soft/cache[root@lb01 ~]# cat /etc/nginx/conf.d/proxy_cache.confupstream cache {server 172.16.1.7:8081;server 172.16.1.7:8082;server 172.16.1.7:8083;}#proxy_cache存放缓存临时文件#levels 按照两层目录分级#keys_zone 开辟空间名, 10m:开辟空间大小, 1m可存放8000key#max_size 控制最大大小, 超过后Nginx会启用淘汰规则#inactive 60分钟没有被访问缓存会被清理#use_temp_path 临时文件, 会影响性能, 建议关闭proxy_cache_path /soft/cache levels=1:2 keys_zone=code_cache:10m max_size=10g inactive=60m use_temp_path=off;server {listen 80;server_name cache.bgx.com;#proxy_cache 开启缓存#proxy_cache_valid 状态码200|304的过期为12h, 其余状态码10分钟过期#proxy_cache_key 缓存key#add_header 增加头信息, 观察客户端respoce是否命中#proxy_next_upstream 出现502-504或错误, 会跳过此台服务器访问下台location / {proxy_pass http://cache;proxy_cache code_cache;proxy_cache_valid 200 304 12h;proxy_cache_valid any 10m;add_header Nginx-Cache "$upstream_cache_status";proxy_next_upstream error timeout invalid_header http_500 http_502 http_503 http_504;include proxy_params;}}
3.客户端测试
#第一次访问无法命中[root@lb01 ~]# curl -s -I http://cache.bgx.com/url3.html|grep "Nginx-Cache"Nginx-Cache: MISS#第二次访问命中[root@lb01 ~]# curl -s -I http://cache.bgx.com/url3.html|grep "Nginx-Cache"Nginx-Cache: HIT
4.缓存如何清理
如何清理proxycache代理的缓存
_1.使用rm删除已缓存数据
[root@lb01 ~]# rm -rf /soft/cache/*[root@lb01 ~]# curl -s -I http://cache.bgx.com/url3.html|grep "Nginx-Cache"Nginx-Cache: MISS
2.通过ngx_cache_purge扩展模块清理, 需要编译安装Nginx
#建立对应目录[root@lb01 ~]# mkdir /soft/src[root@lb01 ~]# cd /soft/src#下载Nginx包[root@lb01 ~]# wget http://nginx.org/download/nginx-1.12.2.tar.gz[root@lb01 ~]# tar xf nginx-1.12.2.tar.gz#下载ngx_cache_purge[root@lb01 ~]# wget http://labs.frickle.com/files/ngx_cache_purge-2.3.tar.gz[root@lb01 ~]# tar xf ngx_cache_purge-2.3.tar.gz#编译Nginx[root@lb01 ~]# cd nginx-1.12.2/ && ./configure \--prefix=/server/nginx --add-module=../ngx_cache_purge-2.3 \--with-http_stub_status_module --with-http_ssl_module[root@lb01 ~]# make && make install
3.增加清理缓存的location,配置如下内容
[root@lb01 ~]# cat /etc/nginx/conf.d/proxy_cache.confupstream cache {server 172.16.1.7:8081;server 172.16.1.7:8082;server 172.16.1.7:8083;}proxy_cache_path /soft/cache levels=1:2 keys_zone=code_cache:10m max_size=10g inactive=60m use_temp_path=off;server {listen 80;server_name cache.bgx.com;location / {proxy_pass http://cache;proxy_cache code_cache;proxy_cache_valid 200 304 12h;proxy_cache_valid any 10m;add_header Nginx-Cache "$upstream_cache_status";proxy_next_upstream error timeout invalid_header http_500 http_502 http_503 http_504;include proxy_params;}}location ~ /purge(/.*) {allow 127.0.0.1;allow 10.0.0.0/24;deny all;proxy_cache_purge code_cache $host$1$is_args$args;}# 检测配置重新加载[root@nginx conf.d]# /server/nginx/sbin/nginx -t[root@nginx conf.d]# /server/nginx/sbin/nginx -s reload
4.使用浏览器访问建立缓存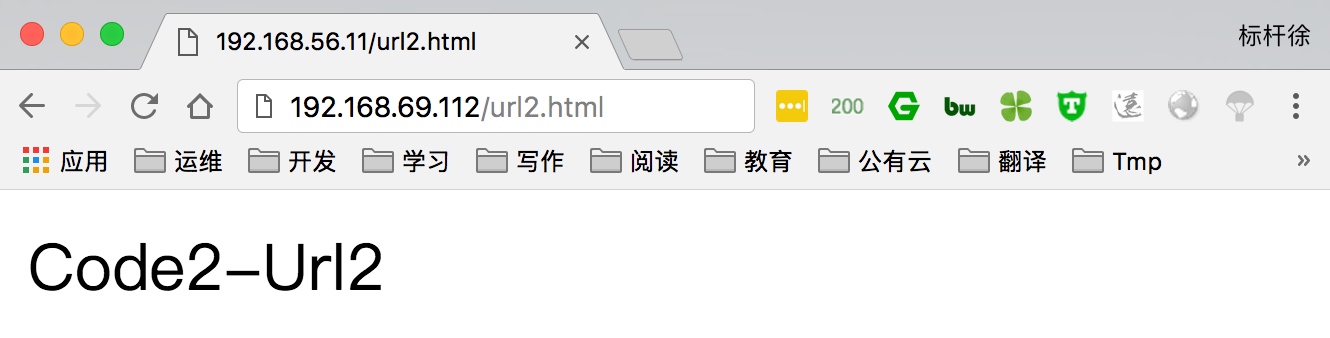
5.通过访问purge/url地址,删除对应的缓存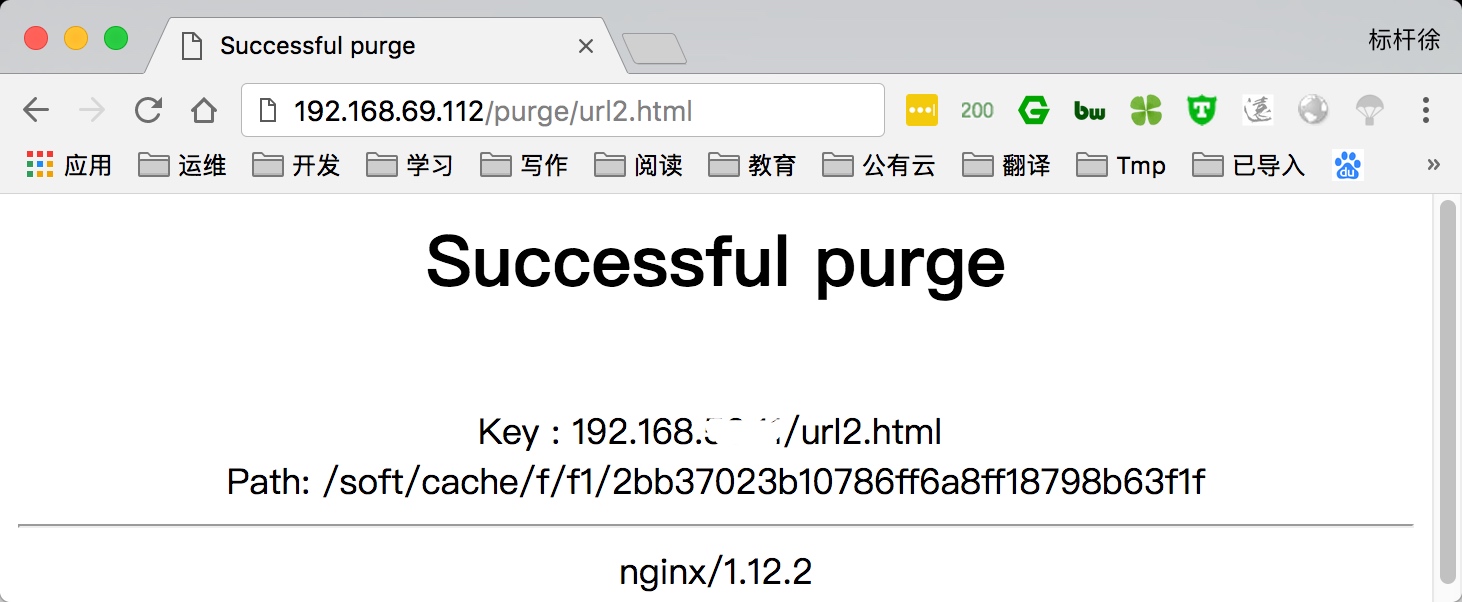
6.再次刷新就会因为缓存内容已清理,而出现404错误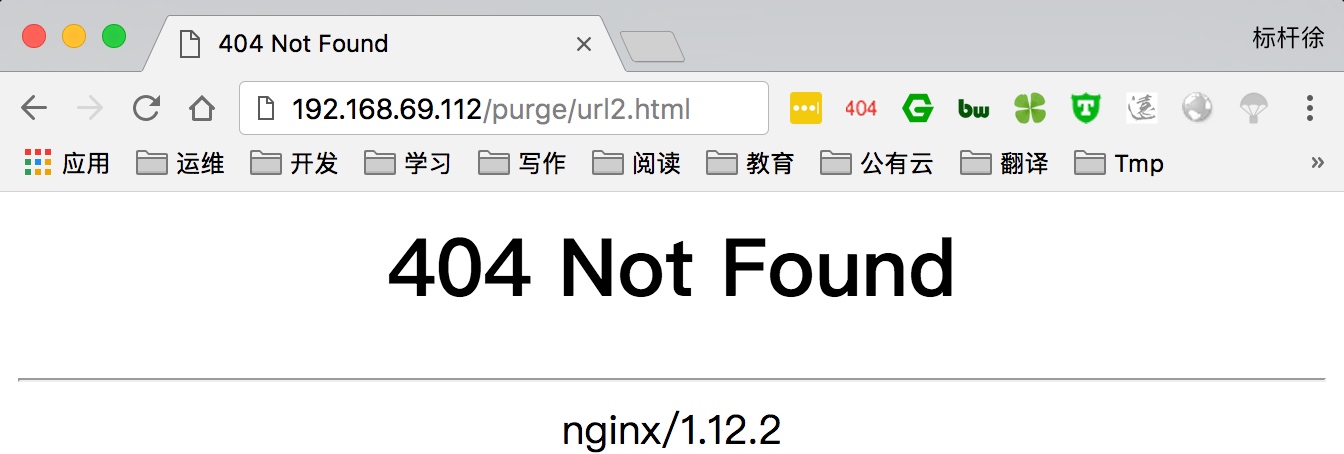
5.指定页面不缓存
1.如何配置指定部分页面不进行proxy_Cache缓存
[root@lb01 ~]# cat /etc/nginx/conf.d/proxy_cache.confupstream cache{server 172.16.1.7:8081;server 172.16.1.7:8082;server 172.16.1.7:8083;}proxy_cache_path /soft/cache levels=1:2 keys_zone=code_cache:10m max_size=10g inactive=60m use_temp_path=off;server {listen 80;server_name cache.bgx.com;#如果请求文件如下,则设定nocache为1if ($request_uri ~ ^/(url3|login|register|password)) {set $nocache 1;}location / {proxy_pass http://cache;proxy_cache code_cache;proxy_cache_valid 200 304 12h;proxy_cache_valid any 10m;proxy_cache_key $host$uri$is_args$args;proxy_no_cache $nocache $arg_nocache $arg_comment; #不缓存变量为nocacheproxy_no_cache $http_pargma $http_authorization; #不缓存http参数以及http认证add_header Nginx-Cache "$upstream_cache_status";proxy_next_upstream error timeout invalid_header http_500 http_502 http_503 http_504;include proxy_params;}}#先清理所有缓存[root@nginx ~]# rm -rf /soft/cache/*#无论如何请求url3都无法命中[root@nginx ~]# curl -s -I http://192.168.69.112/url3.html|grep "Nginx-Cache"Nginx-Cache: MISS[root@nginx ~]# curl -s -I http://192.168.69.112/url3.html|grep "Nginx-Cache"Nginx-Cache: MISS[root@nginx ~]# curl -s -I http://192.168.69.112/url3.html|grep "Nginx-Cache"Nginx-Cache: MISS
6.缓存日志记录
通过日志记录proxy_cache命中情况与对应url
1.修改nginx的log_format格式,增加”$upstream_cache_status”,该变量包含如下几种状态
MISS 未命中,请求被传送到后端 HIT 缓存命中,通过缓存返回数据 EXPIRED 缓存已经过期请求被传送到后端 UPDATING 正在更新缓存,将使用旧的应答 STALE 后端将得到过期的应答
[root@lb01 ~]# vim /etc/nginx/nginx.confhttp {log_format main '$http_user_agent' '$request_uri' '$remote_addr - $remote_user [$time_local] "$request" ''$status $body_bytes_sent "$http_referer" ''"$http_user_agent" "$http_x_forwarded_for"' '"$upstream_cache_status"';}
2.在server标签中添加对应的access日志
server {...access_log /var/log/nginx/proxy_cache.log main;...}
3.使用curl访问, 最后检查日志命令情况
[root@lb01 ~]# tail /var/log/nginx/proxy_cache.log10.0.0.1 - - [19/Apr/2018:11:48:43 -0400] "HEAD /url3.html HTTP/1.1" 200 0 "-" "curl/7.29.0" "-""MISS"10.0.0.1 - - [19/Apr/2018:11:48:45 -0400] "HEAD /url2.html HTTP/1.1" 200 0 "-" "curl/7.29.

若有收获,就点个赞吧
0 人点赞
