1.3 基础教程
预备知识
- 已经安装了包含Newt工具以及工具链的Docker容器,或已经在电脑上完成了安装
- 你已经创建了新的项目空间(目录结构),并使用核心代码库(apache-mynewt-core),或者知道怎么创建一个Mynewt项目
- 有以下一些支持的开发板:
- Arduino
- Olimex
- nRF52
Nordic的nRF52开发工具包支持低功耗蓝牙(BLE)。我们也期待添加新的硬件到这个列表中,如果你想要开发一个新的开发板的板级支持包(BSP),以及硬件抽象层,可以查看Mynewt OS移植相关文档。
1.3.1 Blinky项目——基于STM32F4-Discovery
本教程演示了如何创建、构建以及在STM32F4-Discovery板上运行Blinky应用。
0. 准备工作
- 一块STM32F4-Discovery板
- 连接开发板的UWB线
- 安装好OpenOCD
1. 创建项目
若还没有创建项目,创建一个新项目,若已经创建了项目可跳过,直接创建目标。
$ mkdir ~/dev$ cd ~/dev$ newt new myprojDownloading project skeleton from apache/mynewt-blinky...Installing skeleton in myproj...Project myproj successfully created.$ cd myproj$ newt installapache-mynewt-core$
2. 创建目标
需要为开发板创建两个目标:一个bootloader,一个为Blinky应用。
通过newt target命令创建目标stm32f4disc_boot,特别需要注意bsp的选择,由于stm32f4discovery已经在apache-mynewt-core中支持,从而可以直接使用。
$ newt target create stm32f4disc_boot$ newt target set stm32f4disc_boot app=@apache-mynewt-core/apps/boot$ newt target set stm32f4disc_boot bsp=@apache-mynewt-core/hw/bsp/stm32f4discovery$ newt target set stm32f4disc_boot build_profile=optimized
接下来可以创建应用目标stm32f4disc_blinky。
$ newt target create stm32f4disc_blinky$ newt target set stm32f4disc_blinky app=apps/blinky$ newt target set stm32f4disc_blinky bsp=@apache-mynewt-core/hw/bsp/stm32f4discovery$ newt target set stm32f4disc_blinky build_profile=debug
创建两个目标后,我们可以通过运行newt target show命令来查看目标及配置:
$ newt target showtargets/stm32f4disc_blinkyapp=apps/blinkybsp=@apache-mynewt-core/hw/bsp/stm32f4discoverybuild_profile=debugtargets/stm32f4disc_bootapp=@apache-mynewt-core/apps/bootbsp=@apache-mynewt-core/hw/bsp/stm32f4discoverybuild_profile=optimized
3. 生成目标可执行文件
1)生成bootloader文件:
$ newt build stm32f4disc_bootBuilding target targets/stm32f4disc_bootCompiling repos/apache-mynewt-core/boot/bootutil/src/image_ec.cCompiling repos/apache-mynewt-core/boot/bootutil/src/image_ec256.cCompiling repos/apache-mynewt-core/boot/bootutil/src/bootutil_misc.cCompiling repos/apache-mynewt-core/apps/boot/src/boot.cCompiling repos/apache-mynewt-core/boot/bootutil/src/image_rsa.cCompiling repos/apache-mynewt-core/boot/bootutil/src/image_validate.cCompiling repos/apache-mynewt-core/boot/bootutil/src/loader.c...Archiving sys_flash_map.aArchiving sys_mfg.aArchiving sys_sysinit.aArchiving util_mem.aLinking ~/dev/myproj/bin/targets/stm32f4disc_boot/app/apps/boot/boot.elfTarget successfully built: targets/stm32f4disc_boot
2)生成blinky应用程序:
$newt build stm32f4disc_blinkyBuilding target targets/stm32f4disc_blinkyCompiling apps/blinky/src/main.cCompiling repos/apache-mynewt-core/hw/bsp/stm32f4discovery/src/sbrk.cCompiling repos/apache-mynewt-core/hw/bsp/stm32f4discovery/src/system_stm32f4xx.cCompiling repos/apache-mynewt-core/hw/bsp/stm32f4discovery/src/hal_bsp.cAssembling repos/apache-mynewt-core/hw/bsp/stm32f4discovery/src/arch/cortex_m4/startup_STM32F40x.sCompiling repos/apache-mynewt-core/hw/cmsis-core/src/cmsis_nvic.cCompiling repos/apache-mynewt-core/hw/drivers/uart/src/uart.cCompiling repos/apache-mynewt-core/hw/drivers/uart/uart_hal/src/uart_hal.cCompiling repos/apache-mynewt-core/hw/hal/src/hal_common.cCompiling repos/apache-mynewt-core/hw/hal/src/hal_flash.c...Archiving sys_sysinit.aArchiving util_mem.aLinking ~/dev/myproj/bin/targets/stm32f4disc_blinky/app/apps/blinky/blinky.elfTarget successfully built: targets/stm32f4disc_blinky
4. 签名及创建Blinky应用镜像
通过newt create-image命令创建以及签名应用镜像,示例中设置为1.0.0。
$newt create-image stm32f4disc_blinky 1.0.0App image succesfully generated: ~/dev/myproj/bin/targets/stm32f4disc_blinky/app/apps/blinky/blinky.img
5. 连接到开发板
通过USB连接到PC以及开发板:
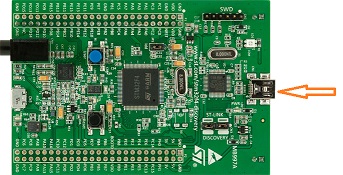
注意:为了能够保证能够将应用程序下载到开发板,需要按照STM32F4-Discovery提示安装相关STM32驱动,以便能够通过STLink连接到MCU。
6. 加载bootloader以及Blinky应用镜像
首先运行newt load stm32f4disc_boot命令加载bootloader到开发板。
当bootloader成功加载到开发板后,加载应用镜像:
$ newt load stm32f4disc_blinkyLoading app image into slot 1
加载成功后将会看到LD4绿色LED开始闪烁,若未闪烁,尝试复位开发板。
1.3.2 在项目中添加仓库
一个存储仓库是指版本化的Mynewt项目,它是一个Mynewt包按照特定的方式进行组织以便再分配的集合。
存储仓库与Mynewt项目的一个区别在于描述存储仓库的repository.yml文件。
社区通过存储仓库的方式共享Mynewt包和项目,从而Mynewt仓库非常有用。
通过存储仓库,可以添加mynewt-core并没有包含的功能,且一个新的仓库可能由于以下一些原因:
- 专业,个人或组织可以通过仓库的形式分享一些专业的知识,例如芯片供应商可以通过创建一个仓库来保持Mynewt系统对其芯片的支持。
- 非核心组件,一些组件可能对Mynewt用户比较有用,但并不是所有用户都有用,从而以仓库形式可选。
- 软件许可,有些软件许可与ASF(Apache Software Foundation)许可不兼容,对于有些用户而言又是非常重要的,但是却也不能包含到apache-mynewt-core中。
对于一个项目而言,在project.yml文件中,我们可以看到相关的仓库信息:
project.repositories:- apache-mynewt-core# 下面为仓库的一些信息,类型、版本、作者、仓库repository.apache-mynewt-core:type: githubvers: 1.4.1user: apacherepo: mynewt-core
当前而言,newt工具还不能定位和搜索Mynewt软件包仓库。但是,由于newt只支持github,在搜索Mynewt的软件包之前可以通过搜索github来替代。
搜索github时,需要注意,由于mynewt仓库必须在根目录中有一个repository.yml文件。如果没有看到该文件,那么就并不是一个mynewt存储库,不能通过newt工具包含在项目中。
当找到需要的仓库,将github URL添加到repository.yml文件中即可。
a.在项目外创建一个仓库
在项目外创建一个仓库,首先需要创建一个repository.yml文档,由于当前的包管理仅支持git,从而可以在github下操作,且需要在master分支中。
repository.yml文件定义所有repository的版本,且对应与项目控制中的tags。
Newt工具常常从master分支中取repository.yml文件,然后根据该文件来查找在项目中真实使用,需要、依靠的分支,因此需要保证repository.yml文件在master分支下。
repo.name: apache-mynewt-corerepo.versions:"0.7.9": "Mynewt_0_8_0_b2_tag""0-latest": "0.7.9""0.8-latest": "0.7.9"
repo.name,在project.yml中需要添加的库的名称,当添加到一个项目中时需要在project.repositories中添加。
repo.versions,为用户提供各个版本信息,便于用户使用参考。repo版本的格式:
<major_num>.<minor_num>.<revision_num>
<major_num>.<minor_num>-<stability string>
<major_num>-<stability string>#statility包含三个选项:stable,dev,latest
在项目project.yml中可以指定对应的版本。
当开发的仓库依赖其他仓库时,需要在repository.yml文件中一并记录,如apache-mynewt-core依赖于sterlys-little-repo:
develop.repositories:sterlys-little-repo:type: githubvers: 0.8-latestuser: sterlinghughesrepo: sterlys-little-repo
这样Newt工具就可以循环处理相关依赖的仓库。
b.访问私有仓库
处于版权原因,可能有些依赖仓库为私有仓库,newt工具需要配置私有仓库的访问令牌或用户的登录认证和密码。而用户信息可以通过两种方式来设定。
1、project.yml文件中指定。
repository.my-private-repo:type: githubvers: 0-devuser: owner-of-reporepo: repo-nametoken: '8ab6433f8971b05c2a9c3341533e8ddb754e404e' #两种方式二选一login: githubloginpassword: githubpassword
2、在$HOME/.newt/repos.yml中配置:
repository.my-private-repo:token: '8ab6433f8971b05c2a9c3341533e8ddb754e404e'login: githubloginpassword: githubpassword
c.更新仓库
对于仓库的更新非常方便,直接运行newt upgrade即可。
newt工具将查看project.yml中所需要的版本,并将其与project.state中的版本所比较,如果二者不同,newt将升级依赖项,升级时不仅仅是针对project.yml中的依赖,还同时将升级所有可能的子依赖项。
1.3.3 BLE
本节的教程将帮助你开始试用Mynewt的BLE协议栈:NimBLE。第一个教程简单的解释了如何为目标定义一个新的应用。且这些教程将会越来越复杂,包括如何写自己的信标,利用仓库中的示例应用来制作自己的终端外设,试用HCI接口等。
a.建立一个简单的NimBLE应用
b.BLE信标
c.BLE Eddystone
蓝牙信标设备通过对外广播以宣告其存在。Eddystone协议建立在标准的BLE广播规范之上,支持多种数据包类型:
- Eddystone-UID:具有10字节命名空间组件和6字节实例组件的唯一静态ID
- Eddystone-URL:一个被压缩的URL,客户端可直接解析,解压缩后使用,可用于感知周边信息
- Eddystone-TIM:“遥测”数据包,与Eddystone-UID或Eddystone-URL包一起广播,并包含信标的状态信息(如电量信息)
- Eddystone-EID:广播一个短暂的标识,每隔几分钟就会改变,只允许有权解析的用户使用信标
d.BLE外设项目
e.HCI访问NimBLE控制器
参考地址:
1、http://mynewt.apache.org/latest/tutorials/tutorials.html
2、Eddystone,https://developers.google.com/beacons/eddystone
1.3.4 LoRa
本节将演示如何为A类或C类设备创建一个LoRa Shell应用程序,并完成一些基础功能,如连接和发送数据包到LoRa网关/服务器。
注意:使用前须有一个运行的LoRa网关和LoRa网络服务器,且用户是理解如何配置和操作LoRa网关/服务器,以便能够与A类或C类设备通信。
0.关于LoRaWAN
LoRaWAN设备终端分类:
| Class | 属性 | 供电 | 节能 | 下行通信延时 |
|---|---|---|---|---|
| A | sensors | 电池-有限 | 最佳 | 大,仅当终端上报时 |
| B | actuators | 电池-有限 | 较好 | 小,延时可调节 |
| C | actuators | 电源-充足 | 不考虑 | 无,随时下行通信 |
Class A
Class A是LoRaWAN的主流,终端根据自己的需要上传数据包,该数据包可被一个或多个网关接收,1秒后由LoRa服务器选择最佳的Gateway下发数据包,终端划分了两个接收时隙Rx Slot1和Rx Slot2,间隔均为1s,若第一个时隙窗口接收成功则不再打开第二个时隙窗口。
Class A节能效果最好,除发送与两个接收时隙,其余时间都休眠,从而只有终端上报时才能下发数据。
Class B
Class B的终端每128秒接收Gateway广播的Beacon,用于校准自身的时钟。在2个Beacon之间,终端会开启一些接收窗口(ping slot),若收到网关的preamble,那么将接收完整的下行数据包。
Class B的终端根据自身电量和应用的需要,选择ping slot的数量,以达到节能和下行通信的折中。
Class C
Class C为充足供电的actuator设计,除了发送数据包及Rx Slot1外,都开启接收,以便能够随时接收服务器下行数据。
1. 准备工作
- 使用Telenor EE02模块
- Segger J-Link或类似调试器
- LORA网关
- newt相关工作环境
2. 创建项目
$ mkdir ~/dev$ cd ~/dev$ newt new myloraDownloading project skeleton from apache/mynewt-blinky...Installing skeleton in mylora...Project mylora successfully created.$ cd mylora
3. 安装依赖
$ newt install -vapache-mynewt-coreDownloading repository description for apache-mynewt-core... success!...apache-mynewt-core successfully installed version 1.2.0-none...
4. 创建目标
$ newt target create telee02_boot$ newt target set telee02_boot bsp=@apache-mynewt-core/hw/bsp/telee02$ newt target set telee02_boot app=@apache-mynewt-core/apps/boot$ newt target set telee02_boot build_profile=optimized$ newt target create lora_app_shell_telee02$ newt target set lora_app_shell_telee02 bsp=@apache-mynewt-core/hw/bsp/telee02$ newt target set lora_app_shell_telee02 app=@apache-mynewt-core/apps/lora_app_shell$ newt target set lora_app_shell_telee02 build_profile=optimized
lora app shell应用需要一些附加的系统配置变量,在dev/mylora/targets/lora_app_shell下创建syscfg.yml文件:
### Package: targets/lora_app_shell_telee02syscfg.vals:SHELL_CMD_ARGC_MAX: "20"LORA_MAC_TIMER_NUM: "4"TIMER_4: "1"
通过newt target show查看目标是否配置正确:
$ newt target show telee02_boottargets/telee02_bootapp=@apache-mynewt-core/apps/bootbsp=@apache-mynewt-core/hw/bsp/telee02build_profile=optimized$ newt target show lora_app_shell_telee02targets/lora_app_shell_telee02app=@apache-mynewt-core/apps/lora_app_shellbsp=@apache-mynewt-core/hw/bsp/telee02build_profile=optimizedsyscfg=LORA_MAC_TIMER_NUM=4:SHELL_CMD_ARGC_MAX=20:TIMER_4=1
5. 生成可执行文件
$ newt clean telee02_boot$ newt build telee02_bootBuilding target targets/telee02_bootCompiling repos/apache-mynewt-core/boot/bootutil/src/image_rsa.cCompiling repos/apache-mynewt-core/boot/bootutil/src/image_ec.cCompiling repos/apache-mynewt-core/boot/bootutil/src/image_ec256.c. . .Archiving telee02_boot-sysinit-app.aArchiving util_mem.aLinking /Users/wes/dev/wes/bin/targets/telee02_boot/app/apps/boot/boot.elfTarget successfully built: targets/telee02_boot$ newt clean lora_app_shell_telee02$ newt build lora_app_shell_telee02Building target targets/lora_app_shell_telee02Assembling repos/apache-mynewt-core/hw/bsp/telee02/src/arch/cortex_m4/gcc_startup_nrf52_split.sCompiling repos/apache-mynewt-core/encoding/base64/src/hex.cCompiling repos/apache-mynewt-core/encoding/base64/src/base64.c. . .Archiving util_mem.aArchiving util_parse.aLinking /Users/wes/dev/wes/bin/targets/lora_app_shell_telee02/app/apps/lora_app_shell/lora_app_shell.elfTarget successfully built: targets/lora_app_shell_telee0
注意:newt clean不是必须操作,但却是一个好的习惯。
6. 签名及创建应用镜像
通过newt create-image命令创建以及签名应用镜像,只用应用镜像需要此步骤,bootloader则不需要。
7. 下载bootloader及加载应用镜像
使用USB将评估板连接到电脑,使用J-Link调试器连接到设备,并通过Uart连接到终端。
8. OTA连接与数据传输
1.3.5 OS基础——事件与事件队列
1.3.6 OS基础——任务及优先级管理
1.3.7 远程设备管理——Newt Manager
1.3.8 远程设备管理——空中升级

若有收获,就点个赞吧
0 人点赞
