1.今日内容
- Feign 声明式服务调用
- Hystrix 熔断器
- Gateway 网关
2.Feign
2.1-Feign-概述
• Feign 是一个声明式的 REST 客户端,它用了基于接口的注解方式,很方便实现客户端配置。取代了restTemplate类
• Feign 最初由 Netflix 公司提供,但不支持SpringMVC注解,后由 SpringCloud 对其封装,支持了SpringMVC注解,让使用者更易于接受
2.2-Feign-快速入门
- 在消费端引入 open-feign 依赖
<!--feign--><dependency><groupId>org.springframework.cloud</groupId><artifactId>spring-cloud-starter-openfeign</artifactId></dependency>
- 编写Feign调用接口
package com.itheima.consumer.feign;import com.itheima.consumer.config.FeignLogConfig;import com.itheima.consumer.domain.Goods;import org.springframework.cloud.openfeign.FeignClient;import org.springframework.web.bind.annotation.GetMapping;import org.springframework.web.bind.annotation.PathVariable;/**** feign声明式接口。发起远程调用的。*String url = "http://FEIGN-PROVIDER/goods/findOne/"+id;Goods goods = restTemplate.getForObject(url, Goods.class);** 1. 定义接口* 2. 接口上添加注解 @FeignClient,设置value属性为 服务提供者的应用名称* 3. 编写调用接口,接口的声明规则和提供方接口保持一致。* 4. 注入该接口对象,调用接口方法完成远程调用*/@FeignClient(value = "FEIGN-PROVIDER")public interface GoodsFeignClient {@GetMapping("/goods/findOne/{id}")public Goods findGoodsById(@PathVariable("id") int id);}
OrderController
package com.itheima.consumer.controller;import com.itheima.consumer.domain.Goods;import com.itheima.consumer.feign.GoodsFeignClient;import org.springframework.beans.factory.annotation.Autowired;import org.springframework.web.bind.annotation.GetMapping;import org.springframework.web.bind.annotation.PathVariable;import org.springframework.web.bind.annotation.RequestMapping;import org.springframework.web.bind.annotation.RestController;import org.springframework.web.client.RestTemplate;@RestController@RequestMapping("/order")public class OrderController {@Autowiredprivate RestTemplate restTemplate;//注入feign接口@Autowiredprivate GoodsFeignClient goodsFeignClient;@GetMapping("/goods/{id}")public Goods findGoodsById(@PathVariable("id") int id){/*String url = "http://FEIGN-PROVIDER/goods/findOne/"+id;// 3. 调用方法Goods goods = restTemplate.getForObject(url, Goods.class);return goods;*///通过接口调用方法进行远程调用Goods goods = goodsFeignClient.findGoodsById(id);return goods;}}
goodsFeignClient报红,不影响使用,配置feign底层实现了Javase的动态代理及反射原理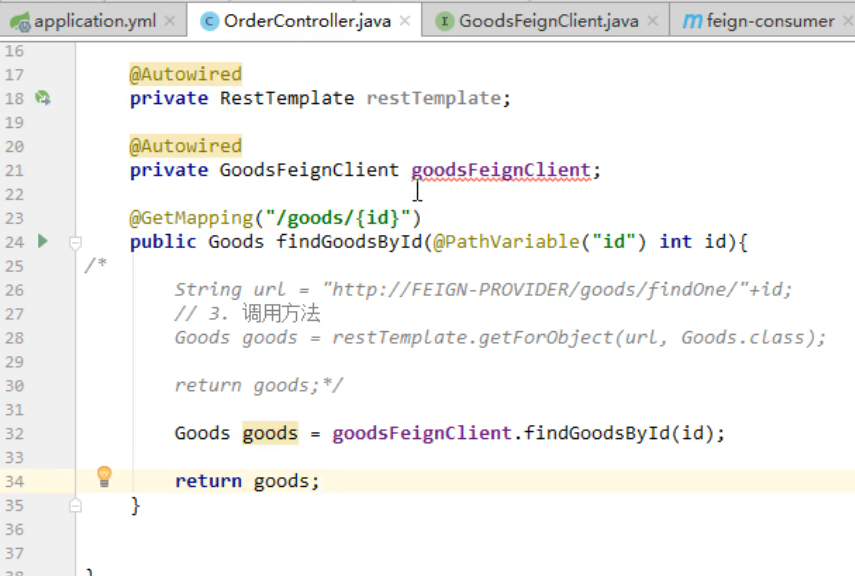
- 在启动类 添加 @EnableFeignClients 注解,开启Feign功能
package com.itheima.consumer;import org.springframework.boot.SpringApplication;import org.springframework.boot.autoconfigure.SpringBootApplication;import org.springframework.cloud.client.discovery.EnableDiscoveryClient;import org.springframework.cloud.netflix.eureka.EnableEurekaClient;import org.springframework.cloud.openfeign.EnableFeignClients;@EnableDiscoveryClient // 激活DiscoveryClient@EnableEurekaClient@SpringBootApplication@EnableFeignClients //开启Feign的功能public class ConsumerApp {public static void main(String[] args) {SpringApplication.run(ConsumerApp.class,args);}}
- 测试调用
2.3-Feign超时配置
• Feign 底层依赖于 Ribbon 实现负载均衡和远程调用。
• Ribbon默认1秒超时。
• 超时配置:
feign-consumer application.yml
# 设置Ribbon的超时时间ribbon:ConnectTimeout: 1000 # 连接超时时间 默认1s 默认单位毫秒ReadTimeout: 3000 # 逻辑处理的超时时间(响应时间超时) 默认1s 默认单位毫秒
2.4-Feign-日志记录
• Feign 只能记录 debug 级别的日志信息。
feign-consumer application.yml
# 设置当前的日志级别 debug,feign只支持记录debug级别的日志logging:level:com.itheima: debug
• 定义Feign日志级别Bean
FeignLogConfig
package com.itheima.consumer.config;import feign.Logger;import org.springframework.context.annotation.Bean;import org.springframework.context.annotation.Configuration;@Configurationpublic class FeignLogConfig {/*NONE,不记录BASIC,记录基本的请求行,响应状态码数据HEADERS,记录基本的请求行,响应状态码数据,记录响应头信息FULL;记录完成的请求 响应数据*/@Beanpublic Logger.Level level(){return Logger.Level.FULL;}}
• 启用该Bean:
package com.itheima.consumer.feign;import com.itheima.consumer.config.FeignLogConfig;import com.itheima.consumer.domain.Goods;import org.springframework.cloud.openfeign.FeignClient;import org.springframework.web.bind.annotation.GetMapping;import org.springframework.web.bind.annotation.PathVariable;/**** feign声明式接口。发起远程调用的。*String url = "http://FEIGN-PROVIDER/goods/findOne/"+id;Goods goods = restTemplate.getForObject(url, Goods.class);** 1. 定义接口* 2. 接口上添加注解 @FeignClient,设置value属性为 服务提供者的 应用名称* 3. 编写调用接口,接口的声明规则 和 提供方接口保持一致。* 4. 注入该接口对象,调用接口方法完成远程调用*/@FeignClient(value = "FEIGN-PROVIDER",configuration = FeignLogConfig.class)public interface GoodsFeignClient {@GetMapping("/goods/findOne/{id}")public Goods findGoodsById(@PathVariable("id") int id);}
3.Hystrix
3.1-Hystrix-概述
• Hystix 是 Netflix 开源的一个延迟和容错库,用于隔离访问远程服务、第三方库,防止出现级联失败(雪崩)。
• 雪崩:一个服务失败,导致整条链路的服务都失败的情形
Hystix 主要功能
• 隔离
- 线程池隔离
- 信号量隔离
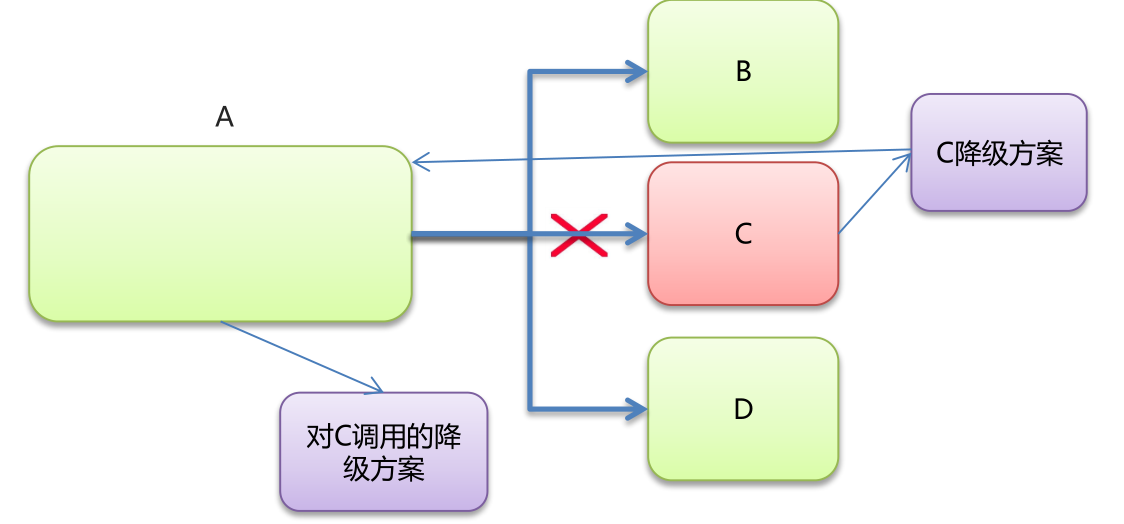
• 降级:异常,超时
• 熔断
• 限流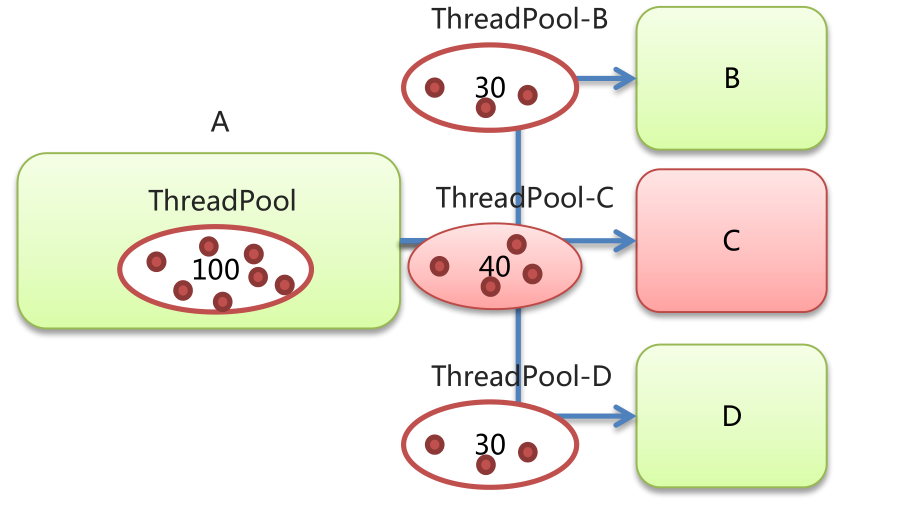
3.2-Hystrix-降级
3.2.1-提供方降级
Hystix 降级:当服务发生异常或调用超时,返回默认数据
服务提供方降级
- 在服务提供方,引入 hystrix 依赖```xml
```<!-- hystrix --><dependency><groupId>org.springframework.cloud</groupId><artifactId>spring-cloud-starter-netflix-hystrix</artifactId></dependency>
服务者提供方法启动类 : 类上标注@EnableCircuitBreaker注解
@EnableEurekaClient@SpringBootApplication@EnableCircuitBreakerpublic class ProviderApp{public static void main(String[]args){SpringApplication.run(ProviderApp.class,args);}}
在服务者提供方的controller中定义降级方法
/*** 定义降级方法:* 1. 方法的返回值需要和原方法一样* 2. 方法的参数需要和原方法一样*/public Goods findOne_fallback(int id){Goods goods = new Goods();goods.setTitle("降级了~~~");return goods;}
- 在服务者提供方的controller中的业务方法上 使用 @HystrixCommand 注解配置降级方法 (该注解的实现原理:基于AOP(动态代理),参见: https://www.wangshouyu.com/archives/hystrix-javanica-source)
/*** 降级:* 1. 出现异常* 2. 服务调用超时* * 默认1s超时** @HystrixCommand(fallbackMethod = "findOne_fallback")* fallbackMethod:指定降级后调用的方法名称*/@GetMapping("/findOne/{id}")@HystrixCommand(fallbackMethod = "findOne_fallback",commandProperties = {//设置Hystrix的超时时间,默认1s@HystrixProperty(name="execution.isolation.thread.timeoutInMilliseconds",value = "3000")})public Goods findOne(@PathVariable("id") int id){//1.造个异常int i = 3/0;try {//2. 休眠2秒Thread.sleep(2000);} catch (InterruptedException e) {e.printStackTrace();}Goods goods = goodsService.findOne(id);goods.setTitle(goods.getTitle() + ":" + port);//将端口号,设置到了 商品标题上return goods;}
- 在启动类上开启Hystrix功能:@EnableCircuitBreaker
package com.itheima.provider;import org.springframework.boot.SpringApplication;import org.springframework.boot.autoconfigure.SpringBootApplication;import org.springframework.cloud.client.circuitbreaker.EnableCircuitBreaker;import org.springframework.cloud.netflix.eureka.EnableEurekaClient;/*** 启动类*/@EnableEurekaClient //该注解 在新版本中可以省略@SpringBootApplication@EnableCircuitBreaker // 开启Hystrix功能public class ProviderApp {public static void main(String[] args) {SpringApplication.run(ProviderApp.class,args);}}
3.2.2-消费方降级
- feign 组件已经集成了 hystrix 组件。
- 定义feign 调用接口实现类,重写方法,即降级方法
- 编写实现类GoodsFeignClientFallback
package com.itheima.consumer.feign;import com.itheima.consumer.domain.Goods;import org.springframework.stereotype.Component;/*** Feign 客户端的降级处理类* 1. 定义类 实现 Feign 客户端接口* 2. 使用@Component注解将该类的Bean加入SpringIOC容器*/@Componentpublic class GoodsFeignClientFallback implements GoodsFeignClient {@Overridepublic Goods findGoodsById(int id) {Goods goods = new Goods();goods.setTitle("又被降级了~~~");return goods;}}
- 在 @FeignClient 注解中使用 fallback 属性设置降级处理类。
编写接口GoodsFeignClient
package com.itheima.consumer.feign;import com.itheima.consumer.domain.Goods;import org.springframework.cloud.openfeign.FeignClient;import org.springframework.web.bind.annotation.GetMapping;import org.springframework.web.bind.annotation.PathVariable;//value值指定的是服务提供者应用名称,fallback的值指定的是降级的类它实现了该接口@FeignClient(value = "HYSTRIX-PROVIDER",fallback = GoodsFeignClientFallback.class)public interface GoodsFeignClient {@GetMapping("/goods/findOne/{id}")public Goods findGoodsById(@PathVariable("id") int id);}
- 配置开启 feign.hystrix.enabled = true
application.yml
# 开启feign对hystrix的支持feign:hystrix:enabled: true
3.3-Hystrix-熔断
3.3.1-熔断-概念
• Hystrix 熔断机制,用于监控微服务调用情况,当失败的情况达到预定的阈值(5秒失败20次),会打开
断路器,拒绝所有请求,直到服务恢复正常为止。
断路器三种状态:打开、半开、关闭。
详细的熔断器的工作原理:hystrix基于微服务调用监控数据,当调用失败率达到设定的值,就打开断路器(针对目标服务),之后,调用方会拒绝发起该服务所有的请求调用(因为就算调用也大概率上不会有好的结果,白白浪费资源而已),一段时间后,断路器会处于半开状态,会有少量的请求尝试调用,会根据调用的结果判断,断路器是继续打开(服务依旧不可用)还是关闭(目标服务恢复正常)。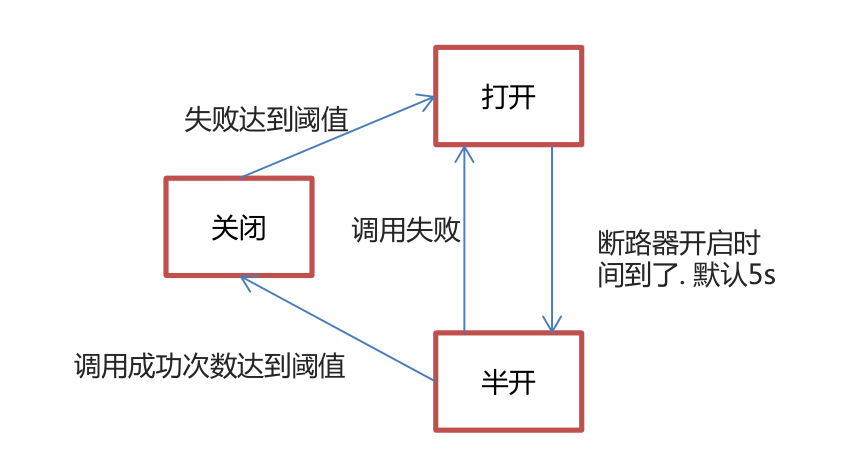
3.3.2-熔断-代码演示
修改服务提供方的方法,演示熔断机制
熔断配置
• circuitBreaker.sleepWindowInMilliseconds:监控时间
• circuitBreaker.requestVolumeThreshold:失败次数
• circuitBreaker.errorThresholdPercentage:失败率
服务提供者的GoodsController
package com.itheima.provider.controller;import com.itheima.provider.domain.Goods;import com.itheima.provider.service.GoodsService;import com.netflix.hystrix.contrib.javanica.annotation.HystrixCommand;import com.netflix.hystrix.contrib.javanica.annotation.HystrixProperty;import org.springframework.beans.factory.annotation.Autowired;import org.springframework.beans.factory.annotation.Value;import org.springframework.web.bind.annotation.GetMapping;import org.springframework.web.bind.annotation.PathVariable;import org.springframework.web.bind.annotation.RequestMapping;import org.springframework.web.bind.annotation.RestController;import java.util.Date;/*** Goods Controller 服务提供方*/@RestController@RequestMapping("/goods")public class GoodsController {@Autowiredprivate GoodsService goodsService;@Value("${server.port}")private int port;/*** 降级:* 1. 出现异常* 2. 服务调用超时* * 默认1s超时** @HystrixCommand(fallbackMethod = "findOne_fallback")* fallbackMethod:指定降级后调用的方法名称*/@GetMapping("/findOne/{id}")@HystrixCommand(fallbackMethod = "findOne_fallback",commandProperties = {//设置Hystrix的超时时间,默认1s@HystrixProperty(name="execution.isolation.thread.timeoutInMilliseconds",value = "3000"),//监控时间 默认5000 毫秒@HystrixProperty(name="circuitBreaker.sleepWindowInMilliseconds",value = "5000"),//失败次数。默认20次@HystrixProperty(name="circuitBreaker.requestVolumeThreshold",value = "20"),//失败率 默认50%@HystrixProperty(name="circuitBreaker.errorThresholdPercentage",value = "50") })public Goods findOne(@PathVariable("id") int id){//如果id == 1 ,则出现异常,id != 1 则正常访问if(id == 1){//1.造个异常int i = 3/0;}/*try {//2. 休眠2秒Thread.sleep(2000);} catch (InterruptedException e) {e.printStackTrace();}*/Goods goods = goodsService.findOne(id);goods.setTitle(goods.getTitle() + ":" + port);//将端口号,设置到了 商品标题上return goods;}/*** 定义降级方法:* 1. 方法的返回值需要和原方法一样* 2. 方法的参数需要和原方法一样*/public Goods findOne_fallback(int id){Goods goods = new Goods();goods.setTitle("降级了~~~");return goods;}}
3.3.3-熔断监控
• Hystrix 提供了 Hystrix-dashboard 功能,用于实时监控微服务运行状态。
• 但是Hystrix-dashboard只能监控一个微服务。
• Netflix 还提供了 Turbine ,进行聚合监控。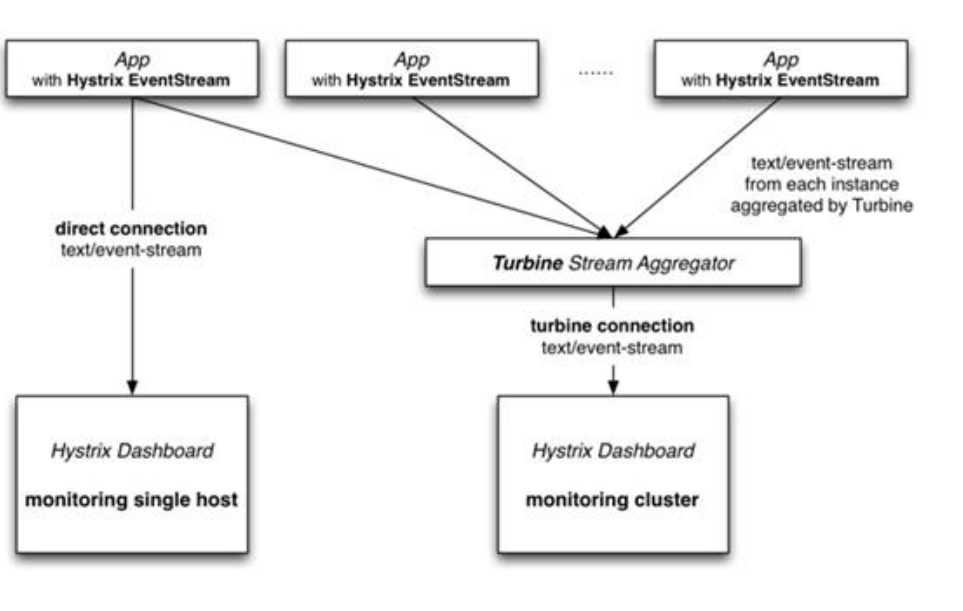
(1)熔断器监控安装
在父工程下面搭建hystrix-monitor模块,使用Turbine聚合监控多个hystrix-dashboard功能 ```xml
<?xml version=”1.0” encoding=”UTF-8”?> <project xmlns=”http://maven.apache.org/POM/4.0.0“
xmlns:xsi="http://www.w3.org/2001/XMLSchema-instance"xsi:schemaLocation="http://maven.apache.org/POM/4.0.0 http://maven.apache.org/xsd/maven-4.0.0.xsd">
<artifactId>hystrix-parent</artifactId><groupId>com.itheima</groupId><version>1.0-SNAPSHOT</version>
4.0.0 hystrix-monitor UTF-8 UTF-8 1.8 <dependency><groupId>org.springframework.cloud</groupId><artifactId>spring-cloud-starter-netflix-hystrix-dashboard</artifactId></dependency><dependency><groupId>org.springframework.cloud</groupId><artifactId>spring-cloud-starter-netflix-turbine</artifactId></dependency><dependency><groupId>org.springframework.boot</groupId><artifactId>spring-boot-starter-actuator</artifactId></dependency><dependency><groupId>org.springframework.cloud</groupId><artifactId>spring-cloud-starter-netflix-eureka-client</artifactId></dependency>
<dependency><groupId>org.springframework.boot</groupId><artifactId>spring-boot-starter-test</artifactId><scope>test</scope></dependency></dependencies><build><plugins><plugin><groupId>org.springframework.boot</groupId><artifactId>spring-boot-maven-plugin</artifactId></plugin></plugins></build>
- 修改hystrix-montior模块下的application.yml文件```yamlspring:application.name: hystrix-monitorserver:port: 8769turbine:combine-host-port: true# 配置需要监控的服务名称列表app-config: hystrix-provider,hystrix-consumercluster-name-expression: "'default'"aggregator:cluster-config: default#instanceUrlSuffix: /actuator/hystrix.streameureka:client:serviceUrl:defaultZone: http://localhost:8761/eureka/ # eureka服务的地址
- 创建启动类 ```java
@SpringBootApplication @EnableEurekaClient //指定eureka的客户端
@EnableTurbine //开启Turbine 很聚合监控功能 @EnableHystrixDashboard //开启Hystrix仪表盘监控功能 public class HystrixMonitorApp {
public static void main(String[] args) {SpringApplication.run(HystrixMonitorApp.class, args);}
}
- 修改被监控的模块(分别修改provider模块和consumer模块)- 导入依赖```xml<dependency><groupId>org.springframework.boot</groupId><artifactId>spring-boot-starter-actuator</artifactId></dependency><dependency><groupId>org.springframework.cloud</groupId><artifactId>spring-cloud-starter-netflix-hystrix</artifactId></dependency><dependency><groupId>org.springframework.cloud</groupId><artifactId>spring-cloud-starter-netflix-hystrix-dashboard</artifactId></dependency>
- 分别在服务提供方和服务消费方配置bean(为了方便配置在启动类中)并在启动类上添加@EnableHystrixDashboard注解 ```java @EnableDiscoveryClient @EnableEurekaClient @SpringBootApplication @EnableFeignClients @EnableHystrixDashboard // 开启Hystrix仪表盘监控功能 public class ConsumerApp {
public static void main(String[] args) {SpringApplication.run(ConsumerApp.class,args);}
@Bean public ServletRegistrationBean getServlet() { HystrixMetricsStreamServlet streamServlet = new HystrixMetricsStreamServlet(); ServletRegistrationBean registrationBean = new ServletRegistrationBean(streamServlet); registrationBean.setLoadOnStartup(1); registrationBean.addUrlMappings(“/actuator/hystrix.stream”); registrationBean.setName(“HystrixMetricsStreamServlet”); return registrationBean; }
(2)启动测试- 启动模块的顺序- eureka-server- hystrix-provider- hystrix-consumer- hystrix-monitor- 访问:- 在浏览器访问[http://localhost:8769/hystrix/](http://localhost:8769/hystrix/) 进入Hystrix Dashboard界面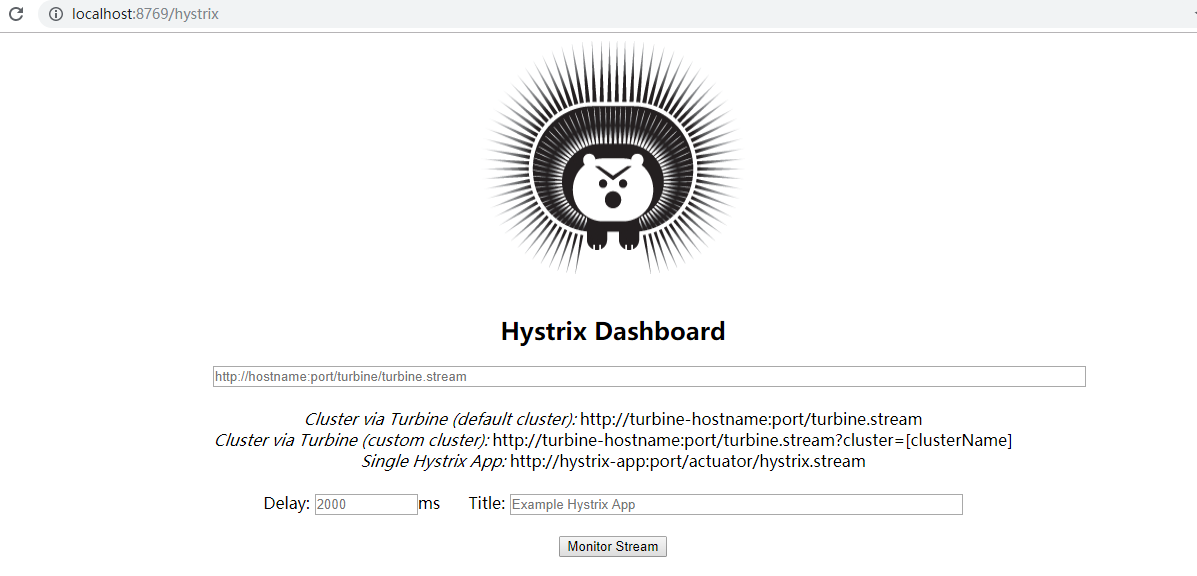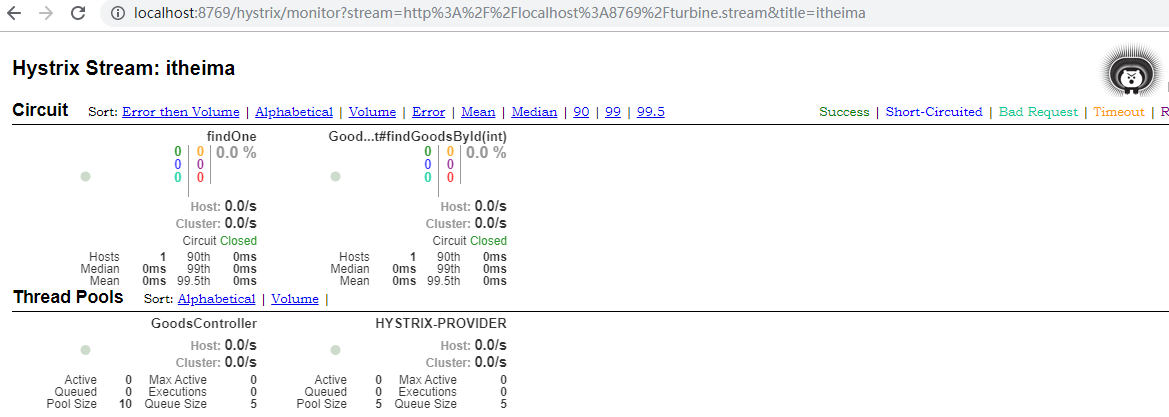- 实心圆:它有颜色和大小之分,分别代表实例的监控程度和流量大小。如上图所示,它的健康度从绿色、黄色、橙色、红色递减。通过该实心圆的展示,我们就可以在大量的实例中快速的发现故障实例和高压力实例。- 曲线:用来记录 2 分钟内流量的相对变化,我们可以通过它来观察到流量的上升和下降趋势。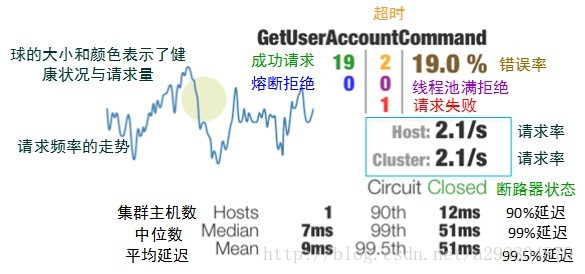<br />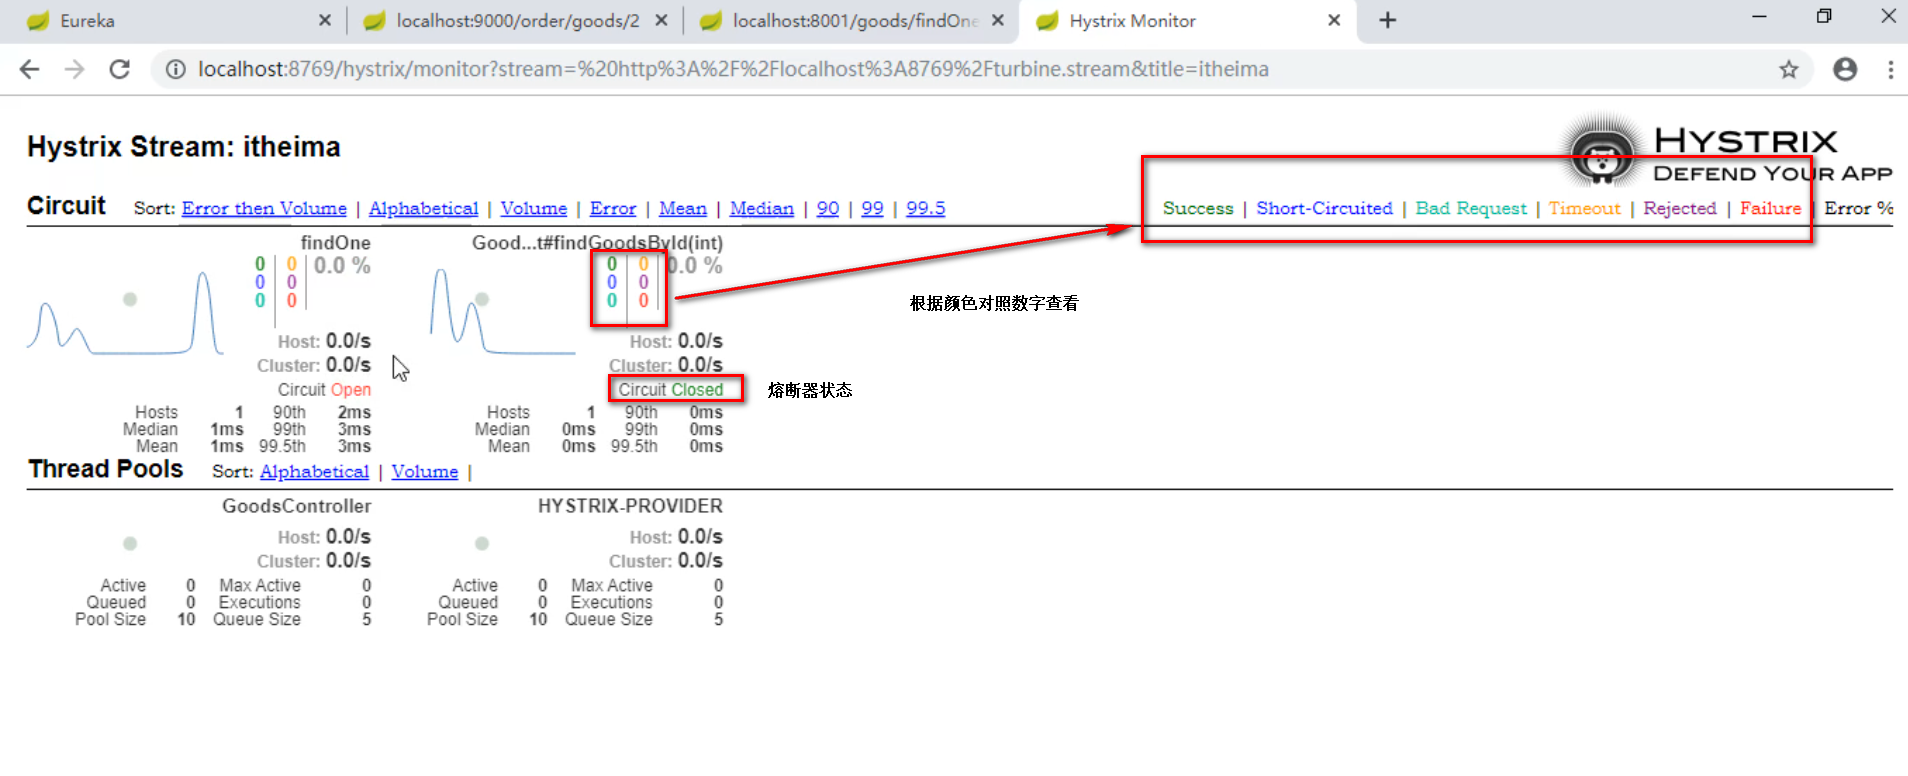<a name="4.Gateway"></a># 4.Gateway<a name="6ad14751"></a>## 4.1-Gateway-概述- 网关旨在为微服务架构提供一种简单而有效的统一的API路由管理方式。- 在微服务架构中,不同的微服务可以有不同的网络地址,各个微服务之间通过互相调用完成用户请求,客户端可能通过调用N个微服务的接口完成一个用户请求。- 存在的问题:```yaml1.客户端多次请求不同的微服务,增加客户端的复杂性2.认证复杂,每个服务都要进行认证3.http请求不同服务次数增加,性能不高
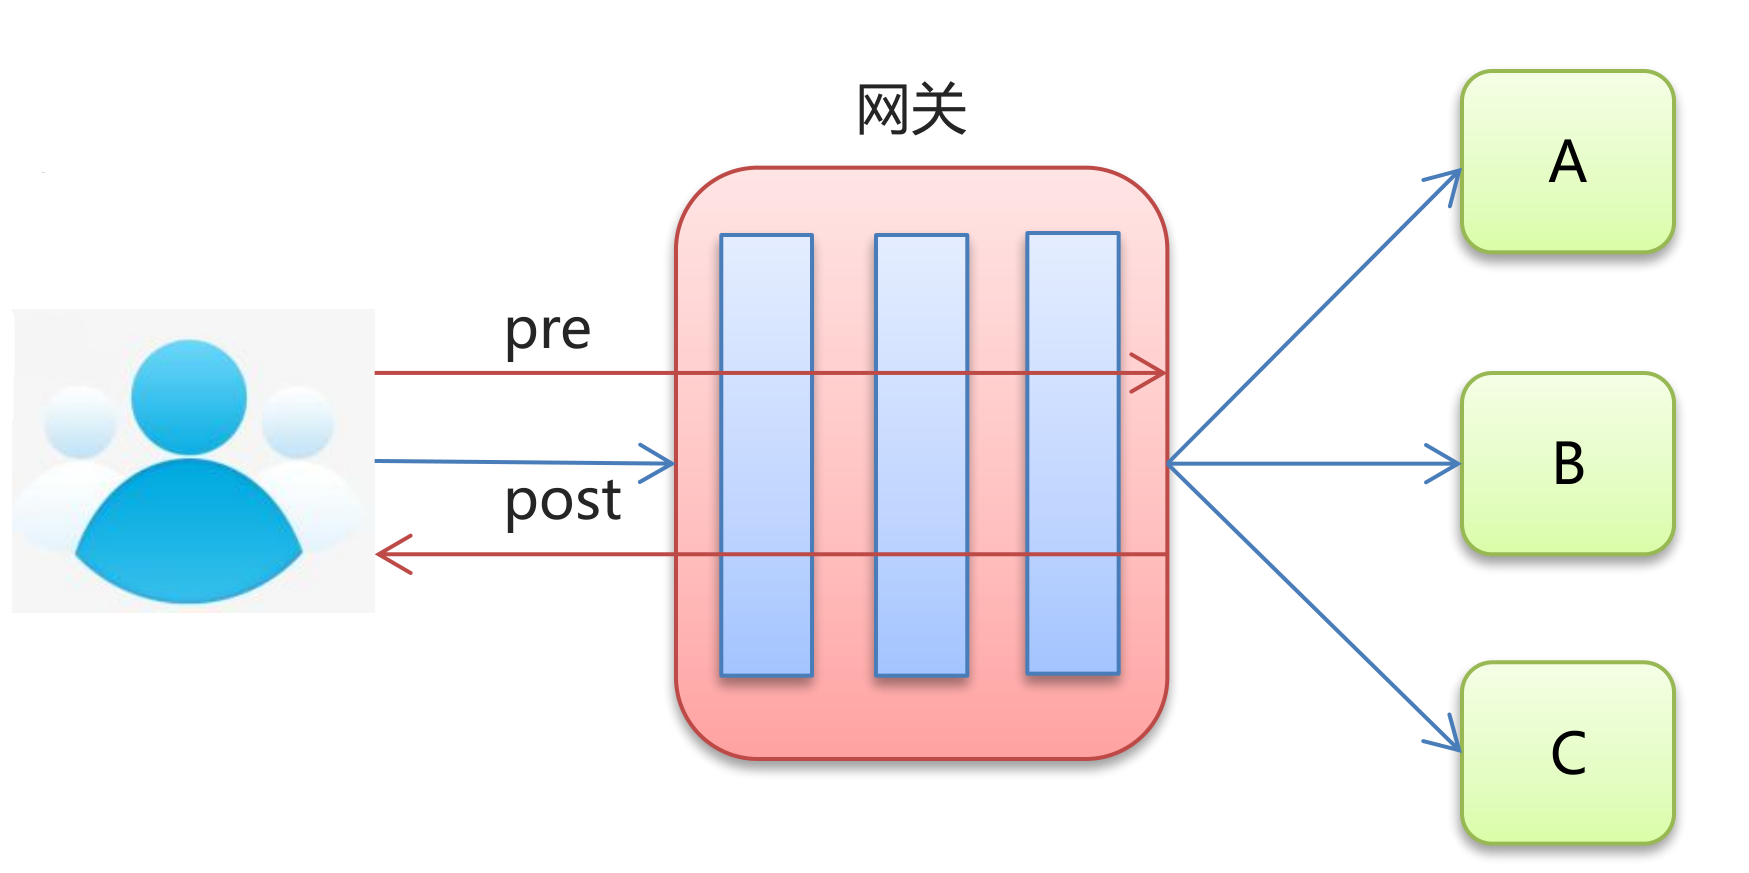
- 网关就是系统的入口,封装了应用程序的内部结构,为客户端提供统一服务调用入口(外网只需要暴露网关端口即可),降低客户端访问的复杂性(网关参与进来形成微服务闭环),一些与业务本身功能无关的公共逻辑可以在这里实现,诸如网关统一身份认证校验、鉴权、缓存、流量管控、路由转发、结合注册中心服务发现实现负载均衡、统一接口日志及监控等。
- 在目前的网关解决方案里,有Nginx+ Lua、Netflix Zuul 、Spring Cloud Gateway等等
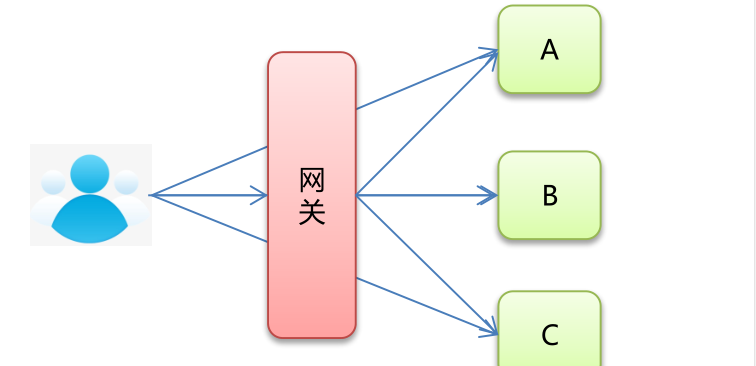
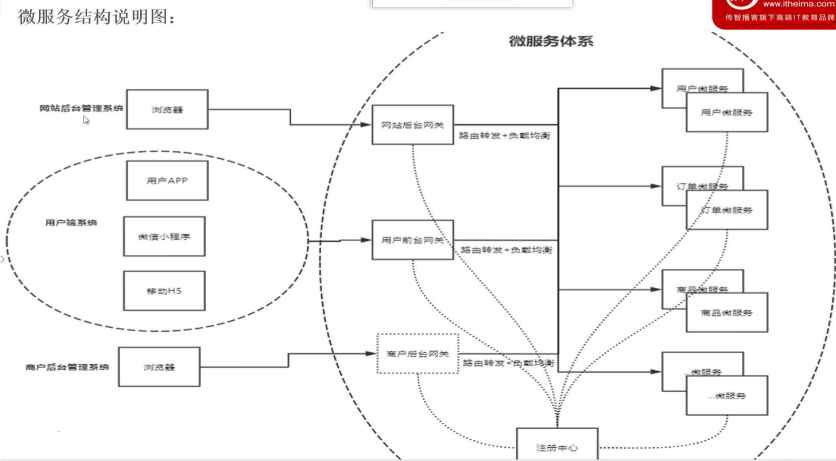
- 网关在微服务架构中的图解
4.2-Gateway-快速入门
- 搭建网关模块
创建api-gateway-server模块 引入依赖:starter-gateway```xml
<!--引入gateway 网关--><dependency><groupId>org.springframework.cloud</groupId><artifactId>spring-cloud-starter-gateway</artifactId></dependency><!-- eureka-client --><dependency><groupId>org.springframework.cloud</groupId><artifactId>spring-cloud-starter-netflix-eureka-client</artifactId></dependency>
```
编写启动类```java package com.itheima.gateway;
import org.springframework.boot.SpringApplication; import org.springframework.boot.autoconfigure.SpringBootApplication; import org.springframework.cloud.netflix.eureka.EnableEurekaClient;
@SpringBootApplication @EnableEurekaClient public class ApiGatewayApp {
public static void main(String[] args) {SpringApplication.run(ApiGatewayApp.class,args);}
}
4. 编写配置文件<br />application.yml```yamlserver:port: 80spring:application:name: api-gateway-servercloud:# 网关配置gateway:# 路由配置:转发规则routes: #集合。# id: 唯一标识。默认是一个UUID# uri: 转发路径# predicates: 条件,用于请求网关路径的匹配规则- id: gateway-provideruri: http://localhost:8001/predicates:- Path=/goods/**
- 启动测试
4.3-Gateway-静态路由
application.yml 中的uri是写死的,就是静态路由
server:port: 80spring:application:name: api-gateway-servercloud:# 网关配置gateway:# 路由配置:转发规则routes: #集合。# id: 唯一标识。默认是一个UUID# uri: 转发路径# predicates: 条件,用于请求网关路径的匹配规则# filters:配置局部过滤器的- id: gateway-provider# 静态路由uri: http://localhost:8001/predicates:- Path=/goods/**
4.4-Gateway-动态路由
启动类添加@EnableEurekaClient(新版本不加也可以)
package com.itheima.gateway;import org.springframework.boot.SpringApplication;import org.springframework.boot.autoconfigure.SpringBootApplication;import org.springframework.cloud.netflix.eureka.EnableEurekaClient;@SpringBootApplication@EnableEurekaClientpublic class ApiGatewayApp {public static void main(String[] args) {SpringApplication.run(ApiGatewayApp.class,args);}}
引入eureka-client配置
application.yml 中修改uri属性:uri: lb://服务名称
server:port: 80spring:application:name: api-gateway-servercloud:# 网关配置gateway:# 路由配置:转发规则routes: #集合。# id: 唯一标识。默认是一个UUID# uri: 转发路径# predicates: 条件,用于请求网关路径的匹配规则# filters:配置局部过滤器的- id: gateway-provider# 静态路由# uri: http://localhost:8001/# 动态路由uri: lb://GATEWAY-PROVIDERpredicates:- Path=/goods/**
4.5-Gateway-微服务名称配置
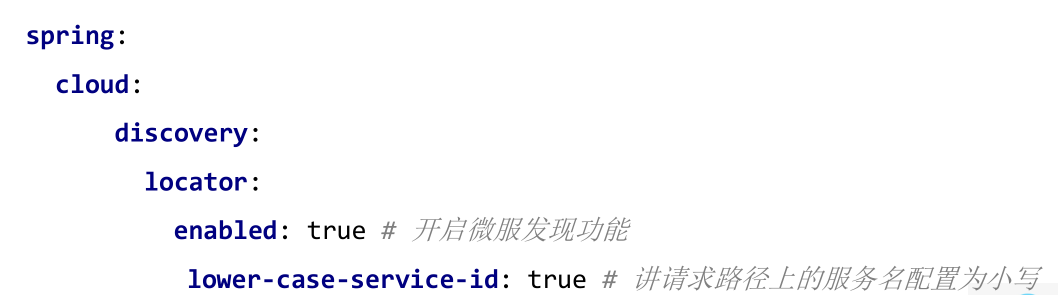
application.yml中配置微服务名称配置
# 微服务名称配置discovery:locator:enabled: true # 设置为true 请求路径前可以添加微服务名称lower-case-service-id: true # 允许为小写
4.6-Gateway-过滤器
4.6.1-过滤器-概述
- Gateway 支持过滤器功能,对请求或响应进行拦截,完成一些通用操作。
- Gateway 提供两种过滤器方式:“pre”和“post”
pre 过滤器,在转发之前执行,可以做参数校验、权限校验、流量监控、日志输出、协议转换等。
post 过滤器,在响应之前执行,可以做响应内容、响应头的修改,日志的输出,流量监控等。 - Gateway 还提供了两种类型过滤器
GatewayFilter:局部过滤器,针对单个路由
GlobalFilter :全局过滤器,针对所有路由
4.6.2-局部过滤器
- GatewayFilter 局部过滤器,是针对单个路由的过滤器。
- 在Spring Cloud Gateway 组件中提供了大量内置的局部过滤器,对请求和响应做过滤操作。
- 遵循约定大于配置的思想,只需要在配置文件配置局部过滤器名称,并为其指定对应的值,就可以让其生效。
具体配置参见gateway内置过滤器工厂.md
测试配置
api-gateway-server application.yml
server:port: 80spring:application:name: api-gateway-servercloud:# 网关配置gateway:# 路由配置:转发规则routes: #集合。# id: 唯一标识。默认是一个UUID# uri: 转发路径# predicates: 条件,用于请求网关路径的匹配规则# filters:配置局部过滤器的- id: gateway-provider# 静态路由# uri: http://localhost:8001/# 动态路由uri: lb://GATEWAY-PROVIDERpredicates:- Path=/goods/**filters:- AddRequestParameter=username,zhangsan
gateway-provider模块中GoodsController中的findOne添加username参数
public Goods findOne(@PathVariable("id") int id,String username){System.out.println(username);//如果id == 1 ,则出现异常,id != 1 则正常访问if(id == 1){//1.造个异常int i = 3/0;}/*try {//2. 休眠2秒Thread.sleep(2000);} catch (InterruptedException e) {e.printStackTrace();}*/Goods goods = goodsService.findOne(id);goods.setTitle(goods.getTitle() + ":" + port);//将端口号,设置到了 商品标题上return goods;}
4.6.3-全局过滤器
- GlobalFilter 全局过滤器,不需要在配置文件中配置,系统初始化时加载,并作用在每个路由上。
- Spring Cloud Gateway 核心的功能也是通过内置的全局过滤器来完成。
- 自定义全局过滤器步骤:
- 定义类实现 GlobalFilter 和 Ordered接口
- 复写方法
- 完成逻辑处理

MyFilter
package com.itheima.gateway.filter;import org.springframework.cloud.gateway.filter.GatewayFilterChain;import org.springframework.cloud.gateway.filter.GlobalFilter;import org.springframework.core.Ordered;import org.springframework.stereotype.Component;import org.springframework.web.server.ServerWebExchange;import reactor.core.publisher.Mono;@Componentpublic class MyFilter implements GlobalFilter, Ordered {@Overridepublic Mono<Void> filter(ServerWebExchange exchange, GatewayFilterChain chain) {System.out.println("自定义全局过滤器执行了~~~");return chain.filter(exchange);//放行}/*** 过滤器排序* @return 数值越小 越先执行*/@Overridepublic int getOrder() {return 0;}}

若有收获,就点个赞吧
0 人点赞
