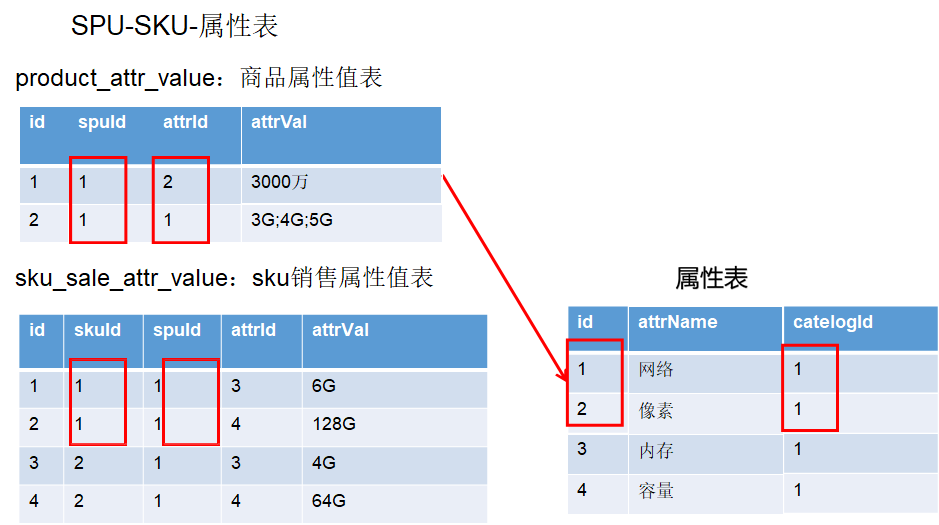
概念——SPU与SKU
SPU
Standard Product Unit 标准化产品单元:是商品信息聚合的最小单位,是一组可复用、易检索的标准化信息的集合,该集合描述了一个产品的特性。
- 通俗点讲,属性值、特性相同的商品就可以称为一个 SPU。
例如:
iPhone 12就是一个 SPU,与商家,与颜色、款式、套餐都无关。SKU
Stock Keeping Unit 库存量单位:即库存进出计量的基本单元,可以是以件、盒等为单位。SKU这是对于大型连锁超市 DC (配送中心)物流管理的一个必要的方法。现在已经被引申为产品统一编号的简称,每种产品均对应有唯一的SKU号。
SKU 即库存进出计量的单位, 可以是以件、盒、托盘等为单位。
- SKU 是物理上不可分割的最小存货单元。在使用时要根据不同业态,不同管理模式来处理。
- 在服装、鞋类商品中使用最多最普遍。
例如:魅族18的颜色(深空灰等),存储容量(64GB 128GB 256GB)。
举例:
iPhoneX 是 SPU、MI8 是 SPU
iPhoneX 64G 黑曜石是 SKU
MI8 8+64G 黑色是 SKU基本属性【规格参数】与销售属性
每个分类下的商品共享规格参数,与销售属性。只是有些商品不一定要用这个分类下全部的属性;
属性是以三级分类组织起来的
- 规格参数中有些是可以提供检索的
- 规格参数也是基本属性,他们具有自己的分组;
- 属性的分组也是以三级分类组织起来的;
- 属性名是确定的,但是值是每一个商品不同决定的;
商品的基础属性是SPU的特性,商品的销售属性是SKU的特性。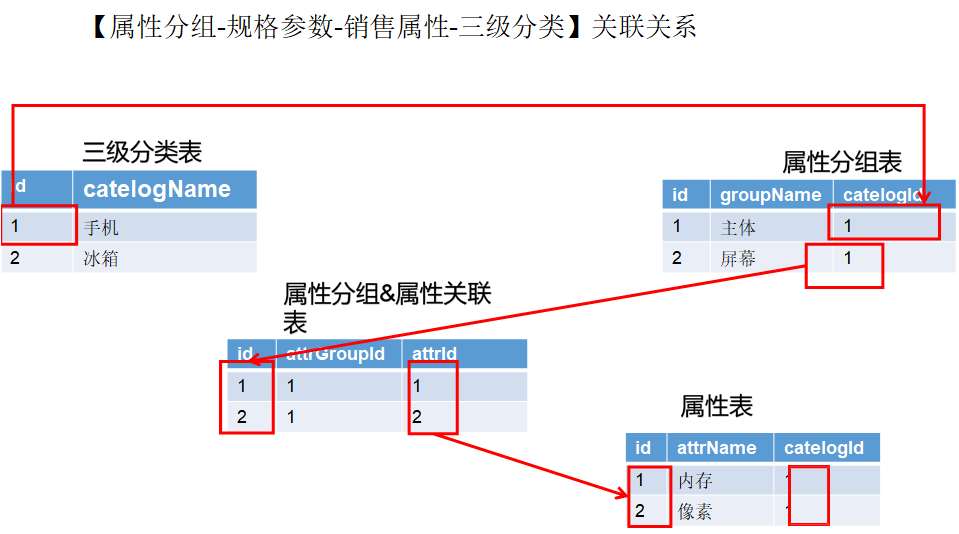
前序准备
sys_menus.sql 我们在gulimall_admin数据库中执行sys_menus.sql文件,该文件会为我们生成很多需要用到的目录菜单。
注意: 这里的名字根据自己数据库修改。
课件也提供了核心功能的前端代码,可以直接复制,但是建议一步一步跟着视频来。
接口文档地址:https://easydoc.net/s/78237135/ZUqEdvA4/hKJTcbfd
属性分组实现效果
选中一个三级分类,然后可以查出这个分类下已经存在的分组,并可以新增/删除属性分组。
所以这一我们需要三级分类的分类树(不需要拖拽、修改等功能,仅需要展示即可)
一、前端组件抽取&父子组件交互
1.1 抽取组件
在前端项目modules文件夹下新建一个common文件夹,新建category.vue作为三级分类组件,在其他组件中使用这个三级分类组件。
1.2 父子组件交互
现在我们在其他组件中均使用了/common/category.vue,那么这样会存在问题,我点击三级分类项是category.vue中的事件,怎么样才能传到使用category.vue的其他组件中去呢?目的就是,当三级分类被点击时,我在父组件中需要知道哪个被点击了。
这里就需要用到vue里面的高级用法,父子组件传递数据。category是子组件,导入cate的是父组件
1.2.1 子组件给父组件传递数据——事件机制
- 子组件给父组件发送一个事件,事件携带数据。
在../common/category中绑定node-click事件,method:{}中添加nodeclick方法通过this.$emit("事件名",需要携带的数据);发送事件和数据
<el-tree :data="menus" :props="defaultProps" node-key="catId" ref="menuTree" @node-click="nodeclick"></el-tree>methods:{nodeclick(data, node, component) {console.log("子组件category被点击",data, node, component);// 向父组件发送事件// $emit("事件名",....所有需要携带的数据)this.$emit("tree-node-click",data, node, component);},}
- 父组件接收子组件发送的事件
```vue
methods:{ // 感知子节点(tree)被点击 treenodeclick(data, node, component) { console.log(“attrgroup感知到category的节点被点击”,data, node, component); console.log(“刚才被点击的菜单名:”, data.name); }, }
<a name="ridaV"></a># 二、获取分类属性分组通过`GET /product/attrgroup/list/{catelogId} ` 来获取属性分组。<a name="mWEw1"></a>## 2.1 修改gulimall-product```java/*** 列表 原方法只有/list*/@RequestMapping("/list/{catelogId}")//@RequiresPermissions("gulimallproduct:attrgroup:list")public R list(@RequestParam Map<String, Object> params,@PathVariable("catelogId") Long catelogId){// PageUtils page = attrGroupService.queryPage(params);// 逆向生成的方法不能查询ID,所以我们需要自己写一个PageUtils page = attrGroupService.queryPage(params, catelogId);return R.ok().put("page", page);}
在AttrGroupService接口中生成该方法,然后在AttrGroupServiceImpl中实现该方法。
public interface AttrGroupService extends IService<AttrGroupEntity> {PageUtils queryPage(Map<String, Object> params);PageUtils queryPage(Map<String, Object> params, Long catelogId);}
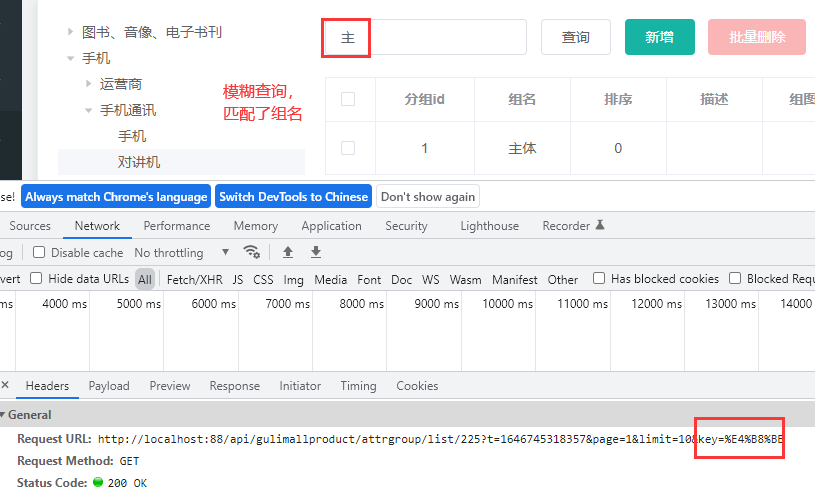
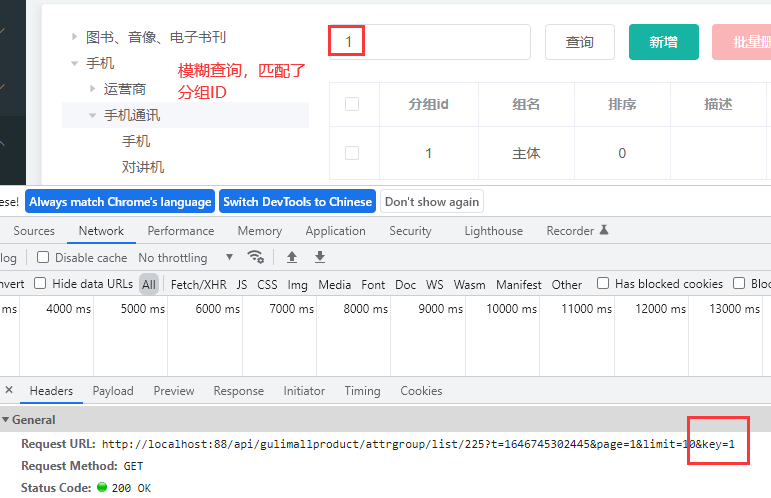
@Overridepublic PageUtils queryPage(Map<String, Object> params, Long catelogId) {// 前端规定如果传过来的catelogId为0,那么表示没有选中三级分类,则查询所有属性分组if (catelogId == 0) {IPage<AttrGroupEntity> page = this.page(new Query<AttrGroupEntity>().getPage(params),new QueryWrapper<AttrGroupEntity>());return new PageUtils(page);}else {// 前端提交的时候还会提交一个参数名,这个参数名是一个模糊查询,可以匹配任意分组字段,所以需要判断String key = (String) params.get("key");// select * from pms_attr_group where catelog_id = ? and (attr_group_id = key or attr_group_name = key)QueryWrapper<AttrGroupEntity> wrapper = new QueryWrapper<AttrGroupEntity>().eq("catelog_id", catelogId);if (!StringUtils.isEmpty(key)) {wrapper.and((obj)->{obj.eq("attr_group_id", key).or().like("attr_group_name", key);});}IPage<AttrGroupEntity> page = this.page(new Query<AttrGroupEntity>().getPage(params), wrapper);return new PageUtils(page);}}
2.2 测试


2.3 前端
点击一级和二级分类不会查询属性分组,只有点击三级分类才会查询.
修改attrgroup.vue,在data中添加一个catId记录目录id,然后分别修改treenodeclick和getDataList方法。
getDataList方法中修改请求的url地址,需要动态的获取catelogId(其实就是catId,目录ID);
treenodeclick需要加一个判断,只有是三级分类目录的时候才查询属性分组。
data() {//这里存放数据return {catId: 0,dataForm: {key: "",},dataList: [],pageIndex: 1,pageSize: 10,totalPage: 0,dataListLoading: false,dataListSelections: [],addOrUpdateVisible: false,};},// 感知子节点(tree)被点击treenodeclick(data, node, component) {console.log("attrgroup感知到category的节点被点击",data, node, component);console.log("刚才被点击的菜单名:", data.name);if (node.level == 3) { //判断当前点击的节点是否为三级分类this.catId = data.catId;this.getDataList(); // 重新插曲属性分组列表}},// 获取属性分组数据列表getDataList () {this.dataListLoading = truethis.$http({url: this.$http.adornUrl(`/gulimallproduct/attrgroup/list/${this.catId}`),method: 'get',params: this.$http.adornParams({'page': this.pageIndex,'limit': this.pageSize,'key': this.dataForm.key})}).then(({data}) => {if (data && data.code === 0) {this.dataList = data.page.listthis.totalPage = data.page.totalCount} else {this.dataList = []this.totalPage = 0}this.dataListLoading = false})},
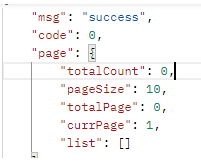
2.4 测试
测试前在gulimall_prodcut数据库的pms_attr_group表中加几条记录

三、分组新增&修改&删除
3.1 Cascader级联选择器
在添加属性分组的时候,所属分类ID应该是一个选择框,选择框中展示已有的分类ID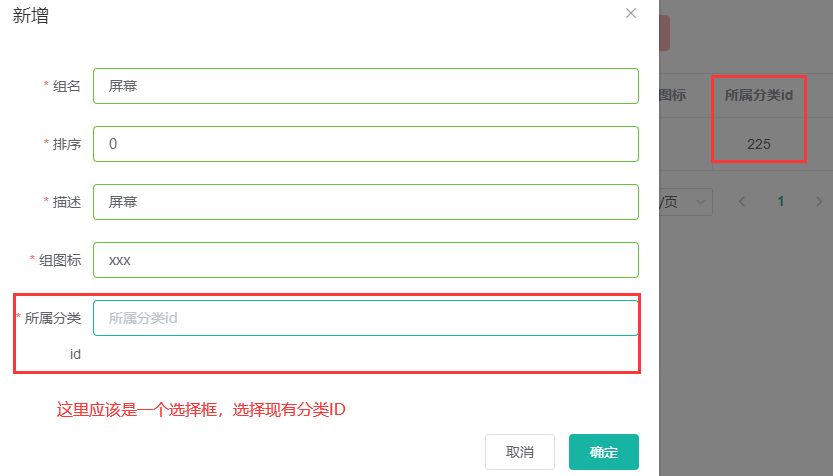
使用EL的Cascader级联选择器,修改attrgroup-add-or-update.vue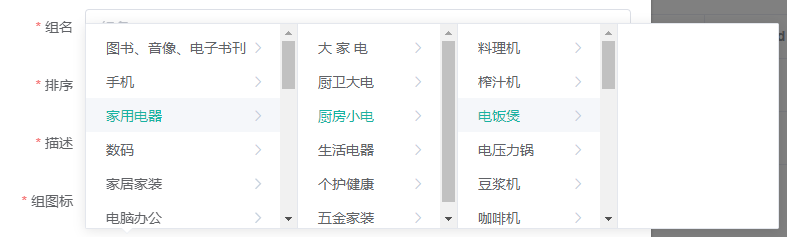
会发现三级目录后面还会有空白的目录,这是因为后端返回的树形目录中,三级目录的children是空数组。需要在调整后端代码,使其返回时三级目录不带有children。
可以通过在实体类的属性上加上@JsonInclude(JsonInclude.Include.NON_EMPTY),实现当该字段非空时,响应才包含此字段。
@JsonInclude(JsonInclude.Include.NON_EMPTY) // 这个注解表示当该属性非空时,响应才包含该字段@TableField(exist = false) // 这个注解表示改属性不是表里面的private List<CategoryEntity> children;
3.2 修改-级联选择器回显
点击修改属性分组的时候,发现所属分类ID并没有回显。 这是因为在修改的时候,只查到了当前三级分类的catalogId,还需要查出catelogId的完整路径
3.2.1 查询当前目录的完整路径
所谓完整路径就是要查出当前目录的所有父目录的catId,再次强调这个目录ID在CategoryEntity中叫catId,在AttrGroupEntity中叫catelogId。
首先需要在AttrGroupEntity实体类中添加一个catelogPath字段,用于存储完整路径。
/*** catelogId的完整路径(包含父菜单)*/@TableField(exist = false)private Long[] catelogPath;
AttrGroupController中,修改查询信息的接口,给返回的AttrGroupEntity添加上完整的路径信息
@Autowiredprivate CategoryService categoryService;/*** 信息*/@RequestMapping("/info/{attrGroupId}")//@RequiresPermissions("gulimallproduct:attrgroup:info")public R info(@PathVariable("attrGroupId") Long attrGroupId){AttrGroupEntity attrGroup = attrGroupService.getById(attrGroupId);// 希望通过catelogId查到完整路径Long catelogId = attrGroup.getCatelogId();Long[] path = categoryService.findCatelogPath(catelogId); // 该方法通过当前分类的catelogId找到完整路径attrGroup.setCatelogPath(path);return R.ok().put("attrGroup", attrGroup);}
因为这里需要通过catelogID(catId)查询其完整路径信息,我们定义一个方法findCatelogPath实现查询完整路径信息。在CategoryService接口中声明该方法,在CategoryServiceImpl中实现该方法
@Overridepublic Long[] findCatelogPath(Long catelogId) {List<Long> paths = new ArrayList<>();findParentPath(paths, catelogId);return paths.toArray(new Long[0]);}private void findParentPath(List<Long> paths, Long catelogId) {CategoryEntity category = this.getById(catelogId);if (category.getParentCid() != 0) { // 这里会触发自动拆箱findParentPath(paths, category.getParentCid());}paths.add(catelogId);}

3.2.2 前端代码
src\views\modules\product\attrgroup-add-or-update.vue
<template><el-dialog:title="!dataForm.attrGroupId ? '新增' : '修改'":close-on-click-modal="false":visible.sync="visible"@closed="dialogClose"><el-form:model="dataForm":rules="dataRule"ref="dataForm"@keyup.enter.native="dataFormSubmit()"label-width="80px"><el-form-item label="组名" prop="attrGroupName"><el-inputv-model="dataForm.attrGroupName"placeholder="组名"></el-input></el-form-item><el-form-item label="排序" prop="sort"><el-input v-model="dataForm.sort" placeholder="排序"></el-input></el-form-item><el-form-item label="描述" prop="descript"><el-input v-model="dataForm.descript" placeholder="描述"></el-input></el-form-item><el-form-item label="组图标" prop="icon"><el-input v-model="dataForm.icon" placeholder="组图标"></el-input></el-form-item><el-form-item label="所属分类id" prop="catelogId"><!-- <el-input v-model="dataForm.catelogId" placeholder="所属分类id"></el-input> --><el-cascaderv-model="dataForm.catelogPath":options="categorys":props="props"placeholder="试试搜索:手机"filterable></el-cascader></el-form-item></el-form><span slot="footer" class="dialog-footer"><el-button @click="visible = false">取消</el-button><el-button type="primary" @click="dataFormSubmit()">确定</el-button></span></el-dialog></template><script>export default {data() {return {props: {value:"catId",label:"name",children:"children"},categorys: [],visible: false,dataForm: {attrGroupId: 0,attrGroupName: "",sort: "",descript: "",icon: "",catelogPath: [],catelogId: 0},dataRule: {attrGroupName: [{ required: true, message: "组名不能为空", trigger: "blur" },],sort: [{ required: true, message: "排序不能为空", trigger: "blur" }],descript: [{ required: true, message: "描述不能为空", trigger: "blur" },],icon: [{ required: true, message: "组图标不能为空", trigger: "blur" }],catelogId: [{ required: true, message: "所属分类id不能为空", trigger: "blur" },],},};},methods: {// 关闭对话框时,清空所选分类dialogClose() {this.dataForm.catelogPath = []},getCategorys() {this.$http({// url表示我们的请求地址url: this.$http.adornUrl("/gulimallproduct/category/list/tree"),method: "get",}).then(({ data }) => {// console.log("成功获取到菜单数据。。。", data.data);this.categorys = data.data;});},init(id) {this.dataForm.attrGroupId = id || 0;this.visible = true;this.$nextTick(() => {this.$refs["dataForm"].resetFields();if (this.dataForm.attrGroupId) {this.$http({url: this.$http.adornUrl(`/gulimallproduct/attrgroup/info/${this.dataForm.attrGroupId}`),method: "get",params: this.$http.adornParams(),}).then(({ data }) => {if (data && data.code === 0) {this.dataForm.attrGroupName = data.attrGroup.attrGroupName;this.dataForm.sort = data.attrGroup.sort;this.dataForm.descript = data.attrGroup.descript;this.dataForm.icon = data.attrGroup.icon;this.dataForm.catelogId = data.attrGroup.catelogId;// 查出catelogId的完整路径this.dataForm.catelogPath = data.attrGroup.catelogPath;}});}});},// 表单提交dataFormSubmit() {this.$refs["dataForm"].validate((valid) => {if (valid) {this.$http({url: this.$http.adornUrl(`/gulimallproduct/attrgroup/${!this.dataForm.attrGroupId ? "save" : "update"}`),method: "post",data: this.$http.adornData({attrGroupId: this.dataForm.attrGroupId || undefined,attrGroupName: this.dataForm.attrGroupName,sort: this.dataForm.sort,descript: this.dataForm.descript,icon: this.dataForm.icon,catelogId: this.dataForm.catelogPath[this.dataForm.catelogPath.length - 1],}),}).then(({ data }) => {if (data && data.code === 0) {this.$message({message: "操作成功",type: "success",duration: 1500,onClose: () => {this.visible = false;this.$emit("refreshDataList");},});} else {this.$message.error(data.msg);}});}});},},//生命周期 - 创建完成(可以访问当前 this 实例)created() {this.getCategorys();},};</script>
四、 品牌分类关联与级联更新
首先我们重新执行pms_catelog.sql文件pms_catelog.sql
可以发现前端的分页数据是错误的,这是因为mybatis-plus的分页插件没有配置mybatis-plus分页
4.1 配置mybatis-plus分页
gulimall-product
注意:这里我的是mybatis-plus3.5.1版本,视频里面用的老版本,配置方式不同,根据自己的版本配置。
package com.atguigu.gulimall.gulimallproduct.config;import com.baomidou.mybatisplus.annotation.DbType;import com.baomidou.mybatisplus.autoconfigure.ConfigurationCustomizer;import com.baomidou.mybatisplus.extension.plugins.MybatisPlusInterceptor;import com.baomidou.mybatisplus.extension.plugins.inner.PaginationInnerInterceptor;import com.baomidou.mybatisplus.extension.plugins.pagination.optimize.JsqlParserCountOptimize;import org.mybatis.spring.annotation.MapperScan;import org.springframework.context.annotation.Bean;import org.springframework.context.annotation.Configuration;import org.springframework.transaction.annotation.EnableTransactionManagement;/*** @author mrlinxi* @create 2022-03-09 16:20*/@Configuration@EnableTransactionManagement // 开启事务@MapperScan("com.atguigu.gulimall.gulimallproduct.dao")public class MyBatisConfig {/*** 老版本的分页插件设置,我这里用的新版本的mybatis-plus3.5.1,*//*@Beanpublic PaginationInterceptor paginationInterceptor() {PaginationInterceptor paginationInterceptor = new PaginationInterceptor();// 设置请求的页面大于最大页后操作, true调回到首页,false 继续请求 默认falsepaginationInterceptor.setOverflow(true);// 设置最大单页限制数量,默认 500 条,-1 不受限制paginationInterceptor.setLimit(1000);// 开启 count 的 join 优化,只针对部分 left joinpaginationInterceptor.setCountSqlParser(new JsqlParserCountOptimize(true));return paginationInterceptor;}*//*** 新的分页插件,一缓和二缓遵循mybatis的规则,需要设置 MybatisConfiguration#useDeprecatedExecutor = false 避免缓存出现问题(该属性会在旧插件移除后一同移除)*/@Beanpublic MybatisPlusInterceptor mybatisPlusInterceptor() {MybatisPlusInterceptor interceptor = new MybatisPlusInterceptor();PaginationInnerInterceptor paginationInnerInterceptor = new PaginationInnerInterceptor(DbType.MYSQL);// 设置请求的页面大于最大页后操作, true调回到首页,false 继续请求 默认falsepaginationInnerInterceptor.setOverflow(true);// 设置最大单页限制数量,默认 500 条,-1 不受限制paginationInnerInterceptor.setMaxLimit(1000L);// optimizeJoin字段设置(默认为true)是否生成 countSql 优化掉 join 现在只支持 left joinpaginationInnerInterceptor.setOptimizeJoin(true);interceptor.addInnerInterceptor(paginationInnerInterceptor);return interceptor;}// @Bean// public ConfigurationCustomizer configurationCustomizer() {// return configuration -> configuration.setUseDeprecatedExecutor(false);// }}
4.2 配置品牌模糊查询功能
当我们使用品牌的模糊查询时,前端发送的请求会携带一个名为key的字段。发送的是/list请求,因为模糊查询会存在多条记录匹配。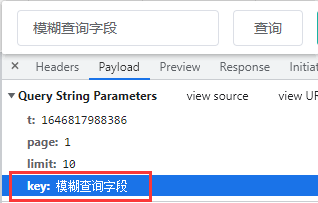 ,默认生成的查询方法没有对这个字段进行处理,所以需要修改BrandServiceImpl实现类的querPage方法。
@Service("brandService")public class BrandServiceImpl extends ServiceImpl<BrandDao, BrandEntity> implements BrandService {@Overridepublic PageUtils queryPage(Map<String, Object> params) {QueryWrapper<BrandEntity> wrapper = new QueryWrapper<>();//1 获取key 当我们使用模糊查询时,前端发送的请求会带一个key的字段String key = (String) params.get("key");if (!StringUtils.isEmpty(key)) { // 当key不是空串,则代表需要进行模糊匹配// select * from pms_brand where brand_id = key or name = keywrapper.eq("brand_id", key).or().like("name", key);}IPage<BrandEntity> page = this.page(new Query<BrandEntity>().getPage(params),wrapper);return new PageUtils(page);}}
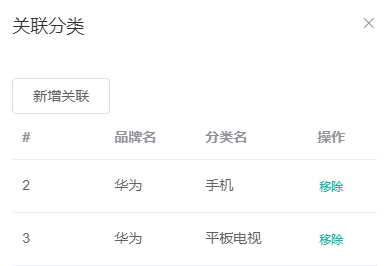
4.3 品牌关联分类
每一个品牌都会有其对应的分类,但是品牌与分类不是一对一的关系,而是多对多的关系。(比如小米又有手机又有电视机等,手机也有很多品牌)所以在数据库中会有一张中间表(pms_category_brand_relation)记录这种多对多的关系。
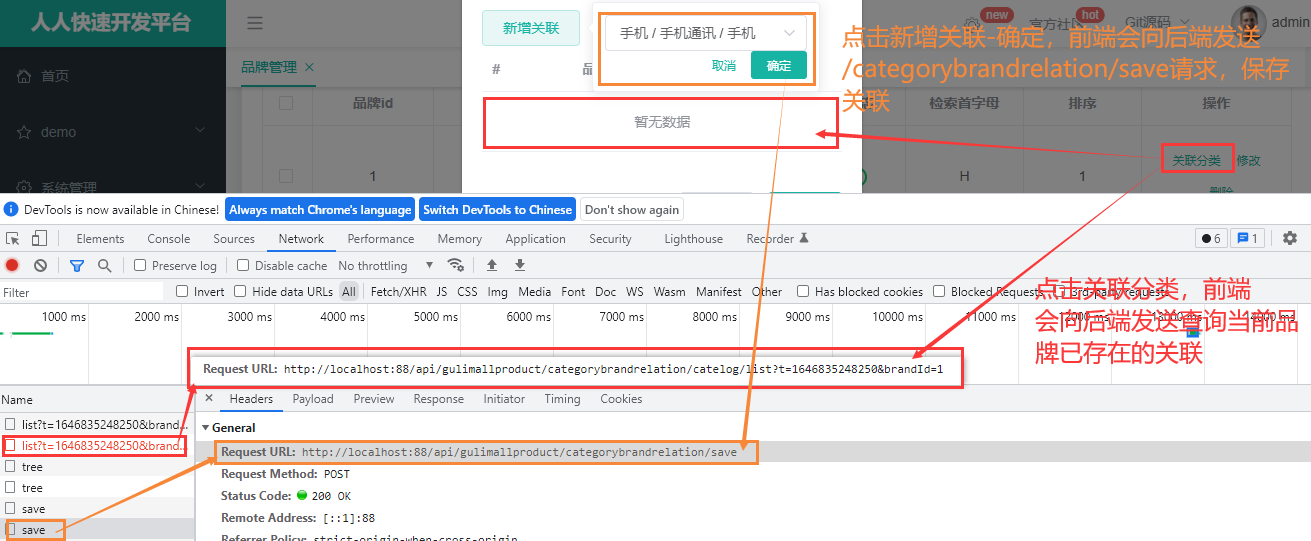
这里存在两个接口需要编写:获取品牌关联的分类、新增品牌与分类关联关系 开发文档
CategoryBrandRelationController中添加下列方法:
/*** 获取当前品牌关联的所有分类list*///@RequestMapping(value = "/catelog/list", method = RequestMethod.GET)@GetMapping(value = "/catelog/list")//@RequiresPermissions("gulimallproduct:categorybrandrelation:list")public R catelogList(@RequestParam("brandId") Long brandId){//查询的就是 brandId对应的品牌列表 查询的是pms_category_brand_relation表List<CategoryBrandRelationEntity> data = categoryBrandRelationService.list(new QueryWrapper<CategoryBrandRelationEntity>().eq("brand_id", brandId));return R.ok().put("data", data);}
CategoryBrandRelationService接口中声明方法,CategoryBrandRelationServiceImpl实现
@Service("categoryBrandRelationService")public class CategoryBrandRelationServiceImpl extends ServiceImpl<CategoryBrandRelationDao, CategoryBrandRelationEntity> implements CategoryBrandRelationService {@AutowiredBrandDao brandDao;@AutowiredCategoryDao categoryDao;@Overridepublic PageUtils queryPage(Map<String, Object> params) {IPage<CategoryBrandRelationEntity> page = this.page(new Query<CategoryBrandRelationEntity>().getPage(params),new QueryWrapper<CategoryBrandRelationEntity>());return new PageUtils(page);}@Overridepublic void saveDetail(CategoryBrandRelationEntity categoryBrandRelation) {// 通过前端传过来的brandId和catelogId查出对应的名称Long brandId = categoryBrandRelation.getBrandId();Long catelogId = categoryBrandRelation.getCatelogId();// 根据brandId和catelogId查询品牌名和分类名,存到需要保存的关联对象中BrandEntity brandEntity = brandDao.selectById(brandId);CategoryEntity categoryEntity = categoryDao.selectById(catelogId);categoryBrandRelation.setBrandName(brandEntity.getName());categoryBrandRelation.setCatelogName(categoryEntity.getName());// 将管关联对象保存到数据库 这里调用的是CategoryBrandRelationServiceImpl的save方法this.save(categoryBrandRelation);}}
4.4 数据一致性
为了方便检索,在点击关联分类的时候会将分类名与品牌名都查出来,这个查询并没有使用到连接查询,而是在pms_category_brand_relation 中进行了冗余存储。那么这样便会存在问题:如果品牌表与分类表中的信息发生了变化,关联表中的信息如何进行数据同步?怎么保证数据的一致性?
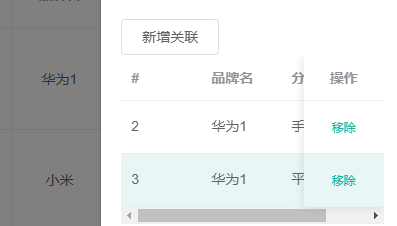
4.4.1 品牌名更改—级联修改
修改BrandController的/update方法
@RequestMapping("/update")//@RequiresPermissions("gulimallproduct:brand:update")public R update(@Validated(UpdateGroup.class) @RequestBody BrandEntity brand){// brandService.updateById(brand);// 为了保证数据库的性能,不使用连接查询,所以在品牌分类关联表中存储了冗余的数据// 那么在更新品牌信息的时候,一定要考虑数据的一致性brandService.updateDetail(brand);return R.ok();}
同样BrandService与BrandServiceImpl中需要声明/实现该方法
@AutowiredCategoryBrandRelationService categoryBrandRelationService;/*** 级联更新,保证其他表中的冗余字段一致* @param brand*/@Transactional // 记得在Mybatis配置类上开启事务@Overridepublic void updateDetail(BrandEntity brand) {//this.updateById(brand);// 保证冗余字段的数据一致if (!StringUtils.isEmpty(brand.getName())) {// 同步更新其他关联表中的数据(冗余存储)categoryBrandRelationService.updateBrand(brand.getBrandId(), brand.getName());//TODO 更新其他关联}}
这里调用了CategoryBrandRelationService的updateBrand方法,同上操作
@Overridepublic void updateBrand(Long brandId, String name) {CategoryBrandRelationEntity relationEntity = new CategoryBrandRelationEntity();relationEntity.setBrandId(brandId);relationEntity.setBrandName(name);// 这里我们自定义了一个更新规则,按照brand_id = brandId更新,relationEntity中带了什么字段就更新哪个字段this.update(relationEntity, new UpdateWrapper<CategoryBrandRelationEntity>().eq("brand_id", brandId));}

4.4.2 分类名修改—级联修改
@RequestMapping("/update")//@RequiresPermissions("gulimallproduct:category:update")public R update(@RequestBody CategoryEntity category){// categoryService.updateById(category);// 目录品牌级联更新categoryService.updateCascade(category);return R.ok();}
CategoryService声明updateCascade方法,实现类实现。
同样需要用到CategoryBrandRelationService来修改其冗余数据,以保证数据一致性。
@AutowiredCategoryBrandRelationService categoryBrandRelationService;/*** 级联更新所有关联的数据* @param category*/@Transactional // 记得在Mybatis配置类上开启事务@Overridepublic void updateCascade(CategoryEntity category) {this.updateById(category);if (!StringUtils.isEmpty(category.getName())) {categoryBrandRelationService.updateCategory(category.getCatId(), category.getName());}}
CategoryBrandRelationService声明updateCategory方法,实现类实现
@Overridepublic void updateCategory(Long catId, String name) {this.baseMapper.updateCategory(catId, name);}
这里跟上面不同,选择另一种方式更新目录信息使用baseMapper(自定义sql语句,上一节是使用wrapper)。在CategoryBrandRelationDao接口中声明该方法(记得给参数使用@Param注解起名字,方便写SQL)
@Mapperpublic interface CategoryBrandRelationDao extends BaseMapper<CategoryBrandRelationEntity> {void updateCategory(@Param("catId") Long catId,@Param("catName") String name);}
因为有MybatisX的插件,快捷键ALT+SHIFT+ENTER可在CategoryBrandRelationDao中生成关联的<update>mapper标签(SQL还是要自己写)
<update id="updateCategory">UPDATE `pms_category_brand_relation` SET `catelog_name` = #{catName} WHERE `catelog_id` = #{catId}</update>

若有收获,就点个赞吧
0 人点赞
