- 一、LDAP服务端部署
- See slapd-config(5) for details on configuration options.
- This file should NOT be world readable.
- TLS settings
- Do not enable referrals until AFTER you have a working directory
- service AND an understanding of referrals.
- olcReferral: ldap://root.openldap.org
- Sample security restrictions
- Require integrity protection (prevent hijacking)
- Require 112-bit (3DES or better) encryption for updates
- Require 64-bit encryption for simple bind
- olcSecurity: ssf=1 update_ssf=112 simple_bind=64
- Load dynamic backend modules:
- - modulepath is architecture dependent value (32/64-bit system)
- - back_sql.la backend requires openldap-servers-sql package
- - dyngroup.la and dynlist.la cannot be used at the same time
- dn: cn=module,cn=config
- objectClass: olcModuleList
- cn: module
- olcModulepath: /usr/lib/openldap
- olcModulepath: /usr/lib64/openldap
- olcModuleload: accesslog.la
- olcModuleload: auditlog.la
- olcModuleload: back_dnssrv.la
- olcModuleload: back_ldap.la
- olcModuleload: back_mdb.la
- olcModuleload: back_meta.la
- olcModuleload: back_null.la
- olcModuleload: back_passwd.la
- olcModuleload: back_relay.la
- olcModuleload: back_shell.la
- olcModuleload: back_sock.la
- olcModuleload: collect.la
- olcModuleload: constraint.la
- olcModuleload: dds.la
- olcModuleload: deref.la
- olcModuleload: dyngroup.la
- olcModuleload: dynlist.la
- olcModuleload: memberof.la
- olcModuleload: pcache.la
- olcModuleload: ppolicy.la
- olcModuleload: refint.la
- olcModuleload: retcode.la
- olcModuleload: rwm.la
- olcModuleload: seqmod.la
- olcModuleload: smbk5pwd.la
- olcModuleload: sssvlv.la
- olcModuleload: syncprov.la
- olcModuleload: translucent.la
- olcModuleload: unique.la
- olcModuleload: valsort.la
- Schema settings
- Frontend settings
- Sample global access control policy:
- Root DSE: allow anyone to read it
- Subschema (sub)entry DSE: allow anyone to read it
- Other DSEs:
- Allow self write access
- Allow authenticated users read access
- Allow anonymous users to authenticate
- olcAccess: to dn.base=”” by * read
- olcAccess: to dn.base=”cn=Subschema” by * read
- olcAccess: to *
- by self write
- by users read
- by anonymous auth
- if no access controls are present, the default policy
- allows anyone and everyone to read anything but restricts
- updates to rootdn. (e.g., “access to by read”)
- rootdn can always read and write EVERYTHING!
- Configuration database
- Server status monitoring
- Backend database definitions
- Default DNS domain
- Default base
- 二、LDAP客户端部署
- LDAP Defaults
- See ldap.conf(5) for details
- This file should be world readable but not world writable.
- BASE dc=example,dc=com
- URI ldap://ldap.example.com ldap://ldap-master.example.com:666
- SIZELIMIT 12
- TIMELIMIT 15
- DEREF never
- Turning this off breaks GSSAPI used with krb5 when rdns = false
- 三、LDAP集成SSH登录并使用SSSD同步用户
- 1、OpenLDAP 客户端 SSSD 配置
- ">

- 2、OpenLdap 与 SSH 集成
- 3、验证SSH登录
- 4、安装过程中的问题解决
- 四、Hive集成LDAP
- 1、Hive 全局配置 OpenLDAP
- 2、Hive 集成 OpenLDAP 验证
- 3、 单个 HiveServer2 集成 OpenLDAP
- 五、Impala集成LDAP
- 六、Hue集成LDAP
一、LDAP服务端部署
1、下载OpenLDAP服务
相关包下载
yum -y install openldap-clients openldap openldap-servers migrationtools openldap-devel nss-pam-ldapd bind-dyndb-ldap compat-openldap perl-LDAP krb5-server-ldap php-ldap openssl
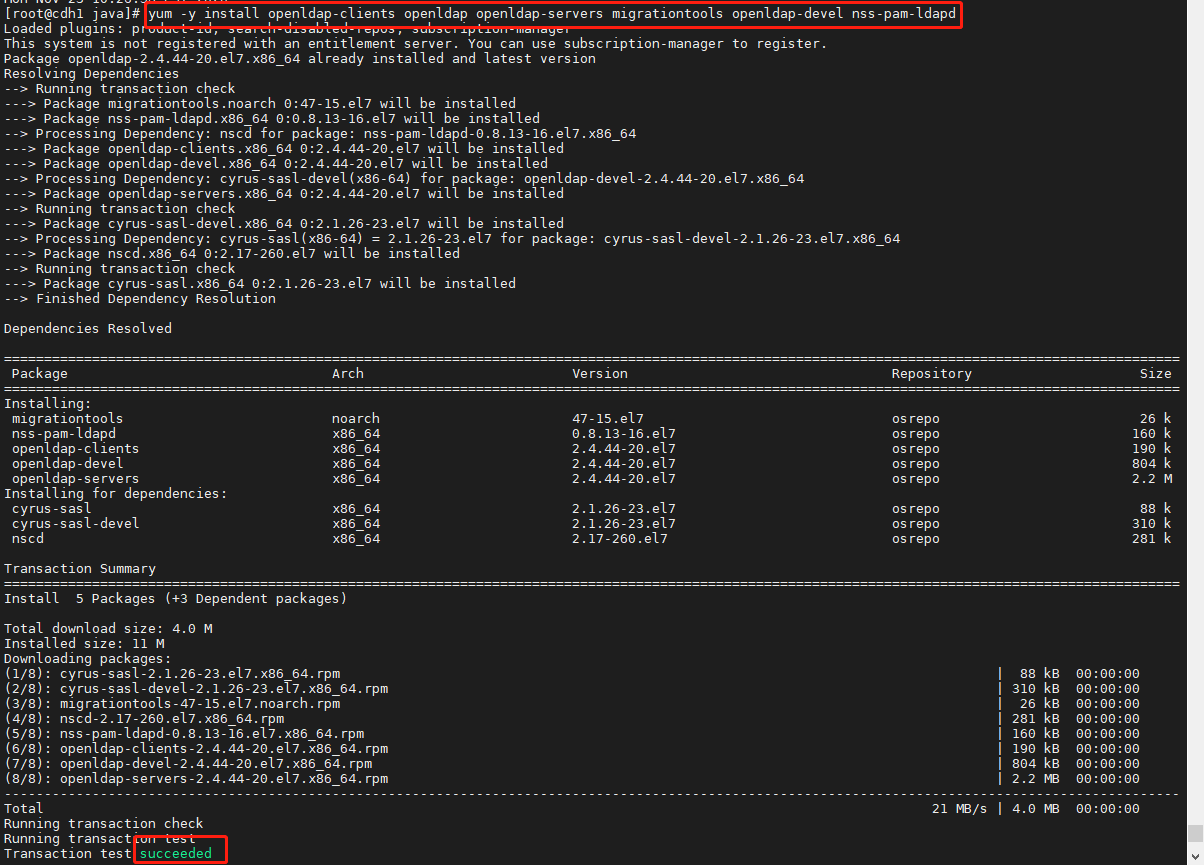
检查是否下载成功
rpm -qa | grep openldap

2、openssl 生成 TLS 加密文件
生成服务器RSA私钥
openssl genrsa -out ldap.key 1024

生成签名文件
openssl req -new -key ldap.key -out ldap.csr
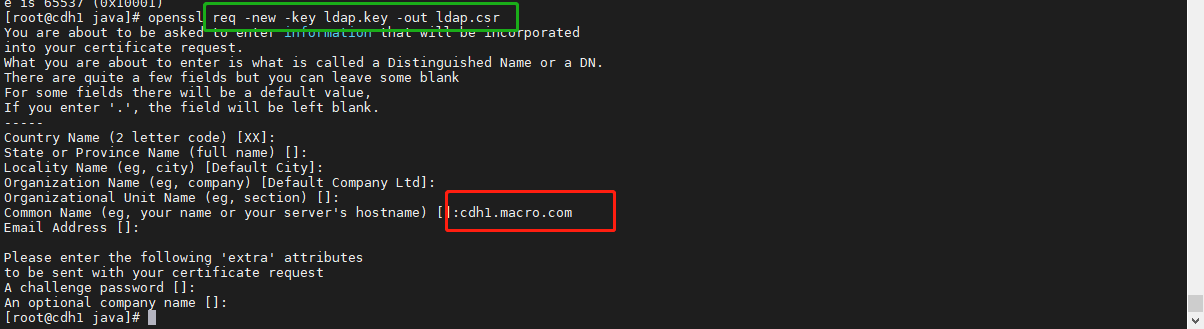
- 上图中红框处填写当前服务器的 hostname 其他地方留空
生成公钥文件
openssl x509 -req -days 3653 -in ldap.csr -signkey ldap.key -out ldap.crt

将生成的公钥文件和私钥拷贝至/etc/openldap/certs 目录下:
cp ldap.key ldap.crt /etc/openldap/certs/ll /etc/openldap/certs/
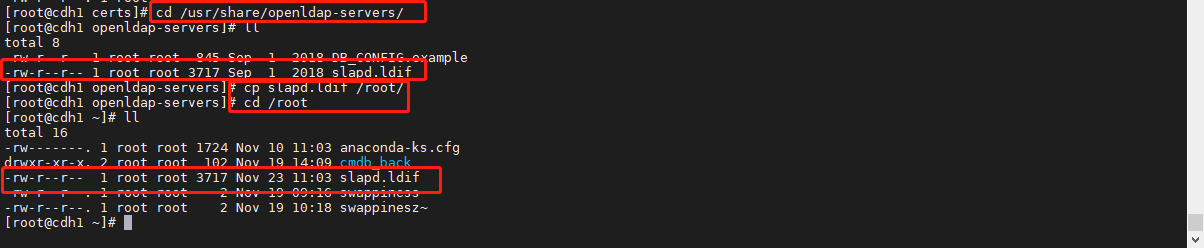
3、修改 OpenLDAP 的 slapd.ldif 配置文件
拷贝/usr/share/openldap-servers/下的slapd.ldif 文件至/root 目录下
cp /usr/share/openldap-servers/slapd.ldif ./ll
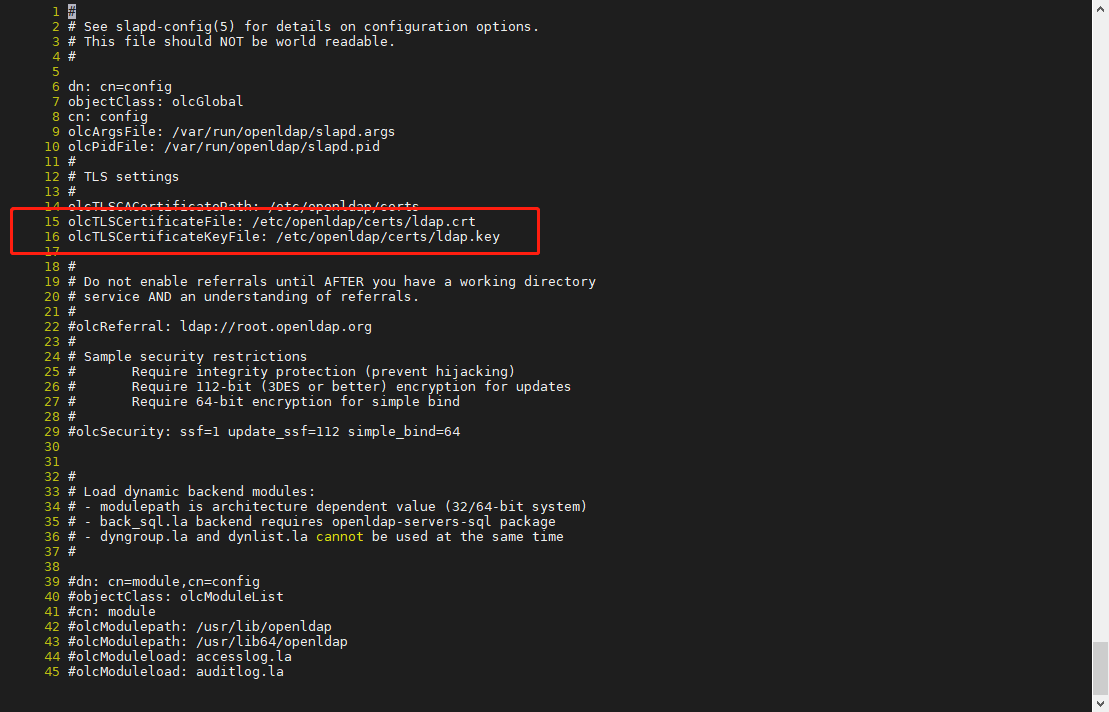
增加 include 的文件及配置管理员账号和 OpenLDAP 的根域信息,文件全部内容如下:
vim ./slapd.ldif
在15、16行添加openldap的公钥和私钥的路径地址
- 在84后添加file:///etc/openldap/schema/下的所有文件(OpenLDAP的根域信息)
- 文件末尾添加管理员账户。详细内容如下下
```shell
#
See slapd-config(5) for details on configuration options.
This file should NOT be world readable.
#

dn: cn=config objectClass: olcGlobal cn: config olcArgsFile: /var/run/openldap/slapd.args olcPidFile: /var/run/openldap/slapd.pid #
TLS settings
# olcTLSCACertificatePath: /etc/openldap/certs olcTLSCertificateFile: /etc/openldap/certs/ldap.crt olcTLSCertificateKeyFile: /etc/openldap/certs/ldap.key #
Do not enable referrals until AFTER you have a working directory
service AND an understanding of referrals.
#
olcReferral: ldap://root.openldap.org
#
Sample security restrictions
Require integrity protection (prevent hijacking)
Require 112-bit (3DES or better) encryption for updates
Require 64-bit encryption for simple bind
#
olcSecurity: ssf=1 update_ssf=112 simple_bind=64
#
Load dynamic backend modules:
- modulepath is architecture dependent value (32/64-bit system)
- back_sql.la backend requires openldap-servers-sql package
- dyngroup.la and dynlist.la cannot be used at the same time
#
dn: cn=module,cn=config
objectClass: olcModuleList
cn: module
olcModulepath: /usr/lib/openldap
olcModulepath: /usr/lib64/openldap
olcModuleload: accesslog.la
olcModuleload: auditlog.la
olcModuleload: back_dnssrv.la
olcModuleload: back_ldap.la
olcModuleload: back_mdb.la
olcModuleload: back_meta.la
olcModuleload: back_null.la
olcModuleload: back_passwd.la
olcModuleload: back_relay.la
olcModuleload: back_shell.la
olcModuleload: back_sock.la
olcModuleload: collect.la
olcModuleload: constraint.la
olcModuleload: dds.la
olcModuleload: deref.la
olcModuleload: dyngroup.la
olcModuleload: dynlist.la
olcModuleload: memberof.la
olcModuleload: pcache.la
olcModuleload: ppolicy.la
olcModuleload: refint.la
olcModuleload: retcode.la
olcModuleload: rwm.la
olcModuleload: seqmod.la
olcModuleload: smbk5pwd.la
olcModuleload: sssvlv.la
olcModuleload: syncprov.la
olcModuleload: translucent.la
olcModuleload: unique.la
olcModuleload: valsort.la
#
Schema settings
#
dn: cn=schema,cn=config objectClass: olcSchemaConfig cn: schema
include: file:///etc/openldap/schema/corba.ldif include: file:///etc/openldap/schema/core.ldif include: file:///etc/openldap/schema/cosine.ldif include: file:///etc/openldap/schema/duaconf.ldif include: file:///etc/openldap/schema/dyngroup.ldif include: file:///etc/openldap/schema/inetorgperson.ldif include: file:///etc/openldap/schema/java.ldif include: file:///etc/openldap/schema/misc.ldif include: file:///etc/openldap/schema/nis.ldif include: file:///etc/openldap/schema/openldap.ldif include: file:///etc/openldap/schema/ppolicy.ldif include: file:///etc/openldap/schema/collective.ldif
#
Frontend settings
#
dn: olcDatabase=frontend,cn=config objectClass: olcDatabaseConfig objectClass: olcFrontendConfig olcDatabase: frontend #
Sample global access control policy:
Root DSE: allow anyone to read it
Subschema (sub)entry DSE: allow anyone to read it
Other DSEs:
Allow self write access
Allow authenticated users read access
Allow anonymous users to authenticate
#
olcAccess: to dn.base=”” by * read
olcAccess: to dn.base=”cn=Subschema” by * read
olcAccess: to *
by self write
by users read
by anonymous auth
#
if no access controls are present, the default policy
allows anyone and everyone to read anything but restricts
updates to rootdn. (e.g., “access to by read”)
#
rootdn can always read and write EVERYTHING!
#
#
Configuration database
#
dn: olcDatabase=config,cn=config objectClass: olcDatabaseConfig olcDatabase: config olcAccess: to by dn.base=”gidNumber=0+uidNumber=0,cn=peercred,cn=external,cn=auth” manage by none
#
Server status monitoring
#
dn: olcDatabase=monitor,cn=config objectClass: olcDatabaseConfig olcDatabase: monitor olcAccess: to by dn.base=”gidNumber=0+uidNumber=0,cn=peercred,cn=external,cn=auth” read by dn.base=”cn=Manager,dc=macro,dc=com” read by none
#
Backend database definitions
#
dn: olcDatabase=hdb,cn=config objectClass: olcDatabaseConfig objectClass: olcHdbConfig olcDatabase: hdb olcSuffix: dc=macro,dc=com olcRootDN: cn=Manager,dc=macro,dc=com olcRootPW: 123456 olcDbDirectory: /var/lib/ldap olcDbIndex: objectClass eq,pres olcDbIndex: ou,cn,mail,surname,givenname eq,pres,sub olcDbIndex: uidNumber,gidNumber,loginShell eq,pres olcDbIndex: uid,memberUid eq,pres,sub olcDbIndex: nisMapName,nisMapEntry eq,pres,sub
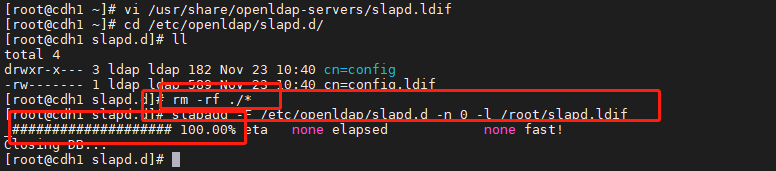
<br />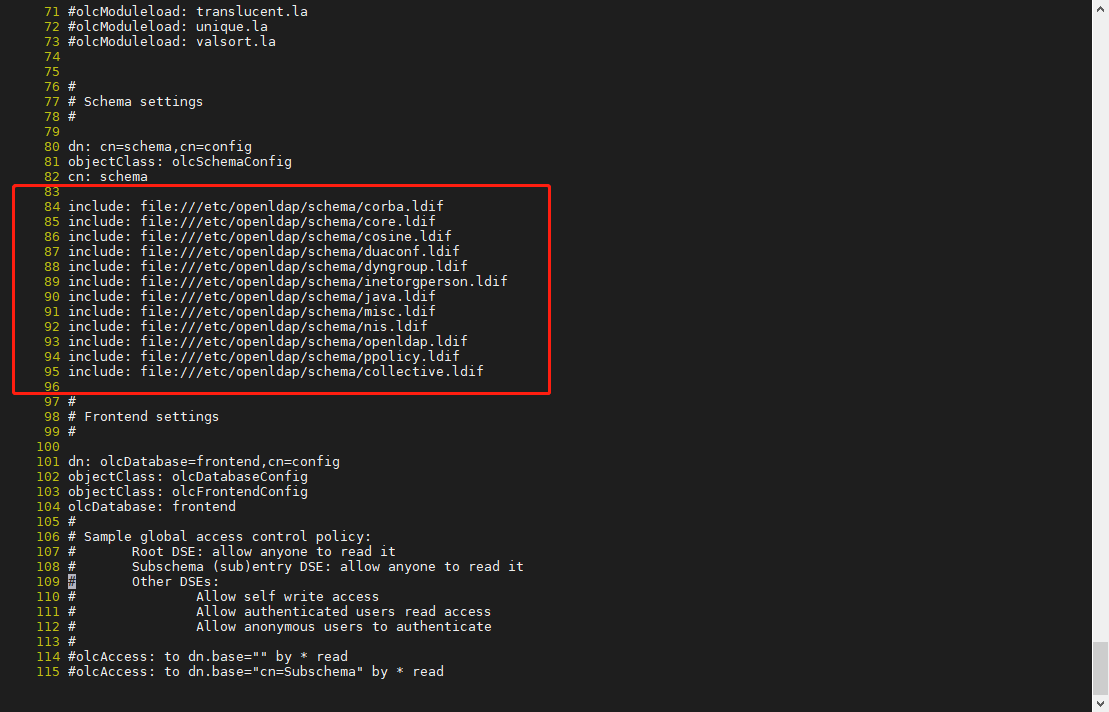<br />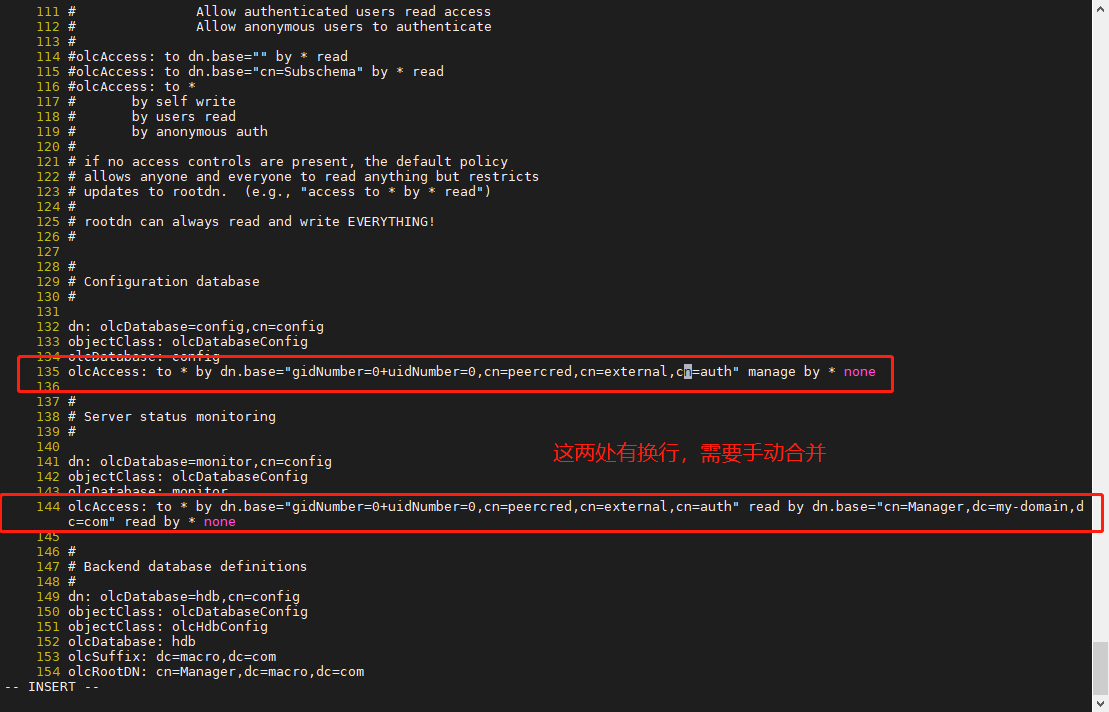<br />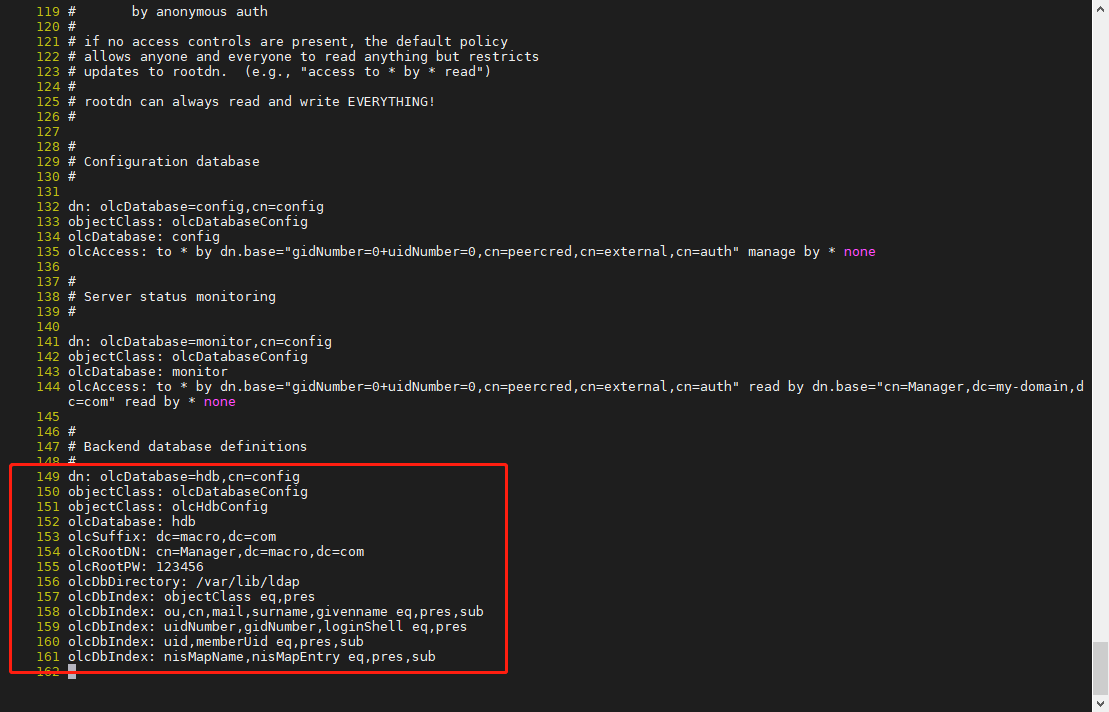<a name="qZRK9"></a>## 4、新建OpenLDAP配置1. 删除原配置,生成新配置```shellrm -rf /etc/openldap/slapd.d/*slapadd -F /etc/openldap/slapd.d -n 0 -l slapd.ldifll /etc/openldap/slapd.d
测试配置文件是否正确。succeeded为正确。
slaptest -u -F /etc/openldap/slapd.d

修改配置文件的属主,操作如下:
chown -R ldap. /etc/openldap/slapd.d/ll /etc/openldap/slapd.d/
5、安装OpenLDAP数据库文件
将/usr/share/openldap-servers/目录下的 DB_CONFIG.example 文件拷贝至/var/lib/ldap 目录下并重命名为 DB_CONFIG,操作如下:
cp /usr/share/openldap-servers/DB_CONFIG.example /var/lib/ldap/DB_CONFIGls /var/lib/ldap/

修改数据库文件属主
chown -R ldap. /var/lib/ldapll /var/lib/ldap/

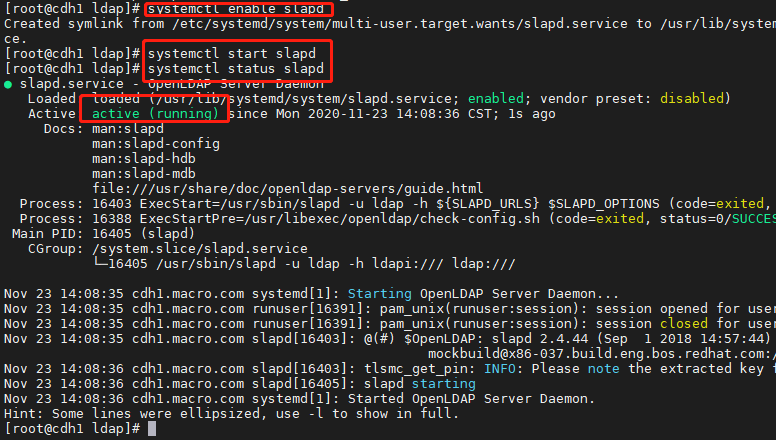
启动slapd服务并添加开机自启
systemctl enable slapdsystemctl start slapdsystemctl status slapd
6、导入根域及管理员账号
创建root.ldif文件,内容如下 ```shell vim ./root.ldif 复制如下内容:

dn: dc=macro,dc=com dc: macro objectClass: top objectClass: domain
dn: cn=Manager,dc=macro,dc=com objectClass: organizationalRole cn: Manager
2. 导入根域及管理员信息到 OpenLDAP 服务中```shellldapadd -D "cn=Manager,dc=macro,dc=com" -W -x -f ./root.ldif

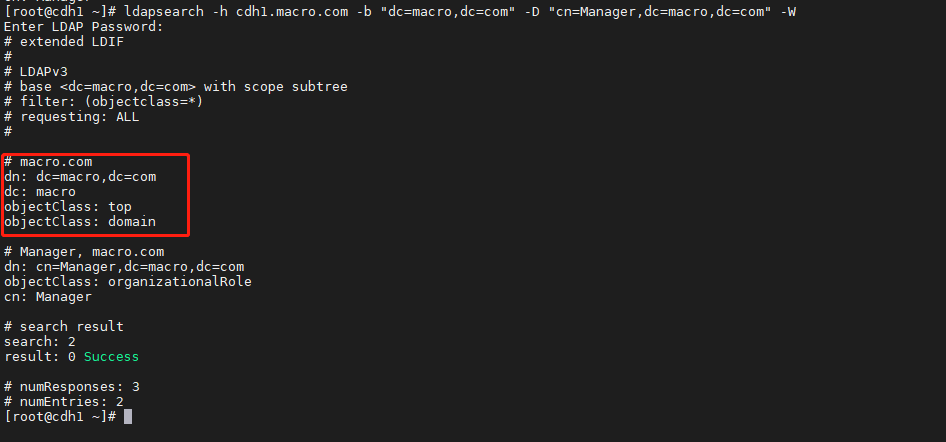
- 查看导入是否成功
ldapsearch -h cdh1.macro.com -b "dc=macro,dc=com" -D "cn=Manager,dc=macro,dc=com" -W
7、导入基础文件及用户和用户组
- 基于 migrationtools 服务已安装,通过该服务生成 OpenLDAP 的基础文件、用户和用户组的 ldif 文件
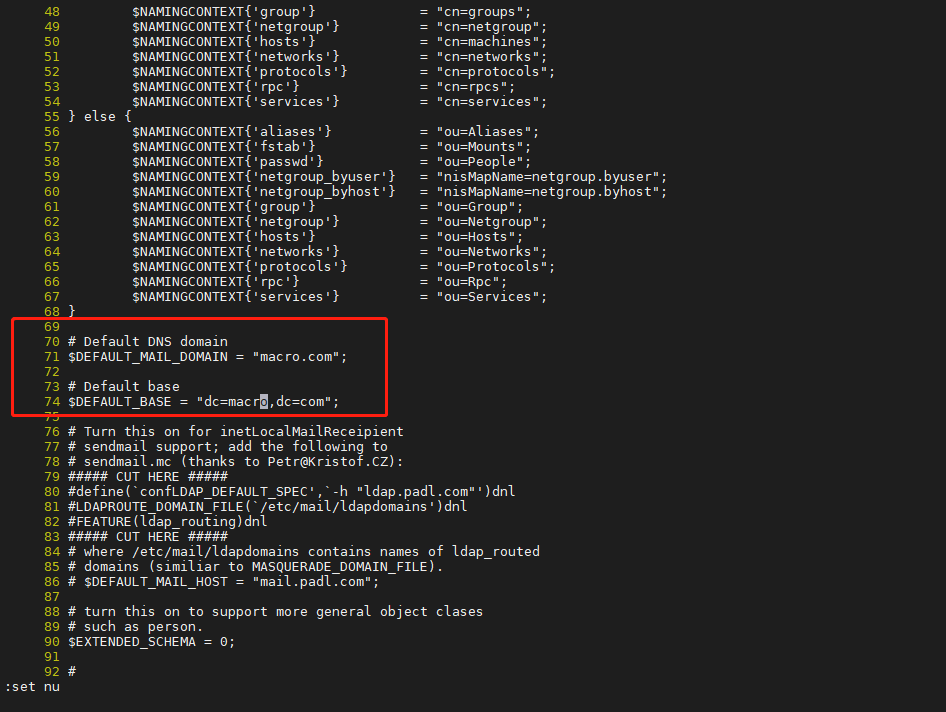
- 修改/usr/share/migrationtools/migrate_common.ph 文件,将文件中的$DEFAULT_MAIL_DOMAIN 和$DEFAULT_BASE 修改为自己 OpenLDAP 的域 ```shell vim /usr/share/migrationtools/migrate_common.ph 修改如下内容:
Default DNS domain
$DEFAULT_MAIL_DOMAIN = “macro.com”;
Default base
$DEFAULT_BASE = “dc=macro,dc=com”;
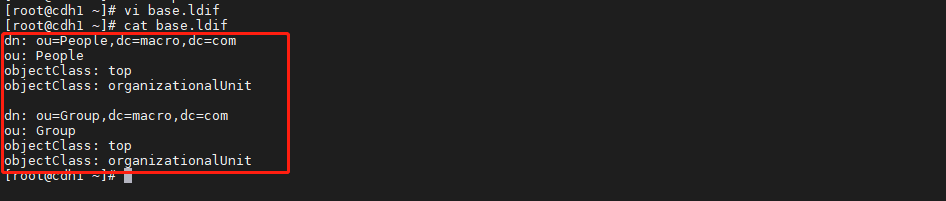
2. 使用如下命令导出 OpenLdap 的 base.ldif 文件```shell/usr/share/migrationtools/migrate_base.pl > base.ldif

- 修改文件如下图,只保留下面两项
执行如下命令导出操作系统的 group.ldif 文件
/usr/share/migrationtools/migrate_group.pl /etc/group > group.ldif
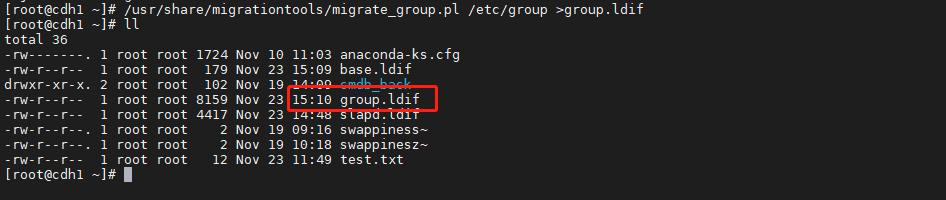
根据需要删除不需要导入 OpenLDAP 服务的 group

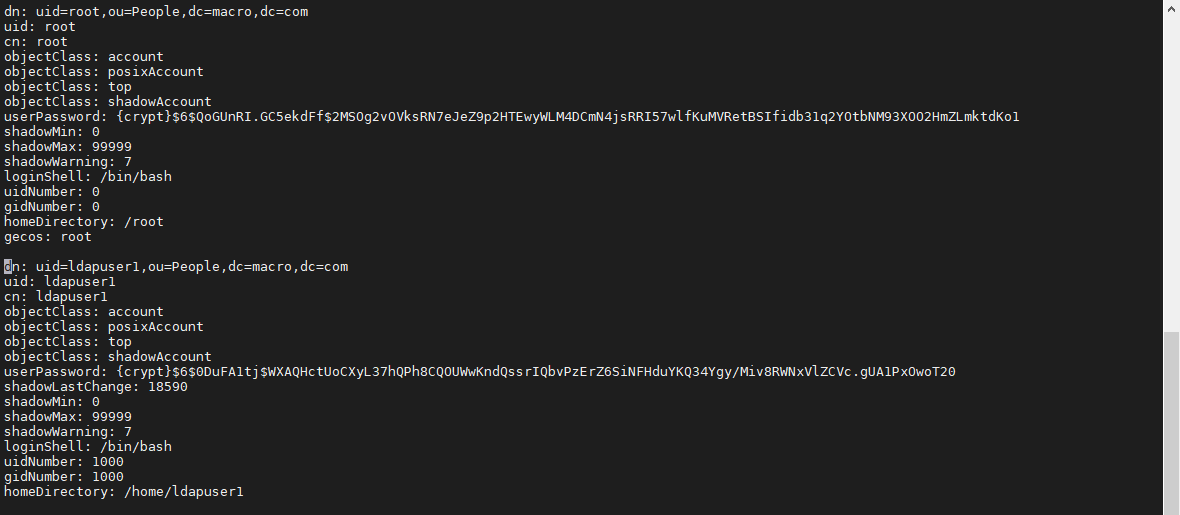
使用如下命令导出操作系统用户的 ldif 文件
/usr/share/migrationtools/migrate_passwd.pl /etc/passwd >user.ldif
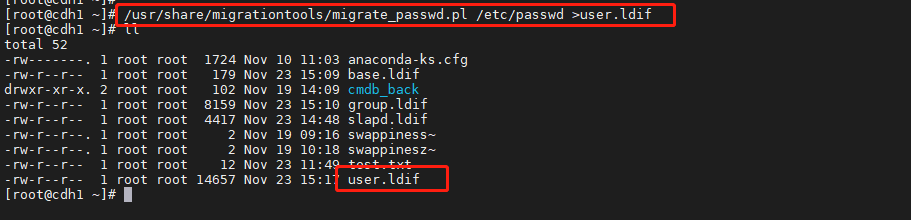
根据需要保留 user.ldif 文件中需要导入 OpenLDAP 服务的用户信息,注意用户信息与group.ldif 中组的对应,否则会出现用户无相应组的问题
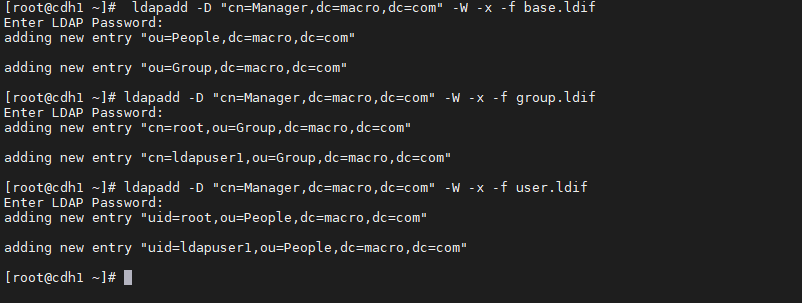
使用 ldapadd 命令将基础文件和用户和组导入 OpenLDAP
ldapadd -D "cn=Manager,dc=macro,dc=com" -W -x -f base.ldifldapadd -D "cn=Manager,dc=macro,dc=com" -W -x -f group.ldifldapadd -D "cn=Manager,dc=macro,dc=com" -W -x -f user.ldif
查看是否导入成功
ldapsearch -h cdh1.macro.com -b "dc=macro,dc=com" -D "cn=Manager,dc=macro,dc=com" -W | grep dn
二、LDAP客户端部署
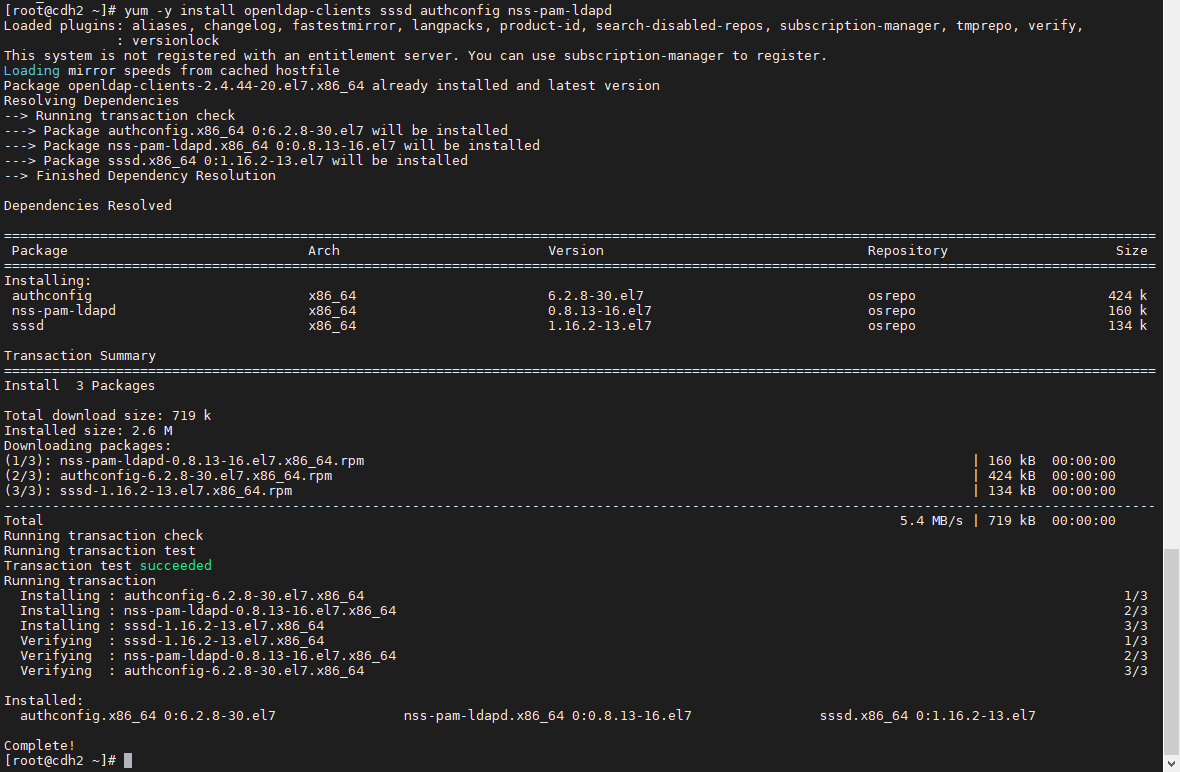
1、下载安装客户端服务
yum install -y openldap-clients
2、修改配置文件
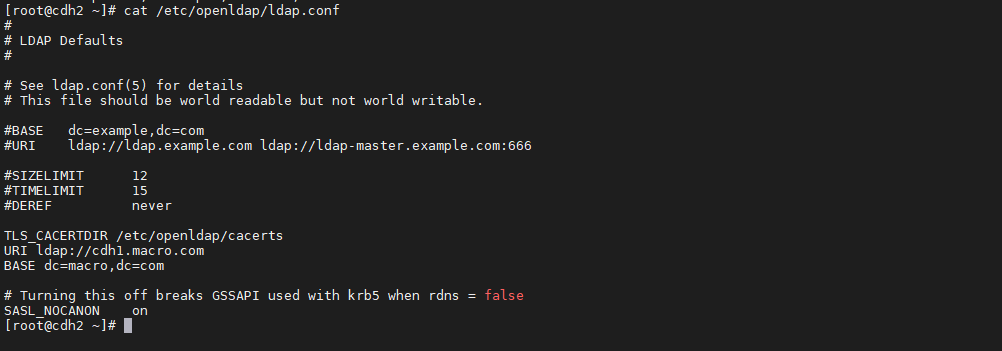
编辑/etc/openldap/ldap.conf文件
vim /etc/openldap/ldap.conf
添加如下内容: ```shell #
LDAP Defaults
#

See ldap.conf(5) for details
This file should be world readable but not world writable.
BASE dc=example,dc=com
URI ldap://ldap.example.com ldap://ldap-master.example.com:666
SIZELIMIT 12
TIMELIMIT 15
DEREF never
TLS_CACERTDIR /etc/openldap/certs URI ldap://cdh1.macro.com BASE dc=macro,dc=com
Turning this off breaks GSSAPI used with krb5 when rdns = false
SASL_NOCANON on
<a name="JEjK1"></a>## 3、测试客户端是否配置成功1. 查询用户是否存在```shellldapsearch -D "cn=Manager,dc=macro,dc=com" -W |grep dn

4、OpenLDAP常用命令
4.1、ldapadd
| -x 进行简单认证 |
|---|
| -D 用来绑定服务器的DN |
| -h 目录服务的地址 |
| -w 绑定DN的密码 |
| -f 使用ldif文件进行条目添加的文件 |
| 例:ldapadd -x -D “cn=root,dc=starxing,dc=com” -w secret -f /root/test.ldif |
4.2、ldapsearch
| -x 进行简单认证 |
|---|
| -D 用来绑定服务器的DN |
| -w 绑定DN的密码 |
| -b 指定要查询的根节点 |
| -H 指定定要查询的服务器 |
| 例:ldapsearch -D “cn=Manager,dc=macro,dc=com” -b “dc=macro,dc=com” -W | grep dn |
| 注解:使用简单认证,用 “cn=Manager,dc=macro,dc=com” 进行绑定,要查询的根域是”dc=macro,dc=com”。这样会把绑定的用户能访问”dc=macro,dc=com”下的所有数据显示出来 |
4.3、ladpdelete
| 例:ldapdelete -x -D “cn=Manager,dc=macro,dc=com” -W “uid=ldapuser1,ou=People,dc=test,dc=com” ldapdelete -x -D “cn=Manager,dc=macro,dc=com” -W “cn=ldapuser1,ou=Group,dc=macro,dc=com” ldapdelete -x -D “cn=Manager,dc=macro,dc=com” -W “cn=ldapuser1,ou=Group,dc=macro,dc=com” |
|---|
| ldappasswd -H ldap:/cdh1.macro.com -x -D “cn=Manager,dc=macro,dc=com” -W -S “uid=ldapuser1,ou=People,dc=macro,dc=com” |
4.4、ladpmodify
| -H ldapuri,格式为ldap://机器名或者IP:端口号,不能与-h和-p同时使用 |
|---|
| -h LDAP服务器IP或者可解析的hostname,与-p可结合使用,不能与-H同时使用 |
| -p LDAP服务器端口号,与-h可结合使用,不能与-H同时使用 |
| -x 使用简单认证方式 |
| -D 所绑定的服务器的DN |
| -w 绑定DN的密码,与-W二者选一 |
| -W 不输入密码,会交互式的提示用户输入密码,与-w二者选一 |
| -c 出错后忽略当前错误继续执行,缺省情况下遇到错误即终止 |
| -n 模拟操作但并不实际执行,用于验证,常与-v一同使用进行问题定位 |
| -v 显示详细信息 |
| -d 显示debug信息,可设定级别 |
| -e 设置客户端证书 |
| -E 设置客户端私钥 |
4.5、ldappasswd
| -H ldapuri,格式为ldap://机器名或者IP:端口号,不能与-h和-p同时使用 |
|---|
| -h LDAP服务器IP或者可解析的hostname,与-p可结合使用,不能与-H同时使用 |
| -p LDAP服务器端口号,与-h可结合使用,不能与-H同时使用 |
| -x 使用简单认证方式 |
| -D 所绑定的服务器的DN |
| -w 绑定DN的密码,与-W二者选一 |
| -W 不输入密码,会交互式的提示用户输入密码,与-w二者选一 |
| -n 模拟操作但并不实际执行,用于验证,常与-v一同使用进行问题定位 |
| -v 显示详细信息 |
| -d 显示debug信息,可设定级别 |
| -S 交互式进行密码的提示和输入以及Re-enter,与-s二者选一 |
| -s 将指定内容设为密码,与-S二者选一 |
三、LDAP集成SSH登录并使用SSSD同步用户
1、OpenLDAP 客户端 SSSD 配置
1.1、客户端软件安装
yum -y install openldap-clients sssd authconfig nss-pam-ldapd
1.2、拷贝 OpenLDAP 服务器的/etc/openldap/certs 目录下的私钥和公钥至OpenLDAP 客户端节点/etc/openldap/cacerts 目录下
cd /etc/openldap/certs/scp ldap.key ldap.crt root@cdh2.macro.com:/etc/openldap/cacerts/scp ldap.key ldap.crt root@cdh3.macro.com:/etc/openldap/cacerts/


提示如下错误,先在客户端创建该目录
mkdir /etc/openldap/cacerts/
1.3、在客户端节点上执行如下命令
cacertdir_rehash /etc/openldap/cacerts/ll /etc/openldap/cacerts/

1.4、执行如下命令启用 sssd 服务
在如下参数中—enableldaptls 如果 OpenLDAP 服务未启用 TLS 则将此参数修改为—disableldaptls
authconfig --enablesssd --enablesssdauth --enablerfc2307bis --enableldap --enableldapauth --enableldaptls --disableforcelegacy --disablekrb5 --ldapserver ldap://cdh1.macro.com --ldapbasedn "dc=macro,dc=com" --enablemkhomedir --update

1.5、修改/etc/sssd/sssd.conf 文件
- 在执行 authconfig 命令时会默认生成,如果文件不存在则新建,文件内容如下
```shell [domain/default]vi /etc/sssd/sssd.conf
autofs_provider = ldap ldap_schema = rfc2307bis ldap_search_base = dc=macro,dc=com id_provider = ldap auth_provider = ldap chpass_provider = ldap ldap_uri = ldap://cdh1.macro.com ldap_id_use_start_tls = True ldap_tls_cacertdir = allow cache_credentials = True ldap_tls_cacertdir = /etc/openldap/cacerts [sssd] services = nss, pam, autofs
domains = default [nss] homedir_substring = /home
[pam]
<a name="pQYoF"></a>## 1.6、修改 sssd.conf 文件权限```shellchmod 600 /etc/sssd/sssd.confll /etc/sssd/sssd.conf

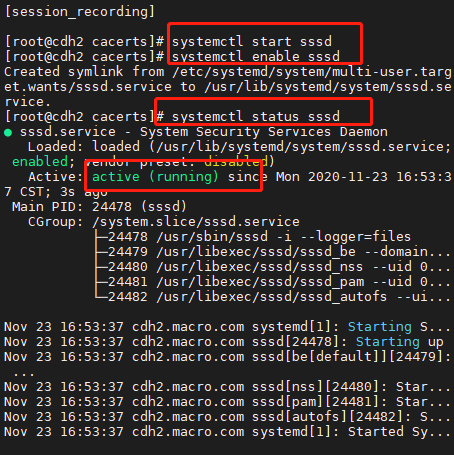
1.7、启动 sssd 服务并加入系统自启动
systemctl start sssdsystemctl enable sssdsystemctl status sssd
1.8、通过 id 查看用户 OpenLDAP 的用户
more /etc/passwd | grep ldapuser1id ldapuser1
2、OpenLdap 与 SSH 集成
2.1、修改配置文件
- PAM(Pluggable Authentication Modules )是由Sun提出的一种认证机制。它通过提供一些动态链接库和一套统一的API,将系统提供的服务和该服务的认证方式分开,使得系统管理员可以灵活地根据需要给不同的服务配置不同的认证方式而无需更改服务程序,同时也便于向系统中添加新的认证手段。
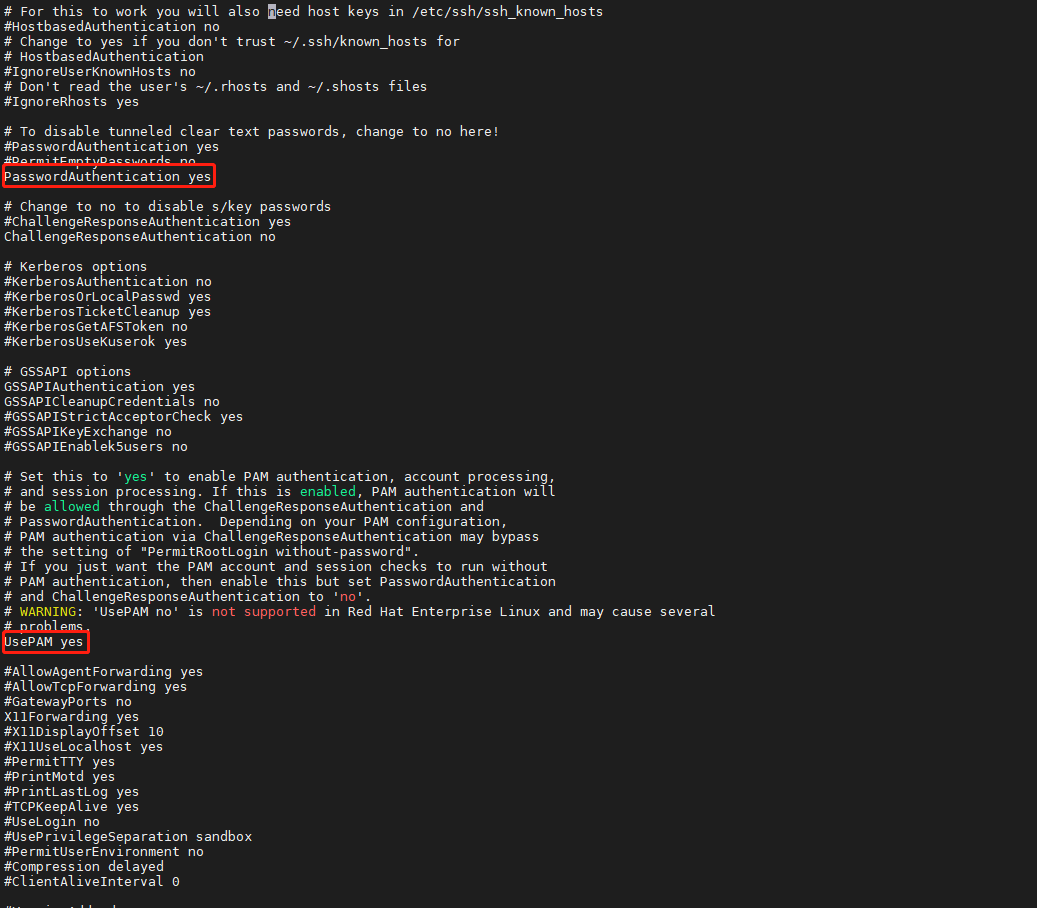
修改配置文件/etc/ssh/sshd_config,使 ssh 通过 pam 认证账户
vi /etc/ssh/sshd_config
修改配置文件/etc/pam.d/sshd,以确认调用 pam 认证文件
vi /etc/pam.d/sshd
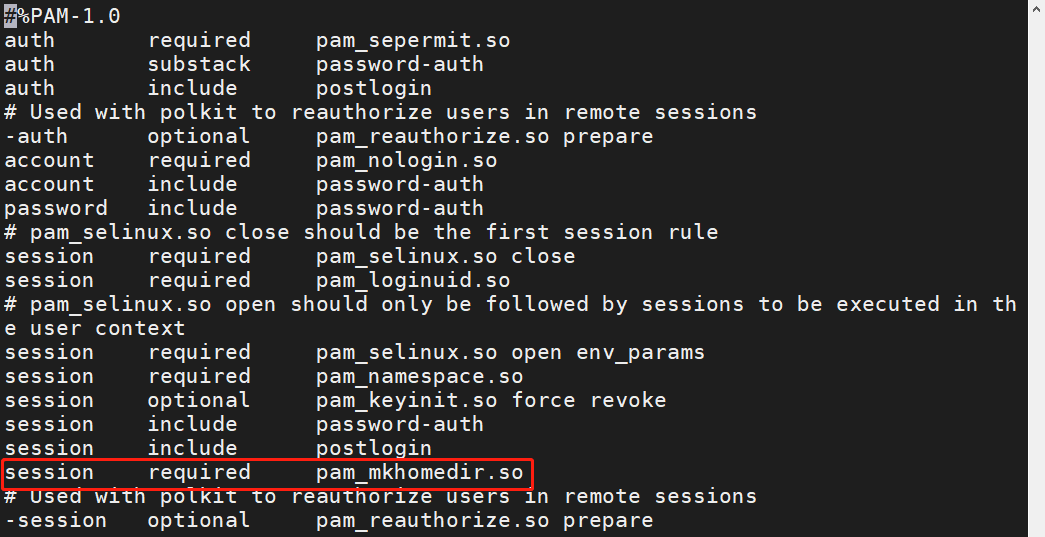
加入这一行确保登录成功后创建用户的 home 目录修改配置文件
vim /etc/pam.d/password-auth
在如下配置文件的四个地方添加如下内容
auth sufficient pam_ldap.so forward_passaccount [default=bad success=ok user_unknown=ignore] pam_ldap.sopassword sufficient pam_ldap.so use_authtoksession optional pam_ldap.so

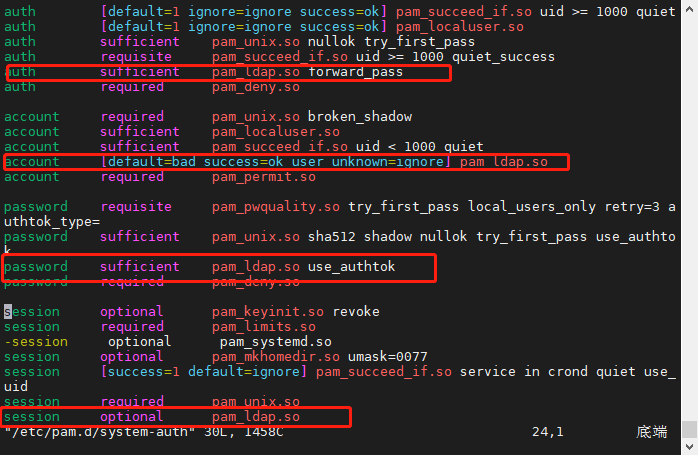
修改/etc/pam.d/system-auth 配置文件
vi /etc/pam.d/system-auth
添加如下配置到/etc/pam.d/system-auth
auth sufficient pam_ldap.so forward_passaccount [default=bad success=ok user_unknown=ignore] pam_ldap.sopassword sufficient pam_ldap.so use_authtoksession optional pam_ldap.so
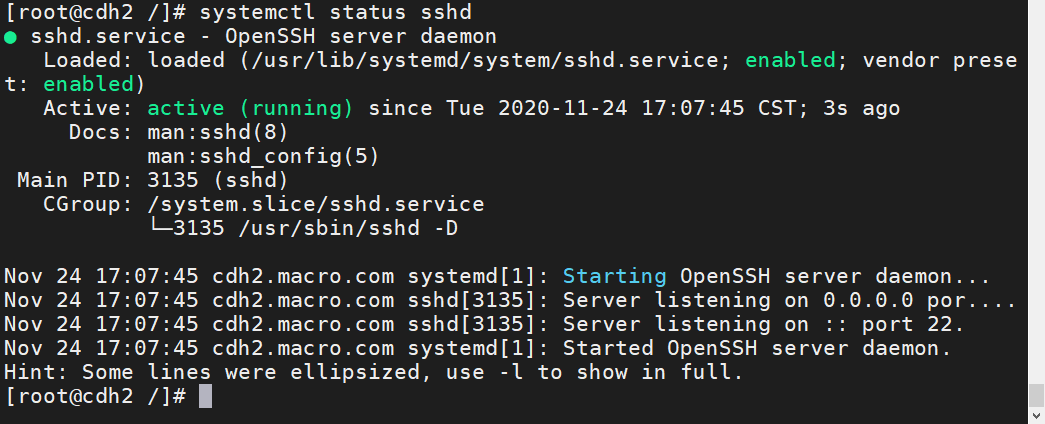
重启 sshd 服务
systemctl restart sshdsystemctl status sshd
3、验证SSH登录
3.1、确认root 用户只存在于 OpenLDAP
more /etc/passwd |grep ldapuser1id ldapuser1
3.2、su 切换到 ldapuser1 用户
su ldapuser1
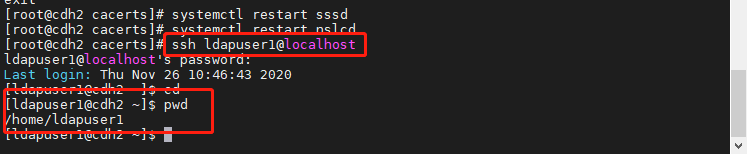
3.3、ssh 登录本机
重启 sssd 和 nslcd 服务。 systemctl restart sssd systemctl restart nslcd
systemctl restart sssdsystemctl restart nslcdssh ldapuser1@localhostpwd


4、安装过程中的问题解决
4.1、ssh登录本机失败,密码错误,截图如下:
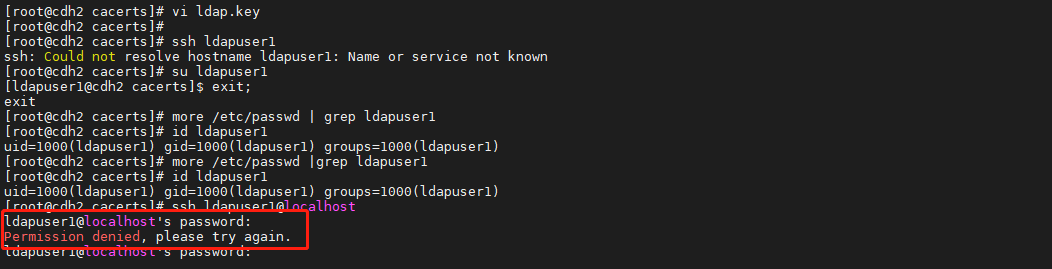
原因:添加ldapuser1用户时user.ldif文件没有设置密码。
解决方案:使用管理员用户修改密码
ldappasswd -H ldap://cdh1 -x -D "cn=Manager,dc=macro,dc=com" -W -S "uid=ldapuser1,ou=People,dc=macro,dc=com"
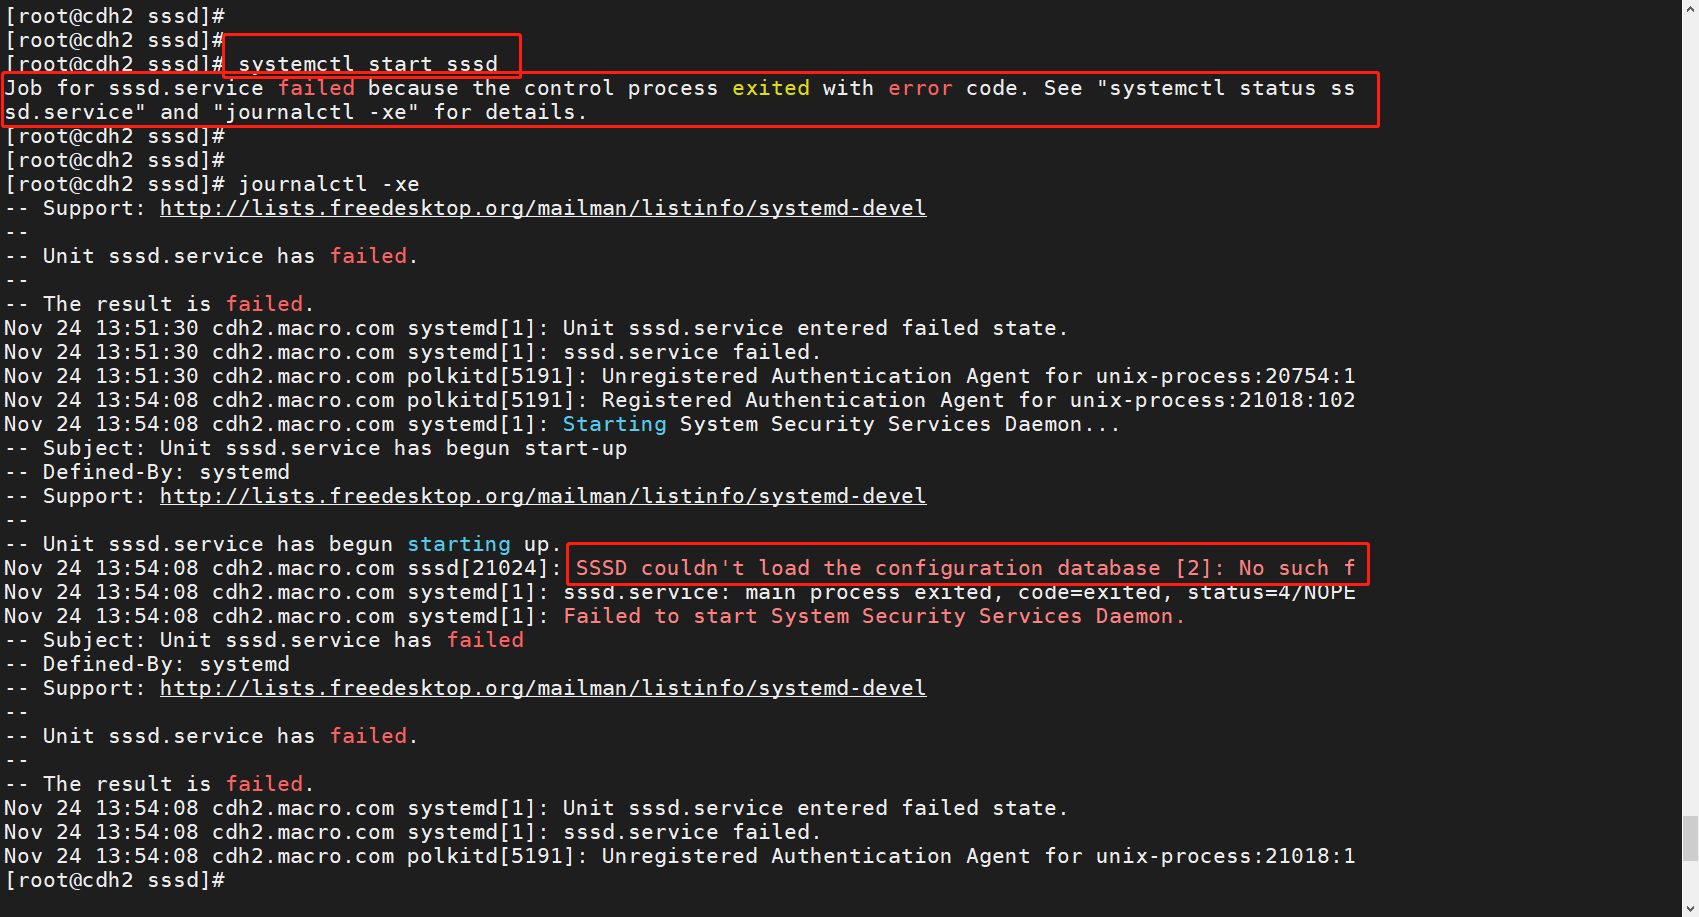
4.2、启动sssd失败,找不到配置文件截图如下。
四、Hive集成LDAP
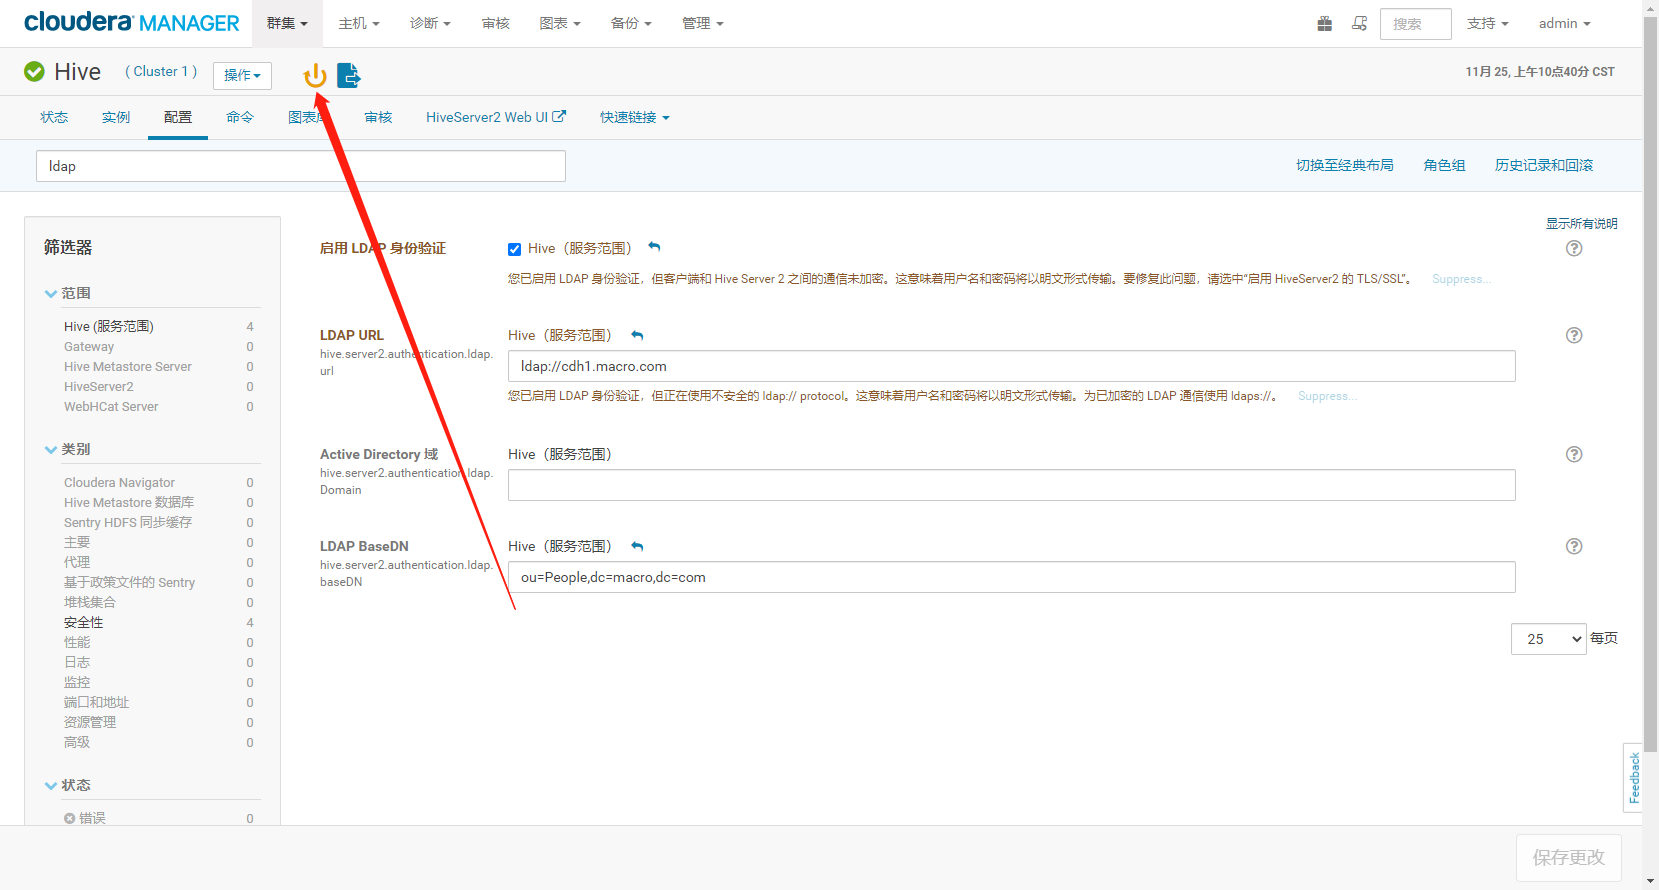
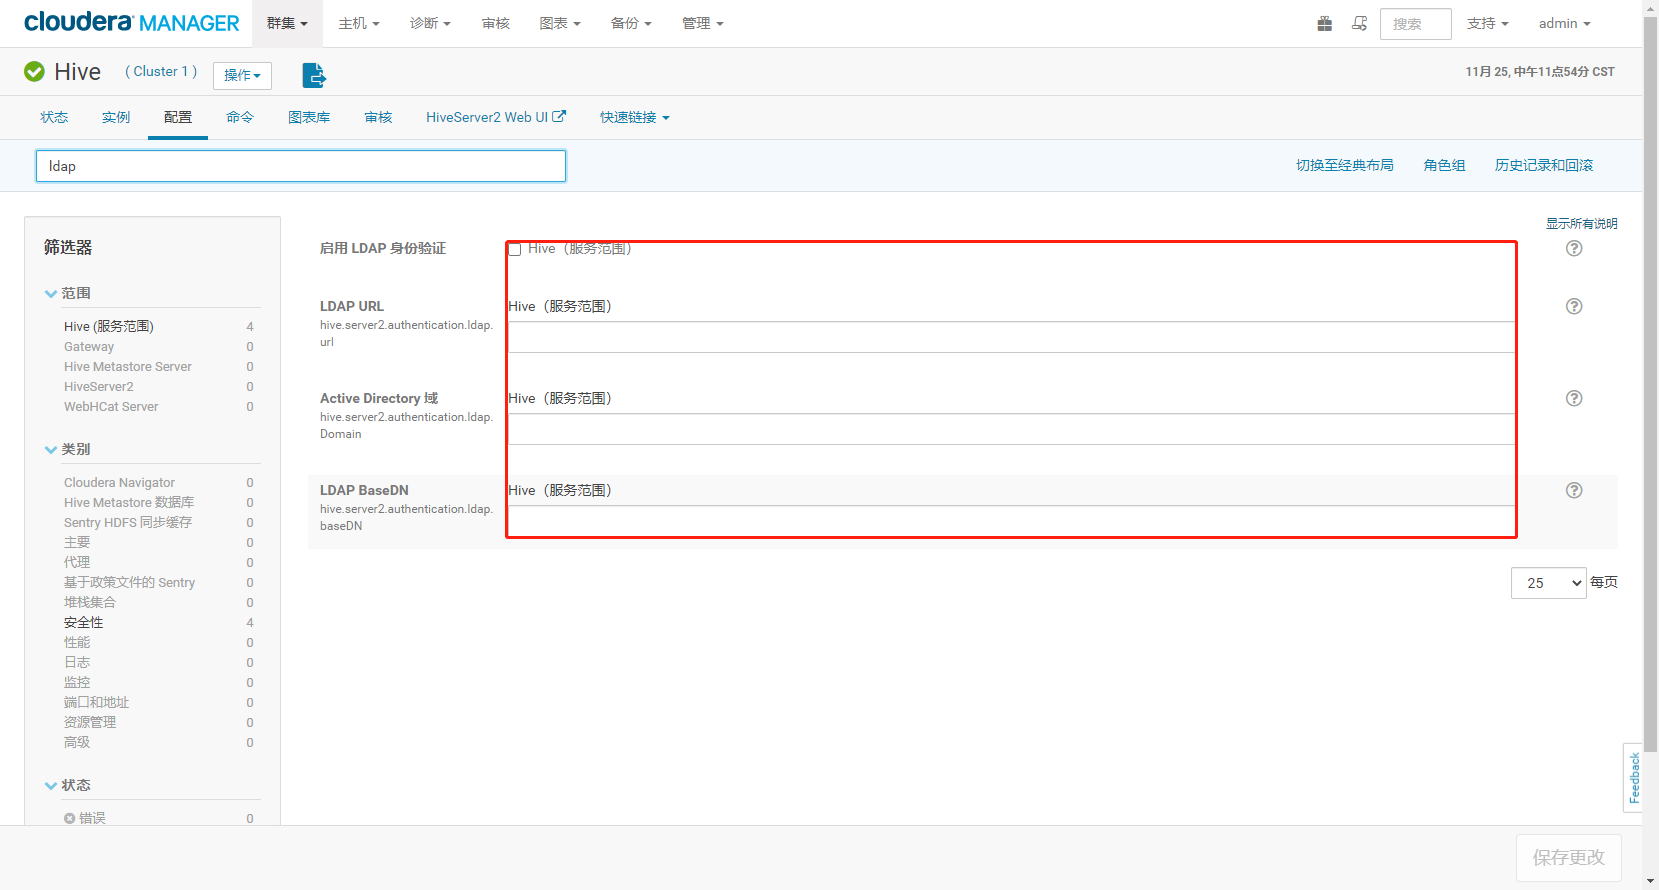
1、Hive 全局配置 OpenLDAP
- 登录 CM 的 Web 控制台,进入 Hive 服务,关闭 Hive 的模拟功能
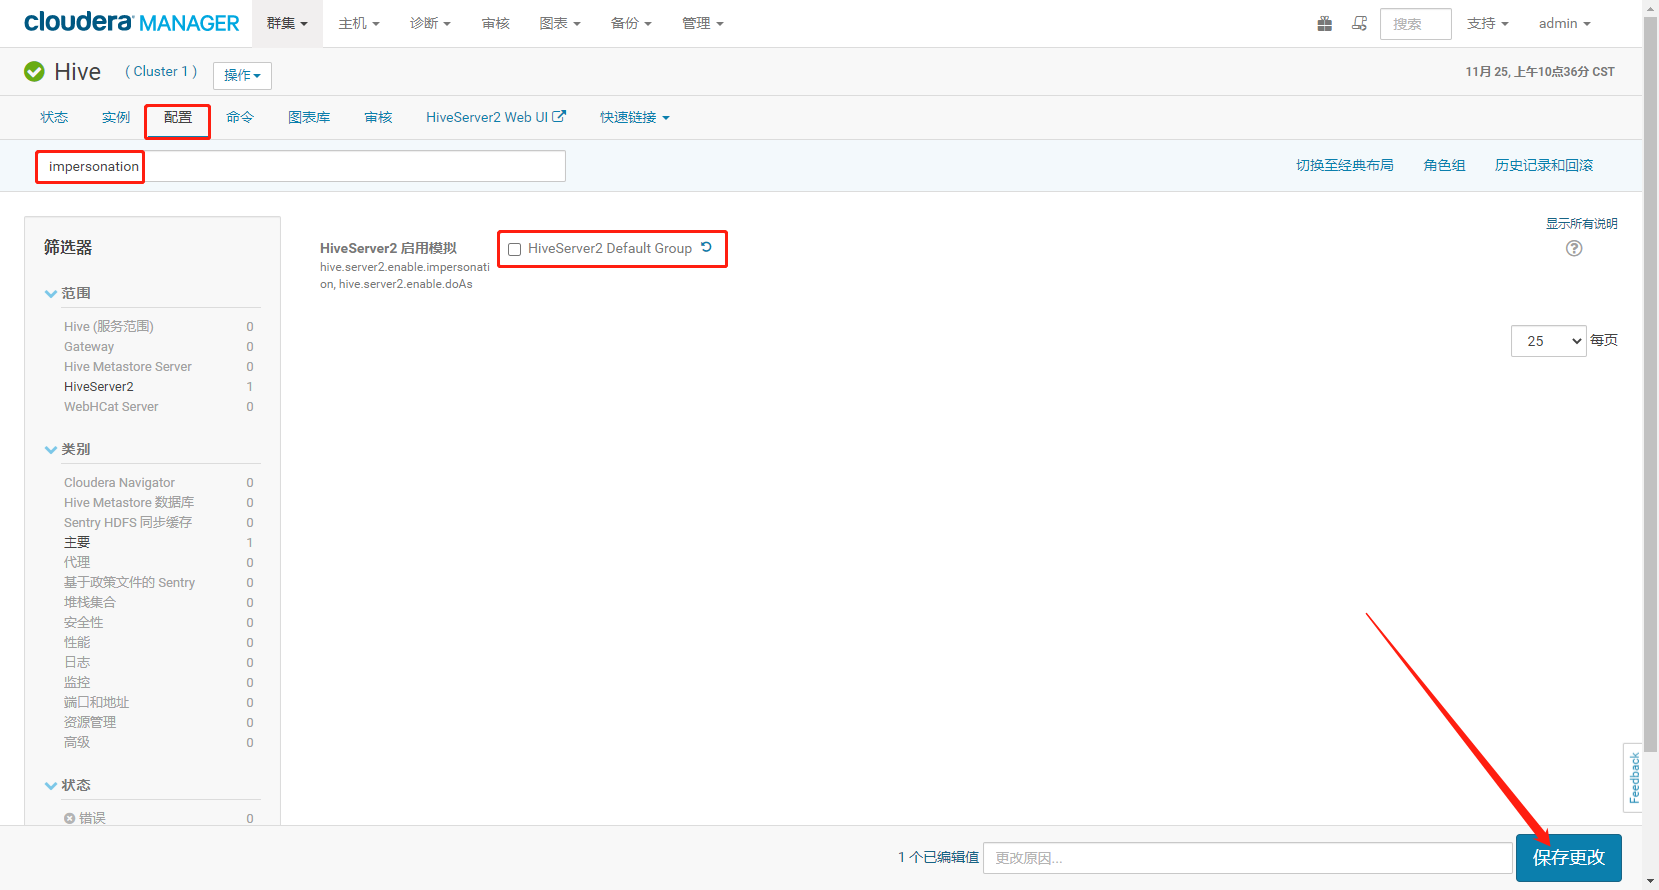
- 修改 LDAP 相关配置,通过这里可以进行全局配置,配置后所有的 HiveServer2 服务均使用该配置
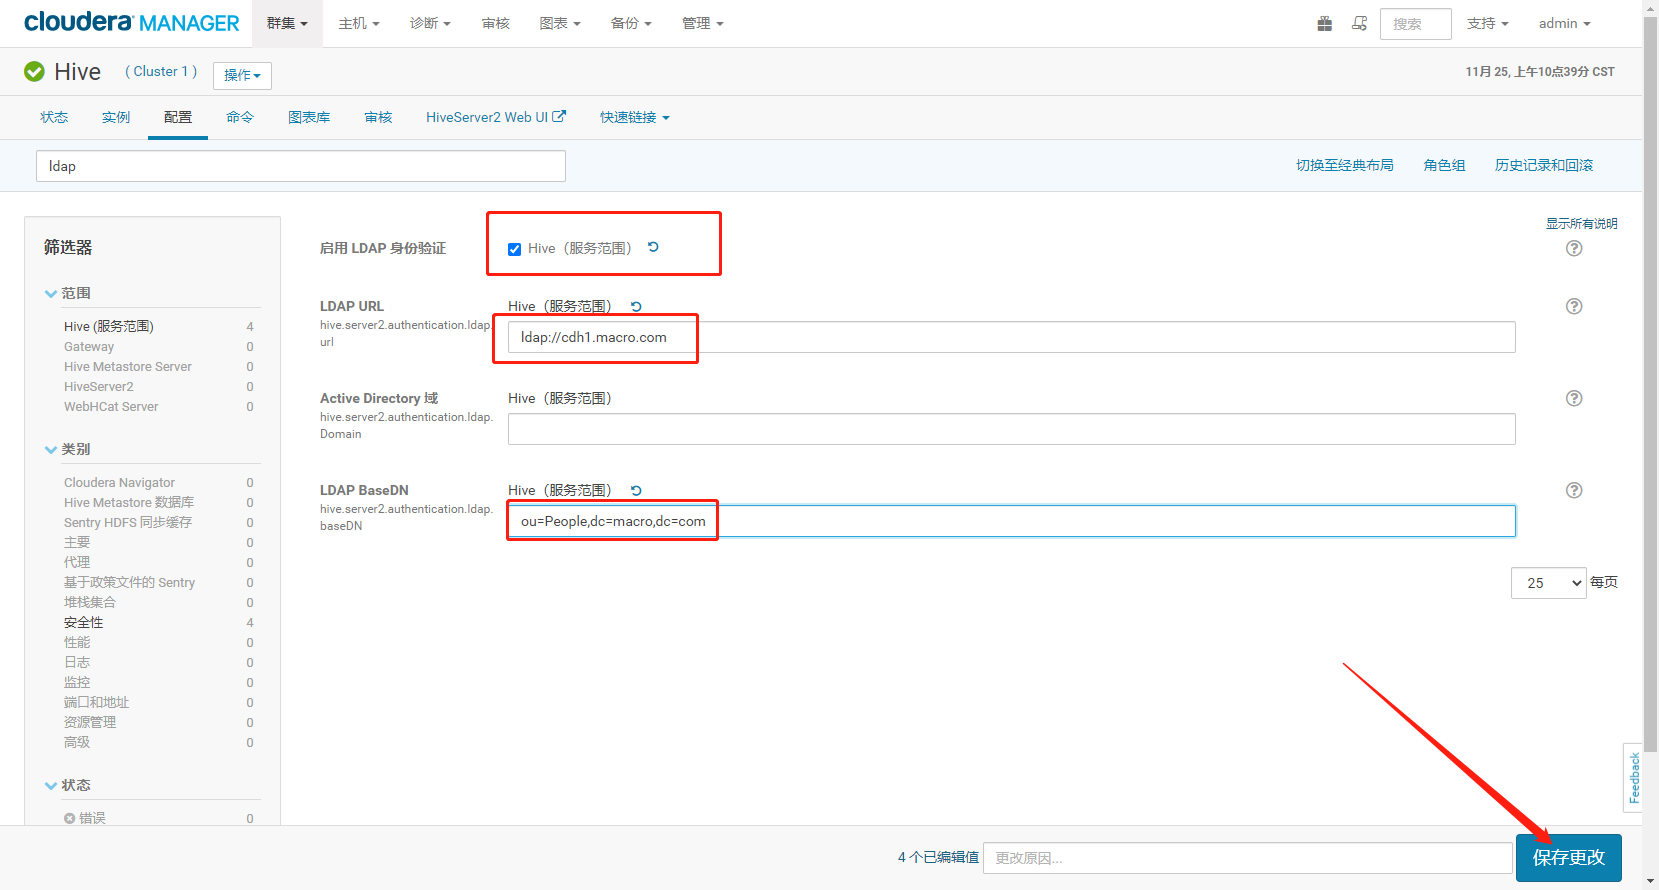
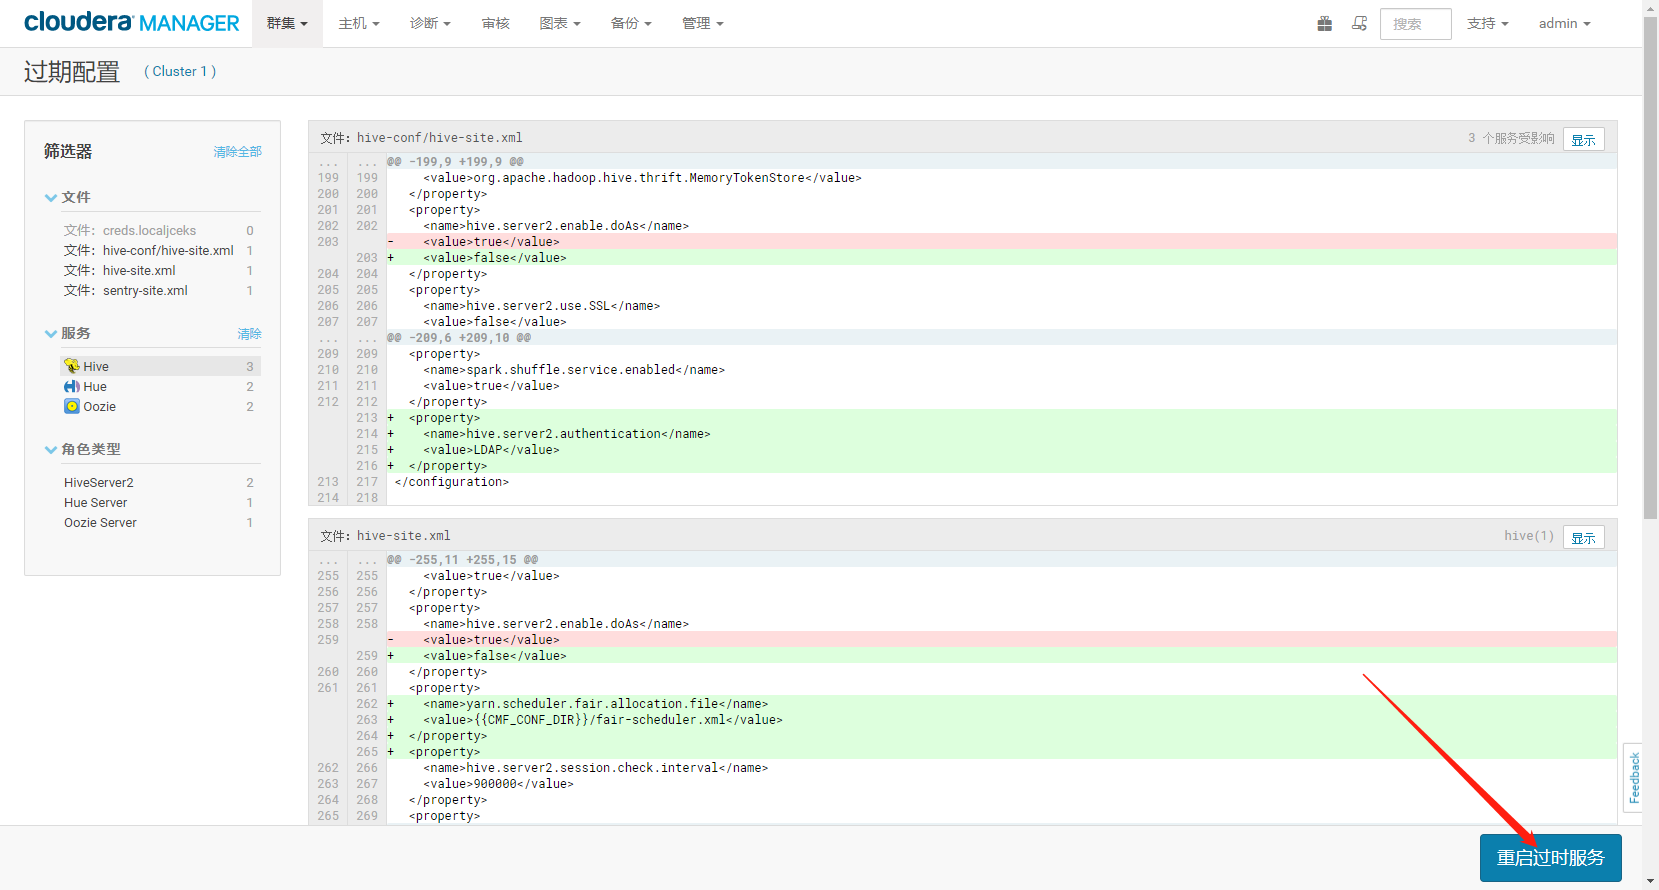
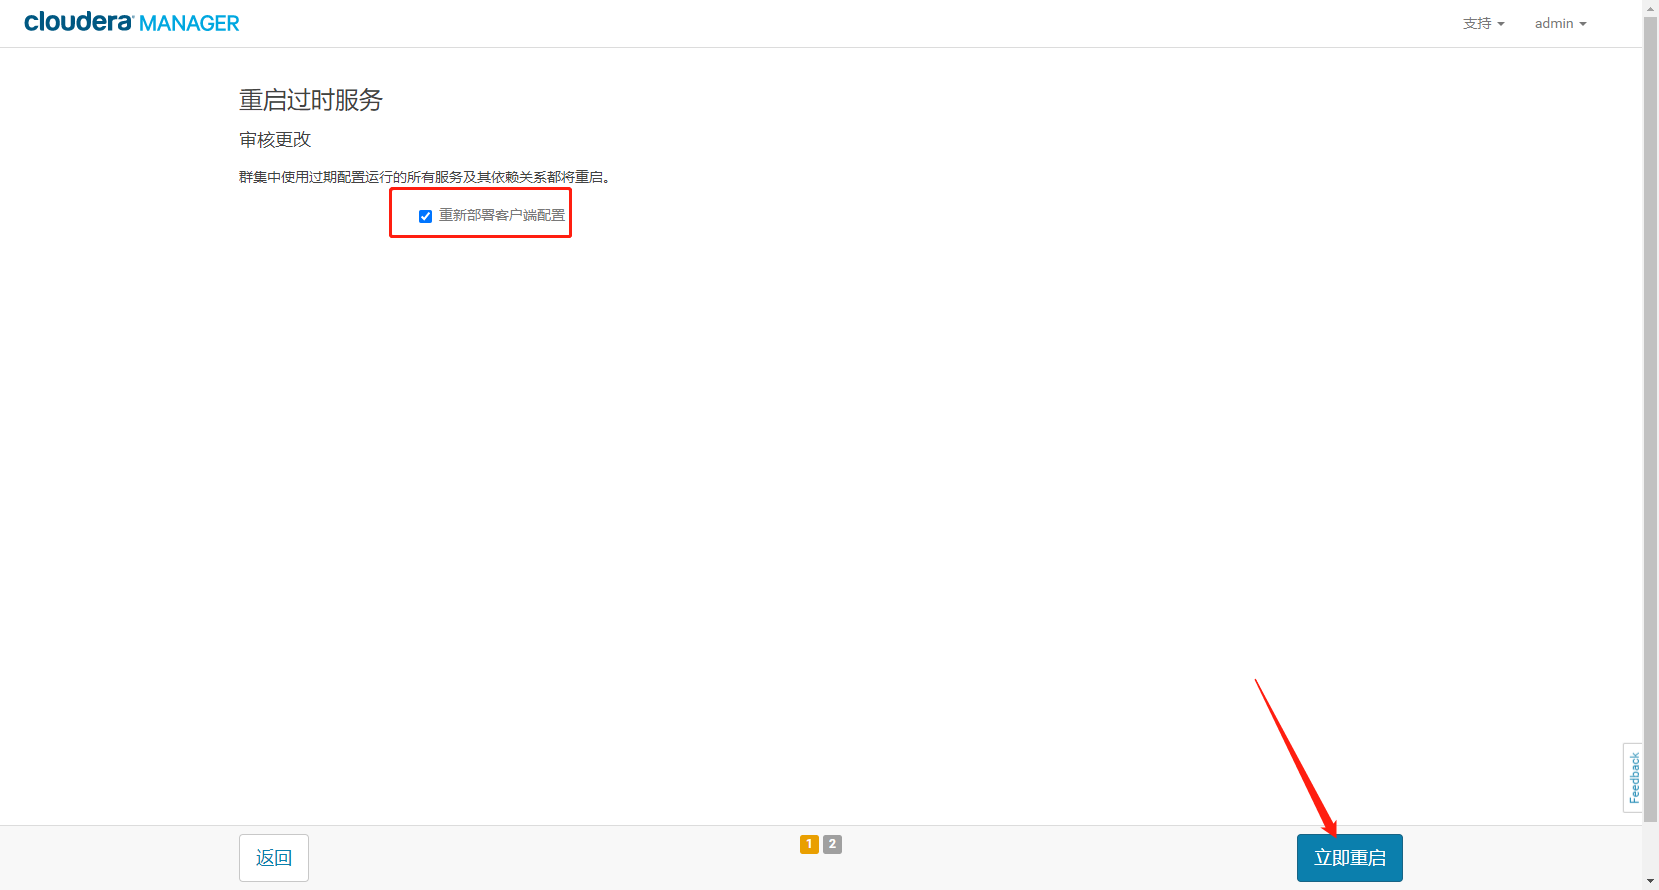
- 保存配置点击重启过时配置服务
 。
。
2、Hive 集成 OpenLDAP 验证
ldapuser1 用户不存在与操作系统,却存在于 OpoenLDAP,可以使用 id 查看到该用户
more /etc/passwd | grep ldapuser1id ldapuser1

确保OpenLDAP 可以搜索到用户
ldapsearch -D "cn=Manager,dc=macro,dc=com" -W | grep ldapuser1

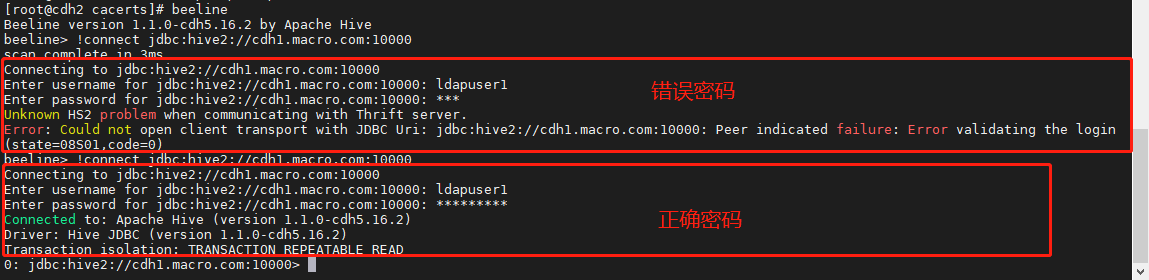
执行错误密码报错

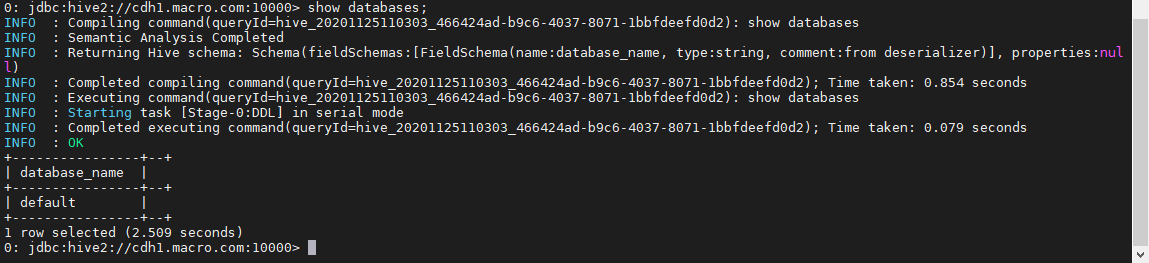
- 通过 beeline 使用 ldapuser1 用户登录 HiveServer2 服务,用正确的密码登陆,如下:

- 试命令,都可以正确执行。
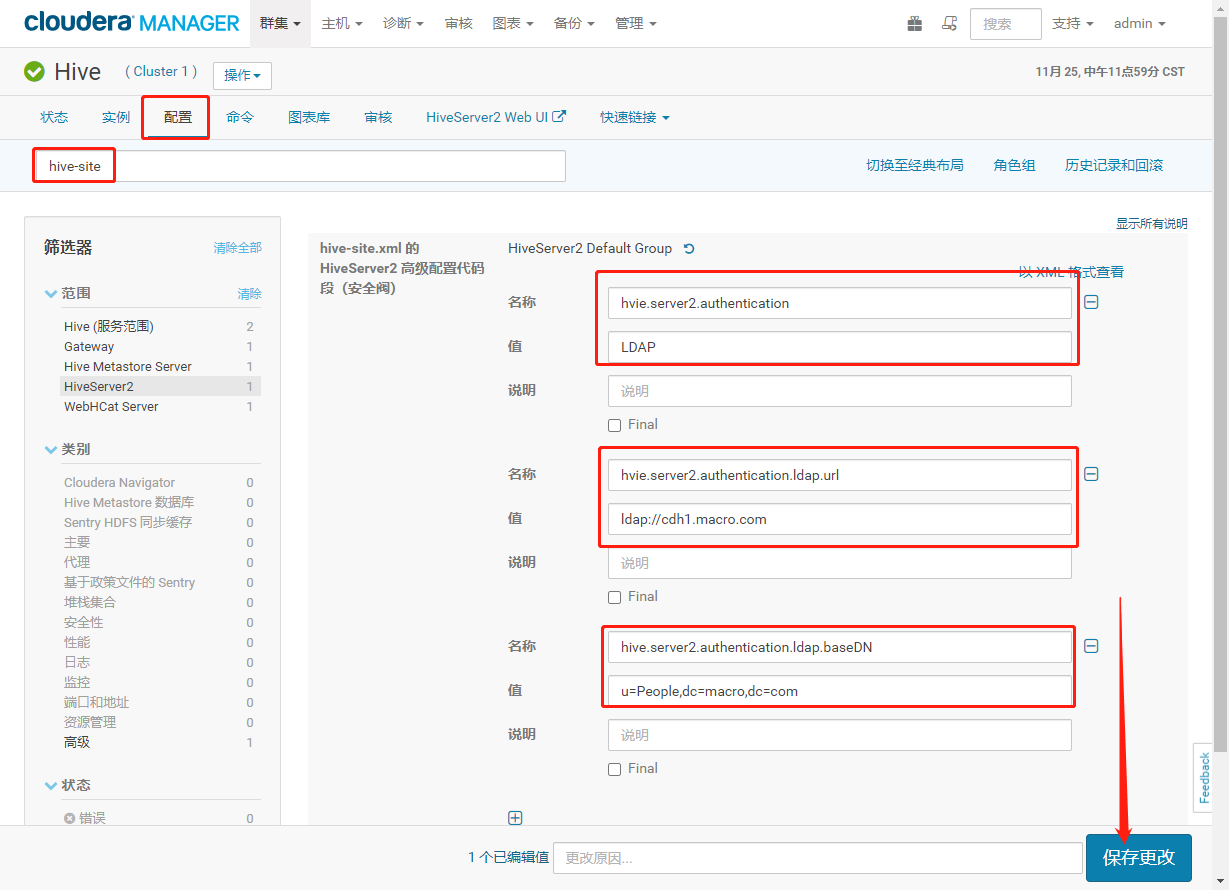
3、 单个 HiveServer2 集成 OpenLDAP
3.1、前面的配置可以对所有的 HiveServer2 服务生效,也可以针对单个 HiveServer2 服务进行配置,操作如下:
- 还原全局配置,然后保存更改,重启过时服务
- 在hive页面选择实例,选择cdh1的hiveserver2
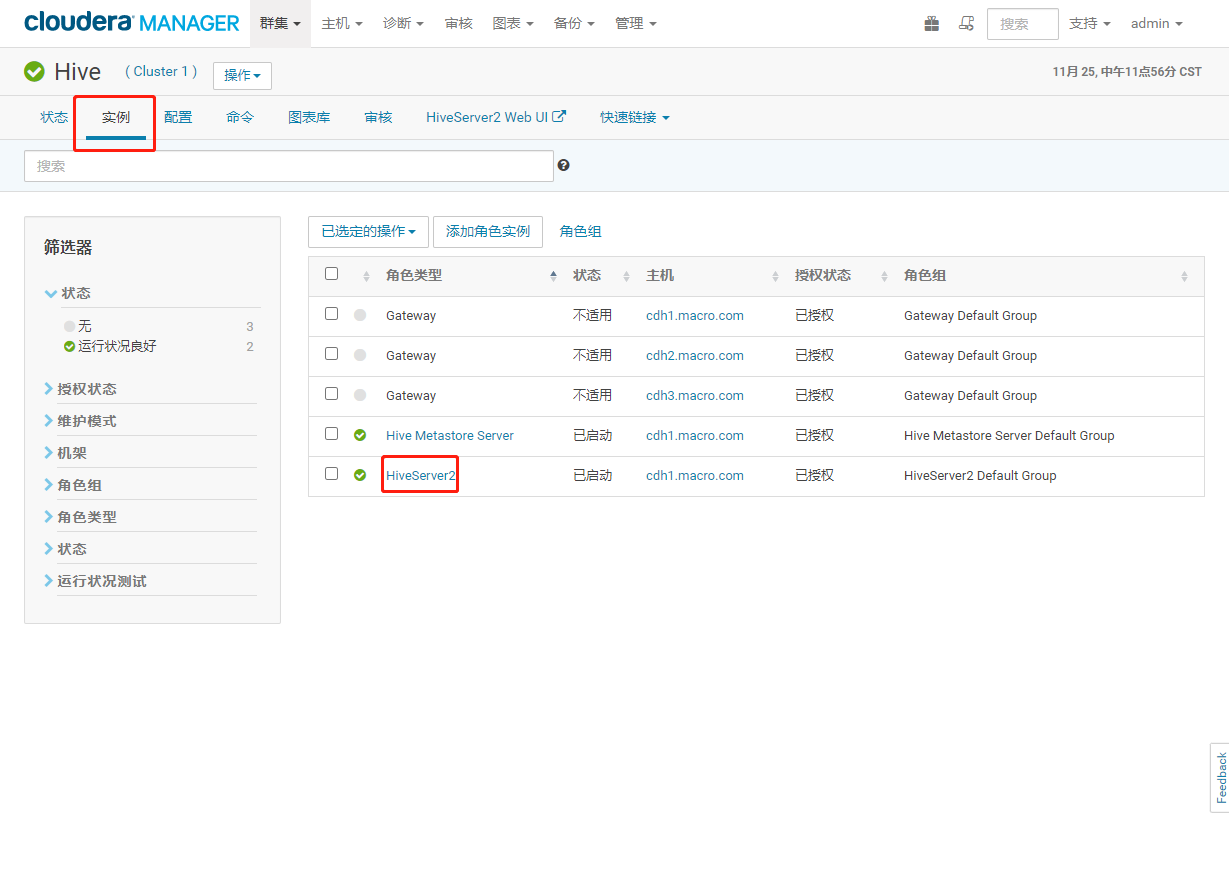
- 配置cdh1,内容如下。
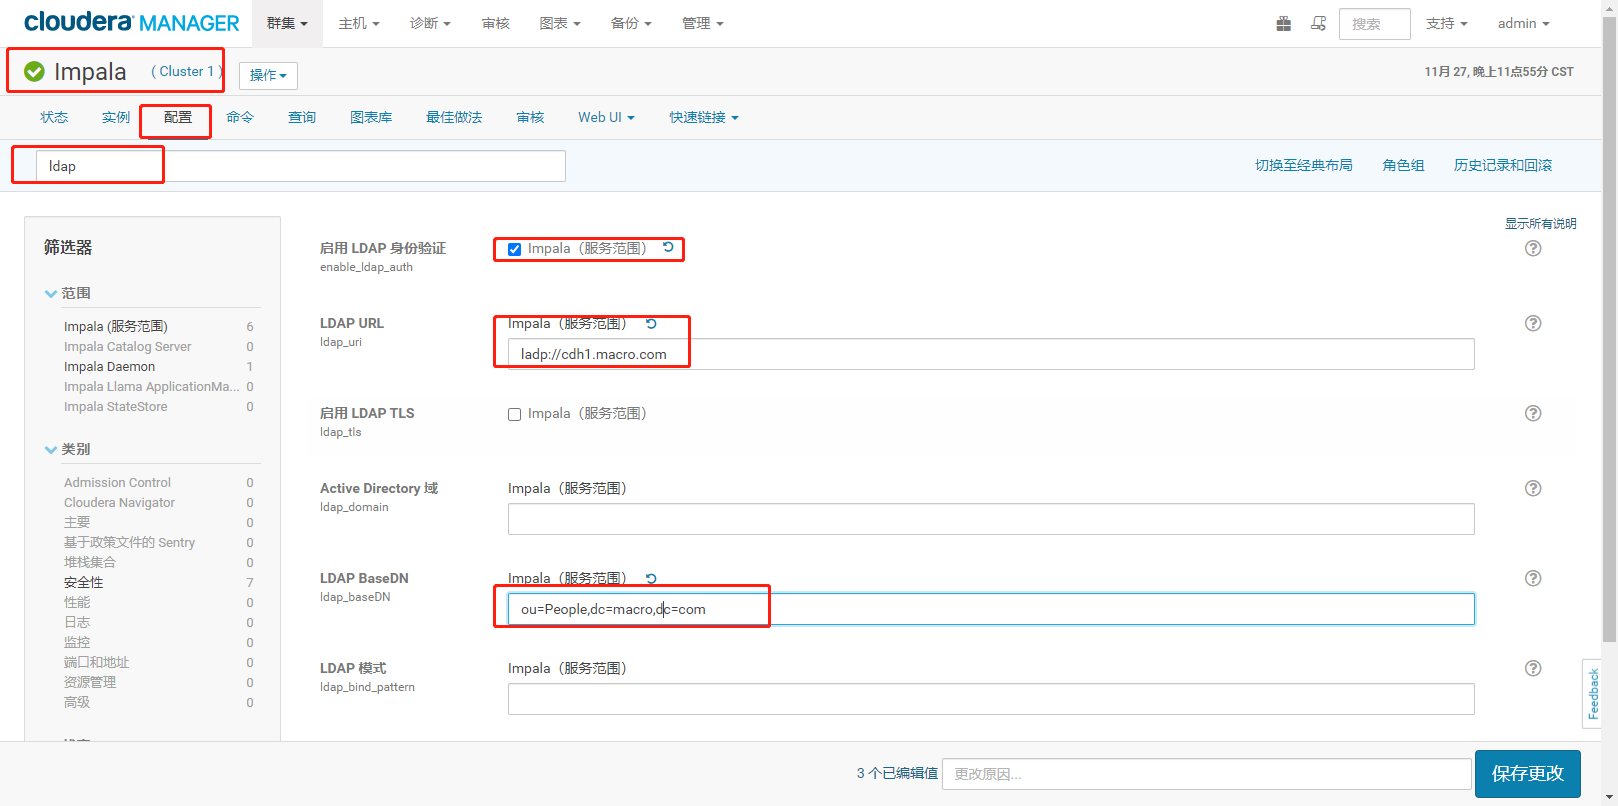
五、Impala集成LDAP
1、impala启动OpenLDAP
- 修改web的impala下ldap配置,保存更改
在Impala Daemon命令行添加如下配置“—ldap_passwords_in_clear_ok”
--ldap_passwords_in_clear_ok
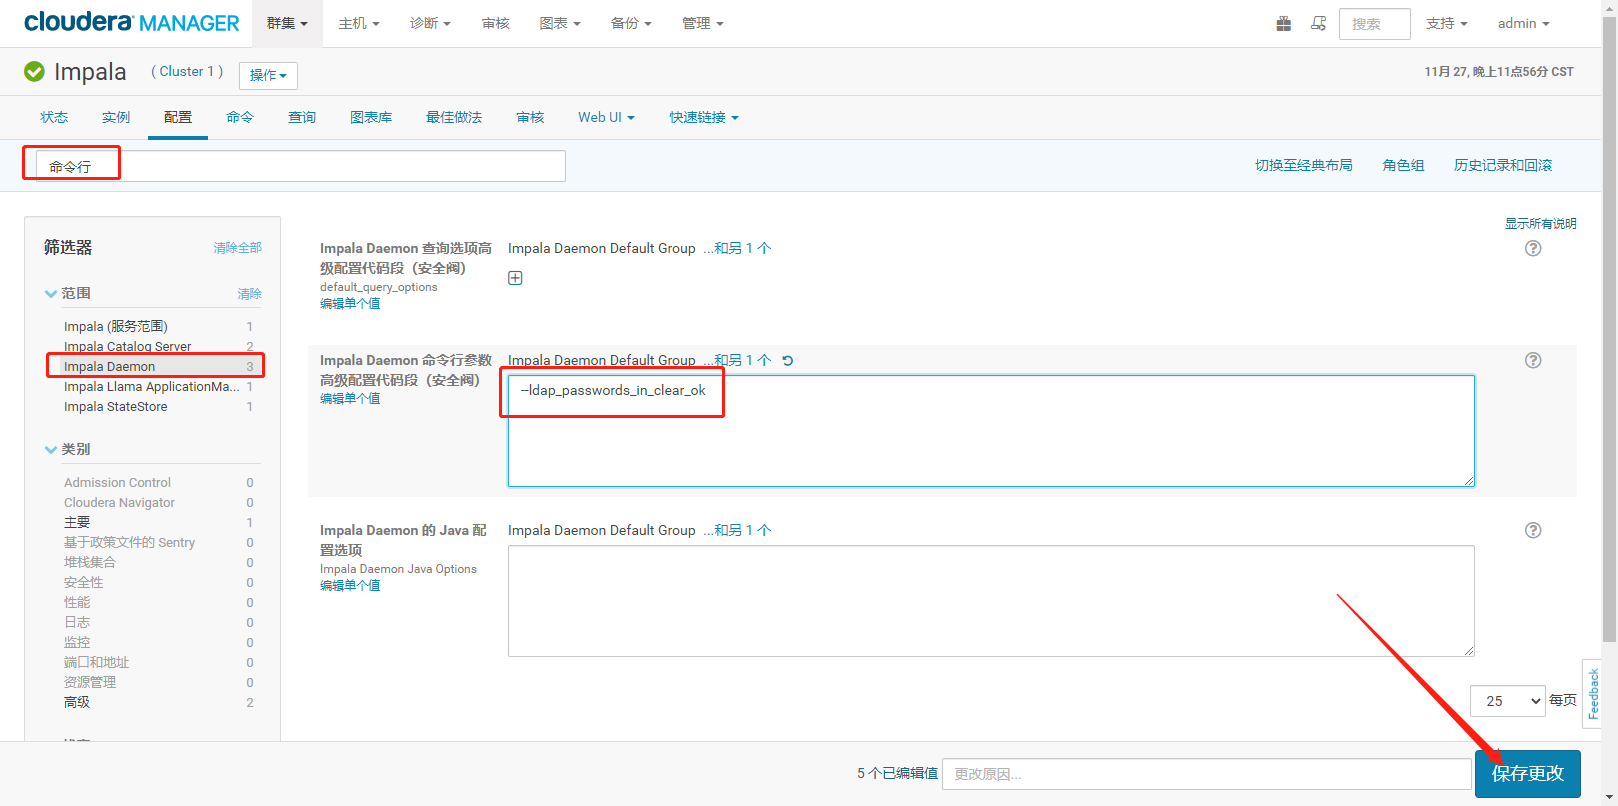
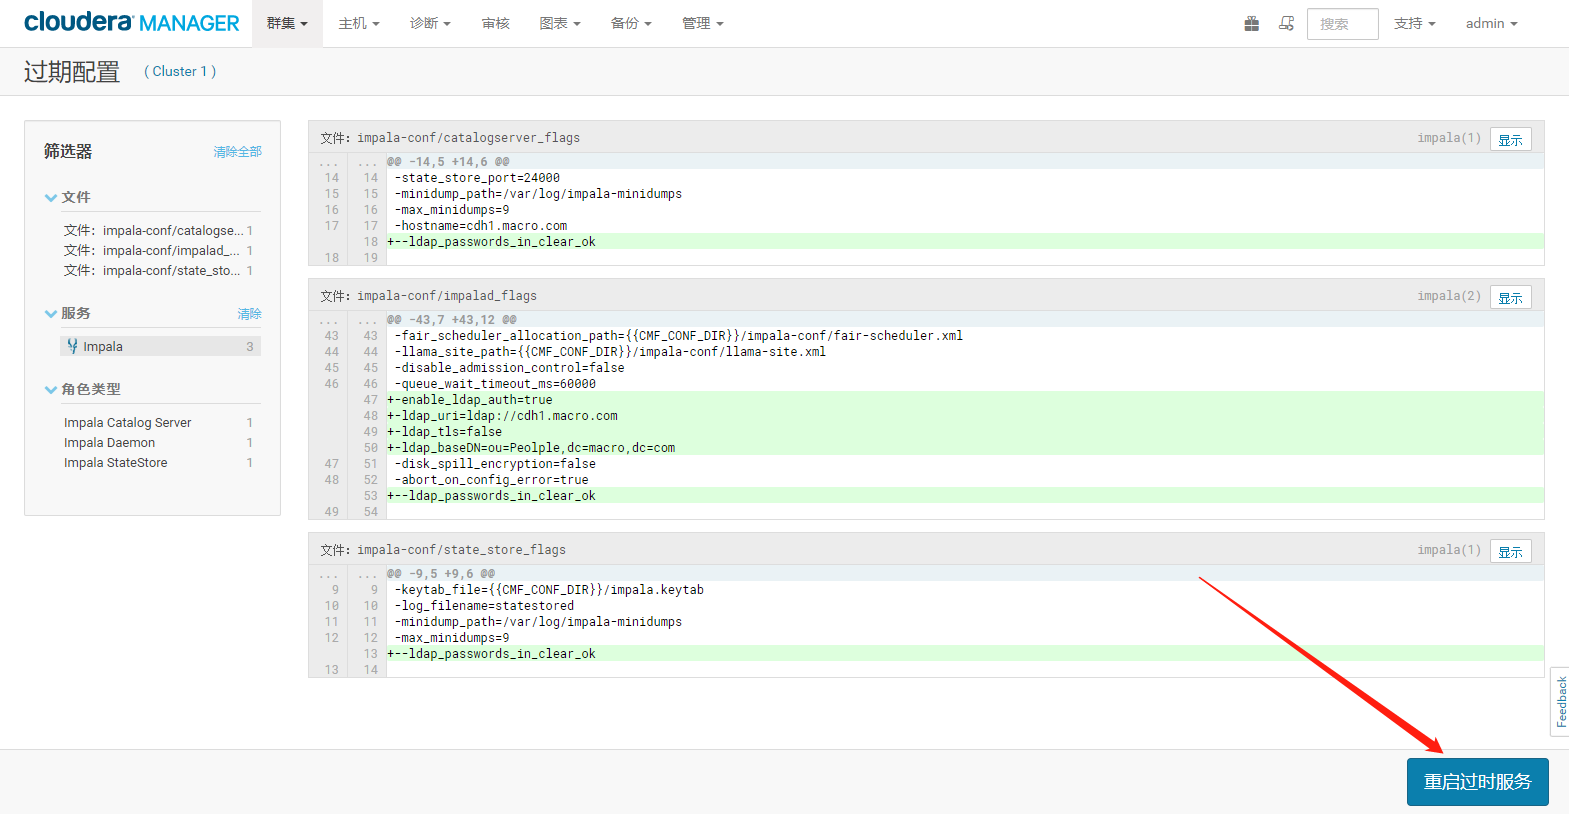
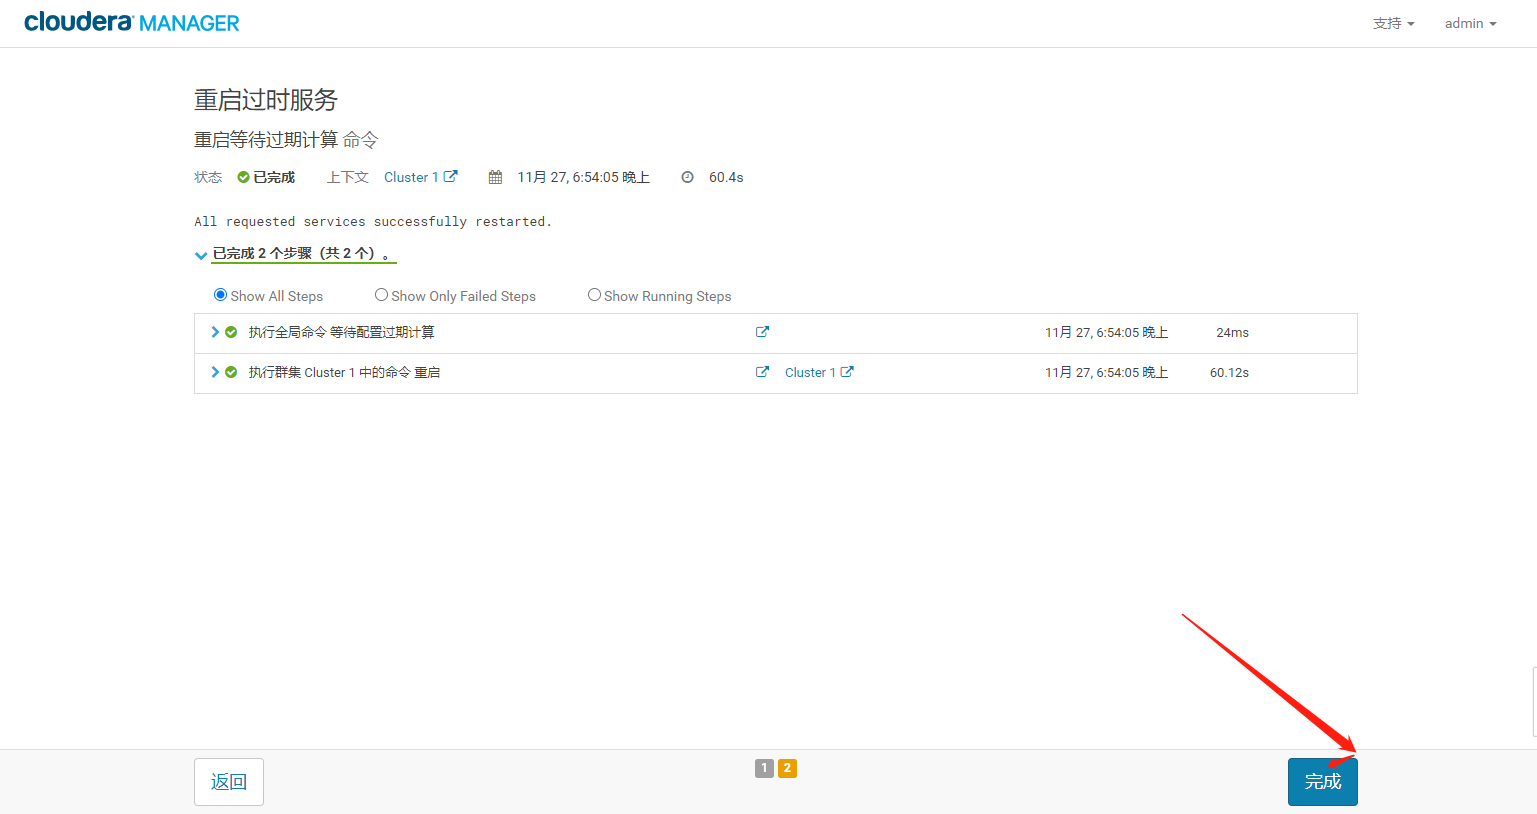
保存更改,根据提示重启impala
2、Impala集成测试
使用impala-shell命令登录Impala Daemon测试
impala-shell -i cdh1.macro.com -l -u ldapuser1 --auth_creds_ok_in_clear
输入错误密码提示如下信息:

- 输入正确密码成功登录

-
六、Hue集成LDAP
1、导入hive用户到OpenLDAP
这里以hive用户为例来测试,该用户也属于一个特殊用户,涉及到Hive和Impala的超级管理员权限问题
查看OS中hive用户的用户ID和用户组ID,hive用户的uid对应users.ldif中的mem.
id hiveid impala

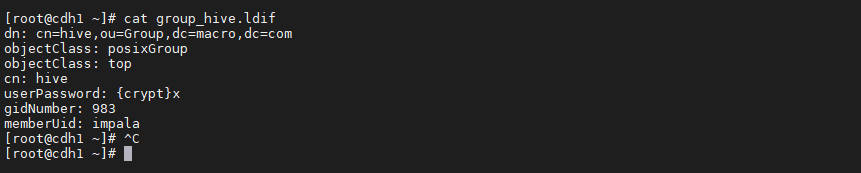
编辑group_hive.ldif文件,内容如下: ```shell vi group.ldif
dn: cn=hive,ou=Group,dc=macro,dc=com objectClass: posixGroup objectClass: top cn: hive userPassword: {crypt}x gidNumber: 983
dn: cn=impala,ou=Group,dc=macro,dc=com objectClass: posixGroup objectClass: top cn: impala userPassword: {crypt}x gidNumber: 977
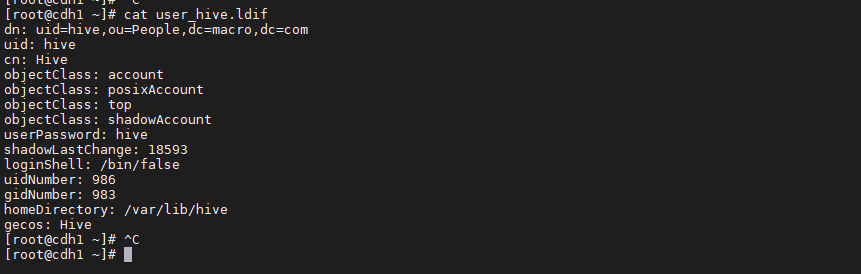
3. 编辑user_hive.ldif文件,内容如下:```shellvi users.ldif------------------------------------dn: uid=hive,ou=People,dc=macro,dc=comuid: hivecn: hiveobjectClass: accountobjectClass: posixAccountobjectClass: topobjectClass: shadowAccountuserPassword: 123456shadowLastChange: 18595loginShell: /bin/falseuidNumber: 986gidNumber: 983homeDirectory: /var/lib/hivegecos: hivedn: uid=impala,ou=People,dc=macro,dc=comuid: impalacn: impalaobjectClass: accountobjectClass: posixAccountobjectClass: topobjectClass: shadowAccountuserPassword: 123456shadowLastChange: 18595loginShell: /bin/bashuidNumber: 980gidNumber: 977homeDirectory: /var/lib/impalagecos: impala
使用如下命令将hive用户和用户组信息导入OpenLDAP
ldapadd -D "cn=Manager,dc=macro,dc=com" -W -x -f group_hive.ldifldapadd -D "cn=Manager,dc=macro,dc=com" -W -x -f user_hive.ldif

查看是否导入成功
ldapsearch -h cdh1.macro.com -b "dc=macro,dc=com" -D "cn=Manager,dc=macro,dc=com" -W |grep hive
2、Hue集成OpenLDAP
2.1、修改配置
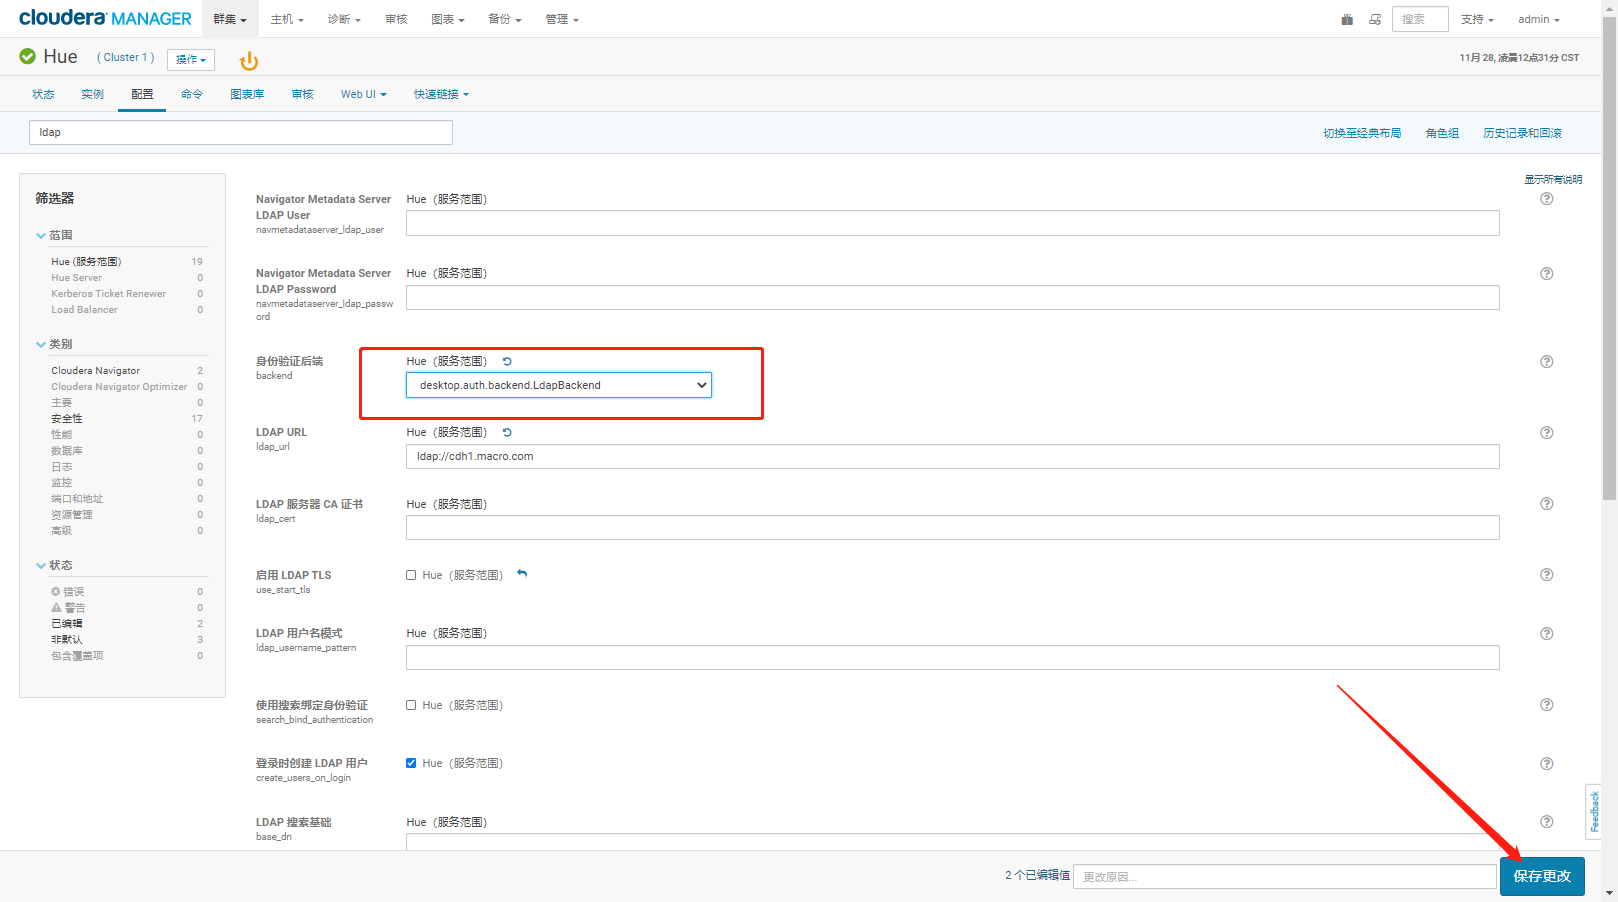
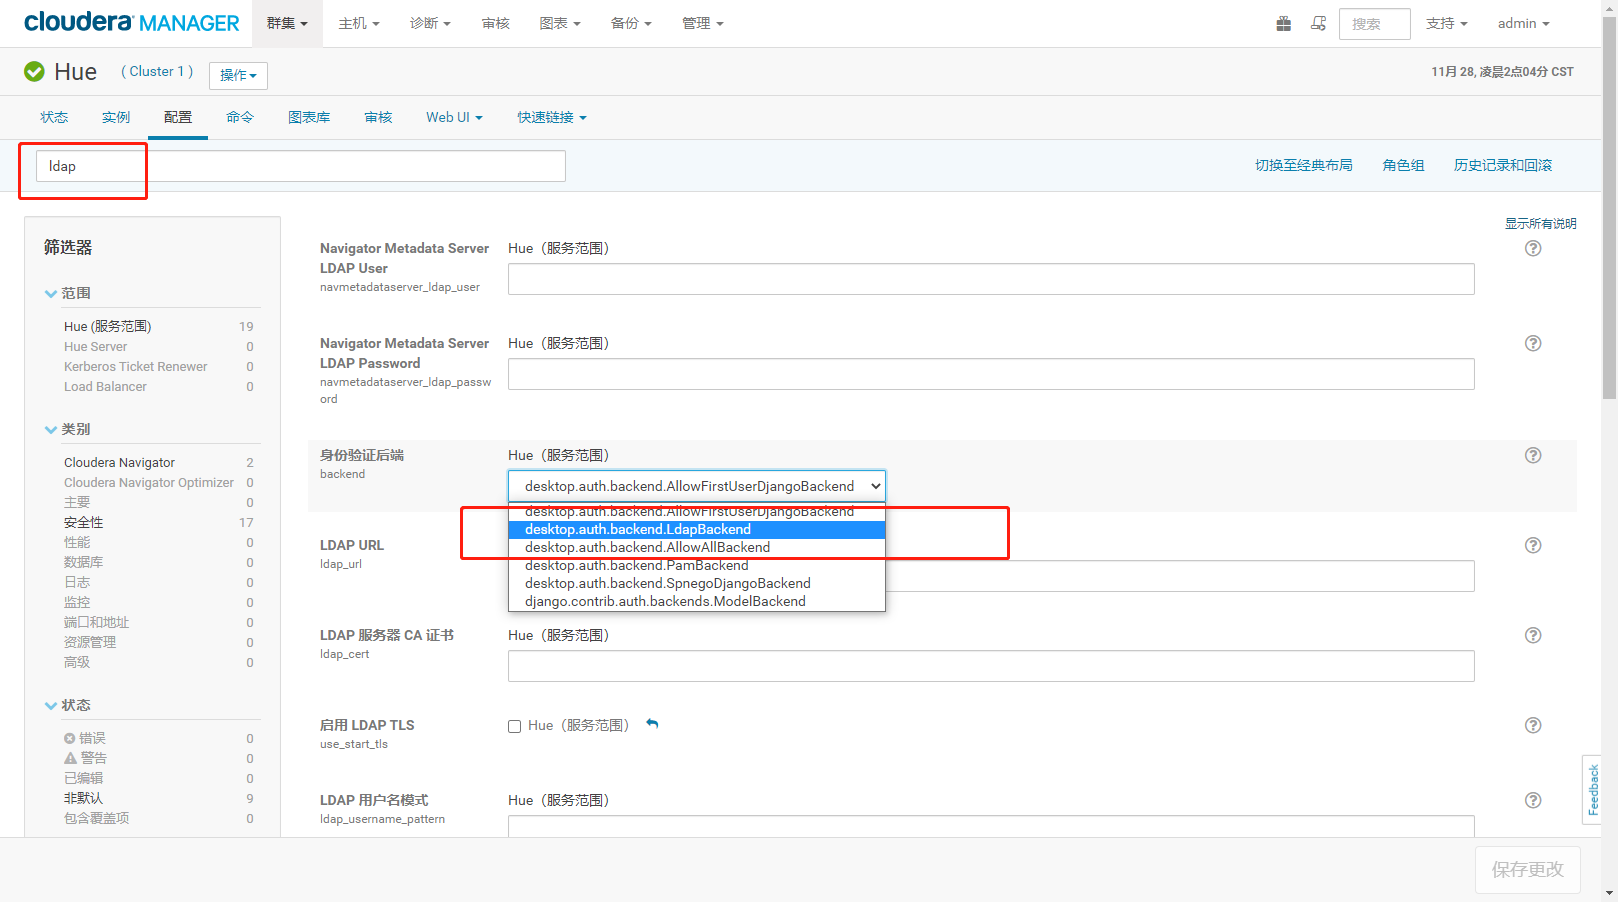
使用管理员登录CM,进入Hue配置页面,修改Hue的认证方式为LDAP,然后保存更改。

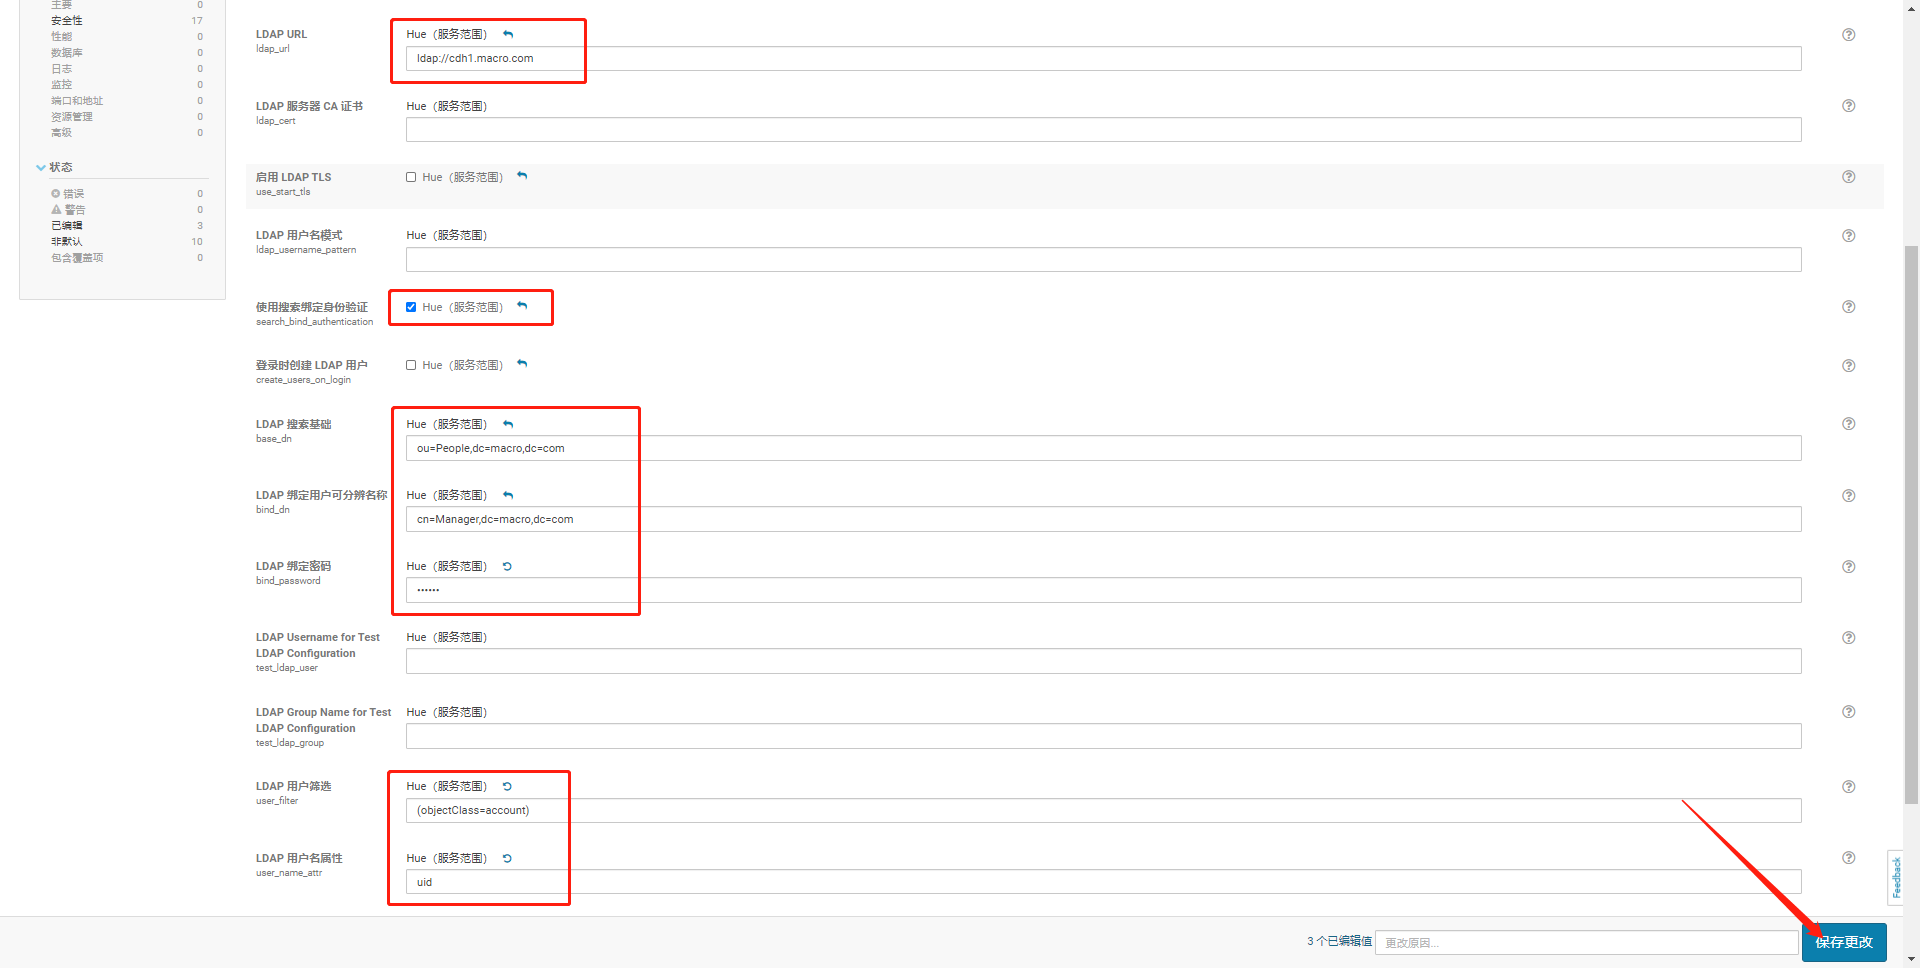
- 配置LDAP信息
- 修改完以上配置后保存,在重启Hue服务前将认证方式修改为desktop.auth.backend.AllowFirstUserDjangoBackend
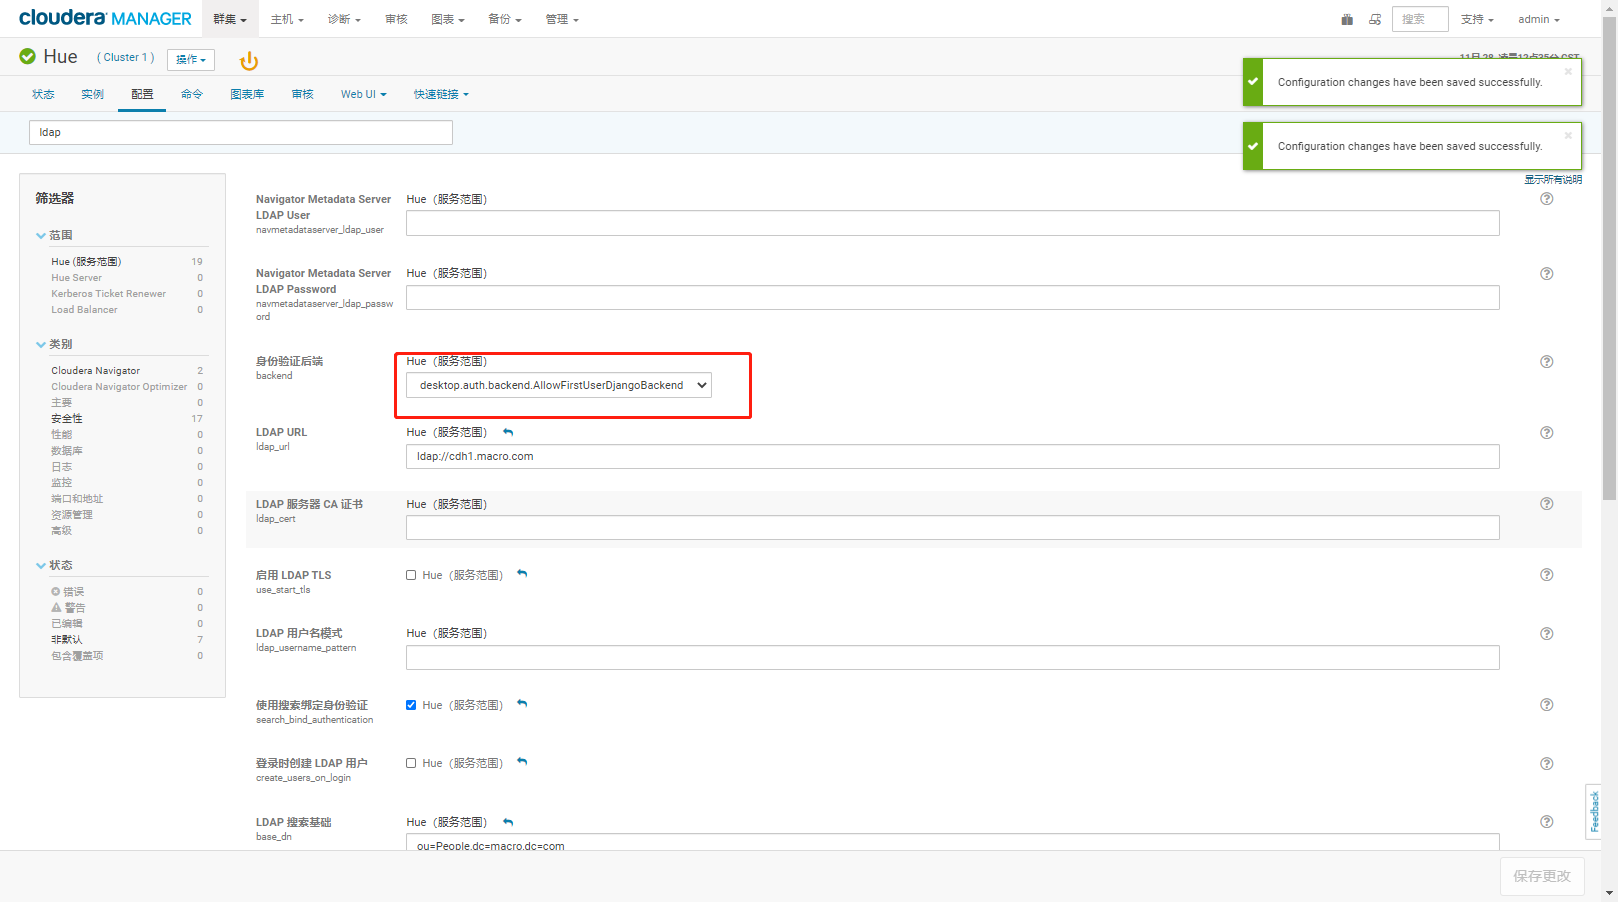
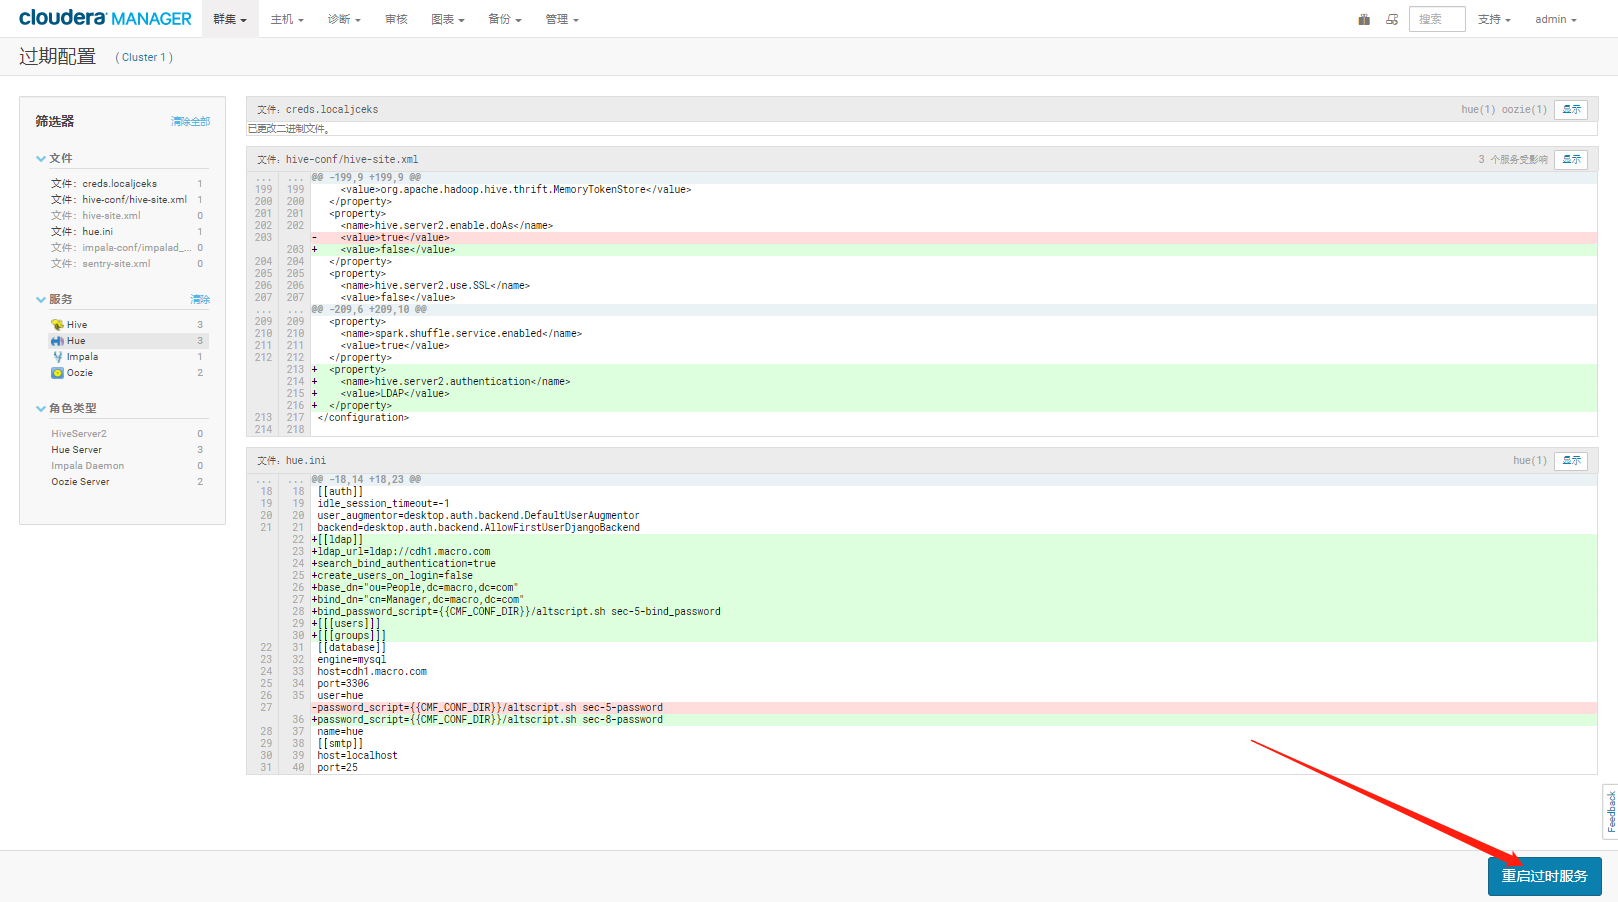
- 再次保存重启。
- 重启成功后使用Hue的超级管理员登录,我们这里是admin用户为超级管理员
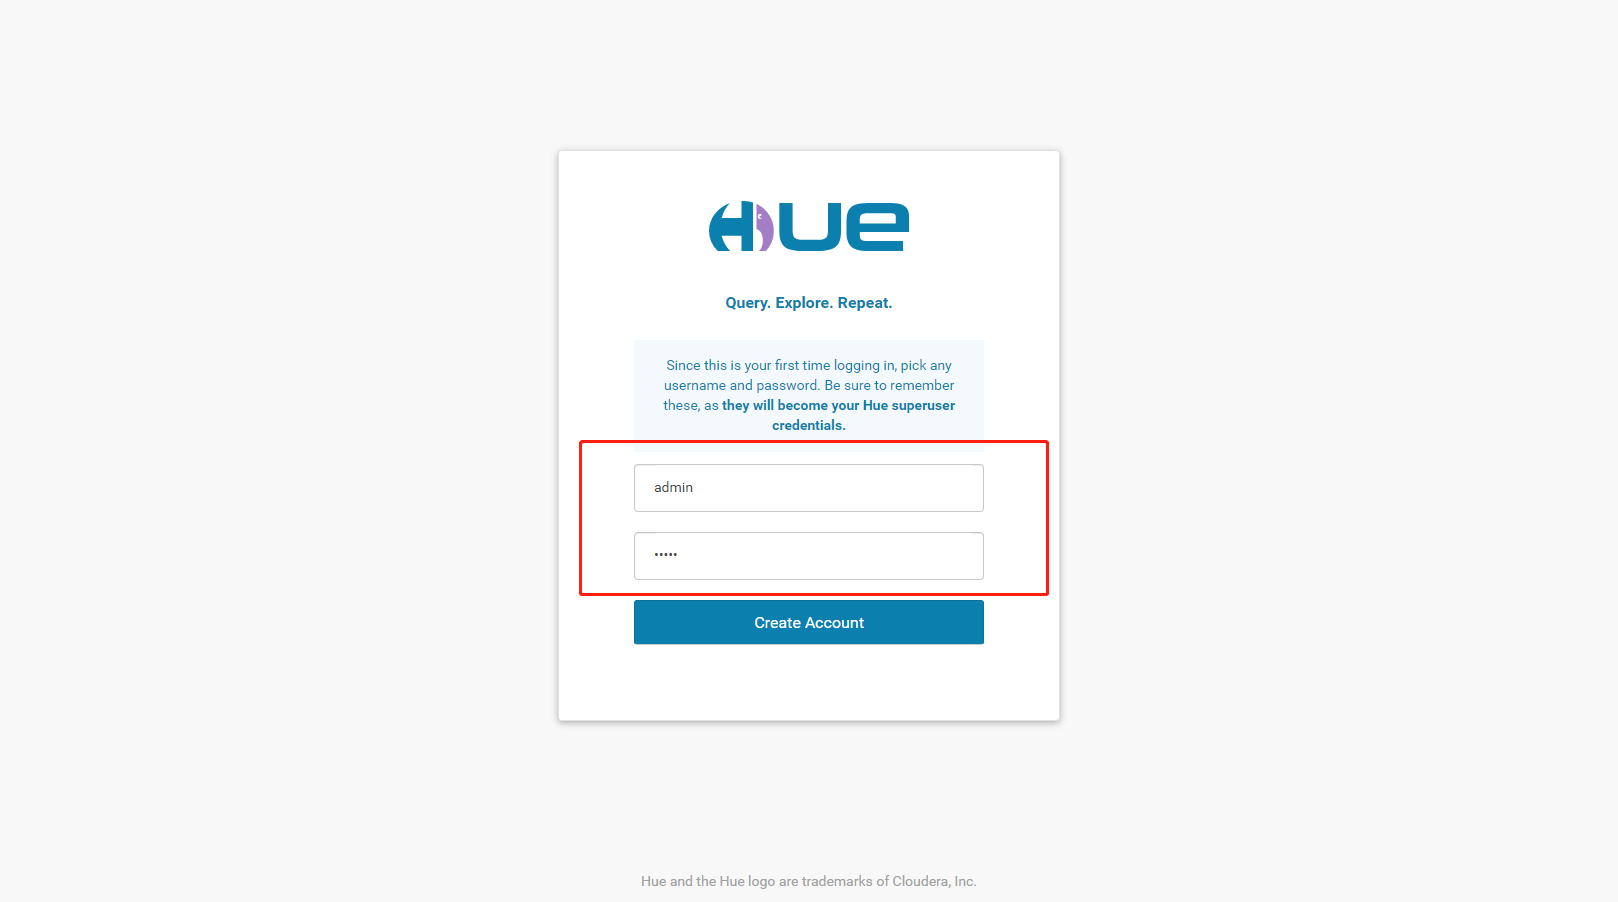
2.2、修改Hive为超级用户
应为:因为启用LDAP认证后admin用户则无法登陆
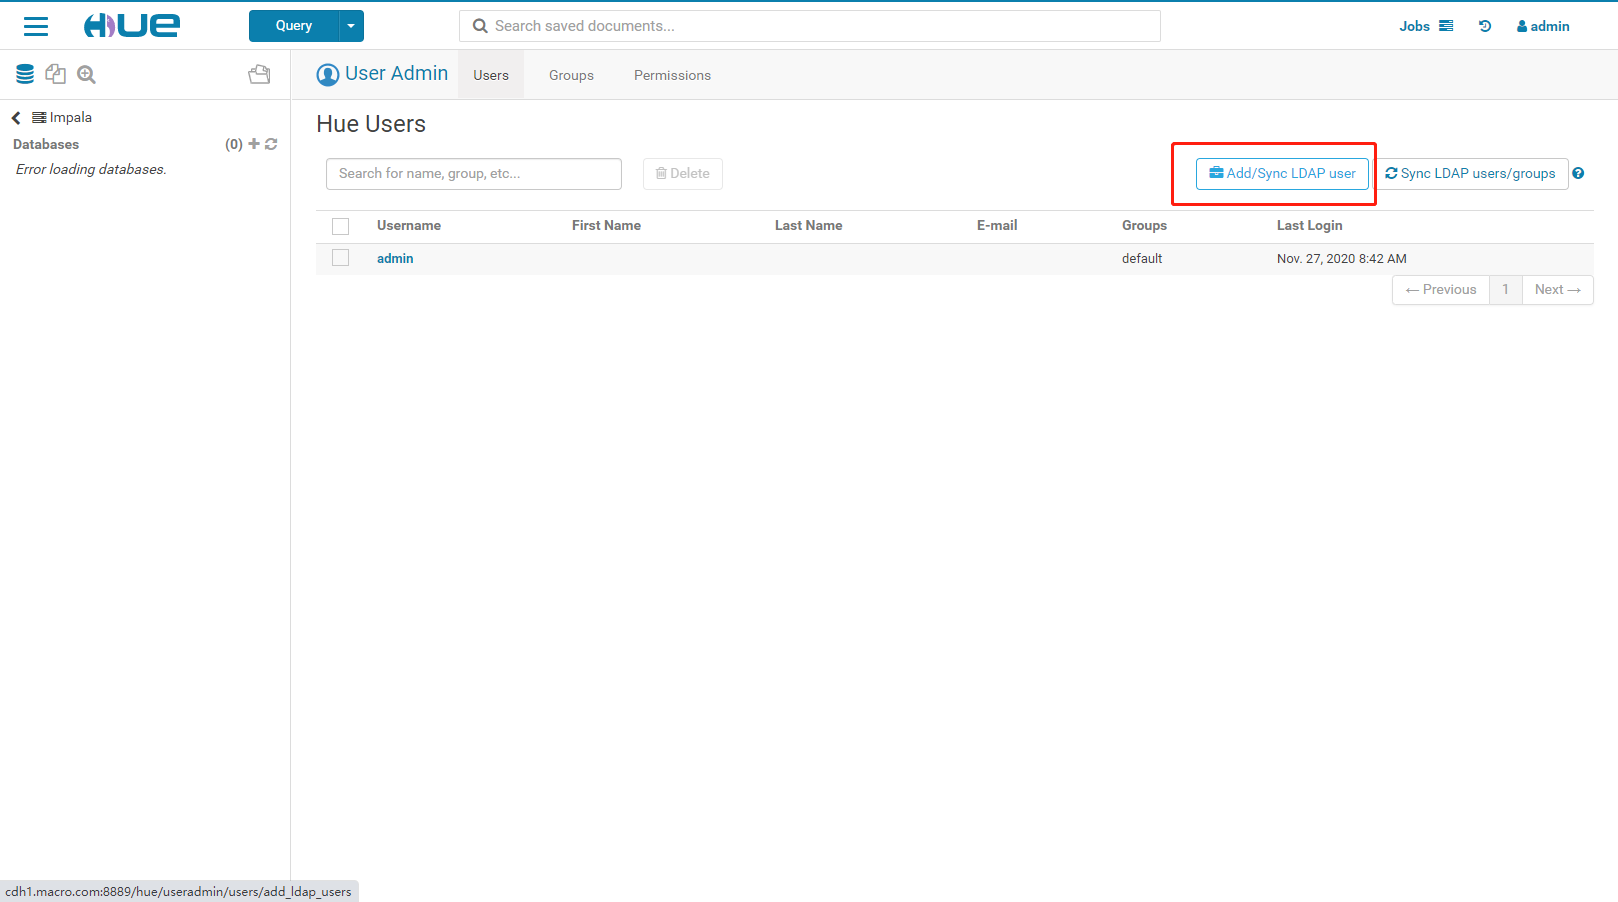
- 登录成功后,进入用户管理界面
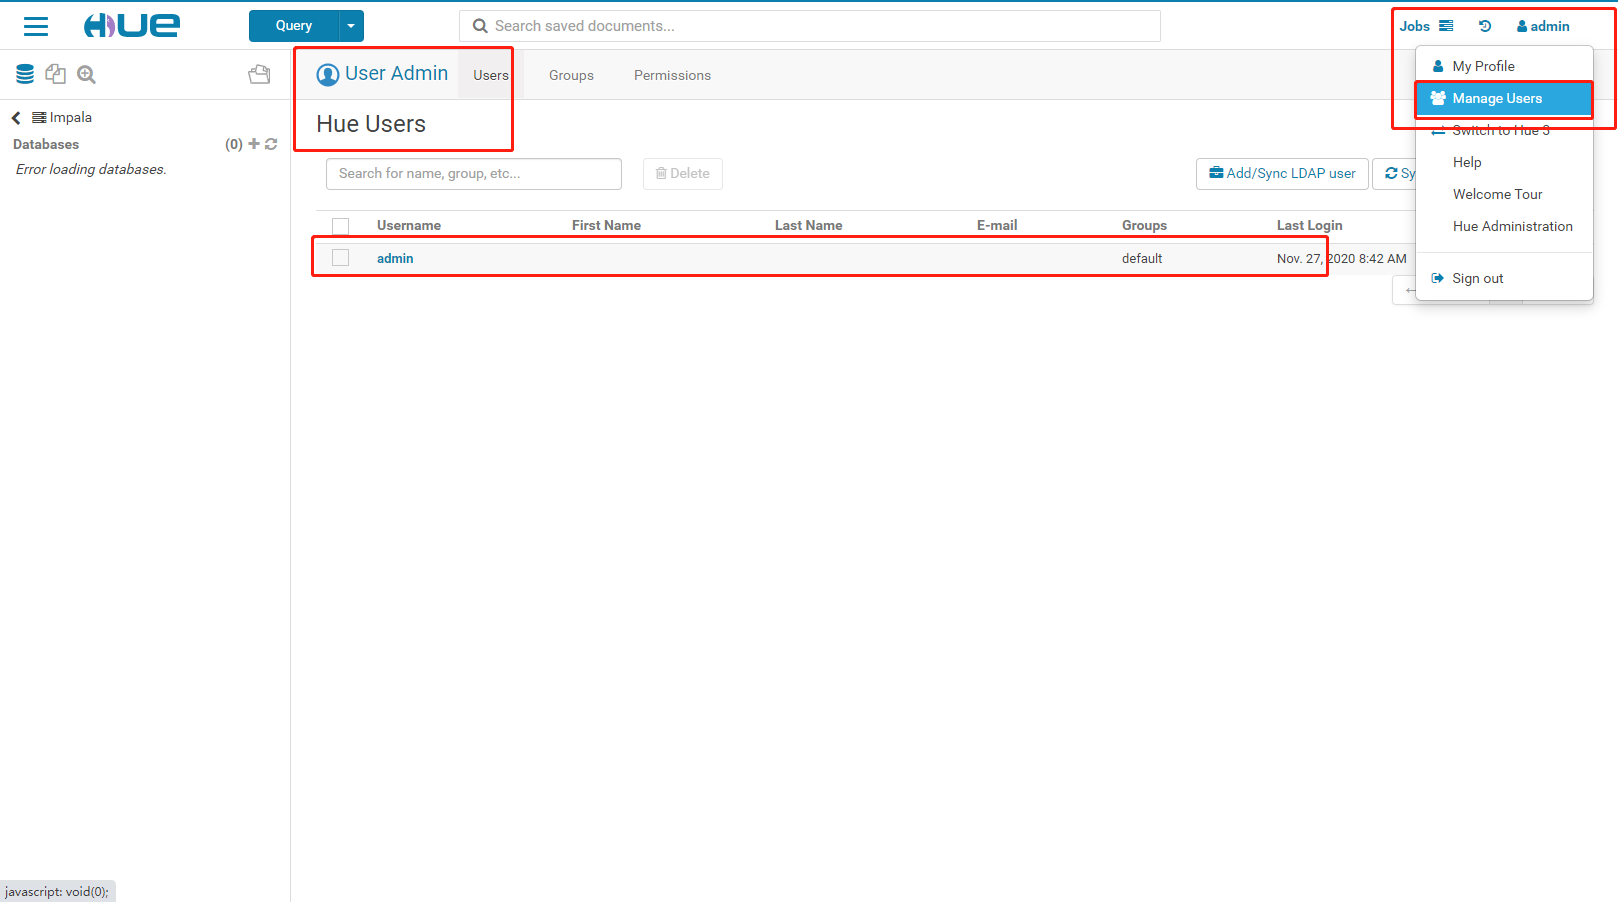
- 点击【Add/SyncLDAP user】添加用户
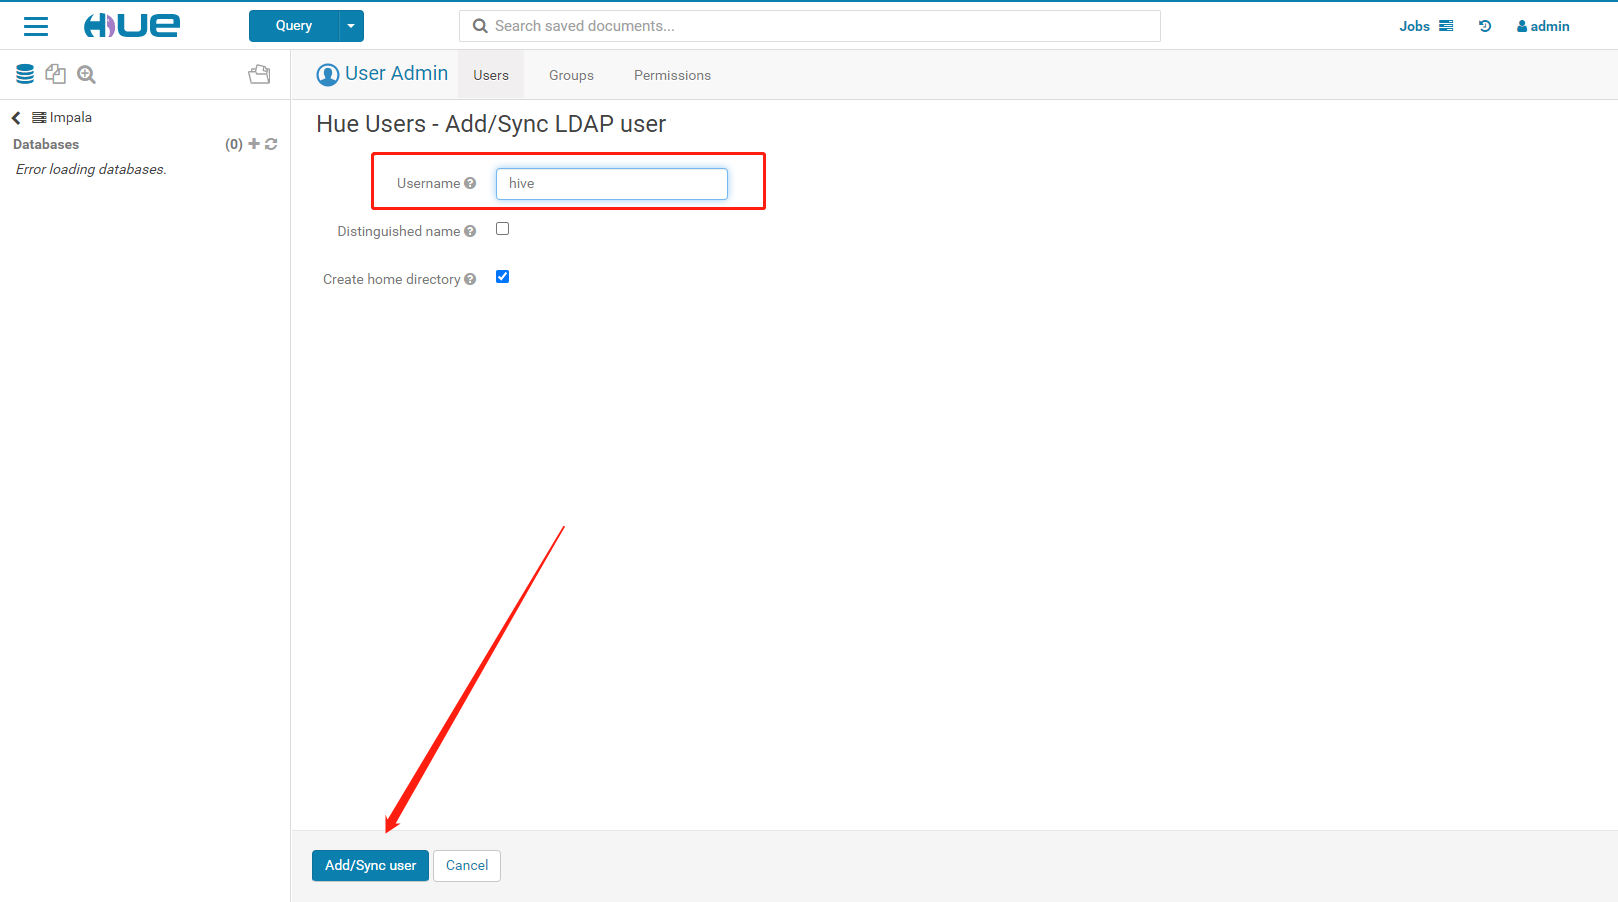
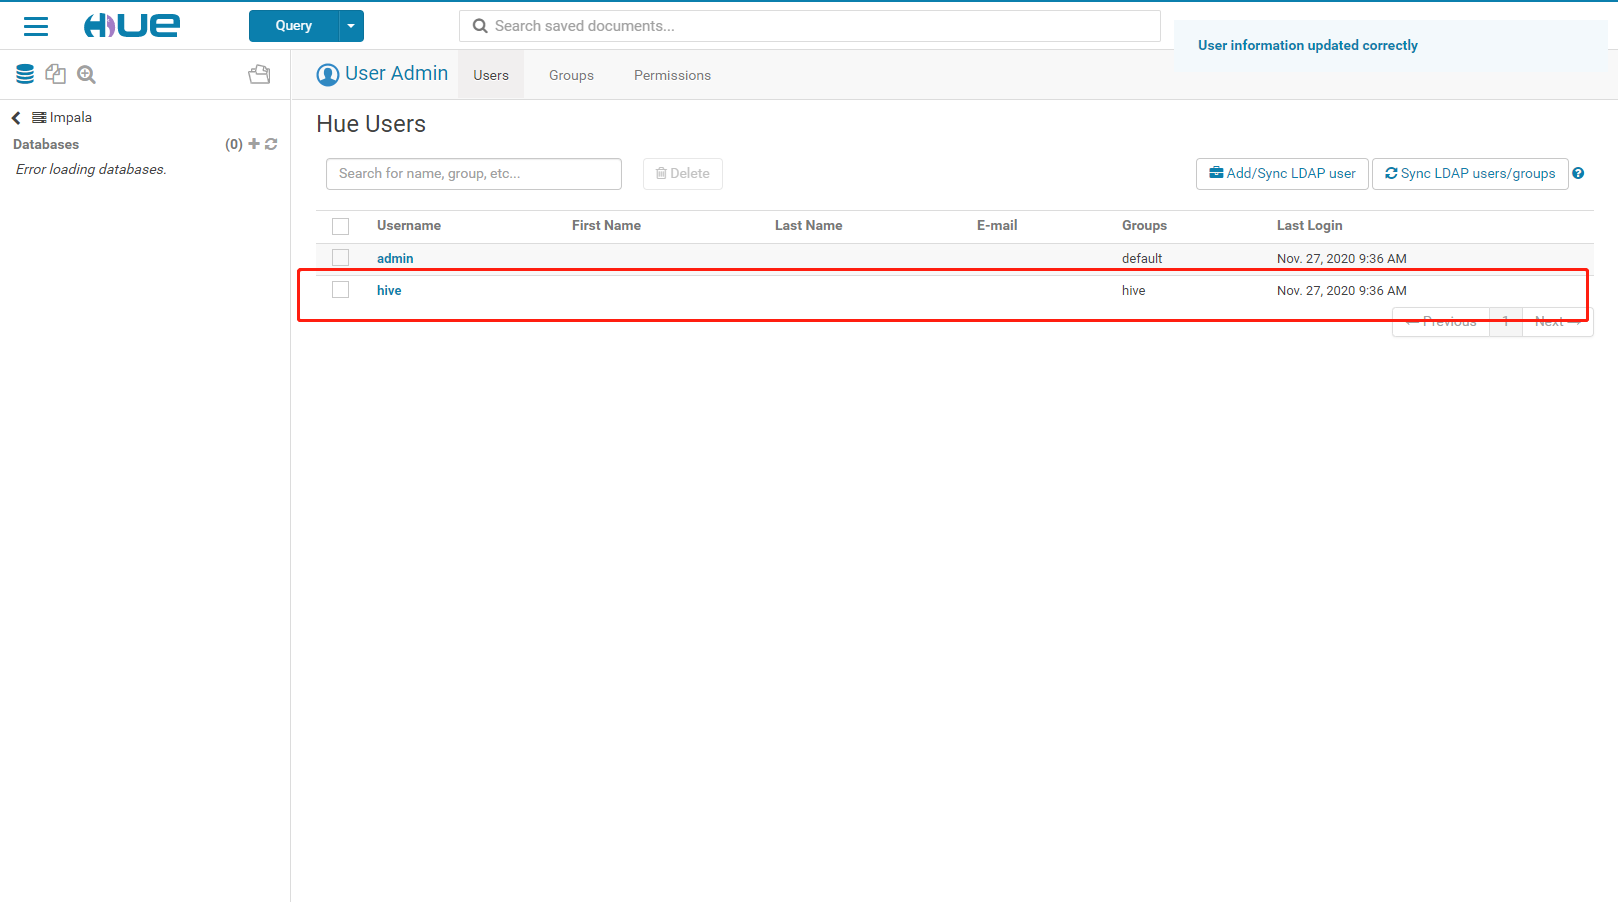
- 添加hive用户点击【Add/Syncuser】按钮,同步hive用户
- 将hive用户设置为超级管理员,点击【Update user】将hive的用户组信息同步

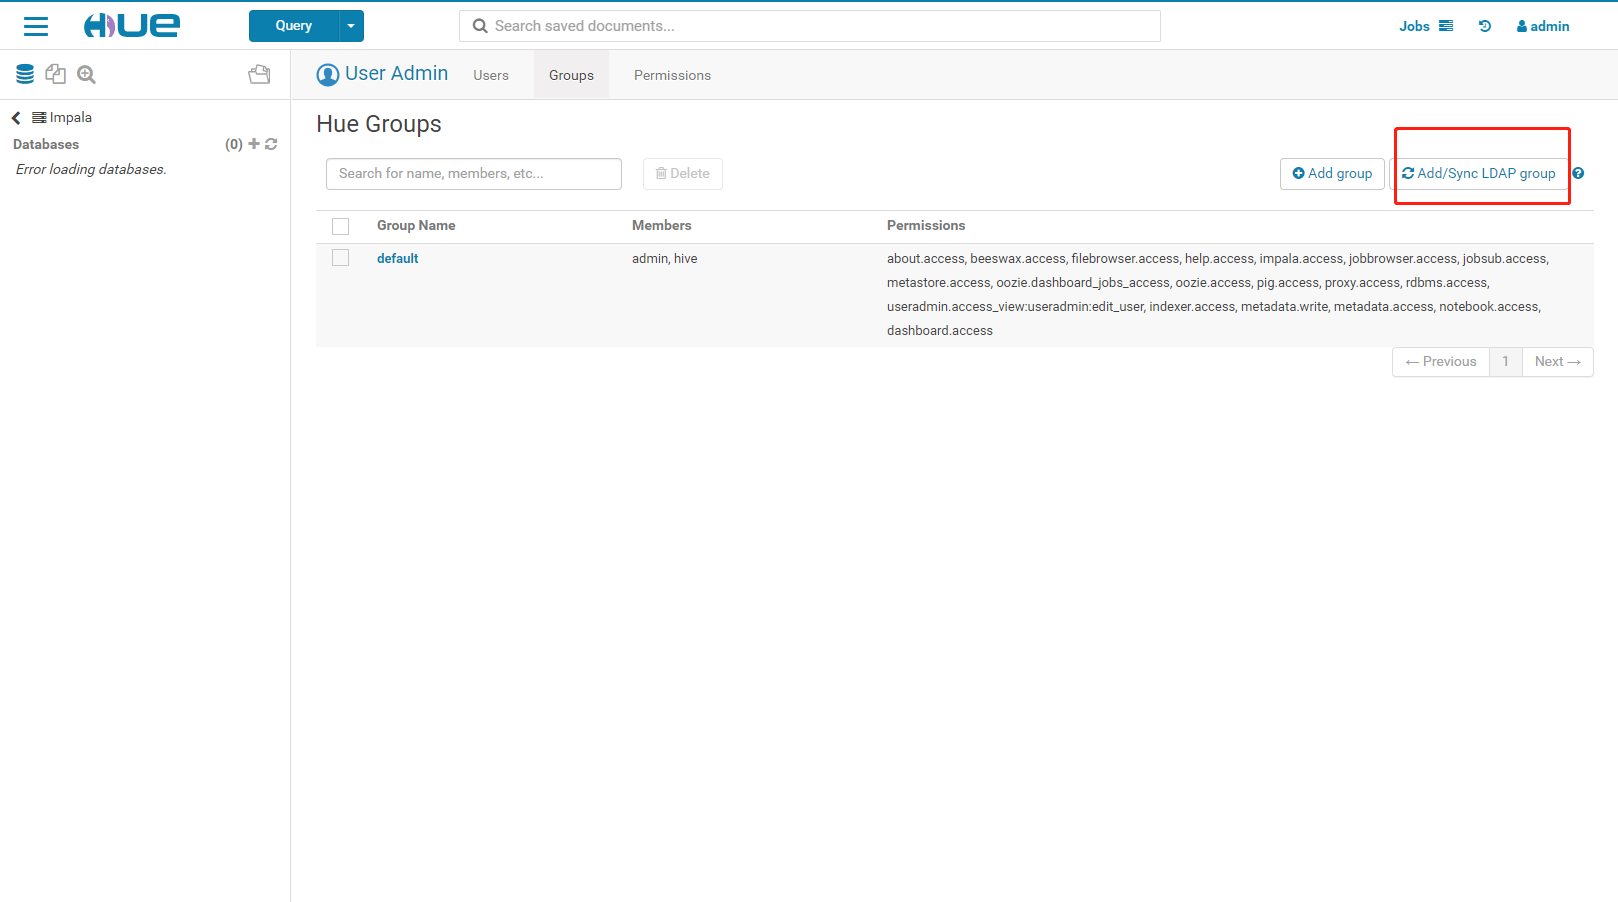
- 点击【Add/SyncLDAP group】添加组hive
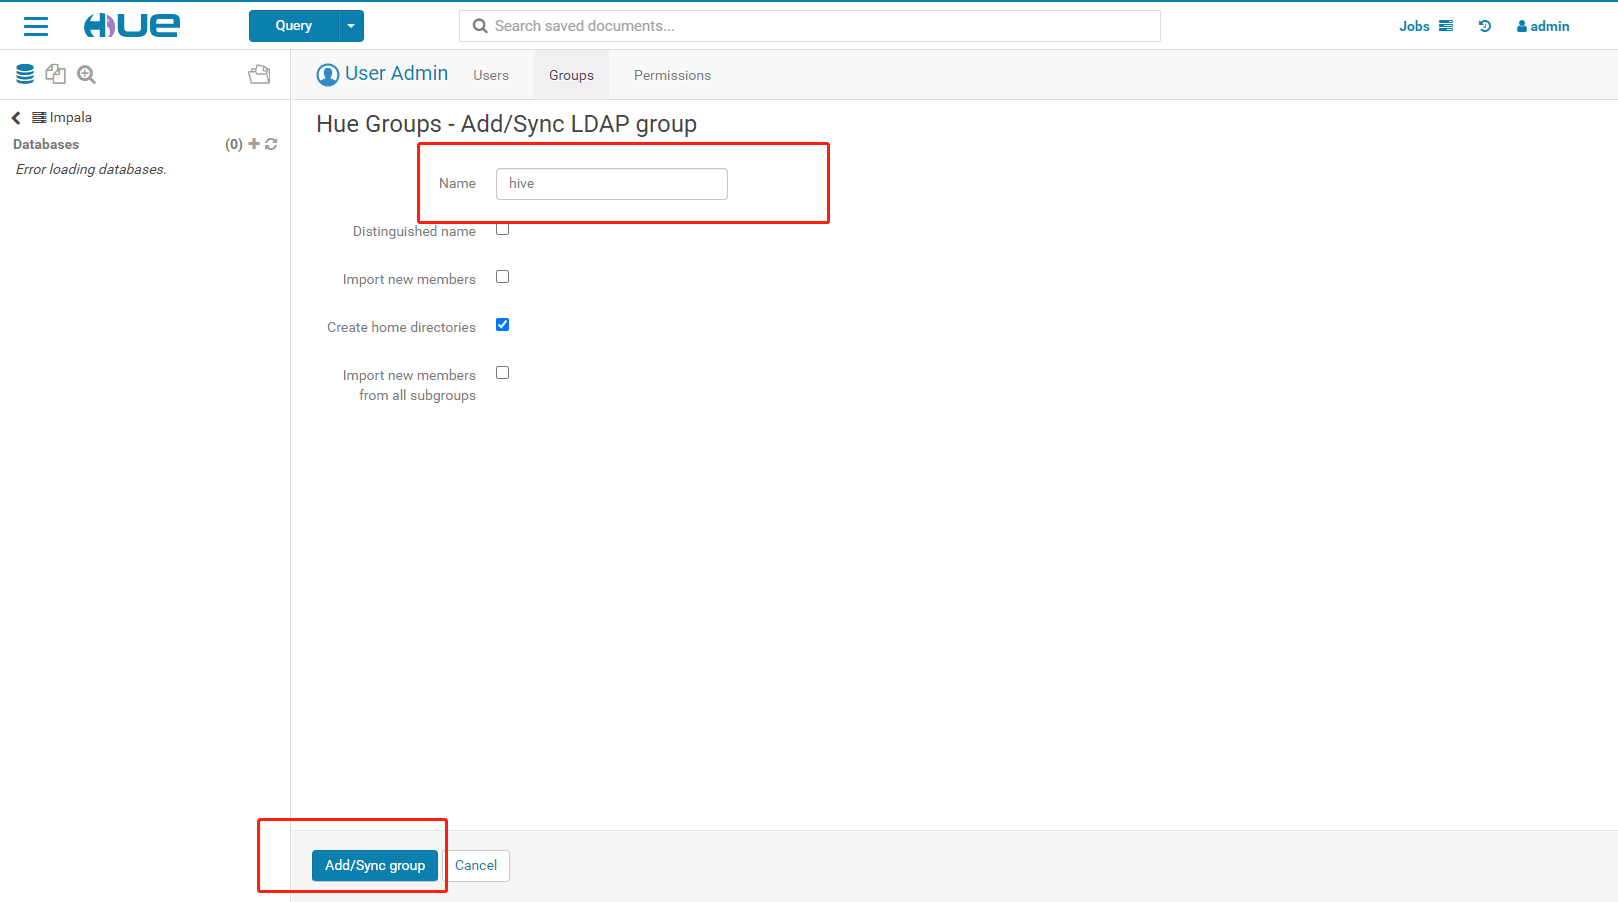
- 勾选【Create home members】点击【Add/Sync group】
- 添加hive组过后,天机hive组,勾选添加hive用户到hive组,点击【Updete group】更新同步
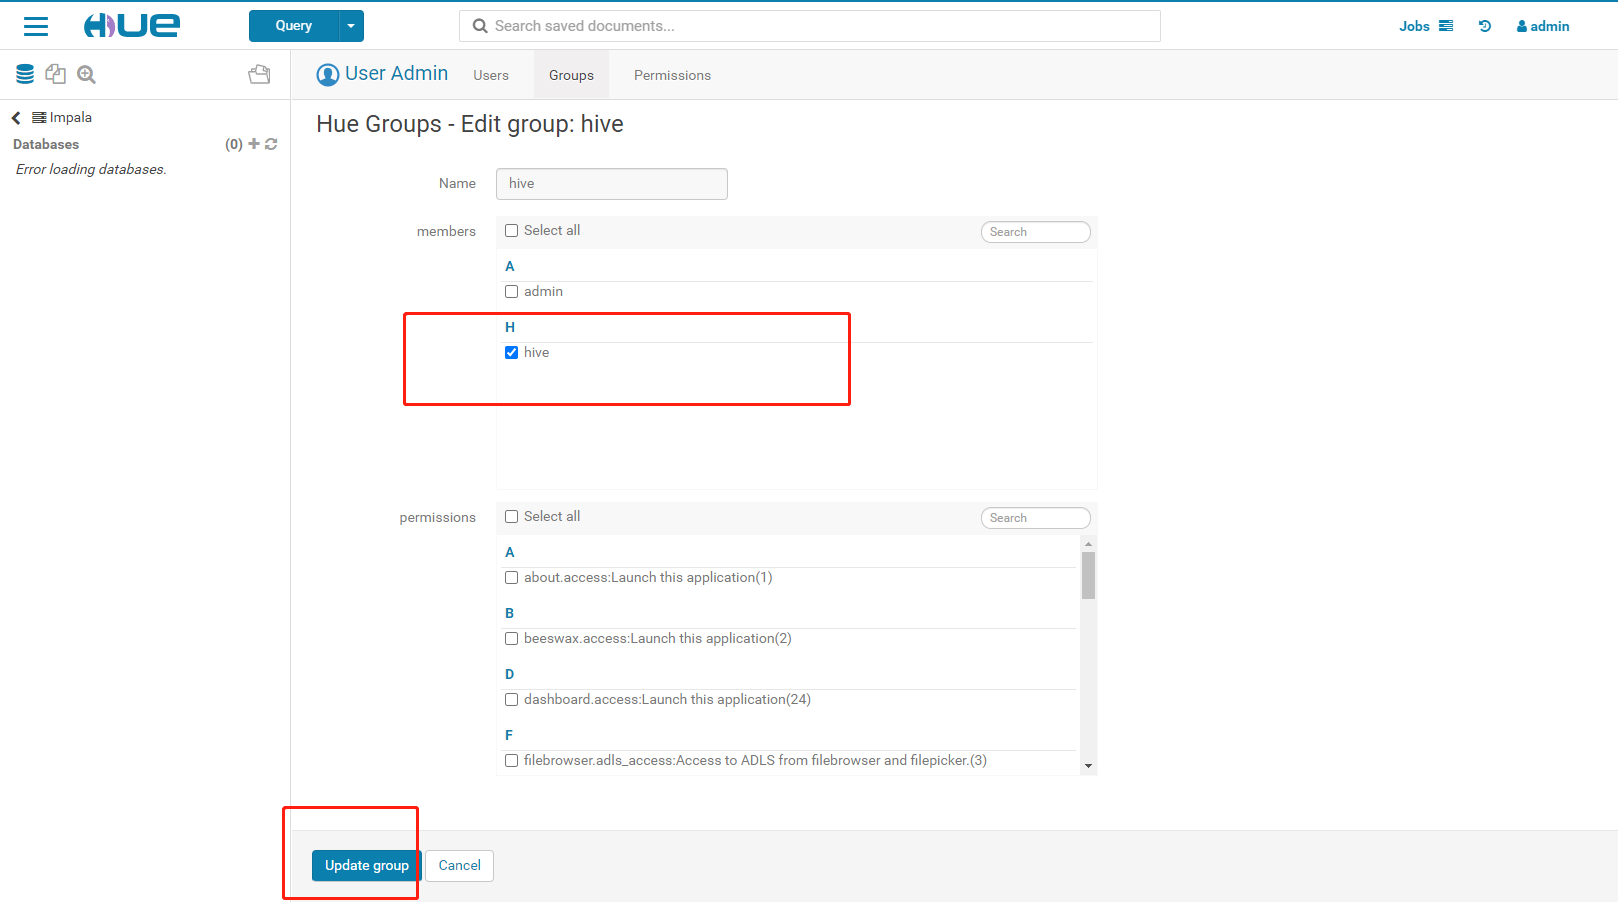
- 如下图所示,用户和组都为hive
2.3、CM界面修改Hue的配置
- 将hue的用户的认证方式修改为LDAPBackend,保存并更改。
- 用户登录测试
这里看到admin用户已无法正常登录,因为在OpenLDAP中并不存在admin这个用户
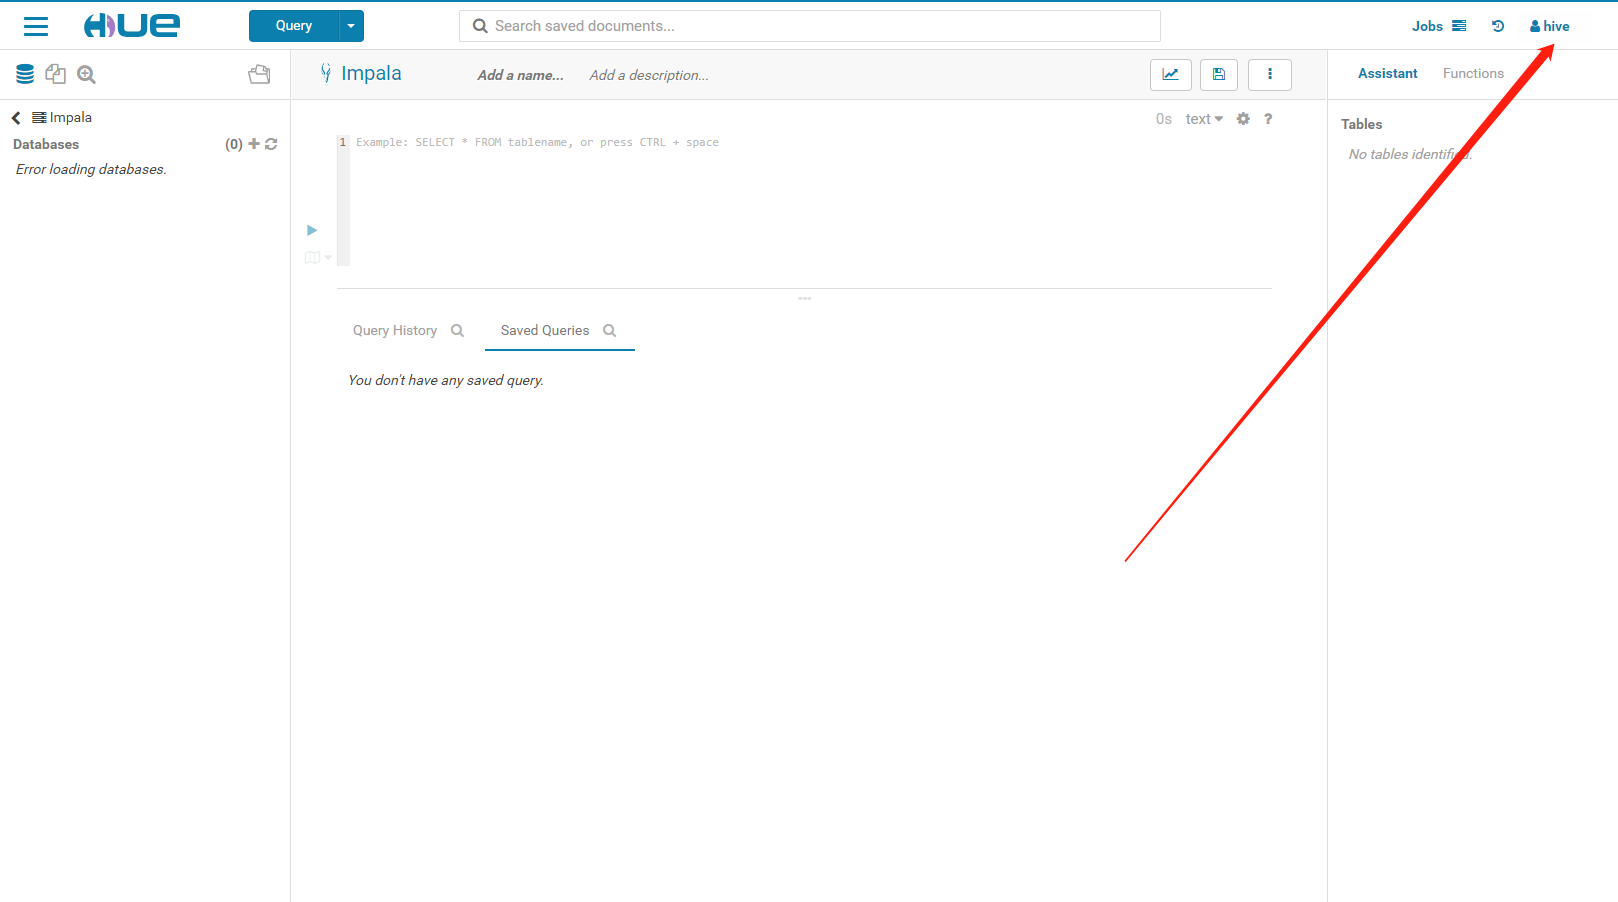
- hive用户可以正常登录。
3、Hue集成Impala和Hive
注意:如果Hive/Impala已设置了LDAP认证,需要在Hue中增加以下设置,否则Hue无法正常连接Hive或Impala进行查询
3.1、修改配置
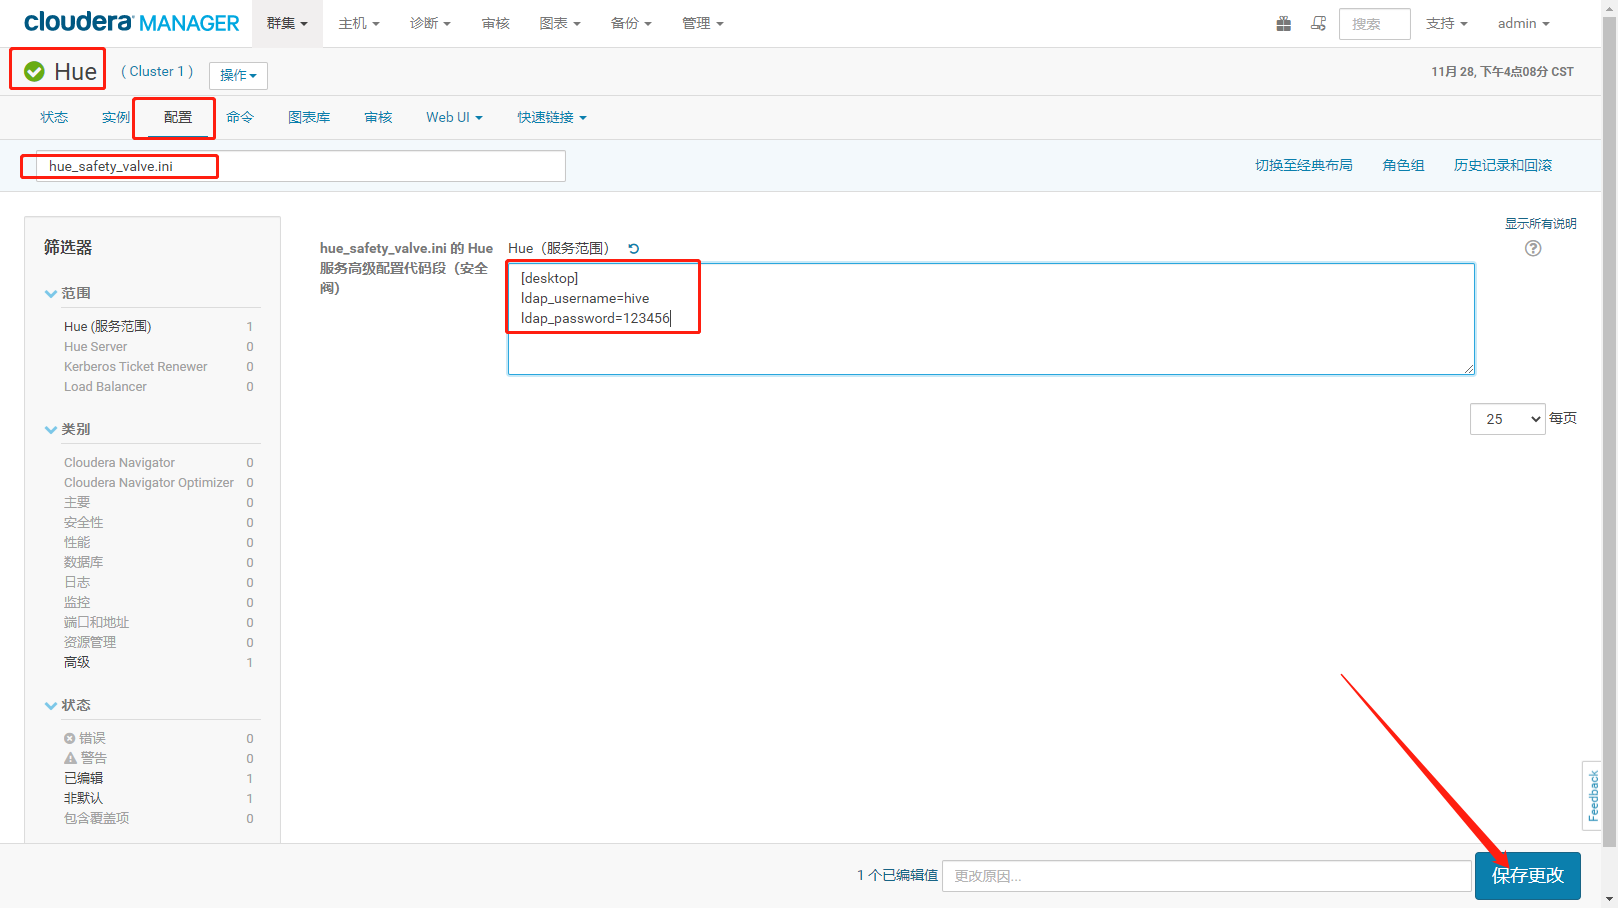
通过CM在Hue中搜索hue_safety_valve.ini中增加如下配置
[desktop]ldap_username=hiveldap_password=123456
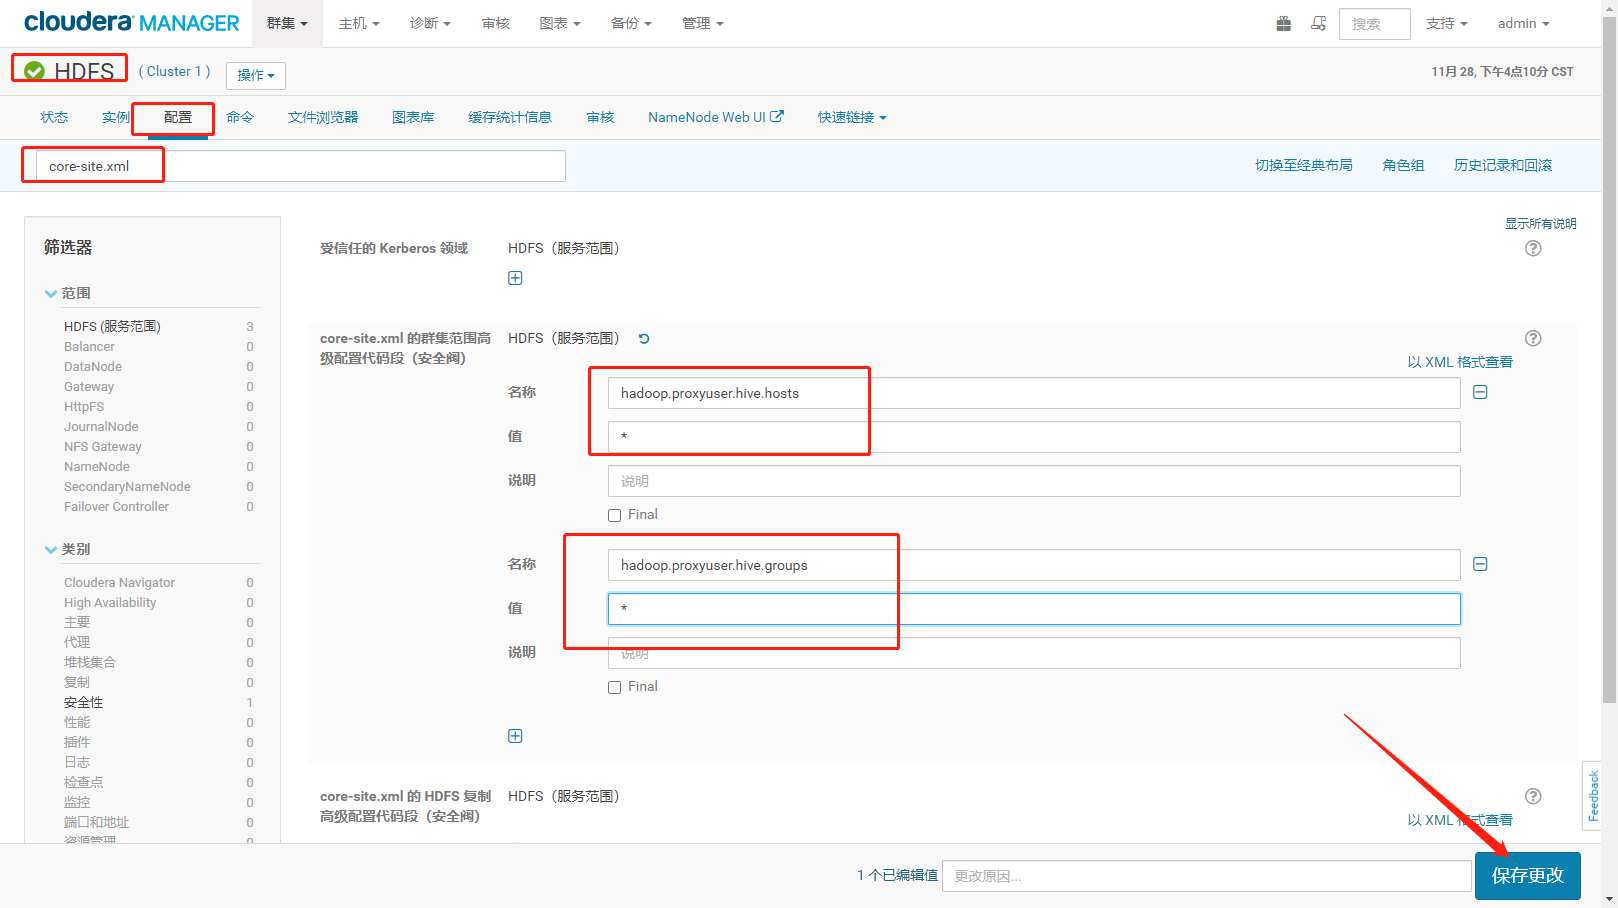
HDFS的core-site.xml配置中增加代理设置
hadoop.proxyuser.hive.hosts*hadoop.proxyuser.hive.groups*
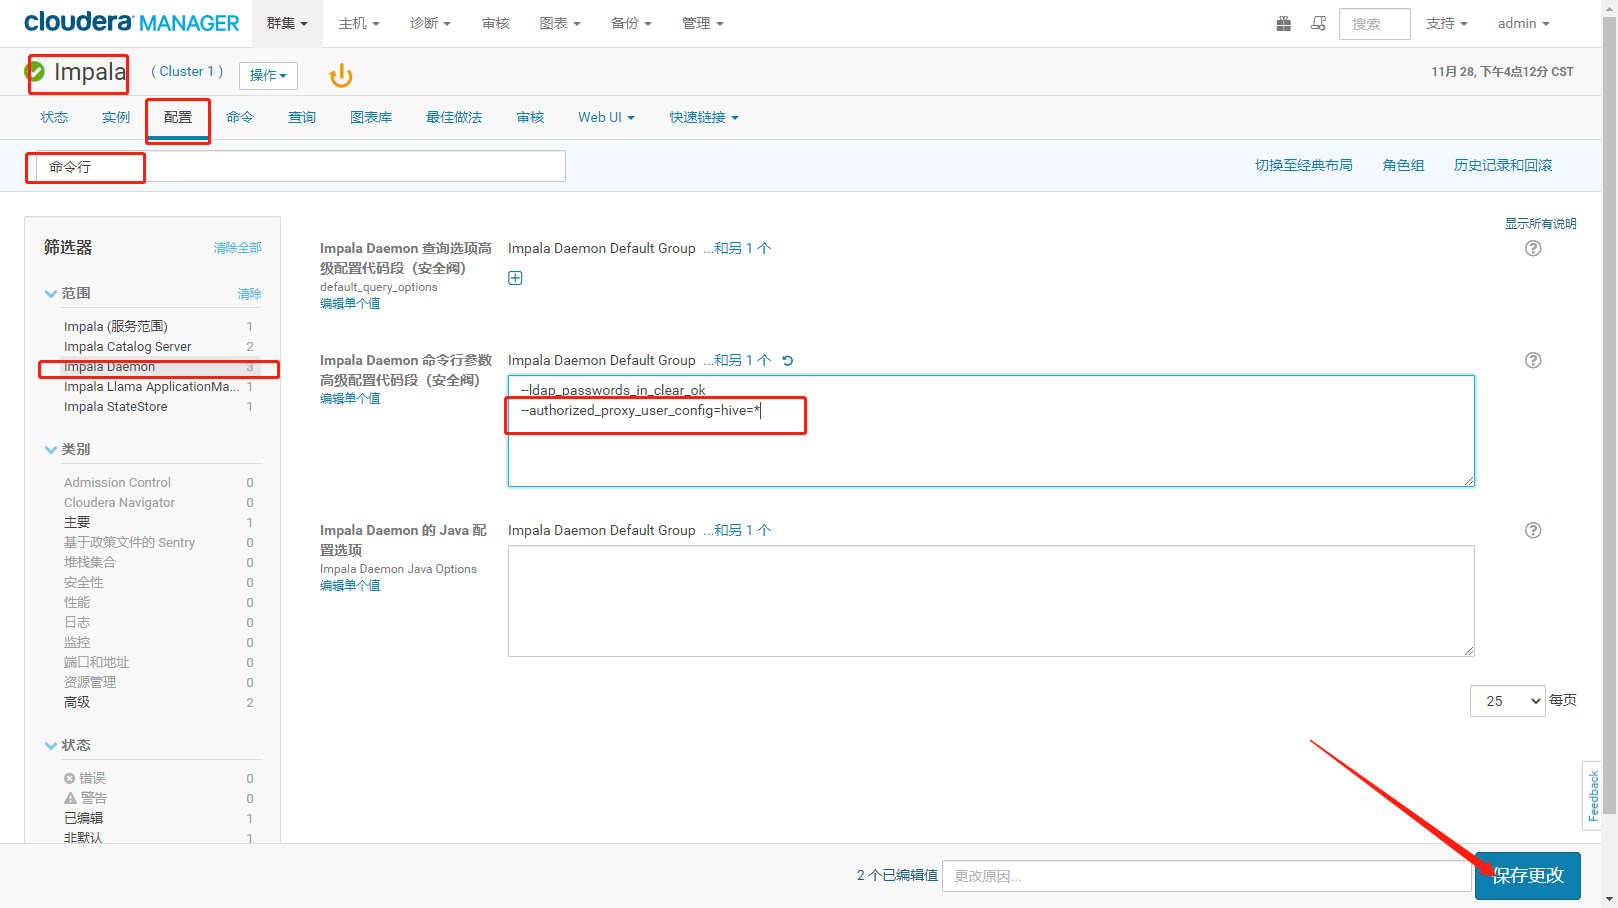
在Impala中增加代理用户的所有权限
--authorized_proxy_user_config=hive=*
-
3.2、Hue集成功能验证
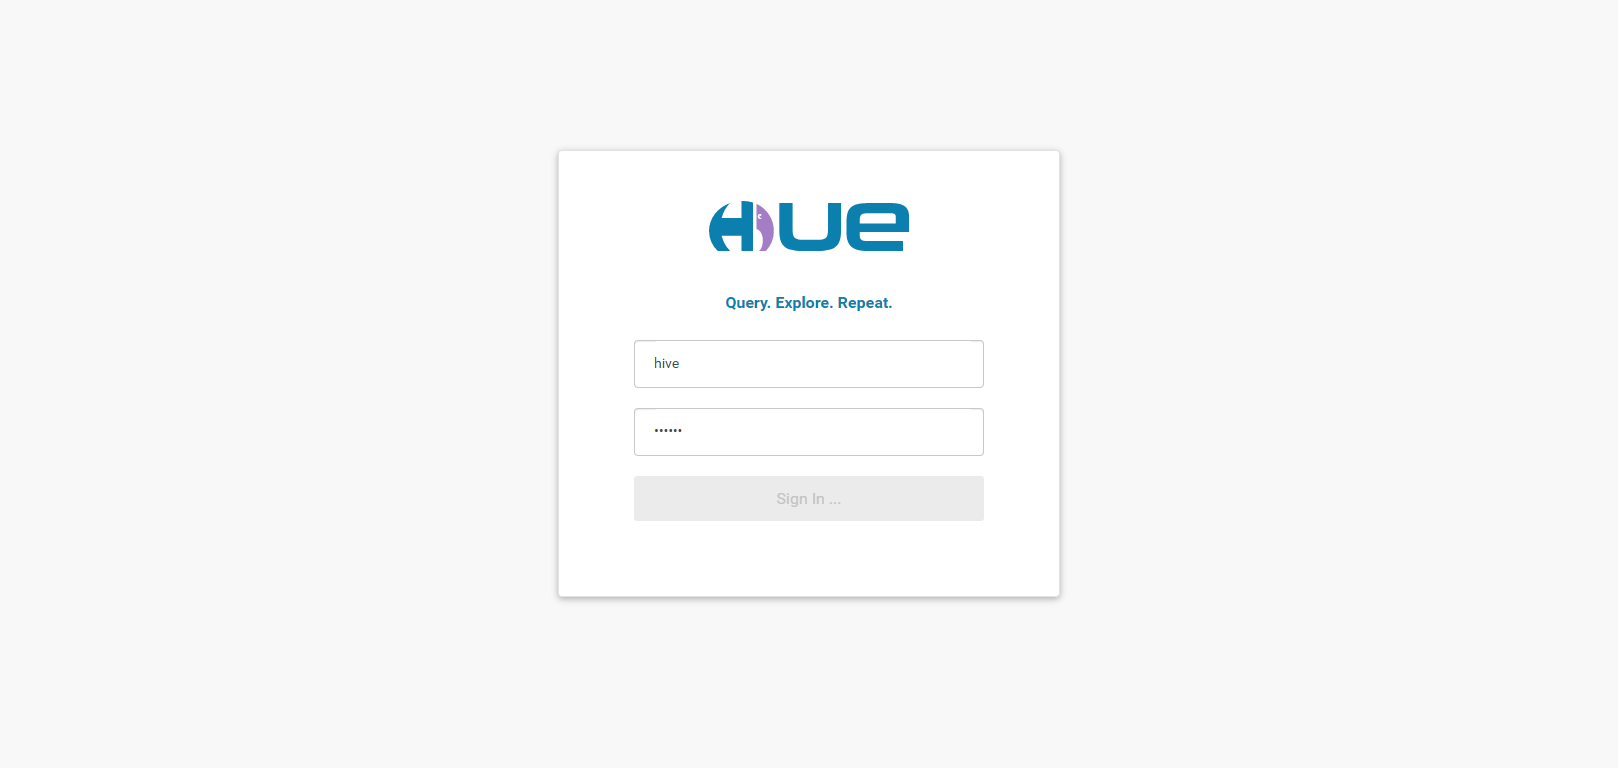
使用hive用户登录Hue
- 使用Hive操作SQL
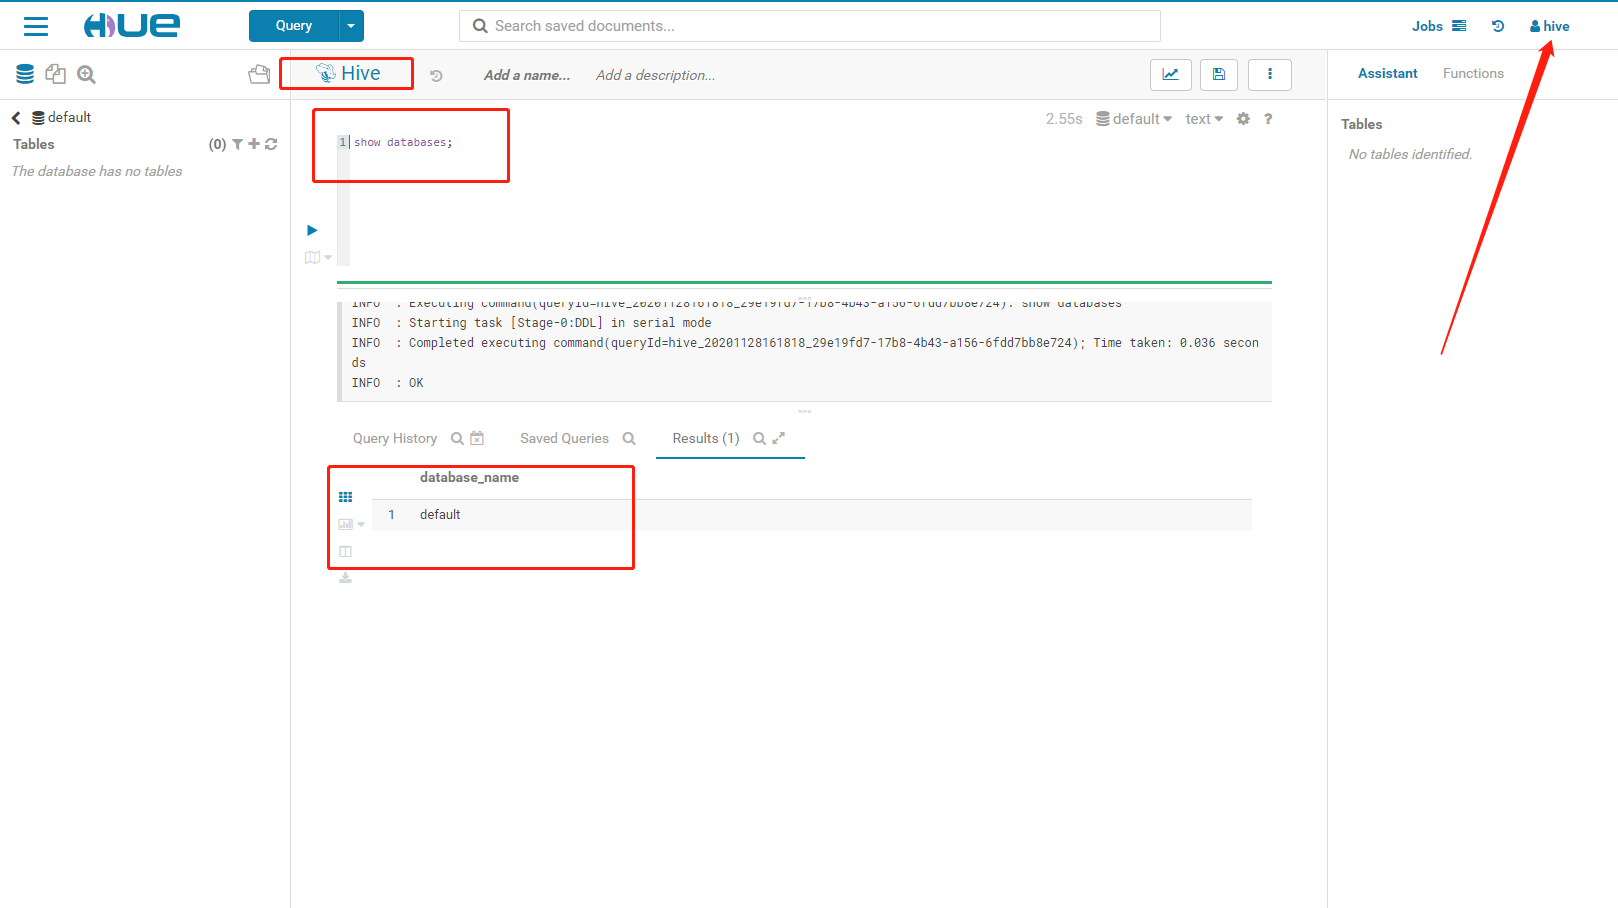
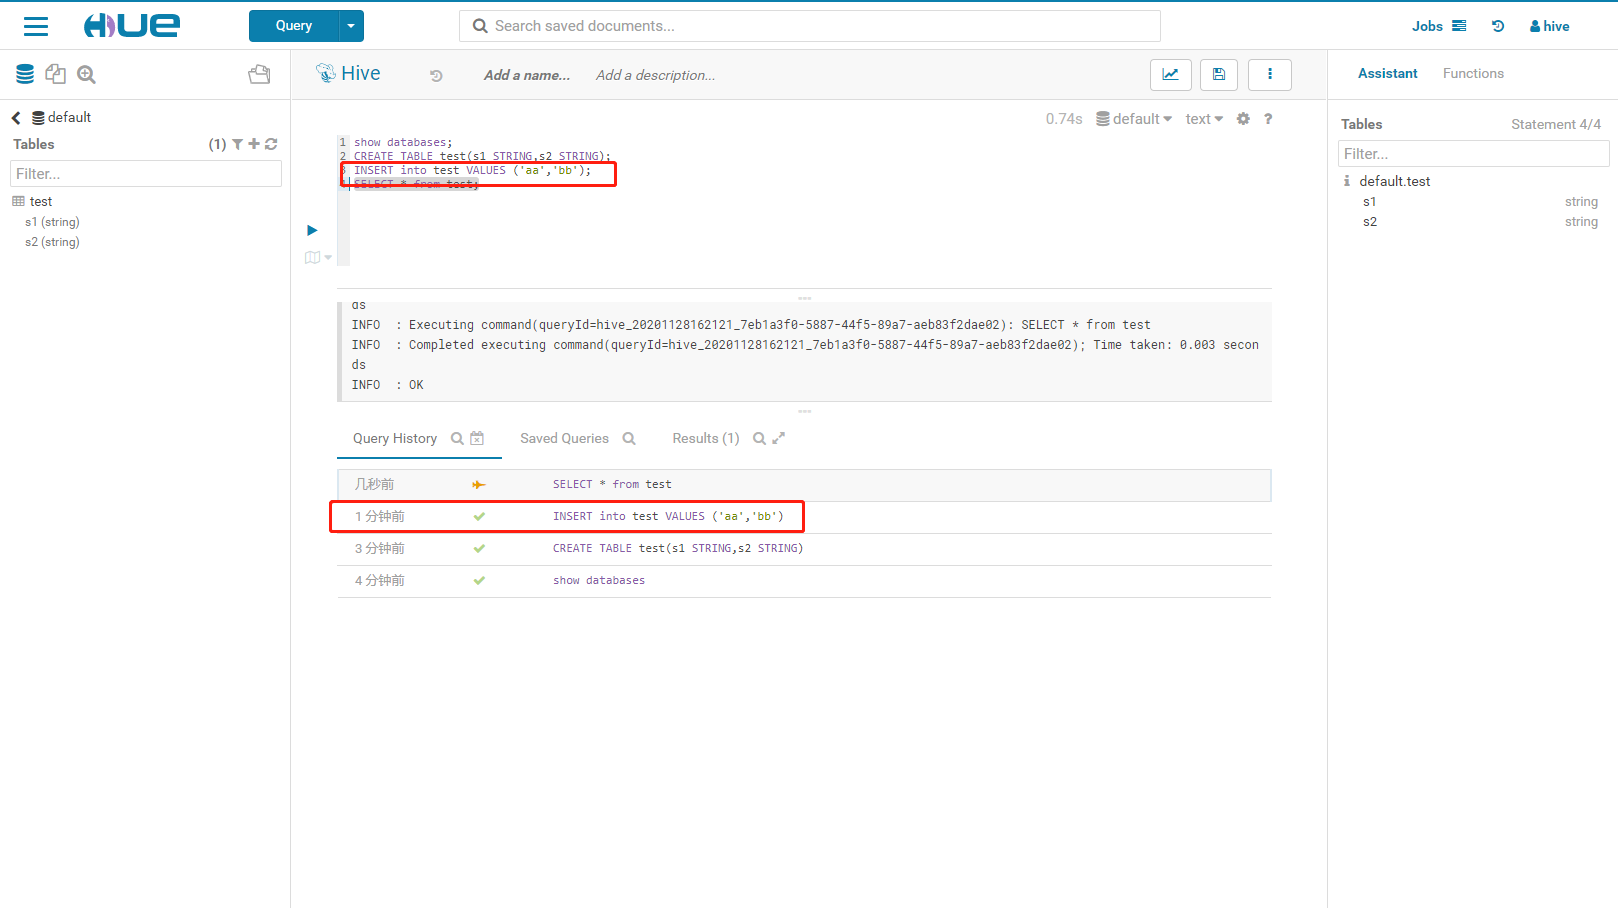
- 建表

- 插入数据
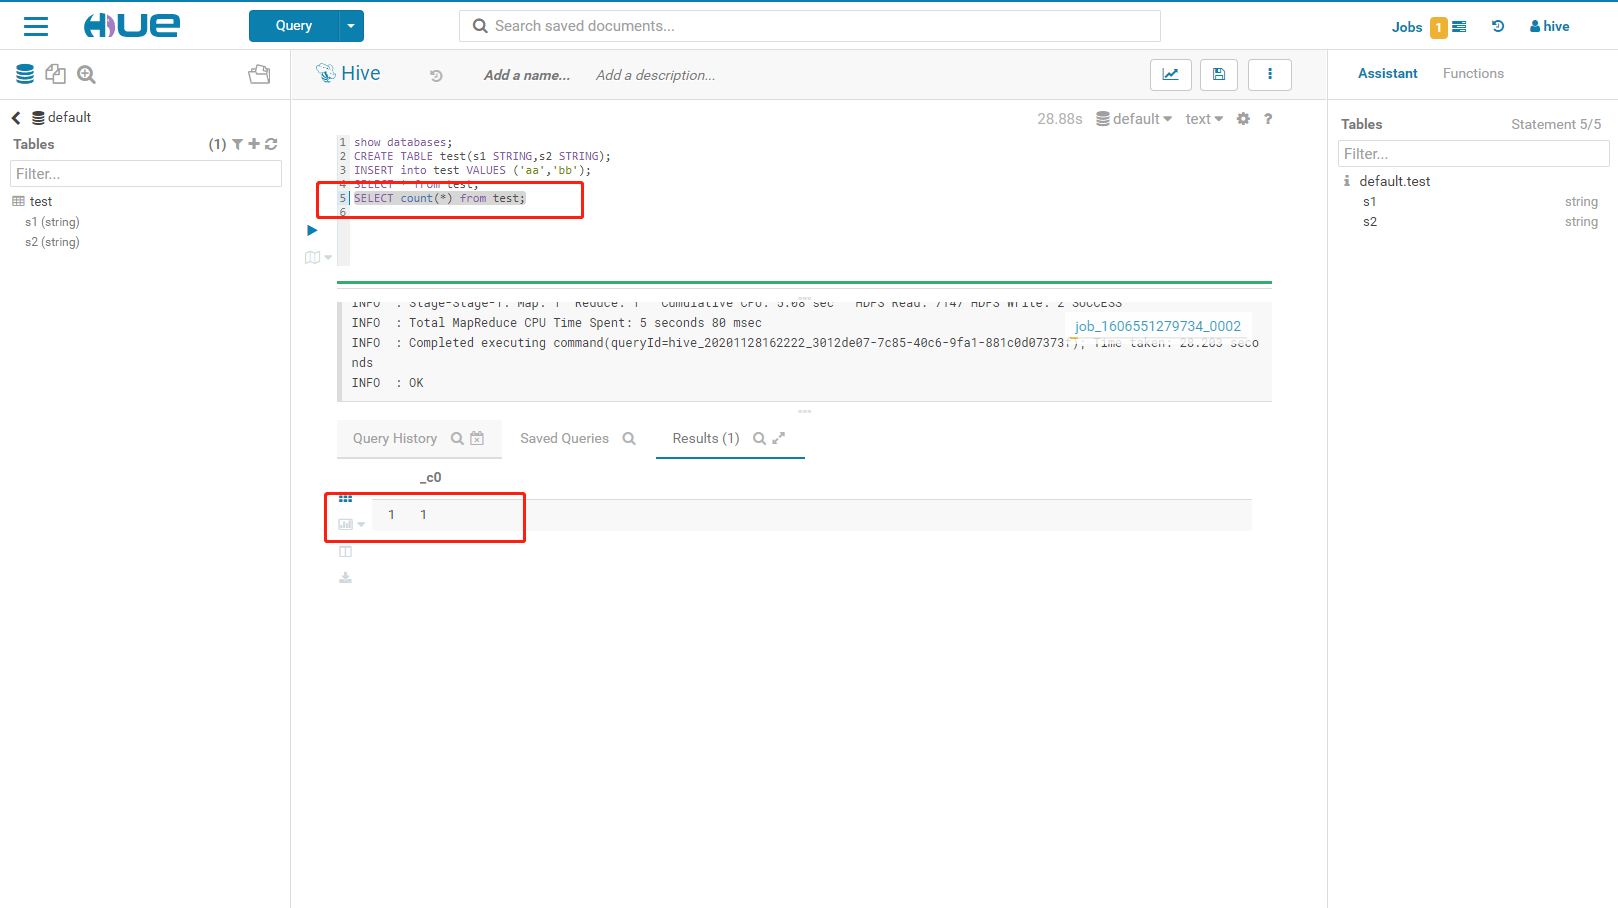
- 执行count操作
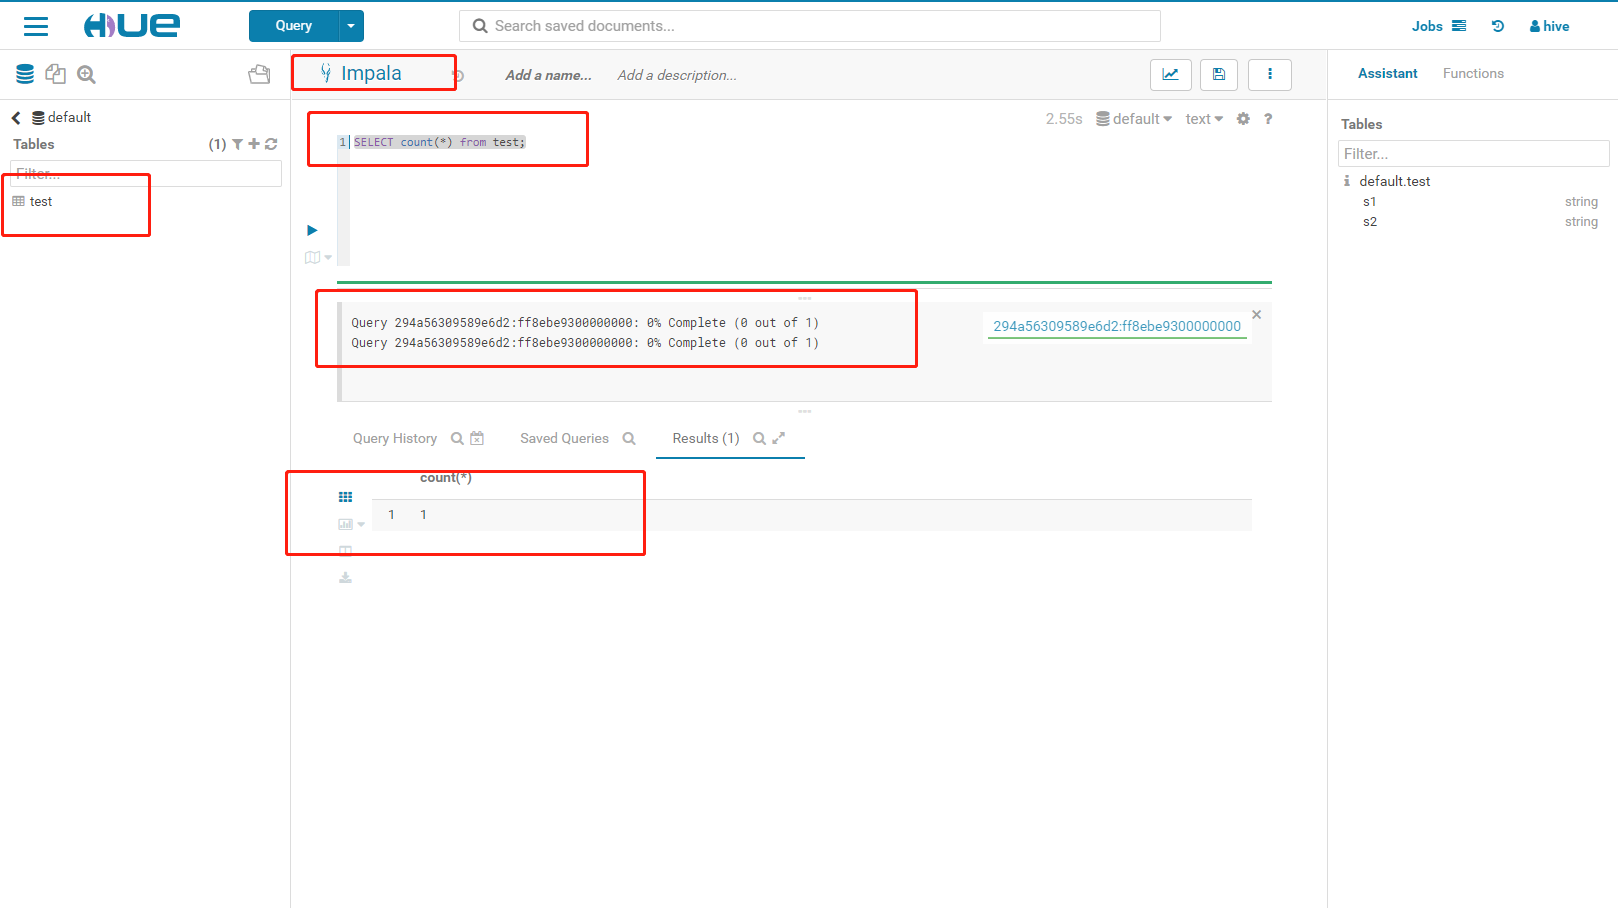
4.2、使用Impala操作SQL
- 执行count操作

若有收获,就点个赞吧
0 人点赞
