三大核心系统
vue的源码包含三大核心:
- Compiler模块:编译模板系统
- Runtime模块:也可以称之为Renderer模块,真正渲染的模块
-
三大系统如何协同工作?
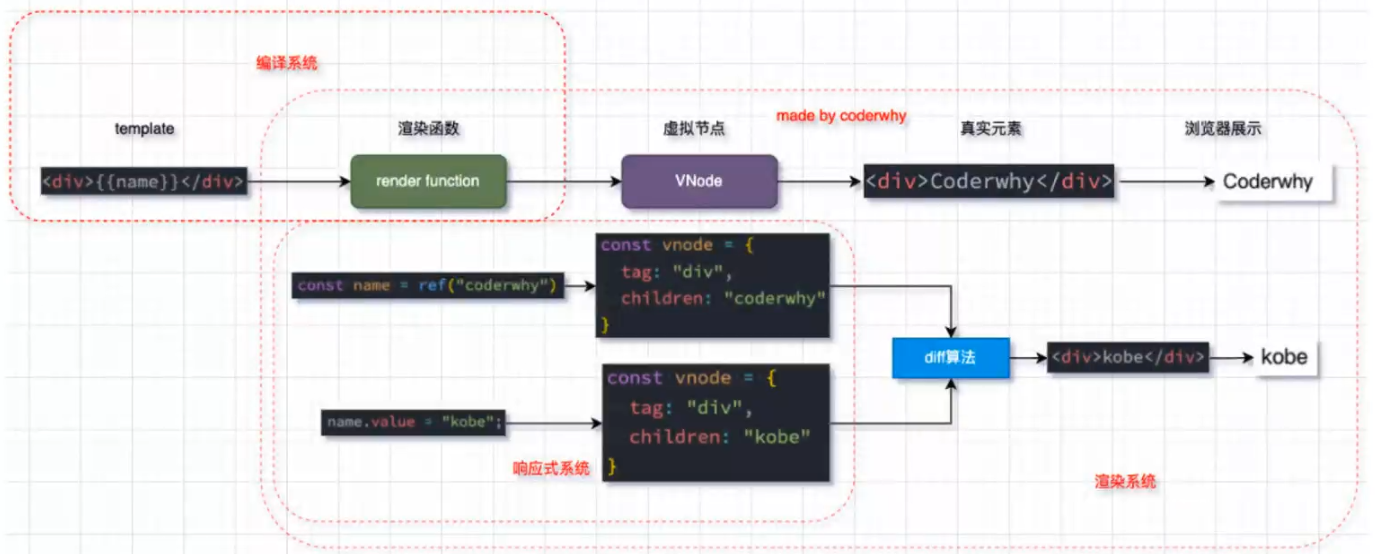
这里我们实现一个简洁版的Mini-Vue框架,该Vue包含三个模块: 渲染系统模块
- 可响应式系统模块
-
渲染系统实现
渲染系统,该模块主要包含三个功能:
功能一:h函数,用于返回一个VNode对象
- 功能二:mount函数,用于将VNode挂载到DOM上
功能三:patch函数,用于对两个VNode进行对比,决定如何处理新的VNode
h函数的实现
const vnode = h('div', { class: 'zx' }, [h("h2", null, "当前计数:100"),h("button", null, "+1")])
const h = (tag, props, children) => {return {tag,props,children,};};
非常的不可思议对不对?本以为h函数会非常复杂,但其实h函数非常的简单,就是返回一个对象,用于描述dom节点的对象,也就是vnode,真实的h函数也和我们这个差不多,不过是多了一些边界处理。
mount函数的实现
mount(vnode, document.querySelector('#app'))
const mount = (vnode, container) => {// 1. 创建出真实的原生,并且在vnode上保留elconst el = (vnode.el = document.createElement(vnode.tag));// 2. 处理propsif (vnode.props) {for (const key in vnode.props) {const value = vnode.props[key];if (key.startsWith("on")) {el.addEventListener(key.slice(2));} else {el.setAttribute(key, value);}}}// 3. 处理childrenif (vnode.children) {if (typeof vnode.children === "string") {el.textContent = vnode.children;} else {vnode.children.forEach((item) => {mount(item, el);});}}container.appendChild(el);};
mount函数的主要作用就是实现将vnode对象转换成真实的dom,也就是说,解析前面h函数生成的对象,根据解析出的对象创建真实的dom节点。
创建节点就是document.createElement(vnode.tag),这个原生的API就能实现这个功能。这里也做了很多的简化,比如没有考虑传入的是组件,但其实即使是组件,也不过是一个不同的vnode罢了,虽然代码会复杂,因为会用到正则表达式,但是原理是一样的。
处理props那部分,就是遍历一遍props的参数,然后通过setAttribute(key, value)这个原生API实现属性绑定。
最后是处理children这部分,也只考虑了string和数组,而数组也只考虑了普通的html标签,而没有考虑组件标签等。如果是字符串,就通过el.textContent = vnode.children绑定字符串;如果是数组,就遍历这个数组,并且这里使用了递归,就是为了对数组内的元素也进行一遍mount函数的操作。
全部处理完成后,我们mount函数的第二个参数是要挂载的节点,将最终得出的el(要创建的真实dom)挂载到我们想要挂载的节点,就实现了mount函数。
patch函数的实现
patch函数的实现要稍微复杂一些,主要的原理就是传入两个vnode,根据这两个vnode的差异来进行diff算法,最终修改dom,实现节点的改变。
const patch = (vnode1, vnode2) => {if (vnode1.tag !== vnode2.tag) {const vnode1ElParent = vnode1.el.parentElement;vnode1ElParent.removeChild(vnode1.el);mount(vnode2, vnode1ElParent);} else {// 1. 取出element对象,并且在n2中进行保存const el = (vnode2.el = vnode1.el);// 2. 处理propsconst oldProps = vnode1.props || {};const newProps = vnode2.props || {};// 2.1 获取所有的newProps添加到elfor (const key in newProps) {const oldValue = oldProps[key];const newValue = newProps[key];if (newValue !== oldValue) {if (key.startsWith("on")) {el.addEventListener(key.slice(2).toLocaleLowerCase(), newValue);} else {el.setAttribute(key, newValue);}}}// 2.2 删除旧的propsfor (const key in oldProps) {if (!(key in newProps)) {if (key.startsWith("on")) {const value = oldProps[key];el.removeEventListener(key.slice(2).toLocaleLowerCase(), value);} else {el.removeAttribute(key);}}}// 3. 处理childrenconst oldChildren = vnode1.children || [];const newChildren = vnode2.children || [];if (typeof newChildren === "string") {if (typeof oldChildren === "string") {// 边界判断if (newChildren !== oldChildren) {el.textContent = newChildren;}} else {el.innerHTML = newChildren;}} else {// 情况二:newChildren本身是一个数组if (typeof oldChildren === "string") {el.innerHTML = "";newChildren.forEach((item) => {mount(item, el);});} else {// oldChildren:[v1,v2,v3]// newChildren:[v1,v5,v6,v8,v9]// 1. 前面有相同节点的元素进行patch操作const commonLength = Math.min(oldChildren.length, newChildren.length);for (let i = 0; i < commonLength; i++) {patch(oldChildren[i], newChildren[i]);}// 2. newChildren > oldChildrenif (newChildren.length > oldChildren.length) {newChildren.slice(oldChildren.length).forEach((item) => {mount(item, el);});}// 2. newChildren < oldChildrenif (newChildren.length < oldChildren.length) {oldChildren.slice(newChildren.length).forEach((item) => {el.removeChild(item.el);});}}}}};
分段讲解
const patch = (vnode1, vnode2) => {if (vnode1.tag !== vnode2.tag) {const vnode1ElParent = vnode1.el.parentElement;vnode1ElParent.removeChild(vnode1.el);mount(vnode2, vnode1ElParent);}
patch函数首先接收两个参数,一个是旧的vnode节点vnode1,一个是新的vnode节点vnode2。首先我们比较新旧两个vnode节点的类型,如果类型都不同,那么直接删除旧节点,生成新的节点。如果类型相同,那么进入下一部分。
else {// 1. 取出element对象,并且在n2中进行保存const el = (vnode2.el = vnode1.el);// 2. 处理propsconst oldProps = vnode1.props || {};const newProps = vnode2.props || {};// 2.1 获取所有的newProps添加到elfor (const key in newProps) {const oldValue = oldProps[key];const newValue = newProps[key];if (newValue !== oldValue) {if (key.startsWith("on")) {el.addEventListener(key.slice(2).toLocaleLowerCase(), newValue);} else {el.setAttribute(key, newValue);}}}// 2.2 删除旧的propsfor (const key in oldProps) {if (!(key in newProps)) {if (key.startsWith("on")) {const value = oldProps[key];el.removeEventListener(key.slice(2).toLocaleLowerCase(), value);} else {el.removeAttribute(key);}}}
首先获取到el对象,也就是节点本身的真实dom,然后遍历新vnode的attribute,以新attribute的键名分别获取新旧attribute的值,如果旧值和新值不相等,那么将新值添加给el。然后遍历旧vnode的attribute,如果和新值不相等就删除。这就实现了attribute的更新。
// 3. 处理childrenconst oldChildren = vnode1.children || [];const newChildren = vnode2.children || [];if (typeof newChildren === "string") {if (typeof oldChildren === "string") {// 边界判断if (newChildren !== oldChildren) {el.textContent = newChildren;}} else {el.innerHTML = newChildren;}} else {// 情况二:newChildren本身是一个数组if (typeof oldChildren === "string") {el.innerHTML = "";newChildren.forEach((item) => {mount(item, el);});} else {// oldChildren:[v1,v2,v3]// newChildren:[v1,v5,v6,v8,v9]// 1. 前面有相同节点的元素进行patch操作const commonLength = Math.min(oldChildren.length, newChildren.length);for (let i = 0; i < commonLength; i++) {patch(oldChildren[i], newChildren[i]);}// 2. newChildren > oldChildrenif (newChildren.length > oldChildren.length) {newChildren.slice(oldChildren.length).forEach((item) => {mount(item, el);});}// 2. newChildren < oldChildrenif (newChildren.length < oldChildren.length) {oldChildren.slice(newChildren.length).forEach((item) => {el.removeChild(item.el);});}}}
这一部分是最复杂的,就是比较子节点。首先是判断新节点是否为字符串类型,如果是的话,再判断旧节点是否为字符串,如果是的话,直接更改textContent,也就是更改文本内容即可;如果不是,那么将旧节点直接更改为新的字符串节点。
然后是边界处理情况,也就是新旧children的不同类型,如果新节点为数组,旧节点为字符串,那么清空节点的文本内容,然后遍历新数组,调用mount函数实现节点的创建和挂载。
如果新旧节点都为数组,那么首先获取新旧节点数组中短的那一方,比如新数组长度为5,旧数组长度为3,那么执行一个0-3的循环,循环的item为新旧树组0-3的值,比较这部分值,递归调用patch函数比较(就是将数组打开,拿到单独的一个个节点,调用patch函数比较,重复之前的步骤,从比较两个节点是否为相同类型结点开始)。
如果新节点比旧节点长,那么新节点截取掉旧节点的长度后,多出来的那部分通过调用mount函数实现节点的创建;如果旧节点比新节点长,那么旧节点截取掉和新节点相同长度的部分后,剩下的那部分通过调用unmount函数实现节点的卸载(这里只简单的通过removeChild实现了节点的卸载,实际实现要复杂一些)。
上面这部分代码就是diff算法的基本逻辑,不论是vue还是react都是基于这个实现的,不过它们的代码处理的边界情况更多。
响应式系统实现
简单实现
class Dep {constructor() {this.subscribers = new Set();}addEffect(effect) {this.subscribers.add(effect);}notify() {this.subscribers.forEach((effect) => {effect();});}}// 测试数据const info = { counter: 100 };const dep = new Dep();function doubleCounter() {console.log(info.counter * 2);}function powerCounter() {console.log(info.counter * info.counter);}dep.addEffect(doubleCounter);dep.addEffect(powerCounter);info.counter++;dep.notify();
分析一下代码:
首先,我们定义了一个Dep类,类中有一个subscribers,是一个不允许重复的数组。然后这个类有两个方法,addEffect方法用于向subscribers数组添加副作用(修改变量的操作);notify方法用于遍历存入subscribers数组的方法并且执行。
然后在测试数据中,我们定义了对象类型变量info,然后新建了Dep的实例dep,然后是两个函数,doubleCounter用于打印info的counter值*2,powerCounter用于打印info的counter的平方。
通过实例的addEffect方法将这两个函数存入subscribers数组。
接着我们将info的counter做一个加一,最后调用实例的notify方法。
那么执行结果是什么呢?
首先info.counter++会使counter的值变为101,然后执行dep.notify(),这时因为之前dep.addEffect(doubleCounter)和dep.addEffect(powerCounter)执行使得subscribers数组内有两个函数分别是doubleCounter和powerCounter,notify会依次执行这两个函数,所以会打印 101 2 = 202,还会打印 101 * 101 = 10201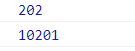
上面的代码实现了在info数据改变的时候监听到每一次改变。
上面的代码,实现了简单的响应式功能,但是需要在数据发生改变时手动添加到subscribers数组,而真正的响应式系统是自动跟踪改变,所以还需要进行改进。
vue2实现思路
class Dep {constructor() {this.subscribers = new Set();}depend() {if (activeEffect) {this.subscribers.add(activeEffect);}}notify() {this.subscribers.forEach((effect) => {effect();});}}let activeEffect = null;function watchEffect(effect) {activeEffect = effect;effect();activeEffect = null;}const targetMap = new WeakMap();function getDep(target, key) {// 1. 根据对象(target)取出对应的Map对象let depsMap = targetMap.get(target);if (!depsMap) {depsMap = new Map();targetMap.set(target, depsMap);}// 2. 取出具体的dep对象let dep = depsMap.get(key);if (!dep) {dep = new Dep();depsMap.set(key, dep);}return dep;}function reactive(raw) {Object.keys(raw).forEach((key) => {const dep = getDep(raw, key);let value = raw[key];Object.defineProperty(raw, key, {get() {dep.depend();return value;},set(newValue) {if (value !== newValue) {value = newValue;dep.notify();}},});});return raw;}const info = reactive({ counter: 100, name: "zx" });// watchEffect1watchEffect(function () {console.log("effect1", info.counter * 2, info.name);});// watchEffect2watchEffect(function () {console.log("effect2", info.counter * info.counter);});// watchEffect3watchEffect(function () {console.log("effect3", info.counter + 10, info.name);});
我们来分析一下:
前面提到简单实现需要手动调用addEffect来将改变变量的函数添加到subscribers数组中,所以我们创建一个watchEffect函数来实现自动添加。
vue3实现思路
class Dep {constructor() {this.subscribers = new Set();}depend() {if (activeEffect) {this.subscribers.add(activeEffect);}}notify() {this.subscribers.forEach((effect) => {effect();});}}let activeEffect = null;function watchEffect(effect) {activeEffect = effect;effect();activeEffect = null;}const targetMap = new WeakMap();function getDep(target, key) {// 1. 根据对象(target)取出对应的Map对象let depsMap = targetMap.get(target);if (!depsMap) {depsMap = new Map();targetMap.set(target, depsMap);}// 2. 取出具体的dep对象let dep = depsMap.get(key);if (!dep) {dep = new Dep();depsMap.set(key, dep);}return dep;}// vue3对raw进行数据劫持function reactive(raw) {return new Proxy(raw, {get(target, key) {const dep = getDep(target, key);dep.depend();return target[key];},set(target, key, newValue) {const dep = getDep(target, key);target[key] = newValue;dep.notify();},});}
为什么vue3选择proxy?
Object.defineProperty在劫持对象的属性时,如果新增元素:
- 那么vue2需要再次调用definedProperty,而Proxy劫持的是整个对象,不需要做特殊处理
修改对象的不同:
- 使用defineProperty时,我们修改原来的obj对象就可以触发拦截
- 而使用proxy,就必须修改代理对象,即Proxy的实例才可以触发拦截
Proxy能观察的类型比defineProperty更丰富
- has:in操作符的捕获器
- deleteProperty:delete操作符的捕捉器
- 等等其他操作
Proxy作为新标准将受到浏览器厂商重点持续的性能优化
缺点:Proxy不兼容IE,也没有polyfi
,defineProperty能支持到IE9

若有收获,就点个赞吧
0 人点赞
