这是我参与8月更文挑战的第11天,活动详情查看:8月更文挑战
在线教育类的产品中经常会遇到的一个场景就是实时显示学生的答题过程并且支持回溯,通常我们想到的做法就是通过记录坐标和重新绘制来达到产品的要求,再查看了相关资料后知道了Canvas元素的captureStream()API可以实时返回捕捉的画布,那我们就来了解一下这个API的使用吧。
关键API: HTMLCanvasElement.captureStream()
语法:
MediaStream = canvas.captureStream(frameRate);
参数:
frameRate 帧捕获速率(FPS)
-
兼容性:
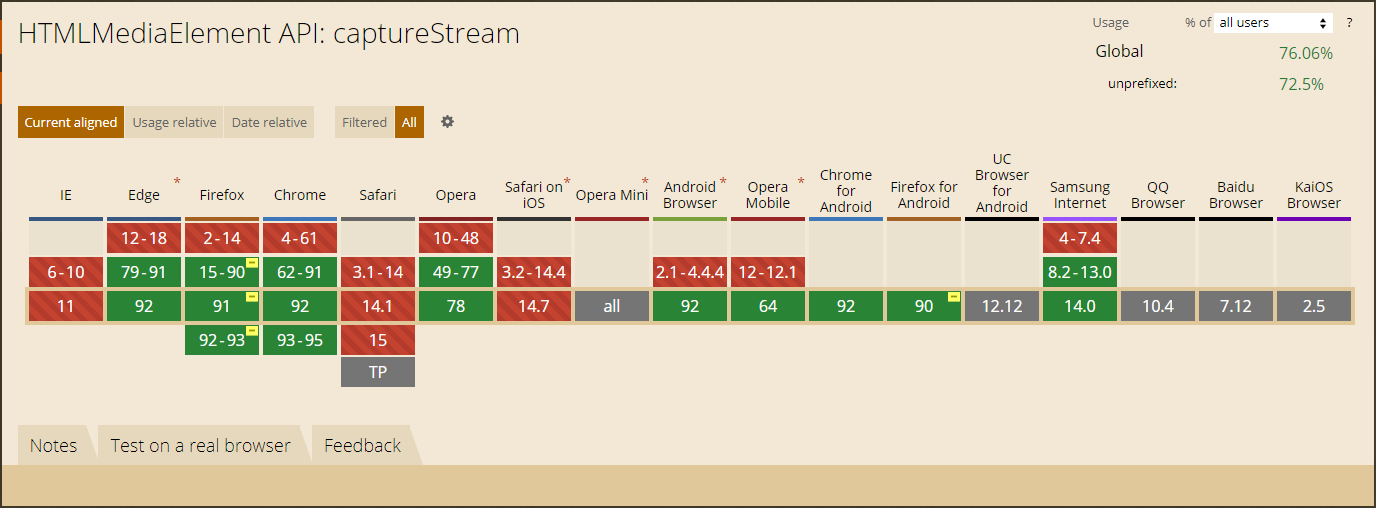
注意: Firefox 41和Firefox 42中需要手动开启,将
canvas.capturestream.enabled设置true- 详细的API还是要参考MDN,我还将一些常见的前端用到的网站进行了汇总也可以通过IT200.CN访问,静态页面不存储任何个人信息。
Demo演示
代码为React版本,参考书籍《WebRTC音视频开发》。
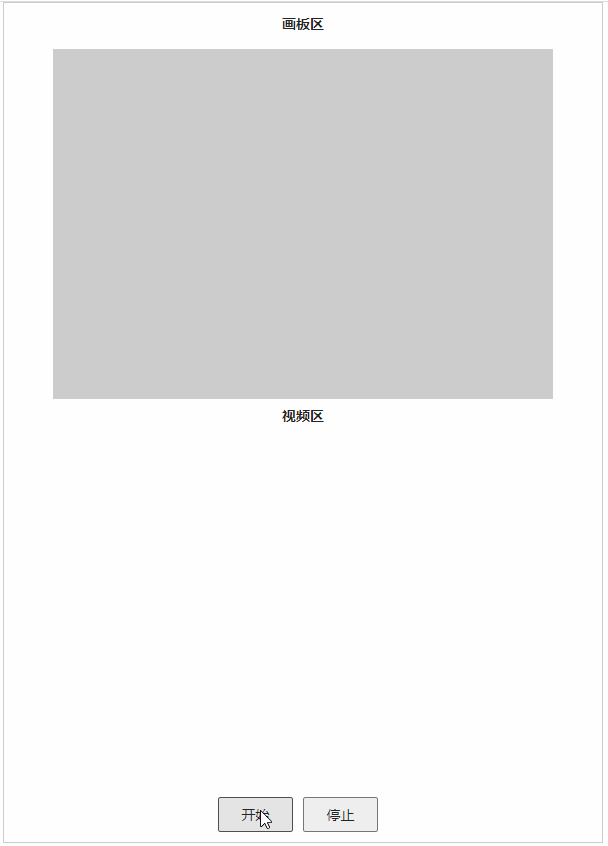
准备我们的布局
- 准备一个canvas元素来做我们的答题板。
- 准备一个video元素来实时显示我们在答题板上的操作。
- 准备一个按钮来启动同步显示答题板并进行录制
准备一个按钮来停止录制
<div className="container"><div><p>画板区</p><canvas ref={this.canvasRef}></canvas></div><div><p>视频区</p><video ref={this.videoRef} playsInline autoPlay></video></div><button onClick={this.startCaptureCanvas}>开始</button><button onClick={this.stopRecord}>停止</button></div>
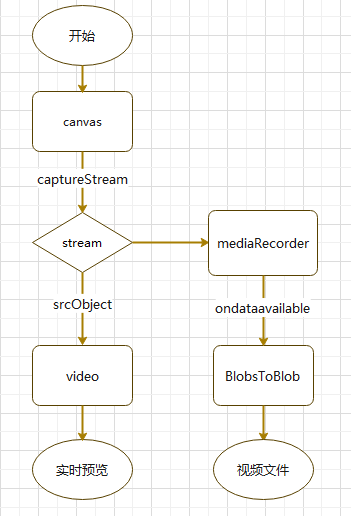
看一下流程图
开始实施
初始化画板答题器
准备画布:初始化宽高数据,将画布填充一个颜色并指定画笔的粗细和颜色
initCanvas = () => {canvas = this.canvasRef.current;canvas.width = 500;canvas.height = 350;context = canvas.getContext("2d");context.fillStyle = "#ccc";context.fillRect(0, 0, canvas.width, canvas.height);context.lineWidth = 1;context.storkeStyle = "#000";canvas.addEventListener("mousedown", this.startAction);canvas.addEventListener("mouseup", this.endAction);};
跟随手指划线:
- 初始化画笔原点
- 移动画笔绘制轨迹
- 结束时移除事件
startAction = (event) => {context.beginPath();context.moveTo(event.offsetX, event.offsetY);context.stroke();canvas.addEventListener("mousemove", this.moveAction);};moveAction = (event) => {context.lineTo(event.offsetX, event.offsetY);context.stroke();};endAction = () => {canvas.removeEventListener("mousemove", this.moveAction);};
让
stream从canvas流向videostartCaptureCanvas = async (e) => {stream = canvas.captureStream(25);const video = this.videoRef.current;video.srcObject = stream;};
启动答题板录制
- start设置数值的作用是录制的媒体按指定大小切块,避免内容过大。
- ondataavailable:保存每次回调的数据块
startRecord = (stream) => {recordeBlobs = [];mediaRecorder = new MediaRecorder(stream, {mimeType: "video/webm",});mediaRecorder.onstop = (event) => {console.log("录制完成");};mediaRecorder.ondataavailable = (event) => {if (event.data && event.data.size > 0) {recordeBlobs.push(event.data);}};mediaRecorder.start(100);};
停止录制后,清空相关对象获取视频文件
stopRecord = () => {mediaRecorder.stop();stream.getTracks().forEach((track) => track.stop());stream = null;const blob = new Blob(recordeBlobs, { type: "video/webm" });const url = window.URL.createObjectURL(blob);const a = document.createElement("a");a.style.display = "none";a.href = url;a.download = "canvas.webm";document.body.appendChild(a);a.click();setTimeout(() => {document.body.removeChild(a);window.URL.revokeObjectURL(url);}, 100);};
完整代码 ```jsx import React from “react”;
let mediaRecorder; let recordeBlobs; let stream; let canvas; let context;
export default class RecordCanvas extends React.Component { constructor() { super(); this.canvasRef = React.createRef(); this.videoRef = React.createRef(); } componentDidMount() { this.initCanvas(); }
initCanvas = () => { canvas = this.canvasRef.current; canvas.width = 500; canvas.height = 350; context = canvas.getContext(“2d”); context.fillStyle = “#ccc”; context.fillRect(0, 0, canvas.width, canvas.height);
context.lineWidth = 1;context.storkeStyle = "#000";canvas.addEventListener("mousedown", this.startAction);canvas.addEventListener("mouseup", this.endAction);
};
startAction = (event) => { context.beginPath(); context.moveTo(event.offsetX, event.offsetY); context.stroke(); canvas.addEventListener(“mousemove”, this.moveAction); };
moveAction = (event) => { context.lineTo(event.offsetX, event.offsetY); context.stroke(); };
endAction = () => { canvas.removeEventListener(“mousemove”, this.moveAction); };
startCaptureCanvas = async (e) => { stream = canvas.captureStream(25); const video = this.videoRef.current; video.srcObject = stream; this.startRecord(stream); };
startRecord = (stream) => { recordeBlobs = []; mediaRecorder = new MediaRecorder(stream, { mimeType: “video/webm”, }); mediaRecorder.onstop = (event) => { console.log(“录制完成”); }; mediaRecorder.ondataavailable = (event) => { if (event.data && event.data.size > 0) { recordeBlobs.push(event.data); } }; mediaRecorder.start(100); }; stopRecord = () => { mediaRecorder.stop(); stream.getTracks().forEach((track) => track.stop()); stream = null; const blob = new Blob(recordeBlobs, { type: “video/webm” }); const url = window.URL.createObjectURL(blob); const a = document.createElement(“a”); a.style.display = “none”; a.href = url; a.download = “canvas.webm”; document.body.appendChild(a); a.click(); setTimeout(() => { document.body.removeChild(a); window.URL.revokeObjectURL(url); }, 100); }; render() { return (
画板区
视频区
效果预览
思路扩展
- API的使用时很简单的,要是对接远程服务器在其他端进行显示还是需要Socket进行加持。

若有收获,就点个赞吧
0 人点赞
