在vRA8中使用现有网络配置文件,是一种最部署网络的方式。在这种情况下,不需要动态创建网络组件,因此配置会很容易。
以下步骤将显示如何创建网络配置文件并进行相应配置。
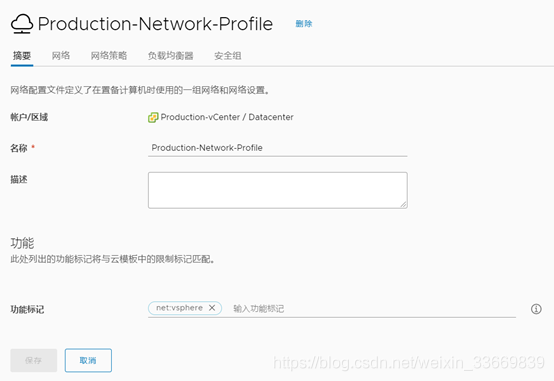
转到基础架构>配置>网络配置文件页面,然后单击新建[网络配置文件]
在“摘要”页面上,提供以下信息:
帐户/区域
名称
描述(可选)
功能标记,可以在云模板中匹配该标记
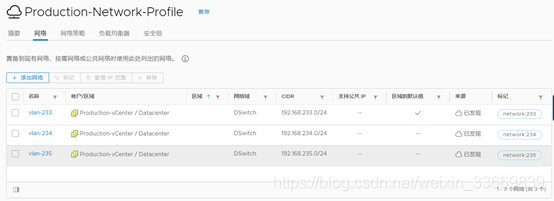
在“网络”页面上,添加适当的现有网络。请记住,如果您拥有更多的网络,则可以将标签用作蓝图约束,以便与已标记的网络进行匹配以避免歧义。
在“网络策略”页面上,无需执行任何配置。
点击创建
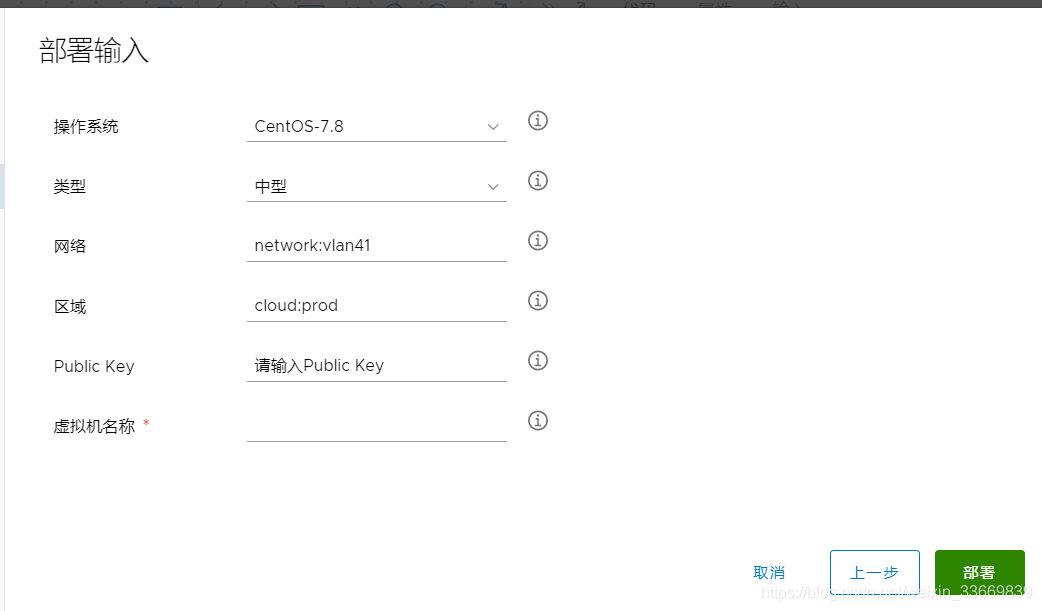
创建网络配置文件后,可以转到云模板并添加一个网络元素。以下是yaml显示的代码,用于到现有网络的ElasticSearch部署(这里以安装ElasticSeach为例,使用标签来标识当前的网络配置文件):
formatVersion: 1name: ElasticStackversion: 1description: Installs Elastic Stack on a single machineinputs:image:type: stringenum:- CentOS-7.8- CentOS-8.2description: 请选择操作系统title: 操作系统default: CentOS-7.8flavor:type: stringenum:- 小型- 中型- 大型description: 请选择类型title: 类型default: 中型network:type: stringtitle: 网络description: 请选择网络default: 'network:vlan41'region:type: stringdescription: 请选择部署区域title: 区域default: 'cloud:prod'key:type: stringtitle: Public Keydescription: 请输入Public Keydefault: 请输入Public Keyname:type: stringtitle: 虚拟机名称description: 请输入虚拟机名称resources:Elastic_Stack_NODE:type: Cloud.Machineproperties:name: elastic_stack_nodeflavor: '${input.flavor}'image: '${input.image}'cloudConfig: |#cloudconfigrepo_update: truerepo_upgrade: allpackage_update: truepackage_upgrade: allhostname: ${input.name}manage_etc_hosts: trueruncmd:- echo "${input.key}" >> /root/.ssh/authorized_keys- echo "${input.key}" >> /home/ubuntu/.ssh/authorized_keys- chmod 400 /root/.ssh/vmware.pubnetworks:- name: '${Elastic_Stack_Network.name}'tags: []network: '${resource.Elastic_Stack_Network.id}'securityGroups: []assignPublicIpAddress: falseconstraints:- tag: '${input.region}'Elastic_Stack_Network:type: Cloud.Networkproperties:name: Elastic_Stack_NetworknetworkType: existingconstraints:- tag: '${input.network}'
[
](https://blog.csdn.net/weixin_33669839/article/details/109529917)

若有收获,就点个赞吧
0 人点赞
