一、Ribbon简介
Ribbon是Netflix发布的负载均衡器,它有助于控制HTTP和TCP的客户端的行为。为Ribbon配置服务提供者地址后,Ribbon就可基于某种负载均衡算法,自动地帮助服务消费者去请求。Ribbon默认为我们提供了很多负载均衡算法,例如轮询、随机等。当然,我们也可为Ribbon实现自定义的负载均衡算法。<br /> Ribbon是一套**客户端负载均衡**工具,供一系列的完善的配置,如超时,重试等。通过Load Balancer获取到服务提供的所有机器实例, Ribbon会自动基于某种规则(轮询,随机)去调用这些服务。<br /> **客户端负载均衡**<br />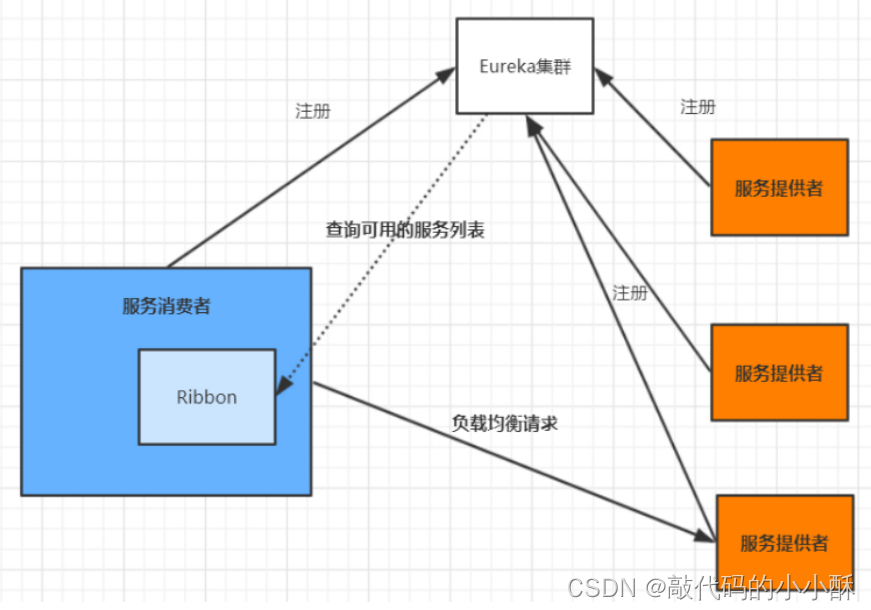<br /> **服务端负载均衡**<br />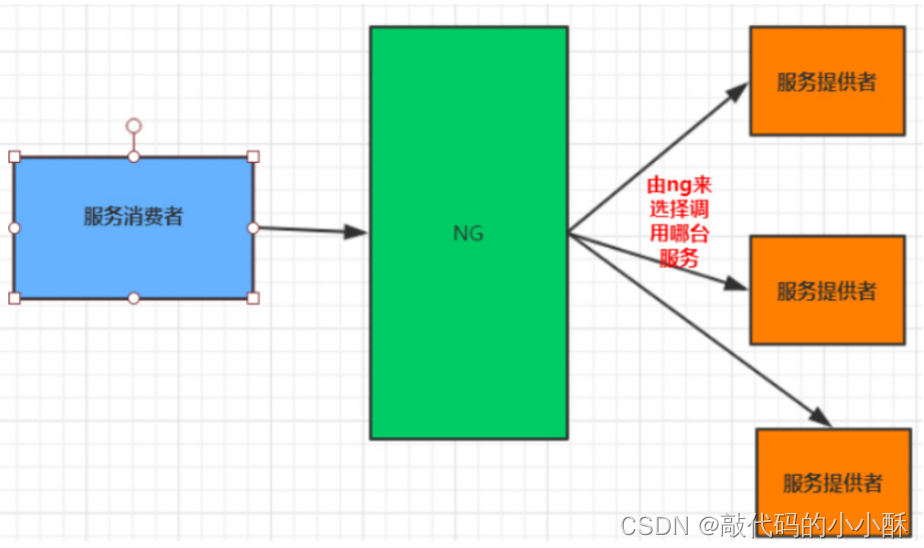
二、Ribbon与SpringCloud整合
由上面可以知道,Ribbon是用于客户端负载均衡的工具。Ribbon只负责负载均衡,那么发送请求,还需要Spring提供的[RestTemplate](https://so.csdn.net/so/search?q=RestTemplate&spm=1001.2101.3001.7020)。只不过,对RestTemplate进行一下加强,控制其把请求发送到哪个服务器上。
1、RestTemplate简介
发送 http 请求,估计很多人用过 httpclient 和 okhttp,确实挺好用的,而 Spring web 中的 RestTemplate 和这俩的功能类似,也是用来发送 http 请求的,不过用法上面比前面的 2 位要容易很多。<br /> spring 框架提供的 RestTemplate 类可用于在应用中调用 rest 服务,它简化了与 http 服务的通信方式,统一了 RESTful 的标准,封装了 http 链接, 我们只需要传入 url 及返回值类型即可。相较于之前常用的 HttpClient,RestTemplate 是一种更优雅的调用 RESTful 服务的方式。<br /> RestTemplate详细用法参考: [一文吃透接口调用神器RestTemplate](https://blog.csdn.net/likun557/article/details/121072832?ops_request_misc=%257B%2522request%255Fid%2522%253A%2522167851613916782428653627%2522%252C%2522scm%2522%253A%252220140713.130102334.pc%255Fblog.%2522%257D&request_id=167851613916782428653627&biz_id=0&utm_medium=distribute.pc_search_result.none-task-blog-2~blog~first_rank_ecpm_v1~rank_v31_ecpm-1-121072832-null-null.article_score_rank_blog&utm_term=%E4%B8%80%E6%96%87%E5%90%83%E9%80%8F%E6%8E%A5%E5%8F%A3%E8%B0%83%E7%94%A8%E7%A5%9E%E5%99%A8RestTemplate&spm=1018.2226.3001.4450)<br /> **RestTemplate发送get请求**<br />Controller接口
@GetMapping("/test/get")@ResponseBodypublic BookDto get() {return new BookDto(1, "SpringMVC系列");}
使用 RestTemplate 调用上面这个接口,通常有 2 种写法,如下
@Testpublic void test1() {RestTemplate restTemplate = new RestTemplate();String url = "http://localhost:8080/chat16/test/get";// getForObject方法,获取响应体,将其转换为第二个参数指定的类型BookDto bookDto = restTemplate.getForObject(url, BookDto.class);System.out.println(bookDto);}@Testpublic void test2() {RestTemplate restTemplate = new RestTemplate();String url = "http://localhost:8080/chat16/test/get";/**getForEntity方法,返回值为ResponseEntity类型ResponseEntity中包含了响应结果中的所有信息,比如头、状态、body*/ResponseEntity<BookDto> responseEntity = restTemplate.getForEntity(url, BookDto.class);//状态码System.out.println(responseEntity.getStatusCode());//获取头System.out.println("头:" + responseEntity.getHeaders());//获取bodyBookDto bookDto = responseEntity.getBody();System.out.println(bookDto);}
2、引入Ribbon
Spring Cloud Alibaba Nacos 中已经内置了 Ribbon 框架,所以无需再单独引入。
<!--Ribbon的依赖--><dependency><groupId>org.springframework.cloud</groupId><artifactId>spring-cloud-starter-netflix-ribbon</artifactId></dependency>
默认情况下,使用RestTemplate是无需进行配置的,Spring会自动注入。但是如果配合Ribbon使用时,就需要手动声明了。
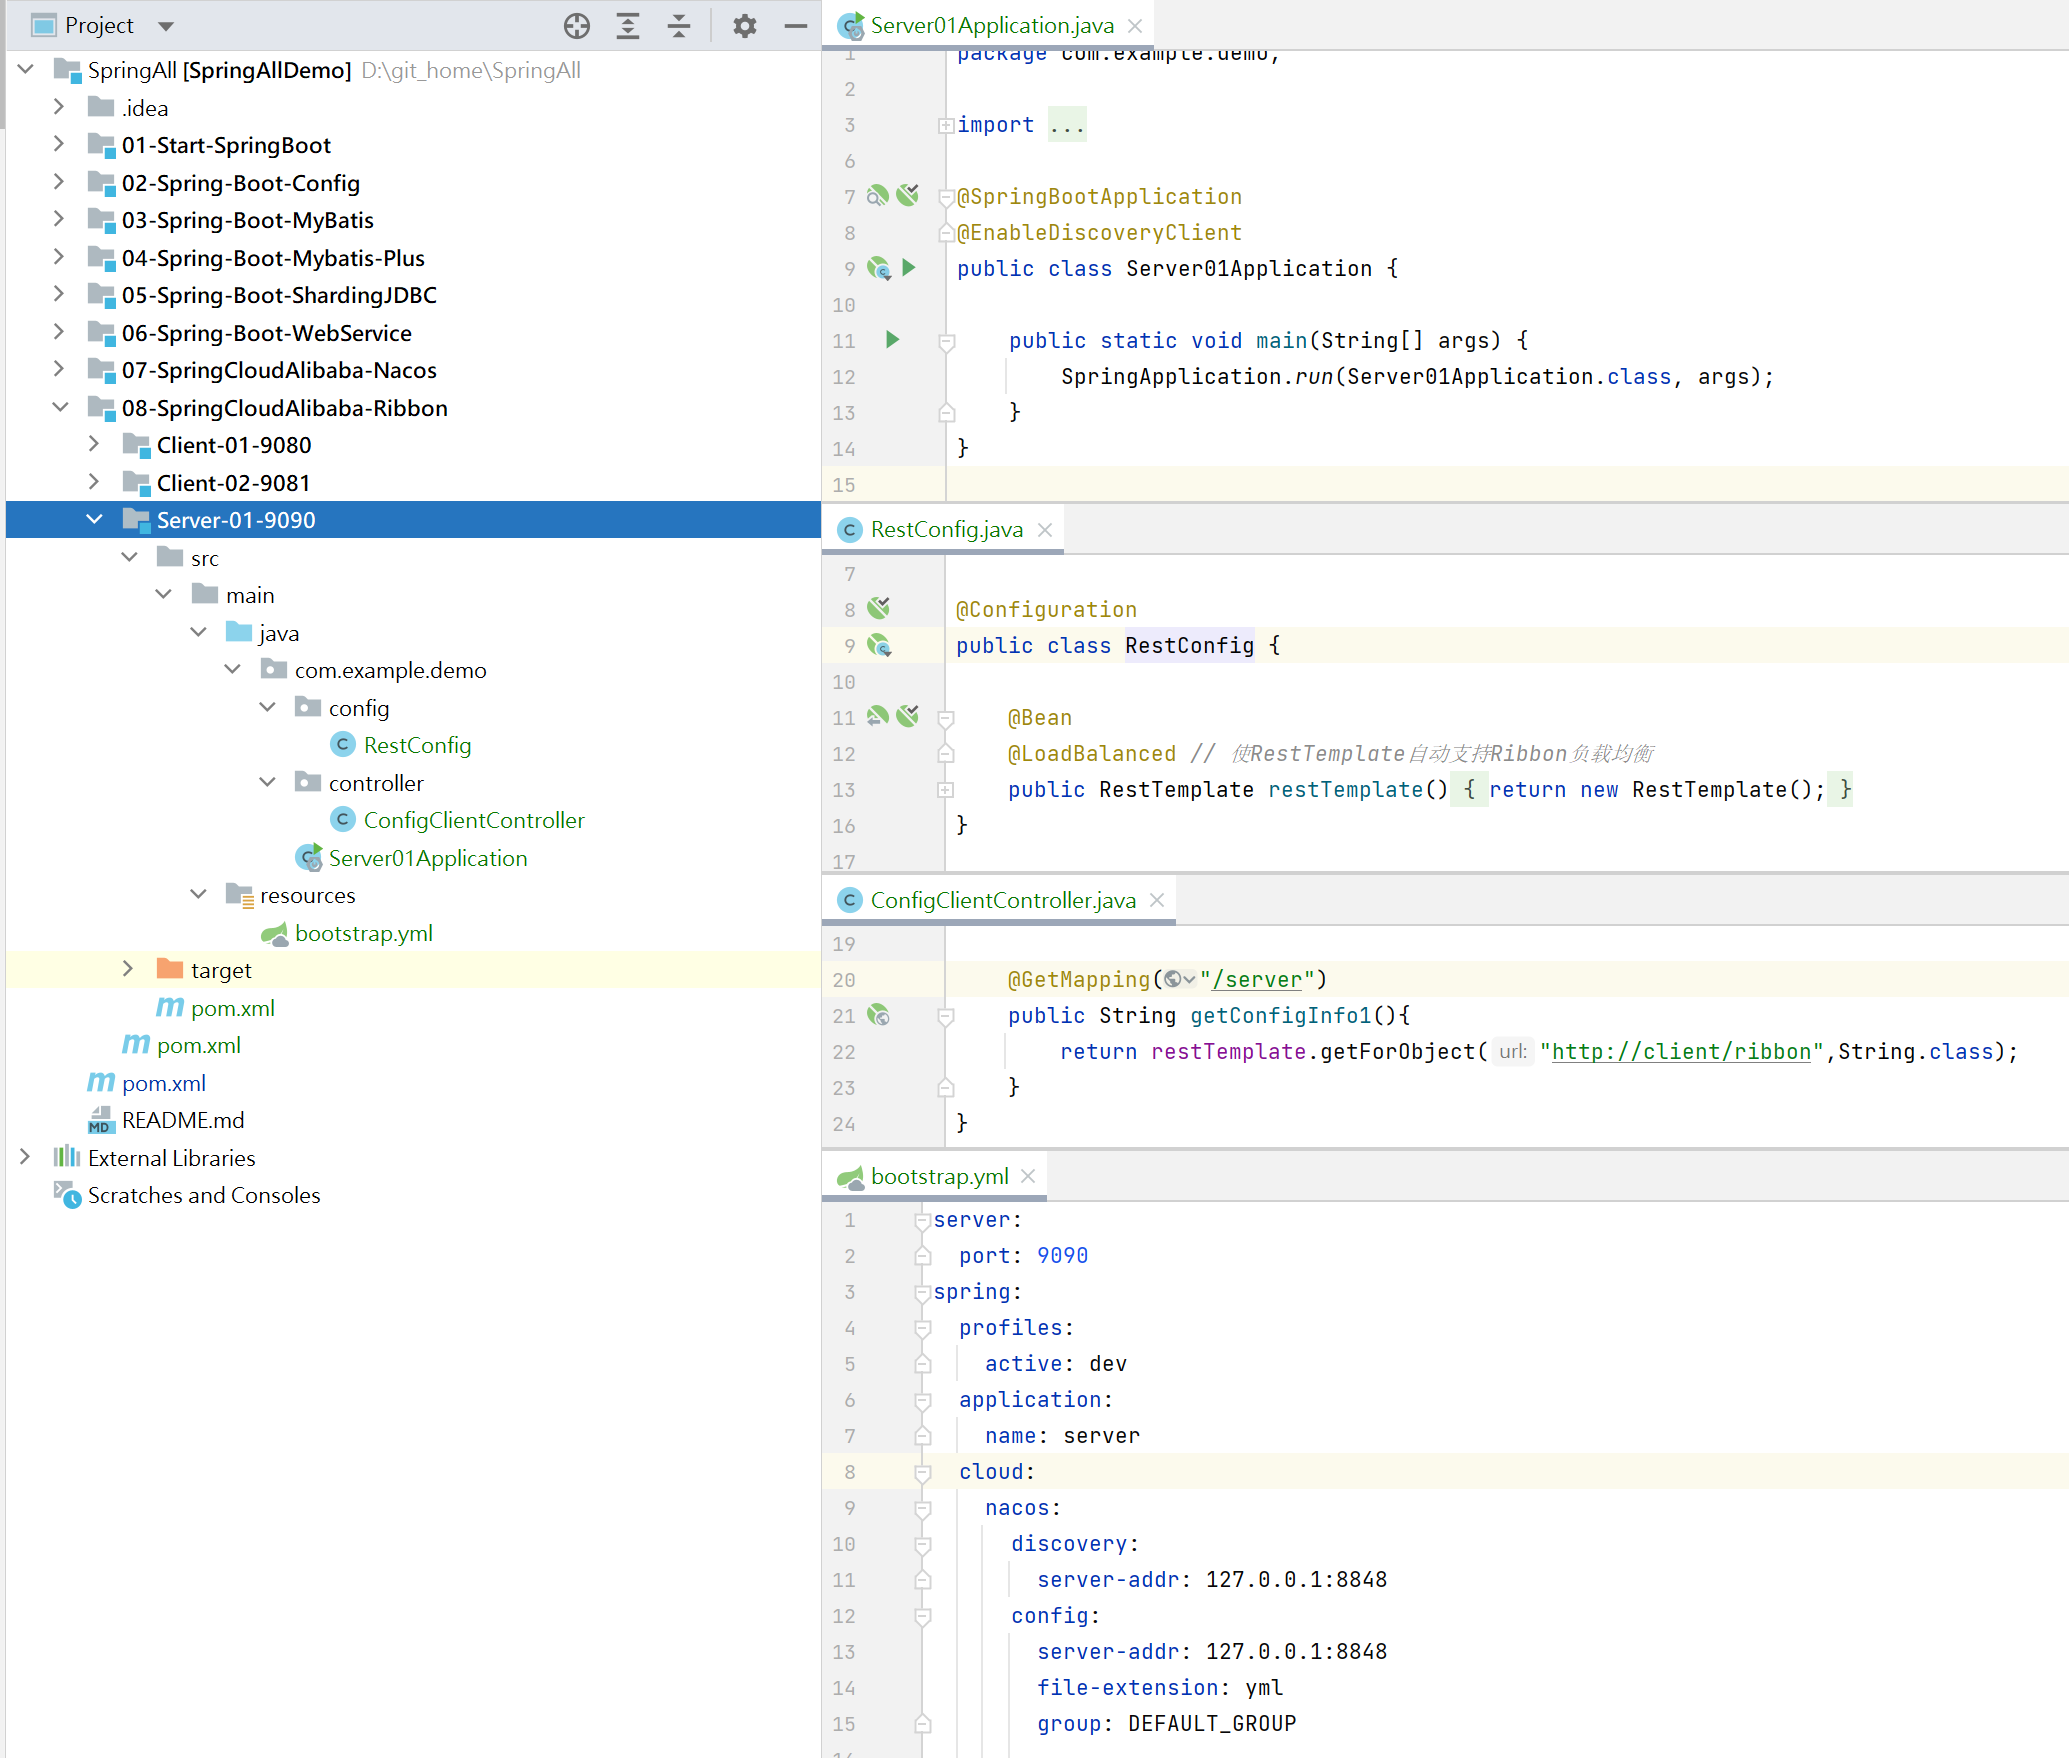
@Configurationpublic class RestConfig {@Bean@LoadBalanced // 使RestTemplate自动支持Ribbon负载均衡public RestTemplate restTemplate() {return new RestTemplate();}}
3、服务调用
使用添加@LoadBalanced注解后的RestTemplate调用服务提供者的接口时,可以使用**虚拟IP**替代**真实IP**地址。所谓的虚拟IP就是服务提供者在application.properties或yml文件中配置的spring.application.name属性的值。
@RestControllerpublic class ConfigClientController {@Autowiredprivate RestTemplate restTemplate;// 客户端注册到Nacos的服务名称private static final String client_name = "client";@GetMapping("/server")public String getConfigInfo1() {return restTemplate.getForObject("http://" + client_name + "/ribbon", String.class);}}
4、搭建环境
- 服务端:Server 端口9090
- 客户端1:Client 端口9080
- 客户端2:Client 端口9081
实现效果: 服务端Server调用客户端,轮训调用客户端1、客户端2,达到负载均衡的效果。
4.1 客户端
客户端整合Nacos,并且两个客户端的application.name相同,为了后续实现负载均衡的效果。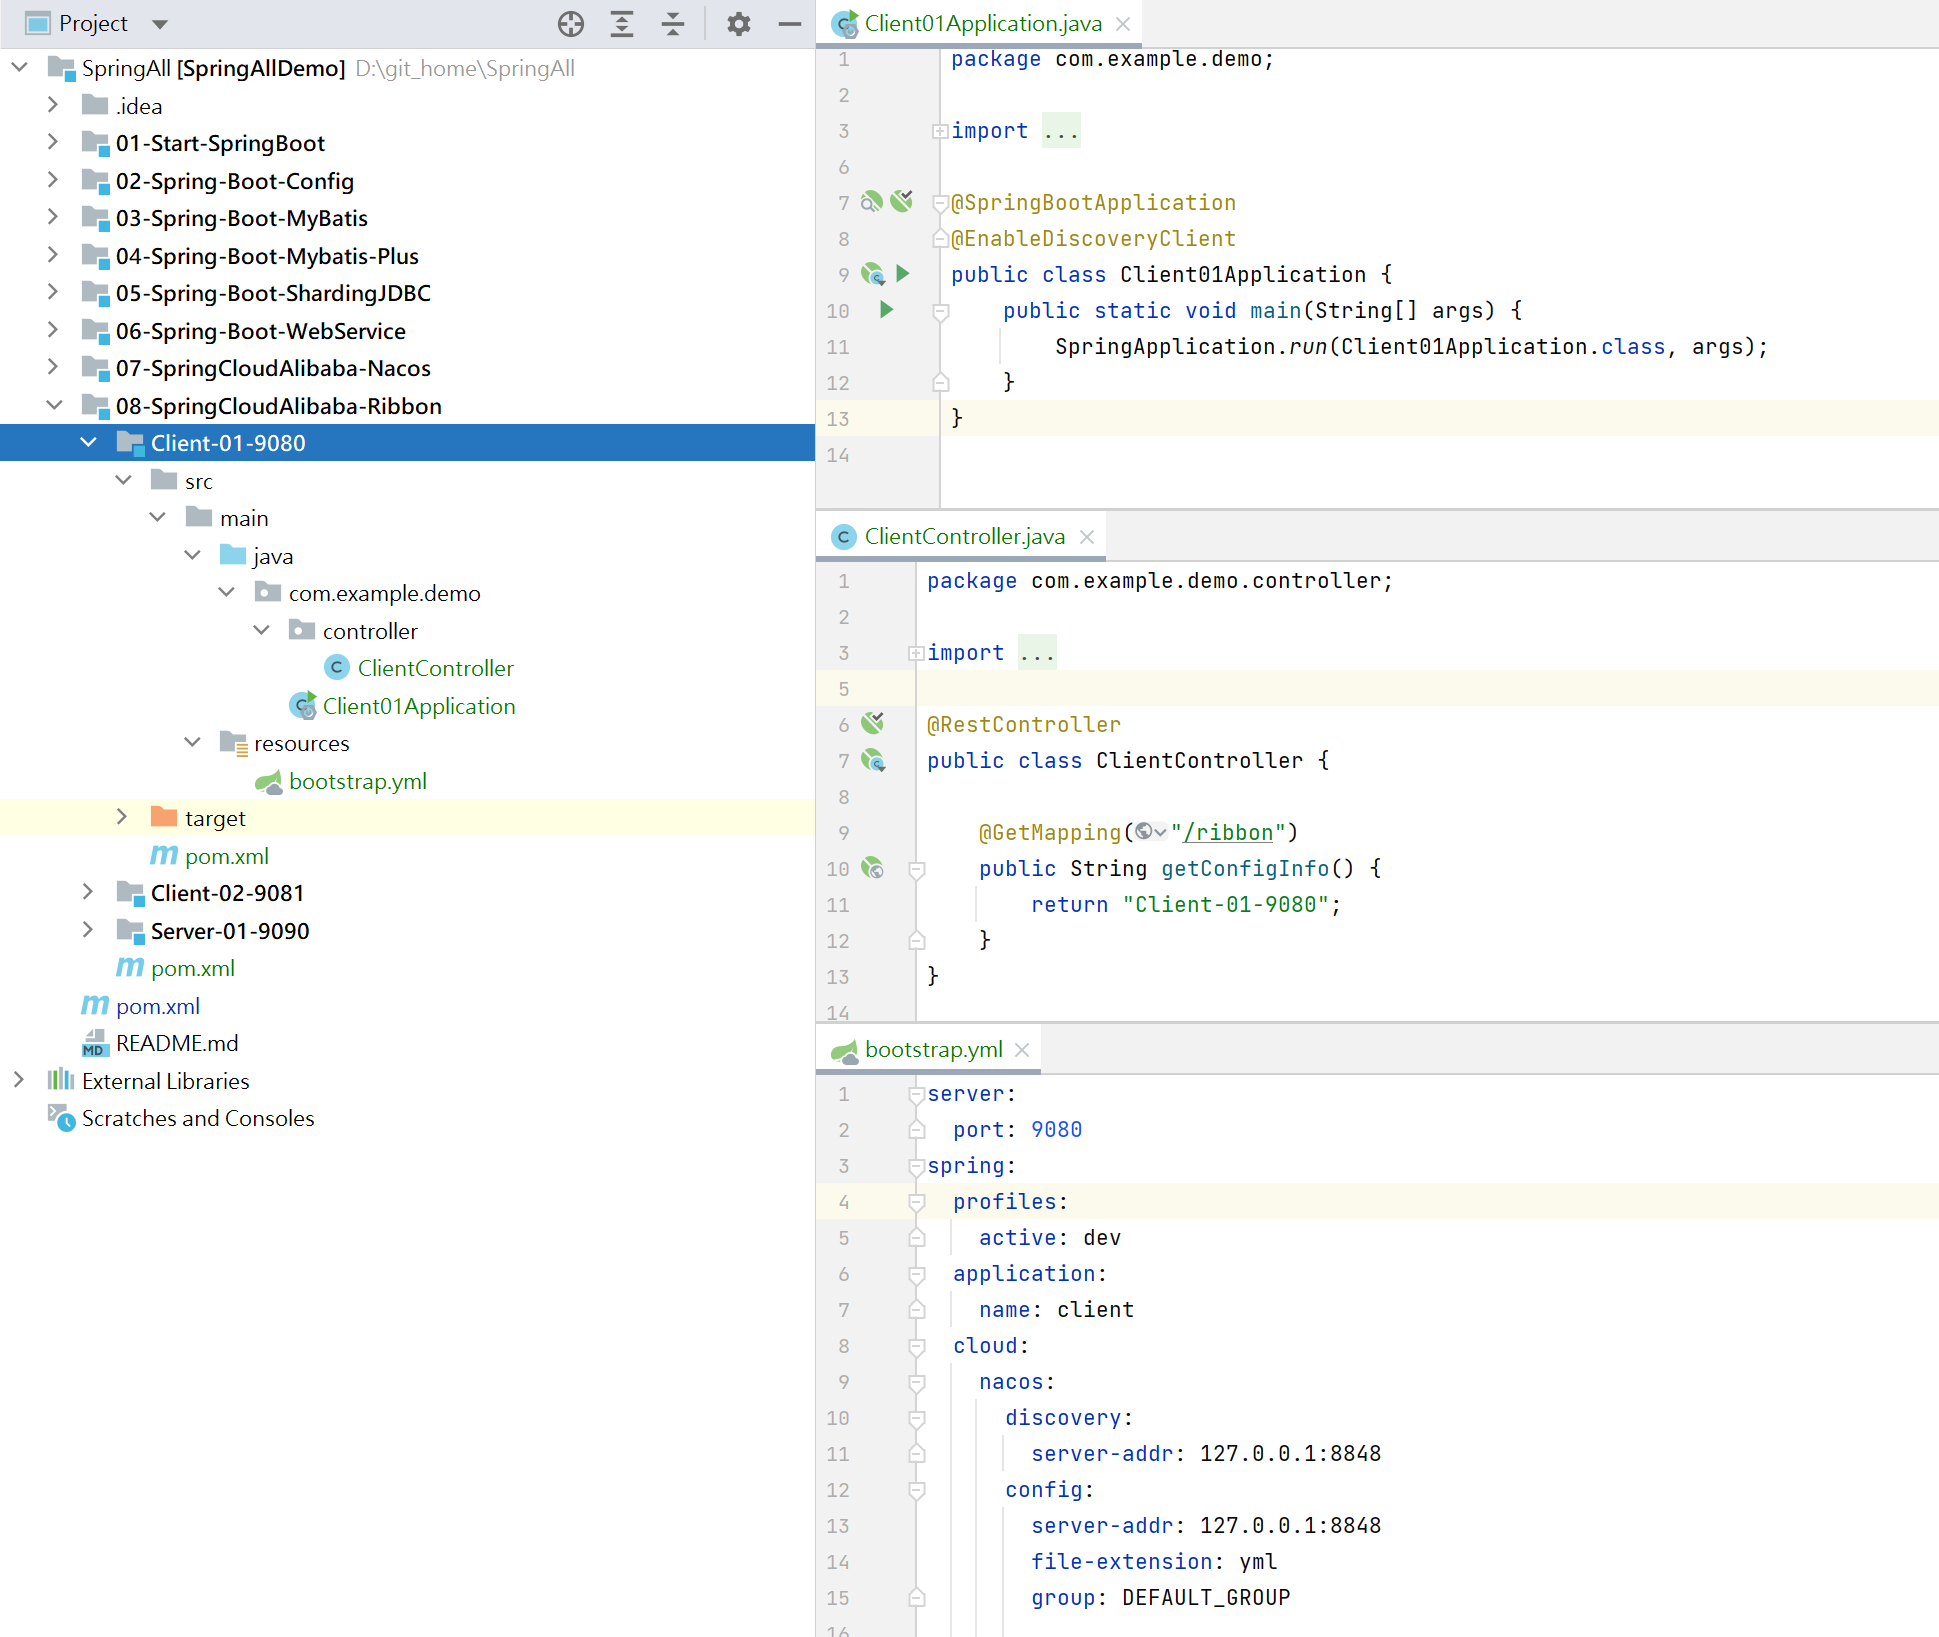
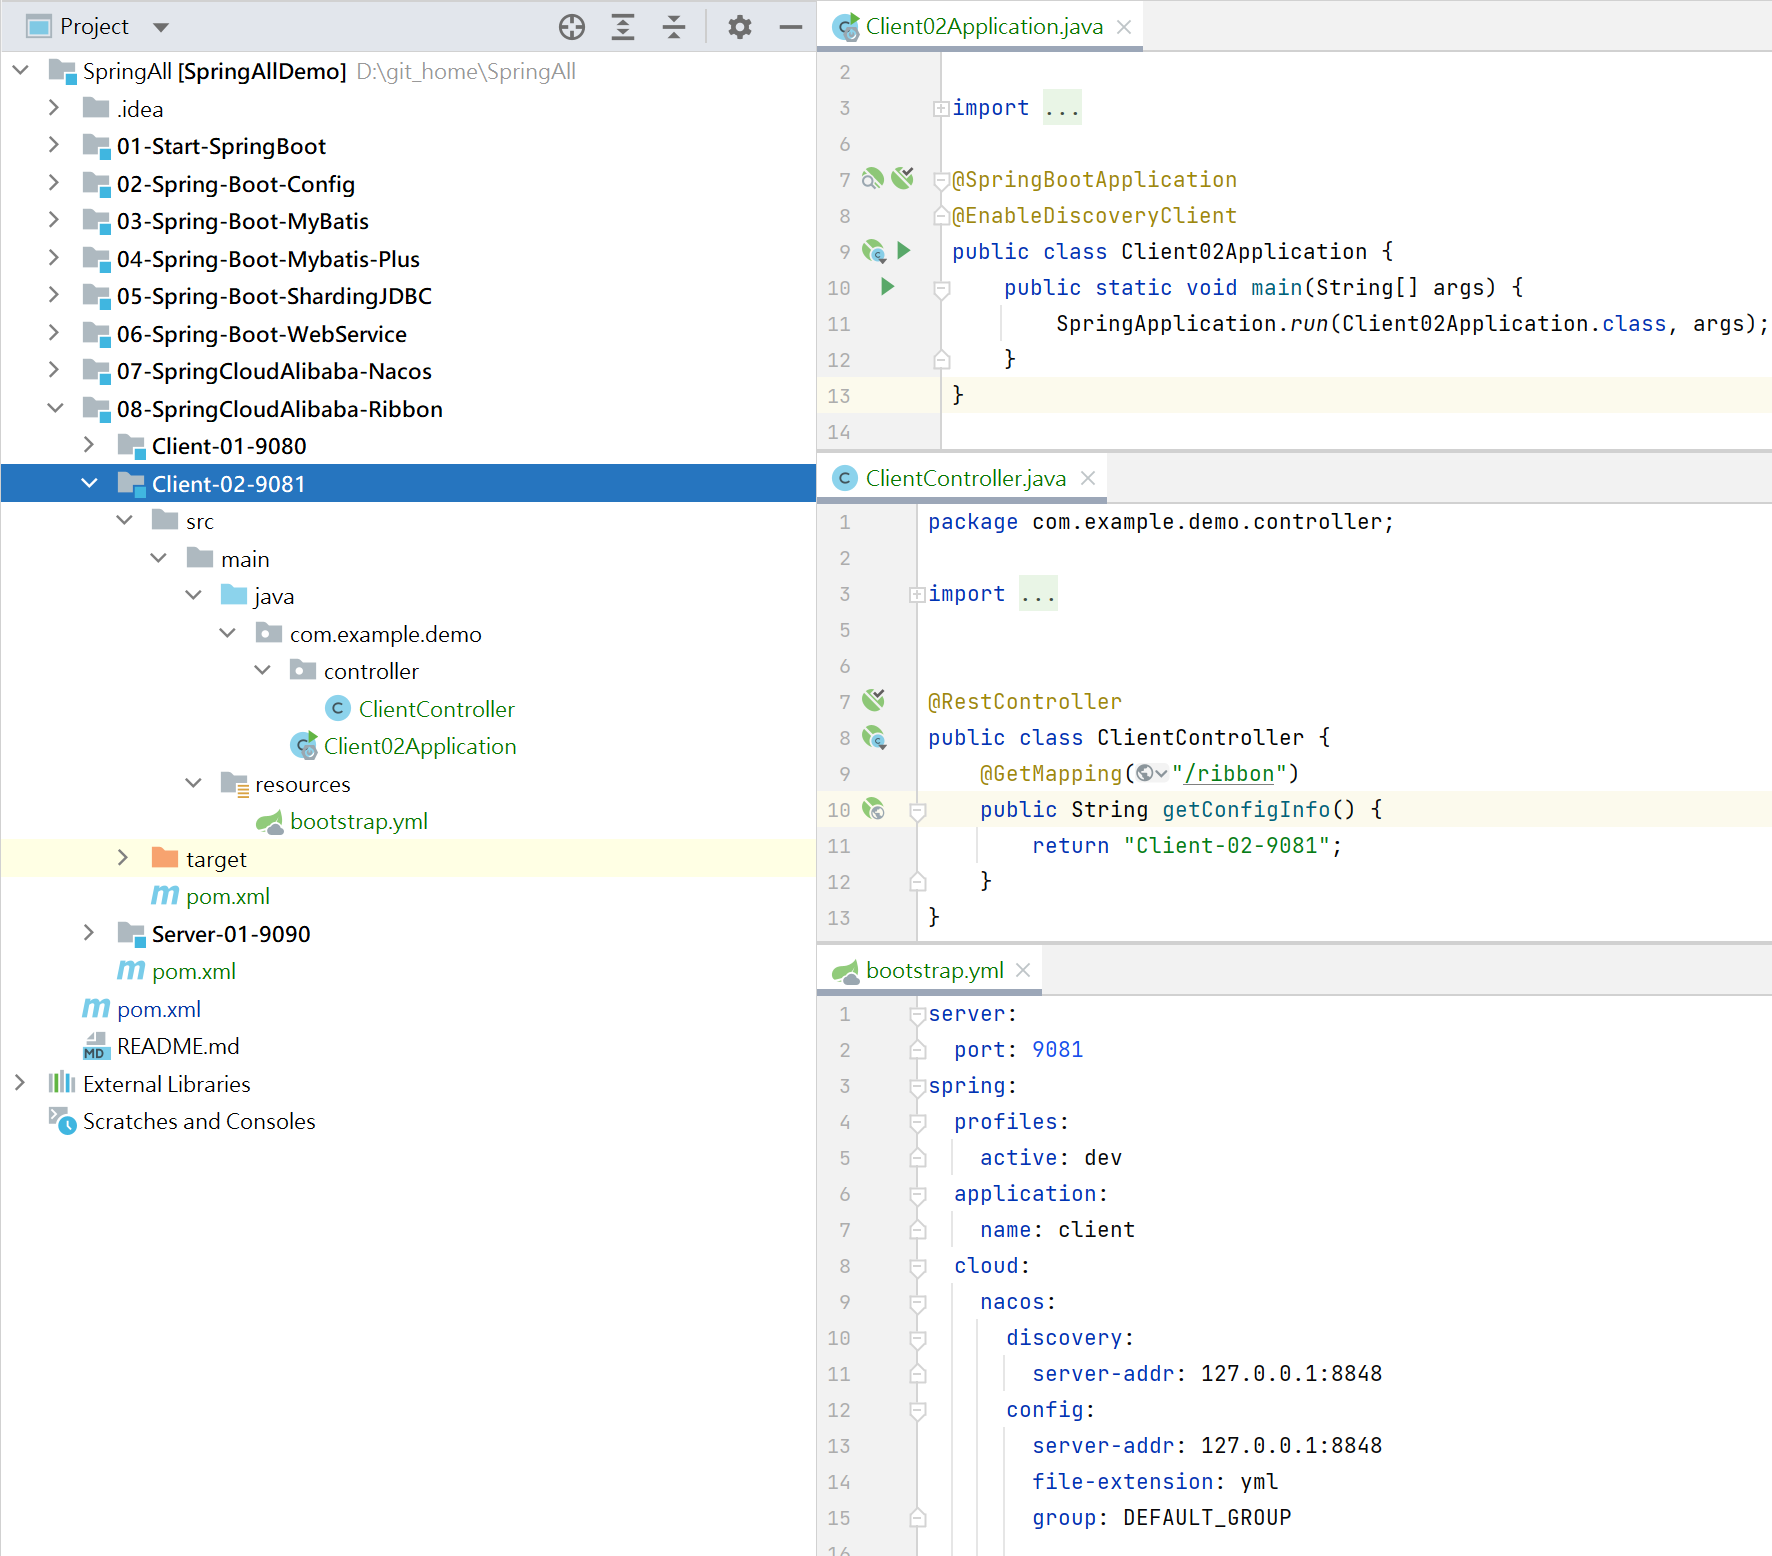
4.2 服务端
4.3 启动服务

4.4 访问接口
访问服务端接口: [http://localhost:9090/server](http://localhost:9090/server) , 返回结果: Client-01-9080 、Client-02-9081 实现了负载均衡效果。
5、Ribbon组件IRule
Ribbon默认的是RoundBobinRule(轮询)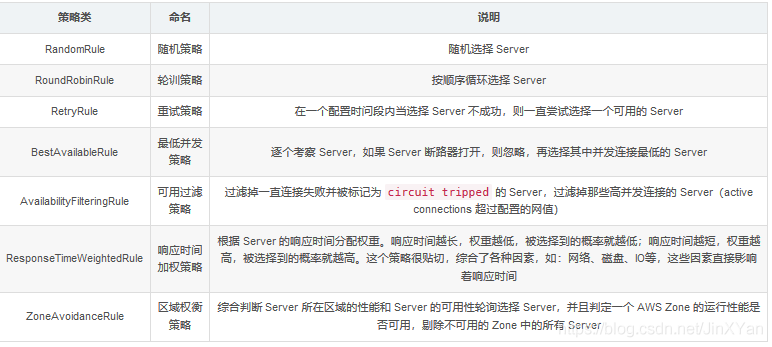
注意:Ribbon的自定义配置类不可以放在@ComponentScan所扫描的当前包下以及子包下,否则这个自定义配置类就会被所有的Ribbon客户端共享,达不到为指定的Ribbon定制配置,而@SpringBootApplication注解里就有@ComponentScan注解,所以不可以放在主启动类所在的包下。(因为Ribbon是客户端(消费者)这边的,所以Ribbon的自定义配置类是在客户端(消费者)添加,不需要在提供者或注册中心添加)
@Configurationpublic class RestConfig {/*** 使RestTemplate自动支持Ribbon负载均衡*/@Bean@LoadBalancedpublic RestTemplate restTemplate() {return new RestTemplate();}/*** 将Ribbon负载均衡机制改为 随机 (默认轮训)*/@Beanpublic IRule myRule(){return new RandomRule();}}
6、自定义负载均衡算法
@Configurationpublic class MySelfRule{@Beanpublic IRule myRule(){return new RandomRule_ZY(); // 我自定义为每台机器5次,5次之后在轮询到下一个}}
springboot主程序
@SpringBootApplication@EnableEurekaClient//在启动该微服务的时候就能去加载我们的自定义Ribbon配置类,从而使配置生效@RibbonClient(name="MICROSERVICECLOUD-DEPT",configuration=MySelfRule.class)public class DeptConsumer80_App{public static void main(String[] args){SpringApplication.run(DeptConsumer80_App.class, args);}}
自定义LoadBalance
public class RandomRule_ZY extends AbstractLoadBalancerRule{// total = 0 // 当total==5以后,我们指针才能往下走,// index = 0 // 当前对外提供服务的服务器地址,// total需要重新置为零,但是已经达到过一个5次,我们的index = 1// 分析:我们5次,但是微服务只有8001 8002 8003 三台,OK?private int total = 0; // 总共被调用的次数,目前要求每台被调用5次private int currentIndex = 0; // 当前提供服务的机器号public Server choose(ILoadBalancer lb, Object key){if (lb == null) {return null;}Server server = null;while (server == null) {if (Thread.interrupted()) {return null;}List<Server> upList = lb.getReachableServers(); //激活可用的服务List<Server> allList = lb.getAllServers(); //所有的服务int serverCount = allList.size();if (serverCount == 0) {return null;}if(total < 5){server = upList.get(currentIndex);total++;}else {total = 0;currentIndex++;if(currentIndex >= upList.size()){currentIndex = 0;}}if (server == null) {Thread.yield();continue;}if (server.isAlive()) {return (server);}// Shouldn't actually happen.. but must be transient or a bug.server = null;Thread.yield();}return server;}@Overridepublic Server choose(Object key){return choose(getLoadBalancer(), key);}@Overridepublic void initWithNiwsConfig(IClientConfig clientConfig){}}
三、OpenFeign简介
OpenFeign官网文档:https://cloud.spring.io/spring-cloud-static/Hoxton.SR1/reference/htmlsingle/#spring-cloud-openfeign
1、Feign简介
Feign也是一个狠角色,Feign旨在使得Java Http客户端变得更容易。
Feign集成了Ribbon、RestTemplate实现了负载均衡的执行Http调用,只不过对原有的方式(Ribbon+RestTemplate)进行了封装,开发者不必手动使用RestTemplate调服务,而是定义一个接口,在这个接口中标注一个注解即可完成服务调用,这样更加符合面向接口编程的宗旨,简化了开发。
但遗憾的是Feign现在停止迭代了。
2、OpenFeign简介
OpenFeign是springcloud在Feign的基础上支持了SpringMVC的注解,如@RequestMapping等等。OpenFeign的@FeignClient可以解析SpringMVC的@RequestMapping注解下的接口,并通过动态代理的方式产生实现类,实现类中做负载均衡并调用其他服务。
3、Feign和OpenFeign的区别
| Feign | OpenFiegn |
|---|---|
| Feign是SpringCloud组件中一个轻量级RESTful的HTTP服务客户端,Feign内置了Ribbon,用来做客户端负载均衡,去调用服务注册中心的服务。Feign的使用方式是:使用Feign的注解定义接口,调用这个接口,就可以调用服务注册中心的服 | OpenFeign 是SpringCloud在Feign的基础上支持了SpringMVC的注解,如@RequestMapping等。OpenFeign 的@FeignClient可以解析SpringMVC的@RequestMapping注解下的接口,并通过动态代理的方式产生实现类,实现类中做负载均衡并调用其他服务。 |
四、OpenFeign与SpringCloud整合
1、引入OpenFeign
<dependency><groupId>org.springframework.cloud</groupId><artifactId>spring-cloud-starter-openfeign</artifactId></dependency>
启动会报错 No Feign Client for loadBalancing defined. Did you forget to include spring-cloud-starter-loadbalancer?
原因是SpringCloud Feign在Hoxton.M2 RELEASED版本之后不再使用ribbon,而是使用spring-cloud-loadbalancer,所以在不引入spring-cloud-loadbalancer情况下会报错,需要单独引入loadbalancer
Spring Cloud LoadBalancer是Spring Cloud官方自己提供的客户端负载均衡器,抽象和实现,用来替代Ribbon。(Spring Cloud LoadBalancer源码解析)
<dependency><groupId>org.springframework.cloud</groupId><artifactId>spring-cloud-loadbalancer</artifactId></dependency>
完整的POM
<?xml version="1.0" encoding="UTF-8"?><project xmlns="http://maven.apache.org/POM/4.0.0"xmlns:xsi="http://www.w3.org/2001/XMLSchema-instance"xsi:schemaLocation="http://maven.apache.org/POM/4.0.0 http://maven.apache.org/xsd/maven-4.0.0.xsd"><parent><groupId>org.springframework.boot</groupId><artifactId>spring-boot-starter-parent</artifactId><version>2.6.11</version><relativePath/> <!-- lookup parent from repository --></parent><modelVersion>4.0.0</modelVersion><artifactId>Producer-OpenFeign-9090</artifactId><properties><java.version>1.8</java.version><spring-cloud-alibaba.version>2021.0.4.0</spring-cloud-alibaba.version><spring-cloud.version>2021.0.4</spring-cloud.version></properties><dependencies><dependency><groupId>org.springframework.boot</groupId><artifactId>spring-boot-starter-web</artifactId></dependency><dependency><groupId>com.alibaba.cloud</groupId><artifactId>spring-cloud-starter-alibaba-nacos-config</artifactId></dependency><dependency><groupId>com.alibaba.cloud</groupId><artifactId>spring-cloud-starter-alibaba-nacos-discovery</artifactId></dependency><dependency><groupId>org.springframework.cloud</groupId><artifactId>spring-cloud-starter-openfeign</artifactId></dependency><dependency><groupId>org.springframework.cloud</groupId><artifactId>spring-cloud-loadbalancer</artifactId></dependency><dependency><groupId>org.springframework.cloud</groupId><artifactId>spring-cloud-starter-bootstrap</artifactId><version>3.1.1</version></dependency><dependency><groupId>org.springframework.boot</groupId><artifactId>spring-boot-starter-test</artifactId><scope>test</scope><exclusions><exclusion><groupId>org.junit.vintage</groupId><artifactId>junit-vintage-engine</artifactId></exclusion></exclusions></dependency></dependencies><dependencyManagement><dependencies><dependency><groupId>org.springframework.cloud</groupId><artifactId>spring-cloud-dependencies</artifactId><version>${spring-cloud.version}</version><type>pom</type><scope>import</scope></dependency><dependency><groupId>com.alibaba.cloud</groupId><artifactId>spring-cloud-alibaba-dependencies</artifactId><version>${spring-cloud-alibaba.version}</version><type>pom</type><scope>import</scope></dependency></dependencies></dependencyManagement><build><plugins><plugin><groupId>org.apache.maven.plugins</groupId><artifactId>maven-compiler-plugin</artifactId><version>3.8.1</version><configuration><source>1.8</source><target>1.8</target><encoding>UTF-8</encoding></configuration></plugin><plugin><groupId>org.springframework.boot</groupId><artifactId>spring-boot-maven-plugin</artifactId></plugin></plugins></build></project>
2、服务调用
2.1、启动类添加注解
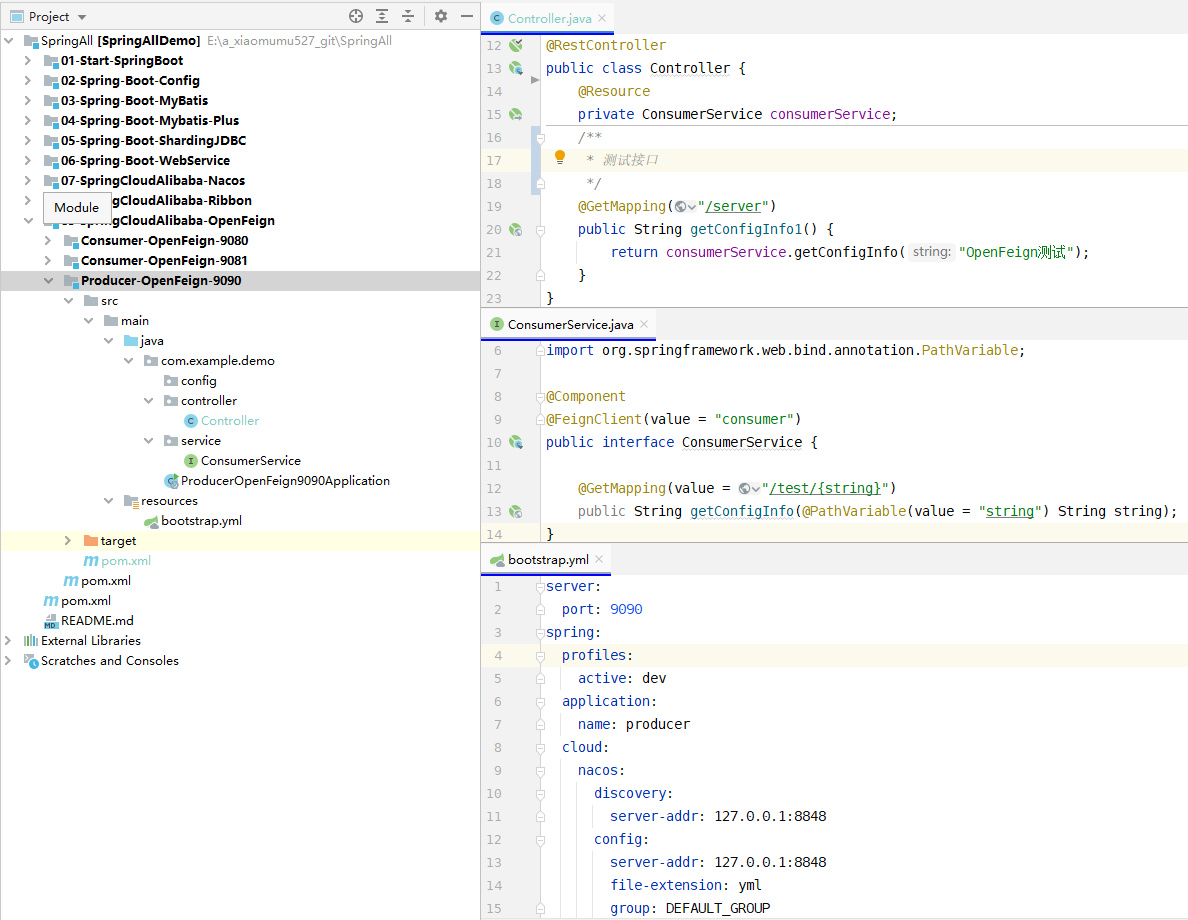
package com.example.demo;import org.springframework.boot.SpringApplication;import org.springframework.boot.autoconfigure.SpringBootApplication;import org.springframework.cloud.client.discovery.EnableDiscoveryClient;import org.springframework.cloud.openfeign.EnableFeignClients;@SpringBootApplication@EnableDiscoveryClient // 通过注解 开启nacos服务注册@EnableFeignClients // 整合openFeignpublic class ProducerOpenFeign9090Application {public static void main(String[] args) {SpringApplication.run(ProducerOpenFeign9090Application.class, args);}}
2.2、编写接口
@Component@FeignClient(value = "consumer") // 被调用服务注册到Nacos的服务名称public interface ConsumerService {// 该接口和被调用者的Controller方法名、参数一致@GetMapping(value = "/test/{string}")public String getConfigInfo(@PathVariable(value = "string") String string);}
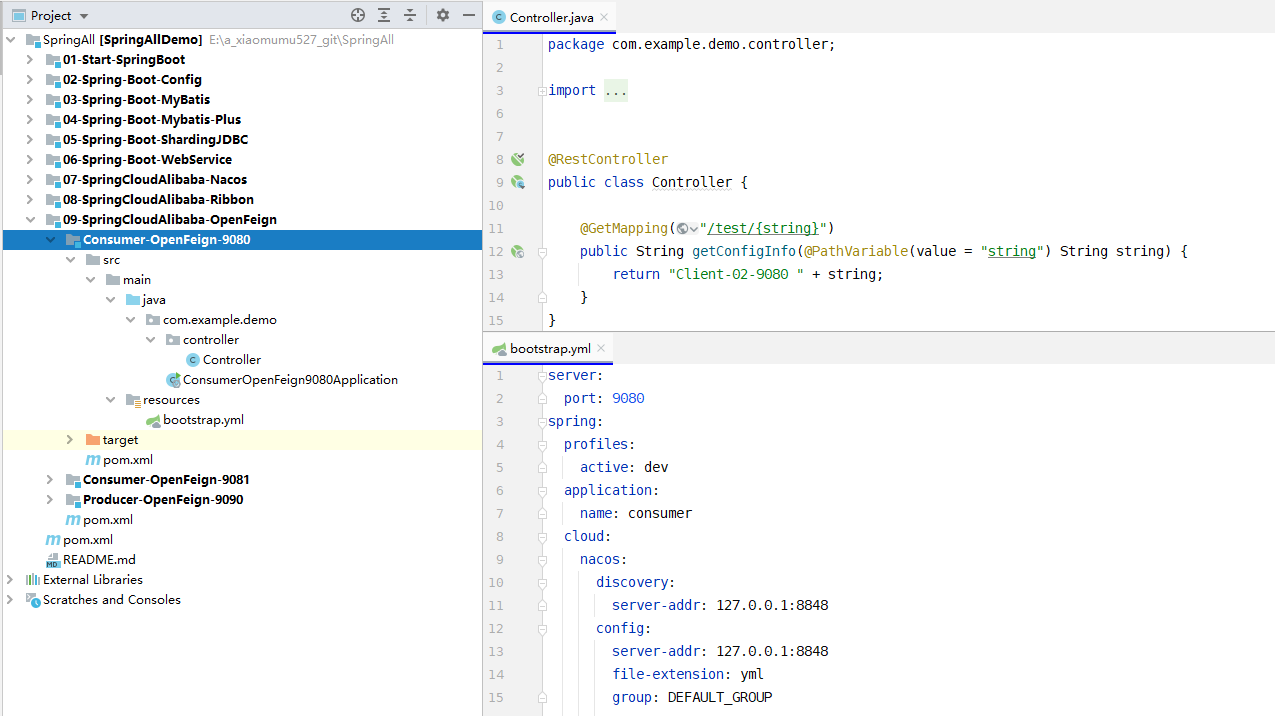
被调用服务的Controller
@RestControllerpublic class Controller {@GetMapping("/test/{string}")public String getConfigInfo(@PathVariable(value = "string") String string) {return "Client-02-9080 " + string;}}
3、服务搭建
- 生产者producer 端口9090
- 消费者consumer 端口9080
- 消费者consumer 端口9081
3.1 生产者
3.2 消费者
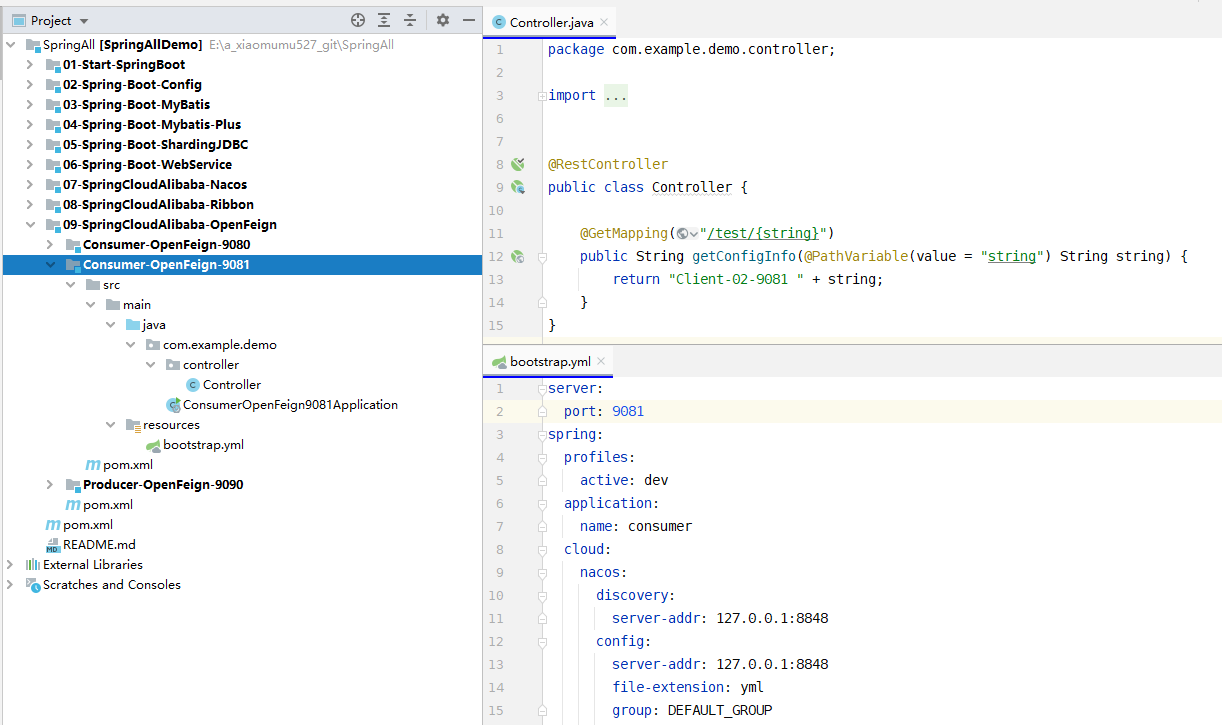
3.3 启动服务

3.4 访问接口
访问服务端接口: [http://localhost:9090/server](http://localhost:9090/server) , 返回结果: 'Client-02-9080 OpenFeign测试' 、'Client-02-9081 OpenFeign测试' 实现了负载均衡效果。
4、OpenFeign传参方式
4.1 传递JSON数据
@RestController@RequestMapping("/openfeign/provider")public class OpenFeignProviderController {@PostMapping("/order2")public Order createOrder2(@RequestBody Order order){return order;}}
@FeignClient(value = "openFeign-provider")public interface OpenFeignService {/*** 参数默认是@RequestBody标注的,这里的@RequestBody可以不填* 方法名称任意*/@PostMapping("/openfeign/provider/order2")Order createOrder2(@RequestBody Order order);}
4.2 POJO表单传参
openFeign提供了一个注解@SpringQueryMap完美解决POJO表单传参。
@RestController@RequestMapping("/openfeign/provider")public class OpenFeignProviderController {@PostMapping("/order1")public Order createOrder1(Order order){return order;}}
@FeignClient(value = "openFeign-provider")public interface OpenFeignService {/*** 参数默认是@RequestBody标注的,如果通过POJO表单传参的,使用@SpringQueryMap标注*/@PostMapping("/openfeign/provider/order1")Order createOrder1(@SpringQueryMap Order order);}
4.3 URL中携带参数
@RestController@RequestMapping("/openfeign/provider")public class OpenFeignProviderController {@GetMapping("/test/{id}")public String test(@PathVariable("id")Integer id){return "accept one msg id="+id;}
@FeignClient(value = "openFeign-provider")public interface OpenFeignService {@GetMapping("/openfeign/provider/test/{id}")String get(@PathVariable("id")Integer id);}
4.4 普通表单参数
@RestController@RequestMapping("/openfeign/provider")public class OpenFeignProviderController {@PostMapping("/test2")public String test2(String id,String name){return MessageFormat.format("accept on msg id={0},name={1}",id,name);}}
@FeignClient(value = "openFeign-provider")public interface OpenFeignService {/*** 必须要@RequestParam注解标注,且value属性必须填上参数名* 方法参数名可以任意,但是@RequestParam注解中的value属性必须和provider中的参数名相同*/@PostMapping("/openfeign/provider/test2")String test(@RequestParam("id") String arg1,@RequestParam("name") String arg2);}
五、OpenFeign超时处理
openFeign其实是有默认的超时时间的,默认分别是连接超时时间10秒、读超时时间60秒
查看源码: 利用Idea按Ctrl+N 搜索 feign.Request.Options#Options()
public Options() {this(10L, TimeUnit.SECONDS, 60L, TimeUnit.SECONDS, true);}
SpringCloud Feign在Hoxton.M2 RELEASED版本之前,集成Ribbon
使用Ribbon时,Ribbon的默认超时连接时间、读超时时间都是是1秒。源码在org.springframework.cloud.openfeign.ribbon.FeignLoadBalancer#execute()方法中,如果openFeign没有设置对应得超时时间,那么将会采用Ribbon的默认超时时间。
SpringCloud Feign在Hoxton.M2 RELEASED版本之后,集成spring-cloud-loadbalancer
SpringCloud Feign在Hoxton.M2 RELEASED版本之后不再使用ribbon,而使用spring-cloud-loadbalancer,spring-cloud-loadbalancer默认是没有超时时间的,所以会使用OpenFeign的60秒超时时间。
消费者端设置75秒的睡眠时间,生产者进行调用,在第60s后会报错 java.net.SocketTimeoutException: Read timed out
1、设置openFeign的超时时间
feign:client:config:default: # 设置的全局超时时间,指定服务名称可以设置单个服务的超时时间connectTimeout: 5000 # 指的是建立链接后从服务器读取可用资源所用的时间readTimeout: 5000 # 指的是建立链接所用的时间,适用于网络状况正常的情况下, 两端链接所用的时间
一般正常的业务逻辑中可能涉及到多个openFeign接口的调用,可单独设置超时时间。
feign:client:config:default:connectTimeout: 5000readTimeout: 5000consumer9080: #注册到nacos的服务名称connectTimeout: 7000readTimeout: 7000
六、OpenFeign开启增强日志
openFeign虽然提供了日志增强功能,但是默认是不显示任何日志的,不过开发者在调试阶段可以自己配置日志的级别。
openFeign的日志级别如下:
- NONE:默认的,不显示任何日志;
- BASIC:仅记录请求方法、URL、响应状态码及执行时间;
- HEADERS:除了BASIC中定义的信息之外,还有请求和响应的头信息;
FULL:除了HEADERS中定义的信息之外,还有请求和响应的正文及元数据。
1.1 配置类中配置日志级别
@Configurationpublic class OpenFeignConfig {@BeanLogger.Level feignLoggerLever() {return Logger.Level.FULL;}}
1.2 yaml文件中设置接口日志级别
logging:level:com.example.demo.service: debug
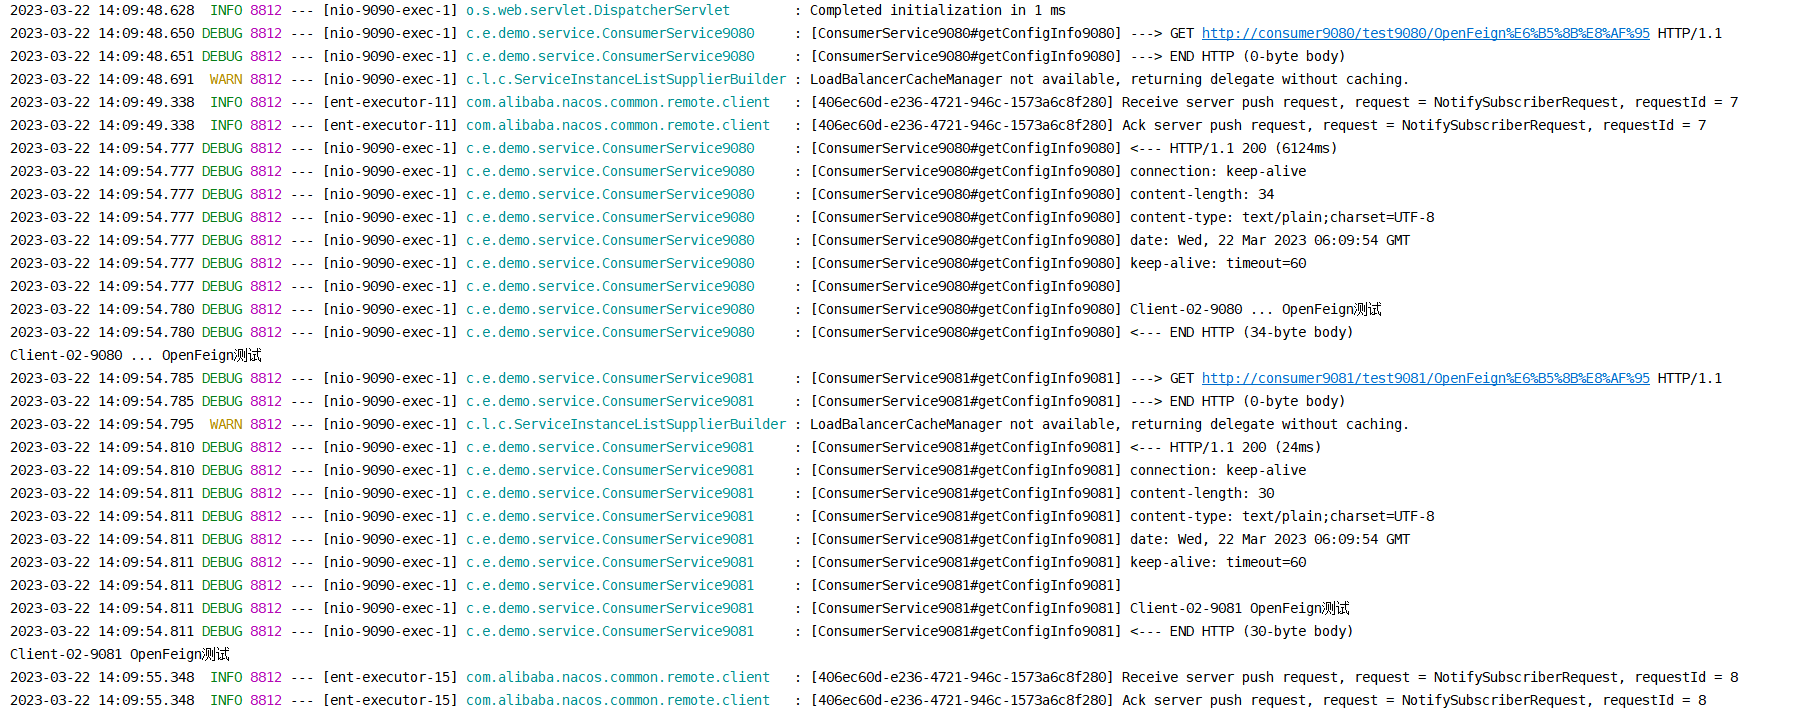
这里的
com.example.demo.service是openFeign接口所在的包名,当然也可以配置一个特定的openFeign接口。1.3 演示效果
七、OpenFeign如何替换默认的httpclient
Feign在默认情况下使用的是JDK原生的URLConnection发送HTTP请求,没有连接池,但是对每个地址会保持一个长连接,即利用HTTP的persistence connection。
在生产环境中,通常不使用默认的http client,通常有如下两种选择:使用ApacheHttpClient
- 使用OkHttp
1.1、添加ApacheHttpClient依赖
为什么要添加上面的依赖呢?从源码中不难看出,请看<!-- 使用Apache HttpClient替换Feign原生httpclient--><dependency><groupId>org.apache.httpcomponents</groupId><artifactId>httpclient</artifactId></dependency><!-- https://mvnrepository.com/artifact/io.github.openfeign/feign-httpclient --><dependency><groupId>io.github.openfeign</groupId><artifactId>feign-httpclient</artifactId><version>11.8</version></dependency>
org.springframework.cloud.openfeign.FeignAutoConfiguration.HttpClientFeignConfiguration这个类,代码如下: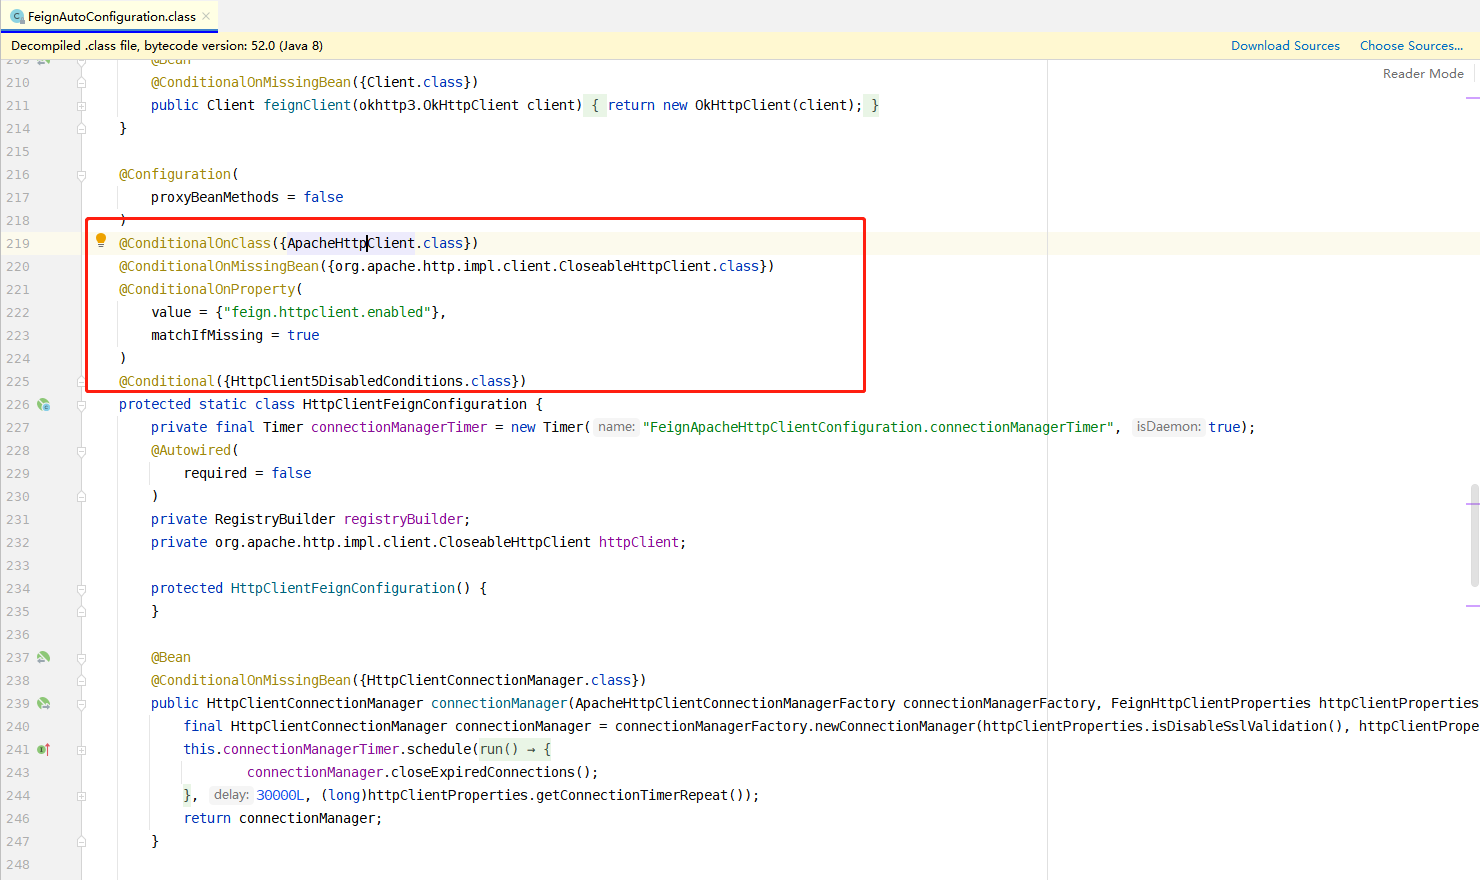
上述红色框中的生成条件,其中的@ConditionalOnClass(ApacheHttpClient.class),必须要有ApacheHttpClient这个类才会生效,并且feign.httpclient.enabled这个配置要设置为true。1.2、配置文件中开启
feign:client:config:# 替换默认的httpclient,开启 Http Clienthttpclient:enabled: true # 开启 Http Clientmax-connections: 200 # 最大连接数,默认:200max-connections-per-route: 50 # 最大路由,默认:50connection-timeout: 2000 # 连接超时,默认:2000/毫秒time-to-live: 900 # 生存时间,默认:900LtimeToLiveUnit: SECONDS # 响应超时的时间单位,默认:TimeUnit.SECONDS
1.3、如何验证已经替换成功
在feign.SynchronousMethodHandler#executeAndDecode()这个方法中可以清楚的看出调用哪个client,如下图: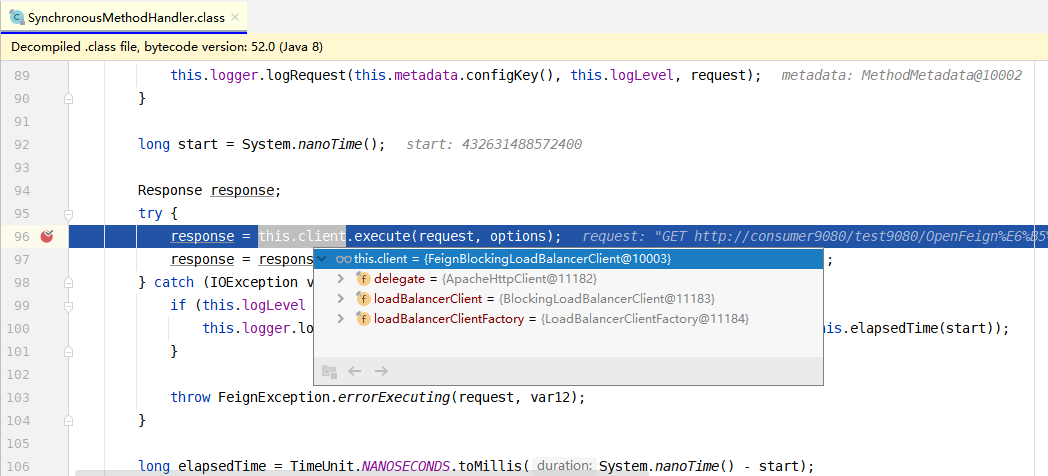
八、OpenFeign如何通讯优化
在讲如何优化之前先来看一下GZIP 压缩算法,概念如下:
gzip是一种数据格式,采用用deflate算法压缩数据;gzip是一种流行的数据压缩算法,应用十分广泛,尤其是在Linux平台。
当GZIP压缩到一个纯文本数据时,效果是非常明显的,大约可以减少70%以上的数据大小。
网络数据经过压缩后实际上降低了网络传输的字节数,最明显的好处就是可以加快网页加载的速度。网页加载速度加快的好处不言而喻,除了节省流量,改善用户的浏览体验外,另一个潜在的好处是GZIP与搜索引擎的抓取工具有着更好的关系。例如 Google就可以通过直接读取GZIP文件来比普通手工抓取更快地检索网页。
GZIP压缩传输的原理如下图:

按照上图拆解出的步骤如下:
客户端向服务器请求头中带有:Accept-Encoding:gzip,deflate 字段,向服务器表示,客户端支持的压缩格式(gzip或者deflate),如果不发送该消息头,服务器是不会压缩的。
服务端在收到请求之后,如果发现请求头中含有Accept-Encoding字段,并且支持该类型的压缩,就对响应报文压缩之后返回给客户端,并且携带Content-Encoding:gzip消息头,表示响应报文是根据该格式压缩过的。
客户端接收到响应之后,先判断是否有Content-Encoding消息头,如果有,按该格式解压报文。否则按正常报文处理。
openFeign支持请求/响应开启GZIP压缩,整体的流程如下图: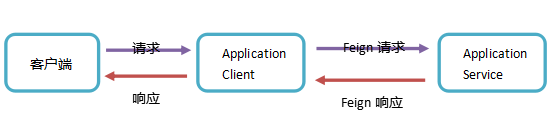
上图中涉及到GZIP传输的只有两块,分别是Application client -> Application Service、 Application Service->Application client。
注意:openFeign支持的GZIP仅仅是在openFeign接口的请求和响应,即是openFeign消费者调用服务提供者的接口。
openFeign开启GZIP步骤也是很简单,只需要在配置文件中开启如下配置:
feign:## 开启压缩compression:request:enabled: true## 开启压缩的阈值,单位字节,默认2048,即是2k,这里为了演示效果设置成10字节min-request-size: 10mime-types: text/xml,application/xml,application/jsonresponse:enabled: true
上述配置完成之后,发出请求,可以清楚看到请求头中已经携带了GZIP压缩,如下图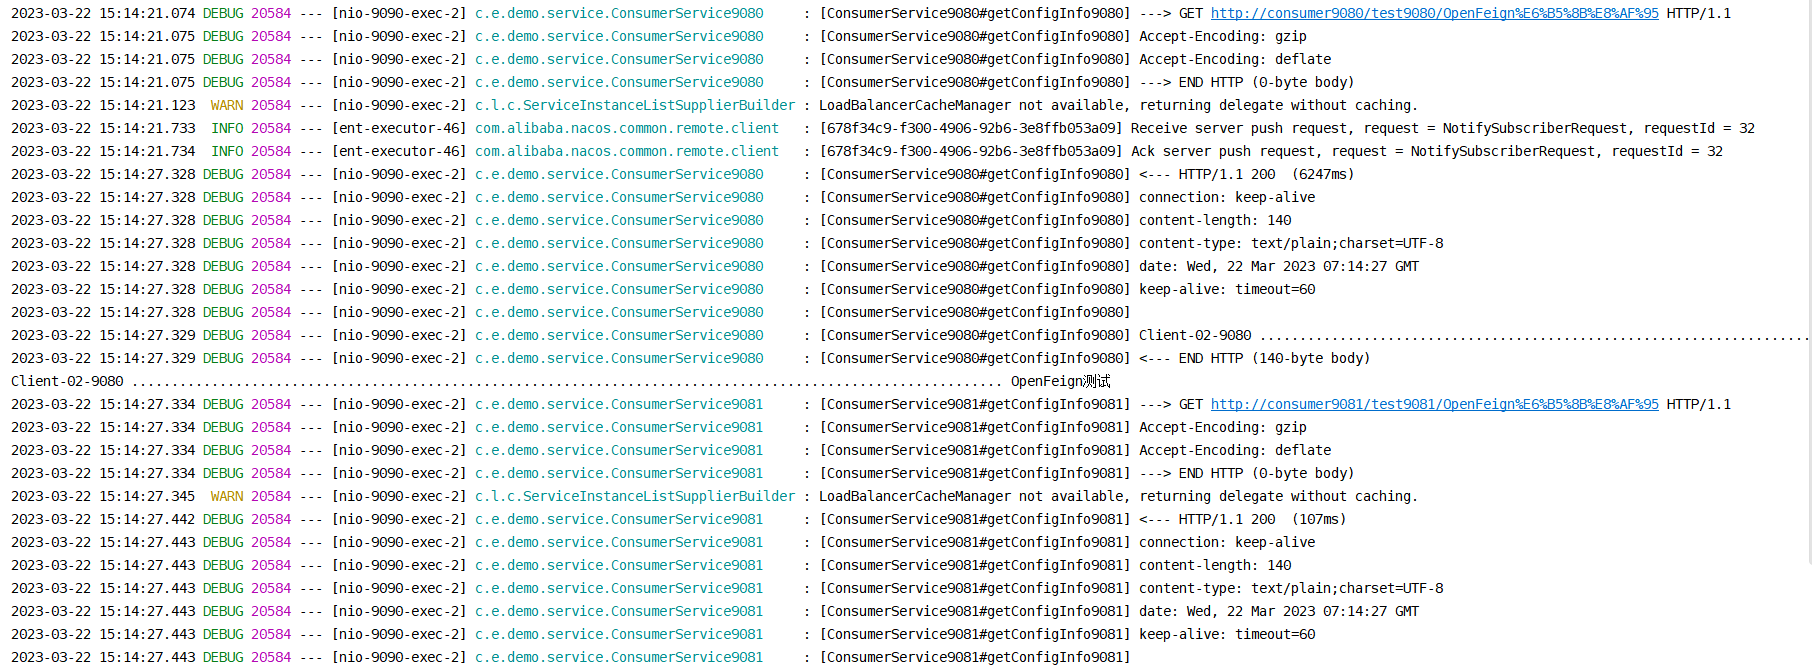

若有收获,就点个赞吧
0 人点赞


