Prompt的类型
根据不同的分类标准,Prompt可以被分为不同的类型,如按照业务用途来划分、按照Prompt语言格式来划分等等。 按照业务用途划分有:- 问题回答,这类Prompt旨在引导AI回答问题,既可以是简单的,也可以是复杂的。例如,“1+1等于几?”或者“能否简要解释相对论,并告诉我如何推演证明?”
- 文本生成,这类Prompt旨在借助AI写文案,如文章、故事、营销文案等。可以指定上下文,然后借助AI来生成连续的内容。例如,“写一个关于菊次郎的故事”或者“xxxx,请续写后面的内容”
- 摘要总结,这类Promot用于引导AI进行总结摘要。提供长篇内容,如小说、论文等,要求AI生成其摘要。例如,“给你一篇论文‘xxxx’,请帮我总结其摘要”
- 互动对话,这类Prompt用于模拟对话或互动场景,可以与AI模型进行多轮的问答或对话。它可以包含先前的对话历史、角色设定和具体问题,以引导模型产生连贯的对话回应。
- 其他,根据业务还有很多,如翻译、如识别情感、如实体抽取等等
- 命令式,这类Prompt采取指示性语言告知AI完成任务或生产内容。优点在于明确告知模型需要输出的内容,缺点是容易形成固定模板,导致内容缺少泛化能力。常用于需要明确指导的文本生成任务,例如“请概括一下文章要点”
- 描述式,这类Prompt采用描述的语气设置生成文本的场景和角度。优点是有助于产生更富创造性的文本,缺点是指导模型的效果较间接。适用于需要创新性输出的写作任务,例如“以下是展示XX公司竞争策略的段落”。
- 示例式,这类Prompt通过提供示例句子或断句来指导模型的文本产出。优点是可以明确指导样式并减少歧义,缺点是可能导致产出过于参照示例化。适用于需要避免歧义的具体写作任务,例如“请参考以下开头句生成小说段落”。
- 混合式,混合Prompt综合运用命令、描述、示例多种方式进行表达。例如“请参考以下背景资料并撰写相关的报告摘要”。混合Prompt可以发挥不同类型Prompt的优势,是较为全面和高级的Prompt表达。
各类型Prompt示意
一个Prompt常常属于多种类型,比如下面的一些Prompt

- Prompt如下:摘要总结、命令式、描述式
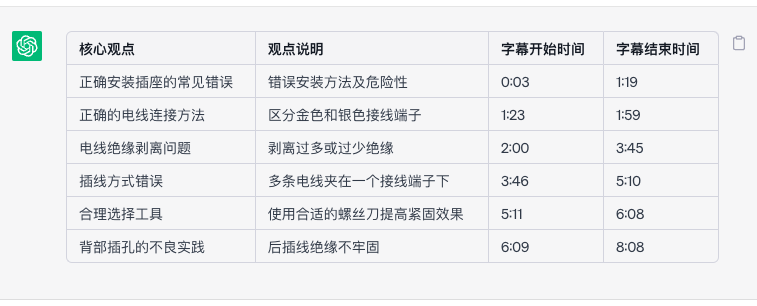
给你一段视频字幕,总结视频的核心观点,每个核心观点不超过10个字。以表格形式输出结果,表格抬头是:核心观点|观点说明|字幕开始时间|字幕结束时间,视频字幕如下:0:00 now when it comes to installing0:00 receptacles or other devices like them0:03 i've seen a lot of very common mistakes0:06 or at the very least some very poor0:08 practices when installing these types of0:11 devices so there's quite a few of them0:13 so let's go ahead and jump right in0:15 let's go alright so the first mistake0:16 i'm going to go over when discussing0:18 installing these receptacles this may0:20 seem very basic but you might be0:22 surprised how many people don't know the0:24 difference as far as where the wires are0:26 supposed to go so on this side here0:29 you'll see we've got these gold colored0:30 terminals if we flip it over the other0:32 side we've got these silver colored0:34 terminals the gold colored terminals are0:36 going to be for your hot wire typically0:38 it's going to be a black wire that's0:40 coming in that's supplying the power and0:42 that's going to be connected over here0:43 to the gold side the neutral wire which0:46 is the white wire is always going to go0:48 over here on the side with the silver0:50 colored terminal screws if you were to0:53 put your black line wire on the silver0:55 terminal and your white neutral wire on0:57 the gold terminals this is referred to0:59 as reverse polarity now the reason why1:02 that's so dangerous to where if you have1:04 the line or the electricity wired into1:07 the neutral side with these silver1:08 screws is because it's going to create1:11 an unsafe receptacle it may work but you1:14 are running a risk of having a short1:16 circuit or a shock or even possibly a1:19 fire1:20 so just remember that black is always to1:23 gold the white neutral wires are always1:25 to the silver terminals and green wires1:27 and bare copper wires like this one here1:29 are always the ground wires and they1:31 will always go to this green ground1:33 screw here all right so for this next1:34 mistake this is a very common1:36 residential receptacle these type1:38 receptacles require for a hook to go1:41 around the terminal screws and then it1:42 gets tightened down but one of the1:44 really big mistakes i see when people1:46 are installing these types of1:47 receptacles is when they take their1:49 wiring they're stripping off way too1:51 much insulation so when they take their1:53 hook and they wrap it around the1:55 terminal screw and then they go to1:56 tighten it down you can see this copper1:59 that's extending on2:00 past the terminal screw by quite a bit2:03 and then also past the back of the2:05 receptacle the problem with this is once2:07 this is all tightened up and pushed into2:08 the back of the box what could happen is2:11 possibly your bare copper your ground2:13 wire could rub up against this hot wire2:15 here and then it's going to cause2:17 everything to shore out you could also2:19 have instances with arcing depending on2:22 how everything is in your box which is2:24 obviously something that you don't want2:26 that could ultimately cause a fire2:28 conversely i've seen people and this is2:30 a little bit of a dramatization but i2:31 have seen them like this where they cut2:33 too little insulation off that hook when2:36 they wrap it around that terminal screw2:38 as you can see even though that hook is2:40 around that terminal screw once we would2:42 tighten down the terminal screw on top2:44 of it if we flip it here to the bottom2:46 side2:47 you can see that insulation is2:49 underneath of the head of that terminal2:51 screw2:52 well when that terminal screw gets2:54 tightened down and it clamps down this2:56 wire it's going to be making a lot of2:58 contact with that insulation which is3:00 obviously wider than the copper portion3:02 of the wire and you're not going to get3:04 a good connection there so you also are3:07 going to have a bunch of issues here the3:09 outlet itself may not work or it may3:11 work intermittently or you could have a3:13 case of where it short circuits or3:14 causes overheating and a really easy way3:17 to check and make sure that you have the3:18 correct amount of insulation stripped3:20 off of the wiring is you can use a strip3:23 gauge they're on pretty much all of the3:25 receptacles that are out there and you3:27 can just put your wiring up into that3:30 strip gauge just to either confirm that3:32 you've stripped off the proper amount or3:34 if this wire wasn't stripped already you3:36 can just lay it up in there make a mark3:38 and then strip it from that mark off and3:40 you know that you're going to have the3:42 perfect amount of insulation removed3:44 from the wiring in order to have that3:45 good connection and so this is what a3:48 good connection would look like all3:50 right so talking about the wiring being3:51 connected to the receptacles that leads3:53 me to the next mistake that i'm going to3:55 talk about3:56 and that has to do with these hooks3:57 again and so i'm just going to put this3:59 hook over this terminal screw4:02 and then i'm just going to go ahead and4:04 tighten that down all right so does4:06 anybody see the mistake with this wire4:08 on this terminal screw yeah it's put on4:12 in the wrong direction it's being put on4:14 in a counterclockwise direction and the4:16 problem with that is if you can see all4:18 this copper up here at the top4:20 and then here at the bottom it's not4:22 awful but what ends up happening if you4:24 put your wiring on in a counterclockwise4:26 direction you may have seen it as i was4:27 tightening that down it's actually going4:30 to promote the wire being pushed away4:33 from the terminal screw so it's not4:35 going to be in nice and tight in the4:37 middle of this terminal screw which4:39 could lead to4:40 not as good of a connection as you would4:42 want so what you'd actually want to do4:44 is you'd actually want to take that hook4:46 and instead of wrapping it around in a4:48 counterclockwise direction we want that4:50 hook or that loop to go around the4:52 terminal screw in a clockwise direction4:56 as i tighten down the terminal screw4:58 it's going to promote pulling that wire5:00 in closer to the center of that terminal5:03 screw which is going to give us a much5:05 better connection5:06 so as you can see it's pulled in here5:08 nice and tight and we have a really nice5:11 solid connection here and this is5:13 especially true for this stranded wire5:15 here it's going to be promoting or5:17 pushing each one of those strands out5:19 away from the terminal screw5:21 but if we take that same strand of wire5:23 and wrap it around in the correct5:24 direction the clockwise direction you'll5:27 see that it actually wants to pull it in5:29 closer5:32 so as you can see all those strands are5:35 in there much tighter we don't have any5:37 of those stray strands that are5:38 basically reaching up to this second5:40 terminal up here everything's in there5:42 nice and tight by going around in a5:44 clockwise direction now really quickly5:46 if you're finding value in this video if5:48 you could do me a huge favor all that i5:49 ask is that you hit that thumbs up5:51 button right down below or leave a5:53 comment down the comment section letting5:54 me know what you think of the video so5:56 far it really does help the video out to5:58 spread out to other people and hopefully6:00 be able to help them out as well i6:02 really appreciate it let's get back into6:04 it all right so for this next mistake or6:06 really a very poor practice and this is6:09 one that i've seen electricians do6:11 because my house was wired in some6:13 places like this since then i have6:15 corrected it because i really think that6:17 this is a really poor way of doing it is6:20 on these residential outlets if we flip6:22 it over here to the back if you see6:24 these four holes here6:25 this is where you can insert up to 14 6:28 gauge wire into these holes to connect6:31 the wiring to the receptacle itself6:34 this is known as speed wiring also known6:37 as backstabbing and the way that this6:39 works we've got our silver terminals6:40 here and a white wire all you have to do6:43 in order to make this connection is push6:46 the wiring into one of those holes6:48 and once it seats as you can see it6:51 doesn't just pull out and while this6:53 seems like a really great way of doing6:55 things because it is so quick and easy6:57 to do there's a lot of problems that can6:59 come from this now if you're going to7:00 have a problem and you have a defective7:02 device you may see issues right away7:05 other times it may take time in order7:08 for issues to develop and the reason7:10 that it may take a while is that the7:12 more that the device is used the more7:14 that it warms and cools the more that7:16 it's moved around that little piece of7:19 metal that's inside that's making7:20 connection and holding this wiring in7:22 may become loose and if it becomes loose7:24 over time what can end up happening is7:26 the wire starts to back out and may fall7:28 out completely if it doesn't fall all7:30 the way out and it just starts to have a7:32 really poor connection well then you7:33 could have arcing and heating and a7:36 bunch of other issues and to kind of7:38 illustrate this wire being backed out as7:40 you can see it's in there nice and tight7:41 you need to depress there's a little tab7:43 inside of here usually use a screwdriver7:45 to depress it and then pull it out if7:47 you wanted to remove the wire i'm going7:49 to show you right here where i can7:50 remove this wire without depressing that7:52 tab just by pulling on it and twisting7:54 the receptacle back and forth and it's7:56 just that easy for that wire to come out7:58 so for this next mistake this is a big8:01 one as you can see here i've got two8:03 terminal screws and just imagine that8:05 the whites both of these terminal screws8:07 are taken up as well and they're wanting8:09 to connect another receptacle or another8:11 device of some sort and they want to use8:13 this as a way to tap into the circuit8:16 well what they'll end up doing8:18 is they'll loosen one of the terminal8:21 screws8:22 they'll leave that wire in place they'll8:24 take their new wire and they'll put it8:27 in on top of the wiring that's already8:30 there so that's what they do they leave8:33 their wires that are already there in8:34 place they take their new wire coming in8:36 so they can connect to something in8:38 order to power a new device and then8:40 they just sandwich the two together8:42 underneath of one terminal screw these8:45 devices are not made to have more than8:47 one wire under the terminal screw so8:49 this is against code and it's also8:51 incredibly dangerous to do over time8:54 what can end up happening is since we8:55 don't have proper pressure from the8:57 terminal screw on the wiring and there's9:00 variables to where these wires can move9:03 one of these wires can eventually fall9:05 out from underneath of the terminal9:06 screw which then also has the other wire9:08 being loose and then that can cause all9:10 kinds of problems with the minimum of9:12 the receptacle not working or damaging9:15 it all the way up to causing a fire it9:18 would be far better to avoid doing this9:20 at all and just use some pigtails in9:23 order to connect all of your devices and9:26 the new device that you're wanting to9:28 install the next thing i want to talk9:29 about as far as installing these9:31 receptacles or devices that are like9:33 them that is really going to make things9:35 a whole lot faster9:36 easier and make sure that your9:38 connections are going to be as tight as9:40 they should be9:41 is it comes down to the tools that you9:43 use now a lot of people are using their9:46 standard phillips head screwdriver in9:49 order to9:50 loosen and tighten the terminal screws9:53 on the receptacles and while a phillips9:56 head will work it can also cause issues10:01 if you get down to the point of where10:02 it's becoming hard to turn if you go to10:04 keep trying to turn it look at what10:06 happens the phillips head wants to just10:08 kind of come out of that terminal screw10:10 and that terminal screw can still be10:12 tightened down a little bit more so with10:15 a phillips head you can't always get10:17 this tightened down as much as you10:19 should10:20 and then there is the robertson bit or a10:22 lot of people call it the square bit the10:25 robertson bit is what i've been using10:26 for quite a while now because it is10:28 extremely effective at tightening down10:30 these terminal screws but there are a10:32 couple of options out there that are10:34 actually better than the robertson bit10:36 so what i'm using now are these two bits10:38 right here over here is milwaukee's ecx10:41 bit and over here is klein's combination10:44 bit if you see here you've got this long10:46 blade here kind of mimics a flat head so10:49 you can get a lot of nice torque on that10:52 terminal screw if we flip it up here to10:54 the top side you can see it's kind of10:56 squared off so it's more like that10:58 robertson bit so you can get right into11:00 the middle of that terminal screw and11:02 also help to add to that torque and get11:04 a nice grip on that terminal screw so11:07 just to kind of give you a visual as to11:08 how much better these work this is a11:10 standard phillips head so i'm going to11:11 get it down to where i can tighten as11:13 much as possible with this11:15 and now it's popping out so let's see if11:17 we can't take one of these newer bits11:20 put it in there and get it to tighten11:21 down a little bit more11:26 so as you can see i was able to rotate11:28 it a little bit further than i was able11:30 to with the phillips head and it was11:31 pretty easy to do so i have links for11:34 both of these down in the description11:35 down below now if you like electrical11:37 projects or other projects for around11:38 the home i'll post some links right over11:40 here of some videos and playlists that11:43 you might be interested in now i hope11:45 this video was helpful and maybe you11:46 found it to be interesting and if you11:48 did if you could do me a huge favor hit11:49 that thumbs up button right down below11:51 and of course if you have any questions11:53 or comments at all you can leave those11:55 down in the comment section and i'll11:56 catch you all in the next one see ya

若有收获,就点个赞吧
0 人点赞
