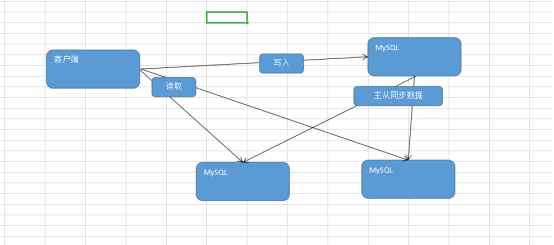
1、读写分离介绍
对于目前单机运行MySQL服务。会导致MySQL连接数过多。最终导致mysql的宕机。因此可以使用多台MySQL服务器一起承担压力。考虑到项目中读写比例的不一致可以区分服务器进行操作。但是实现读写分离的依据为主从复制
2、主从复制原理
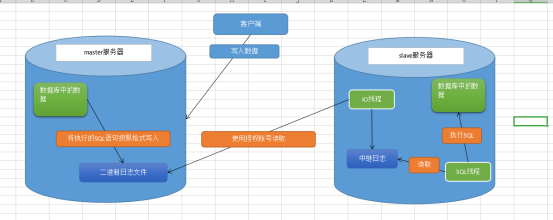
1、当客户端连接主服务器发送写入的SQL语句
2、主服务器将SQL语句执行。再讲对应的SQL语句存储到自己二进制日志文件中(格式为二进制格式但是本质是SQL语句)
3、从服务器中的IO线程使用特殊的授权账号读取主服务器中的二进制日志文件。存储到自己的中继日志文件中
4、再从服务器中的SQL线程读取自己的中继日志文件转换为SQL语句执行。最终数据统一
切记:在主从复制的过程中本质是同步执行写入操作对的SQL语句
基本环境
| 主机名 | 镜像 | IP |
|---|---|---|
| MYSQL1 | CentOS-7-x86_64-DVD-1511.iso | 192.168.200.10 |
| MYSQL2 | CentOS-7-x86_64-DVD-1511.iso | 192.168.200.20 |
| mycat | CentOS-7-x86_64-DVD-1511.iso | 192.168.200.30 |
搭建
[root@localhost ~]# hostnamectl set-hostname mycat[root@localhost ~]# bash[root@mycat ~]# vim /etc/hosts[root@mycat ~]# cat /etc/hosts127.0.0.1 localhost localhost.localdomain localhost4 localhost4.localdomain4::1 localhost localhost.localdomain localhost6 localhost6.localdomain6192.168.200.10 mysql1192.168.200.20 mysql2192.168.200.30 mycat//数据库集群需要安装 MariaDB 数据库服务,需要给集群虚拟机配置 Yum 安装源文件,使用提供的 gpmall-repo 文件上传至 mycat 虚拟机的/opt 目录下,设置本地 Yum 源。首先将/etc/yum.repo.d 目录下的文件移动到/media 下,命令如下:[root@mycat ~]# mkdir /opt/centos[root@mycat ~]# mount /dev/cdrom /opt/centos/mount: /dev/sr0 is write-protected, mounting read-only[root@mycat ~]# mv /etc/yum.repos.d/* /media/[root@mycat ~]# vim /etc/yum.repos.d/local.repo[root@mycat ~]# cat /etc/yum.repos.d/local.repo[centos]name=centosbaseurl=file:///opt/centosgpgcheck=0enabled=1[mariadb]name=mariadbbaseurl=file:///opt/gpmall-repogpgcheck=0enabled=1[root@mycat ~]# yum repolistLoaded plugins: fastestmirrorcentos | 3.6 kB 00:00:00mariadb | 2.9 kB 00:00:00(1/3): centos/group_gz | 155 kB 00:00:00(2/3): mariadb/primary_db | 144 kB 00:00:00(3/3): centos/primary_db | 2.8 MB 00:00:00Loading mirror speeds from cached hostfilerepo id repo name statuscentos centos 3,723mariadb mariadb 165repolist: 3,888[root@mycat ~]# yum install -y java-1.8.0-openjdk java-1.8.0-openjdk-devel[root@mycat ~]# java -versionopenjdk version "1.8.0_222"OpenJDK Runtime Environment (build 1.8.0_222-b10)OpenJDK 64-Bit Server VM (build 25.222-b10, mixed mode)(5)关闭防火墙[root@mycat ~]# iptables -F[root@mycat ~]# iptables -X[root@mycat ~]# iptables -Z[root@mycat ~]# iptables-save//安装 Mycat 服务//将 Mycat 服务的二进制软件包 Mycat-server-1.6-RELEASE-20161028204710-linux.tar.gz上传到Mycat虚拟机的/root目录下,并将软件包解压到/use/local目录中。赋予解压后的Mycat目录权限。[root@mycat ~]# tar -zxvf Mycat-server-1.6-RELEASE-20161028204710-linux.tar.gz -C/usr/local/[root@mycat ~]# chmod -R 777 /usr/local/mycat///在/etc/profile 系统变量文件中添加 Mycat 服务的系统变量,并生效变量。[root@mycat ~]# echo export MYCAT_HOME=/usr/local/mycat/ >> /etc/profile[root@mycat ~]# source /etc/profile[root@mycat ~]# vim /usr/local/mycat/conf/schema.xml[root@mycat ~]# cat /usr/local/mycat/conf/schema.xml<?xml version="1.0"?><!DOCTYPE mycat:schema SYSTEM "schema.dtd"><mycat:schema xmlns:mycat="http://io.mycat/"><schema name="USERDB" checkSQLschema="true" sqlMaxLimit="100"dataNode="dn1"></schema><dataNode name="dn1" dataHost="localhost1" database="test" /><dataHost name="localhost1" maxCon="1000" minCon="10" balance="3" dbType="mysql"dbDriver="native" writeType="0" switchType="1" slaveThreshold="100"><heartbeat>select user()</heartbeat><writeHost host="hostM1" url="192.168.200.10:3306" user="root"password="000000"><readHost host="hostS1" url="192.168.200.20:3306" user="root"password="000000" /></writeHost></dataHost></mycat:schema>[root@mycat ~]# chown root:root /usr/local/mycat/conf/schema.xml//(4)编辑 mycat 的访问用户//修改/usr/local/mycat/conf/目录下的 server.xml 文件,修改 root 用户的访问密码与数据库,密码设置为 000000,访问 Mycat 的逻辑库为 USERDB,命令如下。[root@mycat ~]# cat /usr/local/mycat/conf/server.xml//在配置文件的最后部分,<user name="root"><property name="password">000000</property><property name="schemas">USERDB</property>//然后删除如下几行:<user name="user"><property name="password">user</property><property name="schemas">TESTDB</property><property name="readOnly">true</property></user>保存并退出 server.xml 配置文件[root@mycat ~]# /bin/bash /usr/local/mycat/bin/mycat start[root@mycat ~]# netstat -nltpActive Internet connections (only servers)Proto Recv-Q Send-Q Local Address Foreign Address State PID/Program nametcp 0 0 0.0.0.0:22 0.0.0.0:* LISTEN 1409/sshdtcp 0 0 127.0.0.1:25 0.0.0.0:* LISTEN 1936/mastertcp 0 0 127.0.0.1:32000 0.0.0.0:* LISTEN 3373/javatcp6 0 0 :::9066 :::* LISTEN 3373/javatcp6 0 0 :::38890 :::* LISTEN 3373/javatcp6 0 0 :::22 :::* LISTEN 1409/sshdtcp6 0 0 ::1:25 :::* LISTEN 1936/mastertcp6 0 0 :::34910 :::* LISTEN 3373/javatcp6 0 0 :::1984 :::* LISTEN 3373/javatcp6 0 0 :::8066 :::* LISTEN 3373/java
测试
5.验证数据库集群服务读写分离功能(1)用 Mycat 服务查询数据库信息先在 Mycat 虚拟机上使用 Yum 安装 mariadb-client 服务。[root@mycat ~]# yum install -y MariaDB-client在 Mycat 虚拟机上使用 mysql 命令查看 Mycat 服务的逻辑库 USERDB,因为 Mycat 的逻辑库 USERDB 对应数据库 test(在部署主从数据库时已安装),所以可以查看库中已经创建的表 company。命令如下。[root@mycat ~]# mysql -h127.0.0.1 -P8066 -uroot -p000000Welcome to the MariaDB monitor. Commands end with ; or \g.Your MySQL connection id is 2Server version: 5.6.29-mycat-1.6-RELEASE-20161028204710 MyCat Server(OpenCloundDB)Copyright (c) 2000, 2018, Oracle, MariaDB Corporation Ab and others.Type 'help;' or '\h' for help. Type '\c' to clear the current input statement.MySQL [(none)]> show databases;+----------+| DATABASE |+----------+| USERDB |+----------+1 row in set (0.001 sec)MySQL [(none)]> use USERDBReading table information for completion of table and column namesYou can turn off this feature to get a quicker startup with -ADatabase changedMySQL [USERDB]> show tables;+----------------+| Tables_in_test |+----------------+| company |10+----------------+1 row in set (0.003 sec)MySQL [USERDB]> select * from company;+----+----------+------+ | id | name | addr |+----+----------+------+| 1 | alibaba | china | +----+----------+------+1 row in set (0.005 sec)(2)用 Mycat 服务添加表数据在 Mycat 虚拟机上使用 mysql 命令对表 company 添加一条数据(2,"basketball","usa"),添加完毕后查看表信息。命令如下。MySQL [USERDB]> insert into company values(2,"bastetball","usa");Query OK, 1 row affected (0.050 sec)MySQL [USERDB]> select * from company;+----+------------+------+| id | name | addr |+----+------------+------+| 1 | alibaba | china || 2 | bastetball | usa |+----+------------+------+2 rows in set (0.002 sec)(3)验证 Mycat 服务对数据库读写操作分离在 Mycat 虚拟机节点使用 mysql 命令,通过 9066 端口查询对数据库读写操作的分离信息。可以看到所有的写入操作 WRITE_LOAD 数都在 mysql1 主数据库节点上,所有的读取操作 READ_LOAD 数都在 mysql2 主数据库节点上。由此可见,数据库读写操作已经分离到mysql1 和 mysql2 节点上了。命令如下。[root@mycat ~]# mysql -h127.0.0.1 -P9066 -uroot -p000000 -e 'show @@datasource;'+----------+--------+-------+----------------+------+------+--------+------+------+---------+-----------+------------+| DATANODE | NAME | TYPE | HOST | PORT | W/R | ACTIVE | IDLE | SIZE | EXECUTE | READ_LOAD | WRITE_LOAD |+----------+--------+-------+----------------+------+------+--------+------+------+---------+-----------+------------+| dn1 | hostM1 | mysql | 192.168.200.10 | 3306 | W | 0 | 10 | 1000 | 148 | 0 | 1 || dn1 | hostS1 | mysql | 192.168.200.20 | 3306 | R | 0 | 8 | 1000 | 148 | 4 | 0 |+----------+--------+-------+----------------+------+------+--------+------+------+---------+-----------+------------+

若有收获,就点个赞吧
0 人点赞
