1.修改安装配置文件
wget http://mirrors.linuxeye.com/oneinstack-full.tar.gz
tar xzf oneinstack-full.tar.gz
备分 AND 修改option.cof 文件
# Nginx Apache and PHP-FPM process is run as $run_user(Default "www"), you can freely specifyrun_user=www# set the default install path, you can freely specifynginx_install_dir=/data/services/nginxtengine_install_dir=/data/services/tengineopenresty_install_dir=/data/services/openrestyapache_install_dir=/data/services/apachetomcat_install_dir=/data/webservers/tomcatmysql_install_dir=/data/services/mysqlmariadb_install_dir=/data/services/mariadbpercona_install_dir=/data/services/perconaalisql_install_dir=/data/services/alisqlpgsql_install_dir=/data/services/pgsqlmongo_install_dir=/data/services/mongodbphp_install_dir=/data/services/phppureftpd_install_dir=/data/services/pureftpdmemcached_install_dir=/data/services/memcachedredis_install_dir=/data/services/redispython_install_dir=/data/services/pythonopenssl_install_dir=/data/services/opensslimagick_install_dir=/data/services/imagemagickgmagick_install_dir=/data/services/graphicsmagickcurl_install_dir=/data/services/curl# Add modulesnginx_modules_options=''php_modules_options=''########################################################################## database data storage directory, you can freely specifymysql_data_dir=/data/services/mysql/datamariadb_data_dir=/data/services/mariadb/datapercona_data_dir=/data/services/percona/dataalisql_data_dir=/data/services/alisql/datapgsql_data_dir=/data/services/pgsql/datamongo_data_dir=/data/services/mongodb/data# web directory, you can customizewwwroot_dir=/data/wwwroot# nginx Generate a log storage directory, you can freely specify.wwwlogs_dir=/data/wwwlogs########################################################################## [MySQL/MariaDB/Percona/AliSQL] automatically generated, You can't changedbrootpwd=# [PostgreSQL] automatically generated, You can't changedbpostgrespwd=# [MongoDB] automatically generated, You can't changedbmongopwd=########################################################################## Backup Dest directory, change this if you have someother locationbackup_dir=/data/backup# How many days before the backup directory will be removedexpired_days=5# local ; remote ; upyun ; local,upyunbackup_destination=# db ; web, You can't changebackup_content=# aliyun OSS Bucket, You can't changeoss_bucket=# qiniu Bucket, You can't changeqiniu_bucket=# The backup of the database, You can't changedb_name=# The backup of the website, You can't changewebsite_name=# oneinstack.tar.gz md5, You can't changeoneinstack_md5=
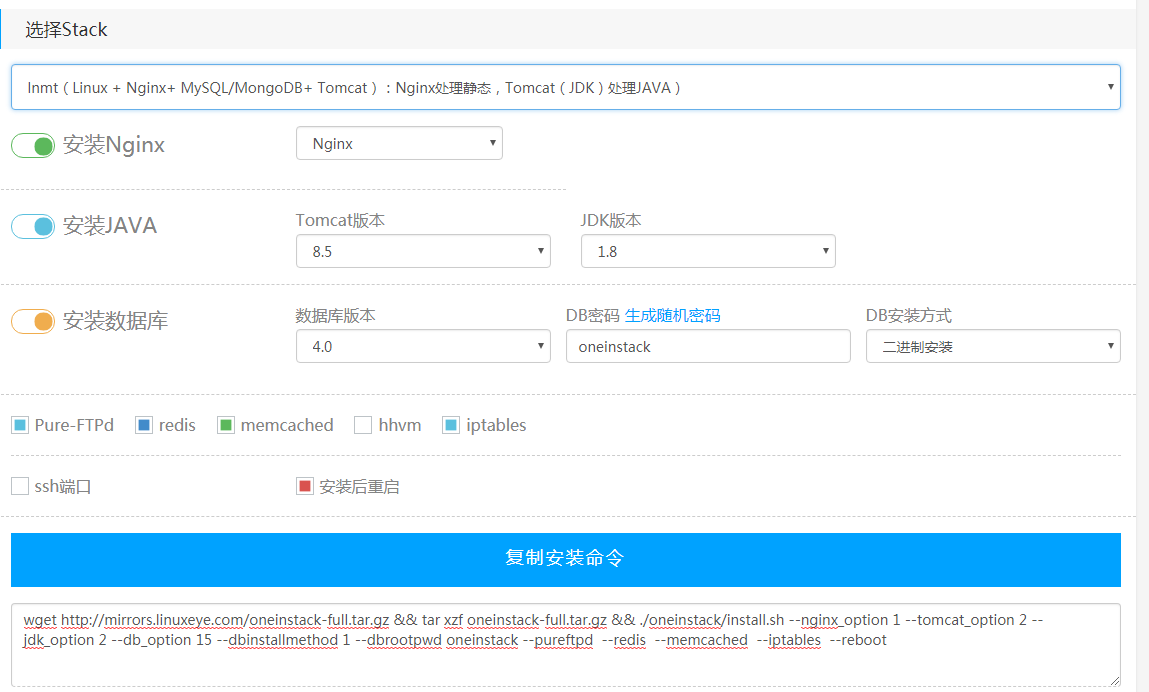
./oneinstack/install.sh —nginx_option 1 —tomcat_option 2 —jdk_option 2 —db_option 15 —dbinstallmethod 1 —dbrootpwd oneinstack —pureftpd —redis —memcached —iptables —reboot
./oneinstack/install.sh —nginx_option 1 —tomcat_option 2 —jdk_option 2 —db_option 15 —dbinstallmethod 1 —dbrootpwd oneinstack —pureftpd —redis —memcached —iptables —reboot
p
yum -y install wget screen curl python #for CentOS/Redhat
wget http://mirrors.linuxeye.com/oneinstack-full.tar.gz #包含源码,国内外均可下载
tar xzf oneinstack-full.tar.gz
cd oneinstack #如果需要修改目录(安装、数据存储、Nginx日志),请修改options.conf文件
screen -S oneinstack #如果网路出现中断,可以执行命令screen -R oneinstack重新连接安装窗口
./install.sh #注:请勿sh install.sh或者bash install.sh这样执行
Nginx/Tengine/OpenResty:service nginx {start|stop|status|restart|reload|configtest}
MySQL/MariaDB/Percona:service mysqld {start|stop|restart|reload|status}
PHP:service php-fpm {start|stop|restart|reload|status}
HHVM(hhvm进程交给supervisord管理):service supervisord {start|stop|status|restart|reload}
Apache:service httpd {start|restart|stop}
Tomcat:service tomcat {start|stop|status|restart}
Pure-Ftpd:service pureftpd {start|stop|restart|status}
Redis:service redis-server {start|stop|status|restart|reload}
Memcached:service memcached {start|stop|status|restart|reload}
2.安装数据库Mongodb4.0.0
2.1 下载
wget https://fastdl.mongodb.org/linux/mongodb-linux-x86_64-amazon2-4.0.0.tgz
2.2 解压
tar -zxvf mongodb-linux-x86_64-amazon2-4.0.0.tgz
2.3 拷贝到自己的所需要的安装目录
mv mongodb-linux-x86_64-amazon2-4.0.0 /data/service/mongodb
2.4 设置环境变量
vim /etc/profileexport PATH=/data/service/mongodb/bin:$PATH
source /etc/profile
2.5创建的数据存储目录、日志存储目录及日志文件
mkdir -p /data/services/mongodb/data/dbmkdir -p /data/services/mongodb/conf/mkdir -p /data/services/mongodb/logstouch /data/services/mongodb/logs/mongod.logchmod -R 777 /data/logs/mongod.log
2.6调整shell资源的设置,以防频繁访问MongoDB产生错误导致无法连接MongoDB实例
ulimit -n 25000 #同一时刻最多开启文件数ulimit -u 25000 #同一时刻最多开启程序数
2.7配置文件mongod.conf
vim /data/services/mongodb/config/mongod.conf
# mongod.conf# for documentation of all options, see:# http://docs.mongodb.org/manual/reference/configuration-options/# where to write logging data.systemLog:destination: filelogAppend: truepath: /data/services/mongodb/logs/mongod.log# Where and how to store data.storage:dbPath: /data/services/mongodb/data/dbjournal:enabled: true# engine:# mmapv1:# wiredTiger:# how the process runsprocessManagement:fork: true # fork and run in backgroundpidFilePath: /data/services/mongodb/data/db/mongod.pidtimeZoneInfo: /usr/share/zoneinfo# network interfacesnet:port: 27017bindIp: 0.0.0.0# unixDomainSocket:# enabled: false#security:# authorization: enabled#operationProfiling:#replication:#sharding:
2.8 设置MongoDB开机自启动 (未用)
vim /etc/rc.local
rm -rf /data/mongodb/mongodb1/mongod.lock
/usr/local/mongodb/bin/mongod -f /data/conf/mongodb1.conf //启动实例
2.9 启动MongoDB数据库
mongod -f /data/services/mongodb/config/mongod.conf
如有glibc 2.18 包缺失,要升级一下
2.10 检查MongoDB进程
netstat -tunlp | grep mongod
2.11 停止MongoDB数据库
mongod -f /data/services/mongodb/config/mongod.conf --shutdown
2.12 本地客户端连接并访问MongoDB数据库(默认端口为:27017)
mongo
2.13 相关命令
mongod.exe负责开机
mongo.exe负责运行数据库(开机)
mongoimport.exe负责导入数据库
mongoexport.exe负责输出数据库
mongorestore.exe负责备份数据库
2.14 设置用户与配置开关
设置用户后,开启mongodb权限开关
#切换数据库use admindb.createUser({user: "admin",pwd: "Root@123",roles: [ { role: "root", db: "admin" } ]});#(这个命令是解决问题的重点)exit#切换数据库use bdddb.createUser({user: "bdd",pwd: "bdd2018",roles: [{ role: "readWrite", db: "bdd" }]});exitdb.createUser({user: "bdd",pwd: "PlM_pro_pw2018",roles: [{ role: "readWrite", db: "bdd" }]});
vim /data/services/mongodb/config/mongod.conf
security:authorization: enabled
防火墙设置
vim /etc/sysconfig/iptables
#特别提示:很多网友把这两条规则添加到防火墙配置的最后一行,导致防火墙启动失败,正确的应该是添加到默认的22端口这条规则的下面# Firewall configuration written by system-config-firewall# Manual customization of this file is not recommended.*filter:INPUT ACCEPT [0:0]:FORWARD ACCEPT [0:0]:OUTPUT ACCEPT [0:0]-A INPUT -m state –state ESTABLISHED,RELATED -j ACCEPT-A INPUT -p icmp -j ACCEPT-A INPUT -i lo -j ACCEPT-A INPUT -m state –state NEW -m tcp -p tcp –dport 22 -j ACCEPT-A INPUT -m state –state NEW -m tcp -p tcp –dport 27017 -j ACCEPT-A INPUT -m state –state NEW -m tcp -p tcp –dport 3306 -j ACCEPT-A INPUT -j REJECT –reject-with icmp-host-prohibited-A FORWARD -j REJECT –reject-with icmp-host-prohibitedCOMMIT
vim /etc/sysconfig/iptables
#service iptables restartRedirecting to /bin/systemctl restart iptable.serviceFailed to issue method call: Unit iptable.service failed to load: No such file or directory.据说从某个版本的Linux系统(CenterOS/RedHat)后就将service命令改了,如下#systemctl restart iptables.service#iptables -L重启防火墙成功~~~~

若有收获,就点个赞吧
0 人点赞
